

Mask R-CNN is an object detection model based on deep convolutional neural networks (CNN) developed by a group of Facebook AI researchers in 2017. The model can return both the bounding box and a mask for each detected object in an image.
The model was originally developed in Python using the Caffe2 deep learning library. The original source code is available on GitHub. To support the Mask R-CNN model with more popular libraries, such as TensorFlow, there is a popular open-source project called Mask_RCNN that offers an implementation based on Keras and TensorFlow 1.14.
Google officially released TensorFlow 2.0 in September 2020. TensorFlow 2.0 is better organized and much easier to learn compared to TensorFlow $\geq$ 1.0. Unfortunately, the Mask_RCNN project does not yet support TensorFlow 2.0.
This tutorial uses the TensorFlow 1.14 release of the Mask_RCNN project to both make predictions and train the Mask R-CNN model using a custom dataset. In another tutorial, the project will be modified to make Mask R-CNN compatible with TensorFlow 2.0.
This tutorial covers the following:
- Overview of the Mask_RCNN Project
- Object Detection with TensorFlow 1.14
- Preparing the Model Configuration Parameters
- Building the Mask R-CNN Model Architecture
- Loading the Model Weights
- Reading an Input Image
- Detecting Objects
- Visualizing the Results
- Complete Code for Prediction
- Downloading the Training Dataset
- Preparing the Training Dataset
- Preparing Model Configuration
- Training Mask R-CNN in TensorFlow 1.14
- Conclusion
Bring this project to life
Overview of the Mask_RCNN Project
The Mask_RCNN project is open-source and available on GitHub under the MIT license, which allows anyone to use, modify, or distribute the code for free.
The contribution of this project is the support of the Mask R-CNN object detection model in TensorFlow $\geq$ 1.0 by building all the layers in the Mask R-CNN model, and offering a simple API to train and test it.
The Mask R-CNN model predicts the class label, bounding box, and mask for the objects in an image. Here is an example of what the model could detect.
The first release of the project (Mask_RCNN 1.0) was published on November 3rd, 2017. The latest release (Mask_RCNN 2.1) was published on March 20th, 2019. Since this date, no new releases were published.
To get the project on your PC, just clone it according to the next command:
$ git clone https://github.com/matterport/Mask_RCNN.gitIt is also possible to download the project as a ZIP file from this link. Let's have a quick look at the project content once it's available locally.
At the time of writing this tutorial, the project has 4 directories:
- mrcnn: This is the core directory that holds the project's Python code.
- samples: Jupyter notebooks providing some examples to use the project.
- images: A collection of test images.
- assets: Some annotated images.
The most important directory is mrcnn, as it holds the source code for the project. It has the following Python files:
__init__.py: Marks the mrcnn folder as a Python library.model.py: Has the functions and classes for building the layers and the model.config.py: Holds a class namedConfigthat holds some configuration parameters about the model.utils.py: Includes some helper functions and classes.visualize.py: Visualizes the results of the model.parallel_model.py: For supporting multiple GPUs.
Some of the files at the root of the project are:
- setup.py: Used to install the project using pip.
- README.md: A Markdown file documenting the project.
- LICENSE: The MIT license.
- requirements.txt: Required libraries to use the project.
Based on the requirements.txt file, the TensorFlow version must be at least 1.3.0. For Keras, it must be 2.0.8 or higher.
There are two ways to use the project:
- Install it using pip.
- Copy the mrcnn folder to where you will be using the project. In this case, make sure that all the required libraries in the requirements.txt file are installed.
To install the project, just issue the following command from the command prompt or terminal. For platforms other than Windows, replace "python" with "python3".
python setup.py installAn alternative way to use the project is to copy the mrcnn folder to where the project will be used. Assume there is a directory called "Object Detection" within which there is a Python file named object_detection.py that uses the code in the mrcnn folder. Then, simply copy the mrcnn folder inside the "Object Detection" directory.
Here is the directory structure:
Object Detection
	mrcnn
	object_detection.py
Now we are ready to use the Mask_RCNN project. The next section discusses how to use the project with TensorFlow $\geq$ 1.0.
Object Detection in TensorFlow 1
Before starting this section, make sure TensorFlow 1 ($\geq$1.3.0) is installed. You can check the version using the following code:
import tensorflow

print(tensorflow.__version__)
The steps to use the Mask_RCNN project to detect objects in an image are:
- Prepare the model configuration parameters.
- Build the Mask R-CNN model architecture.
- Load the model weights.
- Read an input image.
- Detect objects in the image.
- Visualize the results.
This section builds an example that uses a pre-trained Mask R-CNN to detect the objects in the COCO dataset. The next subsections discuss each of the steps listed above.
1. Prepare the Model Configuration Parameters
To build the Mask R-CNN model, several parameters must be specified. These parameters control non-maximum suppression (NMS), intersection over union (IoU), image size, number of ROIs per image, ROI pooling layer, and more.
The mrcnn folder has a script named config.py which has a single class named Config. This class has some default values for the parameters. You can extend this class and override some of the default parameters. The following code creates a new class named SimpleConfig that extends the mrcnn.config.Config class.
import mrcnn.config

class SimpleConfig(mrcnn.config.Config):
	...
One of the critical parameters that must be overridden is the number of classes, which defaults to 1.
NUM_CLASSES = 1In this example the model detects the objects in an image from the COCO dataset. This dataset has 80 classes. Remember that the background must be regarded as an additional class. As a result, the total number of classes is 81.
NUM_CLASSES = 81The other 2 parameters should be carefully assigned, which are GPU_COUNT and IMAGES_PER_GPU. They default to 1 and 2, respectively.
These 2 variables are used to calculate the batch size:
BATCH_SIZE = IMAGES_PER_GPU * GPU_COUNTAssuming that the default values are used, then the batch size is 2*1=2. This means 2 images are fed to the model at once. As a result, the user has to feed 2 images at once.
In some cases the user is only interested in detecting the objects in a single image. Thus, the IMAGES_PER_GPU property should be set to 1.
GPU_COUNT = 1
IMAGES_PER_GPU = 1
Here is the complete code for the configuration class. The NAME property is a unique name for the configuration.
import mrcnn.config

class SimpleConfig(mrcnn.config.Config):
	NAME = "coco_inference"

	GPU_COUNT = 1
	IMAGES_PER_GPU = 1

	NUM_CLASSES = 81
2. Build the Mask R-CNN Model Architecture
To build the Mask R-CNN model architecture, the mrcnn.model script has a class named MaskRCNN. The constructor of this class accepts 3 parameters:
mode: Either"training"or"inference".config: An instance of the configuration class.model_dir: Directory to save training logs and trained weights.
The next example creates an instance of the mrcnn.model.MaskRCNN class. The created instance is saved in the model variable.
import mrcnn.model

model = mrcnn.model.MaskRCNN(mode="inference",
                             config=SimpleConfig(),
                             model_dir=os.getcwd())
The Keras model is saved in the keras_model attribute of the instance. Using this attribute, the summary of the model can be printed.
model.keras_model.summary()The mode architecture is large; just 4 layers from the top and bottom are listed below. The final layer named mrcnn_mask only returns the masks for the top 100 ROIs.
___________________________________________________________________________
Layer (type)                    Output Shape         Param #     Connected to
===========================================================================
input_image (InputLayer)        (None, None, None, 3 0
___________________________________________________________________________
zero_padding2d_1 (ZeroPadding2D (None, None, None, 3 0           input_image[0][0]
___________________________________________________________________________
conv1 (Conv2D)                  (None, None, None, 6 9472        zero_padding2d_1[0][0]
___________________________________________________________________________
bn_conv1 (BatchNorm)            (None, None, None, 6 256         conv1[0][0]
___________________________________________________________________________
...
___________________________________________________________________________
mrcnn_mask_bn4 (TimeDistributed (None, 100, 14, 14,  1024        mrcnn_mask_conv4[0][0]
___________________________________________________________________________
activation_74 (Activation)      (None, 100, 14, 14,  0           mrcnn_mask_bn4[0][0]
___________________________________________________________________________
mrcnn_mask_deconv (TimeDistribu (None, 100, 28, 28,  262400      activation_74[0][0]
___________________________________________________________________________
mrcnn_mask (TimeDistributed)    (None, 100, 28, 28,  20817       mrcnn_mask_deconv[0][0]
===========================================================================
Total params: 64,158,584
Trainable params: 64,047,096
Non-trainable params: 111,488
3. Load the Model Weights
The last subsection created the model architecture. This subsection loads the weights in the created model using the load_weights() method. It is a modified version of the Keras load_weights() method that supports multi-GPU usage, in addition to the ability to exclude some layers.
The 2 parameters used are:
filepath: Accepts the path of the weights file.by_name: If True, then each layer is assigned the weights according to its name.
The next code calls the load_weights() method while passing the path of the weights file mask_rcnn_coco.h5. This file can be downloaded from this link.
model.load_weights(filepath="mask_rcnn_coco.h5",
                   by_name=True)
4. Read An Input Image
Once the model is created and its weights are loaded, next we need to read an image and feed it to the model.
The next code snippet uses OpenCV to read an image and reorder its color channels to be RGB, rather than BGR.
import cv2

image = cv2.imread("3627527276_6fe8cd9bfe_z.jpg")
image = cv2.cvtColor(image, cv2.COLOR_BGR2RGB)
The next figure shows the image we just read. The image is available at this link.
5. Detect Objects
Given the model and the input image, the objects in the image can be detected using the detect() method. It accepts 2 parameters:
images: A list of images.verbose: When set to 1, then some log messages are printed.
The following code calls the detect() method. Note that the length of the list assigned to the images argument must be equal to the batch size. Based on the GPU_COUNT and IMAGES_PER_GPU configuration properties we set, the batch size is 1. Thus, the list must have a single image. The result of the detection is returned in the r variable.
r = model.detect(images=[image],
                 verbose=0)
If more than 1 image is passed (e.g. images=[image, image, image]), the following exception is raised indicating that the length of the images argument must be equal to the BATCH_SIZE configuration property.
...
File "D:\Object Detection\Pure Keras\mrcnn\model.py", in detect
	assert len(images) == self.config.BATCH_SIZE, "len(images) must be equal to BATCH_SIZE"

AssertionError: len(images) must be equal to BATCH_SIZE
For each input image, the detect() method returns a dictionary that holds information about the detected objects. To return the information about the first image fed to the model, then the index 0 is used with the variable r.
r = r[0]The following code prints the keys in the dictionary. There are 4 elements in the dictionary, with the following keys:
rois: The boxes around each detected object.class_ids: The class IDs for the objects.scores: The class scores for each object.masks: The masks.
print(r.keys())dict_keys(['rois', 'class_ids', 'scores', 'masks'])6. Visualize the Results
Once the detect() method completes, it's time to visualize the detected objects. The mrcnn.visualize script is used for this purpose. The mrcnn.visualize.display_instances() function is used for displaying the detection boxes, masks, class names, and scores.
Among the parameters accepted by this function, the following are used:
image: The image on which the detection boxes and masks are drawn.boxes: The detection boxes.masks: The detected masks.class_ids: Detected class IDs.class_names: A list of class names in the dataset.scores: Prediction scores for each object.
In the following code, the class names are prepared in the CLASS_NAMES list. Note that the class label of the first class is BG for the background. The mrcnn.visualize.display_instances() function is called to display the annotated image.
import mrcnn.visualize
CLASS_NAMES = ['BG', 'person', 'bicycle', 'car', 'motorcycle', 'airplane', 'bus', 'train', 'truck', 'boat', 'traffic light', 'fire hydrant', 'stop sign', 'parking meter', 'bench', 'bird', 'cat', 'dog', 'horse', 'sheep', 'cow', 'elephant', 'bear', 'zebra', 'giraffe', 'backpack', 'umbrella', 'handbag', 'tie', 'suitcase', 'frisbee', 'skis', 'snowboard', 'sports ball', 'kite', 'baseball bat', 'baseball glove', 'skateboard', 'surfboard', 'tennis racket', 'bottle', 'wine glass', 'cup', 'fork', 'knife', 'spoon', 'bowl', 'banana', 'apple', 'sandwich', 'orange', 'broccoli', 'carrot', 'hot dog', 'pizza', 'donut', 'cake', 'chair', 'couch', 'potted plant', 'bed', 'dining table', 'toilet', 'tv', 'laptop', 'mouse', 'remote', 'keyboard', 'cell phone', 'microwave', 'oven', 'toaster', 'sink', 'refrigerator', 'book', 'clock', 'vase', 'scissors', 'teddy bear', 'hair drier', 'toothbrush']
r = r[0]
mrcnn.visualize.display_instances(image=image,
boxes=r['rois'],
masks=r['masks'],
class_ids=r['class_ids'],
class_names=CLASS_NAMES,
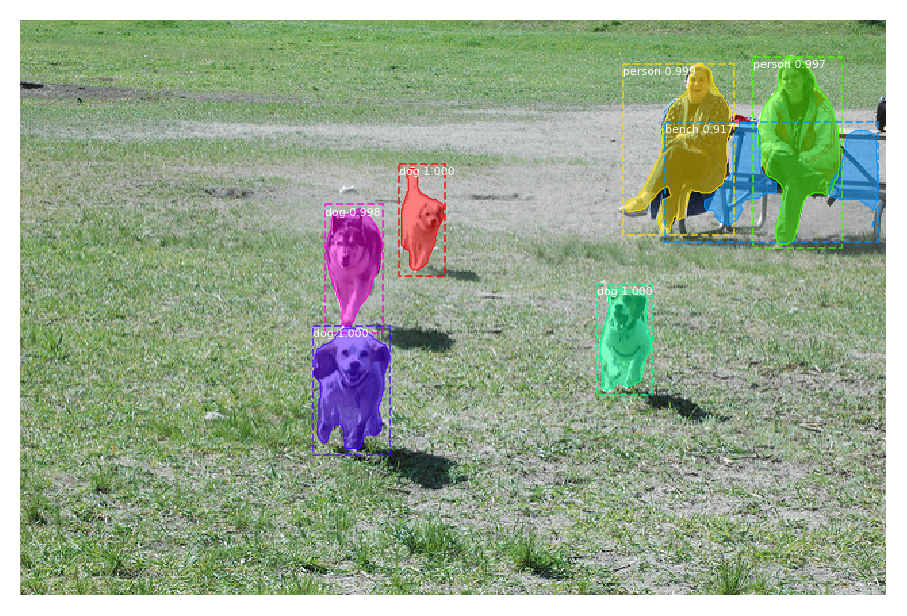
scores=r['scores'])After the function is executed, a figure is shown (as seen below) on which the boxes, masks, class scores, and labels are drawn.

Up to this point, all the steps required to use the Mask_RCNN project to detect objects are discussed.
Complete Code for Prediction
The complete code to use the Mask_RCNN project to detect objects in an image is listed below.
import mrcnn
import mrcnn.config
import mrcnn.model
import mrcnn.visualize
import cv2
import os

CLASS_NAMES = ['BG', 'person', 'bicycle', 'car', 'motorcycle', 'airplane', 'bus', 'train', 'truck', 'boat', 'traffic light', 'fire hydrant', 'stop sign', 'parking meter', 'bench', 'bird', 'cat', 'dog', 'horse', 'sheep', 'cow', 'elephant', 'bear', 'zebra', 'giraffe', 'backpack', 'umbrella', 'handbag', 'tie', 'suitcase', 'frisbee', 'skis', 'snowboard', 'sports ball', 'kite', 'baseball bat', 'baseball glove', 'skateboard', 'surfboard', 'tennis racket', 'bottle', 'wine glass', 'cup', 'fork', 'knife', 'spoon', 'bowl', 'banana', 'apple', 'sandwich', 'orange', 'broccoli', 'carrot', 'hot dog', 'pizza', 'donut', 'cake', 'chair', 'couch', 'potted plant', 'bed', 'dining table', 'toilet', 'tv', 'laptop', 'mouse', 'remote', 'keyboard', 'cell phone', 'microwave', 'oven', 'toaster', 'sink', 'refrigerator', 'book', 'clock', 'vase', 'scissors', 'teddy bear', 'hair drier', 'toothbrush']

class SimpleConfig(mrcnn.config.Config):
    NAME = "coco_inference"

    GPU_COUNT = 1
    IMAGES_PER_GPU = 1

    NUM_CLASSES = len(CLASS_NAMES)

model = mrcnn.model.MaskRCNN(mode="inference",
                             config=SimpleConfig(),
                             model_dir=os.getcwd())

model.load_weights(filepath="mask_rcnn_coco.h5",
                   by_name=True)

image = cv2.imread("sample2.jpg")
image = cv2.cvtColor(image, cv2.COLOR_BGR2RGB)

r = model.detect([image], verbose=0)

r = r[0]

mrcnn.visualize.display_instances(image=image,
                                  boxes=r['rois'],
                                  masks=r['masks'],
                                  class_ids=r['class_ids'],
                                  class_names=CLASS_NAMES,
                                  scores=r['scores'])
Up to this point, the code for making predictions is complete. The remainder of the tutorial discusses how to train the Mask R-CNN model using a custom training dataset. The next section downloads the dataset.
Download the Training Dataset
You must have a dataset to train a machine learning or deep learning model. For each sample in the training data, there might be ground-truth data. This data might be simple, like a class label, or complex, like what is used for an object detection model.
Generally, the ground-truth data for object detection models include a bounding box and a class label for each object within the image. Specifically for the Mask R-CNN model, there is an additional mask that marks the pixels belonging to the object.
Each image might have more than one object, and thus preparing the ground-truth data for an entire dataset is tiresome.
In this section, an existing dataset of Kangaroo images is used to train Mask R-CNN using the Mask_RCNN project. The Kangaroo dataset can be downloaded here. It comes with annotation data (i.e. ground-truth data) and thus it is ready to use.
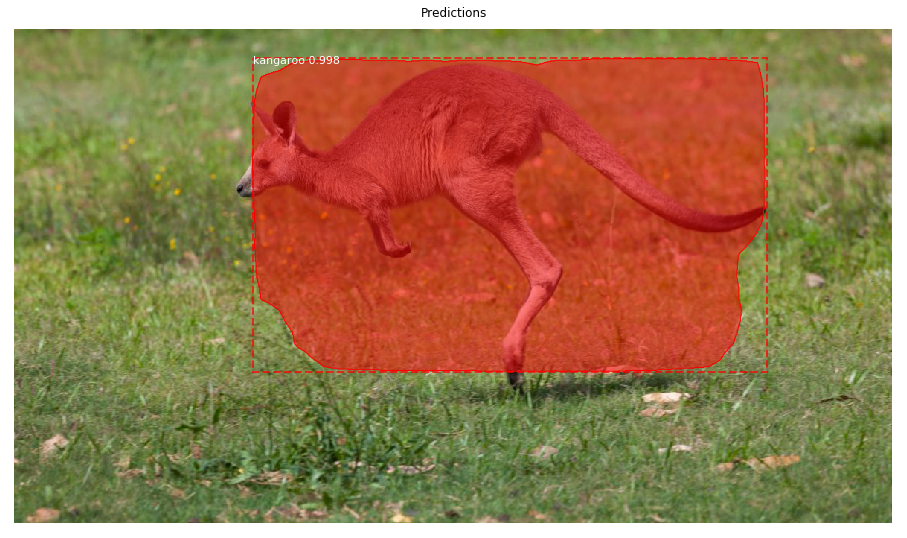
The next figure shows an image from the dataset where the predicted bounding box, mask, and score are drawn. Note that the mask is not accurate, as the model was trained for just a single epoch.
The dataset comes with 2 folders:
- images: The images in the dataset.
- annots: The annotations for each image as a separate XML file.
The next section prepares the dataset for later use to train and validate the Mask R-CNN model.
Prepare the Training Dataset
The Mask_RCNN project has a class named Dataset within the mrcnn.utils module. This class simply stores information about all training images within lists. When the details of all the images are stored in a single data structure it will be easier to manage the dataset.
For example, there is a list named class_info which holds information about each class within the dataset. Similarly, a list named image_info holds information about each image. To train the Mask R-CNN model, the image_info list is used to retrieve the training images and their annotations. The annotations include and bounding boxes and class labels for all objects within each image.
The mrcnn.utils.Dataset class has a number of useful methods, which include:
add_class(): Adds a new class.add_image(): Adds a new image to the dataset.image_reference(): The reference (e.g. path or link) by which the image is retrieved.prepare(): After adding all the classes and images to the dataset, this method prepares the dataset for use.source_image_link(): Returns the path or link of the image.load_image(): Reads and returns an image.load_mask(): Loads the masks for the objects in an image.
The next code block creates an empty instance of the mrcnn.utils.Dataset named KangaroDataset.
import mrcnn.utils

class KangarooDataset(mrcnn.utils.Dataset):
    pass
Within the new class, feel free to override any of the previously mentioned methods if it needs customization. Also, add any new method that might help.
Out of all the previously listed methods, the load_mask() method must be overridden. The reason is that retrieving the objects' masks differ based on the annotation file format, and thus there is no single way to load the masks. As a result, loading the masks is a task that the developer must do.
In the next code block below, we'll build 3 methods:
load_dataset(): It accepts the directory in which theimagesandannotsfolders exist, in addition to a Boolean parameter representing whether the directory refers to the training or validation data.load_mask(): This method loads the masks of the Kangaroo dataset. It accepts the image ID in theimage_idparameter. The image ID is just a unique value for each image. Feel free to assign the IDs of your choice. The method returns the masks and the class IDs of each object. Note that this dataset has a single class representing Kangaroos.extract_boxes: Theload_mask()method calls theextract_boxes()method which is responsible for returning the coordinates of each bounding box, in addition to the width and height of each image.
The implementation of each of these 3 methods is listed in the next block of code.
The first line in the load_dataset() method calls the add_class() method to create a class named kangaroo with ID 1. There is another class with ID 0, which is the background with the label BG. We do not have to add it explicitly because it exists by default. The last line calls the add_image() method to add an image to the dataset. The image ID, path, and the path of the annotation file are passed to this method.
The load_dataset() method splits the dataset so that 150 images are used for training, while the rest are used for testing.
import mrcnn.utils

class KangarooDataset(mrcnn.utils.Dataset):

    def load_dataset(self, dataset_dir, is_train=True):
		self.add_class("dataset", 1, "kangaroo")

		images_dir = dataset_dir + '/images/'
		annotations_dir = dataset_dir + '/annots/'

		for filename in os.listdir(images_dir):
			image_id = filename[:-4]

			if image_id in ['00090']:
				continue

			if is_train and int(image_id) >= 150:
				continue

			if not is_train and int(image_id) < 150:
				continue

			img_path = images_dir + filename
			ann_path = annotations_dir + image_id + '.xml'

			self.add_image('dataset', image_id=image_id, path=img_path, annotation=ann_path)

    def extract_boxes(self, filename):
		tree = xml.etree.ElementTree.parse(filename)

		root = tree.getroot()

		boxes = list()
		for box in root.findall('.//bndbox'):
			xmin = int(box.find('xmin').text)
			ymin = int(box.find('ymin').text)
			xmax = int(box.find('xmax').text)
			ymax = int(box.find('ymax').text)
			coors = [xmin, ymin, xmax, ymax]
			boxes.append(coors)

		width = int(root.find('.//size/width').text)
		height = int(root.find('.//size/height').text)
		return boxes, width, height

    def load_mask(self, image_id):
		info = self.image_info[image_id]
		path = info['annotation']
		boxes, w, h = self.extract_boxes(path)
		masks = zeros([h, w, len(boxes)], dtype='uint8')

		class_ids = list()
		for i in range(len(boxes)):
			box = boxes[i]
			row_s, row_e = box[1], box[3]
			col_s, col_e = box[0], box[2]
			masks[row_s:row_e, col_s:col_e, i] = 1
			class_ids.append(self.class_names.index('kangaroo'))
		return masks, asarray(class_ids, dtype='int32')
Based on the KangarooDataset class, the following code prepares the training dataset. A new instance of the class is simply created. To load the images the load_dataset() method is called, which accepts the path of the dataset images and its annotations in the dataset_dir parameter. This is all in addition to the is_train flag. If this fag is True, then the data is regarded as training data. Otherwise, the data is used for validation or testing.
The prepare() method is called to prepare the dataset for use. It just creates more attributes about the data like the number of classes, number of images, and more.
train_set = KangarooDataset()
train_set.load_dataset(dataset_dir='D:\kangaroo', is_train=True)
train_set.prepare()
Similarly, the validation dataset is prepared according to the following code. The only difference is that the is_train flag is set to False.
valid_dataset = KangarooDataset()
valid_dataset.load_dataset(dataset_dir='D:\kangaroo', is_train=False)
valid_dataset.prepare()
The next section prepares some configuration parameters for the model.
Prepare Model Configuration
A subclass of the mrcnn.config.Config class must be created to hold the model configuration parameters. The next code creates a new class named KangarooConfig, which extends the mrcnn.config.Config class.
Note that the number of classes (NUM_CLASSES) is set to 2 because the dataset has 2 classes only, which are BG (for the background) and kangaroo.
import mrcnn.config

class KangarooConfig(mrcnn.config.Config):
    NAME = "kangaroo_cfg"

    GPU_COUNT = 1
    IMAGES_PER_GPU = 1

    NUM_CLASSES = 2

    STEPS_PER_EPOCH = 131
After the dataset and the model configuration are prepared, the next section discusses training the Mask R-CNN model using TensorFlow 1.0.
Train Mask R-CNN in TensorFlow 1.0
This section assumes that a version of TensorFlow 1.0 is installed and used to run the code mentioned. It is possible also to create a virtual environment in which TensorFlow 1.0 is installed.
The next code creates an instance of the mrcnn.model.MaskRCNN class, which builds the architecture of the Mask R-CNN model. The mode parameter is set to 'training' to indicate that the model will be trained. When the model is loaded for training, there are extra input layers compared to loading the model just for inference (i.e. prediction). The extra layers hold the input images and their annotations (e.g. bounding boxes).
import mrcnn.model
model = mrcnn.model.MaskRCNN(mode='training',
                             model_dir='./',
                             config=KangarooConfig())
Once the model architecture is created, the weights are loaded using the load_weights() method according to the next code. This method accepts the following 3 parameters:
filepath: The path of the weights file. Themask_rcnn_coco.h5file can be downloaded from this link.by_name: Whether to assign the layers' weights according to their names.exclude: The names of the layers for which we do not load their weights. These are the layers at the head of the architecture, which change based on the problem type (e.g. number of classes).
The excluded layers are those responsible for producing the class probabilities, bounding boxes, and masks.
model.load_weights(filepath='mask_rcnn_coco.h5',
                   by_name=True,
                   exclude=["mrcnn_class_logits", "mrcnn_bbox_fc",  "mrcnn_bbox", "mrcnn_mask"])
After loading the weights into the model layers, the model is trained using the train() method. Note that the layers argument is set to heads to indicate that only the layers at the head of the architecture are trained. You can also specify the layer names to be trained.
Notice that the exclude parameter in the load_weights() method accepts the layers' names that will not have their weights loaded, but the layers parameter in the train() method accepts the layer names to be trained.
model.train(train_dataset=train_set,
            val_dataset=valid_dataset,
            learning_rate=KangarooConfig().LEARNING_RATE,
            epochs=10,
            layers='heads')
The training time differs based on the machine's computing power. If you run the training on Gradient with a powerful, low-cost GPU, it should be relatively quick. Once the model is trained, the trained weights can be saved using the Keras save_weights() method.
model_path = 'Kangaroo_mask_rcnn.h5'
model.keras_model.save_weights(model_path)
This is the complete code for training a model.
import os
import xml.etree
from numpy import zeros, asarray

import mrcnn.utils
import mrcnn.config
import mrcnn.model

class KangarooDataset(mrcnn.utils.Dataset):

	def load_dataset(self, dataset_dir, is_train=True):
		self.add_class("dataset", 1, "kangaroo")

		images_dir = dataset_dir + '/images/'
		annotations_dir = dataset_dir + '/annots/'

		for filename in os.listdir(images_dir):
			image_id = filename[:-4]

			if image_id in ['00090']:
				continue

			if is_train and int(image_id) >= 150:
				continue

			if not is_train and int(image_id) < 150:
				continue

			img_path = images_dir + filename
			ann_path = annotations_dir + image_id + '.xml'

			self.add_image('dataset', image_id=image_id, path=img_path, annotation=ann_path)

	def extract_boxes(self, filename):
		tree = xml.etree.ElementTree.parse(filename)

		root = tree.getroot()

		boxes = list()
		for box in root.findall('.//bndbox'):
			xmin = int(box.find('xmin').text)
			ymin = int(box.find('ymin').text)
			xmax = int(box.find('xmax').text)
			ymax = int(box.find('ymax').text)
			coors = [xmin, ymin, xmax, ymax]
			boxes.append(coors)

		width = int(root.find('.//size/width').text)
		height = int(root.find('.//size/height').text)
		return boxes, width, height

	def load_mask(self, image_id):
		info = self.image_info[image_id]
		path = info['annotation']
		boxes, w, h = self.extract_boxes(path)
		masks = zeros([h, w, len(boxes)], dtype='uint8')

		class_ids = list()
		for i in range(len(boxes)):
			box = boxes[i]
			row_s, row_e = box[1], box[3]
			col_s, col_e = box[0], box[2]
			masks[row_s:row_e, col_s:col_e, i] = 1
			class_ids.append(self.class_names.index('kangaroo'))
		return masks, asarray(class_ids, dtype='int32')

class KangarooConfig(mrcnn.config.Config):
    NAME = "kangaroo_cfg"

    GPU_COUNT = 1
    IMAGES_PER_GPU = 1

    NUM_CLASSES = 2

    STEPS_PER_EPOCH = 131

train_set = KangarooDataset()
train_set.load_dataset(dataset_dir='kangaroo', is_train=True)
train_set.prepare()

valid_dataset = KangarooDataset()
valid_dataset.load_dataset(dataset_dir='kangaroo', is_train=False)
valid_dataset.prepare()

kangaroo_config = KangarooConfig()

model = mrcnn.model.MaskRCNN(mode='training',
                             model_dir='./',
                             config=kangaroo_config)

model.load_weights(filepath='mask_rcnn_coco.h5',
                   by_name=True,
                   exclude=["mrcnn_class_logits", "mrcnn_bbox_fc",  "mrcnn_bbox", "mrcnn_mask"])

model.train(train_dataset=train_set,
            val_dataset=valid_dataset,
            learning_rate=kangaroo_config.LEARNING_RATE,
            epochs=1,
            layers='heads')

model_path = 'Kangaro_mask_rcnn.h5'
model.keras_model.save_weights(model_path)
Conclusion
This tutorial introduced the open-source Python project Mask_RCNN, which builds the Mask R-CNN model for object instance segmentation. The project only supports a version of TensorFlow $\geq$ 1.0. This tutorial covered the steps for making predictions, and for training the model on a custom dataset.
Before the model is trained, the train and validation datasets are prepared using a child class of the mrcnn.utils.Dataset class. After preparing the model configuration parameters, the model can be trained.
In the next tutorial we'll see how to edit the project to suport training and making predictions with Mask R-CNN in TensorFlow 2.0.


