Bring this project to life
With the modern suite of graphic design tools, there are a plethora of different methods we can work to our advantage when using computers for design. Ranging from free tools like Figma and Canva to more powerful applications like the Photoshop suite or Daz3D, these give users an incredible array of capabilities for editing photos. There is however a massive caveat to this, and a huge blocker for new users: it requires a large degree of skill and training to create realism when doing image design.
One of the most potent applications of diffusion modeling, and text-to-image generation in general, is image editing, modification, and design. Tools leveraging these capabilities, effectively holding the hand of the user during complex editing tasks, make it possible for even more people to take advantage of these capabilities. These interesting new tools represent a notable moment in the developmental history of AI in real world applications. Many more like them will show up in the coming months and years as more new developers connect there favorite tools to the powerful image synthesis pipeline. In fact, there already exist a large number of powerful plugins for many of these tools that allow us to take advantage of this capability in real time while using these tools, like the Photoshop Stable diffusion Web UI plugin.
In this article, we are going to take a look at one of the latest tools for working with Stable Diffusion for image editing: DragDiffusion. Based on the extremely exciting DragGAN project released earlier this year, DragDiffusion allows us to directly train an LoRA model that enables fast drag and click movement based editing of images. Doing so requires only a short time training the super light weight LoRA on the image to be edited, and the use of a well crafted Gradio application interface. The application is based on the one released publicly by the DragDiffusion author team, and we want to thank Yujun Shi et al. for sharing their work.
In this article, we will start by discussing how the DragDiffusion model works. We will start by looking at the DragDiffusion model itself. We will then look at the DragDiffusion training process, and discuss how the LoRA model works in relation to the original diffusion base. Finally, we will conclude the theory portion of this article with a discussion about the capabilities of this technology for image editing processes.
Following the tech overview, we will jump into a demonstration using DragDiffusion with Paperspace Gradient. We have created a custom template to make running the training and Gradio application easy, with only a few button clicks required. Follow along to the end of this tutorial to learn how to edit your own images with DragDiffusion!
Click the link at the top of this page to get the tutorial started in a Free GPU powered Gradient Notebook!
Model Overview
Let's begin with an overview of the relevant technology underlying the DragDiffusion model. This will give us some much needed context when we get to the implementation stage later on.
How it works
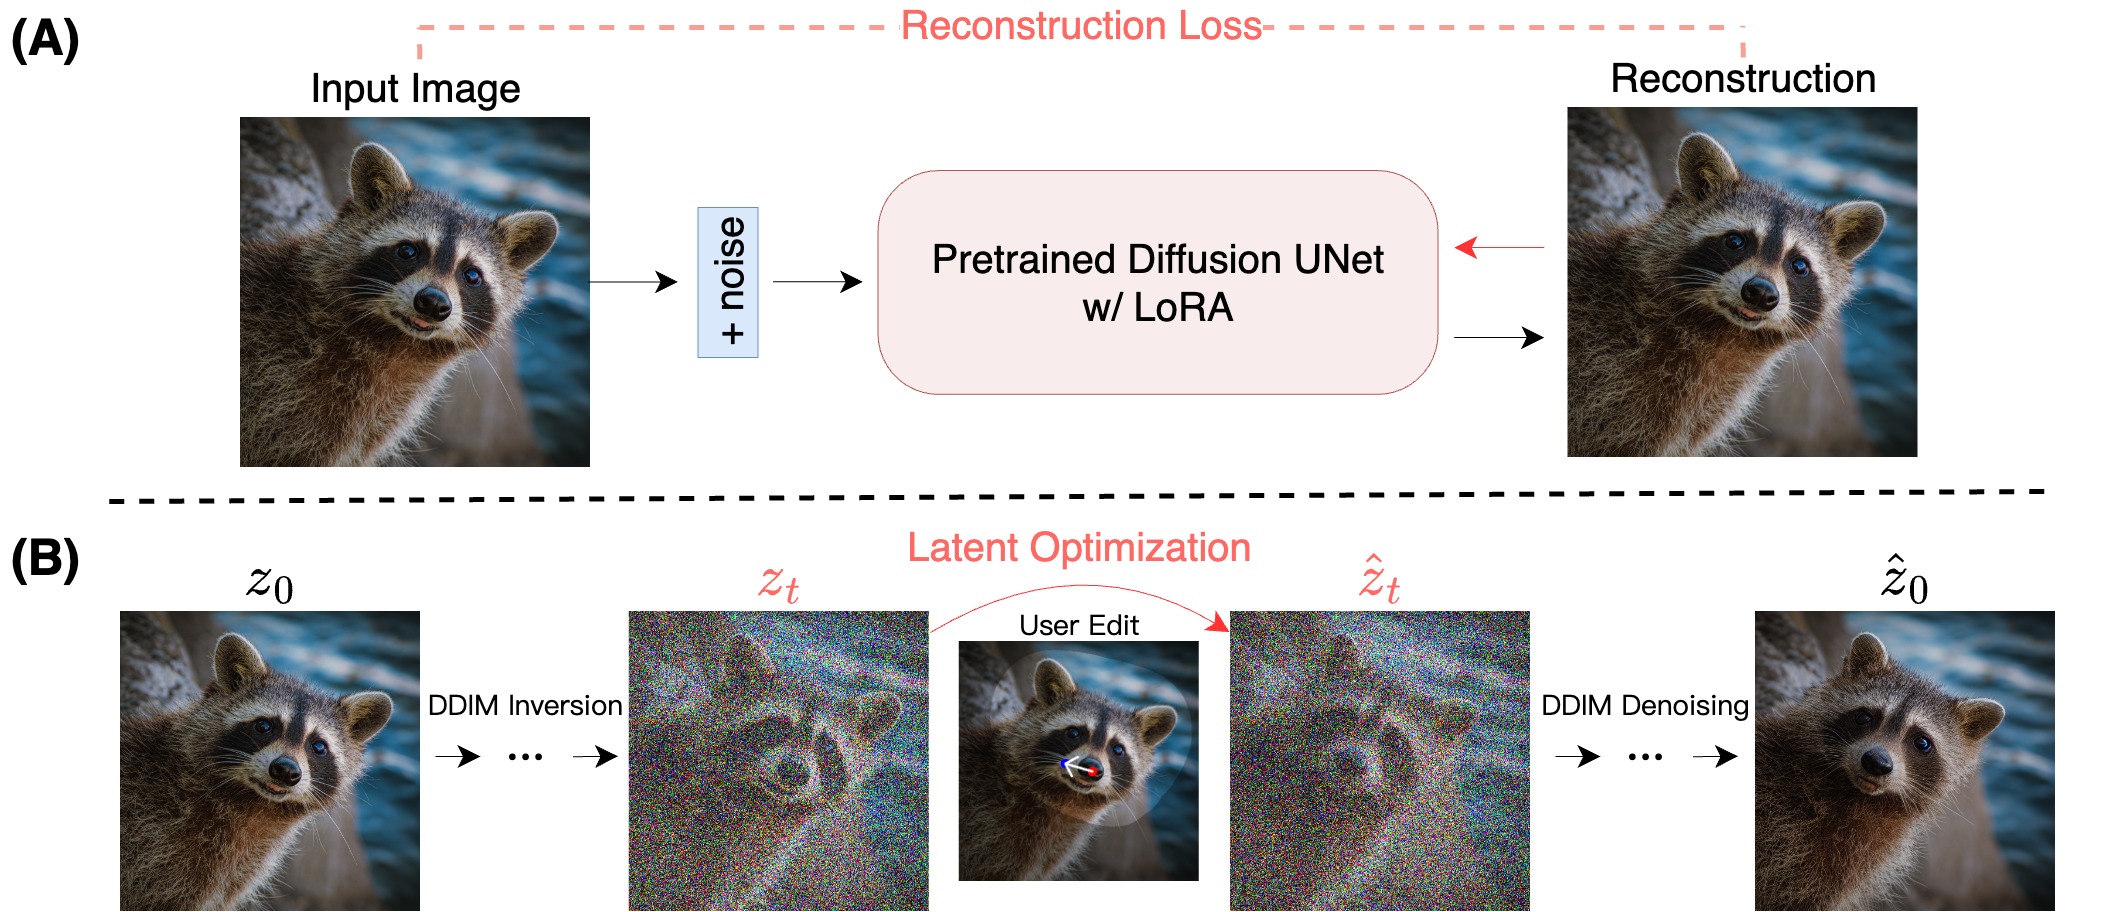
In the figure above, we can see an overview of how DragDiffusion works in general. The top portion of the figure outlines the training process for the LoRA where we finetune it on the Diffusion model's UNet parameters to essentially overfit on the originally inputted image. This gives it a strong visual understanding of the input's feature space for the manipulation alter on. This process should be very familiar to our readers who have been following along with our analyses of the Stable Diffusion modeling process. In short, the model uses the input image plus some added noise as the exclusive reconstruction target to train a hyper fine-tuned add on for the Stable Diffusion model to work with.
In the lower section of the figure, we can see the inference editing process. This shows how it first applies a DDIM inversion on the input image to obtain the latent mapping of the image features contained within. Then, the user can assign a masked region of the image, the region to be edited, with set handle points, where the image features to be displaced should center around in the masked portion, and a target point, where we desire to shift those features within the latent space. This is used to optimize the latent representation of the image in the latent space with the updated feature alignment. Then, DDIM denoising is applied on the optimized latent to get the reconstructed image with the adjusted features.
Training the LoRA for DragDiffusion
Training the LoRA for DragDiffusion is comparatively simple when looked at next to some of the older and more well known techniques that use LoRA type models with Stable Diffusion, like Dreambooth. Rather than requiring multiple images of a subject or style in a variety of positions or from varied angles, DragDiffusion LoRA training only needs the inputted image we wish to edit.
As we mentioned earlier, the process for training functionally overfits a smaller model, the LoRA, that will heavily modify the outputs of a standard Stable Diffusion model to reflect our desired output. By training the model so thoroughly on a single image, we are sure to capture all of the features contained within. In turn, this makes modifying and displacing them much easier in practice.
Capabilities & Limitations
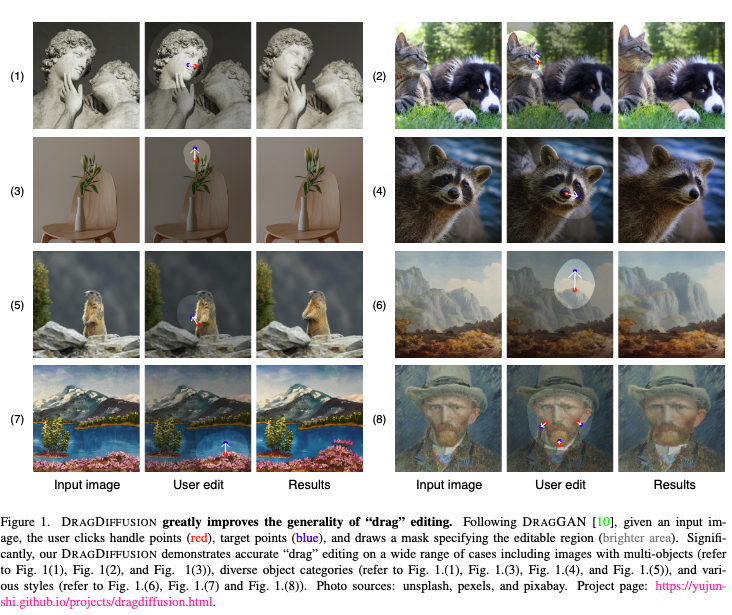
As we described before, the process for actually implementing the drag effect involves displacing features contained within a masked region between user assigned handle points and target points. This enables a wide variety of effects when working on editing images. The most simple of these be single handle to target point movements. For example, turning a head in a portrait or extending the foliage of a tree further in a specific direction. If we apply multiple handle and target points, the model is capable of more complex movements and/or multiple features being displaced or edited.
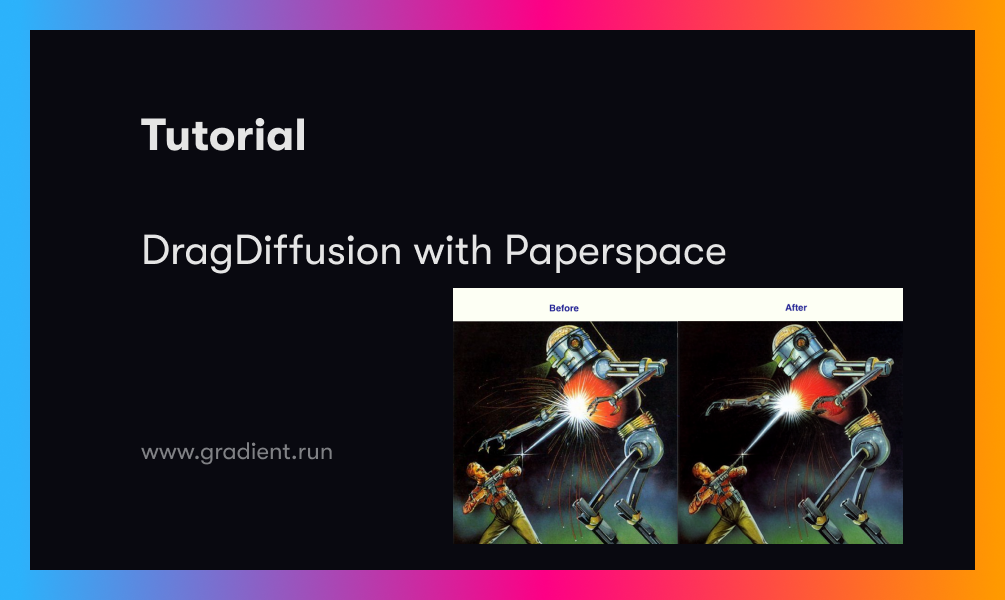
That being said, this is still an imperfect technology. Recreating the effects shown in the demo videos above, taken from the project page, is extremely difficult. Even with our full rundown of how to use the technology, it seems that it is not quite at the desired level of versatility yet that it could be plugged into different applications like Photoshop. Below is an example we made showing this more clearly.
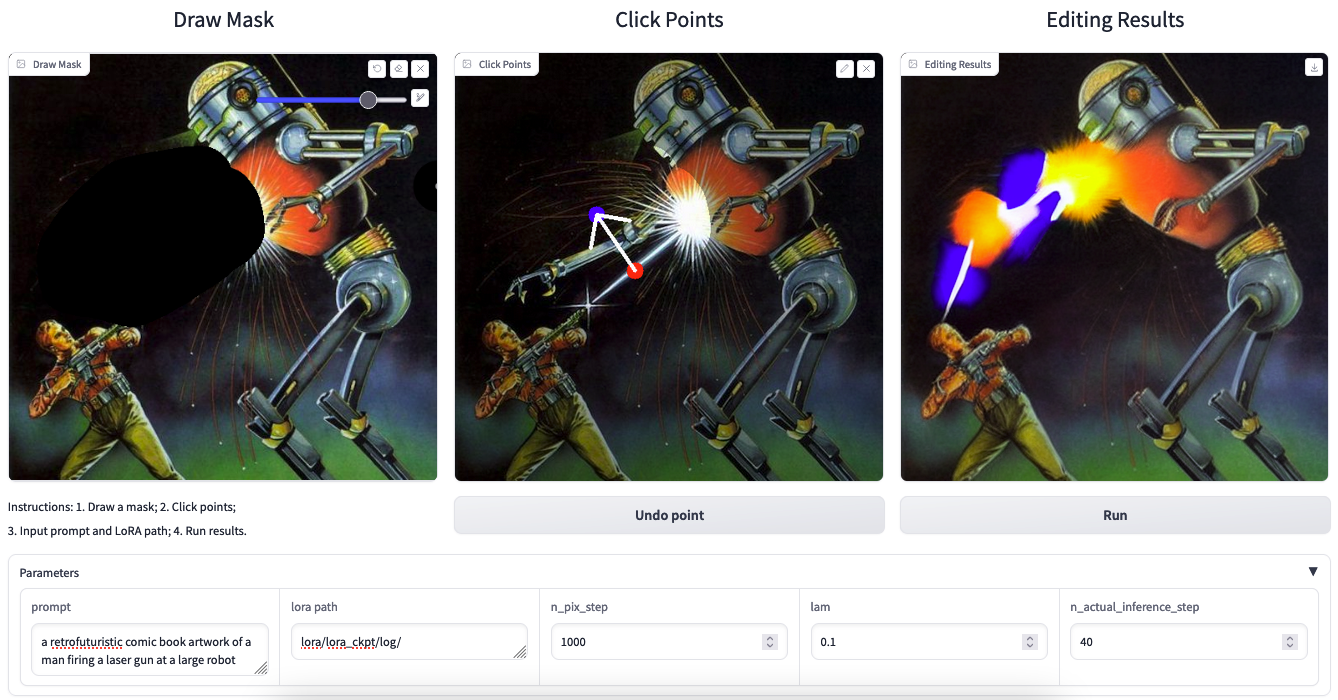
As we can see from the sample above, this process is not perfect. Improper assignment of the parameter values, poorly defined mask areas, and poor placement of the placement markers for the handle and target. Like any tool, this AI method still requires a degree of control and understanding to make best use of. In the demo section below, we will show how to make the intended edit: shifting the arm, laser, and explosion upwards.
Demo
Bring this project to life
Now that we have looked at the DragDiffusion process in more detail, we can now get into the coding demo. To follow along, we only need a Paperspace account, so that we can make use of the Free GPUs offered for 6 hour sessions. To launch this demo, just click the link either directly above or at the top of the page. Let's walkthrough the notebook before doing the same with the Gradio UI.
Above is the full workflow we are going to attempt to recreate for this demo. This shows how to deal with multiple feature manipulations in a single photo, and demonstrates a portion of the versatility offered by DragDiffusion in practice. Follow the demo below to see how to recreate these edits, and potentially do our own complex edits on personal images.
Setting up the notebook
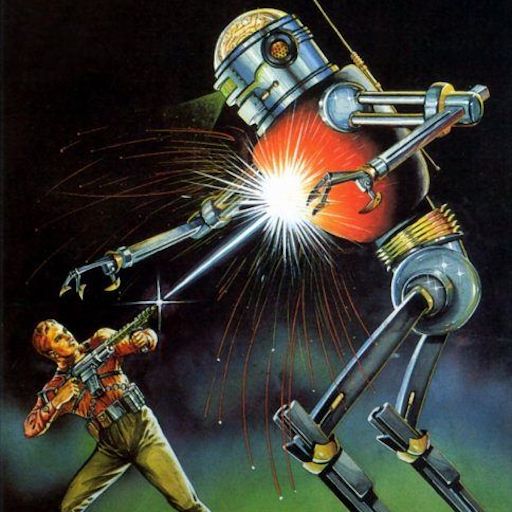
To set up the notebook, we just need to hit the run all button at the top right of the page. This will train the LoRA on the provided sample image. For this tutorial, let's show how we can use our own sample image. Let's use this retrofuturistic artwork we featured above for the demo. We are going to show how to actually make the desired effect of moving the arm and laser actually happen.
Download the image sample, and upload it to a new directory in /lora. Let's name it test. Let's also make another new directory in /lora/lora_ckpt/ called test_ckpt. Then, open up the file /lora/train_lora.sh. We are going to alter it to reflect the paths to our Gradient Public Dataset for the Stable Diffusion Diffusers format models, the path to our new test directory, and the output path to the test_ckpt directory. This should have already been done for us manually in the repo we cloned as the base directory for this Notebook. Let's take a look at it below:
export SAMPLE_DIR="/notebooks/lora/test/"
export OUTPUT_DIR="/notebooks/lora/lora_ckpt/test_ckpt/"

export MODEL_NAME="/datasets/stable-diffusion-diffusers/stable-diffusion-v1-5/"
export LORA_RANK=16

accelerate launch lora/train_dreambooth_lora.py \
  --pretrained_model_name_or_path=$MODEL_NAME  \
  --instance_data_dir=$SAMPLE_DIR \
  --output_dir=$OUTPUT_DIR \
  --instance_prompt="a retrofuturistic comic book artwork of a man firing a laser gun at a large robot" \
  --resolution=512 \
  --train_batch_size=1 \
  --gradient_accumulation_steps=1 \
  --checkpointing_steps=100 \
  --learning_rate=2e-4 \
  --lr_scheduler="constant" \
  --lr_warmup_steps=0 \
  --max_train_steps=100 \
  --lora_rank=$LORA_RANK \
  --seed="0"
Now that we have set up our paths properly for the demo, we can open the run_dragdiffusion.ipynb file. Now, we can hit run all at the top right of the page. This will make the required packages install, the training will run, and, after it is complete, the Gradio web UI will get a sharable link at the end of the Notebook.
Recreating the sample image manipulation with the DragDiffusion demo
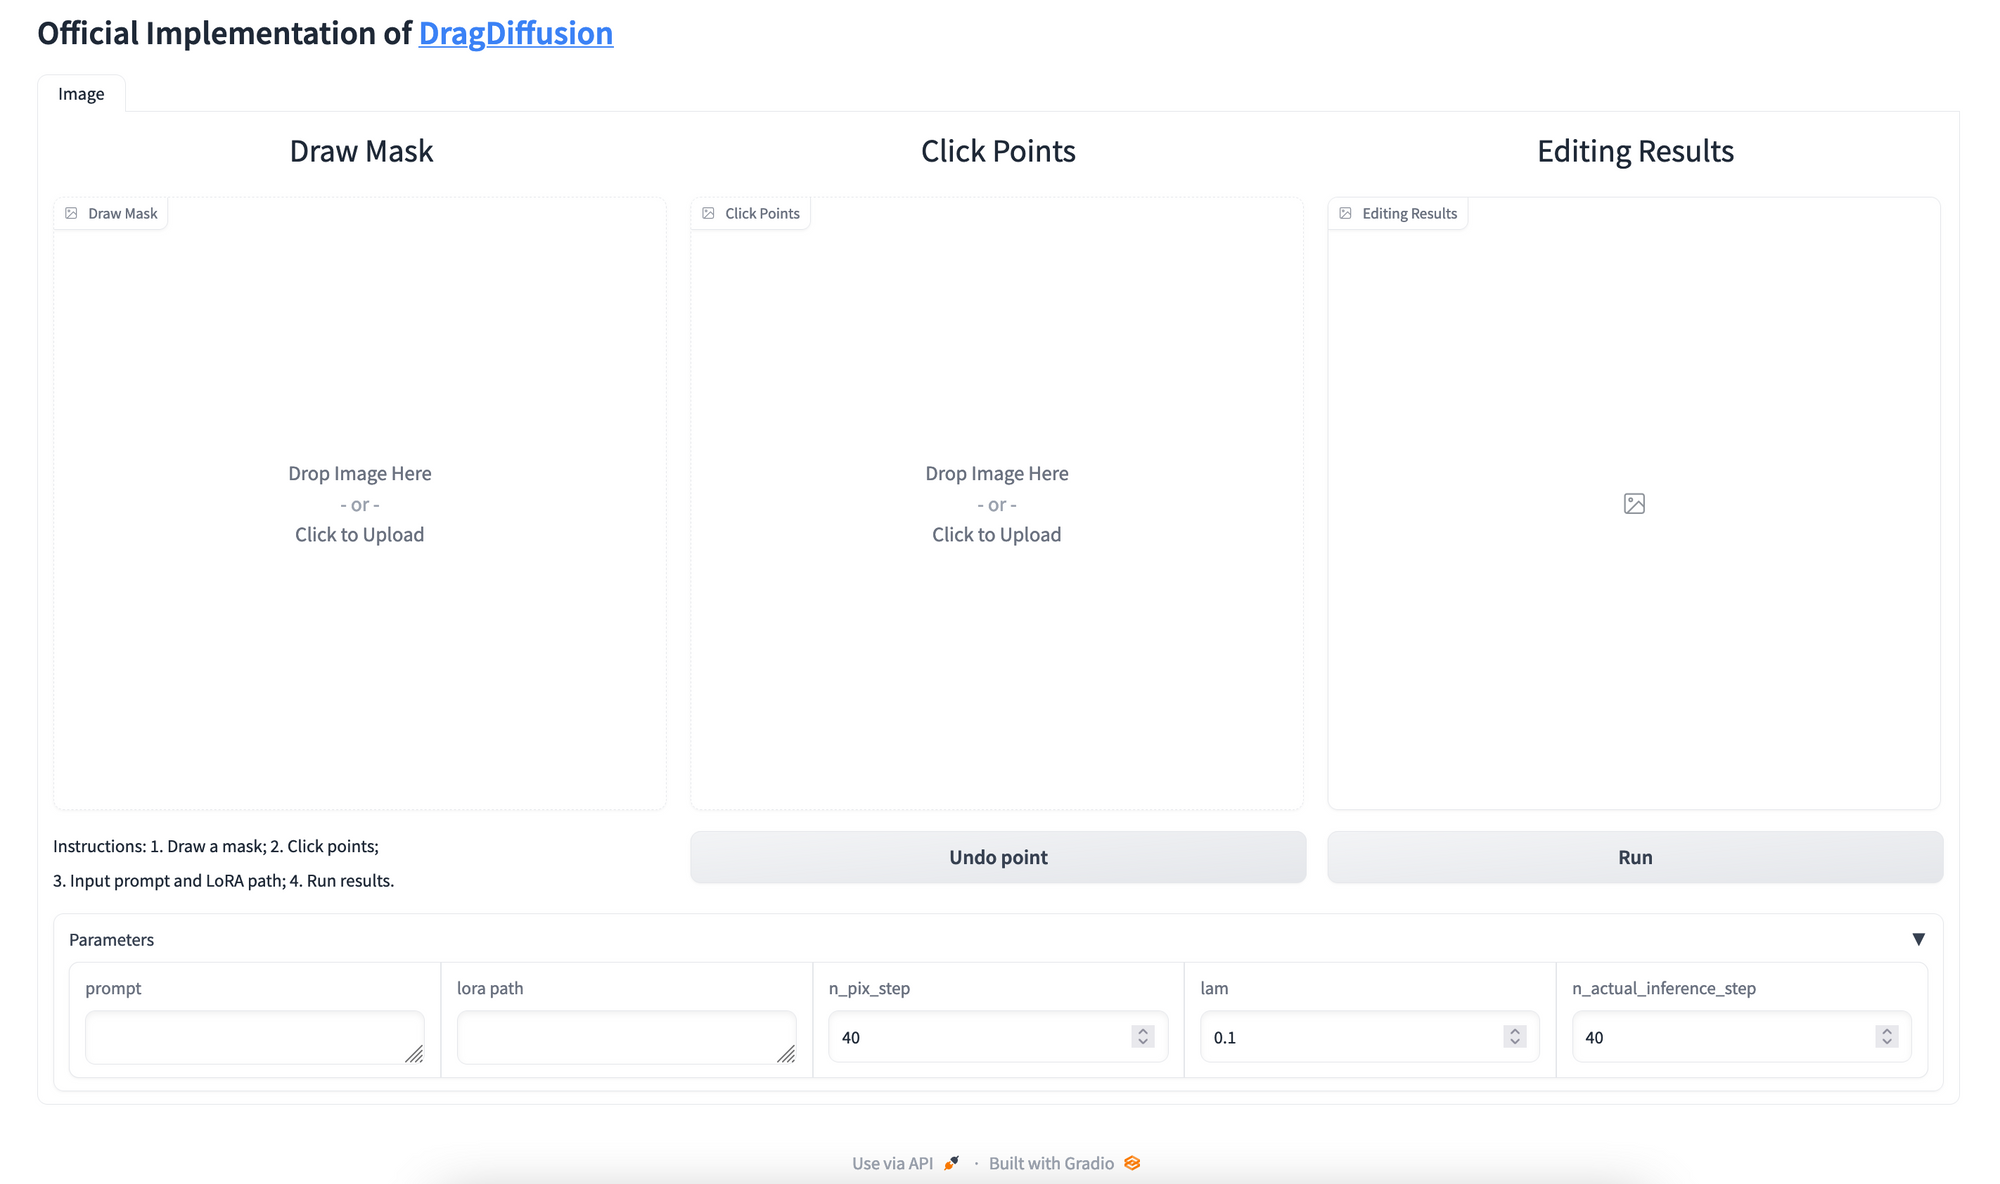
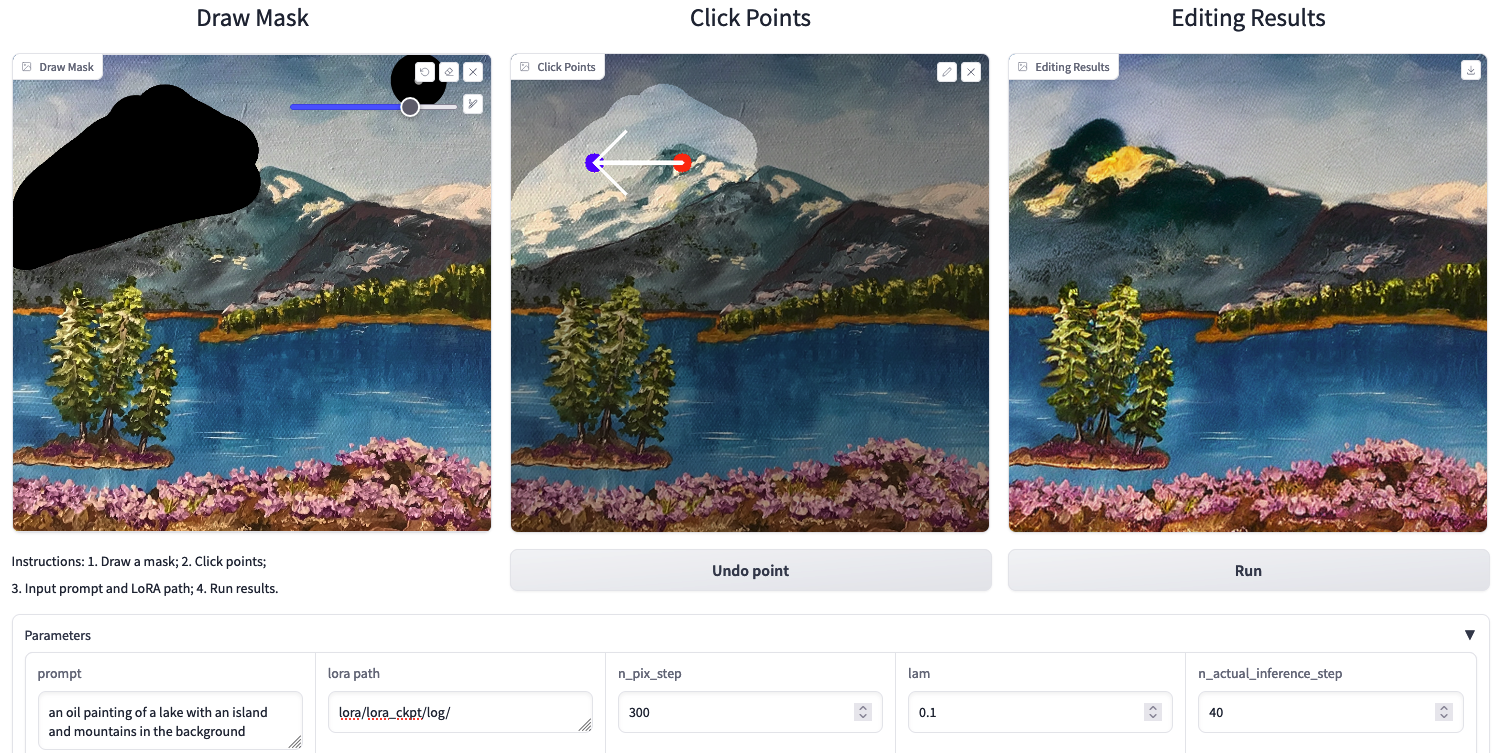
Now, we can go into the Gradio demo itself. There are 5 fields we will need to edit to recreate the effects of the sample image at the start of the demo section. These are namely the:
- Draw Mask: this is where we input the photo we trained the LoRA on, and subsequently draw our mask of the region we would like to edit
- Click Points: Once we have our image and mask setup, we can create the click points. We first assign the handle point near the features we desire to move around, and then assign the target point at the location we want to shift the features towards
- Prompt: the prompt should be the same as the one we used to train the LoRA. This is an approximation of the input used by Stable Diffusion to create an image with the same latent feature distribution as the input image
- LoRA path: this is the path to the trained LoRA. If we are following along with the demo, then the path for this should be
lora/lora_ckpt/test_ckpt/ - n_pix_steps: This is one of the most important fields to adjust. It represents the maximum number of steps of motion supervision. We can decrease or increase this value if handle points have been "dragged" too much or too little to the desired position, respectively
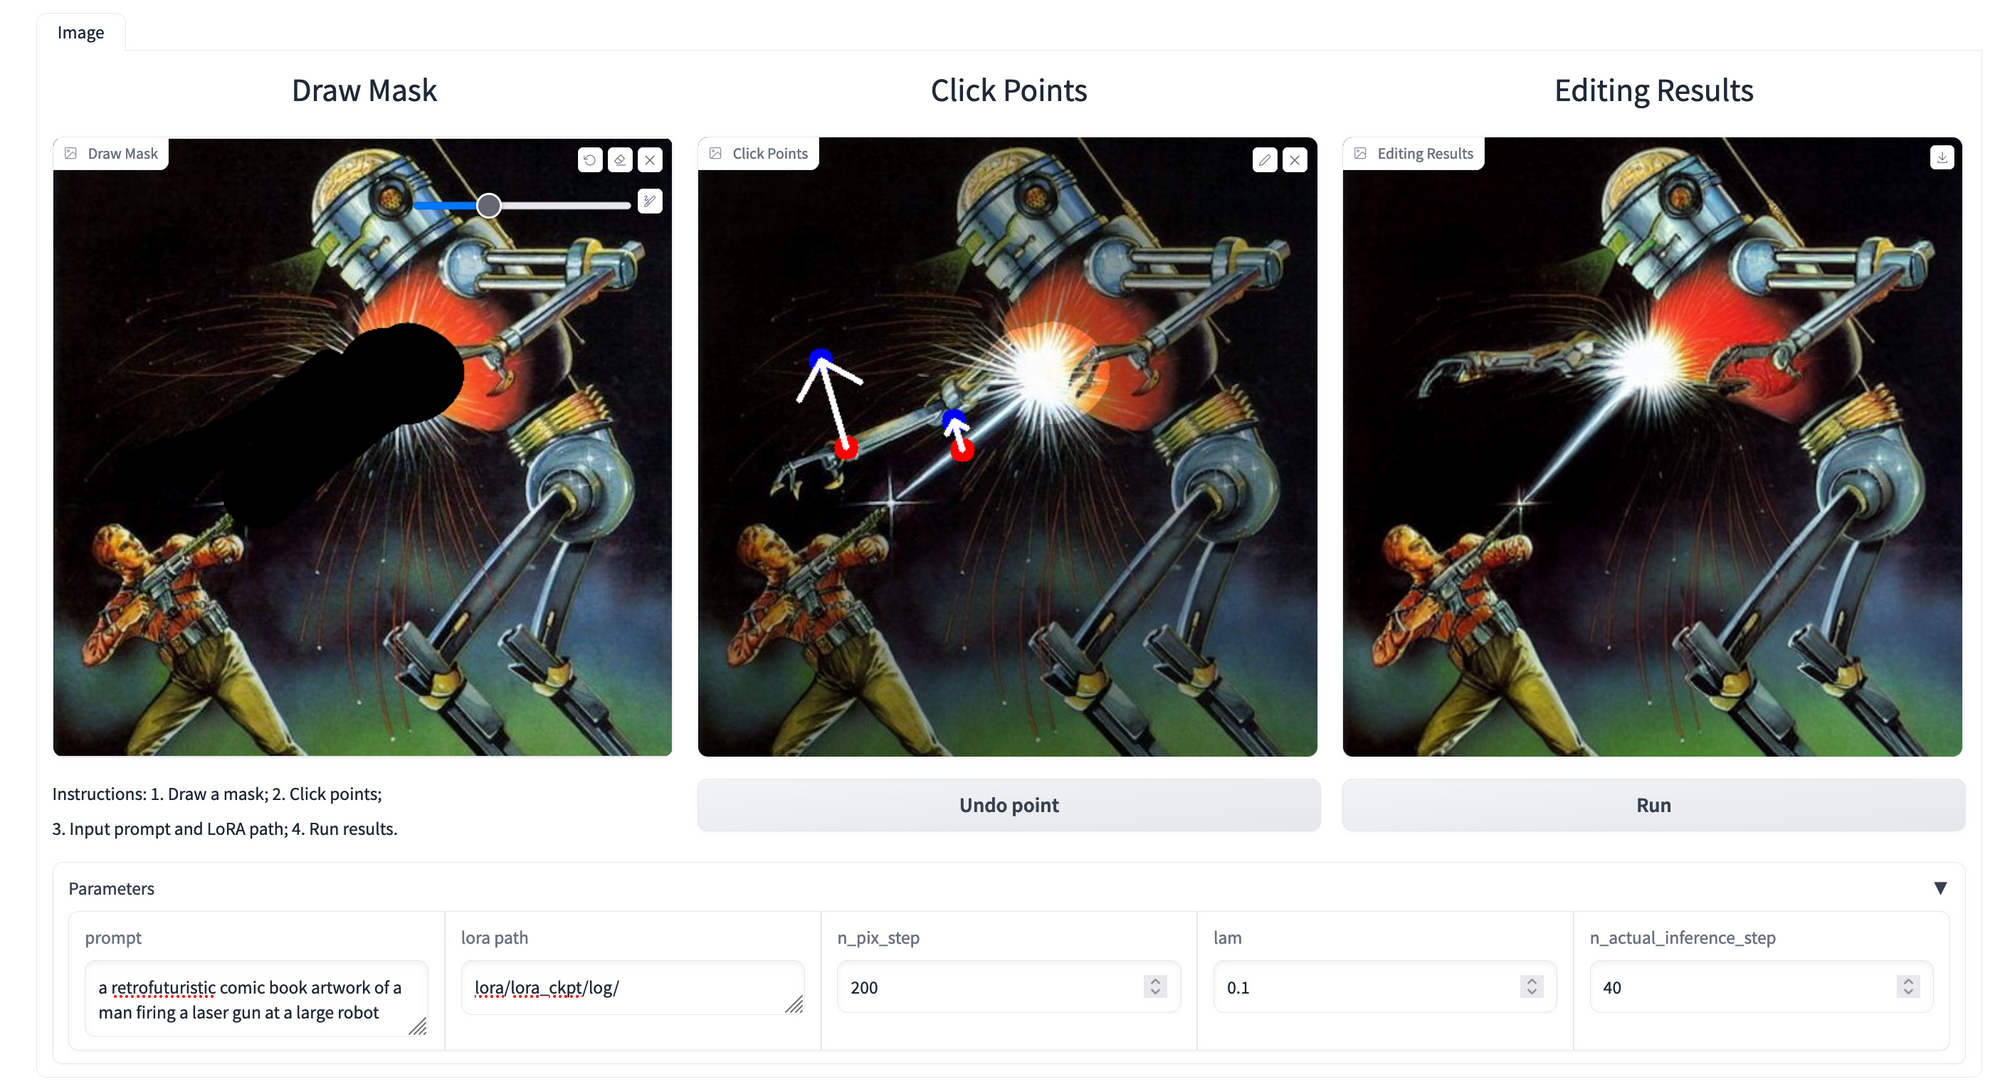
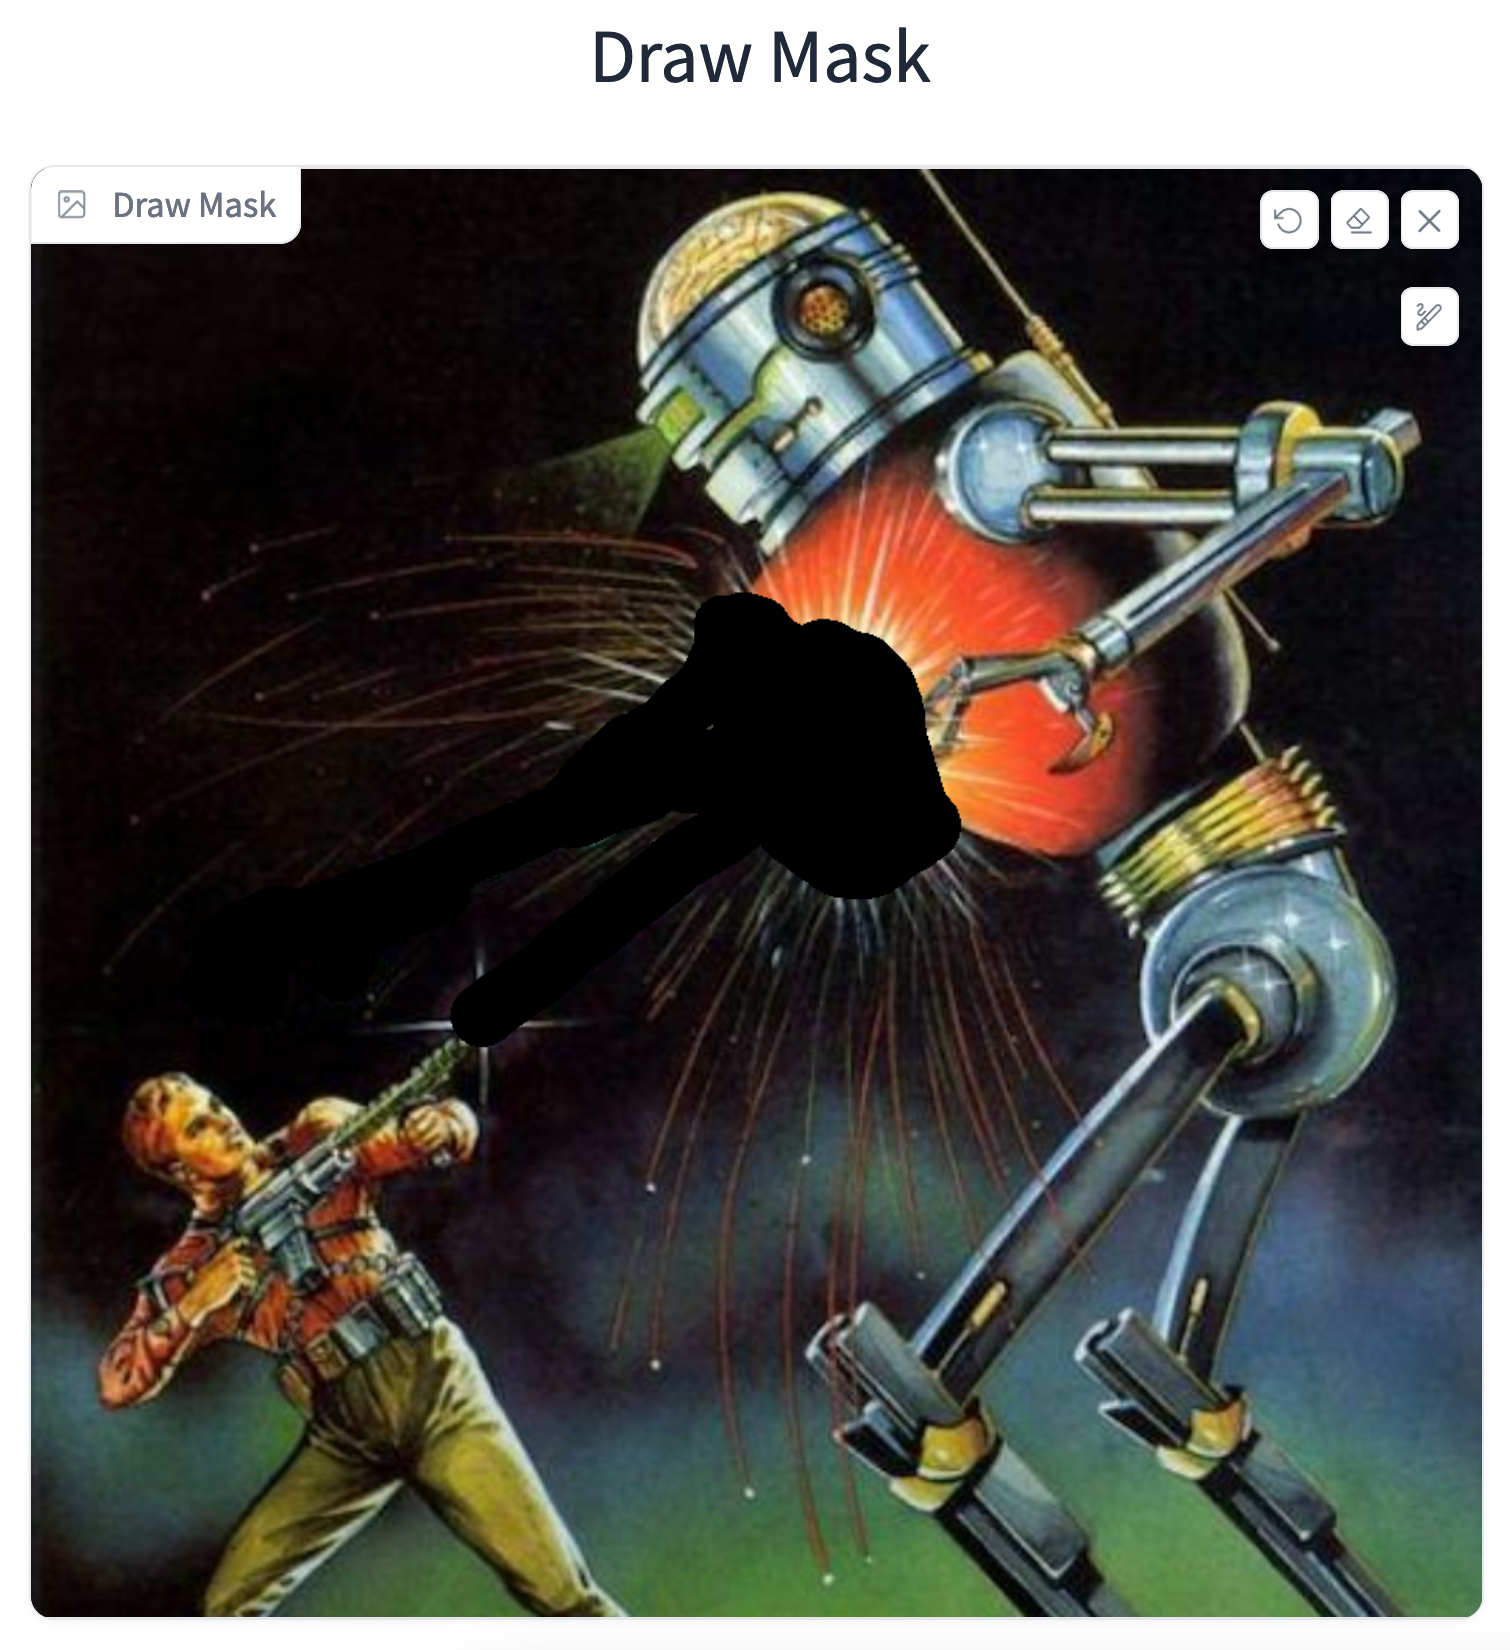
Now, let's upload our image and draw the mask. Be sure to not draw the mask over too much of the empty region between the arm and the laser. We want to reduce the amount of latent space that is being considered by the image manipulation so that the features are less muddled. Below is an example of how we did it:
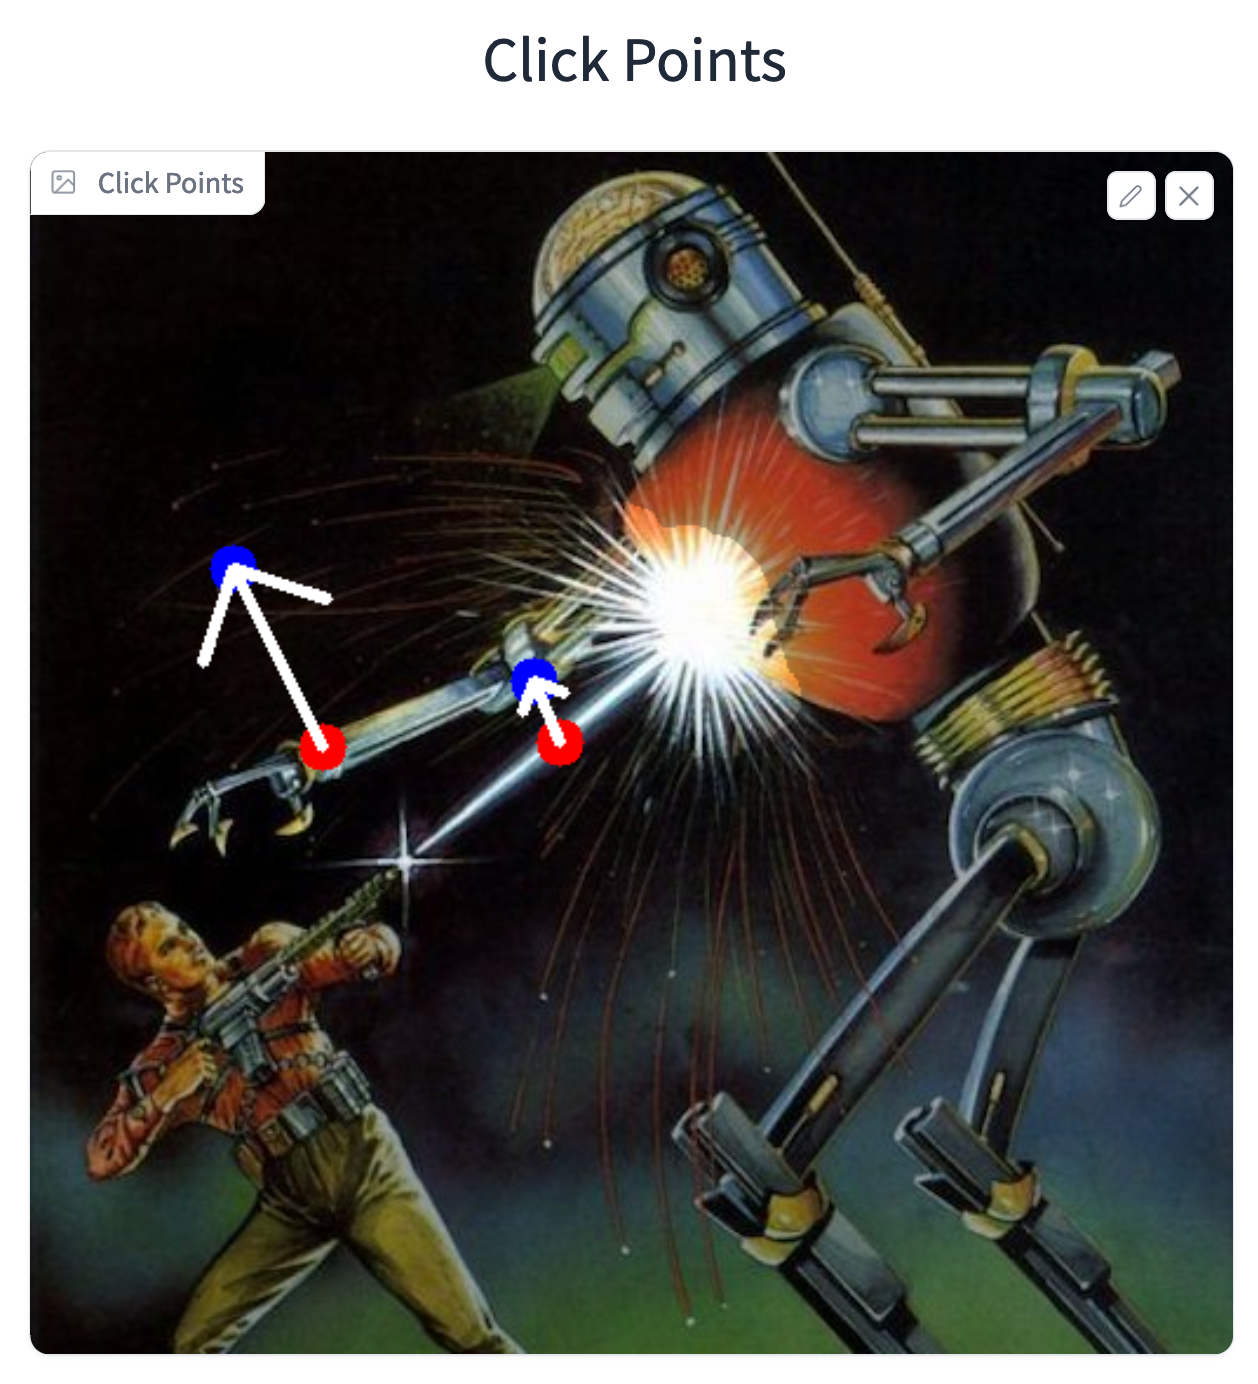
We will then add the handle and target points onto the Click Points field. We will add the first set in the middle of the laser, and then place the second some few pixels above at an angle. We will then do something similar with the arm, but displace the target point from the handle a bit further so the arm isn't muddled by the explosion.
Next, we get to the text fields. These are a bit more straightforward.
- First, is the prompt. This is the same prompt we used in the LoRA training: "a retrofuturistic comic book artwork of a man firing a laser gun at a large robot"
- Second, we have the LoRA path. This should be the same for everyone following the demo as well, as we want to pull from our
test_ckptdirectory with the trained LoRA. The value islora/lora_ckpt/test_ckpt/. - Finally, we have the n_pix_steps field. This exhibits a huge amount of control over the final output. Increasing the value should significantly affect the models ability to displace the features in the manner described by the click points. We recommend raising this value to 200
When all the setup is completed, we are now have the full pipeline setup! We can now click "Run" to run the editing process with DragDiffusion. Below, we can see our final output. If we followed the same steps outlined above, we should be able to recreate a similar result consistently. Let's take a look at the original image besides the altered.
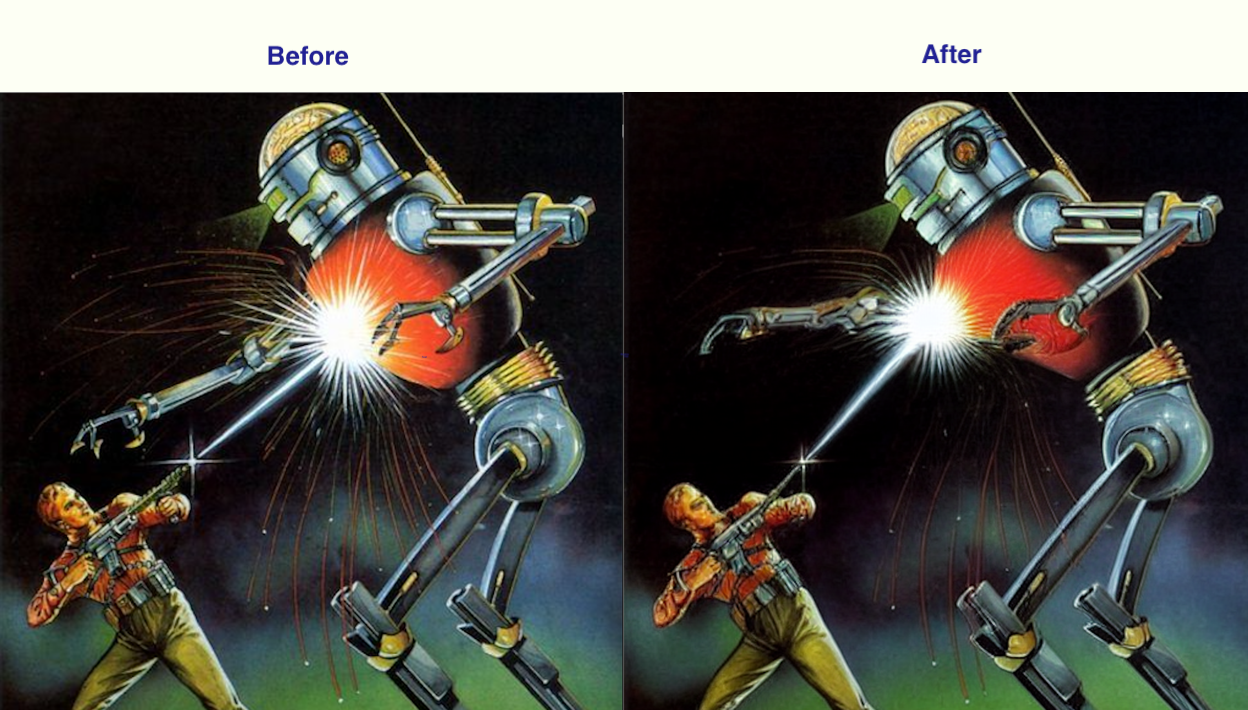
As we can see, this did a pretty decent job from a qualitative perspective. The arm and laser were both moved up and to the left. The explosion itself also seems to have adjusted the shape of the chassis, so it looks a bit warped in the abdomen. It is worth noting some of the editing problems that did crop up. Most of the sparks did not make it into the final output, and the left claw has lost one of its fingers to the red glow of the explosion. That whole area appears to have significant artifacts. This is likely because there is nothing about the described features there in the prompt.
Conclusion
In this article, we looked at the DragDiffusion project in detail and showed how to implement it in a Gradient Notebook. Be sure to try out the demo as outlined above, and then extend the lessons within to edit our own photos. This is an extremely versatile process with a relatively low learning curve, so we look forward to the work our users can do, and the additions they can make to their graphic design workflows with Stable Diffusion and DragDiffusion.