Preface
In this tutorial you will be learning how to integrate Arize into a Gradient Deployment for robust ML model observability. The code that will be used in this tutorial can be found in this GitHub repository.
The perspective of this tutorial is from a Telecommunications company that has customer data (e.g. tenure, billing history, etc.) and wants to prevent customer churn. This Telco company wants to create a model to determine if a customer is likely to churn, and, if so, take actions (e.g. reach out to the customer with a sale) to prevent that from happening. Once the model is created, the company wants to deploy the model and monitor model performance by tracking how the data is changing over time and better visualizing their data.
We will accomplish the above build in 5 main steps:
- Building the Classification Model
- Integrating the Arize API and Logging Data
- Configuring the Arize Model Baseline
- Creating a Gradient Deployment of the Model
- Logging Incoming Requests to Arize
Let's begin!
Tutorial Steps
Model Build
The first thing we need for this exercise is a classification model to predict churn. In the GitHub repo linked above, there is a file named churn_model.ipynb that contains the model build process. In this Python notebook there are data import steps, data preprocessing steps, and model training steps. At the end of this model training process, the XGBoost Classification model is saved as a .json file named xgb_cl_model.json.
The data used in this notebook is from Kaggle and can be found here.
You can see the model training and saving process from the notebook below
import xgboost as xgb
from sklearn.metrics import accuracy_score

# Create and train a XGBoost Classifier
xgb_cl = xgb.XGBClassifier(use_label_encoder=False)
xgb_cl.fit(X_train, y_train)

# Predict on test set
preds = xgb_cl.predict(X_test)
print(accuracy_score(y_test, preds))

# Save model as .json file
xgb_cl.save_model('xgb_cl_model.json')
Bring this project to life
Arize API
Now that we've trained and saved our model, let's log the training data for this model to Arize so we can use it as a baseline. Once the baseline is set, any future real-time predictions that will come through to our model on Arize will be compared to the baseline dataset to monitor for any drift in the data or predictions.
The first thing we will need to do is create an Arize account. Arize does have a free tier which you can use for the purposes of this tutorial.
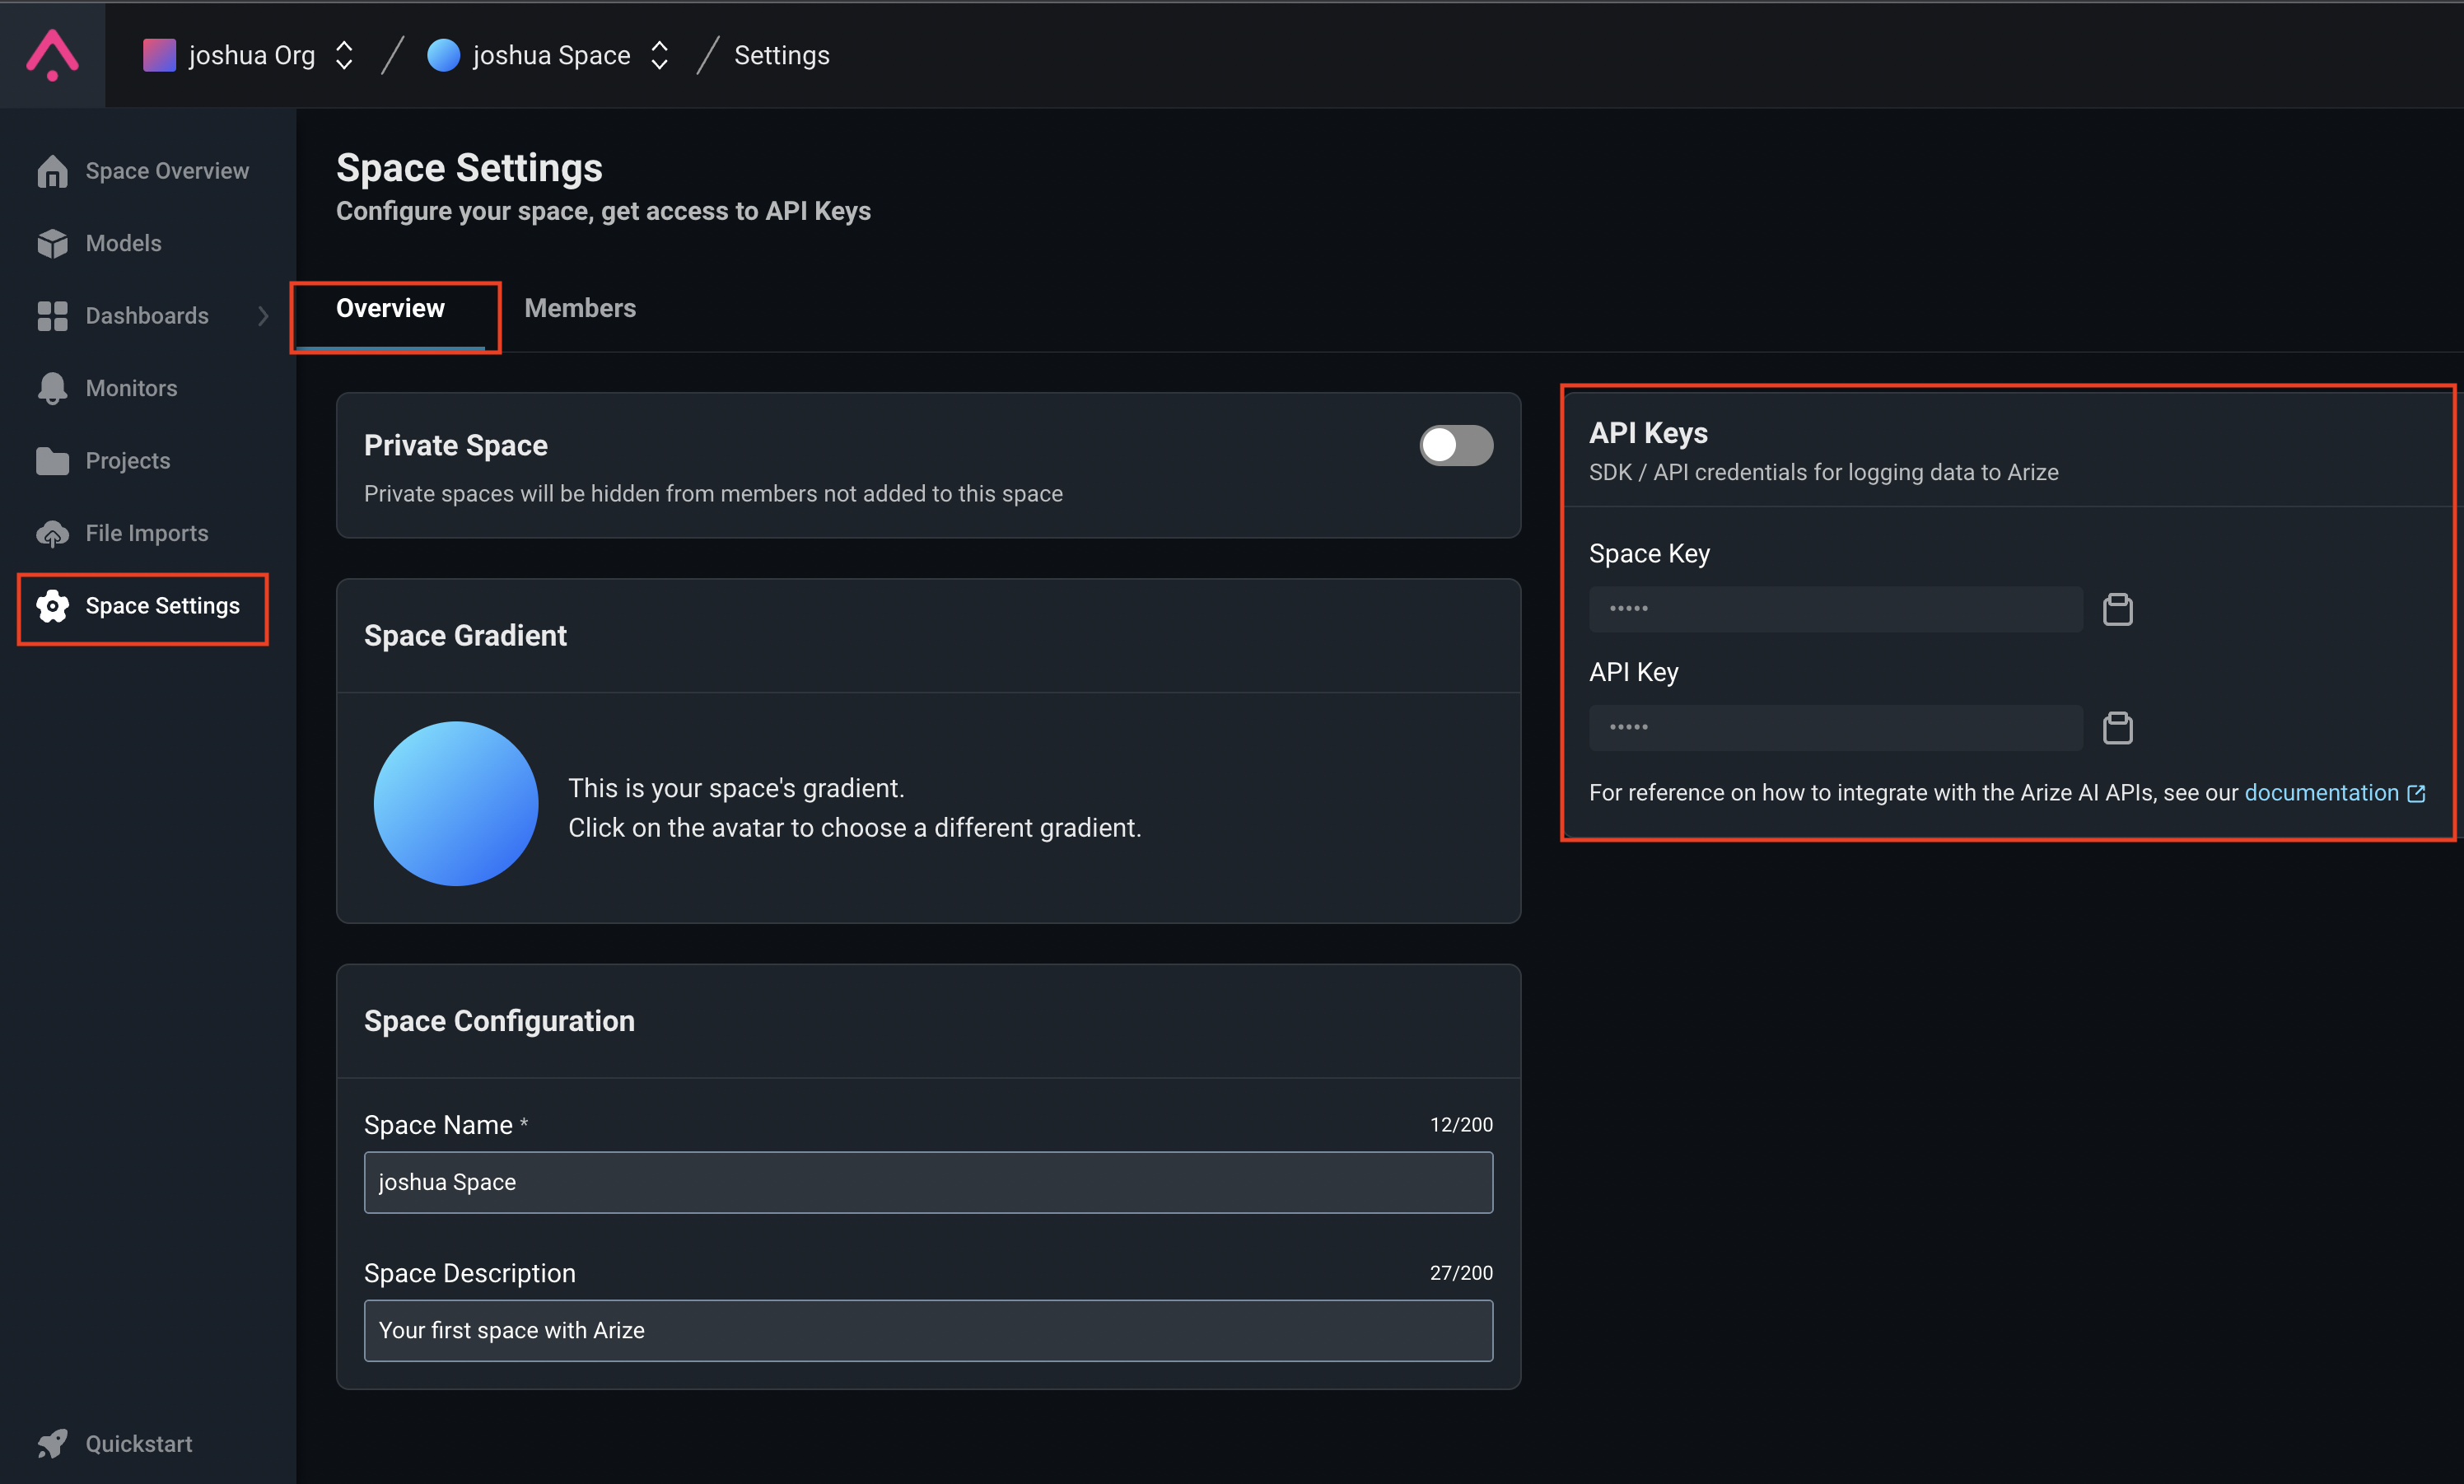
The first step will be to go to the Arize website, click on Get Started and follow the prompts to create your account. Once you have created your account, you will need your your Space Key and API Key to make a connection to Arize from your Python code.
You can find both of these keys in your Arize project by clicking on Space Setting finding them on the right hand side of the page in the Overview tab.
Once you have the two keys from above, you can insert them into the churn_model.ipynb file like below.
from arize.pandas.logger import Client, Schema
from arize.utils.types import Environments, ModelTypes

SPACE_KEY = "YOUR-SPACE-KEY"
API_KEY = "YOUR-API-KEY"

arize_client = Client(space_key=SPACE_KEY, api_key=API_KEY)

model_id = (
    "telco-churn-demo-model"  # This is the model name that will show up in Arize
)
model_version = "v1.0"  # Version of model - can be any string

if SPACE_KEY == "YOUR-SPACE-KEY" or API_KEY == "YOUR-API-KEY":
    raise ValueError("❌ NEED TO CHANGE SPACE AND/OR API_KEY")
else:
    print("✅ Arize setup complete!")
Once the cell above is populated with your keys, you can run the rest of the Python notebook which will load the training data into your Arize model using the code below.
# Define a Schema() object for Arize to pick up data from the correct columns for logging
training_schema = Schema(
prediction_id_column_name="customerID",
prediction_label_column_name="Predicted_Churn",
actual_label_column_name="Churn",
feature_column_names=feature_cols,
)
# Logging Training DataFrame
training_response = arize_client.log(
dataframe=combined_train_df,
model_id=model_id,
model_version=model_version,
model_type=ModelTypes.SCORE_CATEGORICAL,
environment=Environments.TRAINING,
schema=training_schema,
)
# If successful, the server will return a status_code of 200
if training_response.status_code != 200:
print(
f"logging failed with response code {training_response.status_code}, {training_response.text}"
)
else:
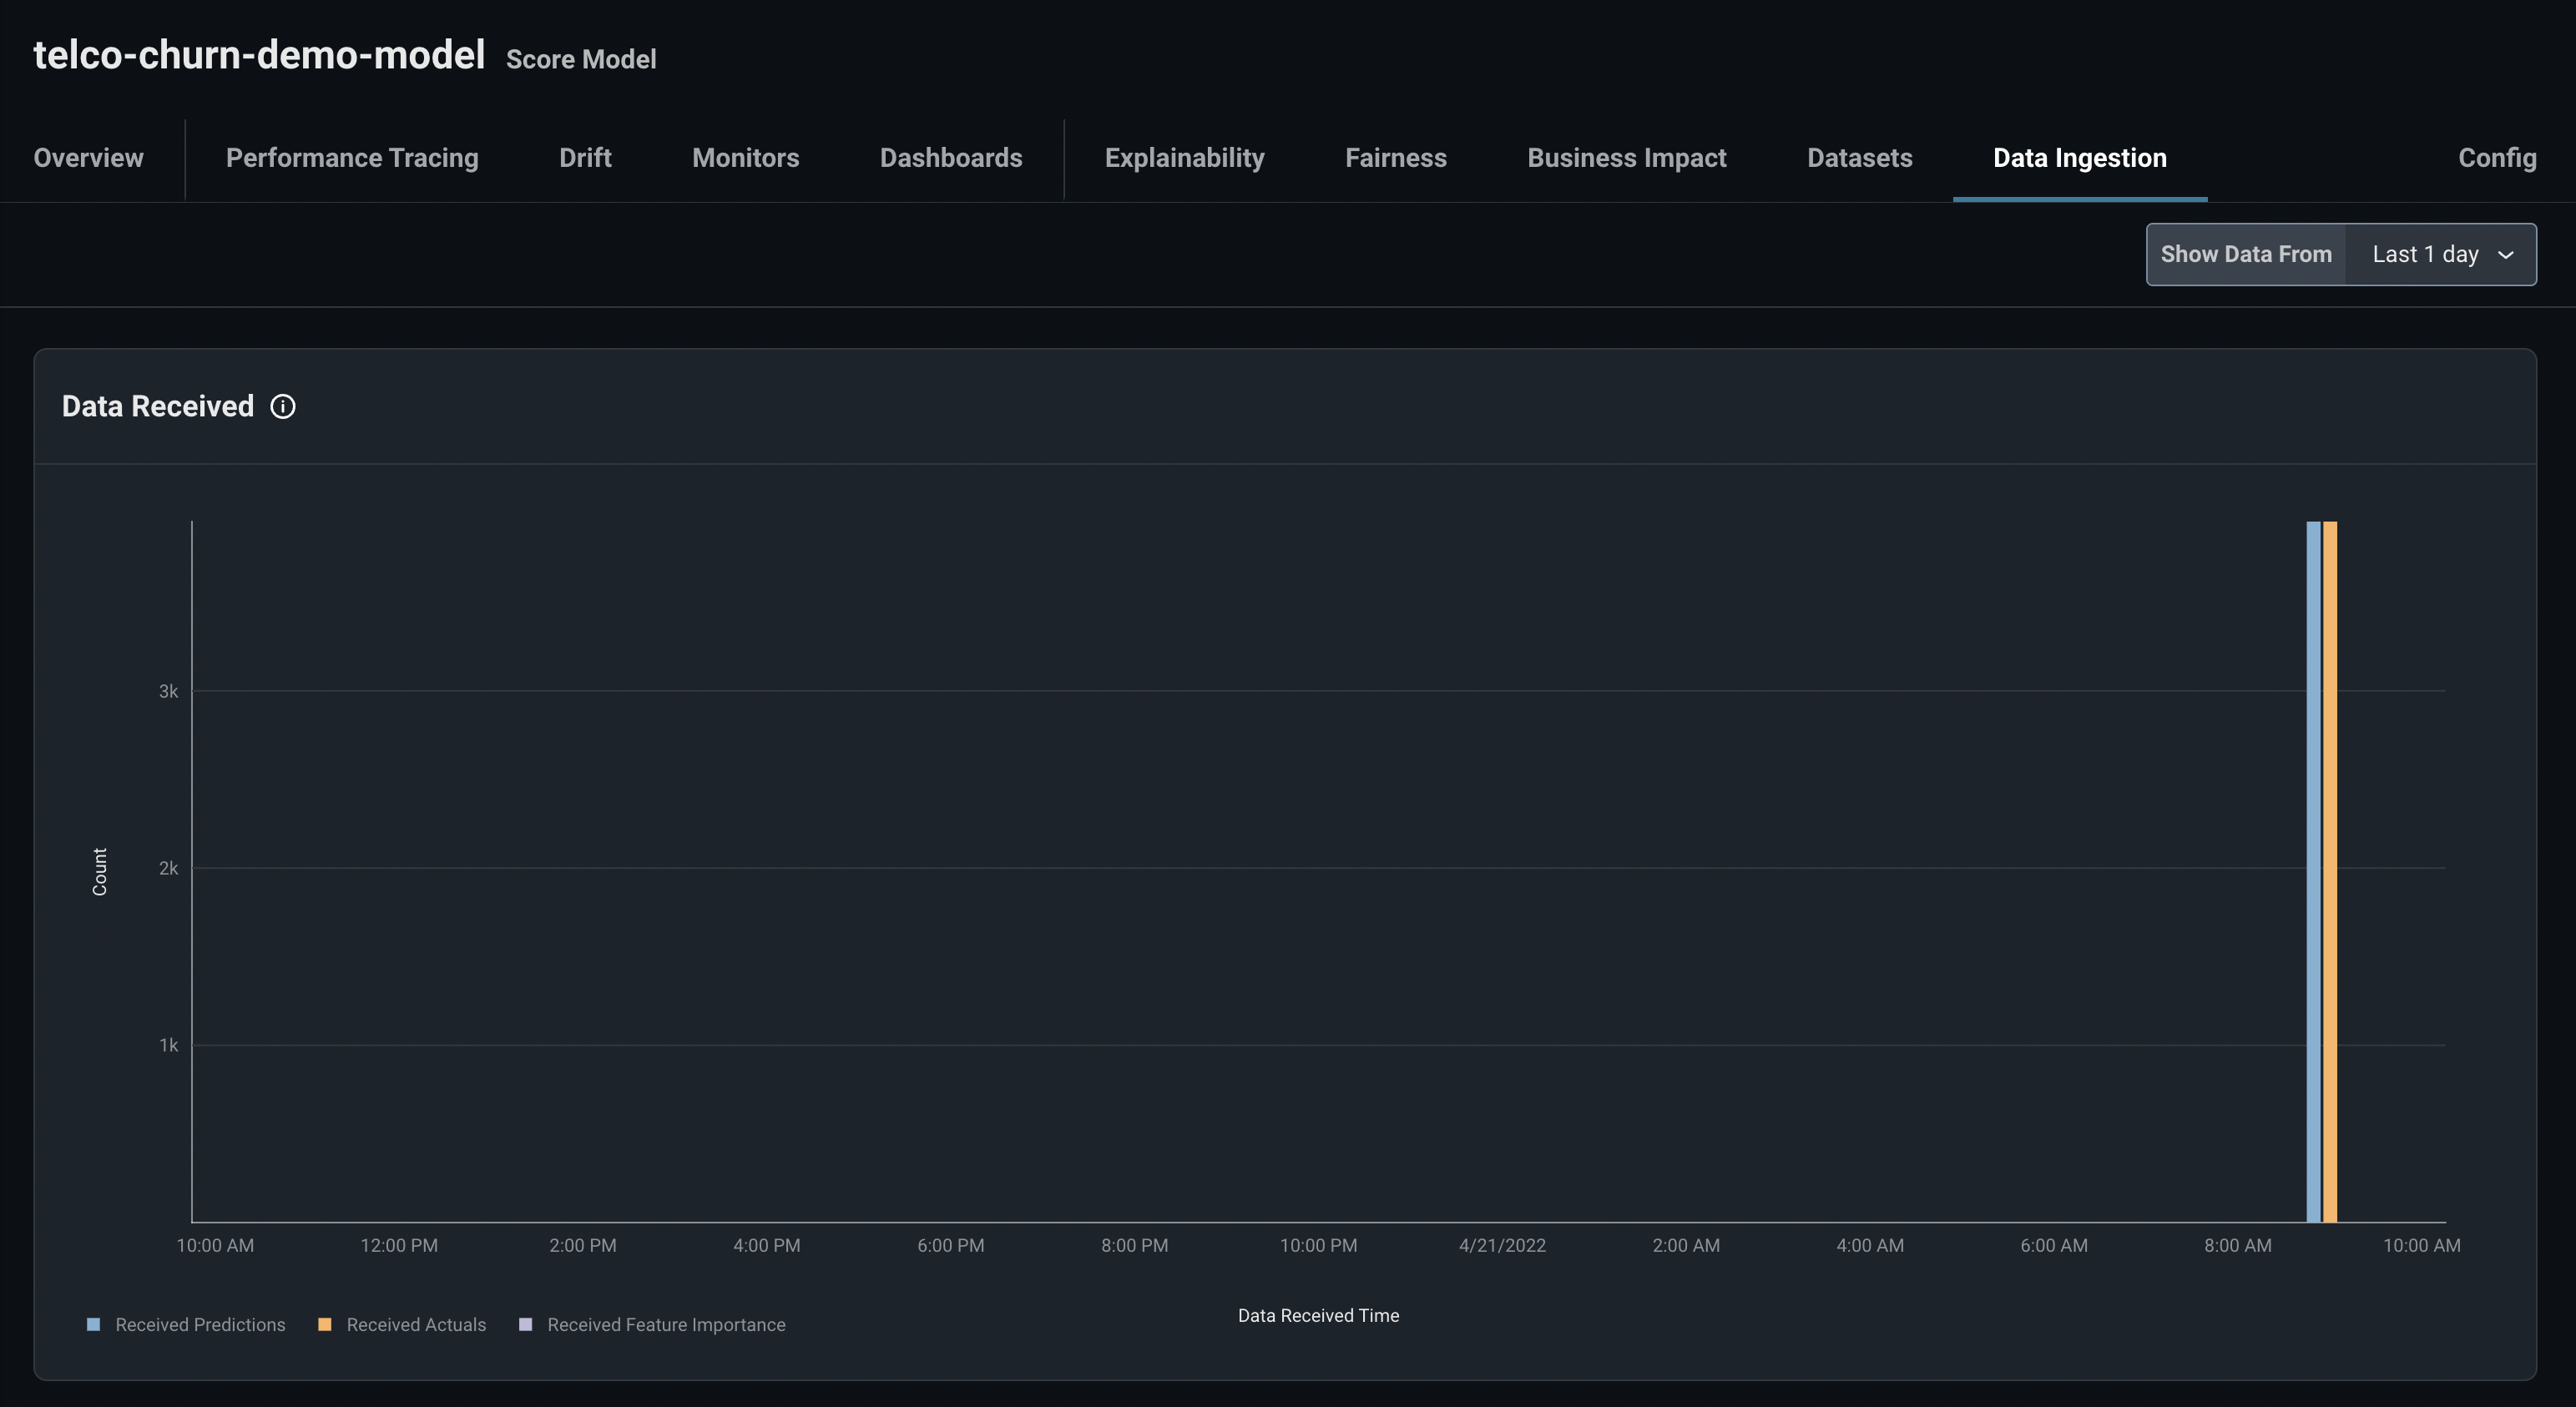
print(f"✅ You have successfully logged training set to Arize")Once you've run the above code cell successfully, head back into your Arize account, click Spaces Overview, and click into the telco-churn-demo-model. Once in your Arize model, navigate to the Data Ingestion tab and you will see the training data being ingested and processed by Arize.
This process can take up to 10 minutes. Once this process is complete, continue to the Configure Data Baseline step in the tutorial.
Configure Data Baseline
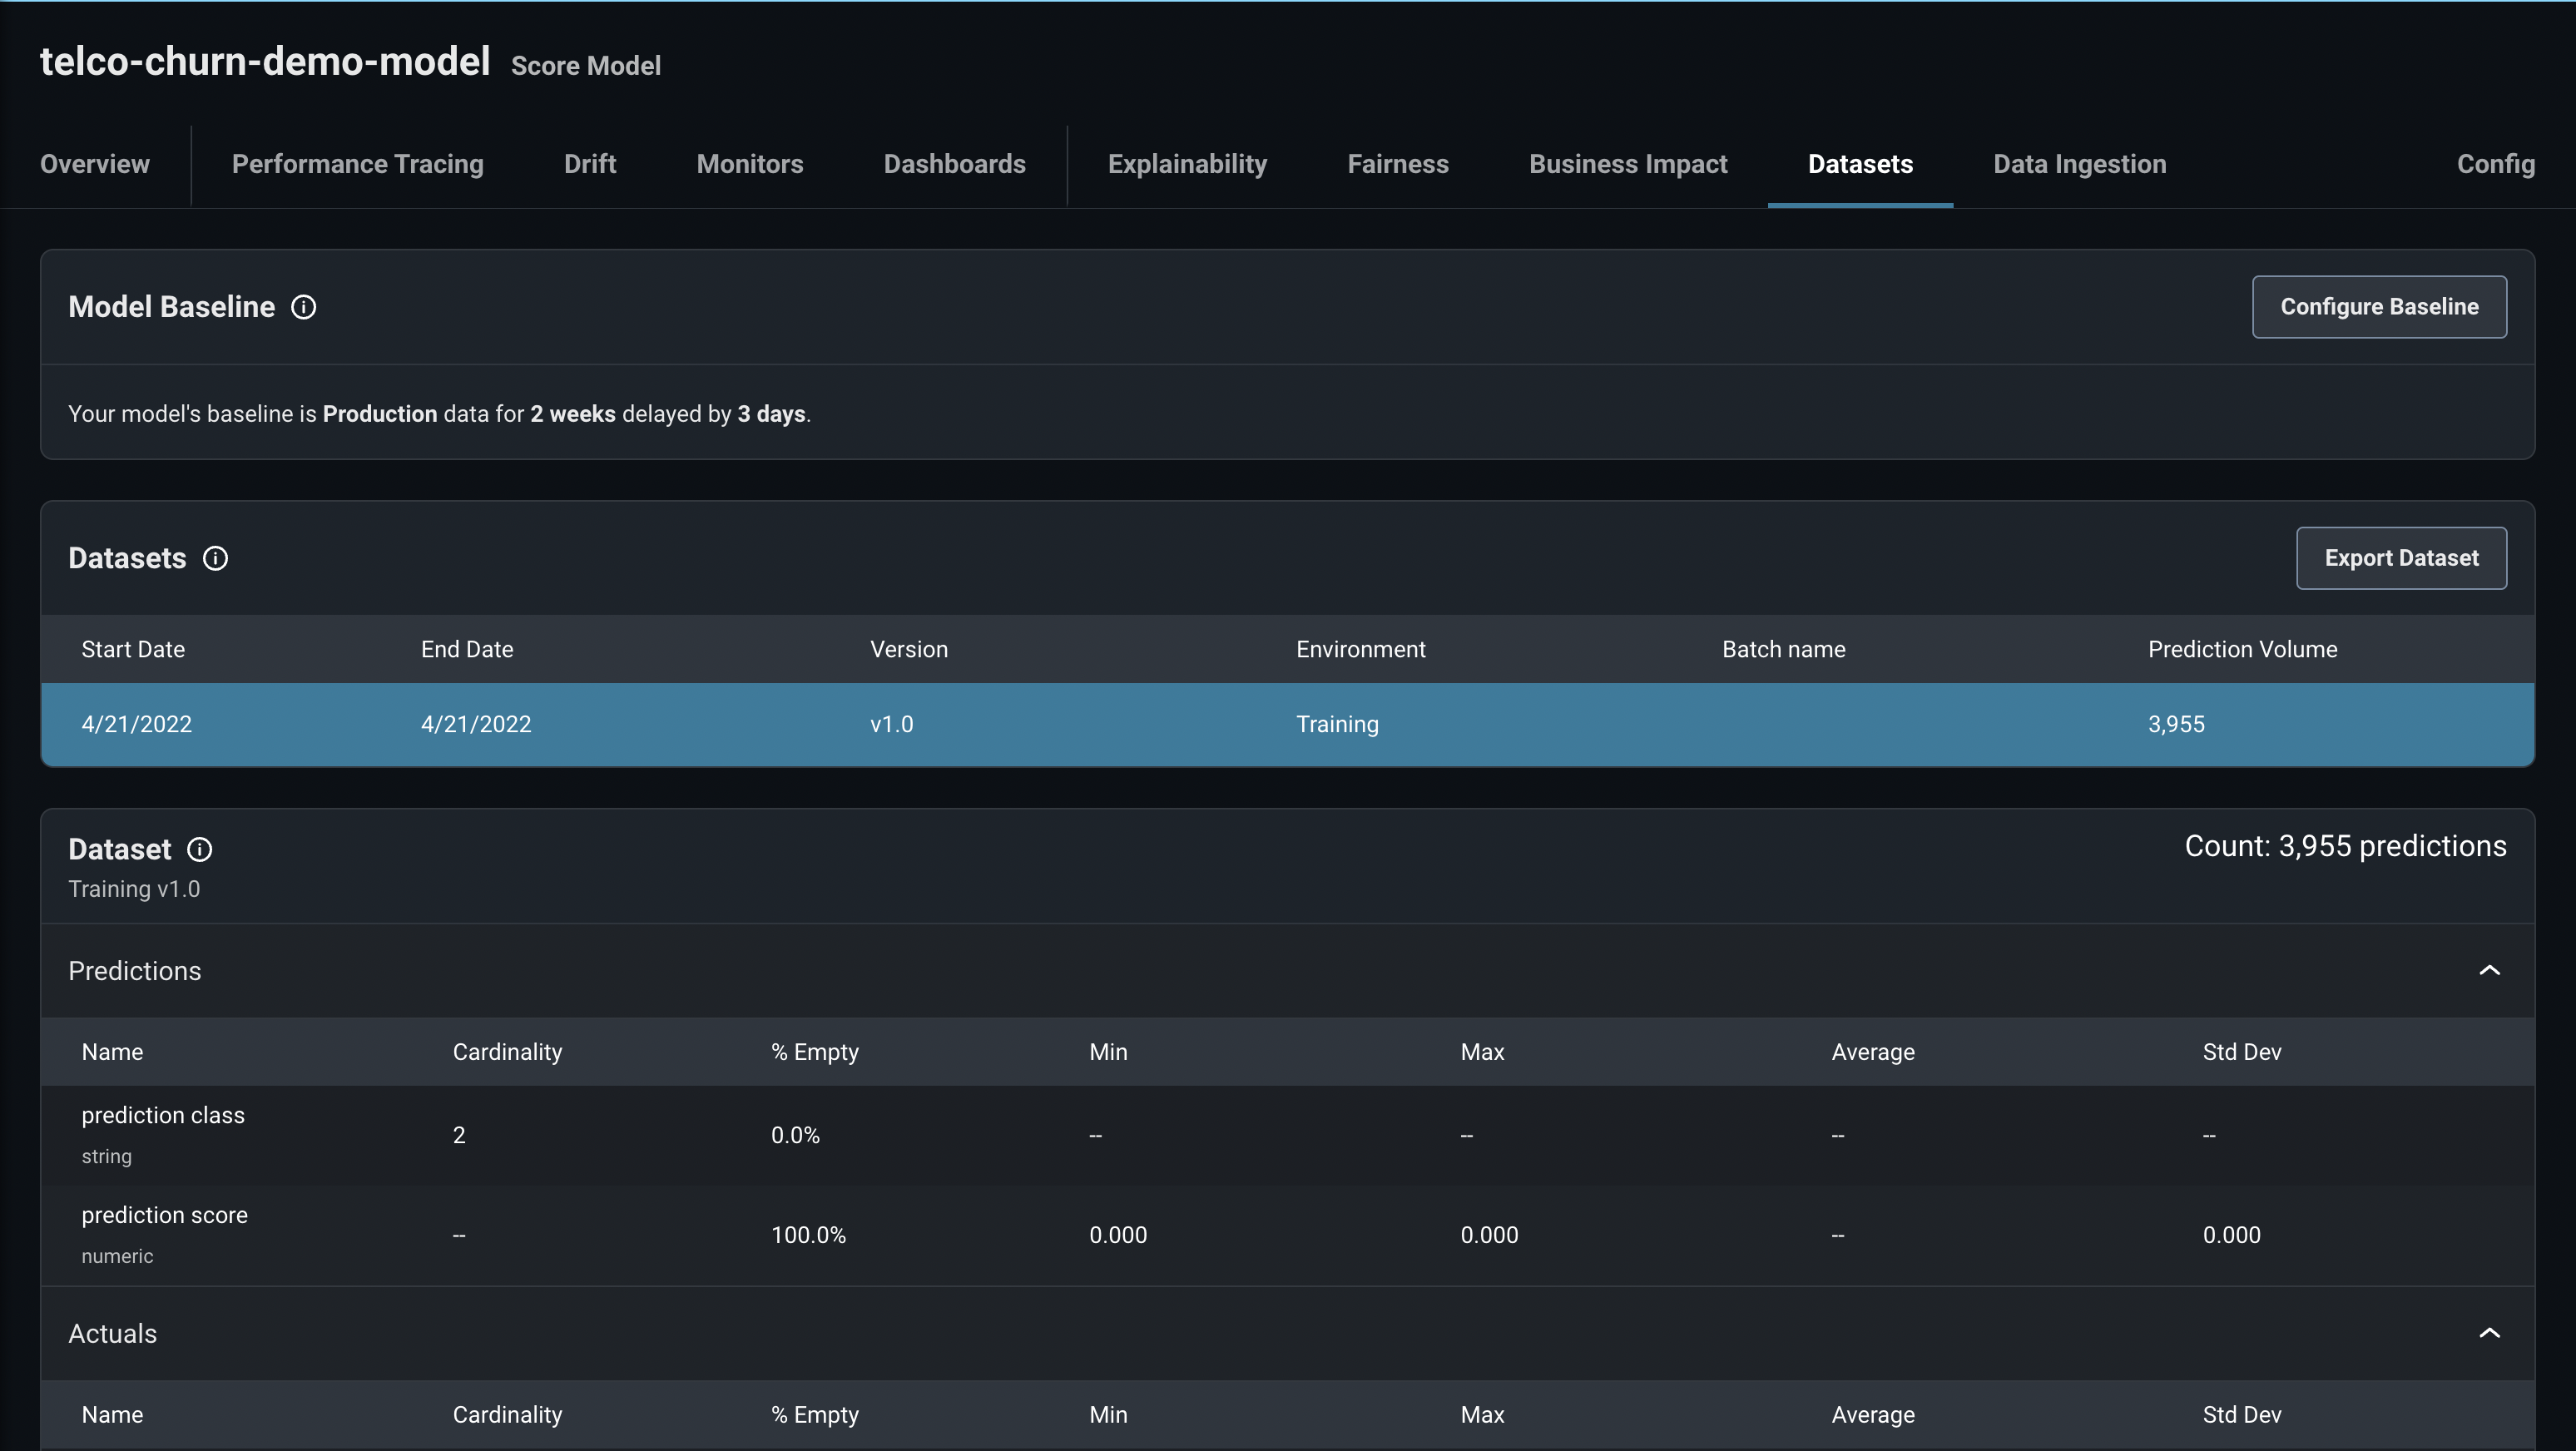
To tell if the data ingestion has completed, on the Arize Datasets tab you should see your dataset listed as well as its feature details.
Now, we want we to set our training data as the Arize model baseline data. You can do that by clicking the Configure Baseline button in the Datasets tab.

Use the following settings to go through the Configure Baseline process:
- Set up a baseline: Pre-Production
- Set up a pre-production baseline: Training Version v1.0
Once this baseline is set, any future requests that come into your model will be compared to the baseline so we can monitor data and prediction drift.
Creating a Deployment
Now that the baseline data is set, we will create a live deployment of an application that serves our model and is able to accept incoming API calls and log those in Arize for monitoring.
In the GitHub repository, there is a Flask application in the Python file: app.py. This Flask application takes in a json object in the body of the request, processes the data, predicts if the Customer is going to churn, and logs the request data and prediction to Arize.
The one change you will need to make in this app.py file is to insert your Arize Space Key and API Key into lines 71 and 72 of the file. Like in the Python Notebook, this will allow your application to connect to your Arize model.
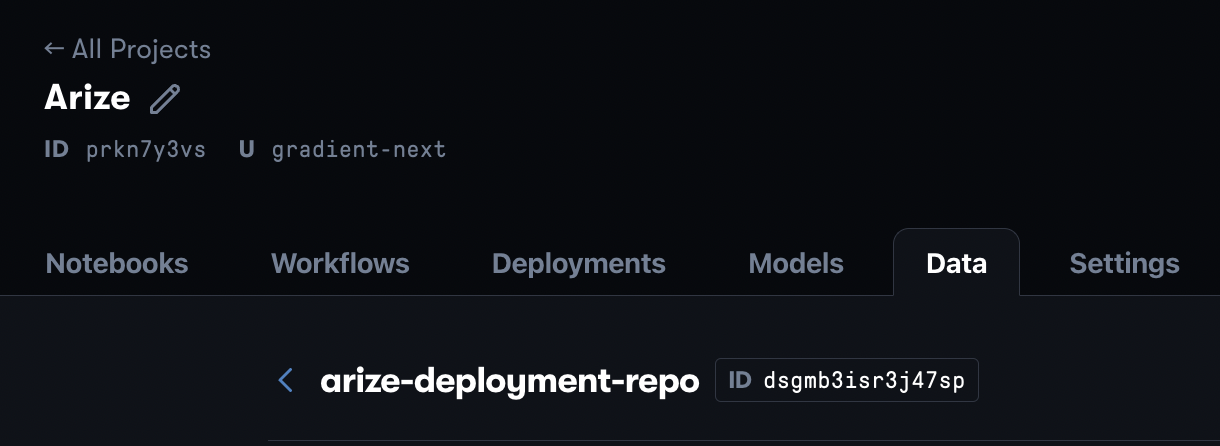
Once the Flask app is written, we need to deploy it in Gradient. The first step will be to create a Gradient dataset. You can do that by navigating to the Data tab in your Gradient project and clicking the Add button. Fill in the form with your desired dataset name (e.g. arize-deployment-repo) and click Create to create your new dataset. Once the dataset is created, take note of the dataset ID (it will be a 15 character string).
After you have created the dataset, we can now deploy our model. In the GitHub repo is a file called deployment.yaml. You can use that as the template deployment specification to build out your Gradient deployment.
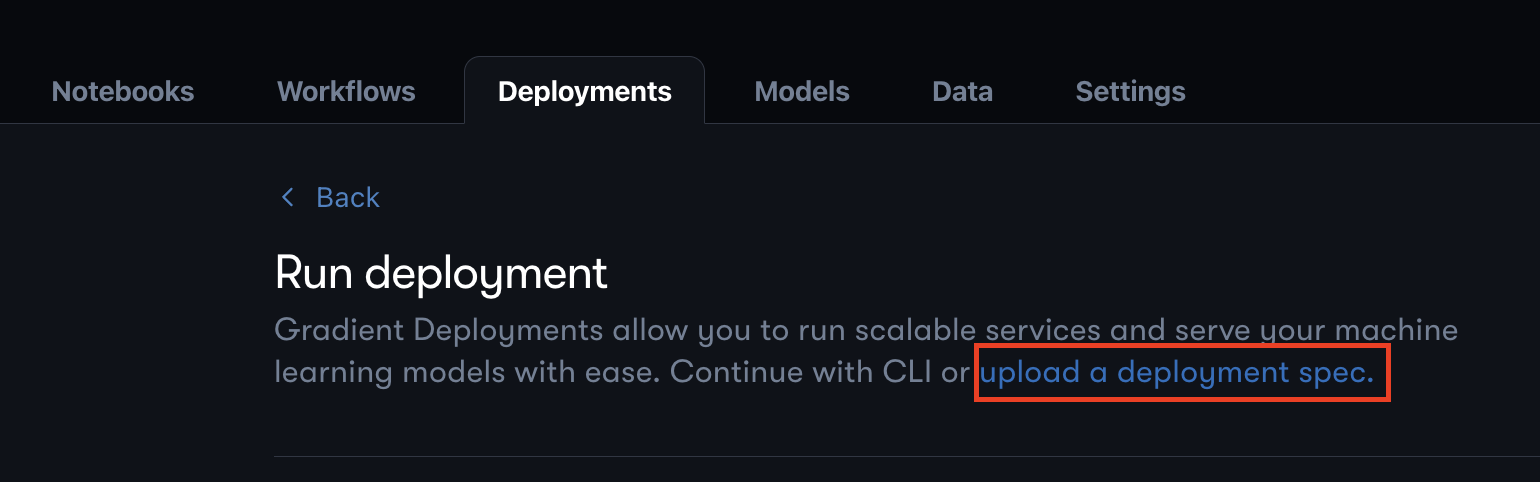
To build out your deployment, navigate to the Deployment tab in your Gradient project and once in that tab, click the Create button, and then click the upload a deployment spec link as shown below.
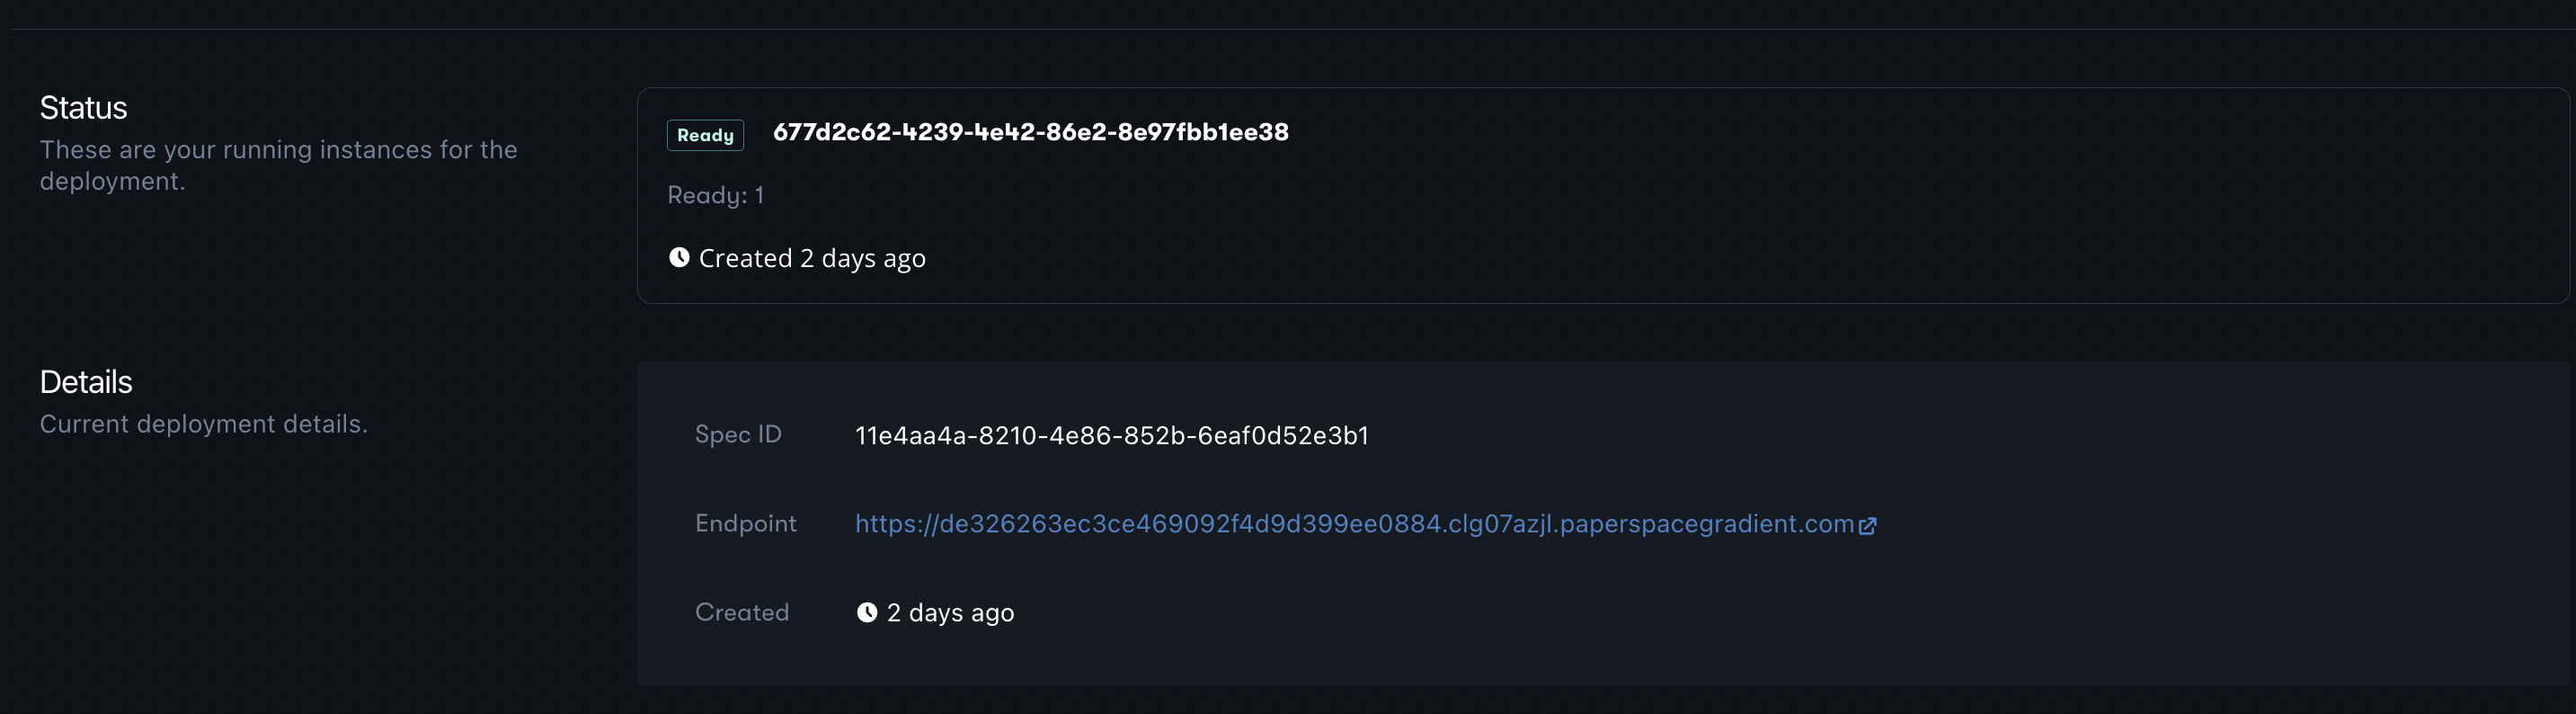
Once in the form, copy the text in deployment.yaml into the text box and replace the dataset ID on line 11 with the ID of the dataset you created above. Once you have pasted that text in as the Deployment spec and named the Deployment, click Create Deployment. Your deployment may take a few minutes to spin up. Once the deployment has spun up successfully, in the Deployments tab, it will show as "Ready".
If you click into your deployment you will see a link that corresponds to the Deployment endpoint as shown below.
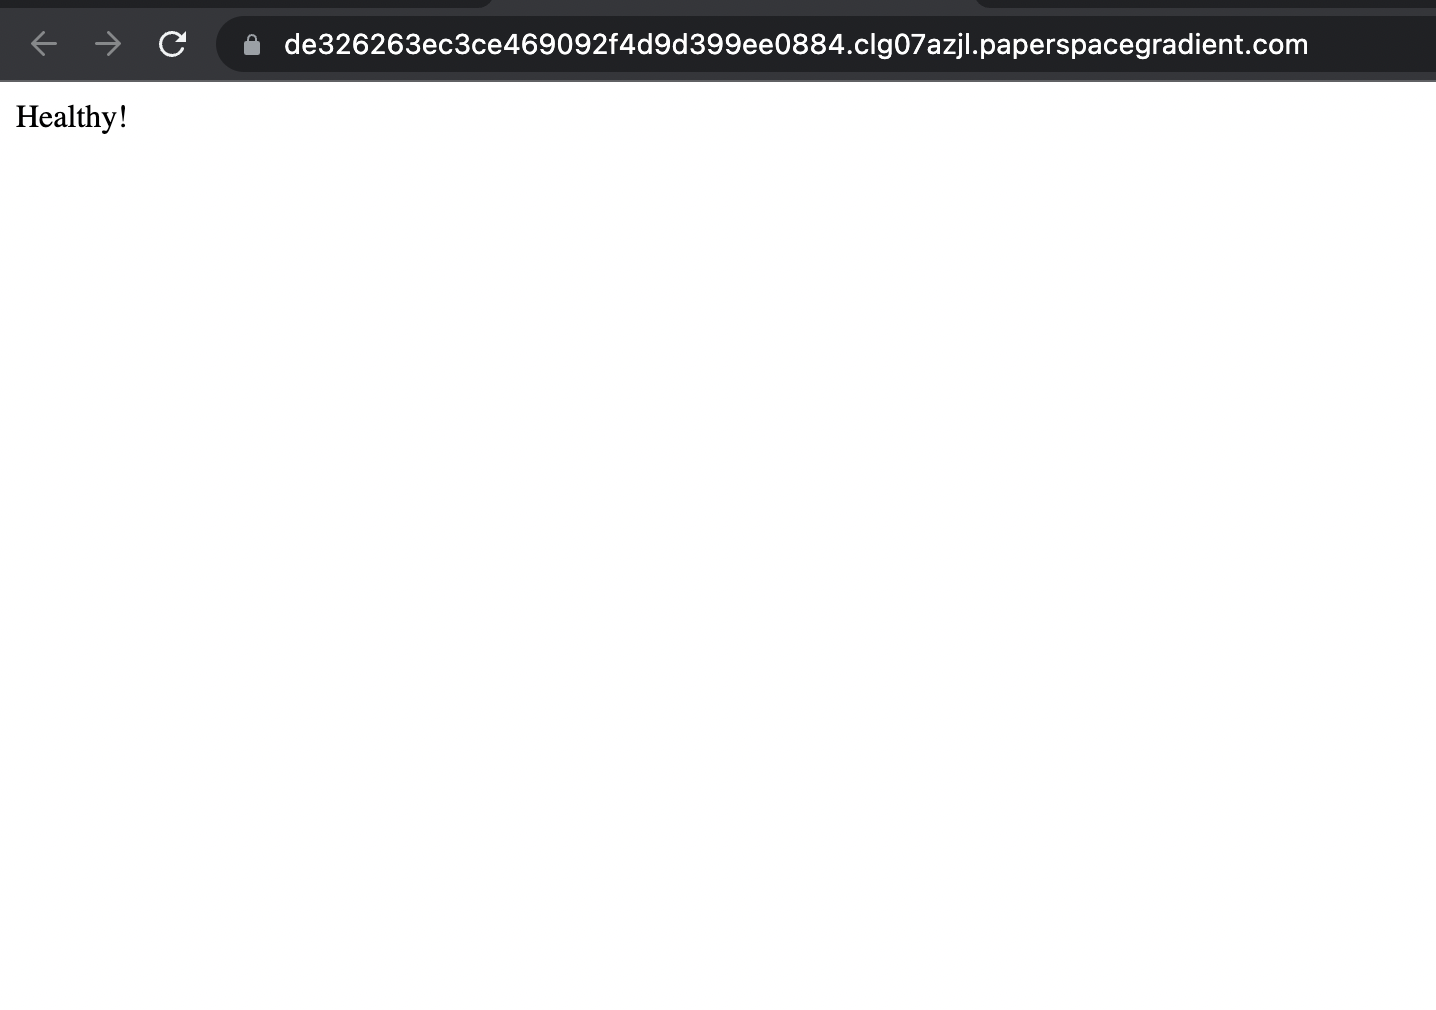
Click on that link to check if you deployment is up and running. If the Deployment is running successfully, you will see a page that states that the Deployment is healthy.
Logging Incoming Requests
Now that your application is live and can take incoming requests, we will send requests to your application's endpoint. When your application receives a request, it will process the data to be fed into the model, make a prediction of whether the customer is expected to churn, and then write that prediction along with the request data to Arize. As incoming calls keep coming, you can monitor for any data drift and view incoming traffic.
There are multiple ways to send API calls to your deployment, but I will use an application called Postman. You can download Postman here, and it's free to use for the purposes of this tutorial.
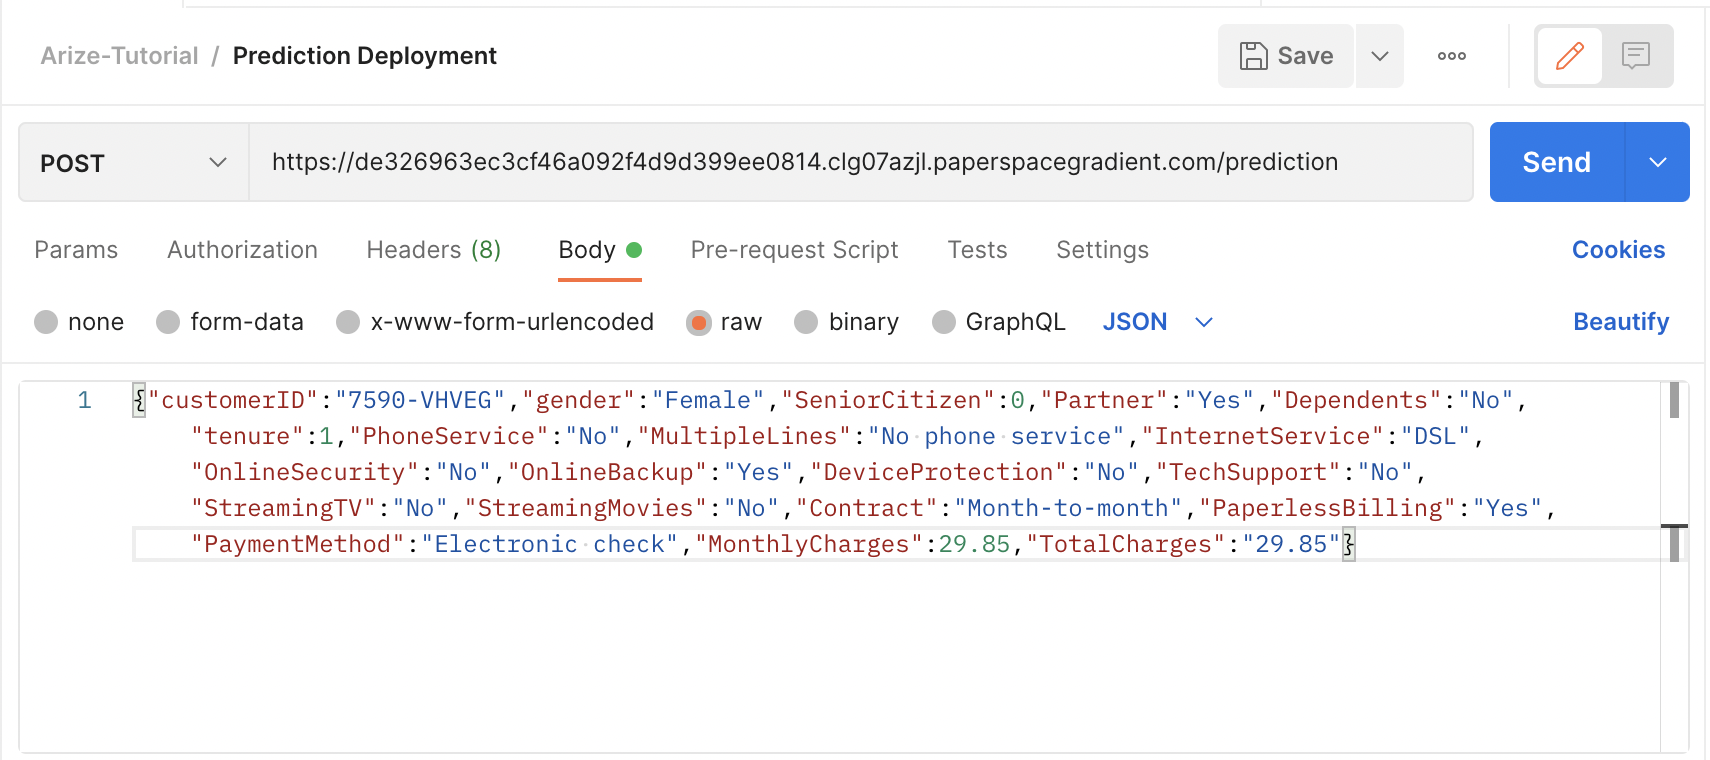
Once installed, you can use Postman to send a Post request to your Deployment endpoint. In Postman, create a New HTTP request by clicking on the New button above the toolbar on the left hand side of the page. Then, change the type of request to POST and in the body of the request, paste in the JSON object below.
{"customerID":"7590-VHVEG","gender":"Female","SeniorCitizen":0,
 "Partner":"Yes","Dependents":"No","tenure":1,"PhoneService":"No",
 "MultipleLines":"No phone service","InternetService":"DSL",
 "OnlineSecurity":"No","OnlineBackup":"Yes","DeviceProtection":"No",
 "TechSupport":"No","StreamingTV":"No","StreamingMovies":"No",
 "Contract":"Month-to-month","PaperlessBilling":"Yes",
 "PaymentMethod":"Electronic check","MonthlyCharges":29.85,
 "TotalCharges":"29.85"}
Lastly, you will paste in your Deployment endpoint into the request URL text box and append "/prediction" to the endpoint. When all that is done, you should have a Postman request that looks like the one below.
Once you have the request setup, you can click Send which will send your request to your Deployment. Once the requests finishes processing, you will be able to see a response at the bottom of your Postman page that will either tell you the model predicted the customer to churn (Churn) or not churn (No Churn).
Now that we've seen the response, let's look at Arize to see if we can see the request being ingested. If you navigate back to your Arize model and look at the Data Ingestion tab, you should see an additional request. This may take a few minutes but if successful, you should see something similar to the image below

Success! Our deployment is working and logging incoming requests and predictions to Arize.
To speed up this process, I am going to share some views below as as if we have logged 1,300 requests over the course of a few days.
First, let's look at the Prediction drift. The below view can be found in the Distribution Comparison chart in the Drift tab.
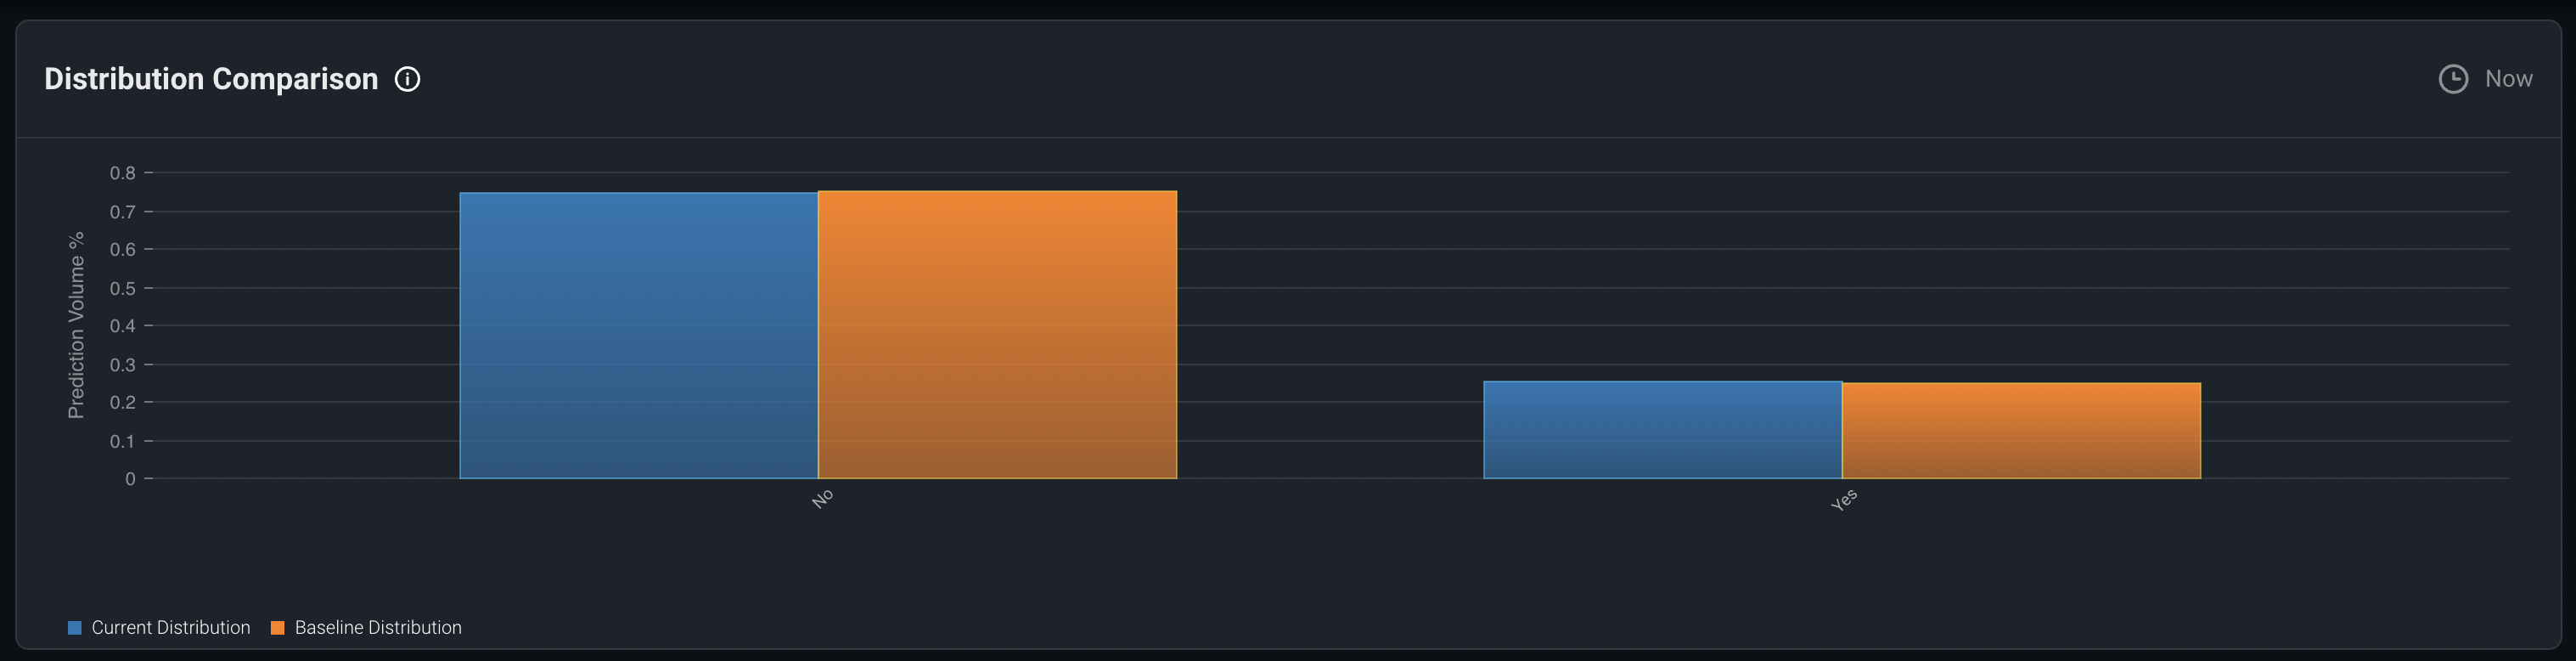
We can see that so far, the prediction distribution is similar to the baseline prediction distribution so no obvious concerns here.
Next, let's look to see if there's been any other data drift in our features.
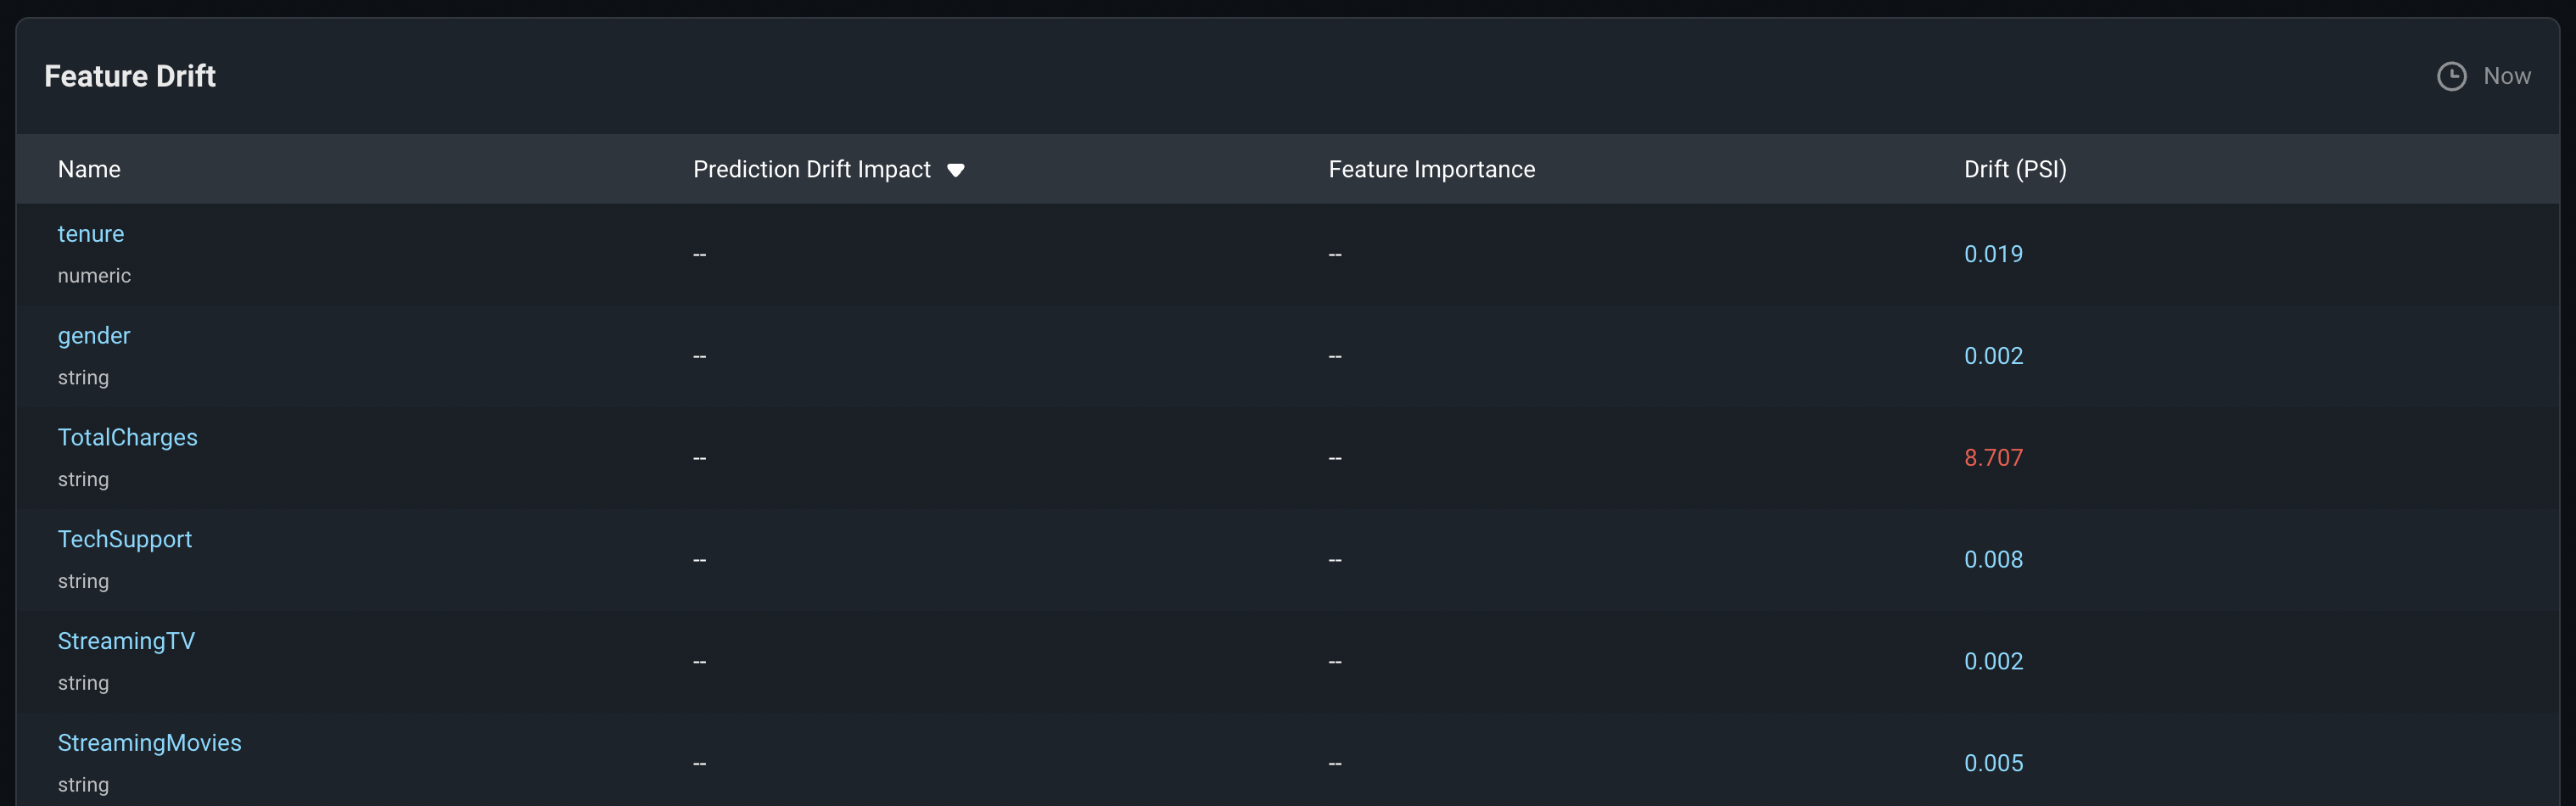
For most of the features there looks like there's only been minor drift expect for TotalCharges which has experienced higher drift. I can investigate TotalCharges by clicking into the feature to bring up a more detailed view.
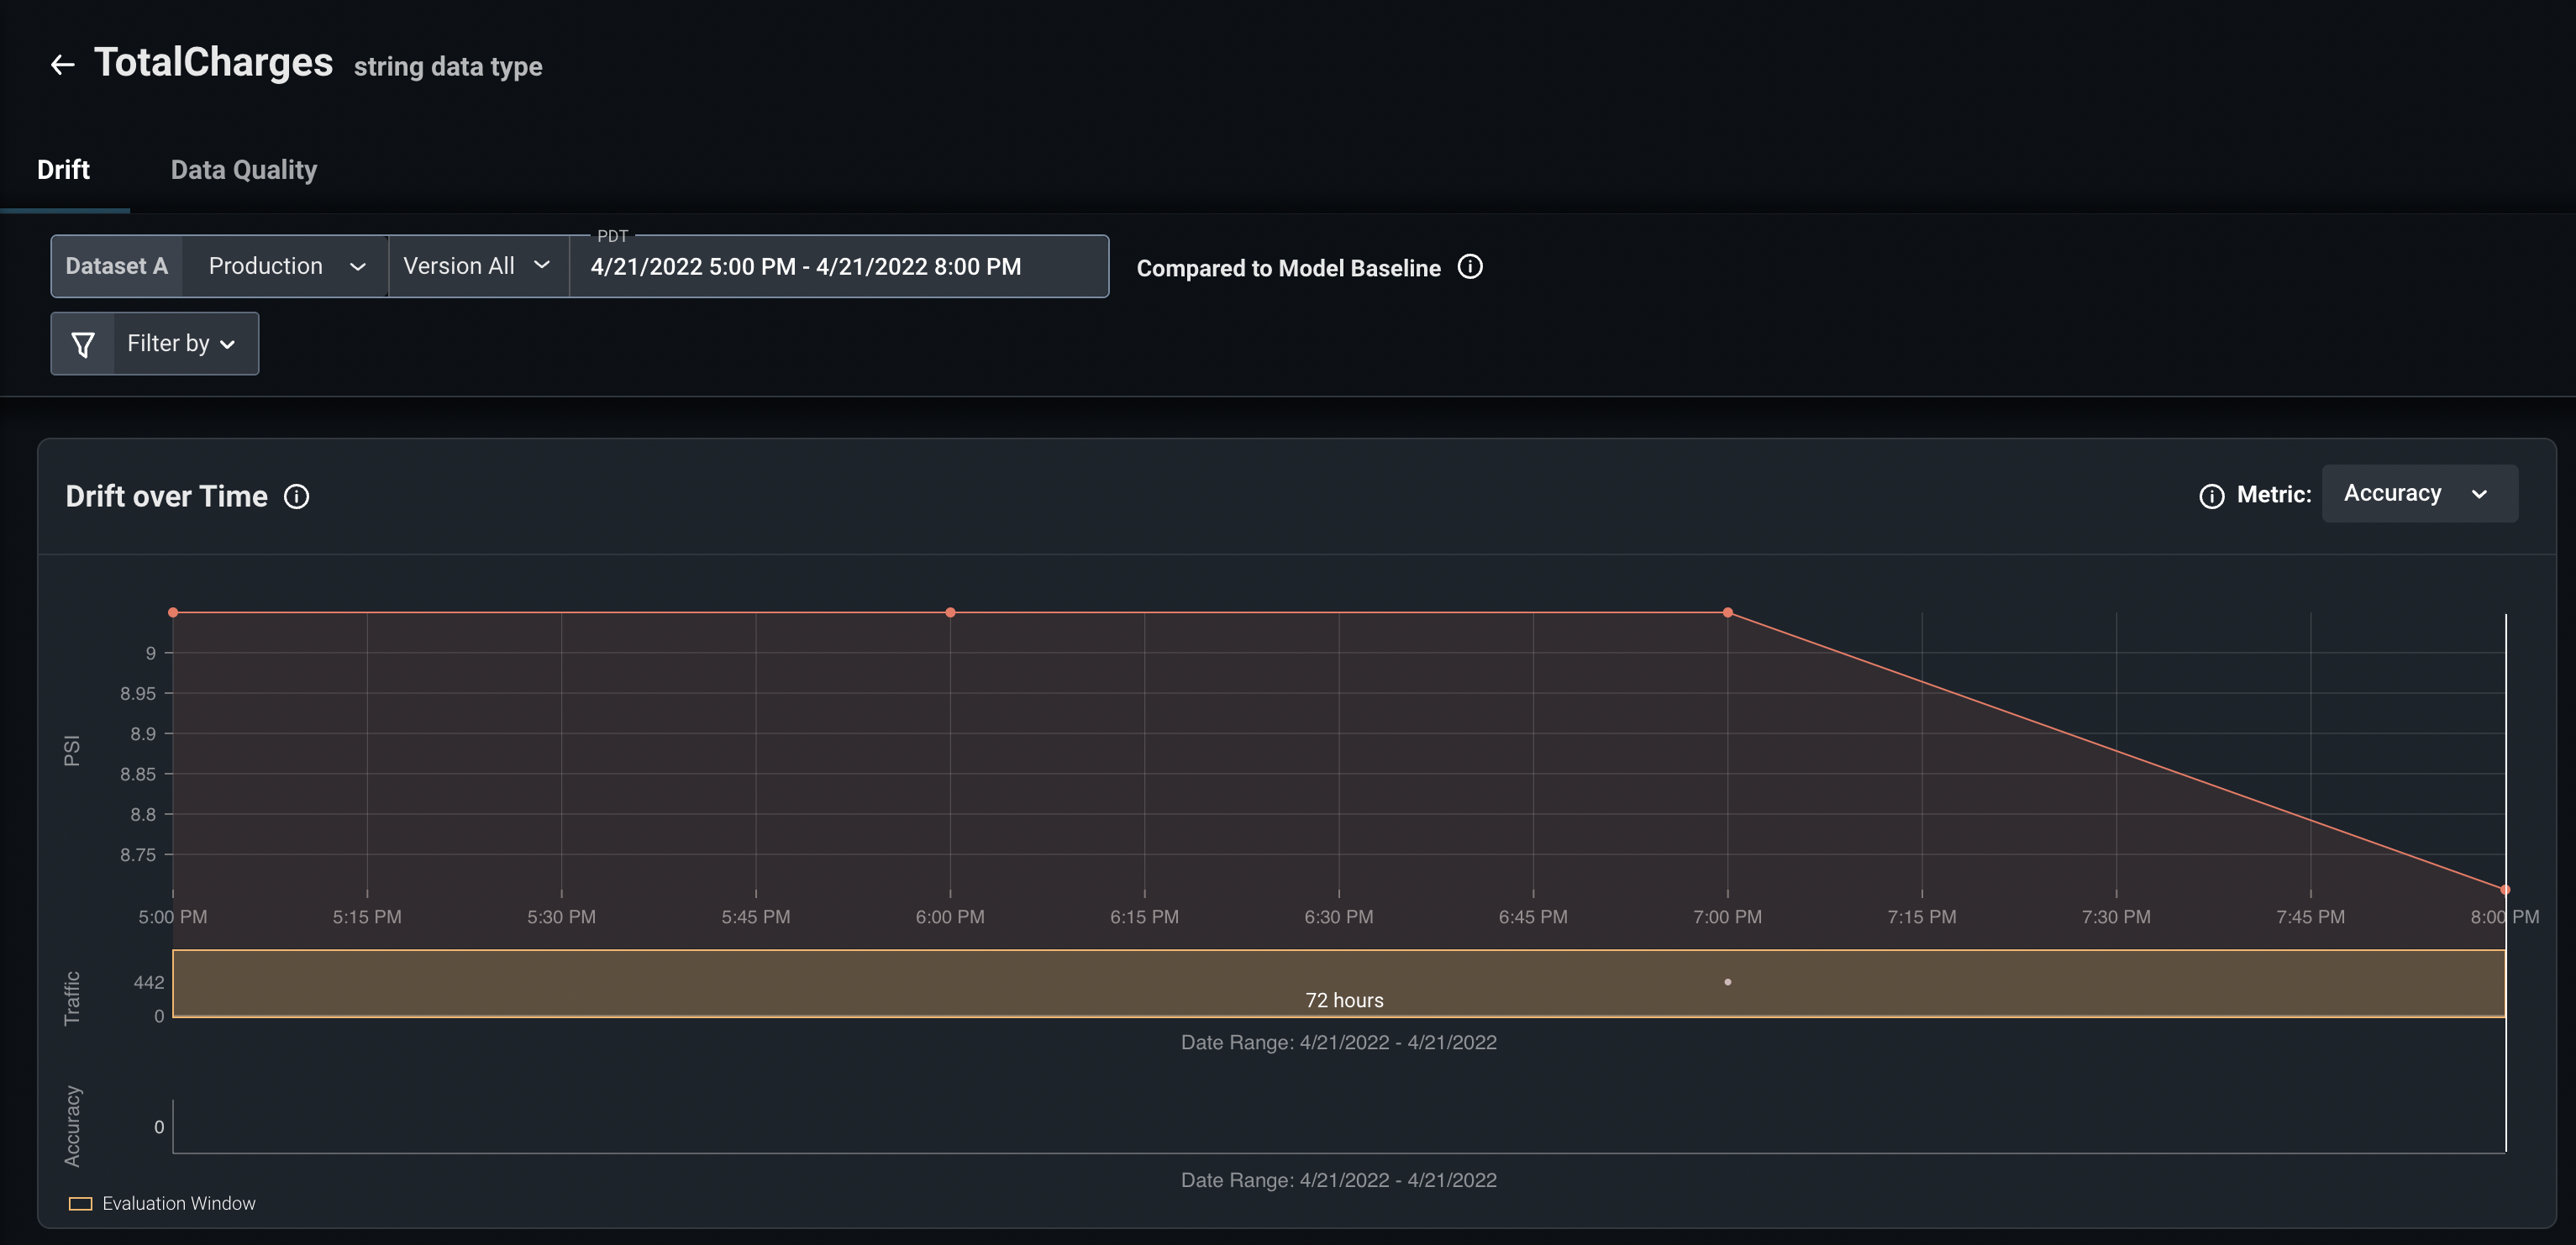
I can see from the above view that the drift for TotalCharges is hovering around 8.7 PSI. We can keep an eye on this feature and monitor the PSI over time to see if we've had an unusual distribution of data in the last 3 hours or if it's a more persistent problem.
That's it for this tutorial! The focus has really been on gaining an understanding of how to integrate Gradient Deployments with Arize, however there are many other other tutorials that will give you a deeper understanding of Arize which I will link to down below.
Next Steps
The process above will allow you to track incoming requests and analyze any data or prediction drift within your Gradient deployed model. However, there are lots of potential next steps you could take to build out the robustness of your ML observability system.
You could create monitors to track metrics and alert you when certain thresholds are crossed. You could also log actuals later in your process when the actual outcomes are known (e.g. did the customer end up churning or not). This will help you track how accurate your model is in any given moment and allow you to see changes over time.
Conclusion
Great! Now you should be able to spin up a Gradient Deployment that serves a model and integrates with Arize to observe your application in production.
Again, the link to the code repository referenced in this tutorial can be found here.
Lastly, if you'd like to see other tutorials using Arize, please see their examples page here.