Convolutional neural networks need no introduction when it comes to image processing using Deep Neural Networks (DNNs). CNNs provide a more realistic way to extract and learn features from an image, while helping reduce the image dimension. But what if we want the opposite?
Suppose you want to perform some image-to-image mapping, like image or instance segmentation, or super-resolution. For the case of semantic segmentation, you'll start with an input image in which each pixel should have a corresponding class label. Now let's assume that you try to solve this problem with a CNN followed by a fully-connected layer (as used in most models for image classification). You will run into several problems:
- A very high number of parameters.
- Lost spatial features of the image.
Suppose the input image is of size 128×128×3 (128-pixel height and width and 3 channels — RGB). Then you pass it through a few layers of CNN and the output shape is 44×64. That means that now we have 1024 neurons in our first hidden layer. Now try to up-sample it by a factor of 32. Even if you put the output layer just after this layer, the size of the output layer will be 32,768.
To handle this issue we use something called Transpose Convolution, a process which can be thought of as doing the opposite of a normal convolution. This is done by maintaining the connectivity pattern.
Bring this project to life
Suppose we are applying the convolution to an image of 5×5×1, with a kernel of 3×3, stride 2×2, and padding VALID.
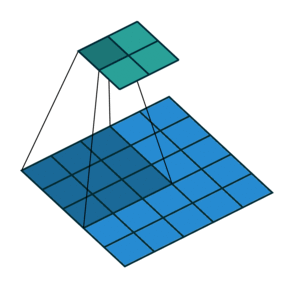
As you can see in the above image, the output will be a 2×2 image. You can calculate the output size of a convolution operation by using the formula below as well:
Convolution Output Size = 1 + (Input Size - Filter size + 2 * Padding) / Stride
Now suppose you want to up-sample this to the same dimension as the input image. You will use the same parameters as for convolution, and will first calculate what was the size of the image before down-sampling. You can get this by changing the above formula from Output Image size to Input Image (in height or width). Valid padding means there is 0 padding around the image. Same padding means we add padding of Filter Size/2 (floor value) on all the sides.
OUTPUT DIMENSIONS:
Transpose Convolution Output Size = (Input Size - 1) * Strides + Filter Size - 2 * Padding + Ouput Padding
So now you have to fill the values in a Matrix of this size. Now comes the tricky part: how will you get the same values as the input? The answer is that you can't. So what will you do to fill this Transposed Convoluted matrix now? Follow the below steps:
- You will take a filter of (Filter size * Filter size), and multiply all the values of the kernel with the first value of the image.
- Then place this filter in the top left corner of the Transposed Conv matrix.
- Take the multiplication of the second pixel and filter and put the result in the Transposed Conv matrix with the specified Stride.
- If there are any values which are overlapping then add those values.
- Repeat this process until the matrix is filled and this is the result.
How can we visualize the results for a better understanding? Let’s take a naive approach to visualize the result. Suppose you have the below 4×4 image as an input.
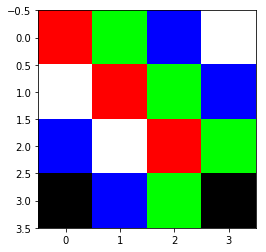
Suppose we got this 4×4 image after a few convolution layers. Now we will apply transpose convolution. For better understanding of the transpose convolution we are assuming that all the values in the filter are a transparent value, which means that it won't change the color when we multiply it. This will help us in understanding the operation in comparison with colors; here we take that adding any color to black will always result in black, and mixing RGB colors in equal quantities will result in white. Now let's try with the below parameters on the above image:
Input: 4x4 | Filter Size: 3x3 | Strides: 4x4 | Padding: 0 | Output Padding: 1
Let’s check what will be the output size after the transposed convolution operation.
Transpose Convolution Output Size =(4-1) * 4 + 3 - 2 * 0 + 1 = 16
So what happened here is that each single-pixel is multiplied by a 3x3 filter and forms a 3x3 block which is then put in output matrix. As we have a stride of 4, values in between will be zero which can be seen as a black stripe in the image. We have added 1 in the output padding which will help in getting even sized output for comparison with the next output.
Input: 4x4 | Filter Size: 4x4 | Strides: 4x4 | Padding: 0 | Output Padding: 0
Let’s check what will be the output size after the transposed convolution operation.
Transpose Convolution Output Size =(4-1) * 4 + 4 - 2 * 0 + 0 = 16
As seen in the result left you can clearly see some more color. This is the result of the addition on overlapping cells. The first 4x4 cells will be filled with red color(255,0,0) and the next 4x4 cells will be filled with green color (0,255,0) and the resulting cell is (255,255,0) i.e. yellow. The same goes for the other cells as well. You can see that overlapping cells have different colors. While the cells which overlap with white will always be white(because all the values greater than 255 are normalized to 255 which is white), the cells which overlap with black will expand(because black is 0 and adding any value will be same).
To add the transpose convolution layer into your Keras model you can use tf.keras.layers.Conv2DTranspose layer. As part of your sequential model.
tf.keras.layers.Conv2DTranspose(
filters_depth, filter_size, strides=(1, 1), padding='valid', output_padding=0)
Transpose convolution is used in many state of the art CNNs. Neural networks doing image to image translation or generation, uses transpose convolution.
Now we know how to use transpose convolution to up-samples an image. When you are training a neural network we need to figure out the values in filters of transpose convolution layers, same as in CNN. That's where our friend backpropagation comes to help.
I hope you enjoyed the post.