

Bring this project to life
This article will explore the llama factory, released on 21 March 2024, and learn how to fine-tune Llama 3 using the Paperspace platform. For our task, we will use the NVIDIA A4000 GPU, considered one of the most powerful single-slot GPUs, enabling seamless integration into various workstation setups.
Utilizing the NVIDIA Ampere architecture, the RTX A4000 integrates 48 second-generation RT Cores, 192 third-generation Tensor Cores, and 6,144 CUDA cores alongside 16GB of graphics memory with error-correction code (ECC); this ensures precise and reliable computing for innovative projects.
Until recently, fine-tuning a large language model was a complex task mainly reserved for machine learning and A.I. experts. However, this notion is changing rapidly with the ever-evolving field of artificial intelligence. New tools like Llama Factory are emerging, making the fine-tuning process more accessible and efficient. In addition, one can now use techniques such as DPO, ORPO, PPO, and SFT for fine-tuning and model optimization. Furthermore, you can now efficiently train and fine-tune models such as Llama, Mistral, Falcon, and more.
What is model fine-tuning?
Fine-tuning a model involves adjusting the parameters of a pre-trained or base model that can be used for a specific task or dataset, enhancing its performance and accuracy. This process involves providing the model with new data and modifying its weights, biases, and certain parameters to minimize loss and cost. By doing so, this new model can perform well on any new task or dataset without starting from scratch, helping to save time and resources.
Typically, when a new large language model (LLM) is created, it undergoes training on a large corpus of textual data, which may include potentially harmful or toxic content. Following the pre-training or initial training phase, the model is fine-tuned with safety measures, ensuring it avoids generating harmful or toxic responses. However, this approach could be better. Nonetheless, the concept of fine-tuning addresses the need to adapt models to specific requirements.
Why use LLama-Factory?
Enter the Llama Factory, a tool that facilitates the efficient and cost-effective fine-tuning of over 100 models. Llama Factory streamlines the process of fine-tuning models, making it accessible and user-friendly. It also has a hugging face space provided by Hiyouga that can be used to fine-tune the model.
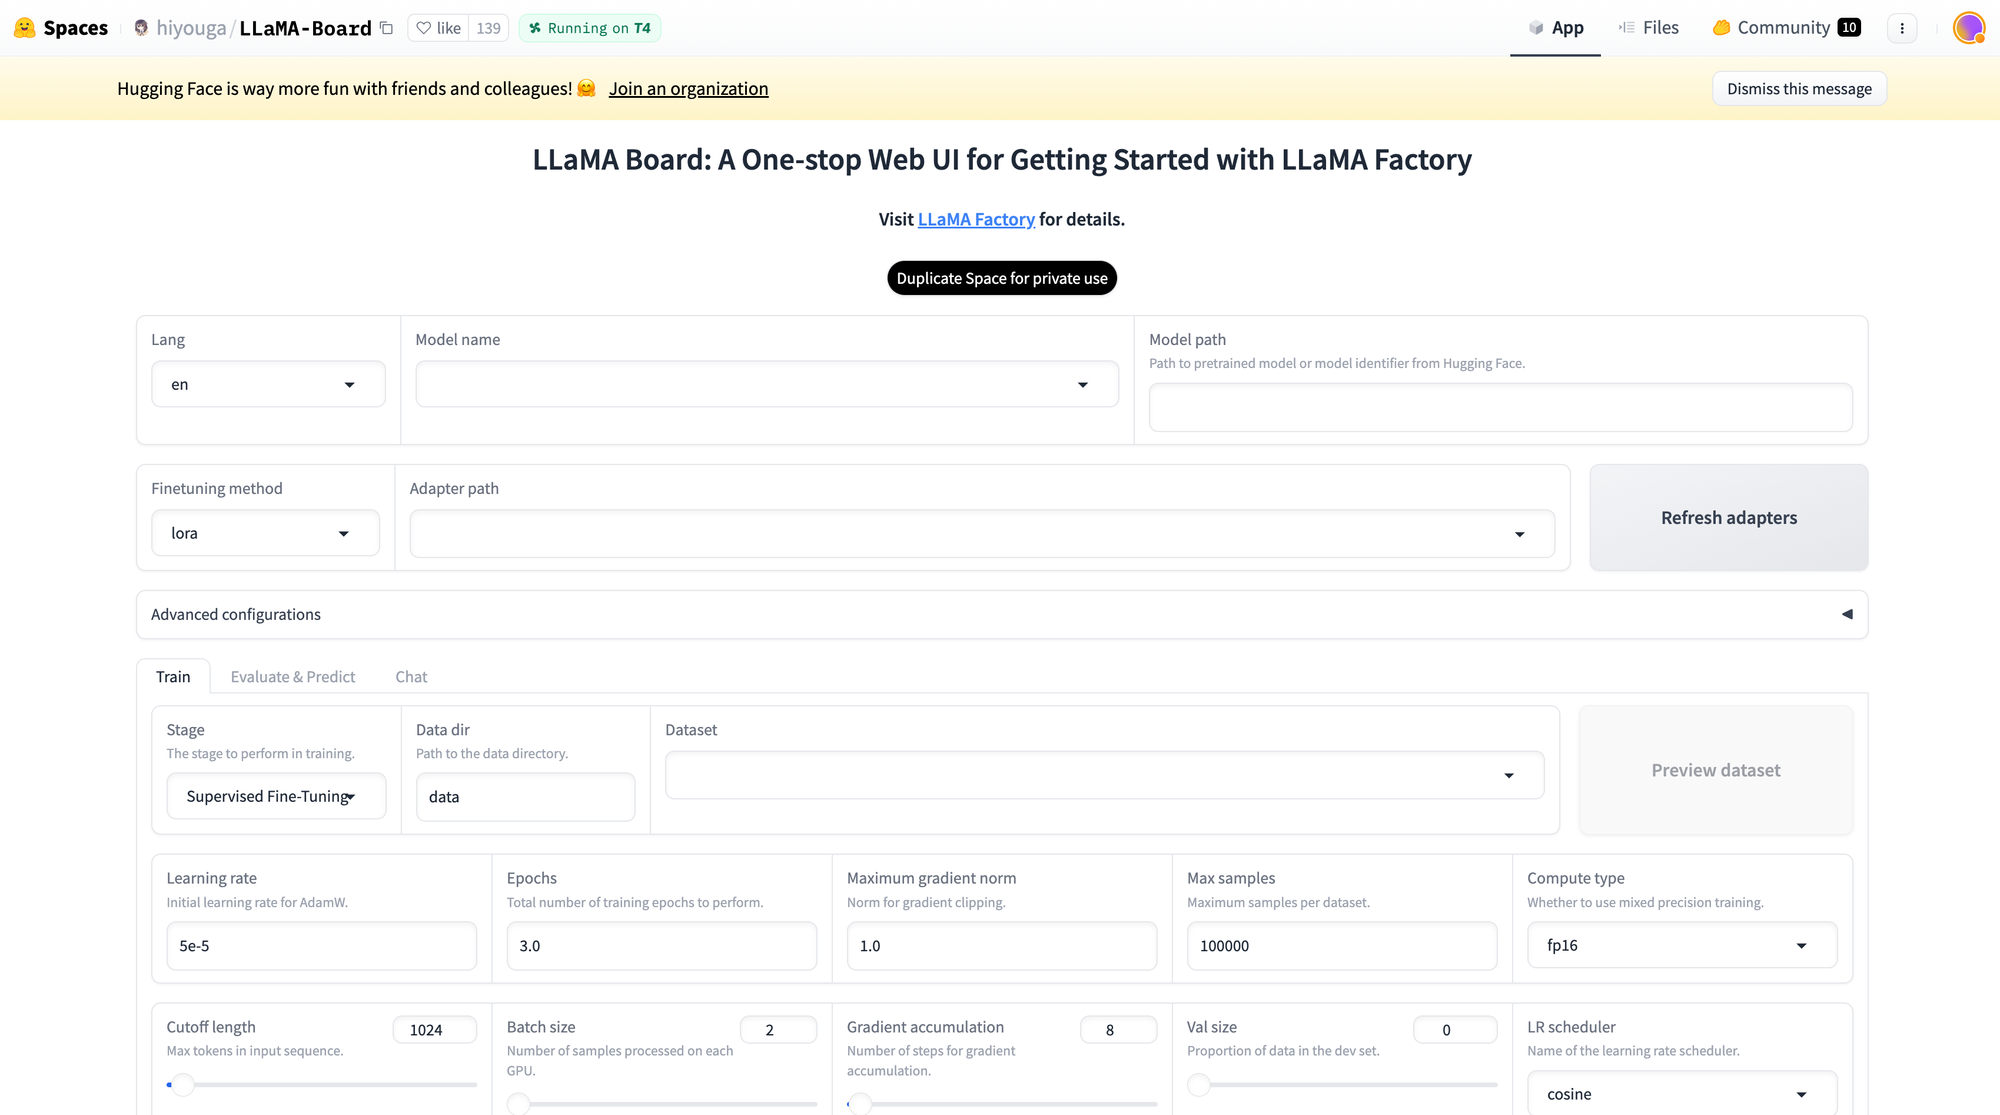
This space also supports Lora and GaLore configuration to reduce GPU usage. With an easy slider bar, users can easily change parameters such as drop-out, epochs, batch size, etc. There are also multiple dataset options to choose from to fine-tune your model. As discussed in this article, the Llama Factory supports many models, including different versions of llama, mistral, and Falcon. It also supports advanced algorithms like galore, badm, and Lora, offering various features such as flash attention, positional encoding, and scaling.
Additionally, you can integrate monitoring tools like TensorBoard, VanDB, and MLflow. For faster inference, you can utilize Gradio and CLI. In essence, the Llama Factory provides a diverse set of options to enhance model performance and streamline the fine-tuning process.
LLAMABOARD: A Unified Interface for LLAMAFACTORY
LLAMABOARD is a user-friendly tool that helps people adjust and improve Language Model (LLM) performance without needing to know how to code. It's like a dashboard where you can easily customize how a language model learns and processes information.
Here are some key features:
- Easy Customization: You can change how the model learns by adjusting settings on a webpage. The default settings work well for most situations. You can also see how your data will look to the model before you start.
- Monitoring Progress: As the model learns, you can see updates and graphs showing how well it's doing. This helps you understand if it's improving or not.
- Flexible Testing: You can check how well the model understands text by comparing it to known answers or by talking to it yourself. This helps you see if the model is getting better at understanding language.
- Support for Different Languages: LLAMABOARD can work in English, Russian, and Chinese, making it useful for people who speak different languages. It's also set up to add more languages in the future.
Fine-tune LLama 3 using Paperspace
Bring this project to life
Let's log in to the platform, select the GPU of your choice, and start the notebook. You can also click the link in the article to help you start the notebook.
- We will start by cloning the repo and installing the necessary libraries,
!git clone https://github.com/hiyouga/LLaMA-Factory.git
%cd LLaMA-Factory
%ls
- Next, we will install unsloth, which allows us to finetune the model efficiently. Further, we will install xformers and bitsandbytes.
# install necessary packages
!pip install "unsloth[colab-new] @ git+https://github.com/unslothai/unsloth.git"
!pip install --no-deps xformers==0.0.25
!pip install .[bitsandbytes]
!pip install 'urllib3<2'- Once everything is installed, we will check the GPU specifications,
!nvidia-smi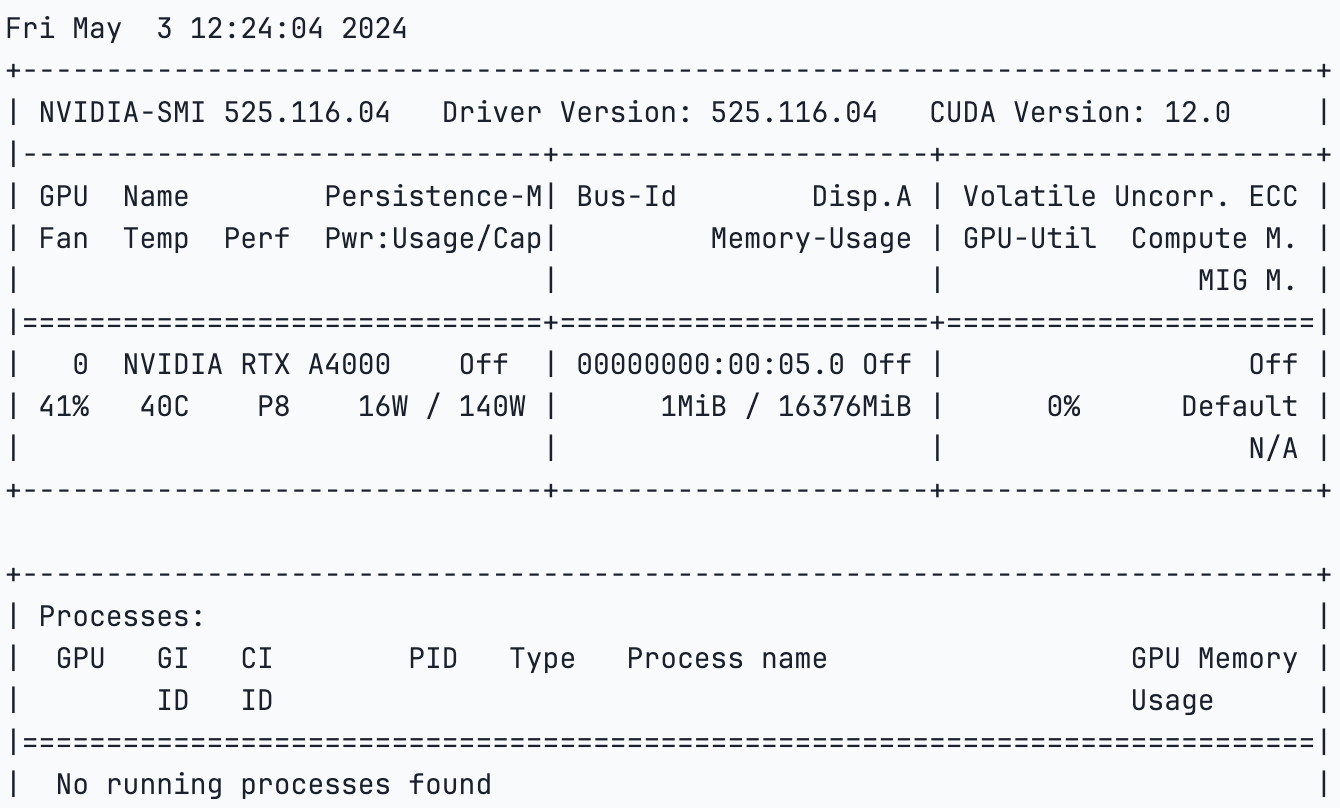
- Next, we will import torch and check our CUDA because we are using GPU,
import torch
try:
    assert torch.cuda.is_available() is True
except AssertionError:
print("Your GPU is not setup!")- We will now import the dataset which comes with the GitHub repo that we cloned. We can also create a custom dataset and use that instead.
import json

%cd /notebooks/LLaMA-Factory
MODEL_NAME = "Llama-3"


with open("/notebooks/LLaMA-Factory/data/identity.json", "r", encoding="utf-8") as f:
    dataset = json.load(f)

for sample in dataset:
    sample["output"] = sample["output"].replace("MODEL_NAME", MODEL_NAME).replace("AUTHOR", "LLaMA Factory")

with open("/notebooks/LLaMA-Factory/data/identity.json", "w", encoding="utf-8") as f:
json.dump(dataset, f, indent=2, ensure_ascii=False)- Once this is done, we will execute the code below to generate the Gradio web app link for Llama Factory.
#generates the web app link
%cd /notebooks/LLaMA-Factory
!GRADIO_SHARE=1 llamafactory-cli webui
You can click on the generated link and follow the instructions or use your specifications.

- Model Selection:
- You can choose any model; here, we choose Llama 3 with 8 billion parameters.
- Adapter Configuration:
- You have the option to specify the adapter path.
- Available adapters include LoRa, QLoRa, freeze, or full.
- You can refresh the adapter list if needed.
- Training Options:
- You can train the model using supervised fine-tuning.
- Alternatively, you can opt for DPU (Data Processing Unit) or PPU (Parallel Processing Unit) if applicable.
- Data Set Selection:
- The selected data set is for supervised fine-tuning (SFT).
- You can also choose your own data set.
- Hyperparameter Configuration:
- You can adjust hyperparameters, such as the number of epochs, maximum gradient norm, and maximum sample size.
- Laura Configuration:
- Detailed configuration options are available for the LoRa model.
- Start Training:
- Once all configurations are set, you can initiate the training process by clicking the "Start" button.
This will start the training.
We will also start the training and fine-tuning using the CLI commands. You can use the below code to specify the parameters.
args = dict(
  stage="sft",                        # Specifies the stage of training. Here, it's set to "sft" for supervised fine-tuning
  do_train=True,
  model_name_or_path="unsloth/llama-3-8b-Instruct-bnb-4bit", # use bnb-4bit-quantized Llama-3-8B-Instruct model
  dataset="identity,alpaca_gpt4_en",             # use the alpaca and identity datasets
  template="llama3",                     # use llama3 for prompt template
  finetuning_type="lora",                   # use the LoRA adapters which saves up memory
  lora_target="all",                     # attach LoRA adapters to all linear layers
  output_dir="llama3_lora",                  # path to save LoRA adapters
  per_device_train_batch_size=2,               # specify the batch size
  gradient_accumulation_steps=4,               # the gradient accumulation steps
  lr_scheduler_type="cosine",                 # use the learning rate as cosine learning rate scheduler
  logging_steps=10,                      # log every 10 steps
  warmup_ratio=0.1,                      # use warmup scheduler
  save_steps=1000,                      # save checkpoint every 1000 steps
  learning_rate=5e-5,                     # the learning rate
  num_train_epochs=3.0,                    # the epochs of training
  max_samples=500,                      # use 500 examples in each dataset
  max_grad_norm=1.0,                     # clip gradient norm to 1.0
  quantization_bit=4,                     # use 4-bit QLoRA
  loraplus_lr_ratio=16.0,                   # use LoRA+ with lambda=16.0
  use_unsloth=True,                      # use UnslothAI's LoRA optimization for 2x faster training
  fp16=True,                         # use float16 mixed precision training
)

json.dump(args, open("train_llama3.json", "w", encoding="utf-8"), indent=2)
Next, open a terminal and run the below command
!llamafactory-cli train train_llama3.jsonThis will start the training process.
- Once the model training is completed, we can use the model to infer from. Let us try doing that and check how the model works.
args = dict(
  model_name_or_path="unsloth/llama-3-8b-Instruct-bnb-4bit", # Specifies the name or path of the pre-trained model to be used for inference. In this case, it's set to "unsloth/llama-3-8b-Instruct-bnb-4bit".
  #adapter_name_or_path="llama3_lora",            # load the saved LoRA adapters
  finetuning_type="lora",                  # Specifies the type of fine-tuning. Here, it's set to "lora" for LoRA adapters.
  template="llama3",                     # Specifies the prompt template to be used for inference. Here, it's set to "llama3"
  quantization_bit=4,                    # Specifies the number of bits for quantization. In this case, it's set to 4
  use_unsloth=True,                     # use UnslothAI's LoRA optimization for 2x faster generation
)

json.dump(args, open("infer_llama3.json", "w", encoding="utf-8"), indent=2)
Here, we define our model with the saved adapter, select chat templates, and specify user-assistant interactions.
Next, run the below code using your terminal,
!llamafactory-cli chat infer_llama3.jsonWe recommend our users to try Llama-Factory with any model and experiment with the parameters.
Conclusion
Effective fine-tuning has become one of the necessity for large language models (LLMs) to adapt itself for specific tasks. However, it requires some amount of effort and is quite challenging sometimes. With the introduction to LLama-Factory, a comprehensive framework that consolidates advanced efficient training techniques users can easily customize fine-tuning for over 100 LLMs without coding requirements.
Many people are now more curious about large language models (LLMs) will tend to get drawn to LLama-Factory to see if they can adjust their own models. This helps the open-source community grow and become more active. LLama-Factory is becoming well-known and has even been highlighted in Awesome Transformers3 as a leading tool for fine-tuning LLMs efficiently.
We hope that this article encourages more developers to use this framework to create LLMs that can benefit society. Remember, it's important to follow the rules of the model's license when using LLama-Factory to fine-tune LLMs to prevent any potential misuse.
With this we come to an end of this article, we saw how easy it is nowadays to fine-tune any model within minutes. We can also use hugging face CLI to push this model to hugging face hub.


