One of the most popular, recent applications of diffusion modeling is StoryDiffusion. This project aims to give more control over to the user when chaining sequential diffusion model text-to-image generations, conserving characteristics of a character or style in order to help facilitate a visual narrative. Because the method is so versatile and plug-and-play, it can be combined with PhotoMaker for an even greater degree of fidelity in the final output.
Since it's open-source release three weeks ago, StoryDiffusion has already gained more than 4900 stars on GitHub, and the project shows great promise for further adaptation with other techniques and models. In this tutorial, we will show how to get StoryDiffusion running on powerful NVIDIA A100 GPUs in Paperspace Notebooks to rapidly generate new comics. We will start with a short overview of the underlying technology, before jumping into the code demo itself.
How does StoryDiffusion work?
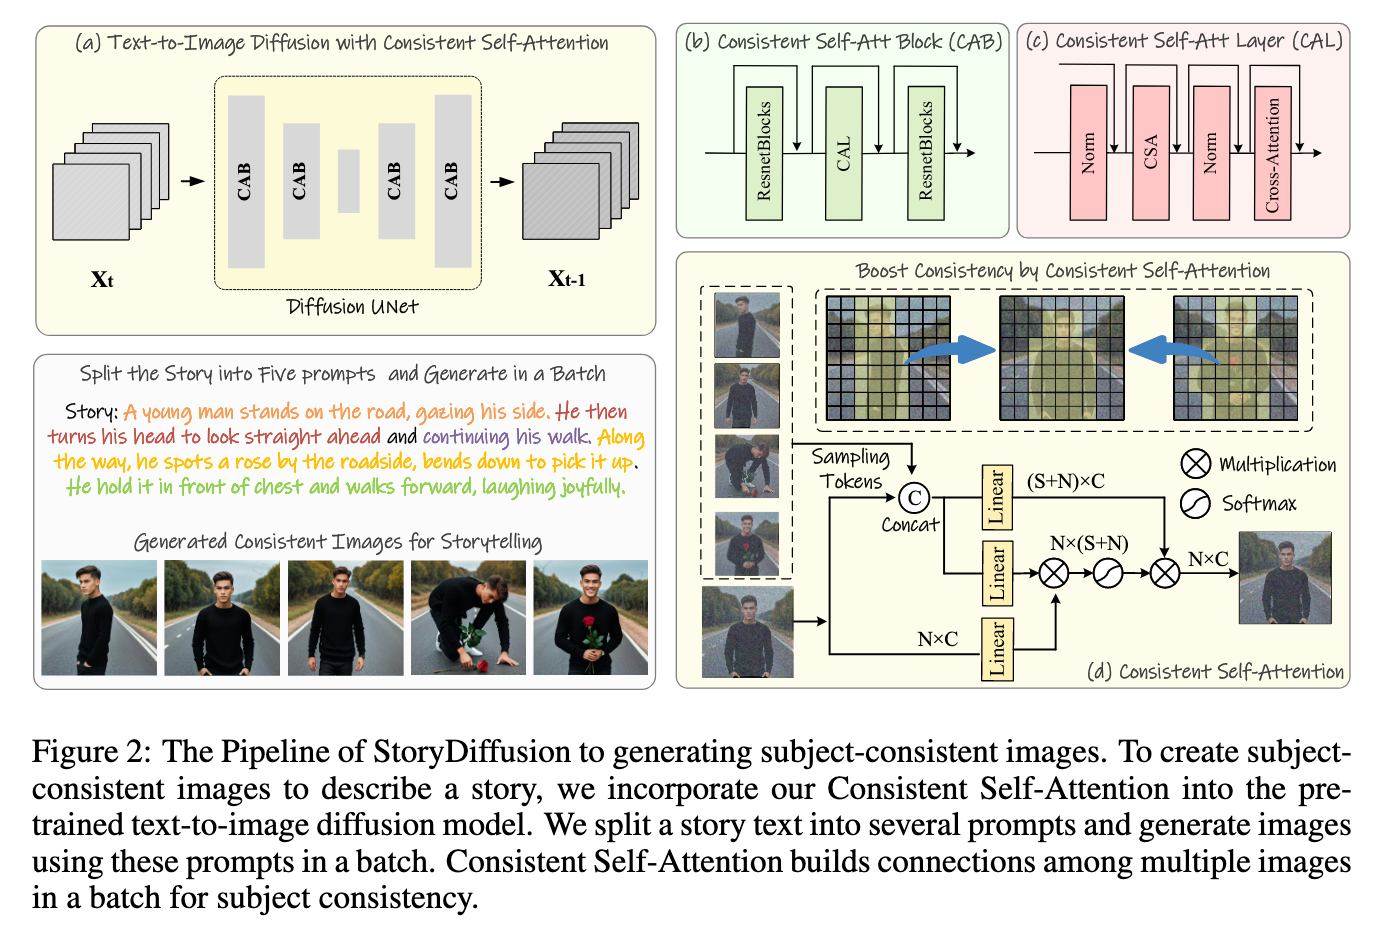
StoryDiffusion is essentially a pipeline for creating connected images with shared features. It achieves this through the clever application of the paper's author's novel attention mechanism, Consistent Self-Attention, across a series of connected prompts. Their Consistent Self-Attention "method performs the self-attention across a batch of images, facilitating interactions among features of different images. This type of interaction promotes the model to the convergence of characters, faces, and attires during the generation process." (Source).
We can see an example from the paper showing how this mechanism works with code below.
def ConsistentSelfAttention(images_features, sampling_rate, tile_size):
"""
images_tokens: [B, C, N]
sampling_rate: Float (0-1)
tile_size: Int
"""
  output = zeros(B, N, C), count = zeros(B, N, C), W = tile_size
  for t in range(0, N - tile_size + 1):
  # Use tile to override out of GPU memory
    tile_features = images_tokens[t:t + W, :, :]
    reshape_featrue = tile_feature.reshape(1, W*N, C).repeat(W, 1, 1)
    sampled_tokens = RandSample(reshape_featrue, rate=sampling_rate, dim=1)
    # Concat the tokens from other images with the original tokens
    token_KV = concat([sampled_tokens, tile_features], dim=1)
    token_Q = tile_features
    # perform attention calculation:
    X_q, X_k, X_v = Linear_q(token_Q), Linear_k(token_KV),Linear_v(token_KV)
    output[t:t+w, :, :] += Attention(X_q, X_k, X_v)
    count[t:t+w, :, :] += 1
output = output/count
return output
In practice, this allows for a training free methodology to retain the coarse to fine features of the images across the generated outputs. This allows for the series of outputted images to conform to the general traits of that batch while still remaining faithful to the original text prompt.

They found that their technique alone actually outperformed SOTA image consistency techniques like IP-Adapter or Photo Maker. In addition, their training free methodology also allows for the user to use additional techniques like Photo Maker to give even more control over the synthesized images, and Photo Maker is a key part of making the usable pipeline for the demo work with realistic, human subjects.
StoryDiffusion demo
Bring this project to life
Running StoryDiffusion with Paperspace is easy. All we need to do is click the link above, and spin up our new Paperspace Notebook on an NVIDIA A100 to get started. Once our Machine is running, we can open a terminal window, and paste the following code snippet in. This will do all of our setup for us, and launch the model demo!
git-lfs clone https://huggingface.co/spaces/YupengZhou/StoryDiffusion
cd StoryDiffusion
pip install -r requirements.txt
python app.py --share
Click the public Gradio URL to continue onto the application. This will open in a new window.
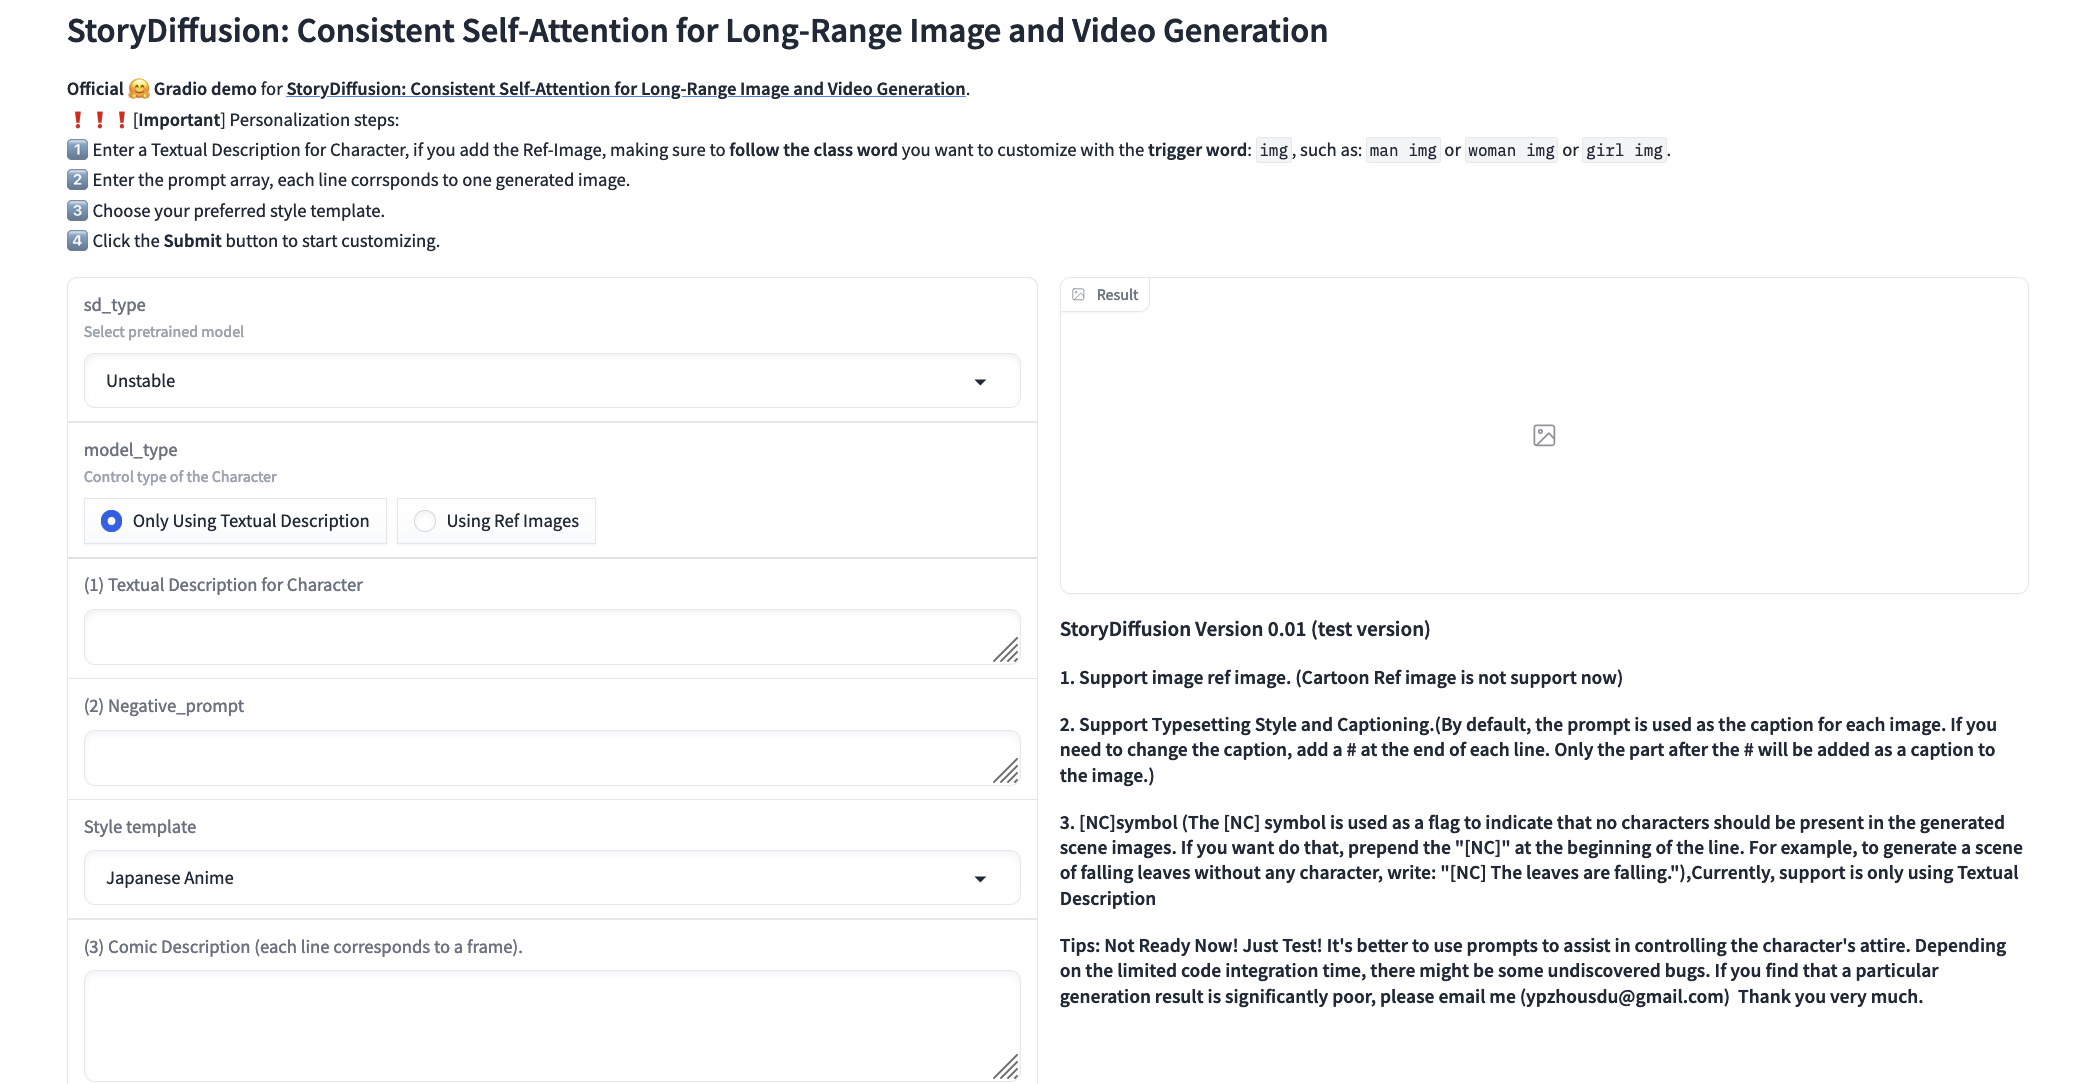
From here, we can get started generating our story. They have provided instructions at the top and right hand side of the demo, as well as additional examples at the bottom that we can use. Read these carefully in order to get the generations right.
To begin, we need to choose our model. They provide Unstable Diffusion and RealVision 4.0 for the user. We recommend using RealVision if human realism is the desired outcome, and Unstable Diffusion for pretty much every other situation.
If you intend to use reference images, we can next submit them here by toggling the 'Using Ref Images' button. This will reload the modal to allow us to upload images. Upload a variety of images that have a clear depiction of the subject's features we want to carry out to the outputs. We recommend 10-20 headshots/portrait images, and an additional 10-20 at different angles and distances from the subject. This will ensure the model has the best understanding of the subject in different positions. We will then need to add a textual description for the character. If we included reference images, then we need to add IMG to allow Photo Maker to function better.
Next, enter in the text description. For this, we want to not actually write out a "story". Instead, it is more effective to describe what the subject is doing in each frame of the comic. For example, we could use:
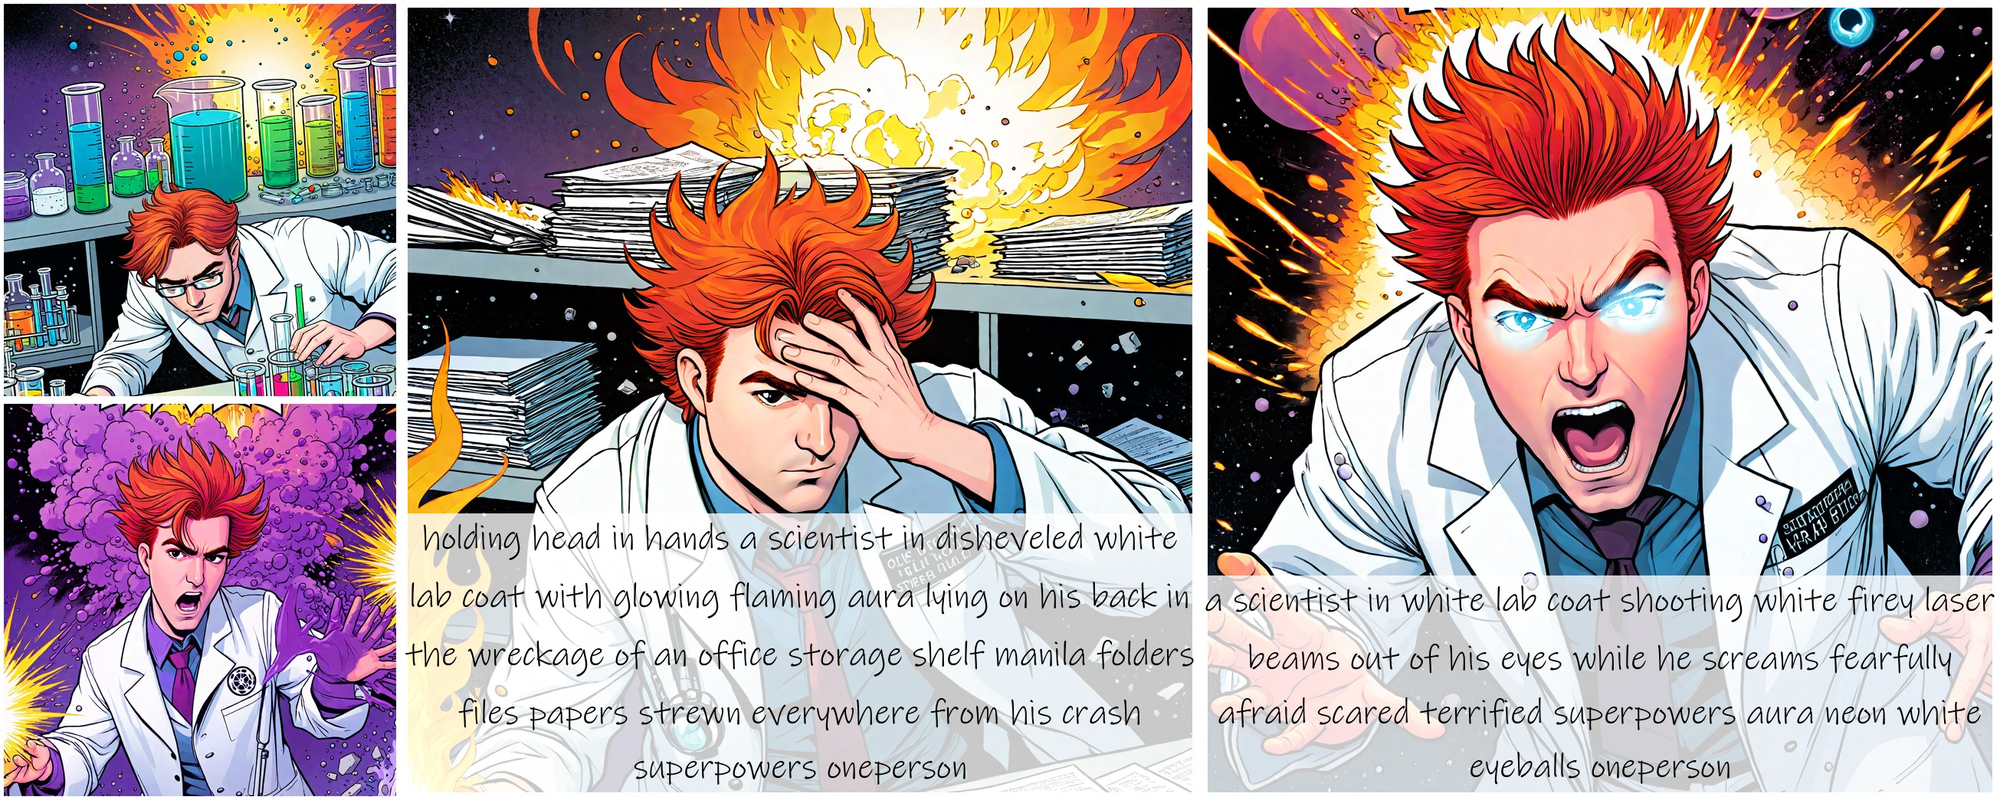
A mad scientist mixes chemicals in his lab
a mad scientist is thrown back from an explosion of purple gas
a mad scientist with glowing eyes screams in pain
a mad scientist with glowing eyes and superpowers fires lasers from his eyes
For the style template, this will affect the final output significantly. We recommend using "No Style" unless the specific, desired style is listed in the dropdown.
Finally, we get to the hyperparameter tuning. We recommend leaving everything on the default settings. The three exceptions are the size dimensions, the guidance scale, and the style strength. We may want to adjust our output size (height and width) in order to better fit the desired shape of our comic. Adjusting the guidance scale affects how strongly the text prompt controls the output, so raising it can increase the fidelity to the text but also risks introducing artifacts and other Stable Diffusion quirks. Finally, the style strength affects how important the strength of the reference images are.
If we put it all together, we get something like the following image. Keep in mind, we added a bit more flavor into the descriptions of the prompts:
You can run this demo using the link below!
Bring this project to life
Closing thoughts
Overall, we are pretty impressed with the capabilities of this model. It has a long way to go in so far as actually taking a story from a user and turning into a viable comic, but this pipeline represents a tangible step forward. We are excited to see their text-to-video code release using Consistent Self-Attention in the coming months, as that should be an even more useful application of this new technique.