
Bring this project to life
Introduction
YOLOv8 was released by Ultralytics on January 10, 2023 and it got the machine learning community buzzing about its awesome capabilities to outperform its previous versions with the best accuracy and efficiency in just about a few lines of python code. It is a very fast and robust model. Ultralytics recently announced its partnership with paperspace. So I thought of sharing my experience training the model from scratch on a custom data of damaged cars and share it with the paperspace community itself.
This is a follow up post on the article Training YOLOv8 on Custom Data by James Skelton. The post by James deeply explains the architecture of YOLOv8 and what's new as compared to the older YOLO versions. YOLOv8 is the most efficient and accurate model of them all and I learnt it myself when I tested it out on my repository of data.
In this article I'm going to walk you through the whole process of implementing the task from data collection to deployment from scratch. So, buckle up your seatbelts and lets get started right into it.
What I like most about the latest version of YOLO is that it is just one pip away! You just have to install Ultralytics using :
pip install ultralyticsNo other complications, no cloning of github repositories. It's as easy as that.
Steps Followed
- Data Collection
- Data Annotation
- Organization of Data Folders
- Preparing the code
- Run the Training
- Test it out on an image for verification
- Deployment using FastAPI
- Coding the Frontend Using React.js
- Connecting the frontend and backend
Data Collection
For this particular usecase I had to collect images of damaged cars. It is sometimes hard to collect dataset of images that are not available openly and for a custom project like this data collection becomes the most time consuming part and makes people exhausted if they are working under a deadline. I had to complete this project on my own and I had no one to help me except the internet. So the most obvious thing I did was to look for hacks as to how to download such large number of images in seconds.
For those who don't know, this is going to be a lifesaver. I found a chrome plugin named Download All Images that scrapes out all the images present in a web page and downloads it as a zip folder . Although it does have some limitations, it will make your life much simpler, trust me.
So you go to google images and type in "damaged car", and you'll get about thousands of results, which is more than enough for this problem statement.
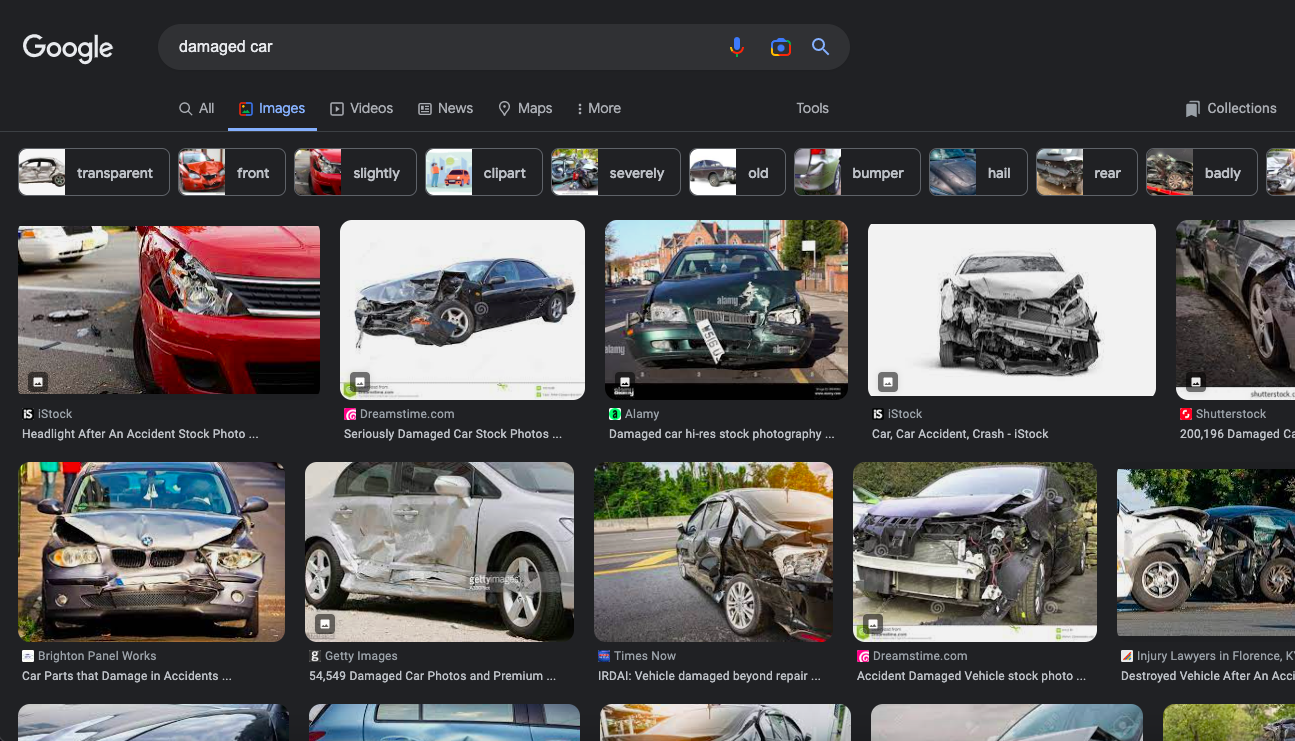
Use the plugin that I mentioned before, and it will automatically download all the imges for you in a zip folder. Extract it to a desired location on your system and you're done!
Data Annotation
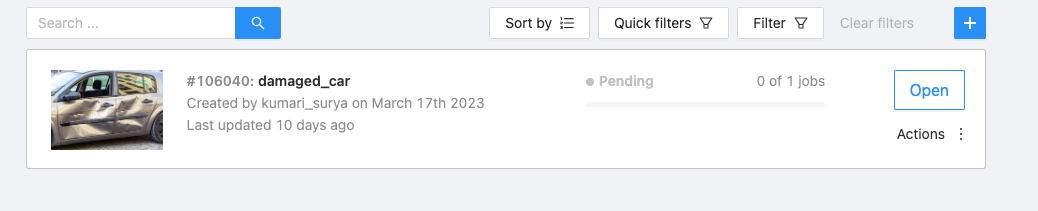
There are many annotation tools available. The one that I'm most comfortable and found the best was cvat.ai . It is free to use and doesn't need any installation on the local system, so I went ahead with it.
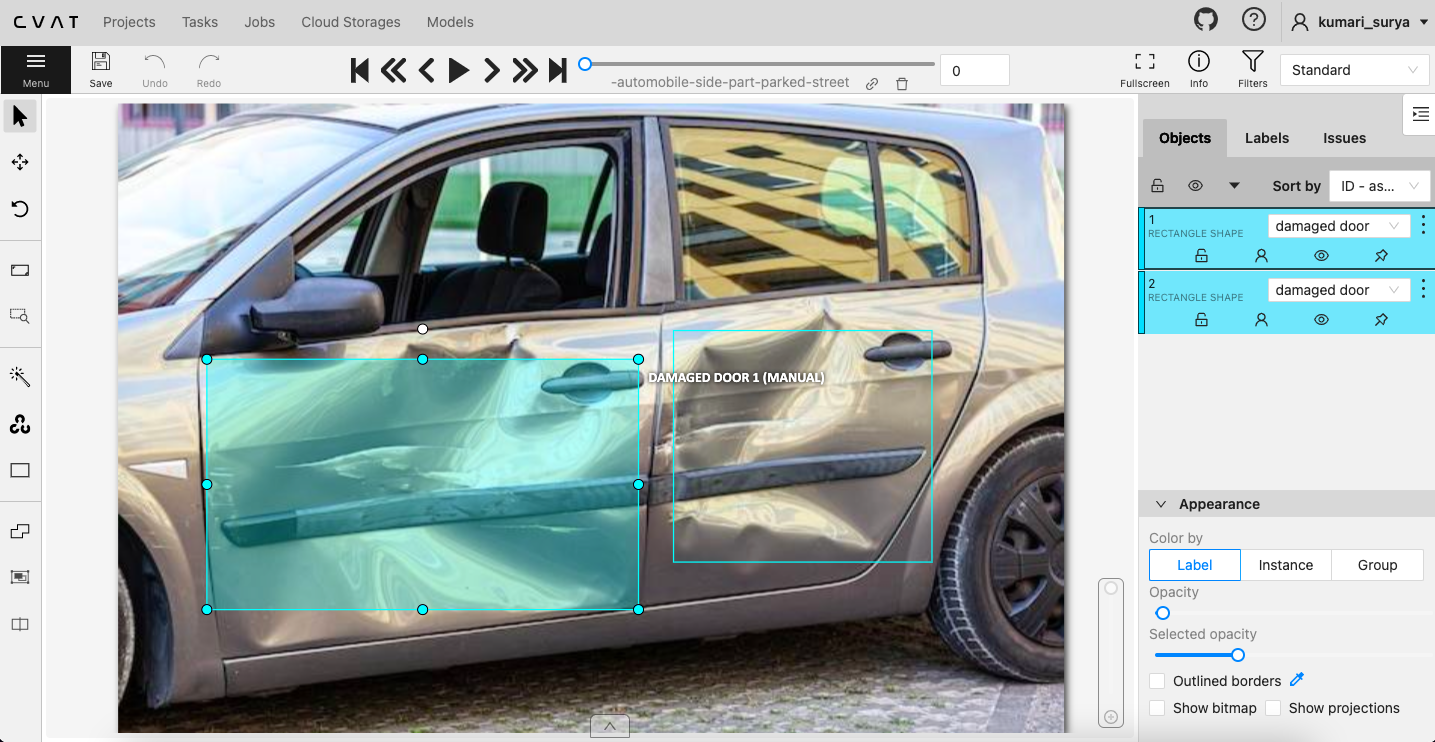
Create a new task by clicking on the "+" button.
While creating a new task it will ask you to name the task and project. You can go ahead with any name of your choice. Add the custom labels that you are going to annotate the images with. In my case they were :
- damaged door
- damaged hood
- damaged winshield
- dent
- damaged window
- damaged bumper
- damaged mirror
- damaged headlight
Start annotating the images in rectangular boxes. And when you're finally done you can download the annotations in YOLO 1.1 format. No need to download the images because you already have them on your local system. Make sure that the name of the images and the corresponding annotation file is the same and there is no data loss. Otherwise, you will run into a whole series of error while trying to train.

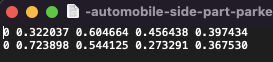
The above screenshot shows an example of an annotation of an image, the first element is the encoded label, and the rest of the numbers following it are the box co-ordinates.
NOTE: Image annotation takes time and patience so be mentally prepared for that.
Organization of Data Folders
This is one crucial step before putting the images to training. In your "project" folder create a folder named "data". Inside the data folder create two empty folders named "images" and "labels".Inside both of these folders, create an empty folder named "train" each. Now copy your images to the corresponding train folder of the images folder and likewise, do the same with the annotation files but in the labels folder.
project/
└── data/
    ├── images/
    │   └── train/
    └── labels/
        └── train/
Preparing the Code
Prepare a .yaml file named config.yaml, you can name it anything. The file should contain the following code, customize it according to your needs:
path: /home/surya/Desktop/object_detection/data  # dataset root dir
train: /home/surya/Desktop/damaged_car_parts_detection/data/images/train  # train images (relative to 'path')
val: /home/surya/Desktop/damaged_car_parts_detection/data/images/train  # val images (relative to 'path')


# Classes
names:
  0: damaged door
  1: damaged window
  2: damaged headlight
  3: damaged mirror
  4: dent
  5: damaged hood
  6: damaged bumper
  7: damaged wind shield
I have given the path to my train and val directory. In this case I have chosen the validation and train directory to be the same since it doesn't really matter while testing on the images used for training. Then I have listed the 8 labels that have been used in the project from 0 to 7. Make sure that the labels are numbered correctly according to the annotations.
After this make a python file named train.py :
from ultralytics import YOLO

# Load a model
model = YOLO("yolov8n.yaml")  # build a new model from scratch

# Use the model
results = model.train(data="config.yaml", epochs=5000)  # train the model
In this code snippet, the YOLOv8n model is loaded as base model and then according to our custom data the results are supposed to be stored as chekpoints after training in the result folder which will only be created after the training process is complete.
So now, the folder structure should be:
project/
├── data/
│   ├── images/
│   │   └── train/
│   └── labels/
│       └── train/
├── train.py
└── config.yaml
Run the Training
In the terminal, run the following command:
python train.pyThe model should hopefully start training if you have followed the above instructions correctly. Mine started and ran for about four and a half hours till the best results were reached at epoch= 1153.
151/5000
3.84G
0.5171
Class
Images
0.4203 Instances
0.9772
15
640: 100%
31/31 [00:08 00:00, 3.78it/s]
Box (P
R
MAP50
all
485
684
0.991
0.998
0.995
MAP50-95): 100% | 0.975
16/16 [00:04 00:00, 3.36it/s]
Epoch 1152/5000
GPU_mem 3.84G
box_loss
Class
0.5169 Images
cls_loss 0.4468 Instances
all
485
684
dfl_loss 0.9978 Box (P 0.991
Instances
Size
19
640: 100%
31/31 [00:07<00:00, 3.91it/s]
R
MAP50
0.998
0.995
MAP50-95): 100% 0.976
16/16 [00:04<00:00, 3.53it/s]
Epoch GPU_mem 1153/5000
3.84G Class
box_loss 0.512
Images
cls_loss 0.4145 Instances
dfl_loss
Instances
Size
0.992
all
485
684
Box(P 0.991
20 R
640: 100%
31/31 [00:07<00:00, 3.96it/s]
0.998
MAP50 MAP50-95): 100%| 0.995 0.975
16/16 [00:04<00:00, 3.33it/s]
Stopping training early as no improvement observed in last 50 epochs. Best results observed at epoch 1103, best model saved as best.pt. To update EarlyStopping(patience=50) pass a new patience value, i.e. `patience=300` or use `patience=0` to disable EarlyStopping. 1153 epochs completed in 4.501 hours.
The above block shows the training process when it has stopped at its maximum accuracy.
After the training is complete a folder called runs is created. Inside it detect is created where the checkpoints are saved. The best.pt file is what is used for testing and deployment.
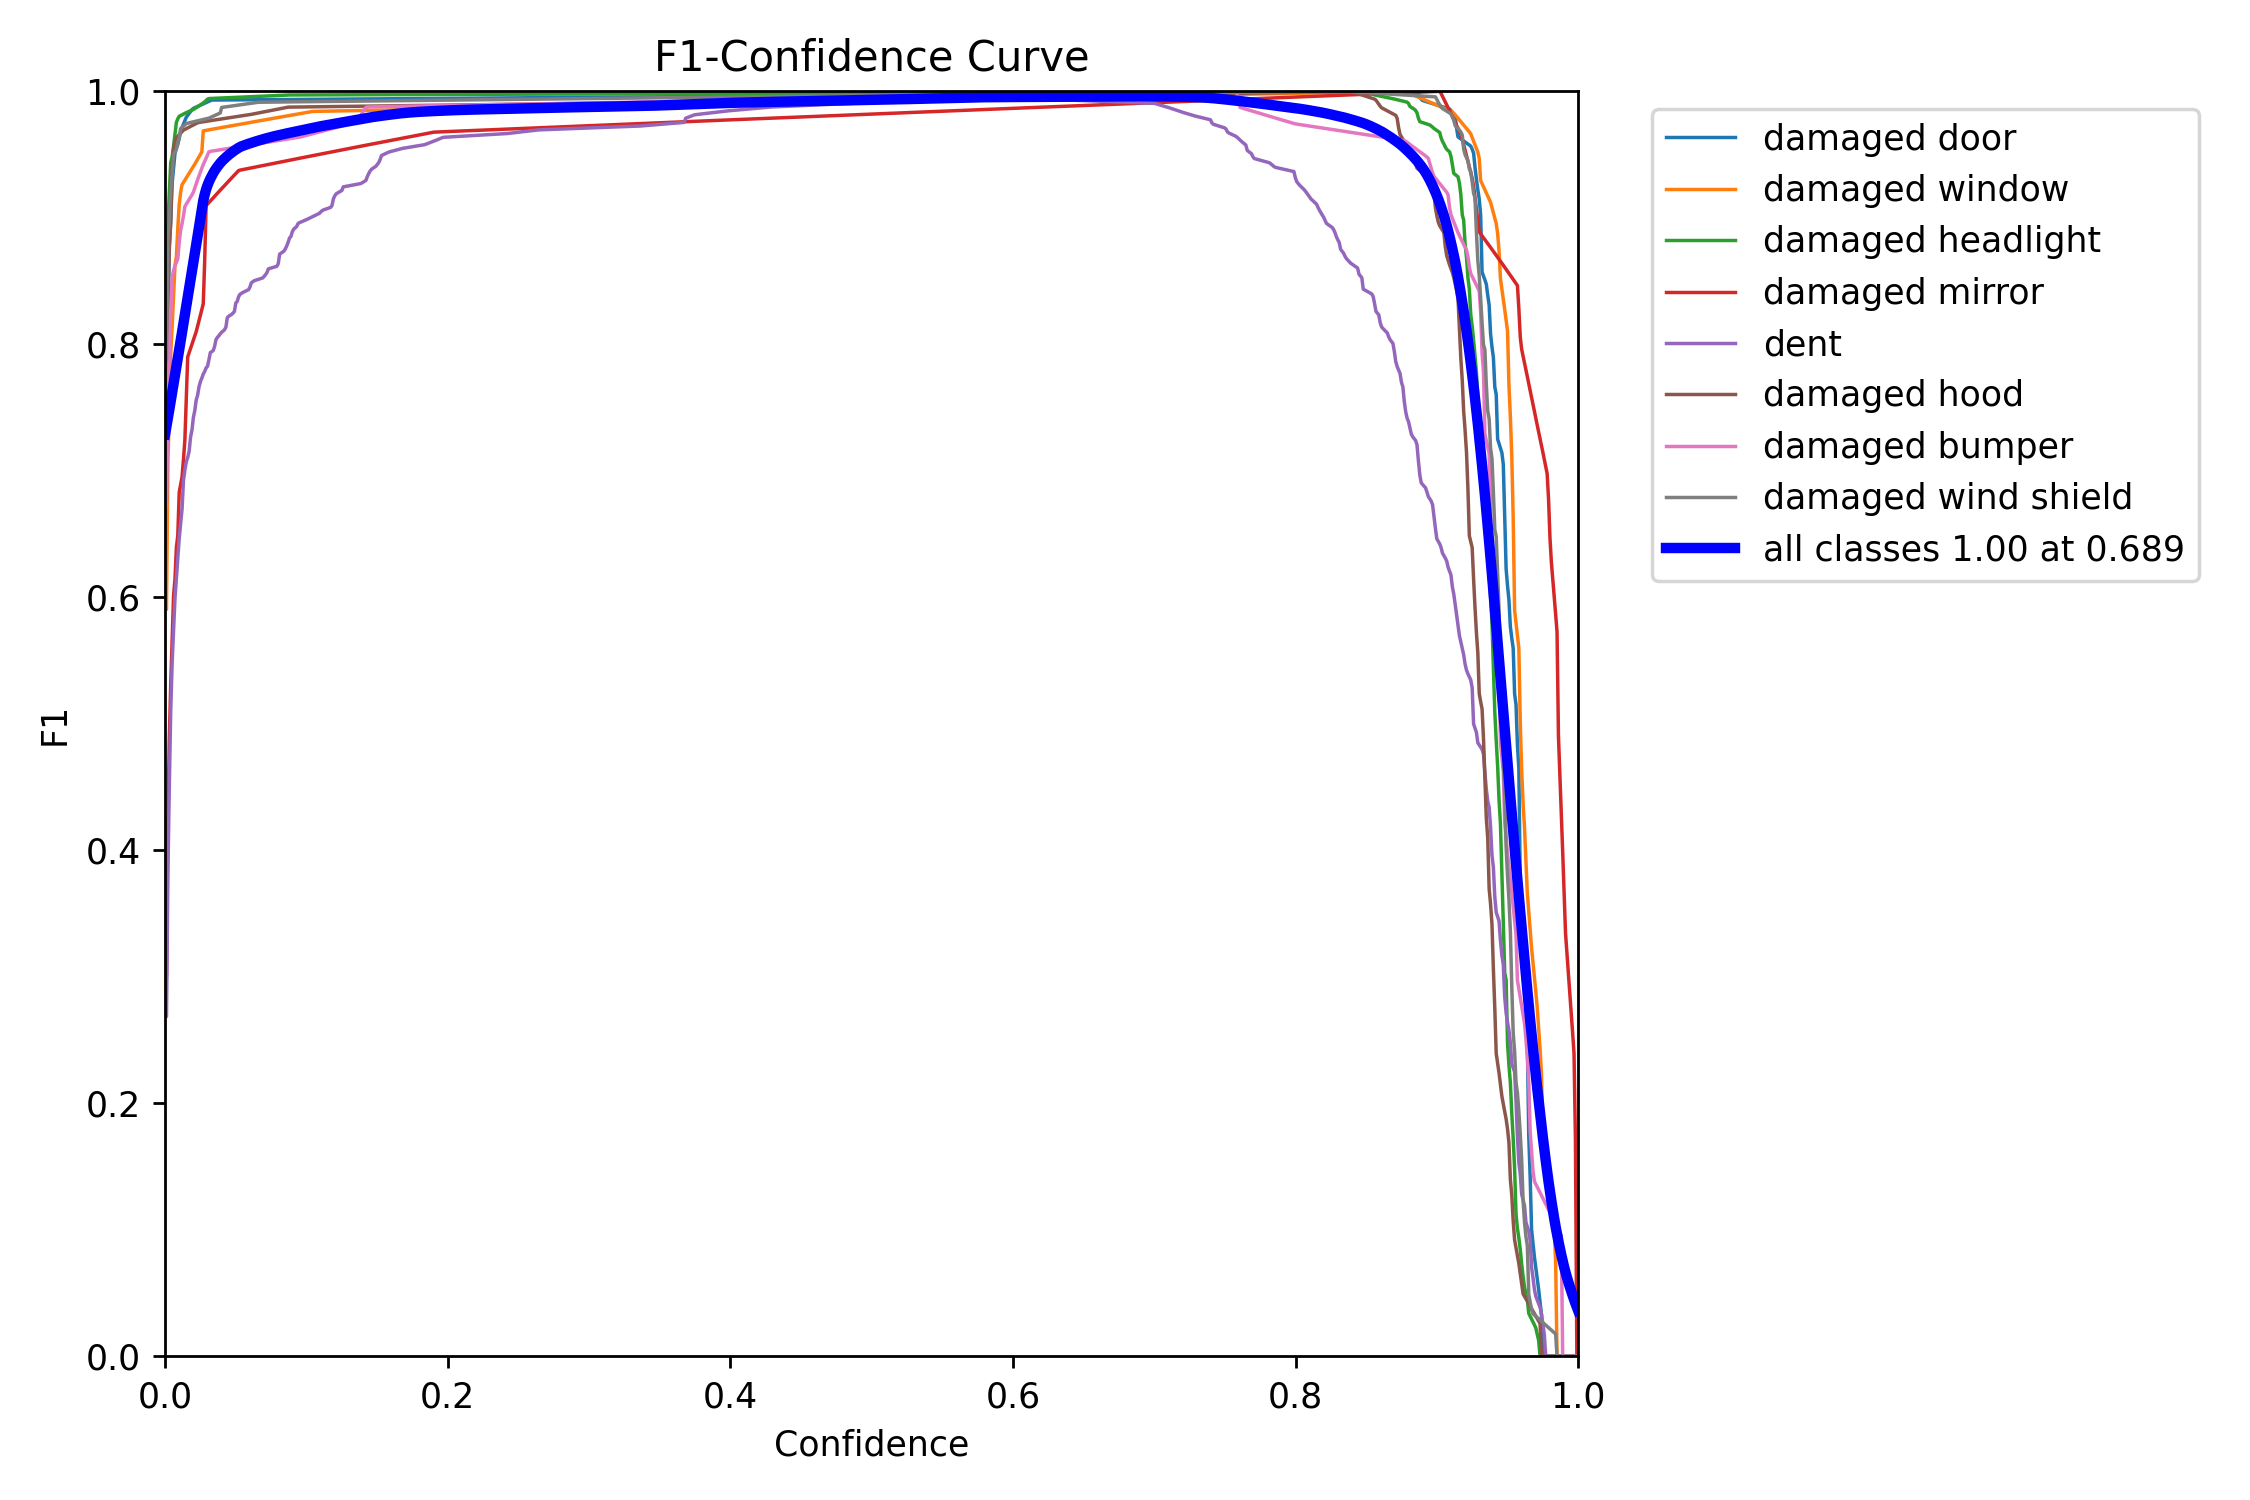
The above F1-Confidence Curve shows that the model has an accuracy of 1 at 0.689.
Similarly,
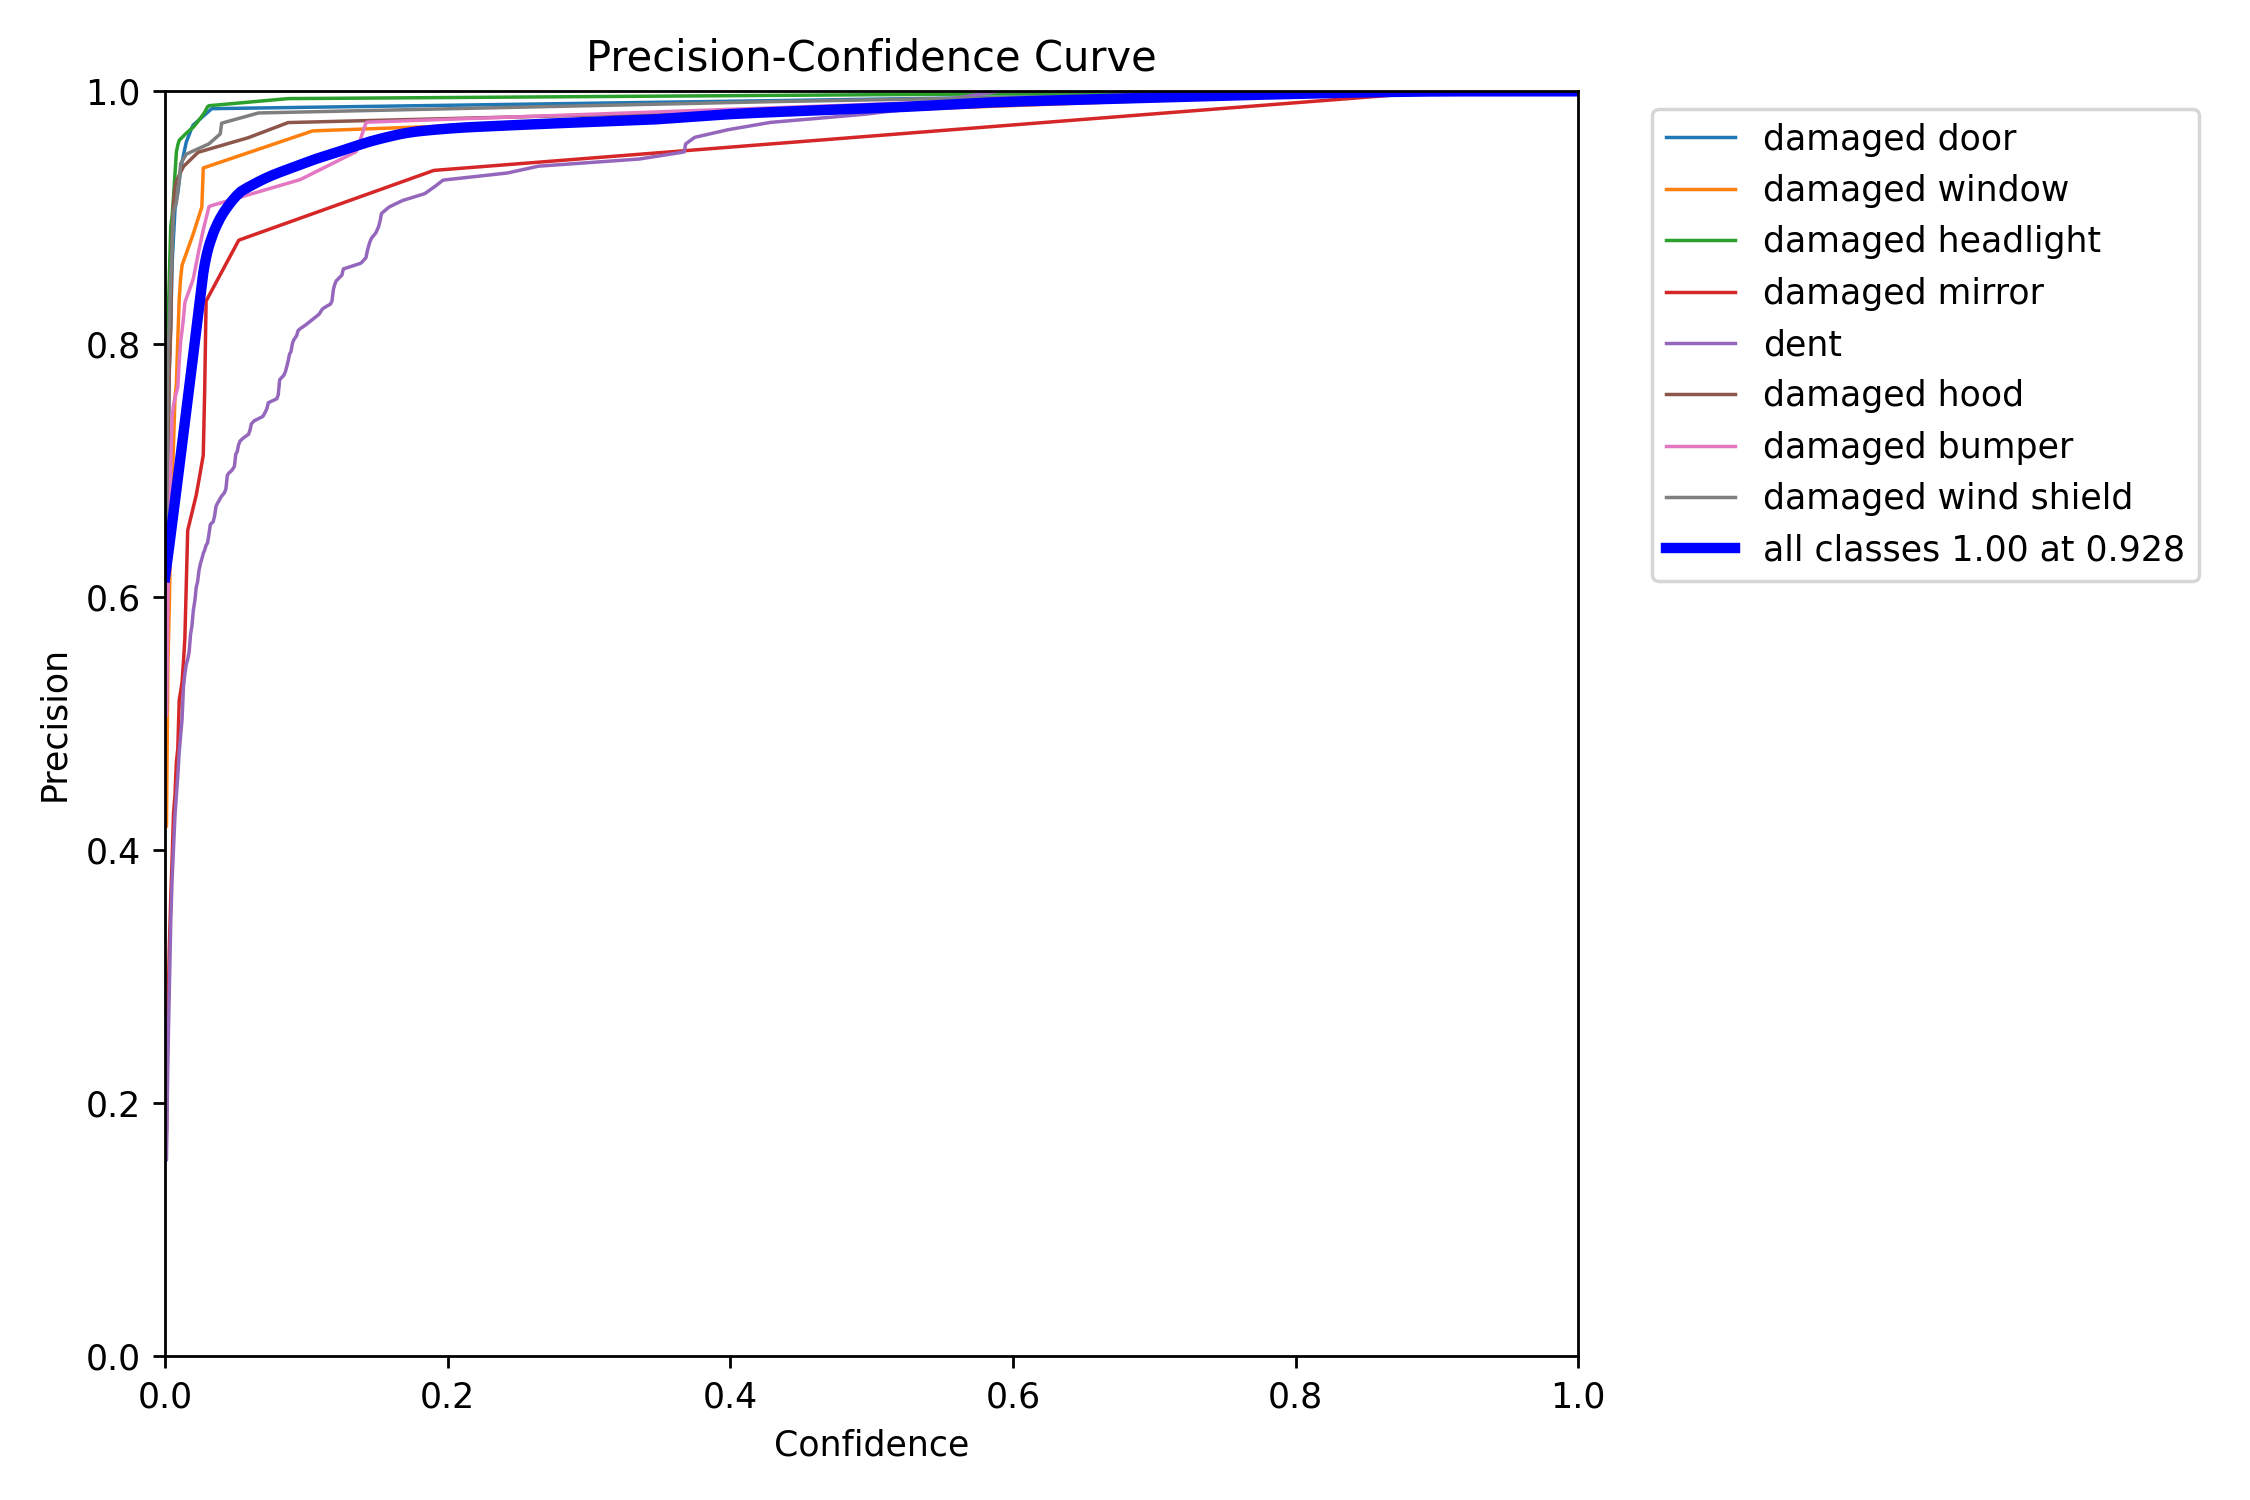
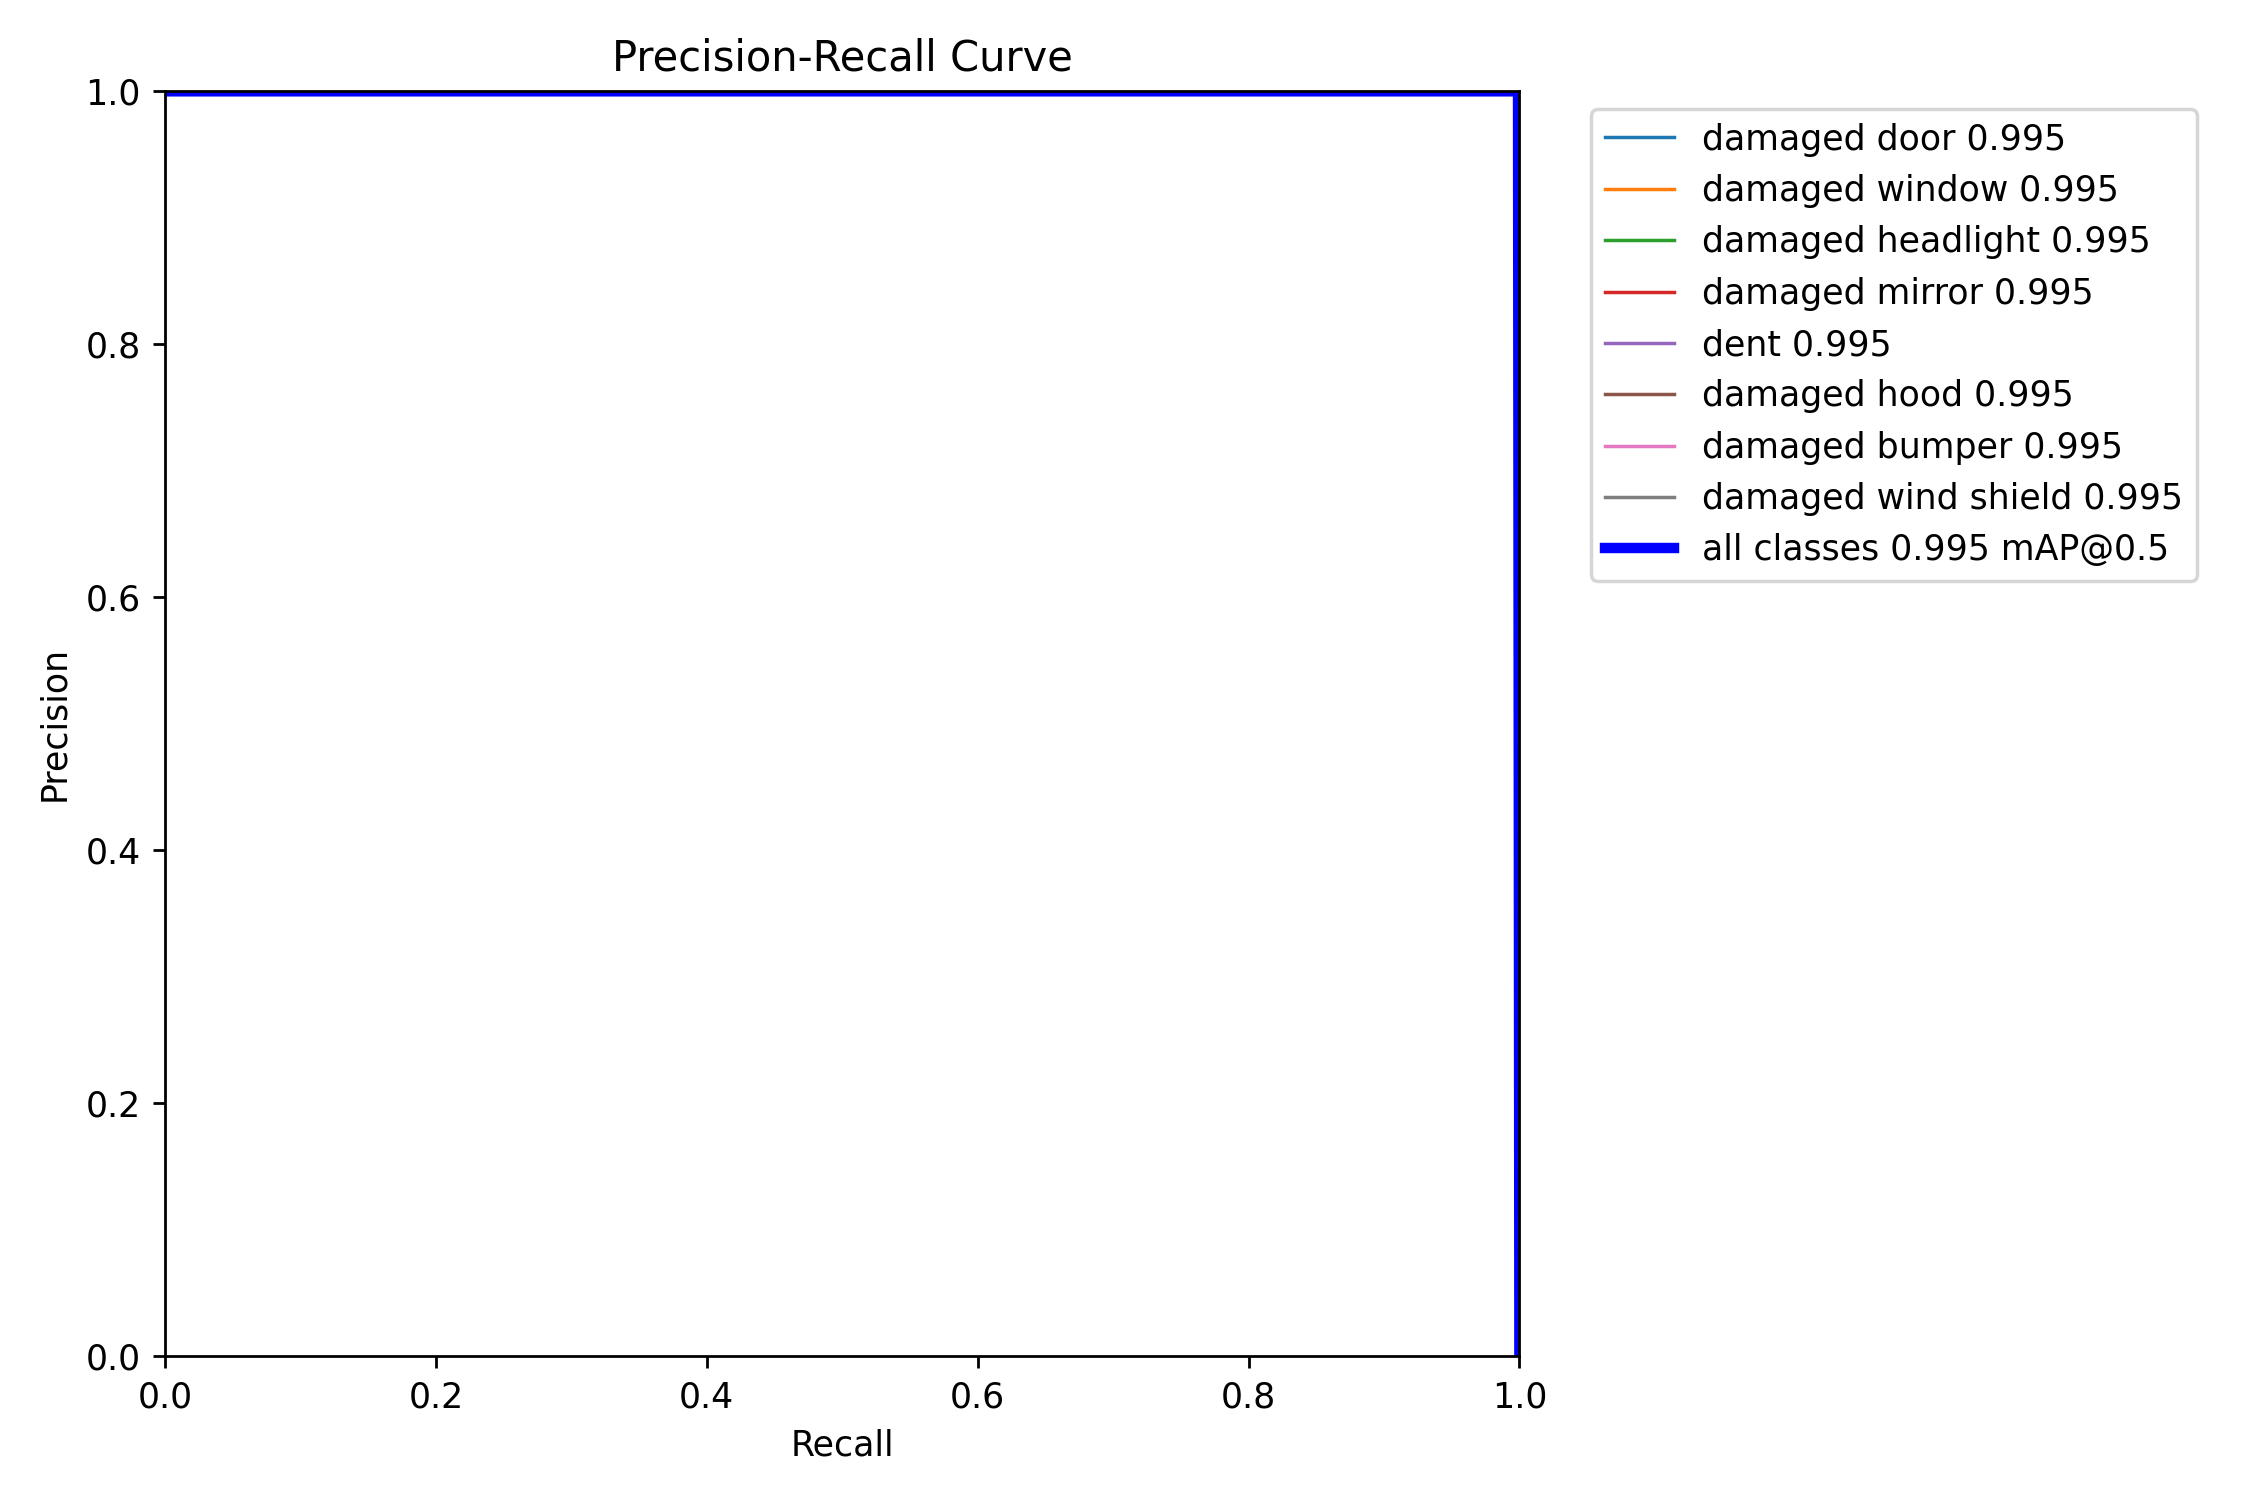
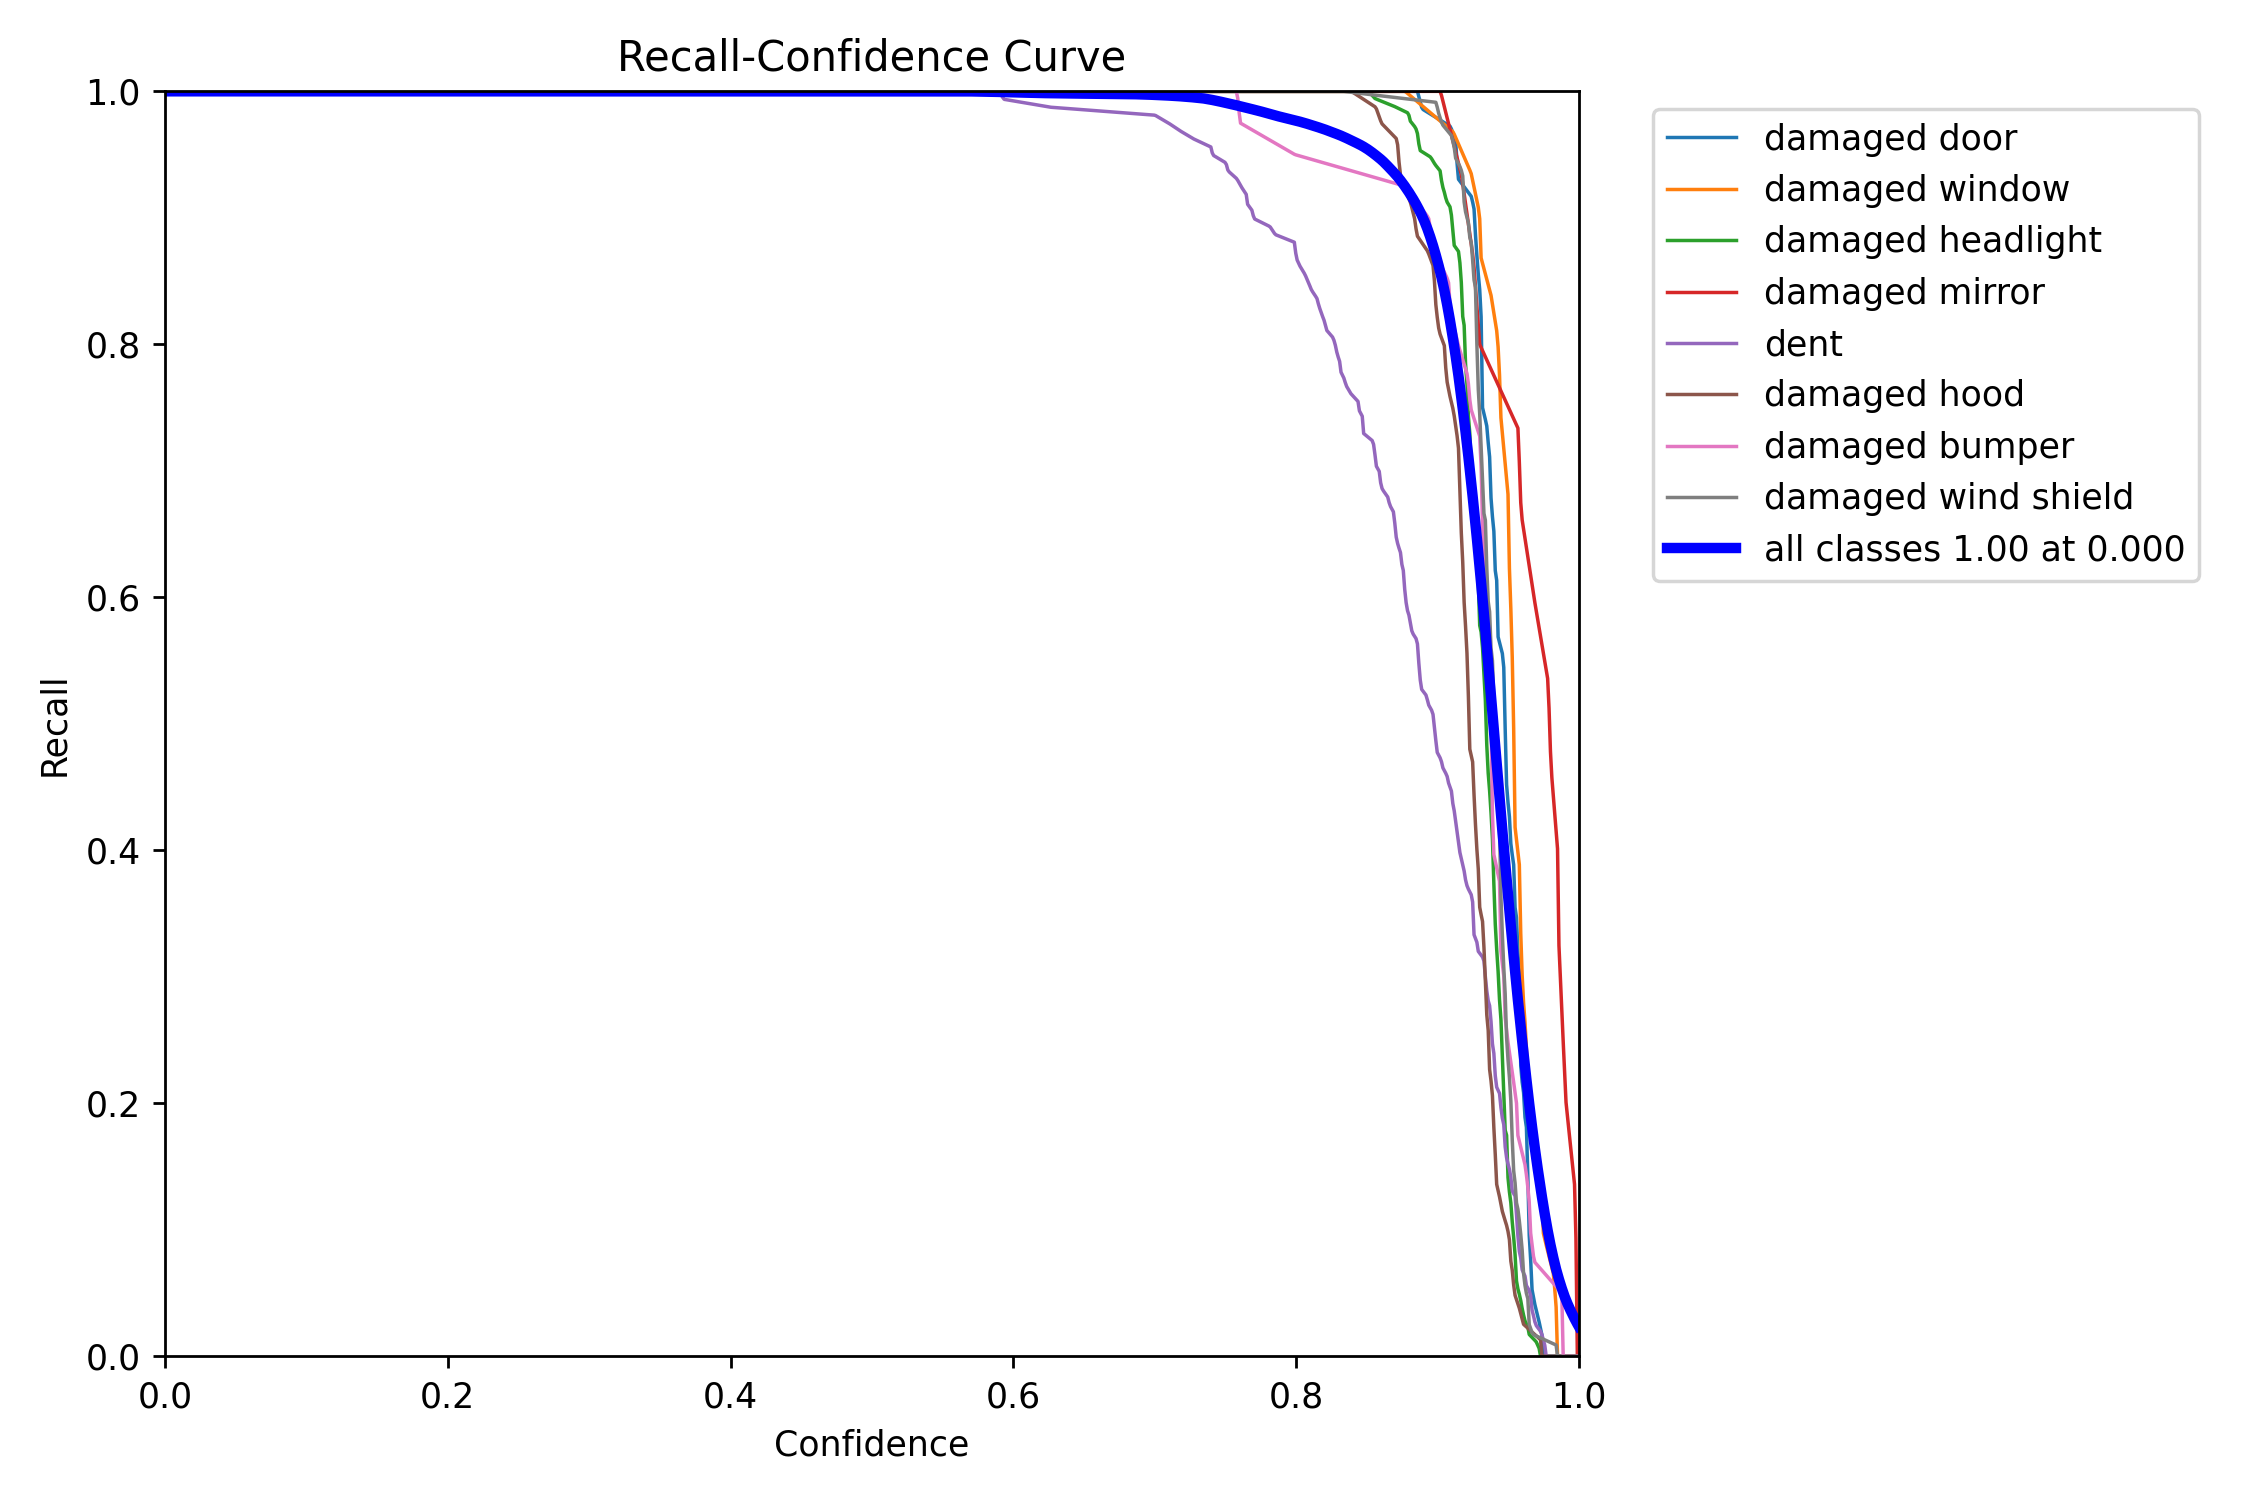
All the above plots are proof that the model trained perfectly, now we have to test and deploy.
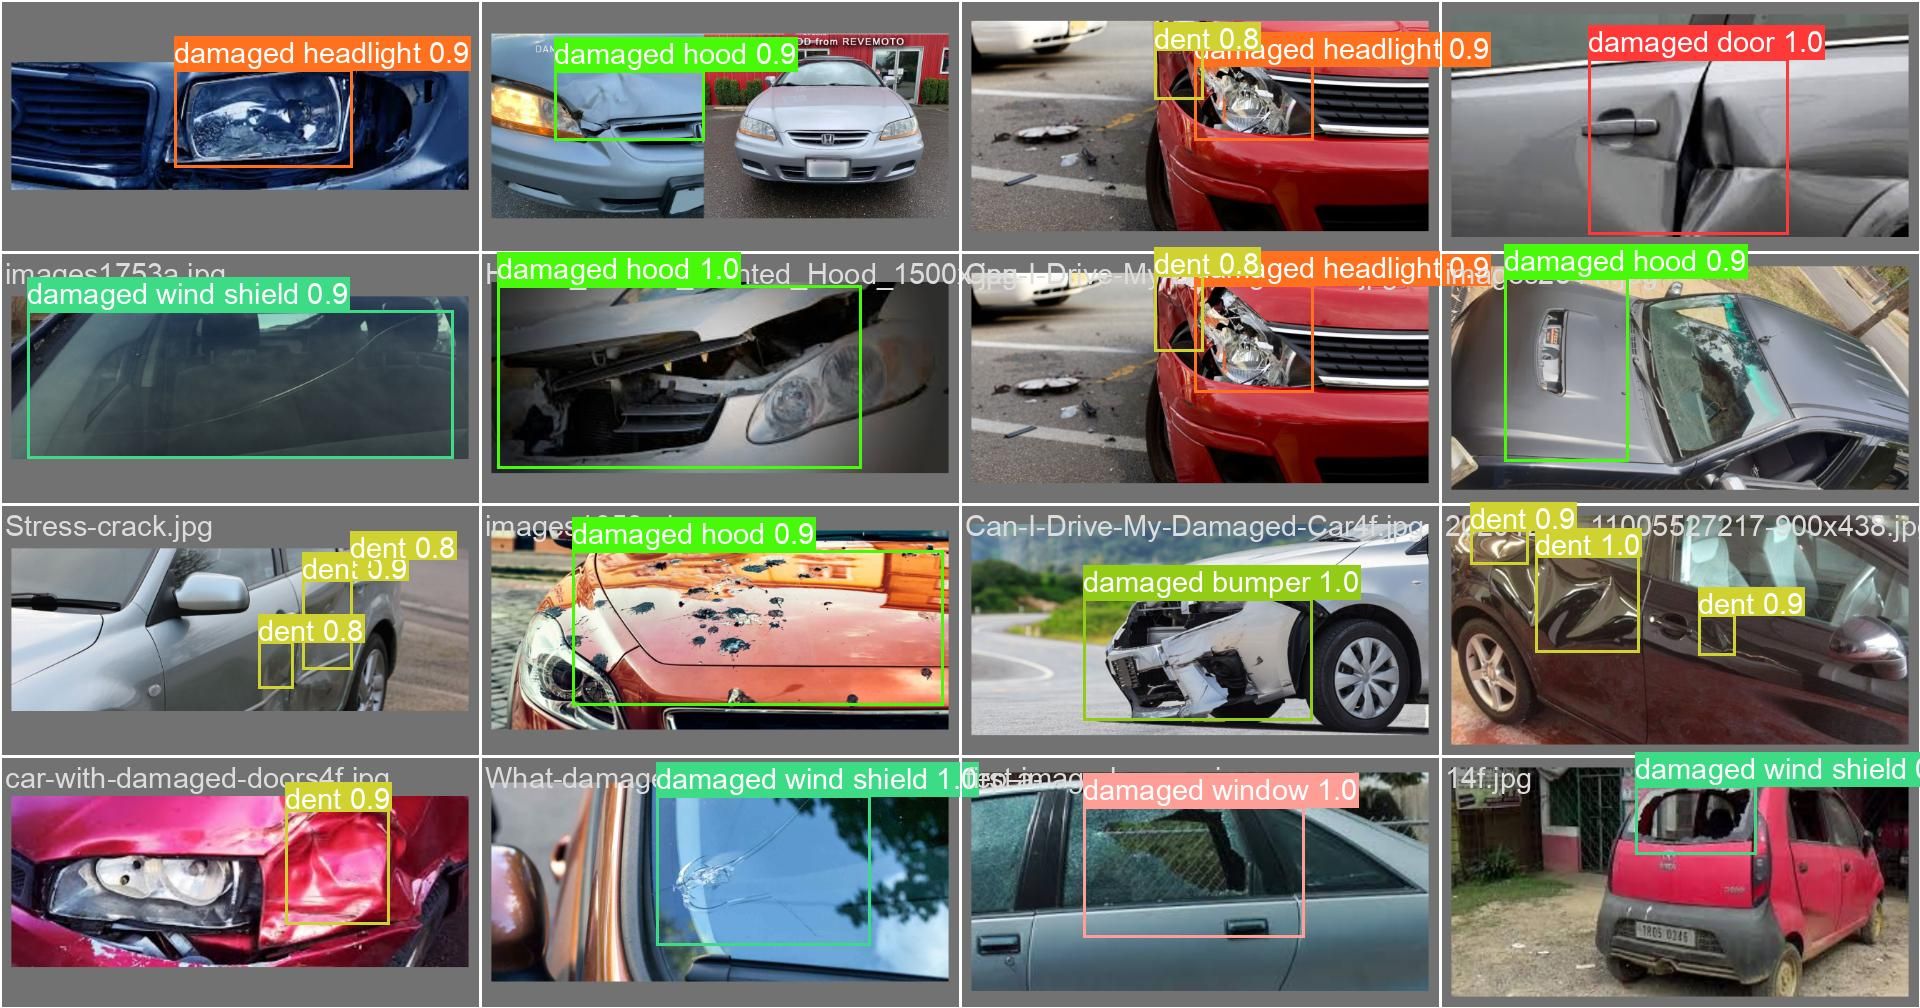
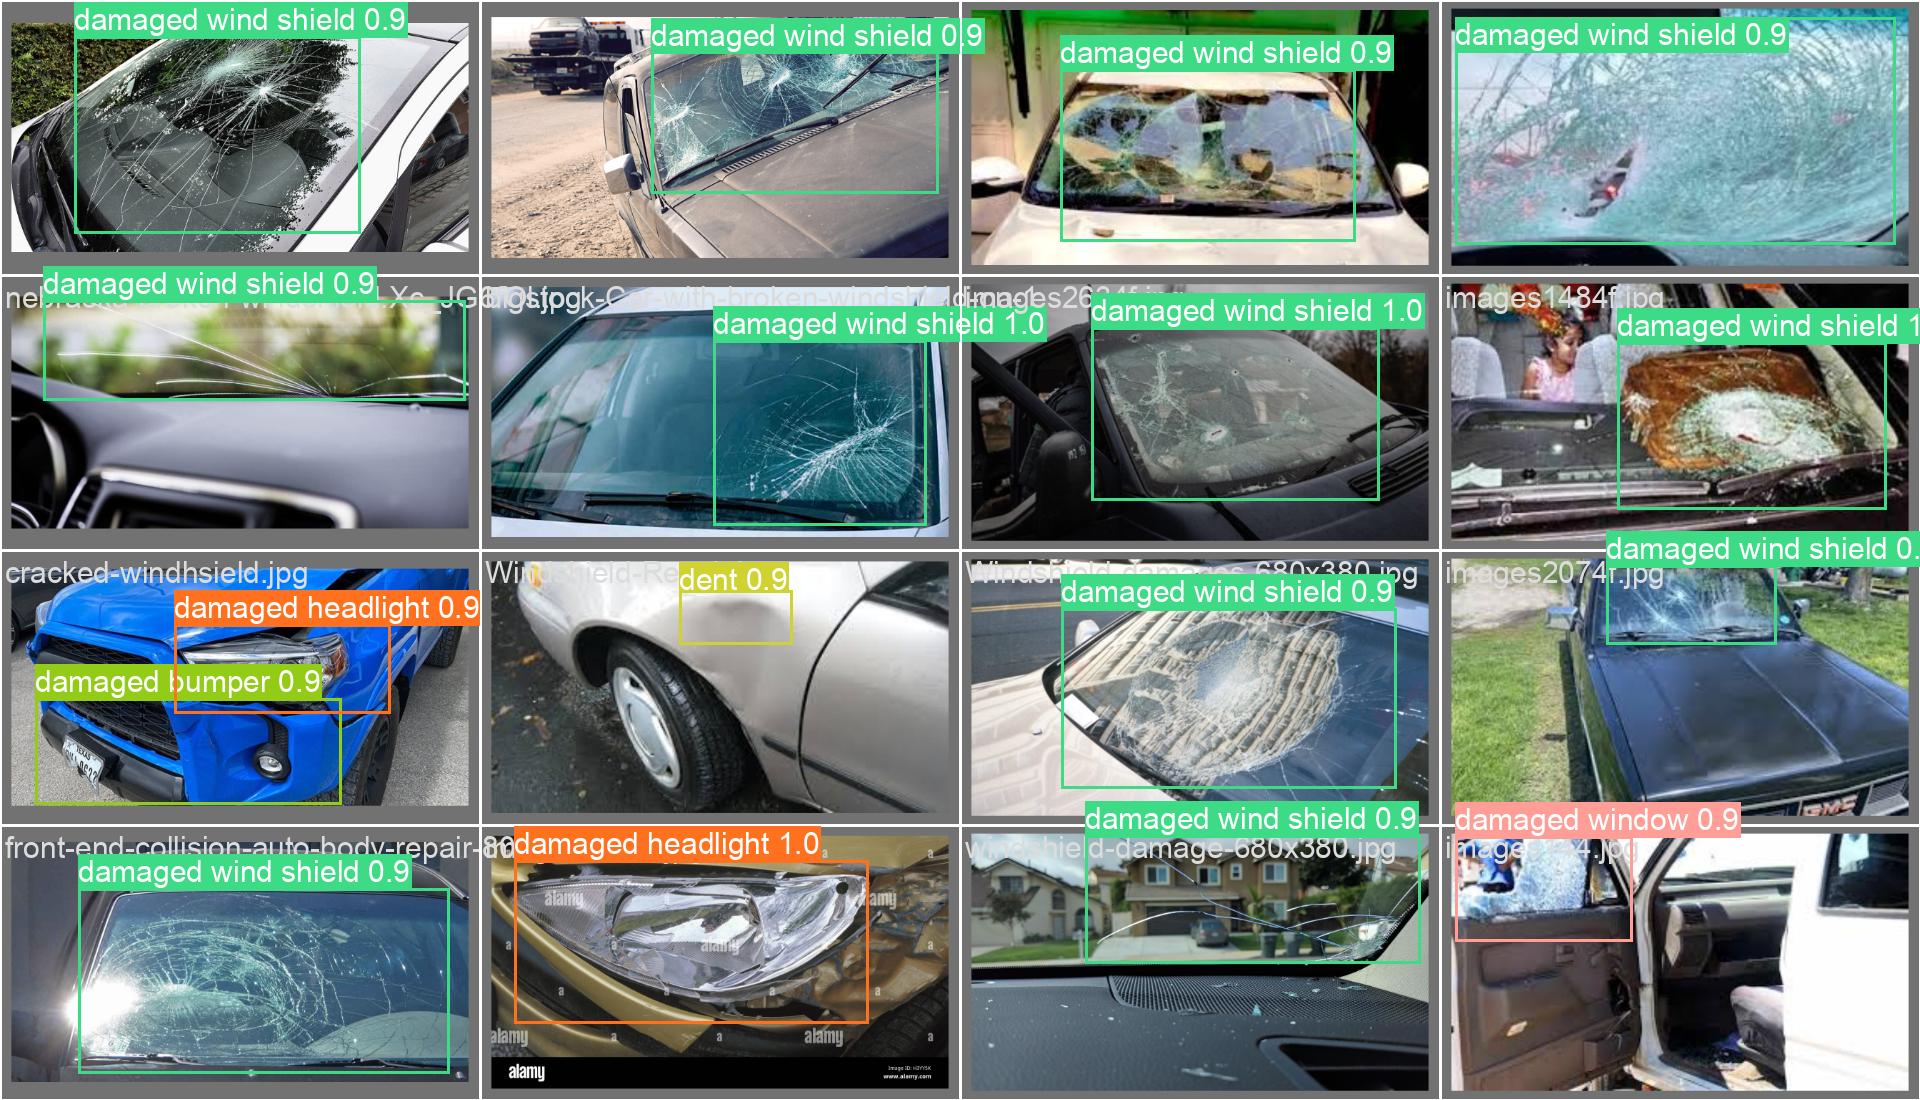
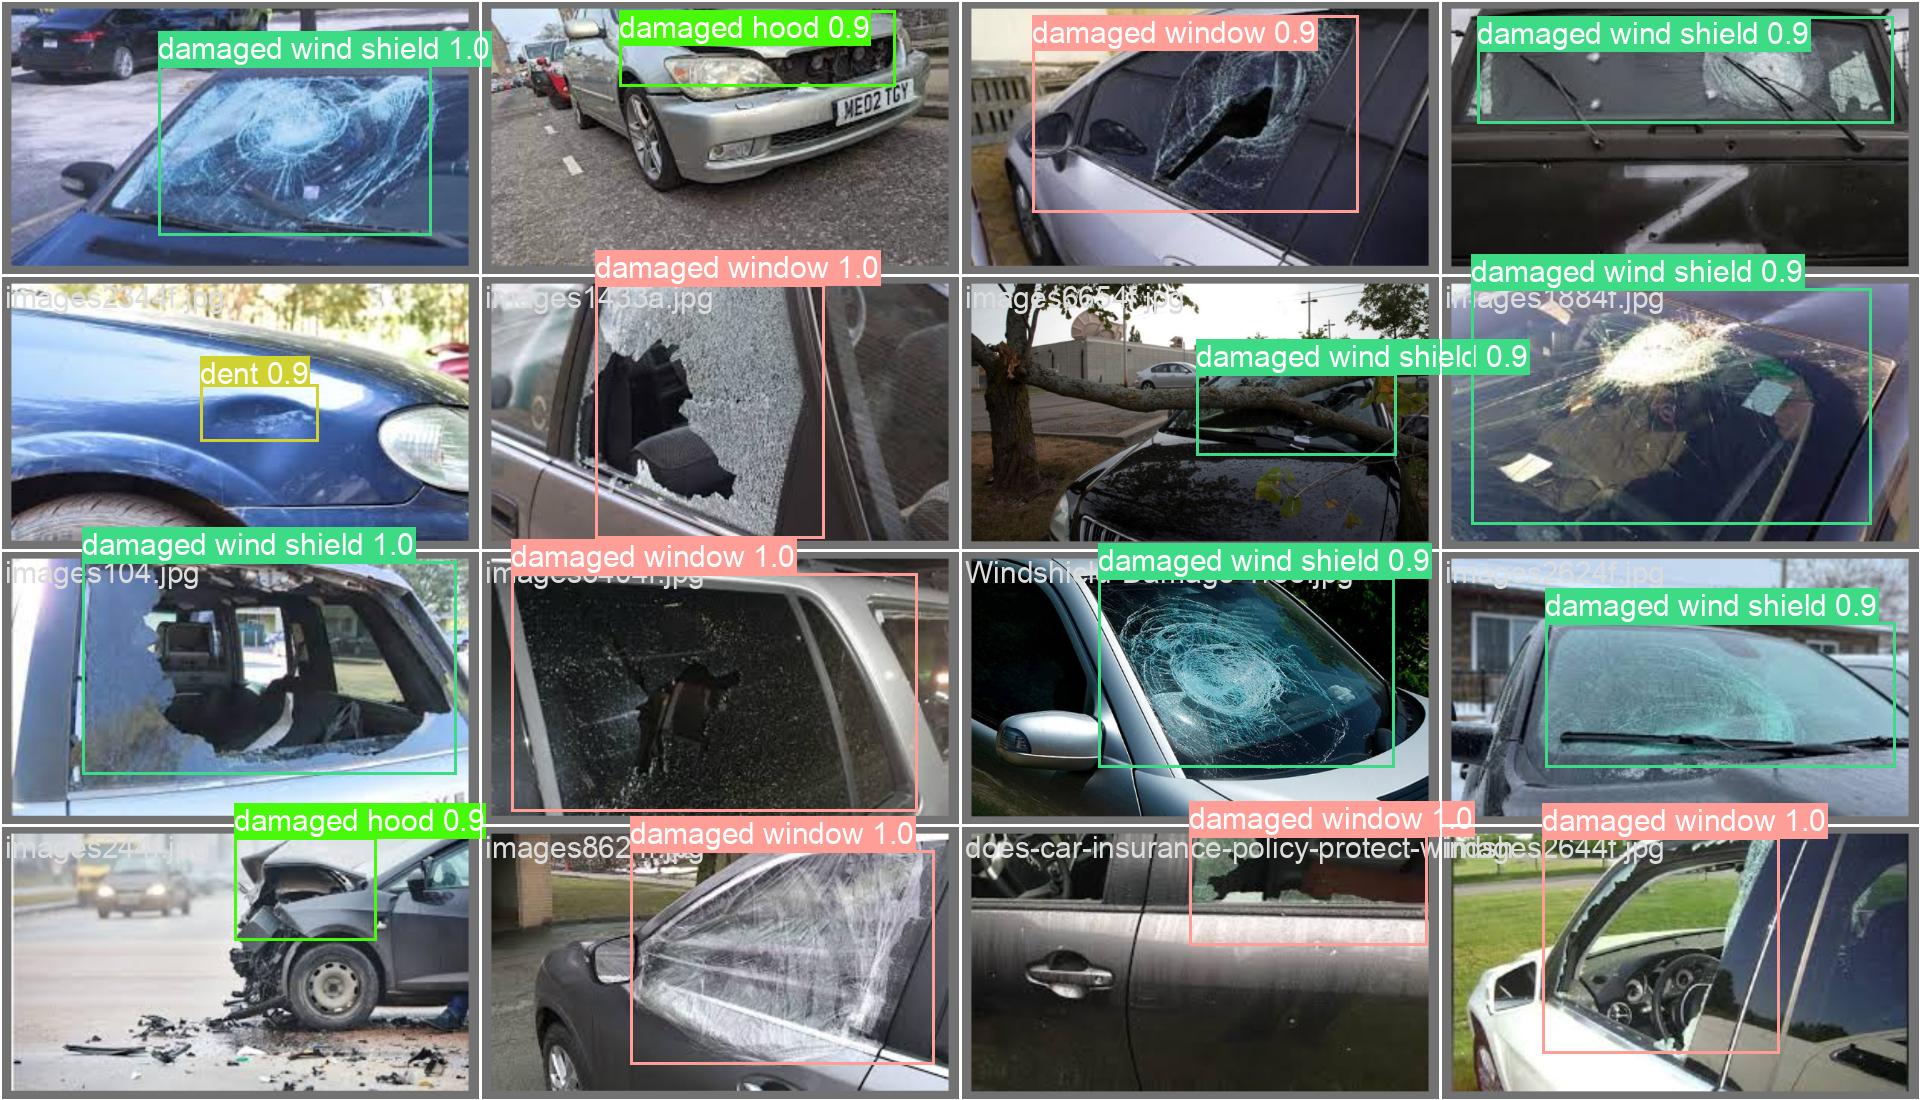
Also, prediction on validation images were also generated:
Testing for Verification
I wrote a script to predict the labels on any custom image. Make sure that opencv is installed in your system. It can be installed via:
pip install opencv-pythonThe code below will plot bounding boxes around the predicted classes if present in the image. Here is the code:
import cv2
from ultralytics import YOLO
img_pth = "1.jpeg"
model = YOLO("best.pt")
results = model(source=img_pth)
res_plotted = results[0].plot()
cv2.imshow("result", res_plotted)
cv2.waitKey(0)
And, I got the following result :
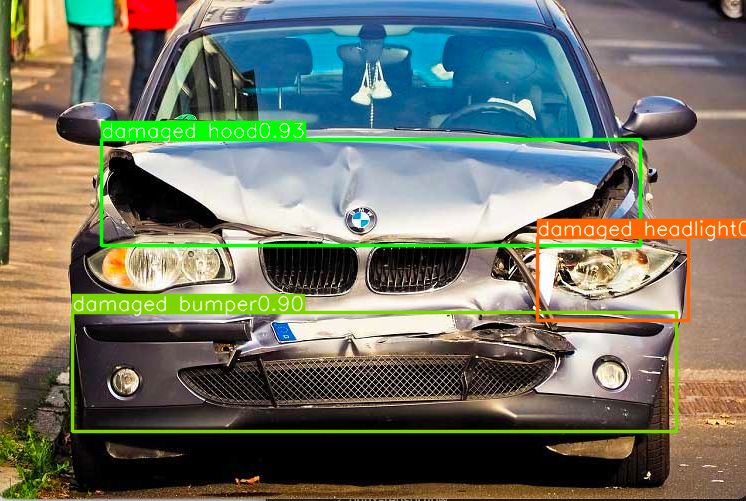
As we can see, the model has successfully been able to predict the labels with high accuracy of almost 90 percent, which is highly impressive.
Bring this project to life
Deployment Using FastAPI
Create a folder and name it "my_fastapi_app". In the folder create a python file called "main.py"
import io
import uvicorn
import numpy as np
import nest_asyncio
from enum import Enum
from fastapi import FastAPI, UploadFile, File, HTTPException
from fastapi.responses import StreamingResponse
import cv2
from typing import List
from numpy import ndarray
from typing import Tuple
from PIL import Image
import base64
from fastapi import Response
class Detection:
def __init__(self,
model_path: str,
classes: List[str]
):
self.model_path = model_path
self.classes = classes
self.model = self.__load_model()
def __load_model(self) -> cv2.dnn_Net:
net = cv2.dnn.readNet(self.model_path)
net.setPreferableTarget(cv2.dnn.DNN_TARGET_CUDA_FP16)
net.setPreferableTarget(cv2.dnn.DNN_TARGET_CPU)
return net
def __extract_ouput(self,
preds: ndarray,
image_shape: Tuple[int, int],
input_shape: Tuple[int, int],
score: float=0.1,
nms: float=0.0,
confidence: float=0.0
) -> dict[list, list, list]:
class_ids, confs, boxes = list(), list(), list()
image_height, image_width = image_shape
input_height, input_width = input_shape
x_factor = image_width / input_width
y_factor = image_height / input_height
rows = preds[0].shape[0]
for i in range(rows):
row = preds[0][i]
conf = row[4]
classes_score = row[4:]
_,_,_, max_idx = cv2.minMaxLoc(classes_score)
class_id = max_idx[1]
# print(classes_score[class_id])
if (classes_score[class_id] > score):
confs.append(conf)
label = self.classes[int(class_id)]
class_ids.append(label)
#extract boxes
x, y, w, h = row[0].item(), row[1].item(), row[2].item(), row[3].item()
left = int((x - 0.5 * w) * x_factor)
top = int((y - 0.5 * h) * y_factor)
width = int(w * x_factor)
height = int(h * y_factor)
box = np.array([left, top, width, height])
boxes.append(box)
r_class_ids, r_confs, r_boxes = list(), list(), list()
indexes = cv2.dnn.NMSBoxes(boxes, confs, confidence, nms)
for i in indexes:
r_class_ids.append(class_ids[i])
r_confs.append(confs[i]*100)
r_boxes.append(boxes[i].tolist())
return {
'boxes' : r_boxes,
'confidences': r_confs,
'classes': r_class_ids
}
def __call__(self,
image: ndarray,
width: int=640,
height: int=640,
score: float=0.1,
nms: float=0.0,
confidence: float=0.0
)-> dict[list, list, list]:
blob = cv2.dnn.blobFromImage(
image, 1/255.0, (width, height),
swapRB=True, crop=False
)
self.model.setInput(blob)
preds = self.model.forward()
preds = preds.transpose((0, 2, 1))
# extract output
results = self.__extract_ouput(
preds=preds,
image_shape=image.shape[:2],
input_shape=(height, width),
score=score,
nms=nms,
confidence=confidence
)
return results
detection = Detection(
model_path='best.onnx',
classes=['damaged door', 'damaged window', 'damaged headlight', 'damaged mirror', 'dent', 'damaged hood', 'damaged bumper', 'damaged wind shield']
)
app = FastAPI()
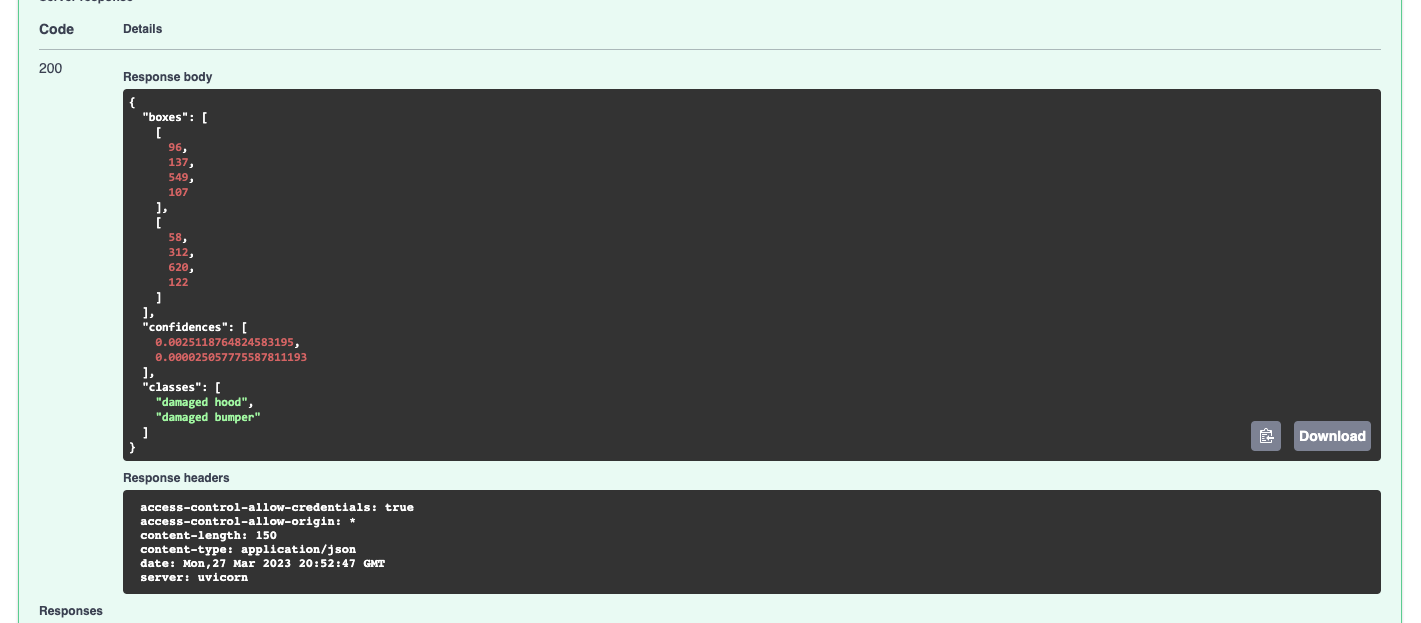
@app.post('/detection')
def post_detection(file: bytes = File(...)):
image = Image.open(io.BytesIO(file)).convert("RGB")
image = np.array(image)
image = image[:,:,::-1].copy()
results = detection(image)
return results
if __name__ == '__main__':
uvicorn.run("main:app", host="0.0.0.0", port=8080)The above code snippet preprocesses the images that are to be deployed and extracts the bounding boxes of detected objects. Once you run main.py, you have to be patient till 1153 epochs are run. This takes about 4 hours anf 50 minutes.
Install the following dependencies using pip:
pip install uvicorn
pip install numpy
pip install nest_asyncio
pip install fastapi
pip install Pillow
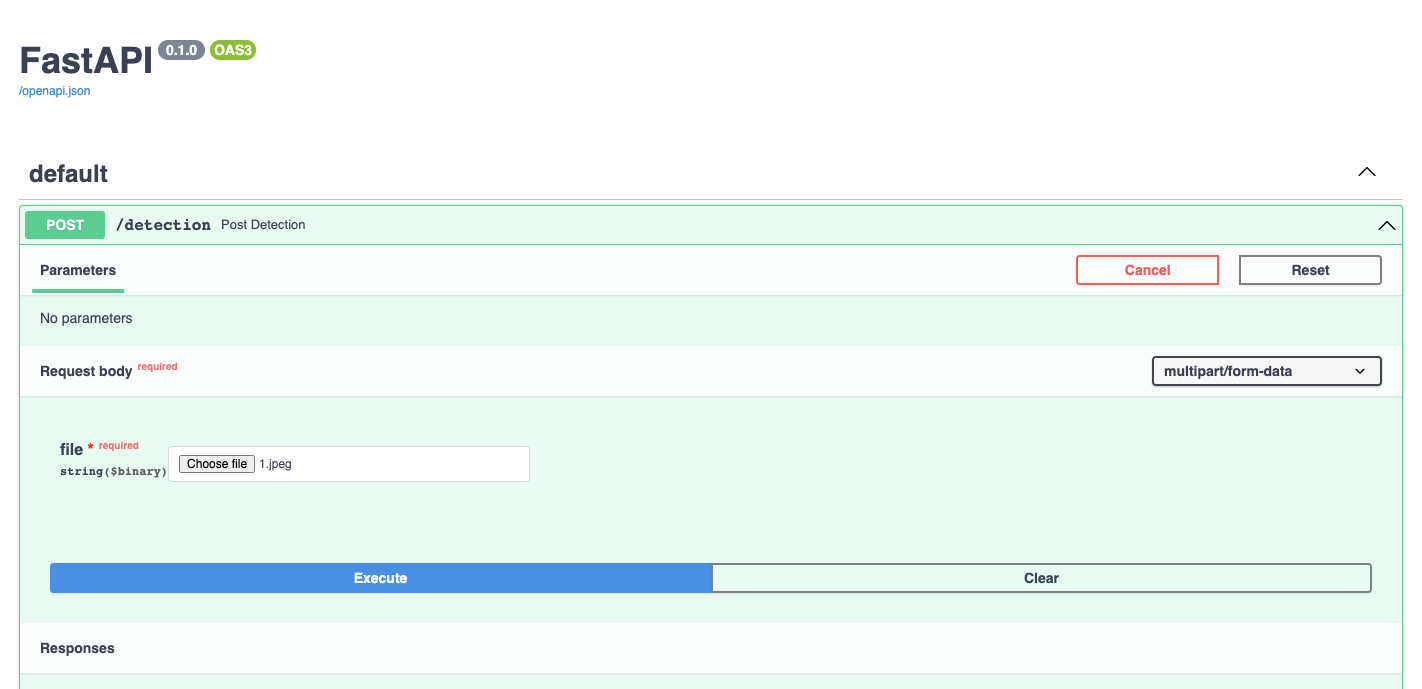
And then cd to "my_fastapi_app". Run main.py. You will be directed to localhost:8080 on your browser. Then go to /docs
Now, we have to send this to the React.js frontend. That's where axios comes into play.
Coding the Frontend Using React.js
Make sure that you have the latest version of node installed on your system. Then create the react app in the terminal using:
npx create-react-app frontend
Now, the directory structure should be something like this:
project/
├── my_fastapi_app/
│   ├── app/
│   │   ├── __init__.py
│   │   ├── main.py
│   │   └── ...
│   └── requirements.txt
├── data/
│   ├── images/
│   │   └── train/
│   └── labels/
│       └── train/
├── frontend/
│   ├── node_modules/
│   ├── public/
│   ├── src/
│   ├── package.json
│   ├── package-lock.json
│   ├── README.md
│   └── ...
├── train.py
└── config.yaml
Install axios using :
npm install axiosNow edit the app.js file and replace it with the following code:
import React, { useState } from 'react';
import axios from 'axios';

function App() {
  const [file, setFile] = useState(null);
  const [classes, setClasses] = useState([]);


  const handleFileChange = (event) => {
    setFile(event.target.files[0]);
  };

  const handleSubmit = (event) => {
    event.preventDefault();
    const formData = new FormData();
    formData.append('file', file);

    axios
    .post('http://0.0.0.0:8080/detection', formData ,
      {headers: {
        'Access-Control-Allow-Credentials': true
      }
    })

      .then((response) => {
        console.log(response.data)
        setClasses(response.data.classes);
      })
      .catch((error) => {
        console.error(error);
      });
  };

  return (
    <div>
      <form onSubmit={handleSubmit}>
        <input type="file" onChange={handleFileChange} />
        <button type="submit">Detect Objects</button>
      </form>


        {classes.map((classa,index) =>(

          <div key={index}>
            <p>class: {classa}</p>


</div>
    ) ) }


  </div>);
}

export default App;
The above code is a very basic implementation of react in order to display the class label. You can customize it according to your own needs.
Connecting the Frontend and The Backend
Having organized all the code pieces together now, lets run two terminals together, one for the FastAPI backend and other for the react.js frontend. Change directory to frontend in the new terminal and type the following:
npm run start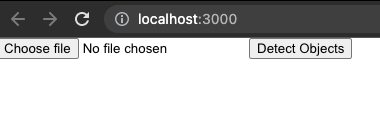
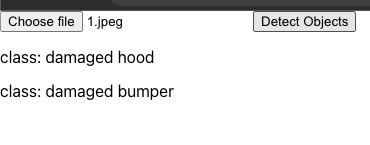
Now choose the same file 1.jpeg, and lets see the results:
Now choose a file which has no damage. For example this image:


As expected, no class is displayed.
Possible Problems You Might Run Into and How to Troubleshoot Them
- You should make sure that the file name of both the image and annotations are the same but their extension should be (.jpg, .jpeg,.png) in case of images and .txt in case of annotations.
- If in case you lost a file, be it image or annotation, you are in big trouble. One thing you can do is delete the corresponding img file if the annotation is missing or vice versa. But since we have a large number of files, it sometimes becomes difficult to place exactly which file is missing in case the naming convention is random. To fix this I wrote a python script:
import os
import pandas as pd

# set the path to the folder containing the files
folder_path = 'path/to/folder/'

# get a list of file names in the folder
file_names = os.listdir(folder_path)

# remove the extensions from the file names
file_names_no_ext = [os.path.splitext(f)[0] for f in file_names]

# create a pandas DataFrame with the file names
df1 = pd.DataFrame({'File Name': file_names_no_ext})

missing_file_name = df1[~df1['File Name'].isin(df2['File Name'])]['File Name'].values[0]

# print the missing file name
print(f"The missing file name is {missing_file_name}.")
The above code snippet will help find out the name of the missing file and we can manually delete it.
- Make sure that the folder structure is exactly correct like I have shown above, otherwise you will run into asyncio errors.
- In case of class imbalance, you can solve the problem by data augmentation, sampling techniques, or assigning weights to the less represented classes.
Other alternatives for deployment
You can also try flask, streamlit, etc to deploy your model.
In case you are using streamlit, you can use the following code snippet:
import streamlit as st
import torch
from PIL import Image, ImageDraw
from ultralytics import YOLO

# Load YOLOv8 model
model = attempt_load('path/to/model.pt', map_location=torch.device('cpu'))

# Load input image
image = Image.open('path/to/image.jpg').convert('RGB')

# Resize image
image_size = 640
image = letterbox(image, new_shape=image_size)[0]

# Convert image to tensor
image = torch.Tensor(image).unsqueeze(0)

# Perform inference
output = model(image)[0]

# Perform non-maximum suppression to remove overlapping detections
output = non_max_suppression(output, conf_thres=0.5, iou_thres=0.5)

# Draw bounding boxes on the input image
draw = ImageDraw.Draw(image)
for detection in output[0]:
    x1, y1, x2, y2, conf, cls = detection.cpu().numpy()
    draw.rectangle([(x1, y1), (x2, y2)], outline=(255, 0, 0), width=3)
    draw.text((x1, y1 - 20), f'{int(conf*100)}% {cls}', fill=(255, 0, 0))

# Display input and output images
st.image([image, output_image], width=300)
You can run the above code using "streamlit run deployment.py" and it will direct you to a sleek UI where you can upload the image and view the results.
Outro
I hope I have covered all the aspects of the latest YOLO model and it can be used by anyone out there who is trying to train it on a custom dataset and deploy it to production. You can also opt to use Gradient by Paperspace for training. Let me know in the comments how else the whole process can be improved. Till then, happy reading!