
FLUX has been taking the internet by storm this past month, and for good reason. Their claims of superiority to models like DALLE 3, Ideogram, and Stable Diffusion 3 have proven well founded. With capability to use the models being added to more and more popular Image Generation tools like Stable Diffusion Web UI Forge and ComyUI, this expansion into the Stable Diffusion space will only continue.
Since the model's release, we have also seen a number of important advancements to the user workflow. These notably include the release of the first LoRA (Low Rank Adaptation models) and ControlNet models to improve guidance. These allow users to impart a certain amount of direction towards the text guidance and object placement respectively.
In this article, we are going to look at one of the first methodologies for training our own LoRA on custom data from AI Toolkit. From Jared Burkett, this repo offers us the best new way to quickly fine-tune either FLUX schnell or dev in quick succession. Follow along to see all the steps required to train your own LoRA with FLUX.
Bring this project to life
Setting up the H100
How to create a new machine on the Paperspace Console
To get started, we recommend a powerful GPU or Multi-GPU set up on DigitalOcean by Paperspace. Spin up a new H100 or multi-way A100/H100 Machine by clicking on the Gradient/Core button in the top left of the Paperspace console, and switching into Core. From there, we click the create machine button on the far right.
Be sure when creating our new machine to select the right GPU and template, namely ML-In-A-Box, which comes pre-installed with most of the packages we will be using. We also should select a machine with sufficiently large storage (greater than 250 GB), so that we won't run into potential memory issues after training the models.
Once that's complete, spin up your machine, and then either access your machine from the Desktop stream in your browser or SSH in from your local machine.
Data Preparation
Now that we are all setup, we can begin loading in all of our data for the training. To select your data for training, choose a subject that is distinctive in camera or images that we can easily obtain. This can either be a style or specific type of object/subject/person.
For example, we chose to train on the author of this article's face. To achieve this, we took about 30 selfies at different angles and distances using a high quality camera. These images were then cropped square, and renamed to fit the format needed for naming. We then used Florence-2 to automatically caption each of the images, and save those captions in their own text files corresponding to the images.
The data must be stored in its own directory in the following format:
---|
  Your Image Directory
   |
------- img1.png
------- img1.txt
------- img2.png
------- img2.txt
...
The images and text files must follow the same naming convention
To achieve all this, we recommend adapting the following snippet to run automatic labeling. Run the following code snippet (or label.py in the GitHub repo) on your folder of images.
!pip install -U oyaml transformers einops albumentations python-dotenv

import requests
import torch
from PIL import Image
from transformers import AutoProcessor, AutoModelForCausalLM
import os

device = "cuda:0" if torch.cuda.is_available() else "cpu"
torch_dtype = torch.float16 if torch.cuda.is_available() else torch.float32


model_id = 'microsoft/Florence-2-large'
model = AutoModelForCausalLM.from_pretrained(model_id, trust_remote_code=True, torch_dtype='auto').eval().cuda()
processor = AutoProcessor.from_pretrained(model_id, trust_remote_code=True)


prompt = "<MORE_DETAILED_CAPTION>"

for i in os.listdir('<YOUR DIRECTORY NAME>'+'/'):
    if i.split('.')[-1]=='txt':
        continue
    image = Image.open('<YOUR DIRECTORY NAME>'+'/'+i)

    inputs = processor(text=prompt, images=image, return_tensors="pt").to(device, torch_dtype)

    generated_ids = model.generate(
      input_ids=inputs["input_ids"],
      pixel_values=inputs["pixel_values"],
      max_new_tokens=1024,
      num_beams=3,
      do_sample=False
    )
    generated_text = processor.batch_decode(generated_ids, skip_special_tokens=False)[0]

    parsed_answer = processor.post_process_generation(generated_text, task="<MORE_DETAILED_CAPTION>", image_size=(image.width, image.height))
    print(parsed_answer)
    with open('<YOUR DIRECTORY NAME>'+'/'+f"{i.split('.')[0]}.txt", "w") as f:
        f.write(parsed_answer["<MORE_DETAILED_CAPTION>"])
        f.close()
Once this is completed running on your image folder, the captioned text files will be saved in corresponding naming to the images. From here, we should have everything ready to get started with the AI Toolkit!
Setting up the training loop
We are basing this work on the Ostris repo, AI Toolkit, and want to shout them out for their awesome work.
To get started with the AI Toolkit, first take the following code and paste it to setup the environment in your terminal:
git clone https://github.com/ostris/ai-toolkit.git
cd ai-toolkit
git submodule update --init --recursive
python3 -m venv venv
source venv/bin/activate
pip3 install -r requirements.txt
pip install peft
pip3 install torch torchvision torchaudio --index-url https://download.pytorch.org/whl/cu118
This should take a few minutes.
From here, we have one final step to complete. Add a read only token to the HuggingFace Cache by logging in with the following terminal command:
huggingface-cli loginOnce setup is completed, we are ready to begin the training loop.
Bring this project to life
Configuring the training loop
AI Toolkit provides a training script, run.py, that handles all the intricacies of training a FLUX.1 model.
It is possible to fine-tune either a schnell or dev model, but we recommend training the dev model. dev has a more limited license for use, but it is also far more powerful in terms of prompt understanding, spelling, and object composition compared to schnell. schnell however should be far faster to train, due to its distillation.
run.py takes a yaml configuration file to handle the various training parameters. For this use case, we are going to edit the train_lora_flux_24gb.yaml file. Here is an example version of the config:
---
job: extension
config:
  # this name will be the folder and filename name
  name: <YOUR LORA NAME>
  process:
    - type: 'sd_trainer'
      # root folder to save training sessions/samples/weights
      training_folder: "output"
      # uncomment to see performance stats in the terminal every N steps
#      performance_log_every: 1000
      device: cuda:0
      # if a trigger word is specified, it will be added to captions of training data if it does not already exist
      # alternatively, in your captions you can add [trigger] and it will be replaced with the trigger word
#      trigger_word: "p3r5on"
      network:
        type: "lora"
        linear: 16
        linear_alpha: 16
      save:
        dtype: float16 # precision to save
        save_every: 250 # save every this many steps
        max_step_saves_to_keep: 4 # how many intermittent saves to keep
      datasets:
        # datasets are a folder of images. captions need to be txt files with the same name as the image
        # for instance image2.jpg and image2.txt. Only jpg, jpeg, and png are supported currently
        # images will automatically be resized and bucketed into the resolution specified
        # on windows, escape back slashes with another backslash so
        # "C:\\path\\to\\images\\folder"
        - folder_path: <PATH TO YOUR IMAGES>
          caption_ext: "txt"
          caption_dropout_rate: 0.05  # will drop out the caption 5% of time
          shuffle_tokens: false  # shuffle caption order, split by commas
          cache_latents_to_disk: true  # leave this true unless you know what you're doing
          resolution: [1024]  # flux enjoys multiple resolutions
      train:
        batch_size: 1
        steps: 2500  # total number of steps to train 500 - 4000 is a good range
        gradient_accumulation_steps: 1
        train_unet: true
        train_text_encoder: false  # probably won't work with flux
        gradient_checkpointing: true  # need the on unless you have a ton of vram
        noise_scheduler: "flowmatch" # for training only
        optimizer: "adamw8bit"
        lr: 1e-4
        # uncomment this to skip the pre training sample
#        skip_first_sample: true
        # uncomment to completely disable sampling
#        disable_sampling: true
        # uncomment to use new vell curved weighting. Experimental but may produce better results
        linear_timesteps: true

        # ema will smooth out learning, but could slow it down. Recommended to leave on.
        ema_config:
          use_ema: true
          ema_decay: 0.99

        # will probably need this if gpu supports it for flux, other dtypes may not work correctly
        dtype: bf16
      model:
        # huggingface model name or path
        name_or_path: "black-forest-labs/FLUX.1-dev"
        is_flux: true
        quantize: true  # run 8bit mixed precision
#        low_vram: true  # uncomment this if the GPU is connected to your monitors. It will use less vram to quantize, but is slower.
      sample:
        sampler: "flowmatch" # must match train.noise_scheduler
        sample_every: 250 # sample every this many steps
        width: 1024
        height: 1024
        prompts:
          # you can add [trigger] to the prompts here and it will be replaced with the trigger word
#          - "[trigger] holding a sign that says 'I LOVE PROMPTS!'"\
          - "woman with red hair, playing chess at the park, bomb going off in the background"
          - "a woman holding a coffee cup, in a beanie, sitting at a cafe"
          - "a horse is a DJ at a night club, fish eye lens, smoke machine, lazer lights, holding a martini"
          - "a man showing off his cool new t shirt at the beach, a shark is jumping out of the water in the background"
          - "a bear building a log cabin in the snow covered mountains"
          - "woman playing the guitar, on stage, singing a song, laser lights, punk rocker"
          - "hipster man with a beard, building a chair, in a wood shop"
          - "photo of a man, white background, medium shot, modeling clothing, studio lighting, white backdrop"
          - "a man holding a sign that says, 'this is a sign'"
          - "a bulldog, in a post apocalyptic world, with a shotgun, in a leather jacket, in a desert, with a motorcycle"
        neg: ""  # not used on flux
        seed: 42
        walk_seed: true
        guidance_scale: 4
        sample_steps: 20
# you can add any additional meta info here. [name] is replaced with config name at top
meta:
  name: "[name]"
  version: '1.0'
The most important lines we are going to edit are going to be found on lines 5 -where we change the name, 30 - where we add the path to our image directory, and 69 and 70 - where we can edit the height and width to reflect our training images. Edit these lines to correspondingly attune the trainer to run on your images.
Additionally, we may want to edit the prompts. Several of the prompts refer to animals or scenes, so if we are trying to capture a specific person, we may want to edit these to better inform the model. We can also further control these generated samples using the guidance scale and sample steps values on lines 87-88.
We can further optimize training the model by editing the batch size, on line 37, and the gradient accumulation steps, line 39, if we want to more quickly train the FLUX.1 model. If we are training on a multi-GPU or H100, we can raise these values up slightly, but we otherwise recommend they be left the same. Be wary raising them may cause an Out Of Memory error.
On line 38, we can change the number of training steps. They recommend between 500 and 4000, so we are going in the middle with 2500. We got good results with this value. It will checkpoint every 250 steps, but we can also change this value on line 22 if needed.
Finally, we can change the model from dev to schnell by pasting the HuggingFace id for schnell in on line 62 ('black-forest-labs/FLUX.1-schnell'). Now that everything has been set up, we can run the training!
Running the FLUX.1 Training Loop
To run the training loop, all we need to do now is use the run.py script.
python3 run.py config/examples/train_lora_flux_24gb.yamlFor our training loop, we used 60 images training for 2500 steps on a single H100. The total process took approximately 45 minutes to run. Afterwards, the LoRA file and its checkpoints were saved in Downloads/ai-toolkit/output/my_first_flux_lora_v1/.
In the outputs directory, we can also find the samples generated by the model using the previously mentioned prompts in the config. These can be used to see how progress is being made on training.
Inference with our new FLUX.1 LoRA
Now that the model has completed training, we can use the newly trained LoRA to adjust our outputs of FLUX.1. We have provided a quick inference script to use in the Notebook.
import torch
from diffusers import DiffusionPipeline
model_id = 'black-forest-labs/FLUX.1-dev'
adapter_id = f'output/{lora_name}/{lora_name}.safetensors'
pipeline = DiffusionPipeline.from_pretrained(model_id)
pipeline.load_lora_weights(adapter_id)
prompt = "ethnographic photography of man at a picnic"
negative_prompt = "blurry, cropped, ugly"
pipeline.to('cuda' if torch.cuda.is_available() else 'mps' if torch.backends.mps.is_available() else 'cpu')
image = pipeline(
prompt=prompt,
num_inference_steps=50,
generator=torch.Generator(device='cuda' if torch.cuda.is_available() else 'mps' if torch.backends.mps.is_available() else 'cpu').manual_seed(1641421826),
width=1152,
height=768,
).images[0]
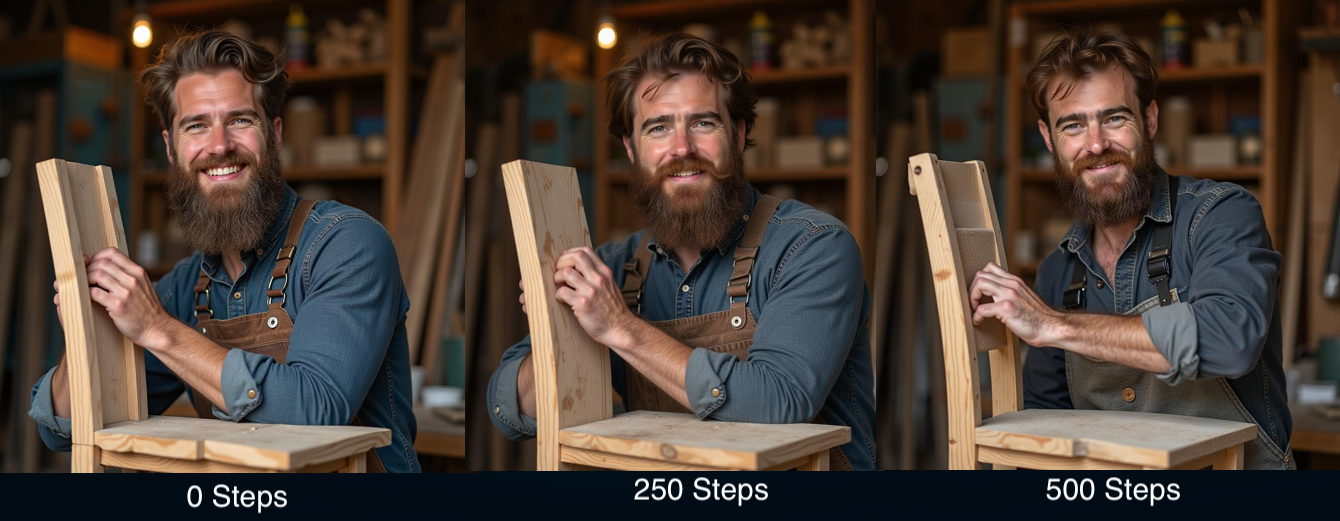
display(image)Fine-tuned on the author of this article's face for only 500 steps, we were able to achieve this fairly accurate recreation of their features:

This process can be applied to any sort of object, subject, concept or style for LoRA training. We recommend trying a wide variety of images that capture the subjects/style in as diverse a selection as possible, just like with Stable Diffusion.
Closing Thoughts
FLUX.1 is truly the next step forward, and we, personally, cannot stop using it for all sorts of art tasks. It is rapidly replacing all other image generators, and for very good reason.
This tutorial showed how to fine-tune a LoRA model for FLUX.1 using GPUs on the cloud. Readers should walk away with an understanding of how to train custom LoRAs using the techniques shown within.
Check back here for more FLUX.1 blogposts in the near future!