One of the greatest promises of deep learning has been the advent of generated media. This is largely because generated media is one of the, currently, most easily monetized solutions that is offered by these frameworks. Generated media, regardless of format be it video, audio, text or others, has the potential to be translated into content for a plethora of different purposes. By harnessing this creative power, we can automate a huge portion of the creative process on associated tasks, and the technology has no reached the point that this content can even be sometimes indistinguishable from content made by true human actors. This is particularly true for NLP and computer vision related tasks.
One of the areas that has yet to be revolutionized by this is animation. It isn't true that animation is untouched by deep learning, as some enterprising engineers have come up with novel methods for inputting instructions to animate existing 3D figures &, conversely, others have created methods to generate novel, textures for static 3D models. But nonetheless, the idea of using a simple text prompt to generate a fully animated 3D figure has been a promise of the future until now.
The exciting new project that takes on this task is AvatarCLIP. Authored by Fangzhou Hong, Mingyuan Zhang, Liang Pan, Zhongang Cai, Lei Yang, and Ziwei Liu, the original paper demonstrates their innovative new method to generate a coarse SMPL (Skinned Multi-Person Linear) model figure, texture and sculpt it based on text prompts, and then animate it to perform some movement using only a text prompt. It does this through a clever integration with OpenAI's CLIP, an even more clever architecture.
In part one of this look at AvatarCLIP, we are going to examine their methodology to generate the initial SMPL figure model and texture it using CLIP. We will then show how to use this technique within a Gradient Notebook to generate a static model from one of their example configurations: Saitama from One Punch Man. In part 2, we will look at animating the figure to complete the full AvatarCLIP pipeline.
AvatarCLIP
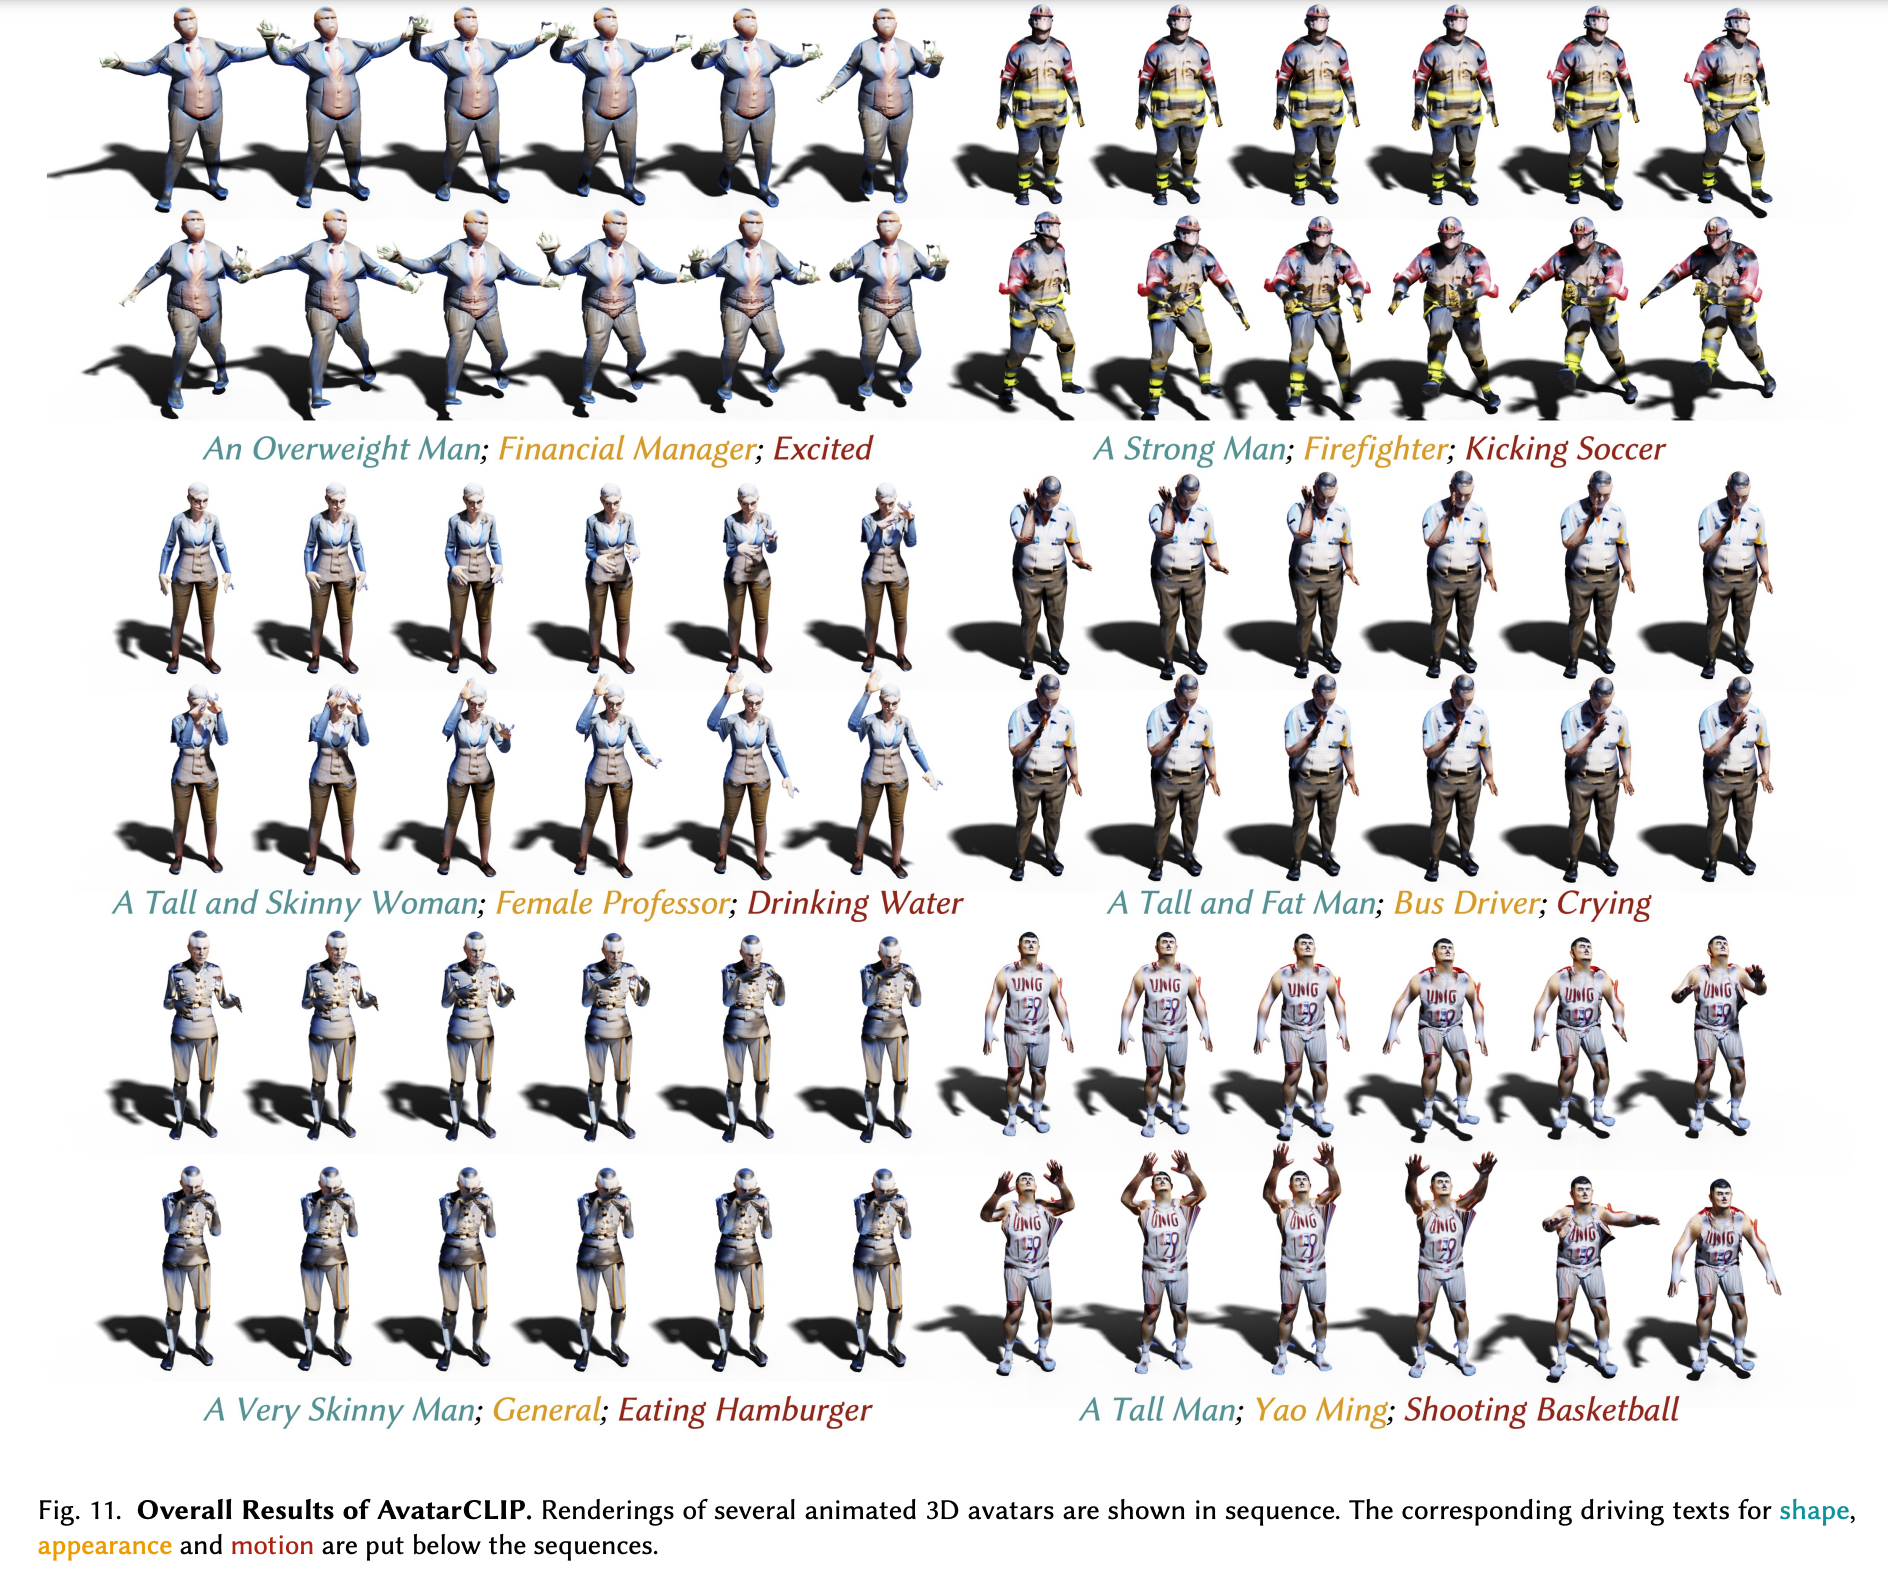
AvatarCLIP works in a series of clearly defined steps that together forms a pipeline to animate the novel creation. As we can see in the sample image above, this goes essentially in three steps where the initial figure is created, then textured and sculpted to match the descriptor elements from the prompt, and finally the Marching Cube algorithm will apply the inputted motion prompts to animate the figure. We will examine the full pipeline in this article, but it's worth noting that the code to animate the figure is in active development. As such, the animation portion of the code will be covered upon release. Look out for part 2 by following us on twitter at @Paperspace.
How it works
In the video above, from the project authors, they show their proprietary interface for text-driven avatar generation and animation. Following the steps we described above, they show a widely varying selection of characters can be modeled and animated. Let's break down what's going on here.
First, AvatarCLIP generates a Coarse Shape Mesh to use as the baseline figure. A mesh is a collection of vertices, edges, and faces that describe the shape of a 3D object. The CLIP model intakes the shape text prompts to determine what base shape should be used for the figure. This baseline figure is our starting place, but it is grey and featureless to start. Textures and sculpting is applied in the next stage based on the appearance and shape text prompts. Simultaneously, the CLIP model interprets the motion text prompt to find descriptive elements for motion the figure will follow. It then generates a series of appropriate reference poses for the model to follow based on these motion prompts. AvatarCLIP then integrates the functions of these two pipelines by moving the now textured figure through a timeline of the reference poses, resulting in a coherent animation of the figure.
Architecture
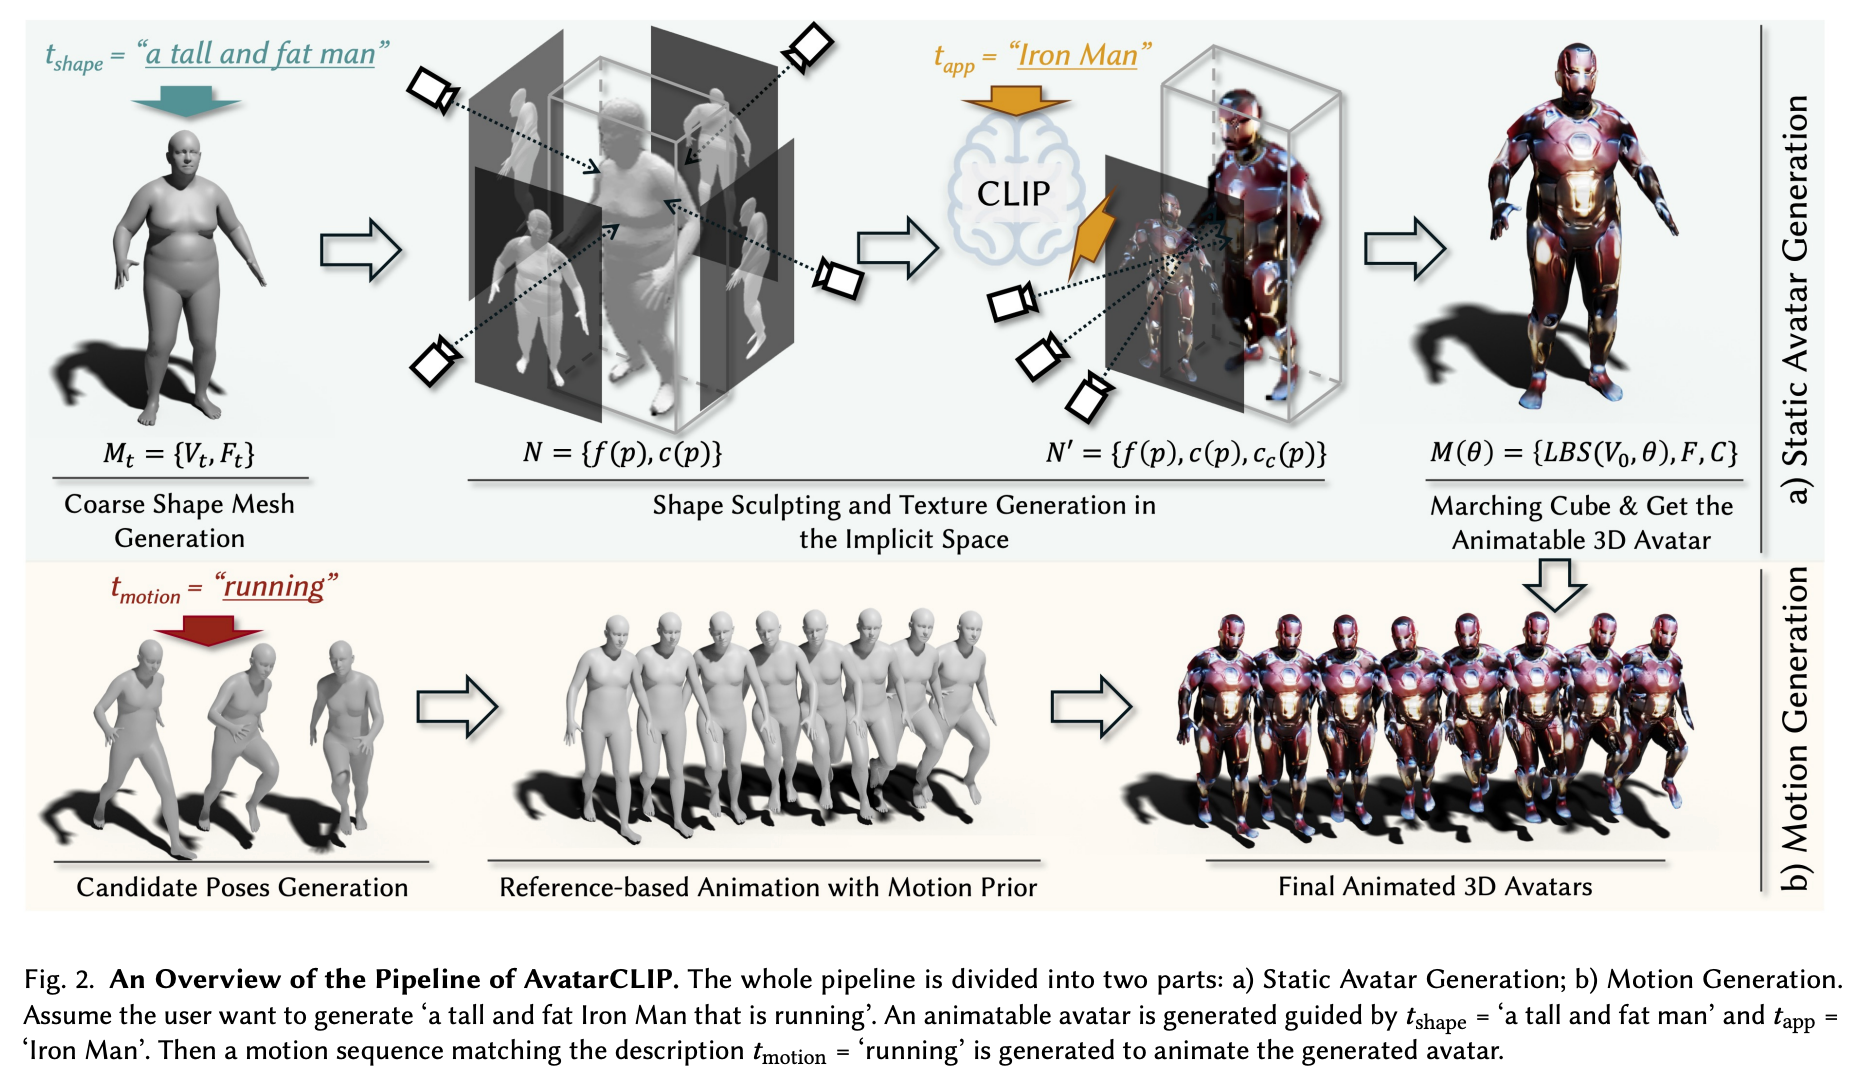
Now that we understand what's going on with AvatarCLIP, let's examine this pipeline under the hood to get a better idea of how the integrated model pipeline makes it happen. The first thing we need to understand is that this is in two fundamental stages: avatar generation and motion generation. Let's take a look a little closer at each stage, and see how each stage of generation is made possible. (In the code demo section, we will cover the former in part one of this series. Part 2 will cover motion generation.)
The overall goal of AvatarCLIP is to create a "zero-shot text-driven 3D avatar generation and animation." In other words, they need the model to work with prompts outside the scope of their training paradigm with a model that is flexible enough to deal with unknown terms. Fortunately, the text portion of this is well covered by CLIP.
To do this, they start with natural language inputs in the form of text, where text = {tshape, tapp, tmotion}. These are three separate text prompts that correspond to the descriptions of the desired body shape, appearance, and motion that we want to use for our final animation.
Coarse Avatar generation
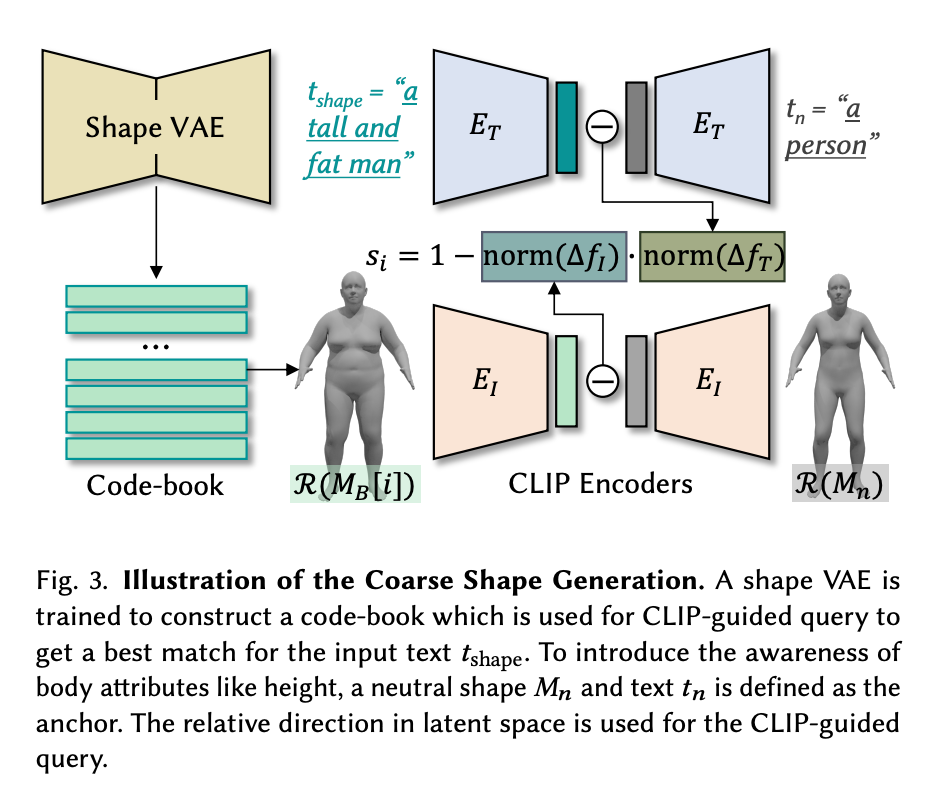
The first two prompts tshape and tapp are used to texture and sculpt the SMPL model before animation, respectively. To do this, the code first generates a coarse SMPL figure via a shape VAE that was trained to construct a code-book for CLIP-guided queries to get the best match for the input text tshape. Now we have our rough, untextured figure mesh Mt to serve as our baseline.
Fine texturing and sculpting
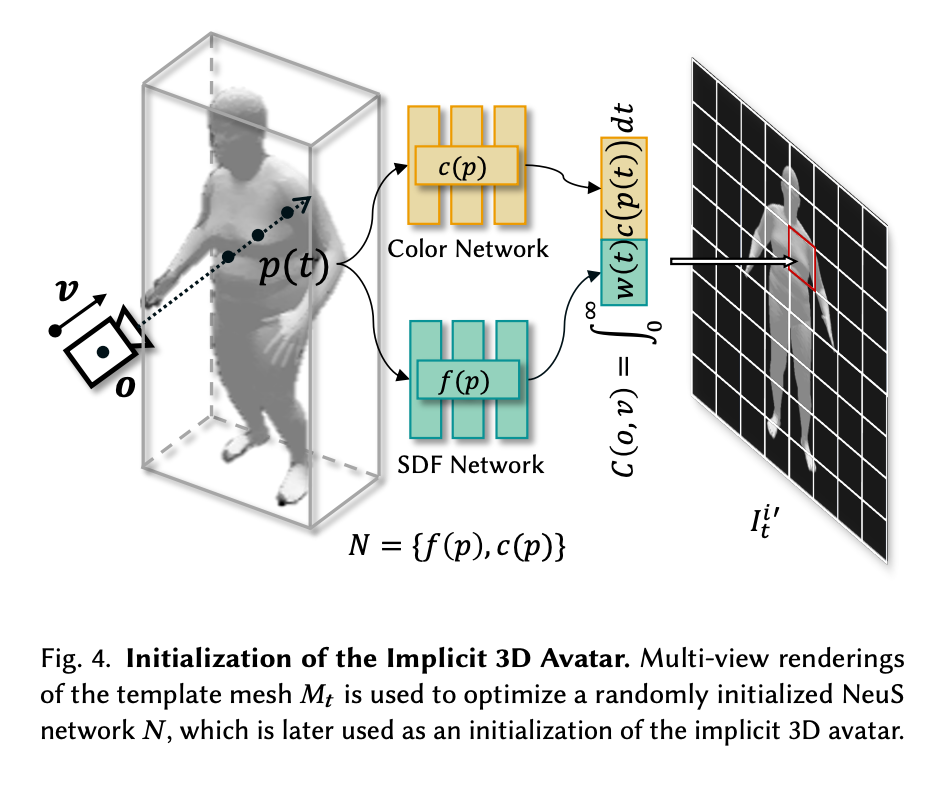
The authors then opted to accelerate the optimization of the coarse to fine detailing of the figure by separating out the steps of further coloring and sculpting to a two stage process. First, Mt is used to optimize a randomly intialized NeuS network, N. This creates an implicit equivalent representation of Mt. The NeuS network is comprised of two MLP sub-networks. "The SDF network 𝑓(𝑝) takes some point 𝑝 as input, and outputs the signed distance to its nearest surface. The color network 𝑐(𝑝) takes some point 𝑝 as input and outputs the color at that point." (Source) These perform an initial, more minor recoloring and sculpting of the figure.
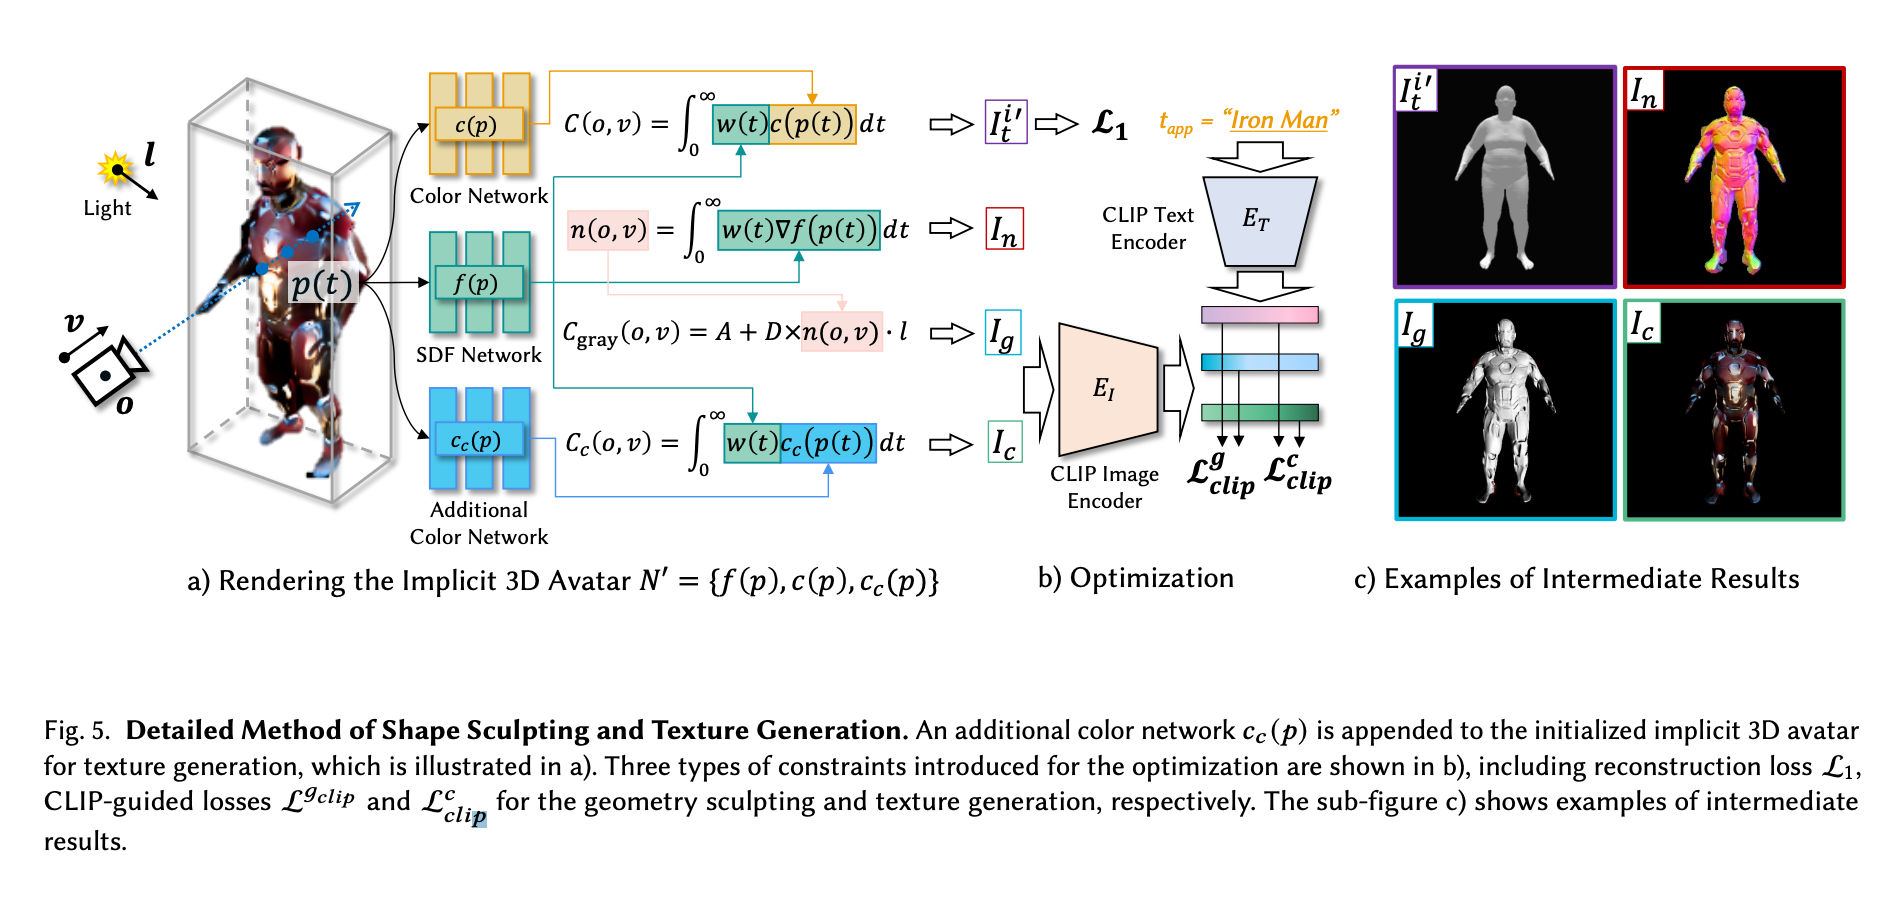
In the next stage, fine detailing and sculpting takes place. In order to not suffer any loss in capability for coloring or sculpting, the authors appended an additional color network for the initialized implicit 3D avatar for texture generation (see above). Each of the color networks works with the SDF network for different tasks simultaneously: the original c(p) color network and f(p) SDF network are used to reconstruct the mesh Mt using guidance from a CLIP text encoder to match the tapp prompt, and the Cc(p), the additional network, and SDF network f(p) then perform the finer level detailing guided by the CLIP encoded image. Using CLIP guided loss, together this system will then generate a finely detailed figure that approximates the input prompt in terms of shape and detail, but without a pose.
Pose generation
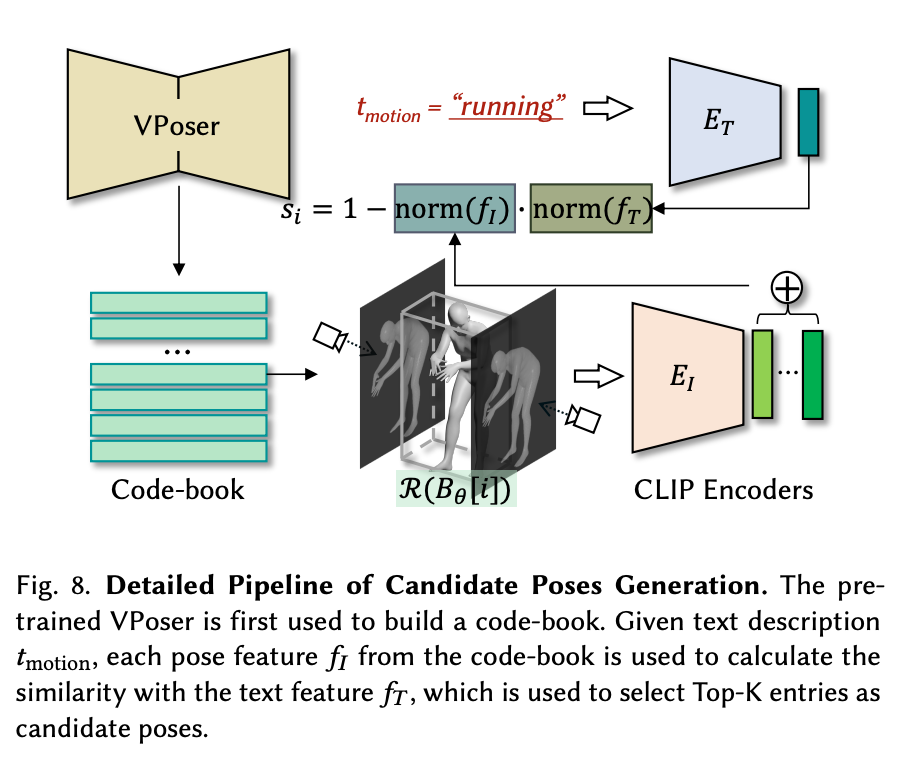
To animate the figure into poses, we need to go back to the start of the generation process. Before any posing or coloring goes on, they first have a pre-trained VAE called VPoser to build a code-book of representations for the prompts using the AMASS dataset. This is meant to collect as many possible descriptive body types for the SMPL model body shape as possible. This code-book is then used to guide a series of candidate poses generated with CLIP. These poses are then used for motion sequences generation using motion priors with the candidate poses as references.
The pipeline uses the text description tmotion, where each pose feature 𝑓𝐼 from the code-book is used to calculate the similarity with the text feature 𝑓𝑇 , which is used to select Top-K entries as candidate poses. These poses are then selected as the candidate pose set S to be passed on to the motion animation stage.
Going from a sequence of poses to animation
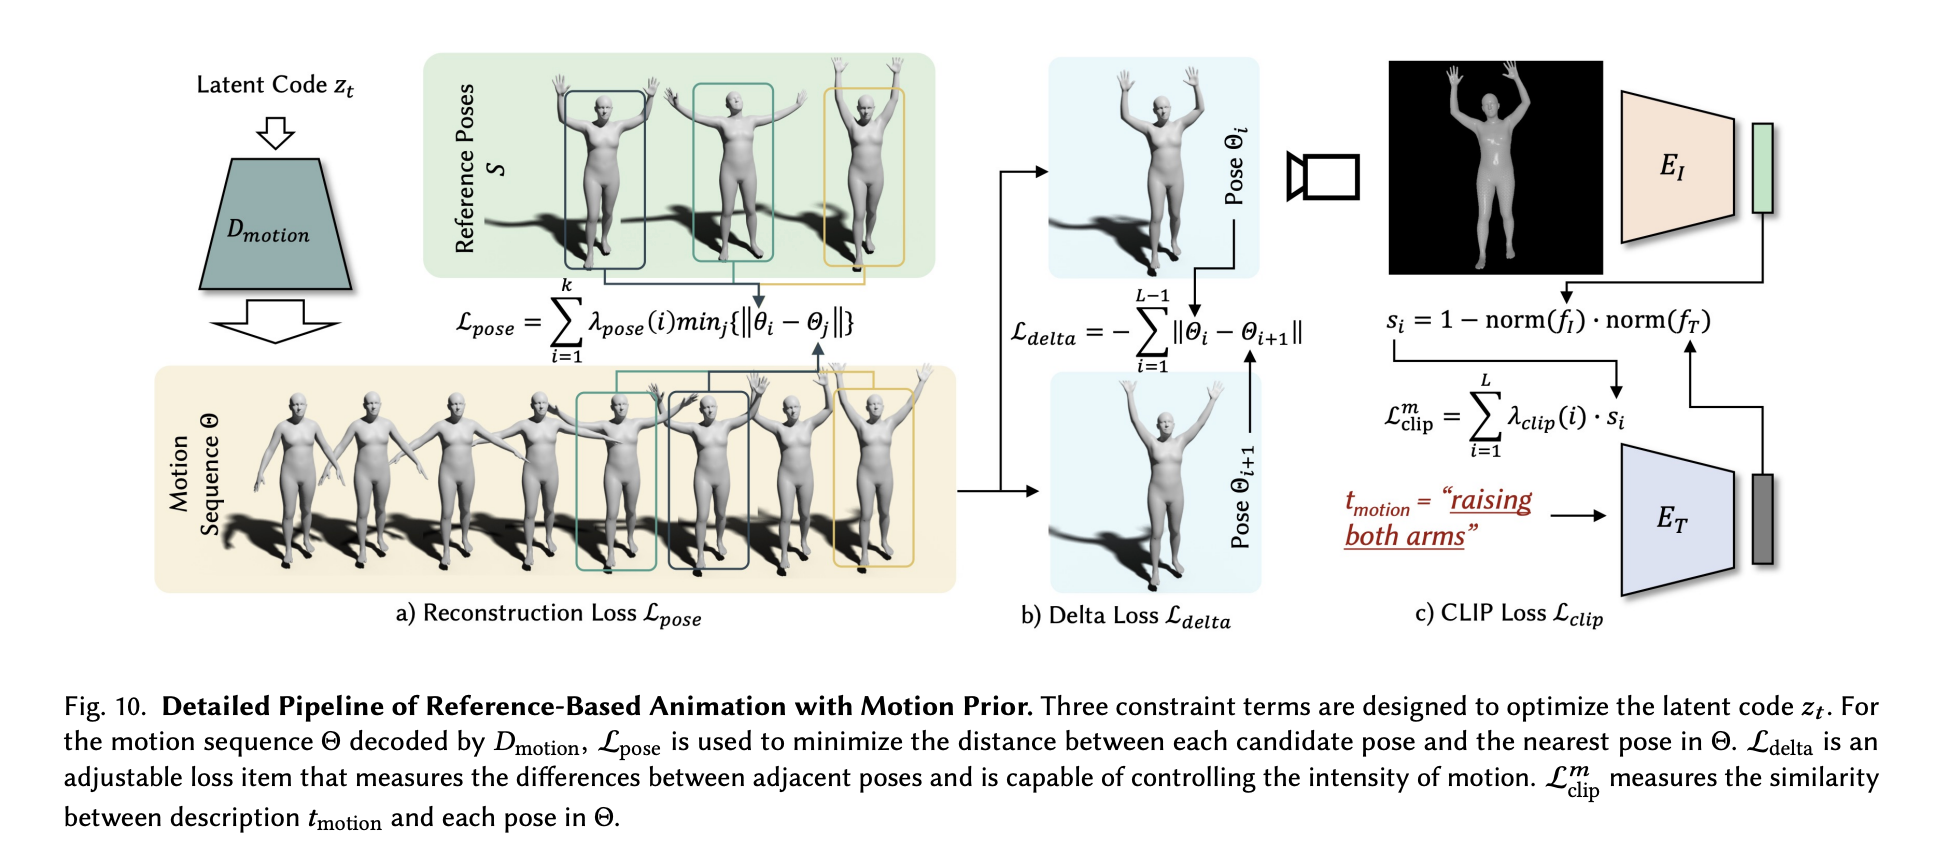
To capture the poses in a sequence we can transfer to our mesh, a motion VAE is first trained to capture human motion priors. With the pretrained VAE now recognizing human like motion in SMPL models, we can then optimize the latent code of the motion VAE using candidate poses 𝑆 as references. For this, three loss terms are used to optimize our motion to more closely match the prompt. The first, the pose loss, acts as the baseline. This loss could be used alone to reconstruct the original poses, but the authors argued this introduced an uncanny looking smoothness to the motion. To further optimize this loss function, they introduce two other loss functions to adjust loss pose. Delta loss measures the differences between adjacent poses, and is used to affect the intensity of the motion. Finally, Loss CLIP measures the similarity between the description in tmotion and each pose in the sequence. Together, these loss function optimize the pose sequence to give us sequence Θ, which can be used to represent the animation steps of the coarse model poses.
Putting it all together
The output is thus two-part. First, an animatable 3D avatar represented as a mesh, Mt. This is represented as 𝑀 = {𝑉, 𝐹, 𝐶} in the paper, where 𝑉 is the vertices, 𝐹 stands for faces, and 𝐶 represents the vertex colors. The second output is then the sequence of poses comprising the desired motion. When combined, we get a fully shaped and textured figure, generated to correspond to tshape and tapp, moving through a timeline of poses that were interpreted from tmotion.
Let's now take a look at how we get the first output with code in the next section.
Bring this project to life
AvatarCLIP Code Demo
To run this on Gradient, first start up a Gradient Notebook on a PyTorch runtime with any GPU you like (though it's worth noting that this will be a lengthy training sequence even on an A100-80GB). You will then want to make this URL the Workspace URL by toggling the advanced options toggle and pasting it into the field. Then create the Notebook.
In this demo we will demonstrate primarily how the fine detailing and sculpting stage of the avatar generation is conducted.
Set up the environment
Once your notebook is spun up, open up and enter the following into a terminal to get started setting up our environment. This is also described in the notebook.
# Needed repos
git clone https://github.com/gradient-ai/AvatarCLIP.git
git clone https://github.com/hongfz16/neural_renderer.git

# First set of requirements, courtesy of author team
pip install -r AvatarCLIP/requirements.txt

# additional installs for Gradient
pip install -U numpy # their requirements.txt has an outdated NumPy install you can fix instead if so desired.
pip install scikit-image


# install neural renderer as package on Gradient
pip install git+https://github.com/hongfz16/neural_renderer

# complete their set up process
%cd neural_renderer
python3 setup.py install
%cd ..

# final housekeeping and setup to display video later
apt-get update && apt-get install libgl1
apt install ffmpeg
Next, go to https://smpl.is.tue.mpg.de/index.html and sign up. This is because we cannot distribute the SMPL model package to you, but you can download it for free by signing up and agreeing to their license. Then, go to https://smpl.is.tue.mpg.de/download.php and download SMPL_python_v.1.1.1.zip. Once you have it on your local machine, you can upload it to the Notebook and then unzip it by running the following code in your terminal:
unzip SMPL_python_v.1.1.1.zipImports
Next, we have the imported packages we will be using to run the demo.
# If you not here, make sure the next line is run somewhere in the notebook prior to this
# %cd /content/AvatarCLIP/AvatarGen/AppearanceGen

# imports
import os
import time
import logging
import argparse
import random
import numpy as np
import cv2 as cv
import trimesh
import torch
import torch.nn.functional as F
from torchvision import transforms
from torch.utils.tensorboard import SummaryWriter
from shutil import copyfile
from icecream import ic
from tqdm import tqdm
from pyhocon import ConfigFactory
from models.dataset import Dataset
from models.dataset import SMPL_Dataset
from models.fields import RenderingNetwork, SDFNetwork, SingleVarianceNetwork, NeRF
from models.renderer import NeuSRenderer
from models.utils import lookat, random_eye, random_at, render_one_batch, batch_rodrigues
from models.utils import sphere_coord, random_eye_normal, rgb2hsv, differentiable_histogram
from models.utils import my_lbs, readOBJ
import clip
from smplx import build_layer
import imageio

to8b = lambda x : (255*np.clip(x,0,1)).astype(np.uint8)
from main import Runner
Input Appearance Description
In the next cell, we get started with inputting our prompts and making adjustments to the coarse model generation. In particular, this is where we input tapp to modify our coarse figure. Currently, this is set up to take the neutral figure mesh for all inputs, and then color them to match the tapp prompt.
You can adjust what type of figure you are making here by editing the values in the AppearanceDescription and conf_path variables. They are by default set to run the example Iron Man configuration. You can find more configurations by going to their examples in confs/examples/, and changing the strings for each of the variables to correspond to the change. For this demo, we are going to use Saitama from the manga author One's seminal work One Punch Man.
#@title Input Appearance Description (e.g. Iron Man)
AppearanceDescription = "Iron Man" #@param {type:"string"}

torch.set_default_tensor_type('torch.cuda.FloatTensor')
FORMAT = "[%(filename)s:%(lineno)s - %(funcName)20s() ] %(message)s"
logging.basicConfig(level=logging.INFO, format=FORMAT)
conf_path = 'confs/examples_small/example.conf'
f = open(conf_path)
conf_text = f.read()
f.close()
conf_text = conf_text.replace('{TOREPLACE}', AppearanceDescription)
# print(conf_text)
conf = ConfigFactory.parse_string(conf_text)
print("Prompt: {}".format(conf.get_string('clip.prompt')))
print("Face Prompt: {}".format(conf.get_string('clip.face_prompt')))
print("Back Prompt: {}".format(conf.get_string('clip.back_prompt')))
Detailing and sculpting the coarse mesh
To start the generation process, we first instantiate the Runner object with our variables set in the last cell as arguments. It then initializes the CLIP ViT-B/32 model for us, and brings out the SMPL files for use in texturing and shaping. Finally, train_clip() initializes and runs the generation process.
Note: If you want to change the number of iterations for training from the default of 30000, you need to go to /AvatarCLIP/AvatarGen/AppearanceGen/main.py to change the variable on line 50 to the desired value. #@title Start the Generation!
runner = Runner(conf_path, 'train_clip', 'smpl', False, True, conf)
runner.init_clip()
runner.init_smpl()
runner.train_clip()After the cell has finished running, you can then go to /AvatarCLIP/AvatarGen/AppearanceGen/exp/smpl/examples to get stills of the model on an interval of 100 training steps between each photo. This can be used with the following code cell to create a nice video showing how the figure was changed over the course of the generation process.
#@title Generate a Video of Optimization Process (RGB)

import os
from tqdm import tqdm
import numpy as np
from IPython import display
from PIL import Image
from base64 import b64encode

image_folder = 'exp/smpl/examples/Saitama/validations_extra_fine'
image_fname = os.listdir(image_folder)
image_fname = sorted(image_fname)
image_fname = [os.path.join(image_folder, f) for f in image_fname]

init_frame = 1
last_frame = len(image_fname)
min_fps = 10
max_fps = 60
total_frames = last_frame - init_frame

length = 15 #Desired time of the video in seconds

frames = []
for i in range(init_frame, last_frame): #
    frames.append(Image.open(image_fname[i]))

#fps = last_frame/10
fps = np.clip(total_frames/length,min_fps,max_fps)

from subprocess import Popen, PIPE
p = Popen(['ffmpeg', '-y', '-f', 'image2pipe', '-vcodec', 'png', '-r', str(fps), '-i', '-', '-vcodec', 'libx264', '-r', str(fps), '-pix_fmt', 'yuv420p', '-crf', '17', '-preset', 'veryslow', 'video.mp4'], stdin=PIPE)
for im in tqdm(frames):
    im.save(p.stdin, 'PNG')
p.stdin.close()
p.wait()
mp4 = open('video.mp4','rb').read()
data_url = "data:video/mp4;base64," + b64encode(mp4).decode()

display.HTML("""
<video width=400 controls>
      <source src="%s" type="video/mp4">
</video>
""" % data_url)
When this is all finished, you should be left with a video like the following. This is a bit lower in quality to the examples used by the authors, but the spirit of the input is obviously captured in a detailed manor:
Closing thoughts
That's it for part one of this series. In this blog post, we covered how AvatarCLIP operates, and showed how to use it to generate a textured and sculpted figure from the provided and easy to use configurations. In the next part of this series on AvatarCLIP, we will go into more depth on the animation portion of the model.
Be sure to visit the project page for the original repo on AvatarCLIP. This is a brand new repo, so expect changes and improvements to come in the back half of 2022 to improve this even further.
Thanks for reading.

