Bring this project to life
As we've discussed frequently on this blog, Stable Diffusion has continued to revolutionize both the image synthesis and AI community in general. As multitudes of new users, developers, and creators have entered the fold, either with financial or educational goals, the huge influx of users to this technology have already rendered Diffusion models one of the most important frameworks in Deep Learning for creating generated content.
This has lead to a plethora of useful and thoughtful spin off projects based on or inspired by the original stable diffusion project. Some examples of this include Dreambooth, Textual Inversion, and the Stable Diffusion Web UI. In this article, we will discuss the latest and potentially most powerful step forward for generating images with diffusion models: ControlNet.
In this tutorial, we will go over ControlNet in general, specifically covering what the model is capable of, how the model works, how to use a custom Stable Diffusion checkpoint with ControlNet, and finally close with a full demo on ControlNet implemented in a Gradient Notebook.
For more information about ControlNet, be sure to visit the original repo.
Introduction to ControlNet
Just introduced early this month, ControlNet represents a sizable advancement for controlling the outputs of an image diffusion model.
Using this new framework, users can capture a scene, structure, object, or subject pose from an inputted image, and then transfer that quality to the generation process. In practice, this allows the model to completely retain the original input shape, and create a novel image that conserves the shape, pose, or outline while using the novel features from the inputted prompt.
How does it work?
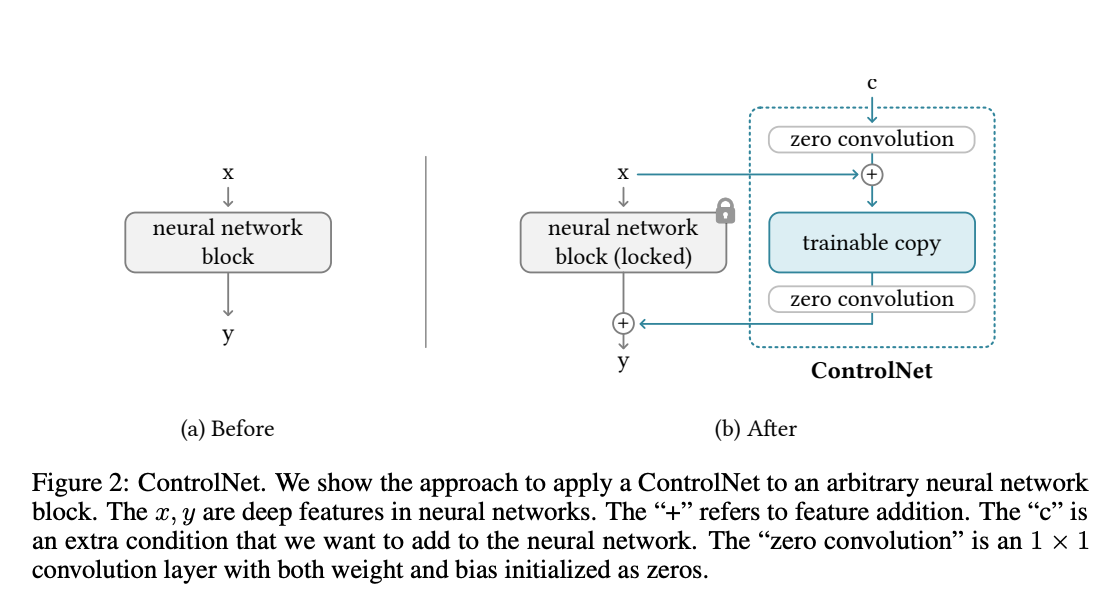
Functionally, ControlNet operates by wrapping around an image synthesis process to impart the attention to shape required to operate the model using either its inbuilt prediction or one of many additional annotator models. Referring to the diagram above, we can see on a rudimentary level how ControlNet uses a trainable copy in conjunction with the original network to modify the final output with respect to the shape of the input control source.
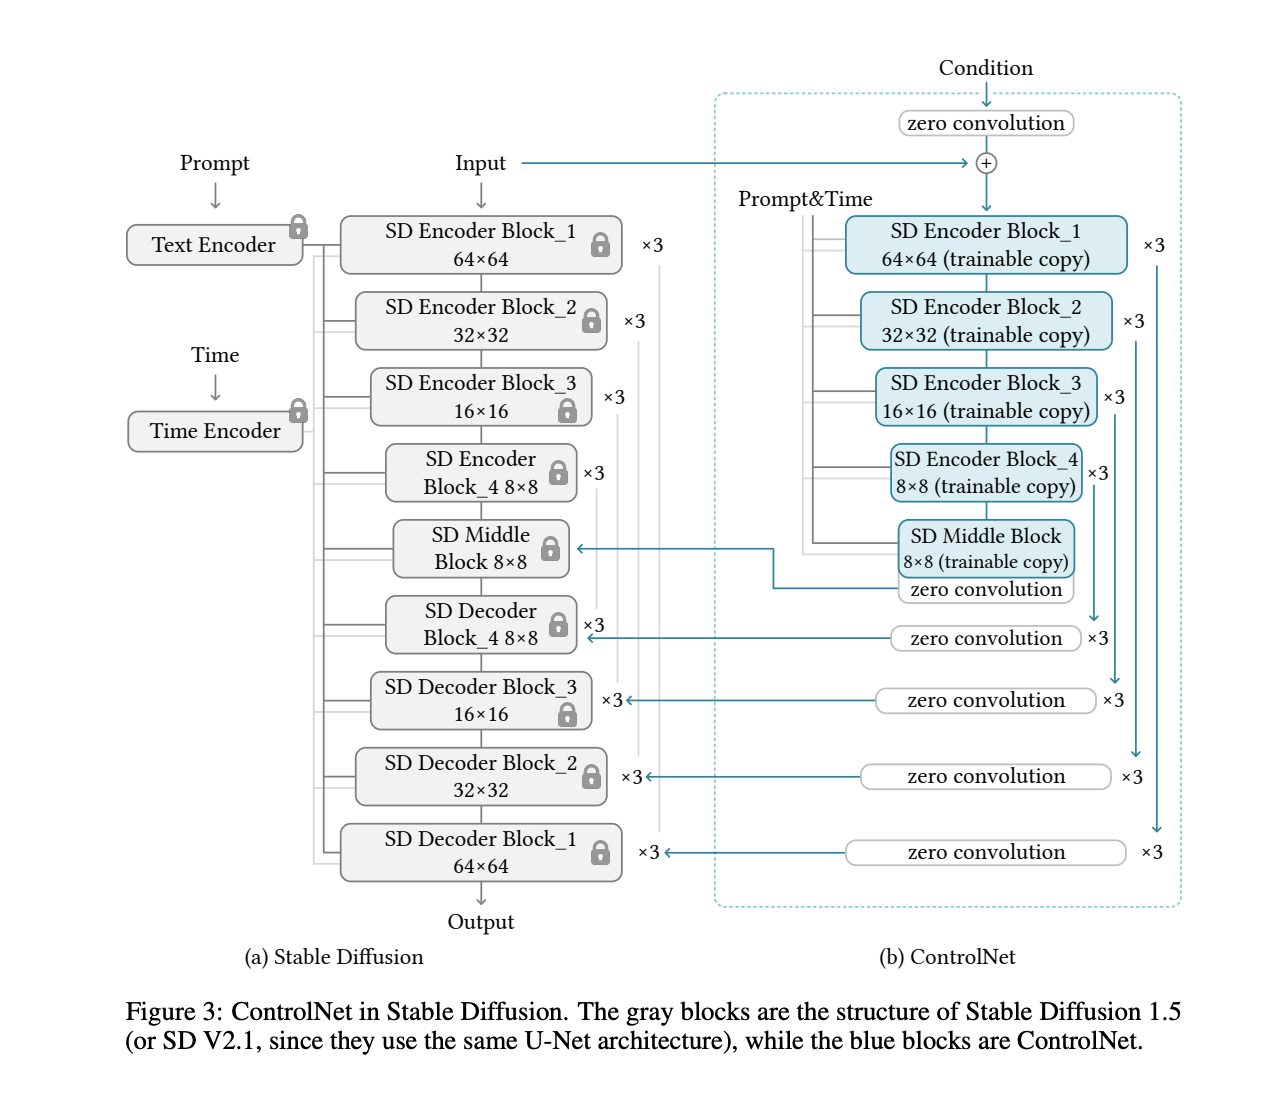
Looking more closely at this implementation, they use "ControlNet to create the trainable copy of the 12 encoding blocks and 1 middle block of Stable Diffusion. The 12 blocks are in 4 resolutions (64 × 64, 32 × 32, 16 × 16, 8 × 8) with each having 3 blocks. The outputs are added to the 12 skip-connections and 1 middle block of the U-net." [Source] This is how the ControlNet model acts as a parallel, corresponding pre-trained model that acts in tandem with the Stable Diffusion model it is based on to impart the control.
The input is simultaneously passed through the SD blocks, represented on the left, while simultaneously being processed by the ControlNet blocks on the right. This process is almost exactly the same during encoding. When renoising the image, at each step the SD decoder blocks will receive control adjustments from the parallel processing path from ControlNet.
In the end, we are left with a very similar image synthesis pipeline with an additional control added for shape of the output features in the final image.
What does it do?
ControlNet comes pre-packaged with compatability with several models that help it to identify the shape/form of the target in the image. In this section, we will walk through each of these with examples.
Canny Edge
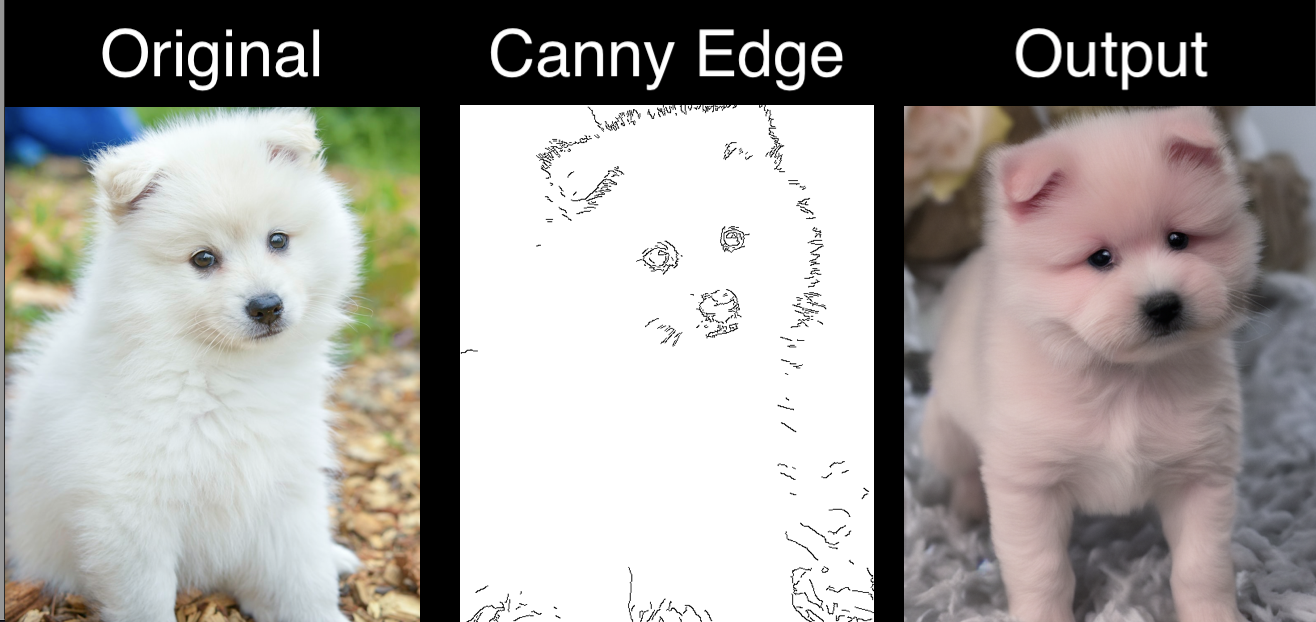
The classic Canny edge detector is an edge detection operator that uses a multi-stage algorithm to detect a wide range of edges in images. This calculates the edge thresholds for the subjects in the photo to impart to the stable diffusion process.
M-LSD Lines
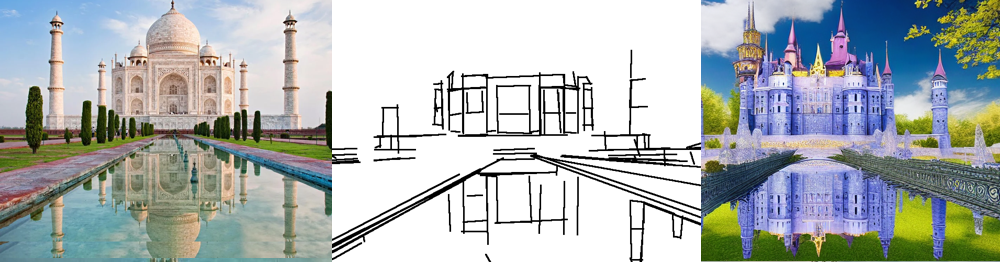
Next, we have the M-LSD simple straight line detection. It detects edges on a much coarser level than the Canny Edge method.
HED Boundary
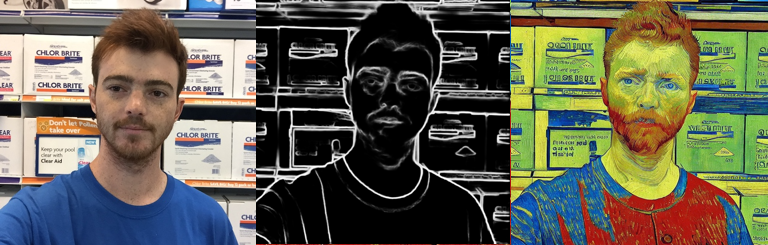
The HED boundary preserves great detail from input images, and this makes it the optimal methodology for recoloring and stylizing.
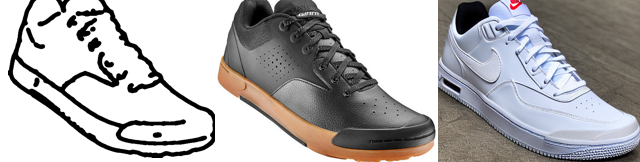
User Scribbles
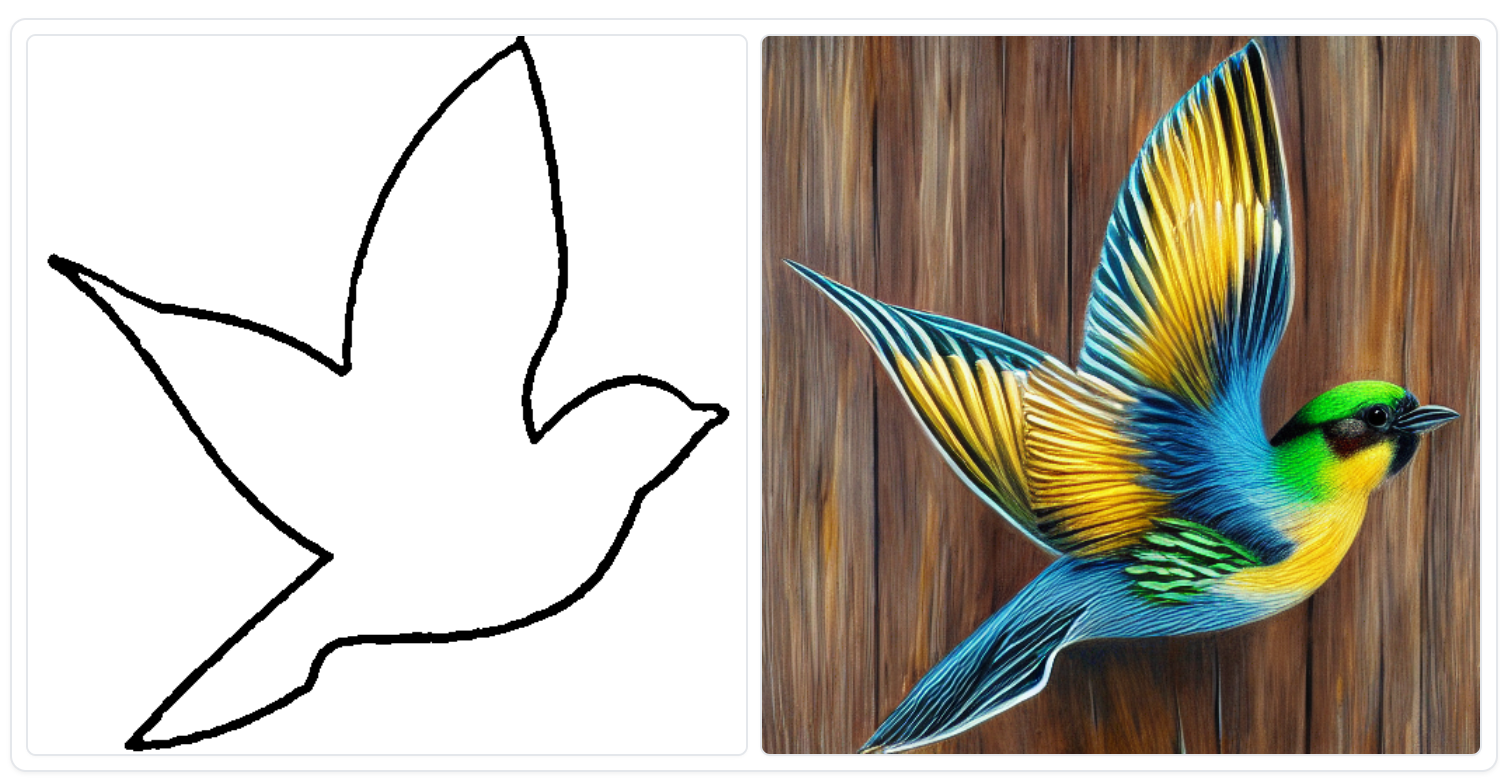
User Scribbles allows ControlNet to synthesize the image entirely based upon a user input or drawn line drawing.
Fake Scribble
Fake Scribble synthesizes a scribble from an existing image, and then mimics the User Scribbles workflow.
Human Pose with OpenPose
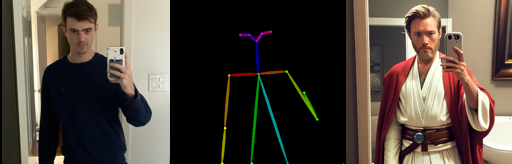
Human Pose detects the form or pose of human entities in the photo, and is used in conjunction with open pose to accurately capture complex body shapes.
Normal Map
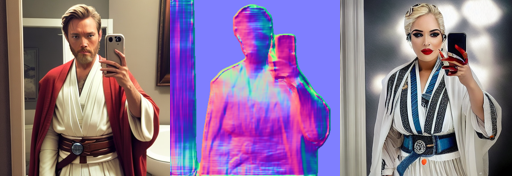
The normal map is calculated using the midas depth map and a user threshold, set within the application. It preserves great detail and depth.
Depth
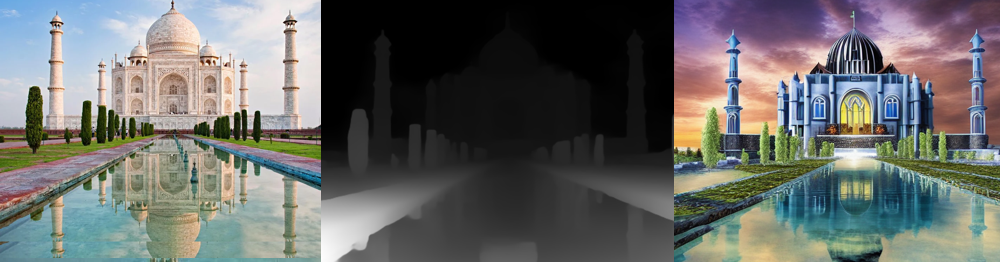
Depth senses the 3 dimensional perceived background and subject position in the background, and then uses that to help guide the next stage of synthesis.
Segmentation map
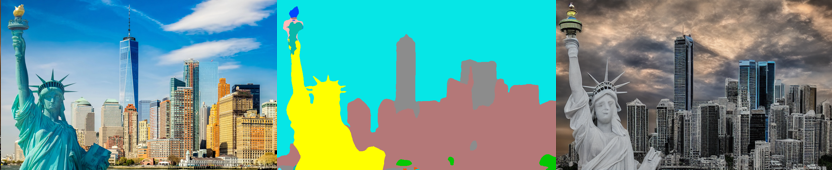
This model use ADE20K's segmentation protocol to draw a predicted segmentation map for the different objects in the image.
Demo
We will now walk through how to implement this within a Gradient Notebook. A fork of the original repo has been prepared to facilitate this is as much as possible.
Bring this project to life
Setting up the Notebook
To facilitate setup, we have provided a setup.sh bash script in the repo fork that handles all of setup. Below is a code block containing all of these steps to install the required packages, get the annotator model files, and get the checkpoint model files.
Note that you will want to hash out the download portion of this setup when restarting the Notebook to avoid waiting for the long start up time.
pip install gradio==3.16.2
pip install albumentations==1.3.0
pip install opencv-contrib-python
pip install imageio==2.9.0
pip install imageio-ffmpeg==0.4.2
pip install pytorch-lightning==1.5.0
pip install omegaconf==2.1.1
pip install test-tube>=0.7.5
pip install streamlit==1.12.1
pip install einops==0.3.0
pip install transformers==4.19.2
pip install webdataset==0.2.5
pip install kornia==0.6
pip install open_clip_torch==2.0.2
pip install invisible-watermark>=0.1.5
pip install streamlit-drawable-canvas==0.8.0
pip install torchmetrics==0.6.0
pip install timm==0.6.12
pip install addict==2.4.0
pip install yapf==0.32.0
pip install prettytable==3.6.0
pip install safetensors==0.2.7
pip install basicsr==1.4.2

cd models
wget https://huggingface.co/lllyasviel/ControlNet/resolve/main/models/control_sd15_canny.pth
wget https://huggingface.co/lllyasviel/ControlNet/resolve/main/models/control_sd15_normal.pth
wget https://huggingface.co/lllyasviel/ControlNet/resolve/main/models/control_sd15_depth.pth
wget https://huggingface.co/lllyasviel/ControlNet/resolve/main/models/control_sd15_hed.pth
wget https://huggingface.co/lllyasviel/ControlNet/resolve/main/models/control_sd15_openpose.pth
wget https://huggingface.co/lllyasviel/ControlNet/resolve/main/models/control_sd15_mlsd.pth
wget https://huggingface.co/lllyasviel/ControlNet/resolve/main/models/control_sd15_scribble.pth
wget https://huggingface.co/lllyasviel/ControlNet/resolve/main/models/control_sd15_seg.pth
cd ../annotator/ckpts
wget https://huggingface.co/lllyasviel/ControlNet/resolve/main/annotator/ckpts/body_pose_model.pth
wget https://huggingface.co/lllyasviel/ControlNet/resolve/main/annotator/ckpts/dpt_hybrid-midas-501f0c75.pt
wget https://huggingface.co/lllyasviel/ControlNet/resolve/main/annotator/ckpts/hand_pose_model.pth
wget https://huggingface.co/lllyasviel/ControlNet/resolve/main/annotator/ckpts/mlsd_large_512_fp32.pth
wget https://huggingface.co/lllyasviel/ControlNet/resolve/main/annotator/ckpts/network-bsds500.pth
wget https://huggingface.co/lllyasviel/ControlNet/resolve/main/annotator/ckpts/mlsd_tiny_512_fp32.pth
wget https://huggingface.co/lllyasviel/ControlNet/resolve/main/annotator/ckpts/upernet_global_small.pth
cd ../../
Run the official Gradio Apps
The author of the original implementation of ControlNet provided a series of very simple Gradio applications to use with these models. To run them, simply open a Notebook, and run the code cell below with all lines but the one of interest, hashed out.
# Canny edge detector
!python canny2image.py

# Depth detector
!gradio depth2image.py

# Generate fake scribble from input image
!python gradio_fake_scribble2image.py

# conserves large amounts of information, useful for restyling
!python gradio_hed2image.py

# Simple lines and edges
!python gradio_hough2image.py

# Midas depth detector, high detail
!python gradio_normal2image.py

# generate from input scribble line drawing
!gradio_scribble2image.py

# Draw a new scribble in the app
!gradio_scribble2image_interactive.py

# Segment and synthesize based on segmentation
!python gradio_seg2image.py

!python gradio_pose2image.py
For examples about each of these techniques, please read the section above "What does it do?"
Run ControlNet in the Stable Diffusion Web UI
There exists a working extension for the stable diffusion Web UI from Automatic1111, which can be found here: https://github.com/Mikubill/sd-webui-controlnet.
To install this extension, you can either directly clone this repo into the extensions directory, or install it using the installer built into the application. Once it is installed, restart the app, and you will now have a prompt to apply ControlNet at the bottom of each Web UI window. Keep in mind, that each of the annotators and ckpts need to be moved into their corresponding subdirectories in the extensions/sd-webui-controlnet directory.
Converting Stable Diffusion models to ControlNet
It is very simple to translate the capabilities of any ControlNet model to any SD model checkpoint. To do this in our Notebook, we just need to edit a few files, get our new checkpoint, and run a command using the provided tool. These instructions are based on tips found here.
Open up the file "tool_transfer_control.py" in your Notebook. The first four lines of the Notebook contain default paths for this tool to the SD and ControlNet files of interest. In this case, it is setup by default for the Anything model, so let's use this as our default example as well. To get the Anything model, simply wget the file from Civit.AI.
wget -O anything.ckpt https://civitai.com/api/download/models/75Once the file is in place, we can edit the paths in the first four lines of "tool_transfer_control.py" to reflect our new model paths. For example, it could be:
path_sd15 = '../../datasets/stable-diffusion-classic/v1-5-pruned-emaonly.ckpt'
path_sd15_with_control = './models/control_sd15_openpose.pth'
path_input = './models/anything.ckpt'
path_output = './models/control_any3_openpose.pth'
Now, we can execute the python script to create our converted "control_any3_openpose.pth" file:
python tool_transfer_control.pyThis new edited version of your model will work with both the original Gradio and Web UI implementations of ControlNet.
Closing thoughts
In this article, we looked in depth at ControlNet, a new technique for imparting high levels of control over the shape of synthesized images. Each of the methodologies work great, so we encourage every reader to try these out in a Free GPU powered Gradient Notebook!