Bring this project to life
Recently, with the image synthesis revolution rising due to the advent of diffusion models, a slew of new techniques have been developed to aid the user in applying greater degrees of control, versatility, and specificity to the Stable Diffusion image synthesis process. This is achieved by various means for each of the techniques, and each gives a different sort of utility to the process.
In this article, we will review the first of these popular techniques, and seek to identify which of them is useful in specific situations. We will then show how to run them either via Gradient Notebooks in either Gradio apps or short, prepared demos.
This is part one of an article series where we will be looking at each of the techniques introduced here in greater depth over the coming weeks. Check the Paperspace Blog for updates to this tutorial series on Fridays, with part 2 arriving March 3rd.
T2I Adapter
What is it?
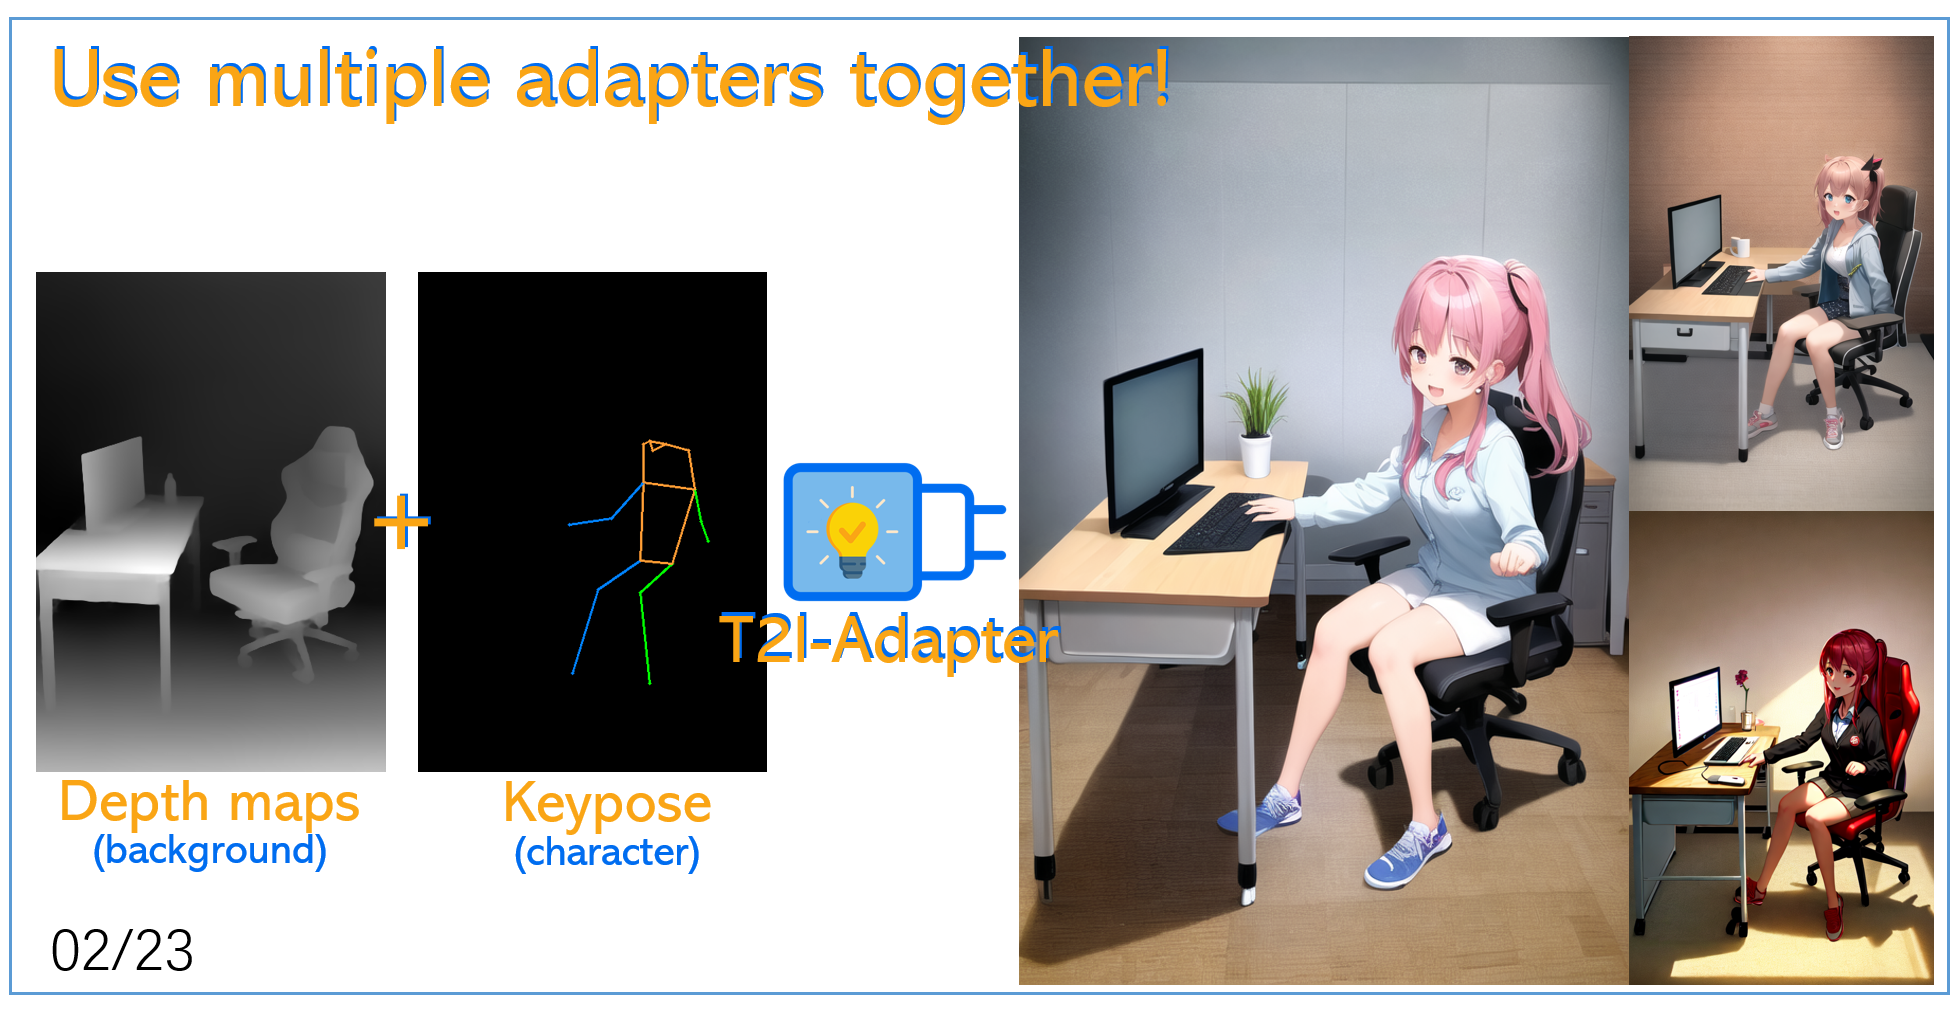
Probably the greatest opponent to the rabidly popular ControlNet, T2I-Adapter is a simple and small (~70M parameters, ~300M storage space) network that provides extra guidance to pre-trained text-to-image models (like Stable Diffusion) while freezing the original large text-to-image models. It is capable of detecting edge maps with the sketch function, a keypose adapter for detecting the pose of humanoid figures, a segmentation based edge object detector, a depth detector for arranging the perceived depth of the produced images, and, most importantly, a combined depth and keypose adapter that allows for detection of humanoid figures in 3d.
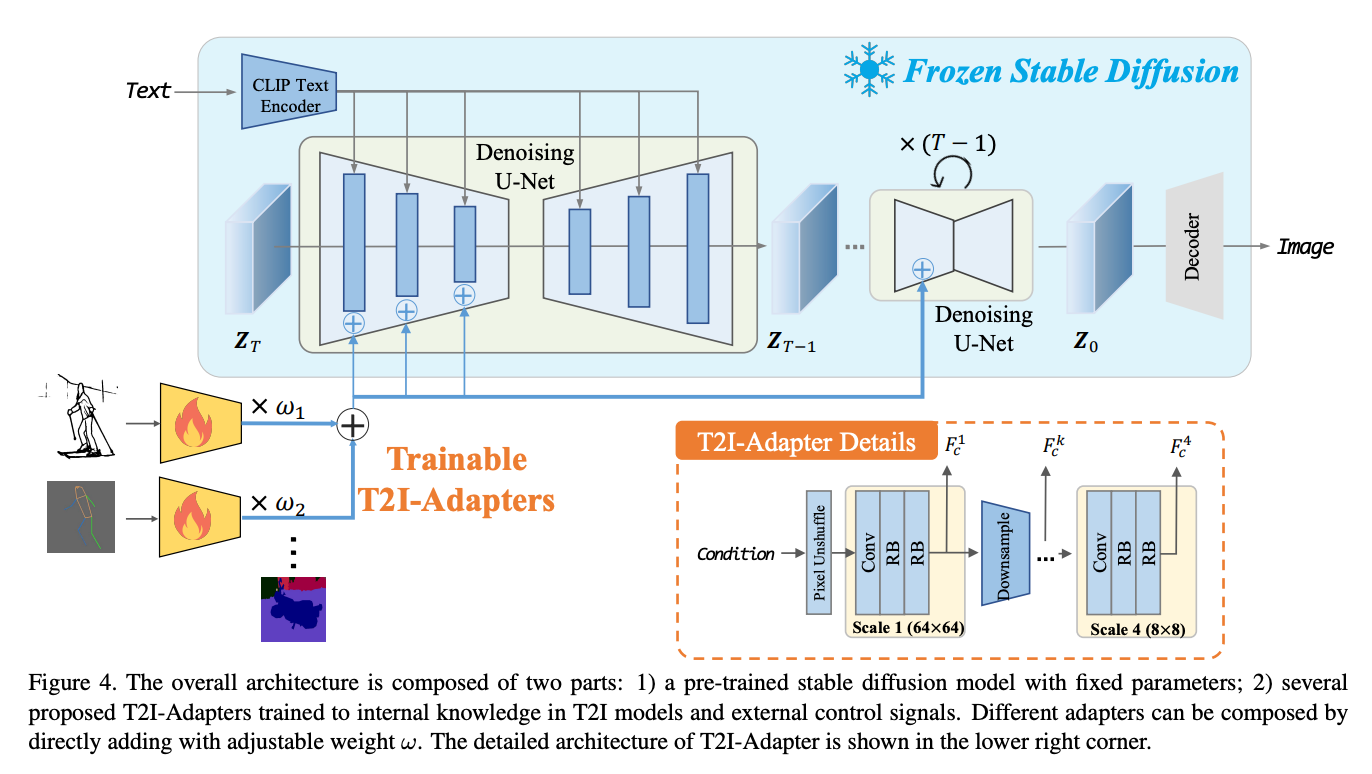
The process of freezing the text to image model allows for the transference of the detected feature distributions from the inputted sample. The adapters extract the guidance information in their different forms, and they are then applied to the re-noised images. This allows for the T2I adapter to achieve a high degree of control over the synthesis of novel and editing of images.

Just like ControlNet, this allows for T2Iadapter to achieve extremely high levels of control over the eventual final outputs. As we can see from the example above, their method works much better than Stable Diffusion on it's own.
Running on Gradient
T2I is a potent technique. If we want to use it on our own remote machines, rather than being potentially limited by HuggingFace Space GPU availability, then follow the instructions here to setup the T2IAdapter Gradio notebook.
To run this, open up the Gradient Notebook linked at the top of this page. Once the Notebook has spun up, navigate to the first section labeled T2I Adapter. Here, we will first clone the Space from HuggingFace onto our machine. From there, all we need to do is install the requirements for the application. Run the code cell shown below first to install the required files.
!apt-get update && apt-get install git-lfs
!git-lfs clone https://huggingface.co/spaces/Adapter/T2I-Adapter
!pip install -r requirements.txt
This will install everything we need to run the Gradio app. From there, run the next cell below to get our shareable link to the Gradio app.
!python app.py --share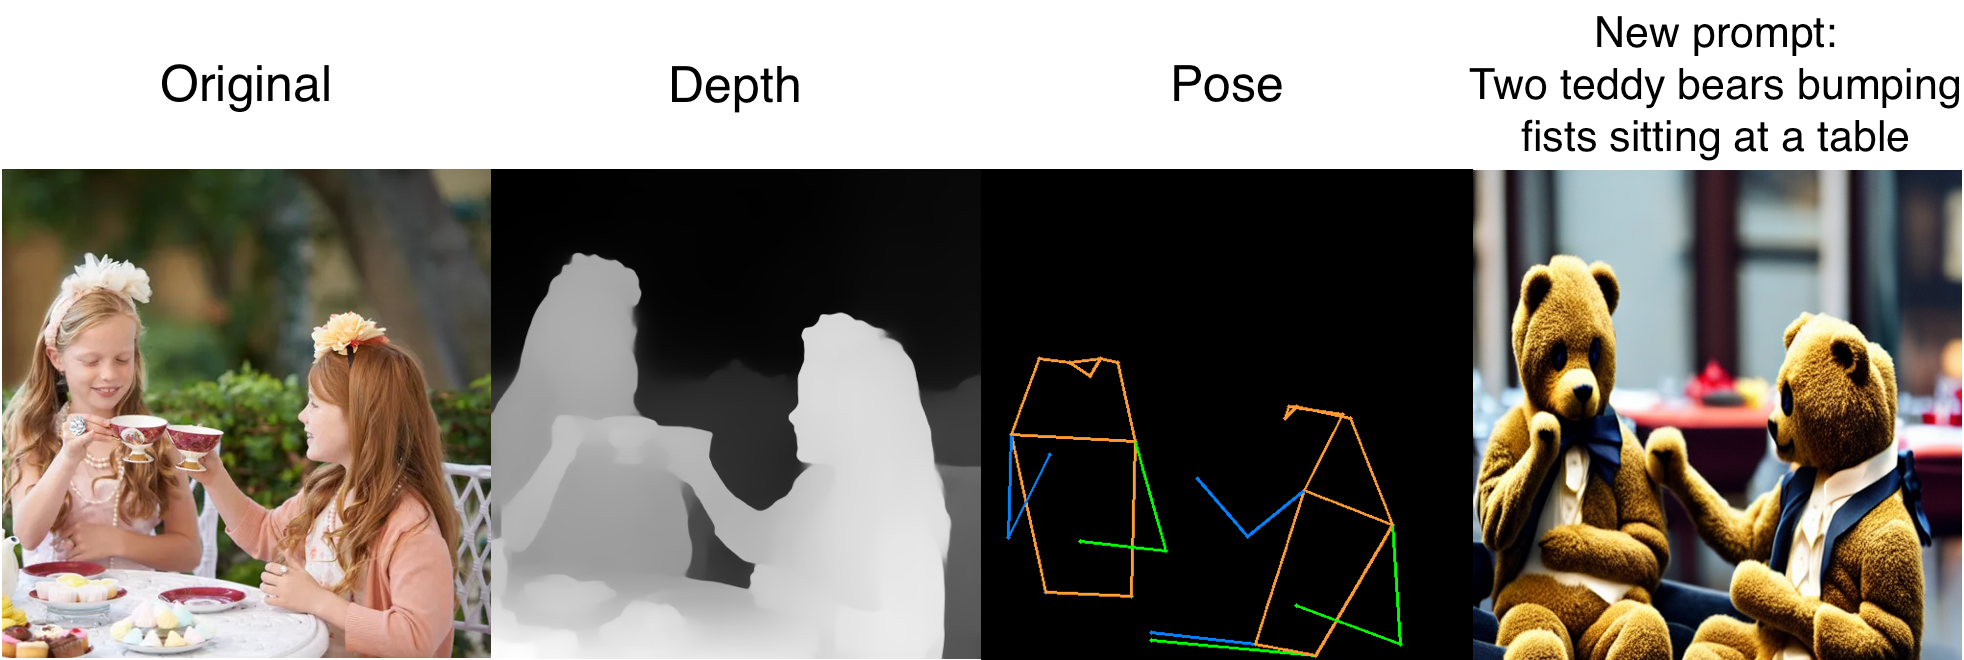
From there, we can test out the various functionalities of the app. Above is a sample we made using a photo of two girls having a tea party and the depth + keypose adapter, and turn it into an image of two teddy bears fist bumping.
To add your own models to work with this, we need to go to notebooks/T2I-Adapter/demo/demos.py, and edit each of the demo functions to point towards the location of the saved files. It's simplest to move them into the models folder to facilitate this.
We'll go into more detail on each capability in our full breakdown of T2IAdapter coming soon.
Do we recommend it?
This is probably the best of these techniques, in some ways even outperforming ControlNet in terms of perceived accuracy towards the input images and prompt guidance. We highly recommend adding this to your workflow, and look forward to the development of an an extension for a Web UI containing this technique.
InstructPix2Pix
What is it?
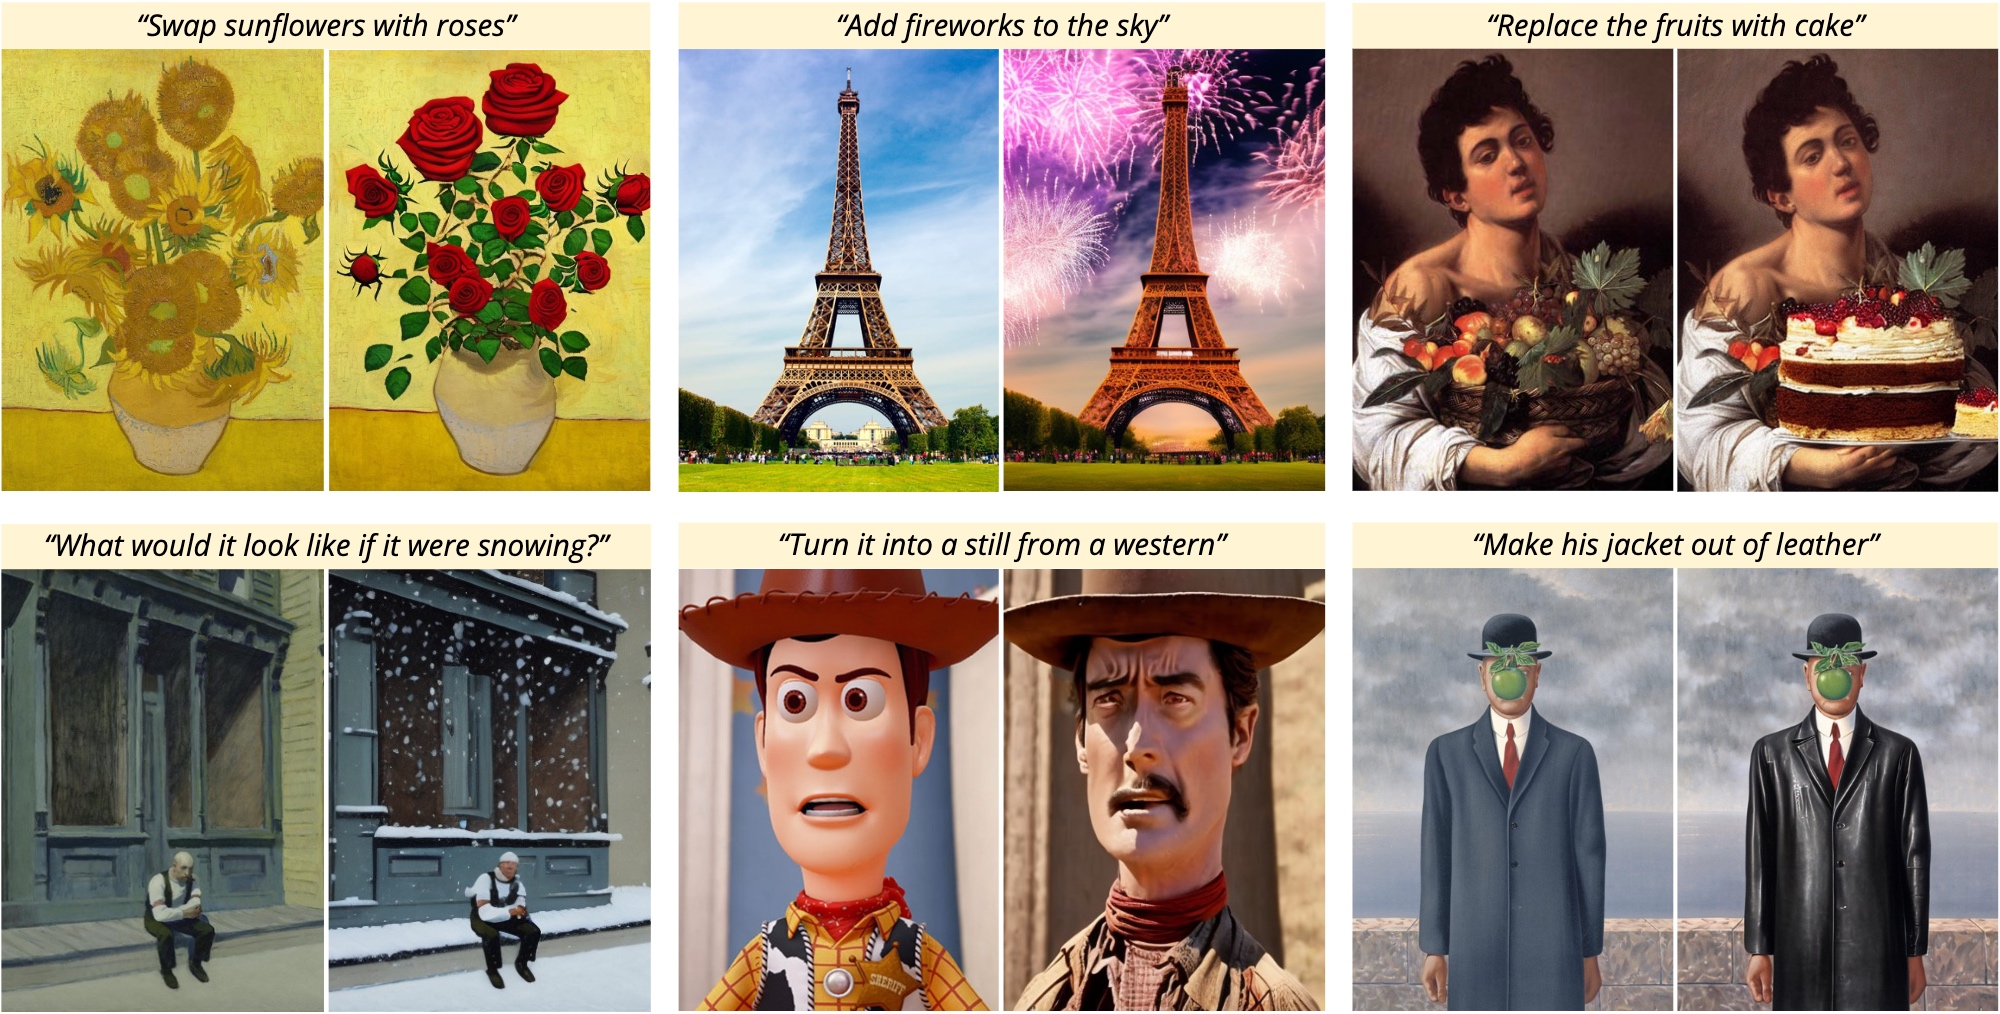
One of the first techniques to come out for adding additional guidance to the Stable Diffusion pipeline is Instruct-Pix2Pix. This method was designed to pair the knowledge bases of Stable Diffusion with the GPT-3 large language model. In practice, this creates a unified methodology capable of interpreting human made text to create comprehensive edits to an existing image.
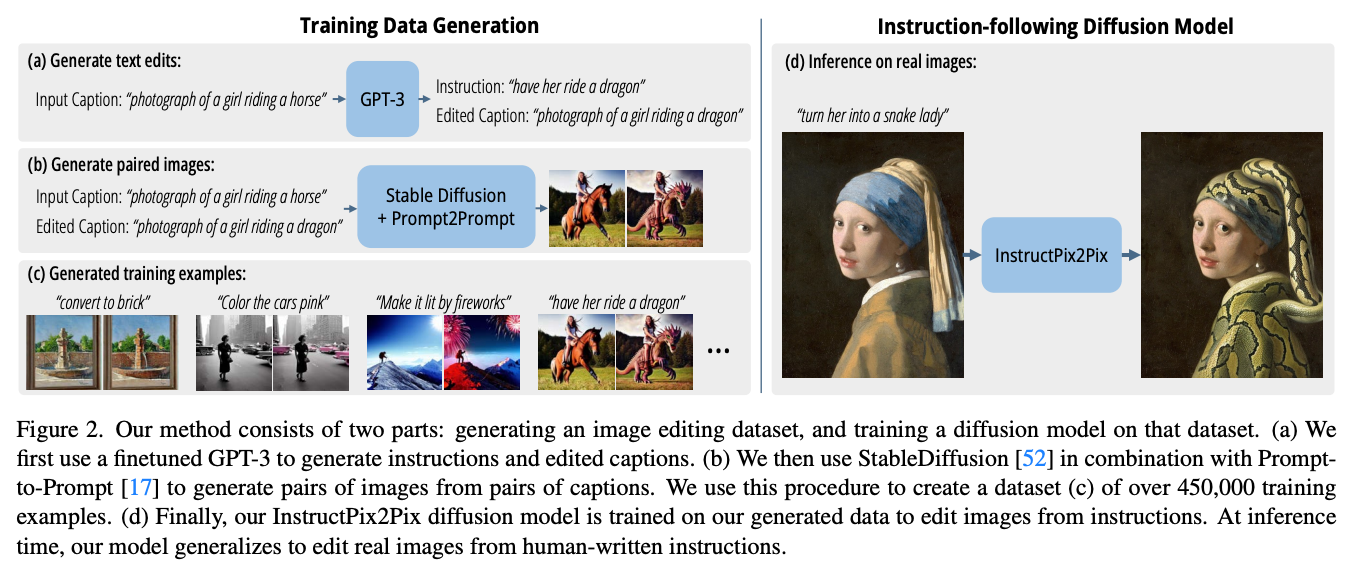
Instruct Pix2Pix uses custom trained models, distinct from Stable Diffusion, trained on their own generated data. They first created an image editing dataset using Stable Diffusion images paired with GPT-3 text edits to create varied training pairs with similar feature distributions in the actual images.
During inference, the model is fast and high performant. Due to the simplicity of the diffusion training process, the model only needs to take a single image and an instruction for how to edit that image (i.e., not a full description of any image). It then performs the edit directly in the forward pass without need for a user-drawn mask, additional images, or per-example inversion or fine-tuning.
Running on Gradient
In practice, Instruct Pix2Pix is capable, but imprecise compared to the other techniques we will discuss in this article. It will generate the edits as desired, but they are often filled with artifacts and distortions. Let's take a look at some examples in a Gradient Notebook.
To run this, open up the Gradient Notebook linked at the top of this page. Once the Notebook has spun up, navigate to the first section labeled Instruct-Pix2Pix. Here, we will first clone the Instruct Pix2Pix Space from HuggingFace onto our machine. From there, all we need to do is install the requirements for the application, and make a small edit to the application file itself. Run the code cell shown below first to install the required files.
!apt-get update && apt-get install git-lfs
!git-lfs clone https://huggingface.co/spaces/timbrooks/instruct-pix2pix
!pip install -r instruct-pix2pix/requirements.txt
%cd instruct-pix2pix/
Then, we need to make a single edit to change the app to run with share set to True, ensuring that we can access the Gradio window in our local browser.
import sys
import fileinput

# with is like your try .. finally block in this case
with open('edit_app.py', 'r') as file:
    # read a list of lines into data
    data = file.readlines()

# now change the 2nd line, note that you have to add a newline
data[-5] = '\n    demo.launch(share=True)'

# and write everything back
with open('edit_app.py', 'w') as file:
    file.writelines( data )
Once that is done, we will execute the final cell in this section to launch the application.
!python edit_app.py You will then be greeted with a shared link for the Gradio app we can open in our browser. From there, we can directly input our input image, our prompt in human style speech form, and our hyperparameters for the inference run.
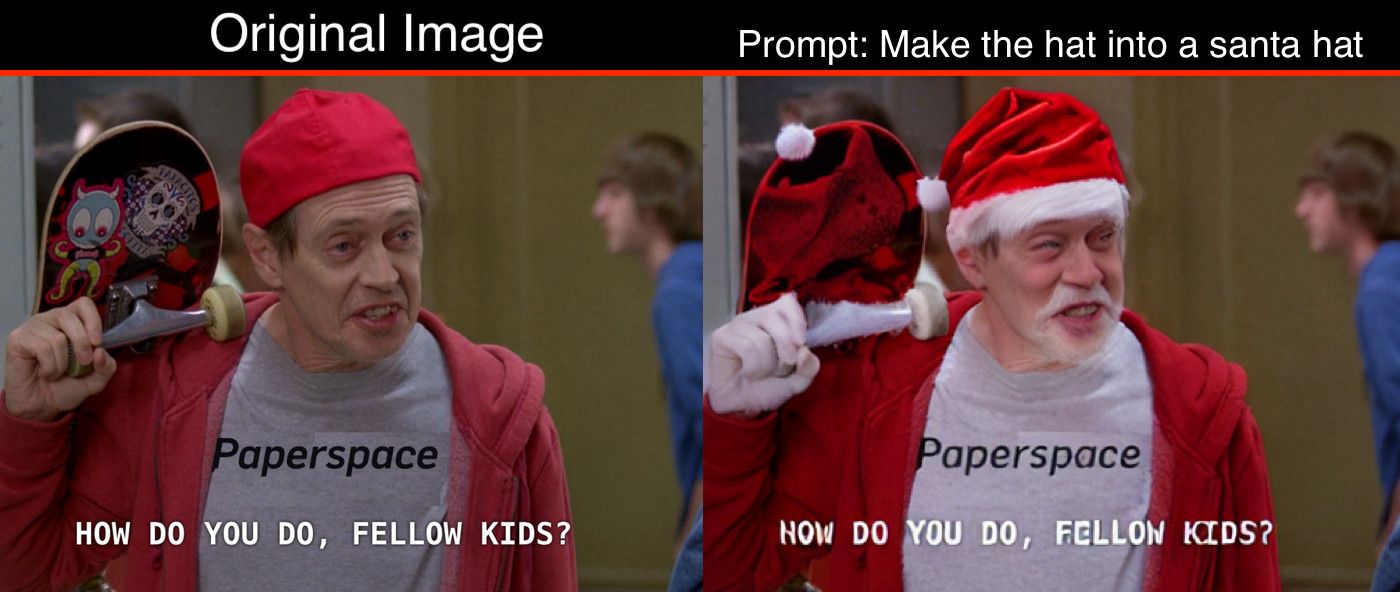
Here is an example we made using a classic Steve Buscemi photo to add some Santa features to the rad skateboarder in the image. As we can see, though we explicitly instructed the changes to be conserved to the hat, the face is still a lighter, red color and now has facial hair. Nonetheless, it achieved the task we set out for it.
Do we recommend it?
Compared to other techniques we will look at in this article, Instruct Pix2Pix is rather crude in what it can accomplish. It is extremely fast, however, so it may be a great option for people on lower VRAM machines, like Paperspace's Free GPU powered Notebooks.
Bring this project to life
Attend and Excite
What is it?
The Attend and Excite methodology is another interesting technique for guiding the generative process of any text-to-image diffusion model. It works by modifying the cross-attention values during synthesis to generate images that more accurately portray the features described by the text prompt.
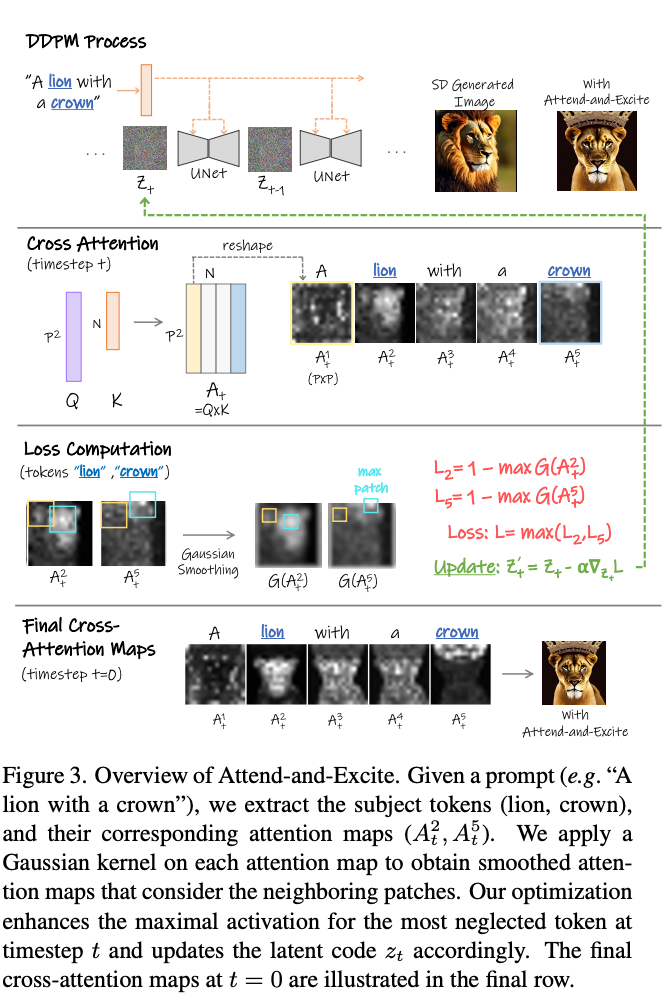
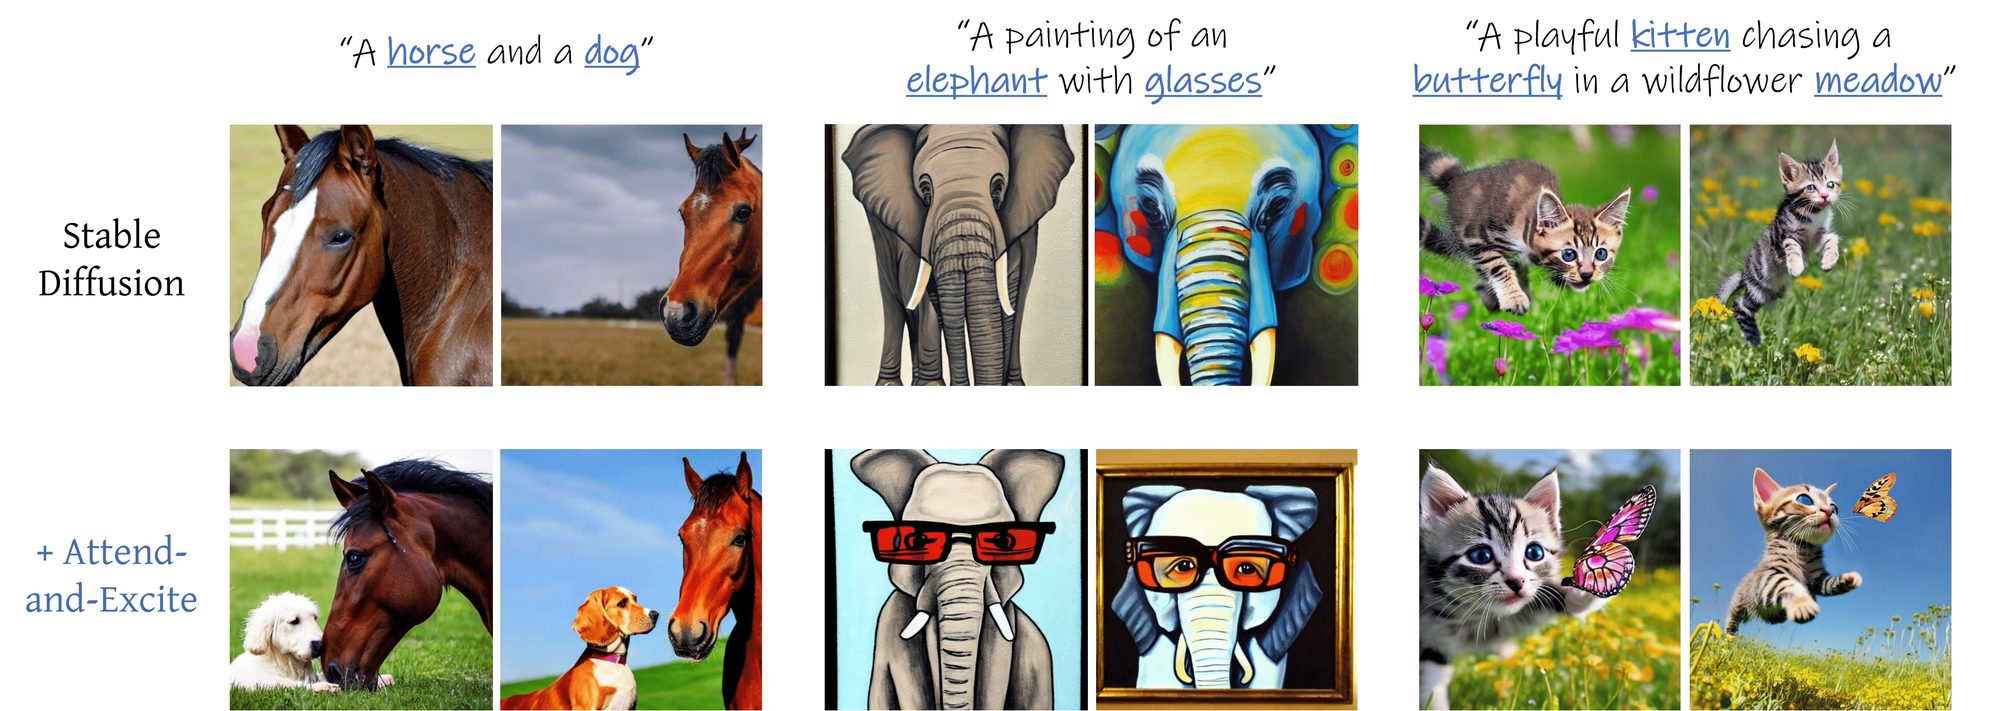
Stable Diffusion, on its own, has difficulty capturing multiple entities in a single generated image. Multiple objects confuse the process, and their features mix, interfere, or completely overwhelm the other objects. Attend and Excite works to identify the most important tokens in the prompt, and strenghtening their relative importance for the final image. This way, the output images are more "semantically faithful" to the inputted prompt.
Running on Gradient
In practice, Attend and Excite is similar to InstructPix2Pix. It applies greater attention to specific tokens to achieve a greater degree of semantic faithfullness to the original inputted prompt.
To get started, navigate to the Attend and Excite section of the notebook and run the first cell, below:
!git-lfs clone https://huggingface.co/spaces/AttendAndExcite/Attend-and-Excite/
%cd Attend-and-Excite
!git clone https://github.com/AttendAndExcite/Attend-and-Excite
!pip install -r Attend-and-Excite/environment/requirements.txt
!pip install diffusers==0.13.0
!pip install -U transformers
This will setup the packages and environment needed to run this application. From there, similarly to before, we again change the launch line in the app to have share set to True. This will give us an accessible link when we run the application.
import sys
import fileinput

# with is like your try .. finally block in this case
with open('app.py', 'r') as file:
    # read a list of lines into data
    data = file.readlines()

# now change the 2nd line, note that you have to add a newline
data[-1] = 'demo.launch(share=True)'

# and write everything back
with open('app.py', 'w') as file:
    file.writelines( data )
Finally, we can run the final cell of this section to launch the application.
!python app.py
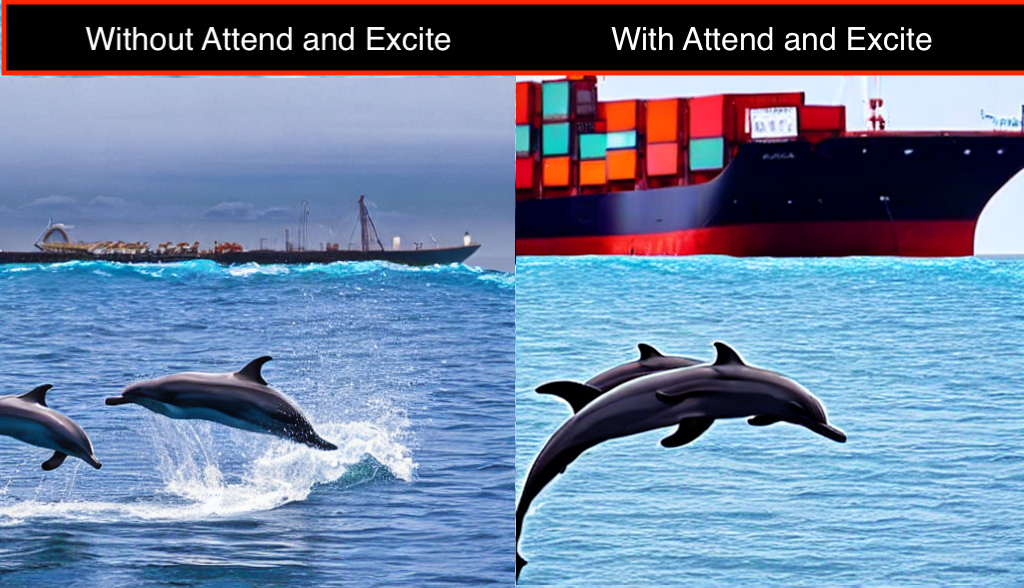
We are then taken into the Gradio application. Here there are a number of examples we can input automatically, pre-set during the app launch. Above we have one of the examples after running through the Attend and Excite pipeline with the exact same input parameters (seed, prompt, image size, etc.). The leftmost image was done without without the Attend and Excite modifications, while the right has them. As is clear from the sample, the boat and dolphins both are more distinct and clearly synthesized in the latter.
Do we recommend it?
Much like Instruct Pix2Pix, Attend and Excite could be situationally very useful. It is rather fast, and represents a notable step forward from the typical Stable Diffusion pipeline in terms of capturing the desired, multiple entities in the image. Overall, it's worth using if it is important to capture multiple subjects.
MultiDiffusion
What is it?
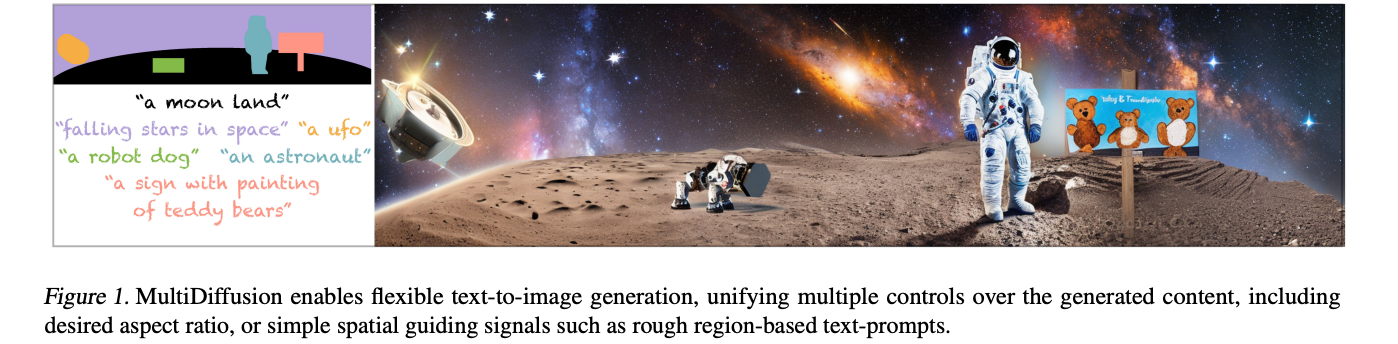
MultiDiffusion is the last technique we will look at today. It promises the ability to create wide landscapes with controlled generation of features from text prompts to designated areas. It unifies these control mechanisms together to ensure the application of each prompted feature is placed in the desired region.
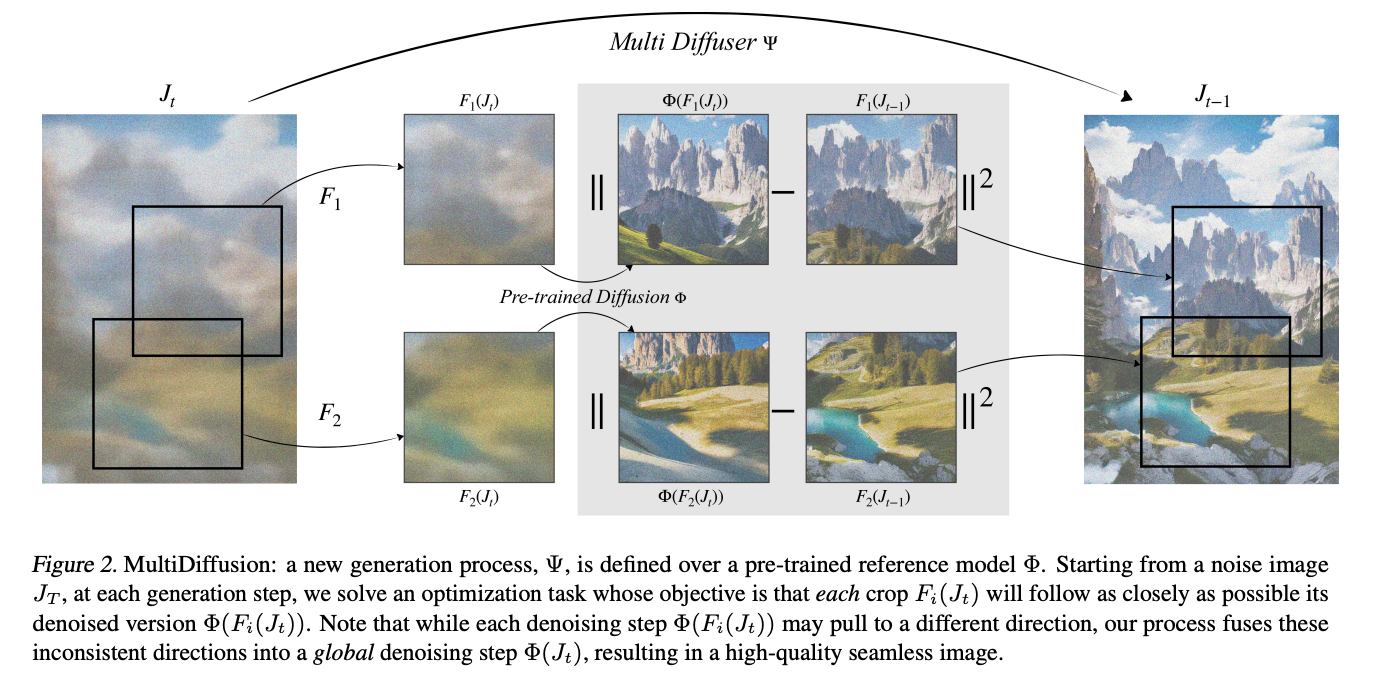
Just like normal diffusion processes, the model starts from an initial noised input, but rather than a single image, it crates a noise distribution. It then uses this distribution to sequentially generate from that noise the desired image features. This allows for complex applications of the patterning, such as panoramas.
Running on Gradient

It's a bit different than the other techniques we are discussing in this article, because the full version hasn't been released, and we are unable to enact this full capability as of yet, but the Gradio Demo shows immense promise. We will use it to create a landscape similar to the image above.
Navigate to the MultiDiffusion section of the Notebook, and run the first cell to initiate setup.
!apt-get update && apt-get install git-lfs
!git-lfs clone https://huggingface.co/spaces/weizmannscience/MultiDiffusion
%cd MultiDiffusion
!pip install -r requirements.txt
!pip install -U transformers
Once again, we will need to make a small edit to the application file itself, app.py, to make it functional for our remote machine. Execute the following cell to automatically fix this capability for ourselves.
import sys
import fileinput

# with is like your try .. finally block in this case
with open('app.py', 'r') as file:
    # read a list of lines into data
    data = file.readlines()

# now change the 2nd line, note that you have to add a newline
data[-1] = '\n).launch(enable_queue=True, share = True)'

# and write everything back
with open('app.py', 'w') as file:
    file.writelines( data )
And finally, we are ready to run the application. Execute the final cell, and click the public link to open the application in our browser of choice.
!python app.pyFrom here, we suggest coming up with a creative test prompt to demonstrate the function of the MultiDiffusion application. We chose "HD realism Cowboys riding horses across space dunes pyramids gold stars comets intricate details high definition" to get the header photo in this section.
Do we recommend it?
This is a great tool for those seeking to create a panorama or landscape image, and helps significantly with smoothing some of the problems that crop up when stringing together particularly wide images with multiple subjects using a normal stable diffusion pipeline.
Closing thoughts
Each of these techniques can be extremely useful in their own situations. It is worth taking the time to look at each of them individually, and test how they could improve the Stable Diffusion outputs in our own workflows.
This was part 1 of a tutorial series covering these techniques. In part 2, we will examine 4 more additional techniques that are also great for adding new means of control to our pipelines. These include Cross Domain Compositing, Universal Guided Diffusion, Self-Attention Guidance, and Plug and Play.