Bring this project to life
In a previous article, we discussed the effects of class imbalance on a convnet's performance, and the achievement of specific model objectives. We also discussed a couple of methods which could help handle class imbalance, and at this point upsampling was mentioned. In this article we will be taking a look at upsampling in greater detail to see how it applies as regards image data.
#  article dependencies
import torch
import torch.nn as nn
import torch.nn.functional as F
import torchvision
import torchvision.transforms as transforms
import torchvision.datasets as Datasets
from torch.utils.data import Dataset, DataLoader
import numpy as np
import matplotlib.pyplot as plt
import cv2
from tqdm.notebook import tqdm
from tqdm import tqdm as tqdm_regular
import seaborn as sns
from torchvision.utils import make_grid
import random
# setting up device
if torch.cuda.is_available():
device = torch.device('cuda:0')
print('Running on the GPU')
else:
device = torch.device('cpu')
print('Running on the CPU')Upsampling
Upsampling in the context of an imbalanced dataset refers to the process of bringing up the number of images in the minority class to match the number of images in the majority class. As I had mentioned previously, this can either be done by collecting more data for the minority class or by creating new data instances from the preexisting data to supplement the difference. The process of creating new data instances form preexisting data is termed data augmentation.
Image Data Augmentation
As regards images, how exactly can we generate new images from those already available? We don't necessarily need to utilize a generative model (although this is a very viable option). A much simpler technique is to create copies of the original images and transform them subtly enough for them to be perceived as new images.
Bear in mind that we can think of images as just a bunch of pixels - pixels which are numbers representing intensity. If we find ways to transform or manipulate these numbers, we can end up with a new set of numbers which retain the much of the overall attributes of the original image while at the same time being distinct enough to be perceived as a different image. If this is archived, a convolutional neural network will treat the augmented image as an entirely new image instance thereby helping to supplement the dataset.
Image Augmentation Techniques
In this section, we will be taking a look at some common image augmentation techniques. It should be noted however that this is by no means an exhaustive list.
Random Cropping
Random cropping is an augmentation technique where a random segment of an image is cropped thereby bringing it into focus. This cropped version of the original image will be missing some pixels essentially rendering it a distinct image of its own. Apart from being an augmentation technique, random cropping can help add some redundancy in models as models trained with random crop augmented images may have the capability of identifying images even when the object of interest is not in full view.
def random_crop(dataset: list, crop_size=(20, 20)):
  """
  This function replicates the random crop process
  """
  cropped = []
  images = [x[0] for x in dataset]
  for image in tqdm_regular(images):
    # deriving image size
    img_size = image.shape

    #  extracting channels
    channel_0, channel_1, channel_2 = image[:,:,0], image[:,:,1], image[:,:,2]

    #  deriving random indicies
    idx_row = random.randint(0, img_size[0] - crop_size[0])
    idx_column = random.randint(0, img_size[0] - crop_size[0])

    #  cropping image per channel
    channel_0 = channel_0[idx_row:idx_row + crop_size[0],
                          idx_column:idx_column + crop_size[1]]
    channel_1 = channel_1[idx_row:idx_row + crop_size[0],
                          idx_column:idx_column + crop_size[1]]
    channel_2 = channel_2[idx_row:idx_row + crop_size[0],
                          idx_column:idx_column + crop_size[1]]

    #  stacking images
    image = np.dstack((channel_0, channel_1, channel_2))

    #  resizing image
    image = cv2.resize(image, (32, 32))
    #  labelling and appending to list
    cropped.append((image, 1))
return cropped 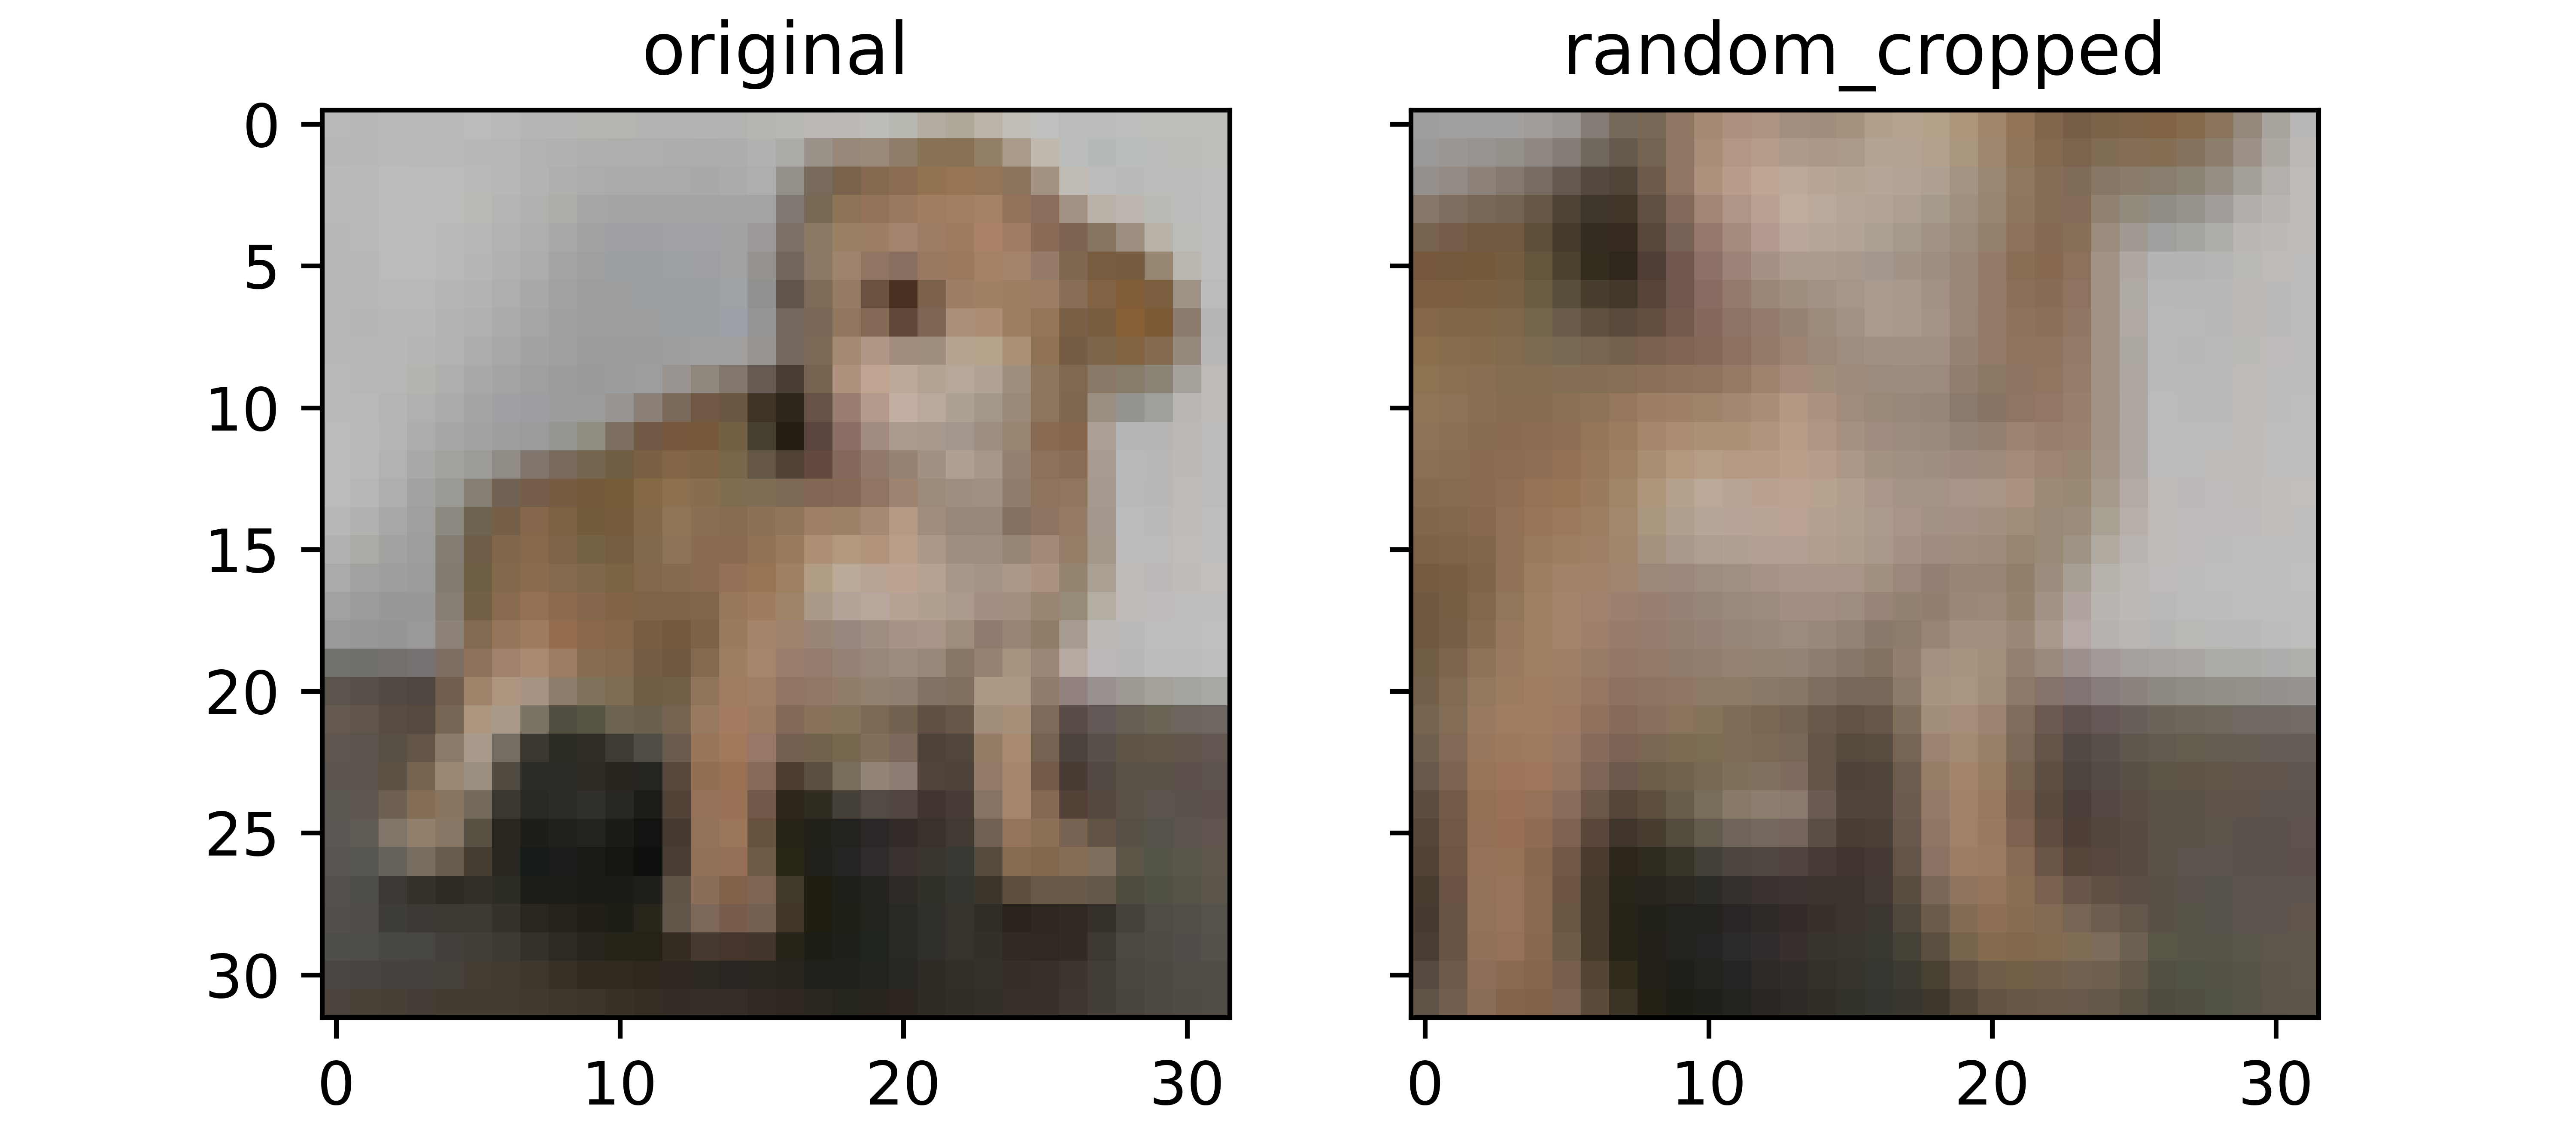
Image Noising
An augmentation technique where random pixels in an image are purposefully 'corrupted' so as to create an illusion of a completely different image. This corruption is done by randomly casting some pixels to white or black. Images augmented via noising have certain pixels of completely different intensities to their original versions and are thereby perceived distinct.
def noise_image(dataset: list, noise_intensity=0.2):
  """
  This function replicates the image noising process
  """
  noised = []
  noise_threshold = 1 - noise_intensity
  images = [x[0] for x in dataset]

  for image in tqdm_regular(images):
    #  extracting channels
    channel_0, channel_1, channel_2 = image[:,:,0], image[:,:,1], image[:,:,2]

    #  flatenning channels
    channel_0 = channel_0.reshape(1024)
    channel_1 = channel_1.reshape(1024)
    channel_2 = channel_2.reshape(1024)

    #  creating vector of zeros
    noise_0 = np.zeros(1024, dtype='uint8')
    noise_1 = np.zeros(1024, dtype='uint8')
    noise_2 = np.zeros(1024, dtype='uint8')

    #  noise probability
    for idx in range(1024):
      regulator = round(random.random(), 1)
      if regulator > noise_threshold:
        noise_0[idx] = 255
        noise_1[idx] = 255
        noise_2[idx] = 255
      elif regulator == noise_threshold:
        noise_0[idx] = 0
        noise_1[idx] = 0
        noise_2[idx] = 0
      else:
        noise_0[idx] = channel_0[idx]
        noise_1[idx] = channel_1[idx]
        noise_2[idx] = channel_2[idx]

    #  reshaping noise vectors
    noise_0 = noise_0.reshape((32, 32))
    noise_1 = noise_1.reshape((32, 32))
    noise_2 = noise_2.reshape((32, 32))

    #  stacking images
    image = np.dstack((noise_0, noise_1, noise_2))
    #  labelling and appending to list
    noised.append((image, 1))
  return noised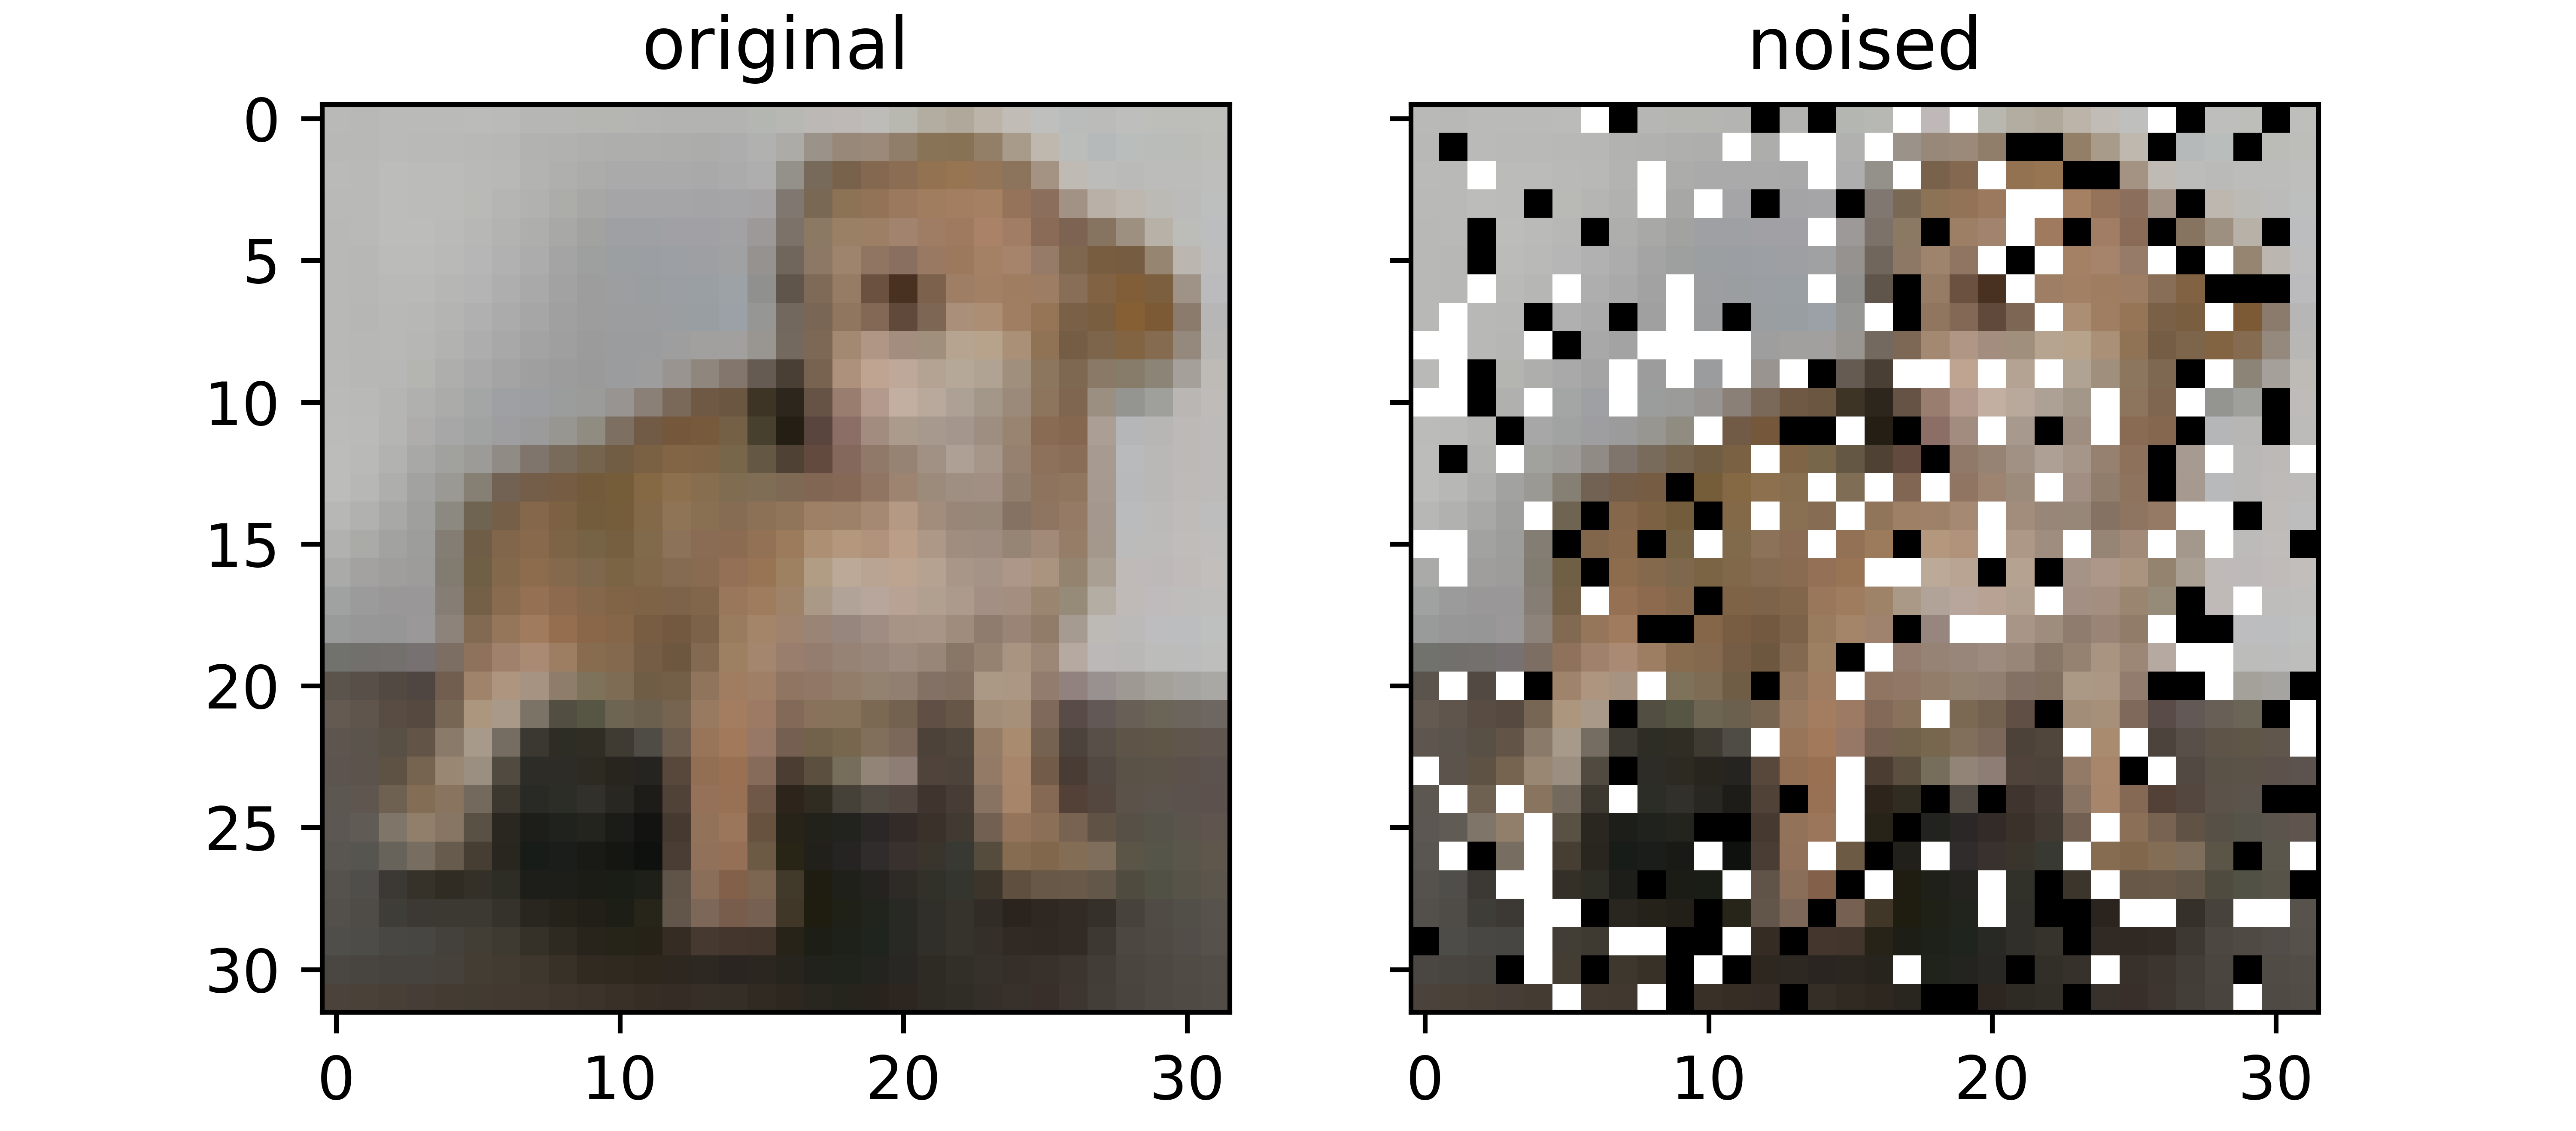
Image Flipping
Image flipping, a mainstay in image processing, is an augmentation technique where the arrangement of rows or columns of pixels are reversed creating a mirror view effect. When images are flipped, the arrangement of their pixels change effectively allowing them to be perceived as different to the original.
def flip_image(dataset: list):
  """
  This function replicates the process of horizontal flipping
  """
  flipped = []
  images = [x[0] for x in dataset]

  for image in tqdm_regular(images):
    #  extracting channels
    channel_0, channel_1, channel_2 = image[:,:,0], image[:,:,1], image[:,:,2]

    channel_0 = channel_0[:, ::-1]
    channel_1 = channel_1[:, ::-1]
    channel_2 = channel_2[:, ::-1]

    #  stacking images
    image = np.dstack((channel_0, channel_1, channel_2))
    #  labelling and appending to list
    flipped.append((image, 1))
  return flipped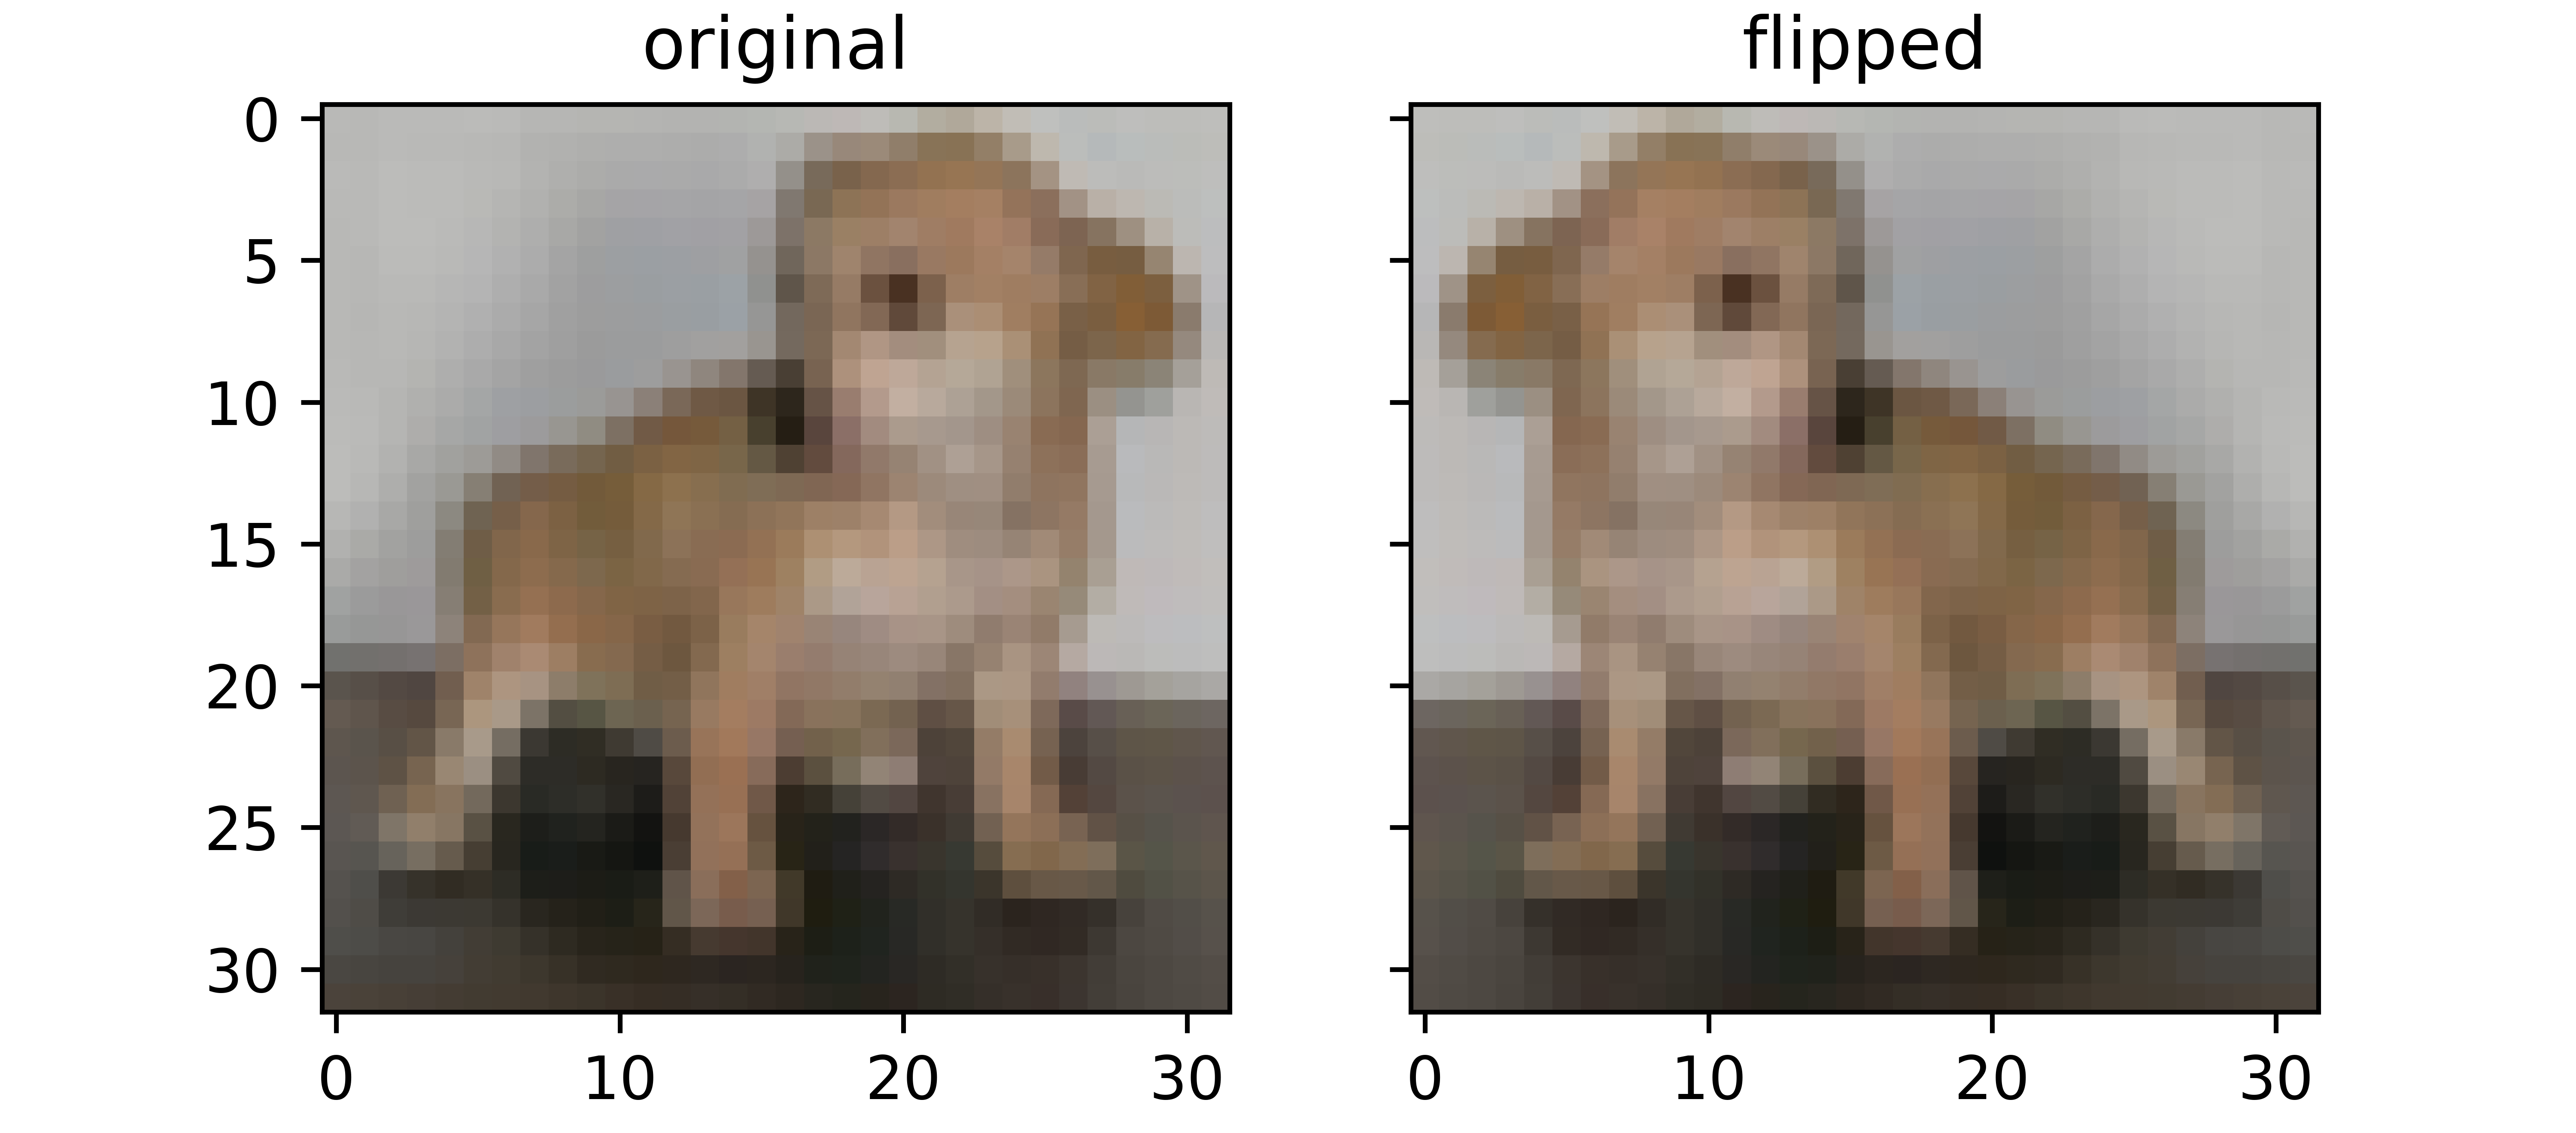
Image Blurring
Another image processing regular, blurring serves as an augmentation technique where pixel intensities are changed across board so as to create a dulling effect in the blurred version. Since pixel values are changed, the blurred versions are treated as entirely new images on a pixel level.
def blur_image(dataset, kernel_size=5, padding=True):
  """This function performs convolution over an image
   with the aim of blurring"""

  #  defining internal function for padding
  def pad_image(image, padding=2):
    """
    This function performs zero padding using the number of
    padding layers supplied as argument and return the padded
    image.
    """
    #  extracting channels
    channel_0, channel_1, channel_2 = image[:,:,0], image[:,:,1], image[:,:,2]

    #  creating an array of zeros
    padded_0 = np.zeros((image.shape[0] + padding*2,
                         image.shape[1] + padding*2), dtype='uint8')
    padded_1 = np.zeros((image.shape[0] + padding*2,
                         image.shape[1] + padding*2), dtype='uint8')
    padded_2 = np.zeros((image.shape[0] + padding*2,
                         image.shape[1] + padding*2), dtype='uint8')

    #  inserting image into zero array
    padded_0[int(padding):-int(padding),
             int(padding):-int(padding)] = channel_0
    padded_1[int(padding):-int(padding),
             int(padding):-int(padding)] = channel_1
    padded_2[int(padding):-int(padding),
             int(padding):-int(padding)] = channel_2

    #  stacking images
    padded = np.dstack((padded_0, padded_1, padded_2))

    return padded

  #  defining list to hold blurred images
  all_blurred = []

  #  defining gaussian 5x5 filter
  gauss_5 = np.array([[1, 4, 7, 4, 1],
                     [4, 16, 26, 16, 4],
                     [7, 26, 41, 26, 7],
                     [4, 16, 26, 16, 4],
                     [1, 4, 7, 4, 1]])

  filter = 1/273 * gauss_5

  #  extracting images
  images = [x[0] for x in dataset]

  for image in tqdm_regular(images):
    if padding:
      image = pad_image(image)
    else:
      image = image

    #  extracting channels
    channel_0, channel_1, channel_2 = image[:,:,0], image[:,:,1], image[:,:,2]

    #  creating an array to store convolutions
    blurred_0 = np.zeros(((image.shape[0] - kernel_size) + 1,
                          (image.shape[1] - kernel_size) + 1), dtype='uint8')
    blurred_1 = np.zeros(((image.shape[0] - kernel_size) + 1,
                          (image.shape[1] - kernel_size) + 1), dtype='uint8')
    blurred_2 = np.zeros(((image.shape[0] - kernel_size) + 1,
                          (image.shape[1] - kernel_size) + 1), dtype='uint8')

    #  performing convolution
    for i in range(image.shape[0]):
      for j in range(image.shape[1]):
        try:
          blurred_0[i,j] = (channel_0[i:(i+kernel_size), j:(j+kernel_size)] * filter).sum()
        except Exception:
          pass

    for i in range(image.shape[0]):
      for j in range(image.shape[1]):
        try:
          blurred_1[i,j] = (channel_1[i:(i+kernel_size), j:(j+kernel_size)] * filter).sum()
        except Exception:
          pass

    for i in range(image.shape[0]):
      for j in range(image.shape[1]):
        try:
          blurred_2[i,j] = (channel_2[i:(i+kernel_size), j:(j+kernel_size)] * filter).sum()
        except Exception:
          pass

    #  stacking images
    blurred = np.dstack((blurred_0, blurred_1, blurred_2))
    #  labelling and appending to list
    all_blurred.append((blurred, 1))

  return all_blurred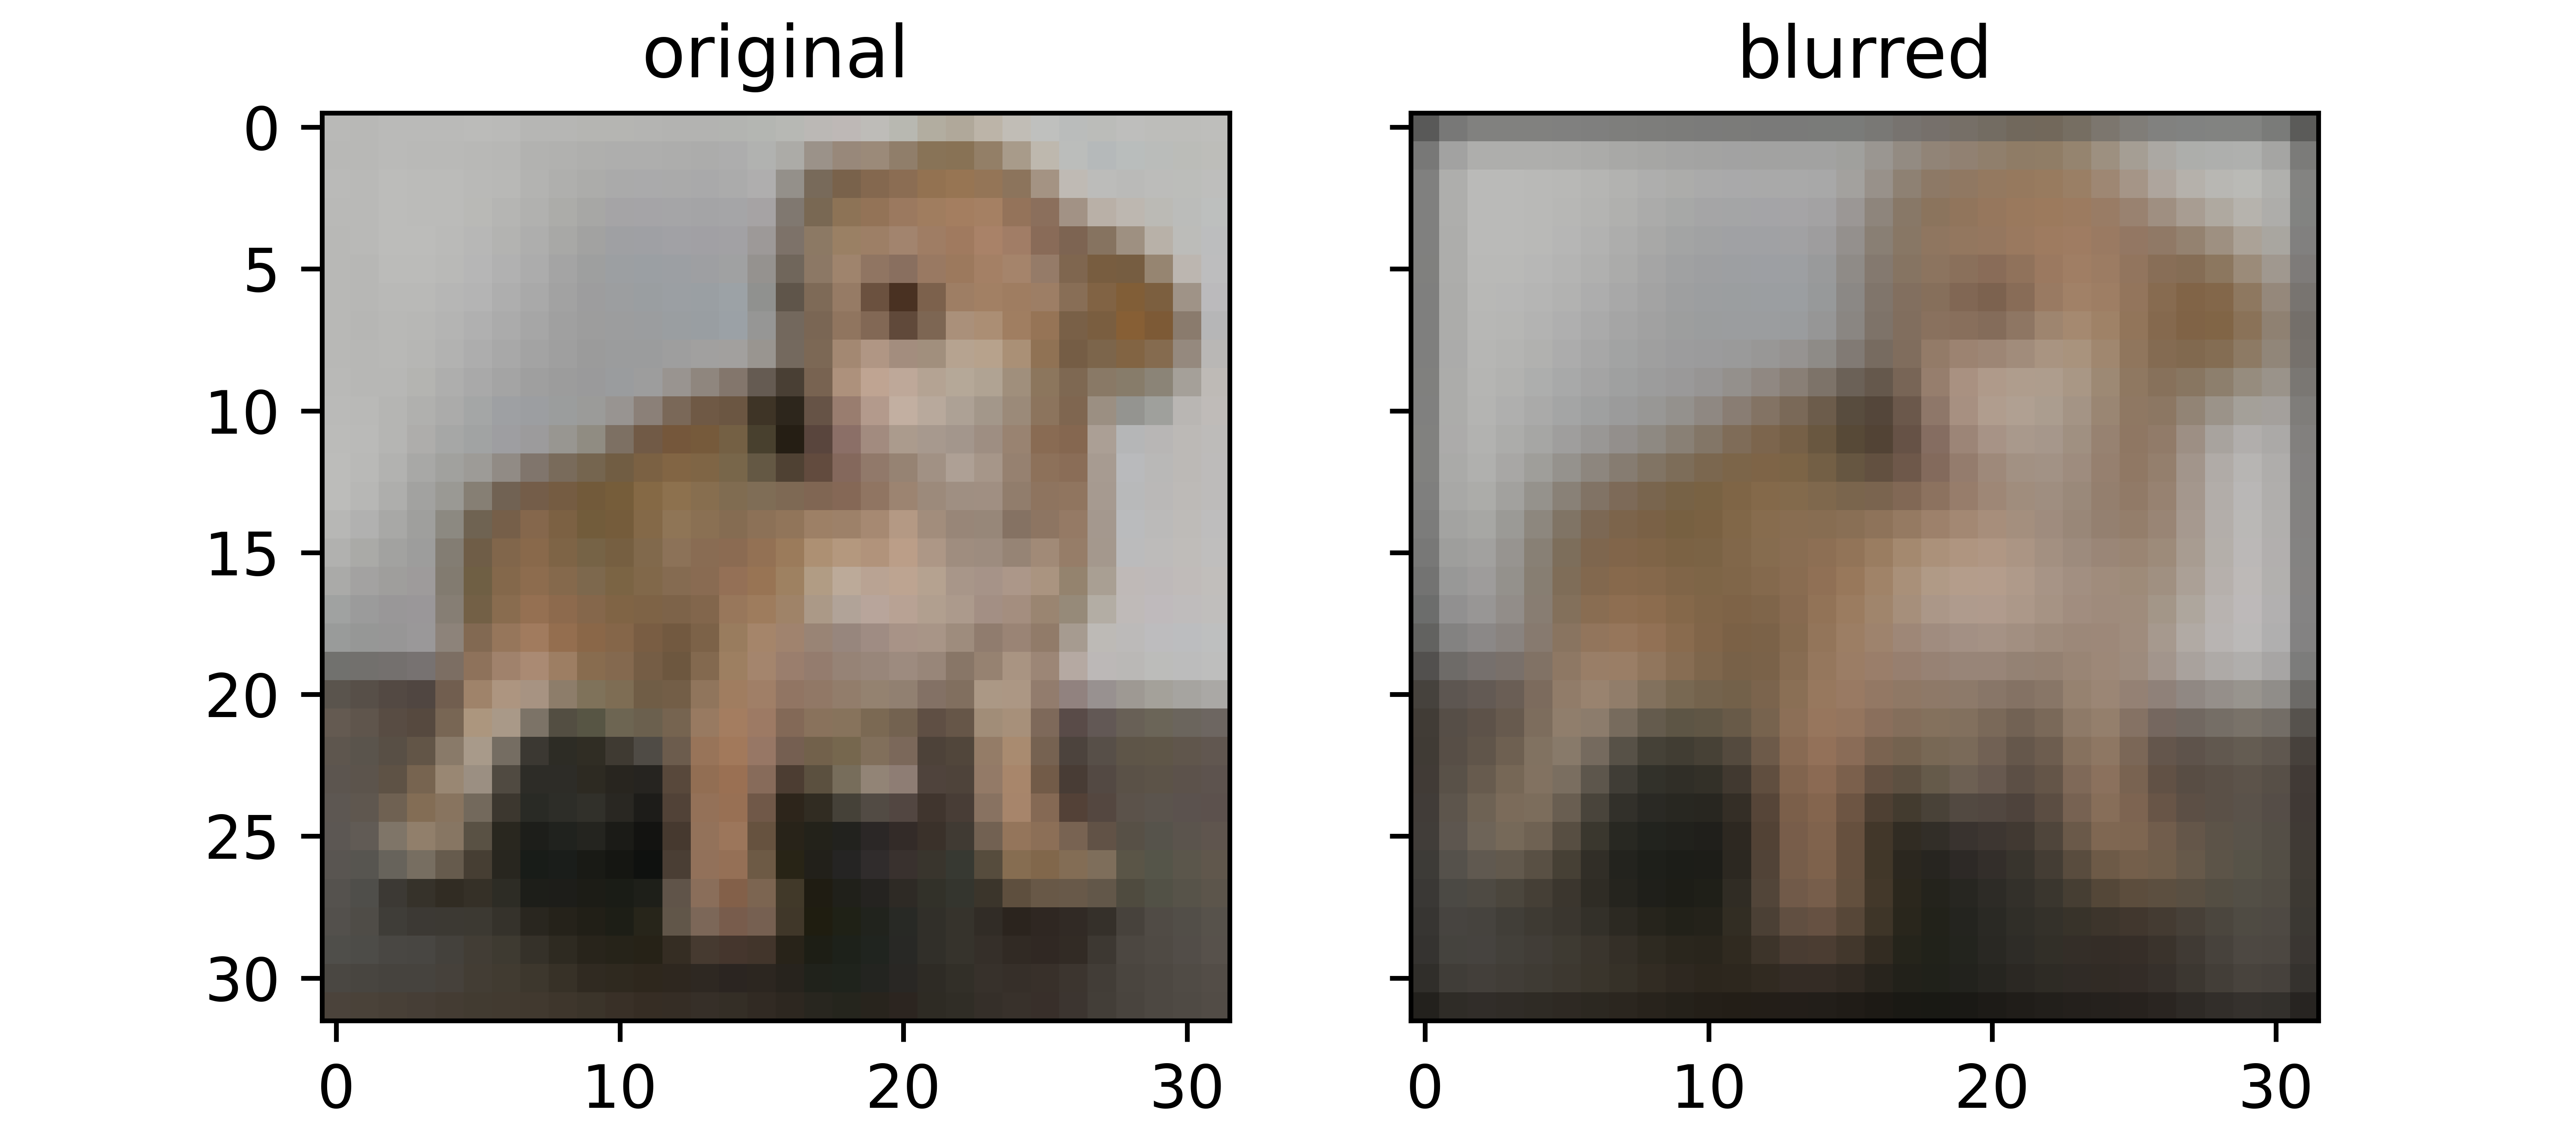
Putting It All Together
Bring this project to life
In this section, we will utilize the above defined augmentation technique in upsampling the dataset from the previous article where we had a 4:1 class imbalance (80% cats, 20% dogs). For this purpose we will be using the CIFAR-10 dataset which can be loaded into PyTorch using the code cell below.
#  loading training data
training_set = Datasets.CIFAR10(root='./', download=True,
                              transform=transforms.ToTensor())

#  loading validation data
validation_set = Datasets.CIFAR10(root='./', download=True, train=False,
                                transform=transforms.ToTensor())
We will now extract cat and dogs images from the dataset using a function defined as follows.
def extract_images(dataset):
  """
  This function helps to extract cat and dog images
  from the cifar-10 dataset
  """
  cats = []
  dogs = []

  for idx in tqdm_regular(range(len(dataset))):
    if dataset.targets[idx]==3:
      cats.append((dataset.data[idx], 0))
    elif dataset.targets[idx]==5:
      dogs.append((dataset.data[idx], 1))
    else:
      pass
  return cats, dogs

#  extracting from the training set
train_cats, train_dogs = extract_images(training_set)
#  extracting from the validation set
val_cats, val_dogs = extract_images(validation_set)
Upsampling Training Images via Augmentation
In the article on class imbalance, we had set up a 4:1 imbalance in favor of cats by using the first 4,800 cat images and just the first 1,200 dog images i.e data = train_cats[:4800] + train_dogs[:1200]. To allow for synergy, we will keep with the same theme which means we need up augment dog images with 3,600 images.
In order to keep things simple, we will utilize three of the above mentioned augmentation methods, producing 1,200 augmented version of the original images with each method.
#  deriving images of interest
dog_images = train_dogs[:1200]

#  creating random cropped copies
dog_cropped = random_crop(dog_images)

#  creating flipped copies
dog_flipped = flip_image(dog_images)

#  creating noised copies
dog_noised = noise_image(dog_images)
Piecing Together a Dataset
Now that the transformed copies are in place, all we need to do now is to finish putting together our dataset for both the training and validation set.
#  creating a dataset of 4,800 dog images
train_dogs = dog_images + dog_cropped + dog_flipped + dog_noised

#  instantiating training data
training_images = train_cats[:4800] + train_dogs
random.shuffle(training_images)

#  instantiating validation data
validation_images = val_cats + val_dogs
random.shuffle(validation_images)
Next we need to define a class so as to be able to create a PyTorch dataset from our custom dataset.
#  defining dataset class
class CustomCatsvsDogs(Dataset):
  def __init__(self, data, transforms=None):
    self.data = data
    self.transforms = transforms

  def __len__(self):
    return len(self.data)

  def __getitem__(self, idx):
    image = self.data[idx][0]
    label = torch.tensor(self.data[idx][1])

    if self.transforms!=None:
      image = self.transforms(image)
    return(image, label)


 #  creating pytorch datasets
training_data = CustomCatsvsDogs(training_images, transforms=transforms.Compose([transforms.ToTensor(),
                                                                                 transforms.Normalize((0.5, 0.5, 0.5), (0.5, 0.5, 0.5))]))
validation_data = CustomCatsvsDogs(validation_images, transforms=transforms.Compose([transforms.ToTensor(),
                                                                                     transforms.Normalize((0.5, 0.5, 0.5), (0.5, 0.5, 0.5))]))
Convnet Classes
In a bid to train a convnet, we need to define a class which will enable us to neatly package training, validation, metric calculation and logging as well as model utilization all into a single object as seen below.
class ConvolutionalNeuralNet_2():
  def __init__(self, network):
    self.network = network.to(device)
    self.optimizer = torch.optim.Adam(self.network.parameters(), lr=1e-3)

  def train(self, loss_function, epochs, batch_size,
            training_set, validation_set):

    #  creating log
    log_dict = {
        'training_loss_per_batch': [],
        'validation_loss_per_batch': [],
        'training_accuracy_per_epoch': [],
        'training_recall_per_epoch': [],
        'training_precision_per_epoch': [],
        'validation_accuracy_per_epoch': [],
        'validation_recall_per_epoch': [],
        'validation_precision_per_epoch': []
    }

    #  defining weight initialization function
    def init_weights(module):
      if isinstance(module, nn.Conv2d):
        torch.nn.init.xavier_uniform_(module.weight)
        module.bias.data.fill_(0.01)
      elif isinstance(module, nn.Linear):
        torch.nn.init.xavier_uniform_(module.weight)
        module.bias.data.fill_(0.01)

    #  defining accuracy function
    def accuracy(network, dataloader):
      network.eval()

      all_predictions = []
      all_labels = []

      #  computing accuracy
      total_correct = 0
      total_instances = 0
      for images, labels in tqdm(dataloader):
        images, labels = images.to(device), labels.to(device)
        all_labels.extend(labels)
        predictions = torch.argmax(network(images), dim=1)
        all_predictions.extend(predictions)
        correct_predictions = sum(predictions==labels).item()
        total_correct+=correct_predictions
        total_instances+=len(images)
      accuracy = round(total_correct/total_instances, 3)

      #  computing recall and precision
      true_positives = 0
      false_negatives = 0
      false_positives = 0
      for idx in range(len(all_predictions)):
        if all_predictions[idx].item()==1 and  all_labels[idx].item()==1:
          true_positives+=1
        elif all_predictions[idx].item()==0 and all_labels[idx].item()==1:
          false_negatives+=1
        elif all_predictions[idx].item()==1 and all_labels[idx].item()==0:
          false_positives+=1
      try:
        recall = round(true_positives/(true_positives + false_negatives), 3)
      except ZeroDivisionError:
        recall = 0.0
      try:
        precision = round(true_positives/(true_positives + false_positives), 3)
      except ZeroDivisionError:
        precision = 0.0
      return accuracy, recall, precision

    #  initializing network weights
    self.network.apply(init_weights)

    #  creating dataloaders
    train_loader = DataLoader(training_set, batch_size)
    val_loader = DataLoader(validation_set, batch_size)

    #  setting convnet to training mode
    self.network.train()

    for epoch in range(epochs):
      print(f'Epoch {epoch+1}/{epochs}')
      train_losses = []

      #  training
      print('training...')
      for images, labels in tqdm(train_loader):
        #  sending data to device
        images, labels = images.to(device), labels.to(device)
        #  resetting gradients
        self.optimizer.zero_grad()
        #  making predictions
        predictions = self.network(images)
        #  computing loss
        loss = loss_function(predictions, labels)
        log_dict['training_loss_per_batch'].append(loss.item())
        train_losses.append(loss.item())
        #  computing gradients
        loss.backward()
        #  updating weights
        self.optimizer.step()
      with torch.no_grad():
        print('deriving training accuracy...')
        #  computing training accuracy
        train_accuracy, train_recall, train_precision = accuracy(self.network, train_loader)
        log_dict['training_accuracy_per_epoch'].append(train_accuracy)
        log_dict['training_recall_per_epoch'].append(train_recall)
        log_dict['training_precision_per_epoch'].append(train_precision)

      #  validation
      print('validating...')
      val_losses = []

      #  setting convnet to evaluation mode
      self.network.eval()

      with torch.no_grad():
        for images, labels in tqdm(val_loader):
          #  sending data to device
          images, labels = images.to(device), labels.to(device)
          #  making predictions
          predictions = self.network(images)
          #  computing loss
          val_loss = loss_function(predictions, labels)
          log_dict['validation_loss_per_batch'].append(val_loss.item())
          val_losses.append(val_loss.item())
        #  computing accuracy
        print('deriving validation accuracy...')
        val_accuracy, val_recall, val_precision = accuracy(self.network, val_loader)
        log_dict['validation_accuracy_per_epoch'].append(val_accuracy)
        log_dict['validation_recall_per_epoch'].append(val_recall)
        log_dict['validation_precision_per_epoch'].append(val_precision)

      train_losses = np.array(train_losses).mean()
      val_losses = np.array(val_losses).mean()

      print(f'training_loss: {round(train_losses, 4)}  training_accuracy: '+
      f'{train_accuracy}  training_recall: {train_recall}  training_precision: {train_precision} *~* validation_loss: {round(val_losses, 4)} '+
      f'validation_accuracy: {val_accuracy}  validation_recall: {val_recall}  validation_precision: {val_precision}\n')

    return log_dict

  def predict(self, x):
    return self.network(x)
Next, we need to define a convolutional neural network for this binary classification task. For the sake of this article we will be using a custom built convnet as defined in the code block below.
class ConvNet(nn.Module):
  def __init__(self):
    super().__init__()
    self.conv1 = nn.Conv2d(3, 8, 3, padding=1)
    self.batchnorm1 = nn.BatchNorm2d(8)
    self.conv2 = nn.Conv2d(8, 8, 3, padding=1)
    self.batchnorm2 = nn.BatchNorm2d(8)
    self.pool2 = nn.MaxPool2d(2)
    self.conv3 = nn.Conv2d(8, 32, 3, padding=1)
    self.batchnorm3 = nn.BatchNorm2d(32)
    self.conv4 = nn.Conv2d(32, 32, 3, padding=1)
    self.batchnorm4 = nn.BatchNorm2d(32)
    self.pool4 = nn.MaxPool2d(2)
    self.conv5 = nn.Conv2d(32, 128, 3, padding=1)
    self.batchnorm5 = nn.BatchNorm2d(128)
    self.conv6 = nn.Conv2d(128, 128, 3, padding=1)
    self.batchnorm6 = nn.BatchNorm2d(128)
    self.pool6 = nn.MaxPool2d(2)
    self.conv7 = nn.Conv2d(128, 2, 1)
    self.pool7 = nn.AvgPool2d(3)

  def forward(self, x):
    #-------------
    # INPUT
    #-------------
    x = x.view(-1, 3, 32, 32)

    #-------------
    # LAYER 1
    #-------------
    output_1 = self.conv1(x)
    output_1 = F.relu(output_1)
    output_1 = self.batchnorm1(output_1)

    #-------------
    # LAYER 2
    #-------------
    output_2 = self.conv2(output_1)
    output_2 = F.relu(output_2)
    output_2 = self.pool2(output_2)
    output_2 = self.batchnorm2(output_2)

    #-------------
    # LAYER 3
    #-------------
    output_3 = self.conv3(output_2)
    output_3 = F.relu(output_3)
    output_3 = self.batchnorm3(output_3)

    #-------------
    # LAYER 4
    #-------------
    output_4 = self.conv4(output_3)
    output_4 = F.relu(output_4)
    output_4 = self.pool4(output_4)
    output_4 = self.batchnorm4(output_4)

    #-------------
    # LAYER 5
    #-------------
    output_5 = self.conv5(output_4)
    output_5 = F.relu(output_5)
    output_5 = self.batchnorm5(output_5)

    #-------------
    # LAYER 6
    #-------------
    output_6 = self.conv6(output_5)
    output_6 = F.relu(output_6)
    output_6 = self.pool6(output_6)
    output_6 = self.batchnorm6(output_6)

    #--------------
    # OUTPUT LAYER
    #--------------
    output_7 = self.conv7(output_6)
    output_7 = self.pool7(output_7)
    output_7 = output_7.view(-1, 2)

    return F.softmax(output_7, dim=1)
Training a Convolutional Neural Network
By utilizing the convnet we defined in the previous section and instantiating it as a member of the convolutional neural network class, also defined in the previous section, we can now proceed to train our convnet for 10 epochs using parameters as defined as follows.
#  training model
model = ConvolutionalNeuralNet_2(ConvNet())

log_dict = model.train(nn.CrossEntropyLoss(), epochs=10, batch_size=64,
                       training_set=training_data, validation_set=validation_data)
Analyzing Results
A bit of a refresher, in the class imbalance article when we trained a model on the imbalanced dataset, we wound up with a model with 80% training accuracy and 50% validation accuracy with a validation recall of 0%. This indicated that the model was indiscriminate, and was simply predicting all image instances as cats.
However, training the model on augmented data as we have done yielded results as seen in the image below. Overall, both training and validation accuracy increased through the course of training, albeit with validation accuracy plateauing from the 5th epoch.
Of key interest however are the validation metrics, with a validation accuracy of approximately 73% from the 3rd epoch, validation recall was not 0%, in fact it climbed to as high as 78% by the 9th epochs indicating that the model is now in fact being discriminative even though we had used augmented images for training purposes. Performance can further be tweaked by trying other augmentation methods or adjusting class weights.

Finding the Best Technique
As you might have noticed, I chose not to select blurring as an augmentation method for this dataset. That's because I had actually tried it and it did not yield desirable results. In fact certain datasets have schemes of augmentation techniques which work best for them, it is therefore imperative to find the best techniques for whichever dataset one is dealing with.
Final Remarks
In this article we took a look at data augmentation as an upsampling technique for handing class imbalance. We went further by discussing in detail a few image augmentation techniques and how they can be implemented in Python. Thereafter, we augmented a dataset and trained a convnet using said dataset with results showing that it yielded reasonable validation accuracy and recall scores.