Follow this guide to learn how to deploy our model with FastAPI using a Gradient Deployment. Readers should expect to learn how to upload their trained model as a Gradient model artifact, create a Docker image that will serve their model, and deploy their image on Gradient using a deployment.
Important: At the end of this tutorial, we will have spun up a Gradient Deployment. Please ensure to turn it off by changingreplicas: 0or adding anenabled: falseflag to the specification or deleting the Deployment entirely. Otherwise, the owner's account will be charged for compute as long as the deployment is running. We can confirm our deployment is offline by checking the status at the top of the deployment page in the Paperspace Console.
Preface
The goal of this guide is to show users how to take their own trained models, and deploy them on Gradient Deployments by providing an endpoint that users can send requests to return outputs generated from their model. To do this, we will be using FastAPI. FastAPI is a modern, high performance web framework for building APIs that are easy to use and great for creating apps to service a model.
What we will be doing in the tutorial below is creating a FastAPI application that will serve our model by providing an endpoint that our model can be called from. This endpoint will accept an API request, generate a model output and return that output to the sender. We will create a Docker image that contains that FastAPI app, and then deploy that image along with the model on Gradient to allow users access to our model.
Prerequisites
As a starting point for this tutorial, we will need to have:
- A trained model
- FastAPI application files
This tutorial isn’t meant to be a deep dive into FastAPI development, but rather a guide on how to deploy a FastAPI application on Gradient to serve our model. However, we will be highlighting a few files and code snippets below that we used for this demo application. We can also check out the GitHub repository we used for this project which includes all the files we used for this FastAPI application, the Dockerfile, and any other accompanying file.
At a high level, the FastAPI application (in main.py) sets up the following processes:
- Establishes an endpoint for the model predict function
- Checks for an API request to be received
- Inputs the attached image file
- Processes the image by transforming it into a tensor ready suitable for model input
- Passes the image into the model, and captures the classification prediction
- Returns the prediction to the sender
We can see a snippet of the FastAPI app below.
# Library import and model setup
# ...
app = FastAPI()

@app.get("/predict")
async def predict(image: bytes = File()):

		# Transform input image into tensor
    tensor = imgToTensor(image)

		# Generate model output
    model.eval()
    with torch.inference_mode():
        output = model(tensor)

		# Convert model output to prediction
    _, predicted = torch.max(output.data, 1)
    prediction = prediction_classes[predicted]

		# Return prediction
    return {"prediction": prediction}
The goal of this specific project is to deploy an image classification model (ResNet) that can receive an API request that contains an image, predict what class the image belongs to, and return that prediction. The primary files in the GitHub repository are briefly described below.
- main.py - Builds and defines the FastAPI application
- preprocess.py - Contains the process that transforms the image from the API request into the proper format for the model
- resnet.py - Includes functions to create the ResNet model object
- config - Contains configurations of the model and application
- requirements.txt - Python library requirements of the application
Note: The requirements.txt file contains the libraries needed to run the model inference. When we build the Docker image in the following steps, we will be importing from a base image that already includes Python 3.9, the appropriate CUDA drivers, and packages to run FastAPI. However, our requirements.txt file will need to contain any ML Frameworks or other Python libraries needed beyond that (e.g. PyTorch, TensorFlow, NumPy).
Once we have the above requirements met, we are ready to follow the steps below to get our application up and running on Gradient.
Tutorial
Getting Started
There are three main steps to get our model running on a FastAPI app on Gradient. The steps are as follows:
- Upload our model as a Gradient model artifact
- Create a Docker image for our application
- Create and run our Gradient Deployment
Assuming we have met the prerequisites above, the first thing we will need to do is upload our model as a Gradient model artifact. Let's begin by looking below at how this works using two different methods.
Upload our Model
There are two ways to upload our model file(s) as a Gradient model artifact. The first way to upload our model is through the Paperspace Console where we can select a local file from our machine. The second way is through the Gradient CLI. We will highlight both ways to upload our model below.
Upload Model through Console
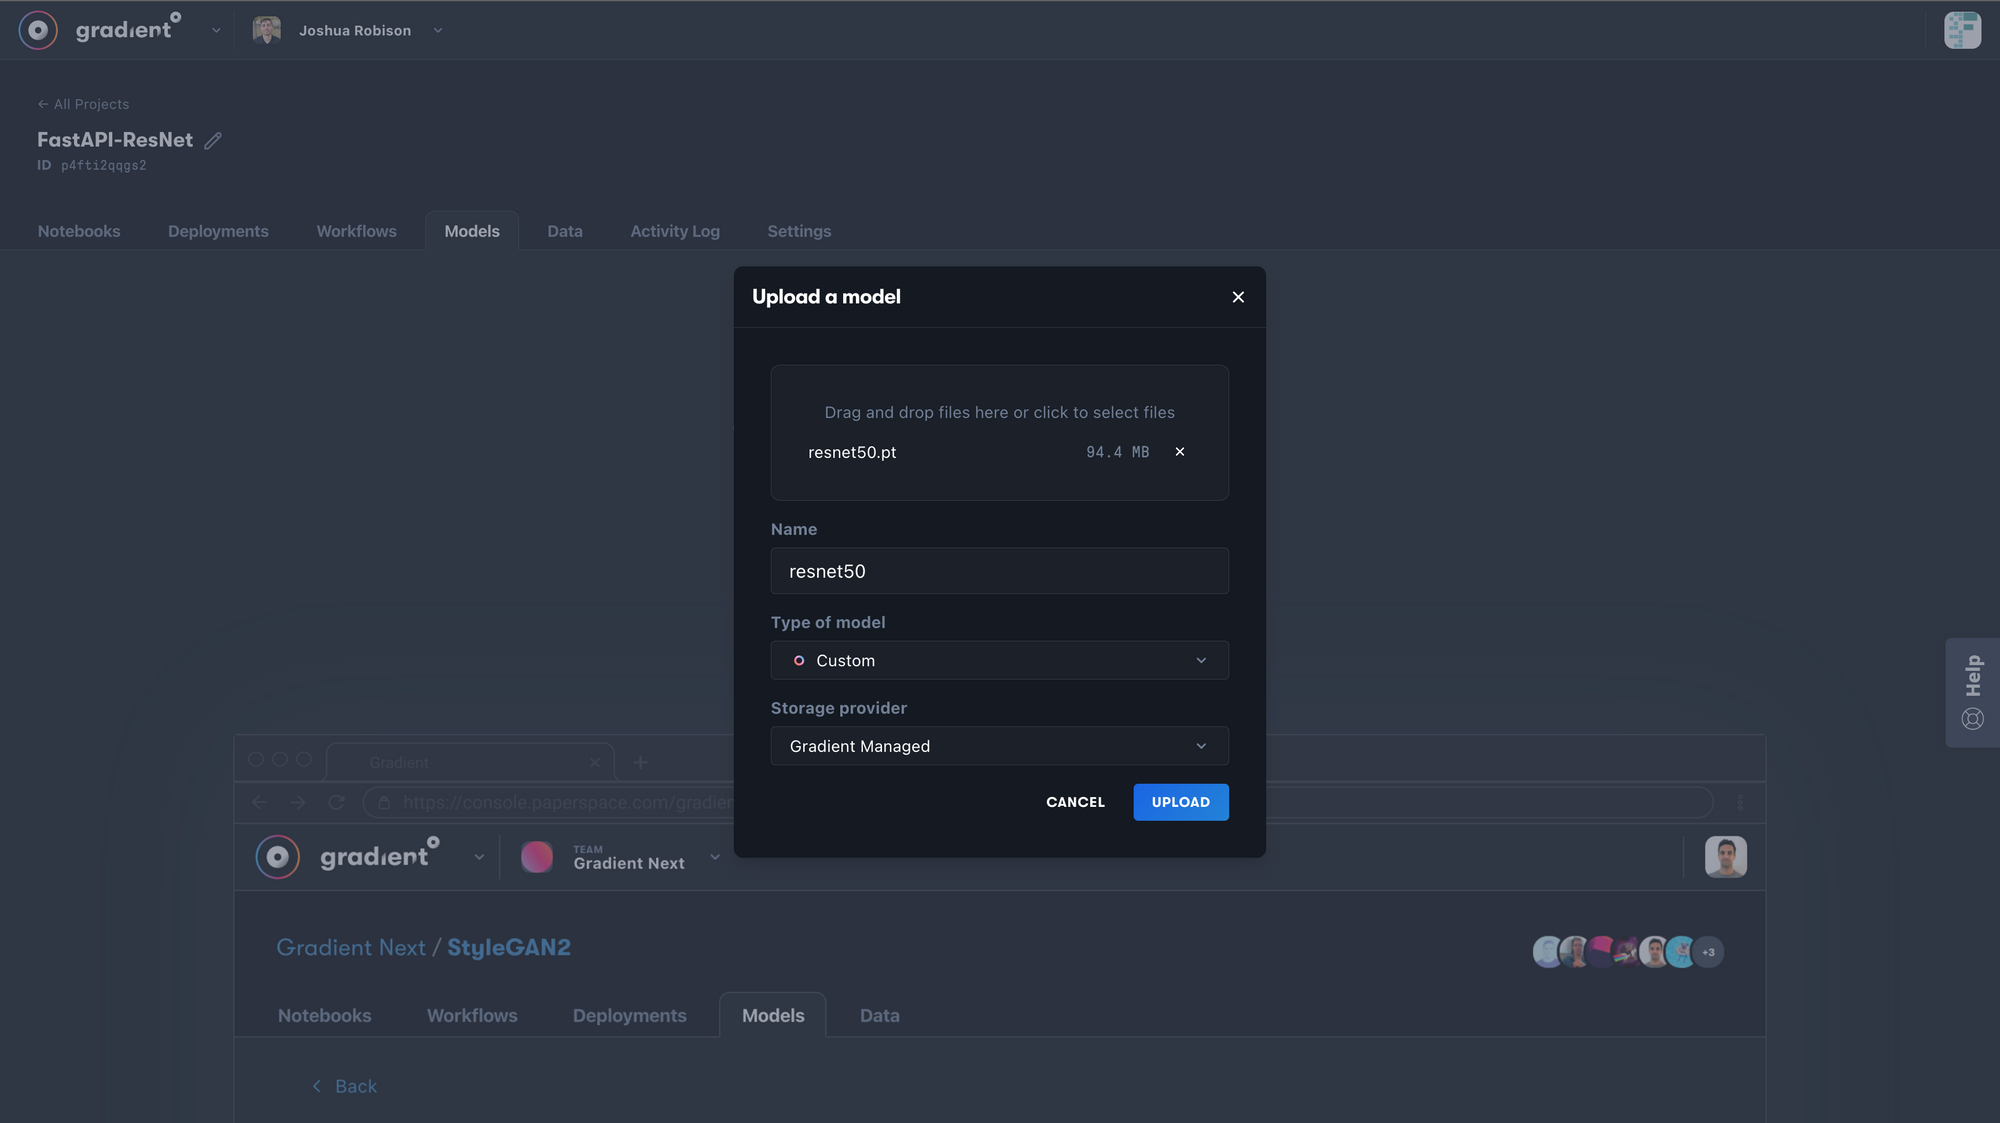
To upload our model through the Paperspace Console, make sure our model file(s) are located on our local machine. Next, navigate to our Gradient Project, into the Models tab and click on Upload Model. A popup will appear that allows us to name the model and select the file we wish to upload. Other configurations are shown in the image below.
Note: Use the "Custom" model type for PyTorch/PopTorch models.
Upload Model through Gradient CLI
To upload our model using the Gradient CLI, we first need to make sure our model file(s) are located in an environment where the Gradient CLI is installed. In this case, we will assume the model files were trained and are located in a Gradient Notebook where the CLI is installed.
Note: More information about the CLI commands can be found in our documentation here.
The first step we need to take is find our Gradient API key. We will use this to log in to our account through the CLI. To find our API Key, we can reference this documentation.
Once we have our API key, we can follow the steps below by using the CLI commands provided in our environment’s terminal.
- Log in to our Gradient account using our API key
gradient apiKey "your-api-key"
- Create a dataset to be used as the reference for our Gradient model artifact.
gradient datasets create \
	--name "dataset-name" \
	--storageProviderId "storage-provider"
Note: To get the Gradient Storage Provider ID, navigate to our Profile on the top right of the console, into Team Settings, into Storage, and find the storage provider ID at the bottom of the page. The value should look something like: splvqdtq9ofuxui. An example is shown below.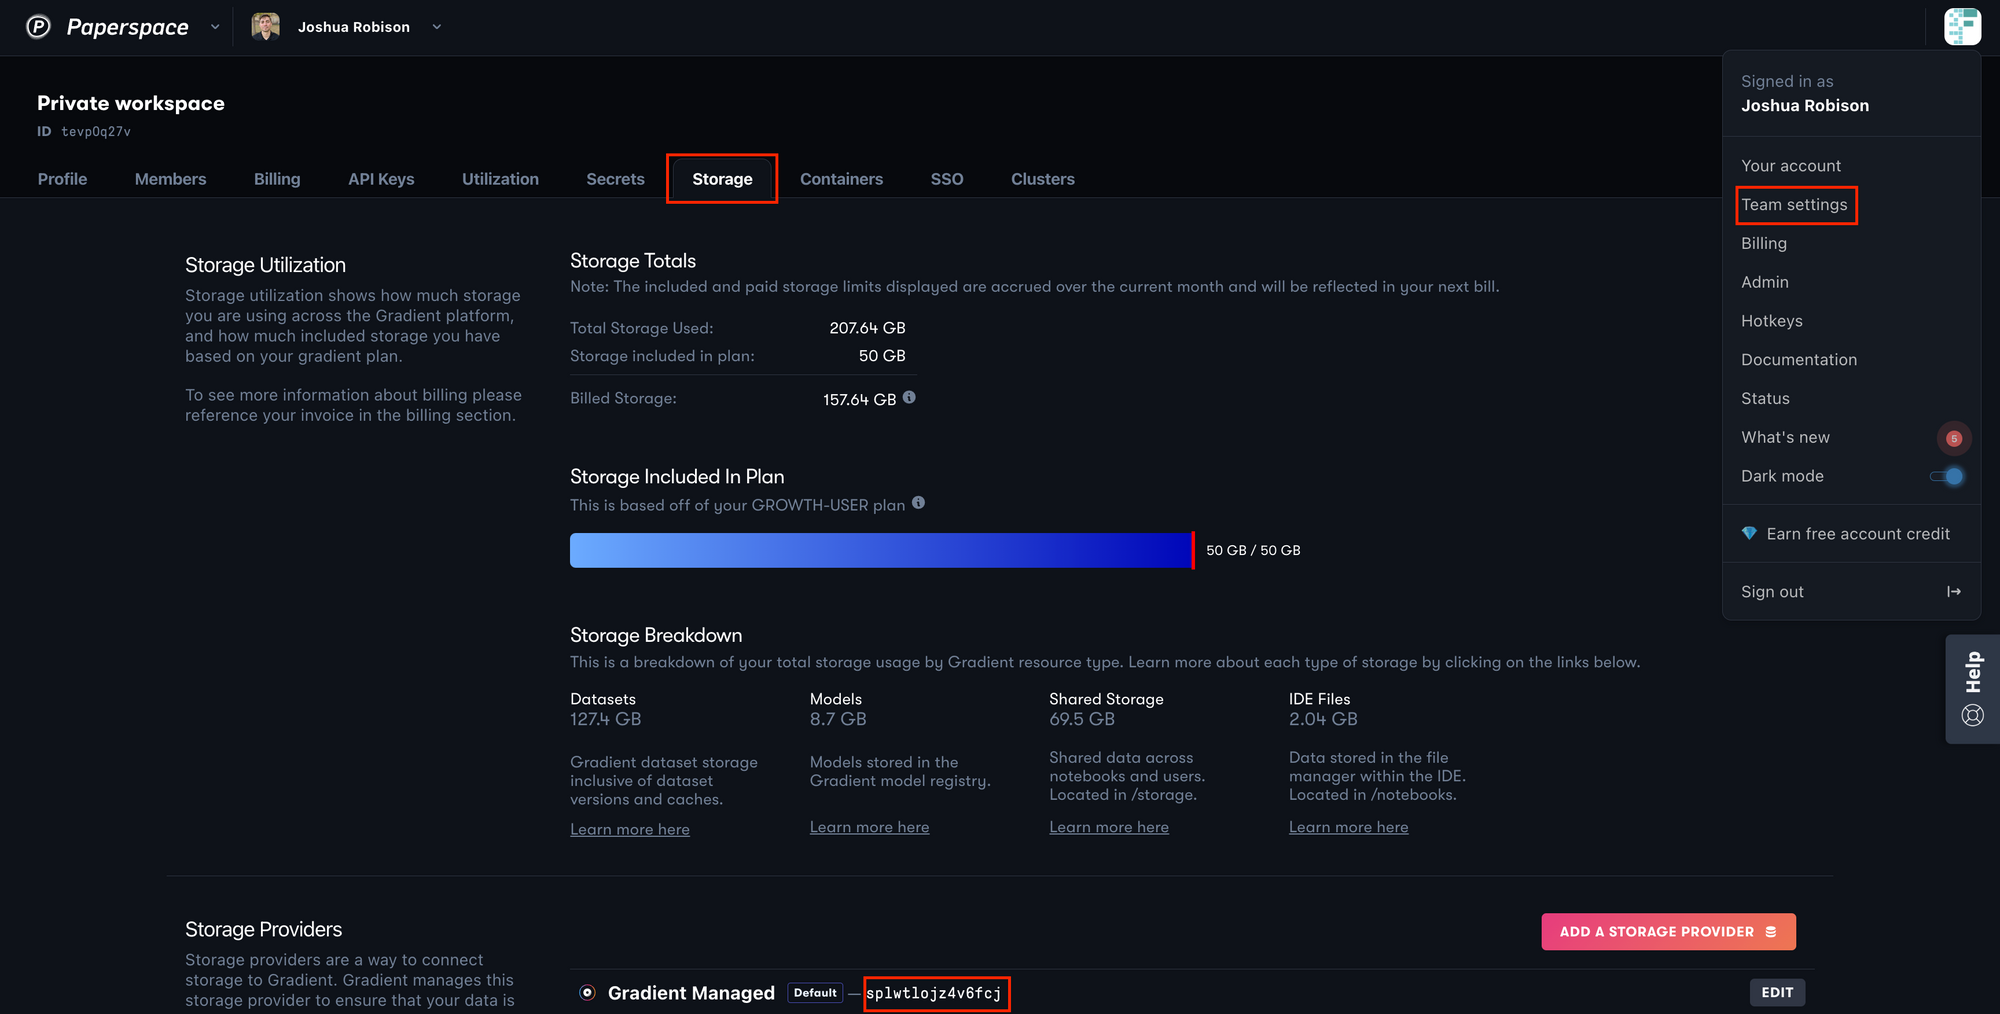
- Upload our model file(s) to the dataset we created. The dataset ID will be outputted after running the above command.
gradient datasets versions create \
	--id "your-dataset-id" \
	--source-path "./local/path/to/model-file"
- Create a Gradient model artifact with the dataset we created as its reference.
gradient models create \
  --name "model-name" \
  --modelType "Custom" \
  --datasetRef "your-dataset-id"
Great! We have now created our Gradient model object. Let’s move on to creating the Docker image for our deployment.
Create Docker Image
Next we will need to build the Docker image for our deployment. This image will include any application files for our FastAPI model service to run and the environment to run on. As we walk through the details below, feel free to reference the GitHub repository which contains all the files discussed.
Setup
Below is a template Dockerfile that we used to create the demo application image. This Dockerfile uses a Paperspace hosted FastAPI deployment image as its base layer, copies in the application files, and runs the appropriate setup commands. Details on each command are below.
FROM paperspace/fastapi-deployment:latest

WORKDIR /app

COPY main.py preprocess.py resnet.py requirements.txt ./
COPY config ./config

RUN pip3 install -U pip && pip3 install -r requirements.txt

CMD ["uvicorn", "main:app", "--host", "0.0.0.0", "--port", "80"]
A brief description of each of the Dockerfile steps:
FROM: Sets the base image to build our image on top of
WORKDIR: Sets the working directory for other Dockerfile instructions
COPY: Copies the locally stored files needed to run the FastAPI application to the working directory in the image (i.e. /app)
RUN: Runs a pip update and install on requirements.txt to install the application requirements
CMD: Command that starts the uvicorn server that the FastAPI application runs on
As mentioned at the beginning of this tutorial, the base Docker image paperspace/fastapi-deployment contains Python 3.9, the needed CUDA drivers, and the libraries needed to run a FastAPI application. All other requirements will need to be included in our requirements.txt file.
We can use the above template and modify it for our purposes. A few changes that may need to be made:
- Requirements.txt - Ensure that our requirements.txt has the proper python library requirements for our application. Our file will need to contain any ML Frameworks or other Python libraries needed (e.g. PyTorch, NumPy).
- Dockerfile COPY command - This is where we will list our application specific files that are needed to run our FastAPI application.
Once we’ve made the changes above, but before we build the Docker image, we will need to create a repository to host our Docker image. We recommend using Docker Hub as the container registry. Anybody can sign up for a free Docker Hub account to take advantage of the useful service.
After we create our Docker Hub account, create a public repository in Docker Hub. For example, we named our repository resnet-fastapi which will be hosted on Docker Hub at paperspace/resnet-fastapi.
We are now ready to build our Docker image. To do so, we will need our code files, including our Dockerfile, on an environment with Docker installed. We recommend using a Paperspace Core machine with the ML-in-a-Box template. That machine will have all the packages needed to build our Docker image, and will allow the user to take advantage of the extremely fast download and upload speeds available for Paperspace machines. More instructions on how to set that up are here.
We would also recommend creating a GitHub repository to store the project including the application files, Dockerfile, and any other accompanying files. Once we have a GitHub repository that stores our project files, then we can clone our repository on to our local or Core machine, so that all the needed files live in the same directory.
Docker Image Build
Once our Dockerfile is created and we have a Docker Hub repository, we are ready to build our Docker image. To do so, we then clone our project GitHub repository or move the necessary files to our chosen machine.
To build our Docker image from our Dockerfile, run the following command using our Docker Hub account and image name. Notice that we are using the Paperspace namespace and naming our image resnet-fastapi (the demo's will be different) and adding an optional tag of latest.
nvidia-docker build -t paperspace/resnet-fastapi:latest
Note: We can replace nvidia-docker with docker in these 2 commands however nvidia-docker is recommended as it’s a wrapper around the docker command that provisions a container with the necessary components to execute code on the GPU.
Once our Docker image is built, we can push it to our Docker Hub repository using the following command.
nvidia-docker push paperspace/resnet-fastapi:latest
Congrats! Our image is now on Docker Hub. We are now ready to deploy the application on Gradient.
Deploy FastAPI Application
There are 2 ways to deploy our FastAPI application on Gradient. The first, is to use the Model Builder interface in the Paperspace Console. The other way is to use the Gradient CLI. We will show both of these methods below.
Deploy Application through Model Builder
First, we navigate to the Deployments tab in our Gradient project and click on "Create". This will open up a model builder form that we can use to specify the configurations of our Deployment. Below is a screenshot of configurations we have selected. Further below is more detail on each configuration.

Configuration Options
Deployment name: The desired name of our deployment
Select a machine: The machine type we want to run our deployment on
Replicas: The number of containers of our image to spin up. If we set replicas to more than 1, there’s a built-in load balancer that will direct incoming requests to our containers based on each instance’s current utilization. Setting replicas to 0 will disable the deployment
Image: The namespace and tag of the image we want to spin up
Port: The local container port that our application is running on. If we used the Dockerfile template above, then our FastAPI app should be running on port 80
Environment variables: (Optional) we use these in our application file to load the model, so that the application itself is agnostic to which model file is loaded or which path it’s mounted to. More details on this below
Add models: A dropdown menu to select the model that we uploaded in the first step of this tutorial
To better explain how we used the environment variables set above, take a look at the model setup function we use to load the PyTorch model onto the GPU in our application.
def model_setup():
    MODEL_DIR = os.getenv('MODEL_DIR')
    MODEL_FILE = os.getenv('MODEL_FILE')
    MODEL_NAME = os.getenv('MODEL_NAME')
    MODEL_PATH = os.path.join(MODEL_DIR, MODEL_FILE)

    model_dict = model_dict = {'resnet18': resnet18(3,10)
                    ,'resnet34': resnet34(3,10)
                    ,'resnet50': resnet50(3,10)
                    ,'resnet101': resnet101(3,10)
                    ,'resnet152': resnet152(3,10)
                    }

    device = torch.device("cuda" if torch.cuda.is_available() else "cpu")
    model = model_dict[MODEL_NAME]
    model.load_state_dict(torch.load(MODEL_PATH, map_location=device))

    return model
Notice that by using environment variables and the model dictionary, we can use the same Python code in this application, and then use the model builder configurations to load in different ResNet models and leave the image untouched. This provides me with some additional flexibility, but isn’t required.
Once we have our above configurations set, click the "Deploy" button at the bottom of the screen. We will initially see our deployment status set to offline, but as the Deployment is being built and starts to scale, and then is ready to serve requests, we will see that status change. Depending on the size of the image and model this can take some time, but we should see changes in just a minute or two.
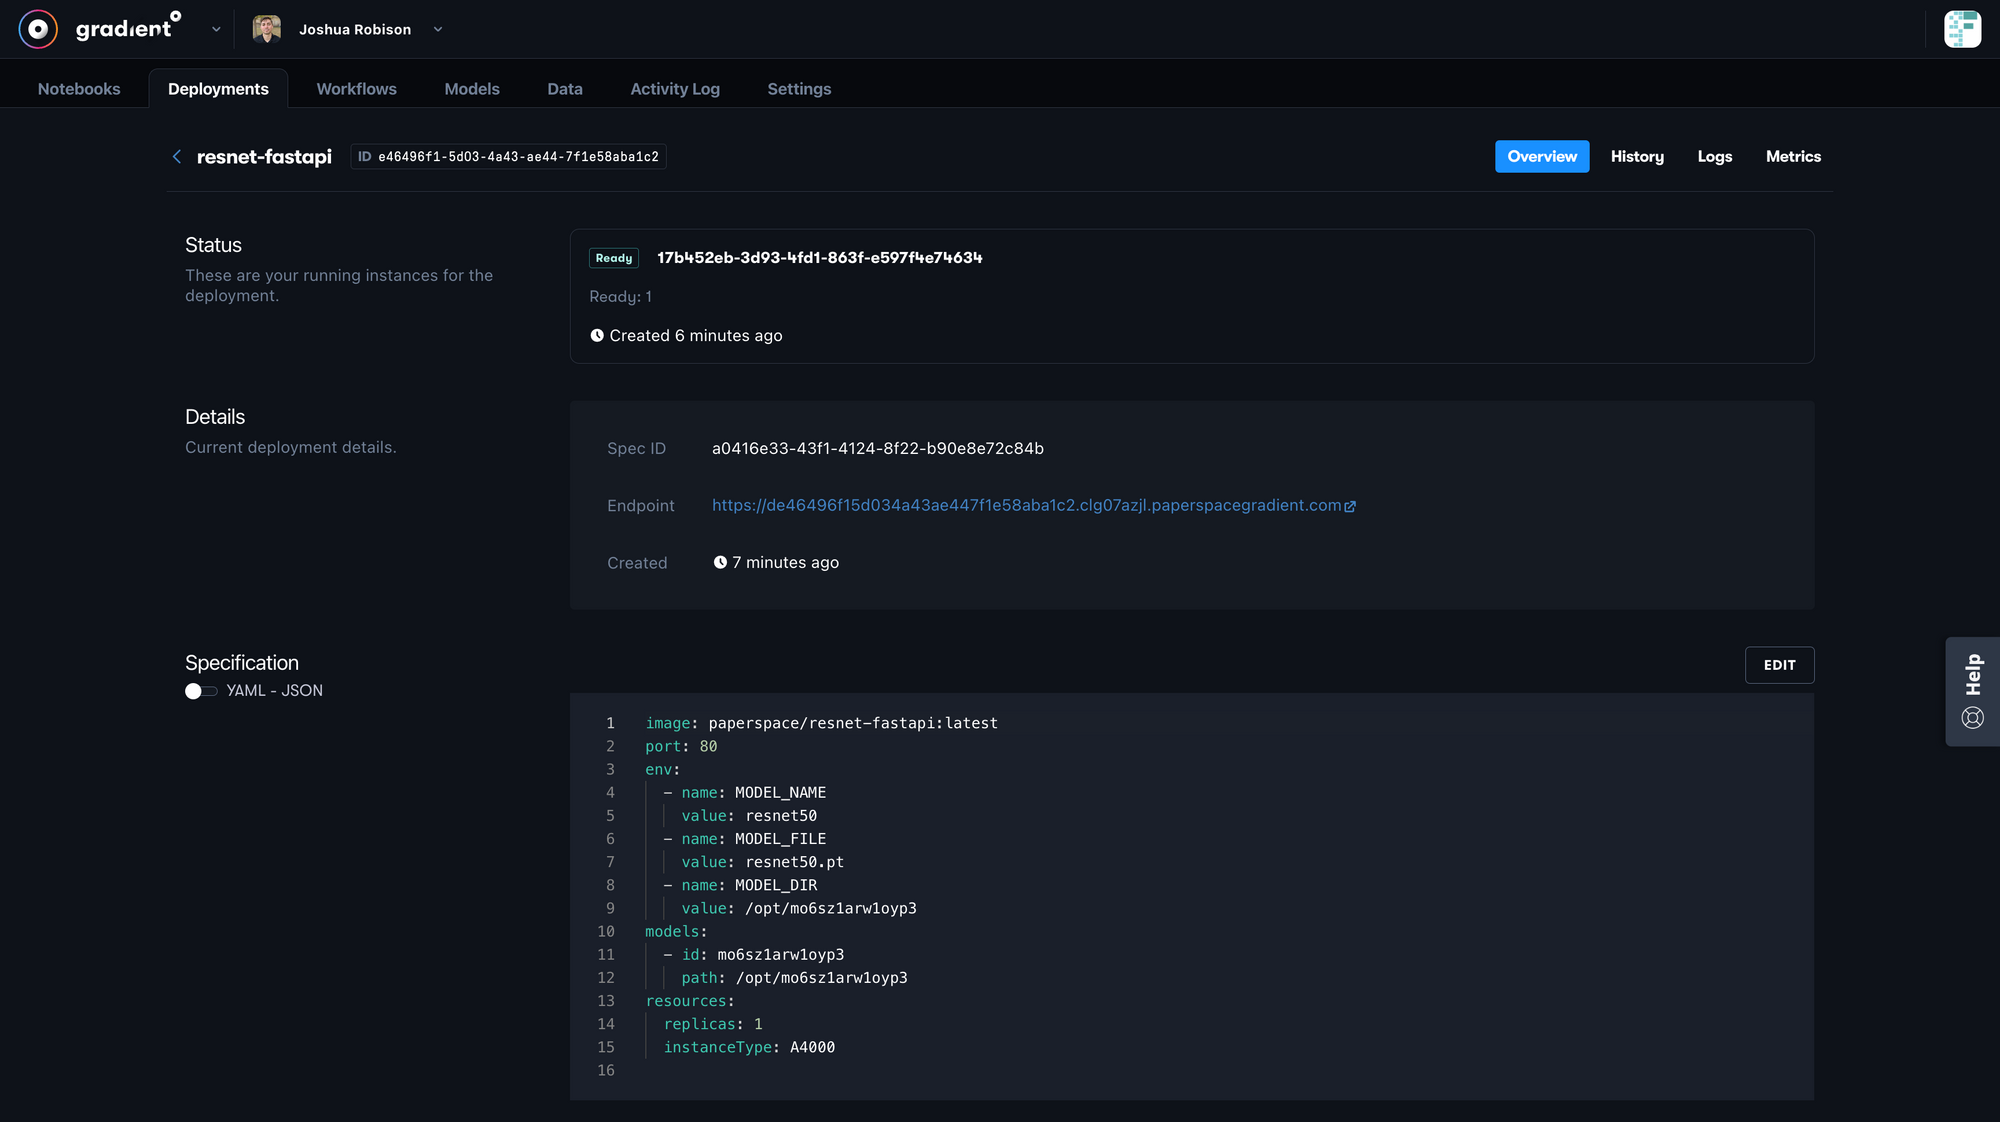
Gradient Deployments through CLI
The other way to deploy our FastAPI app is through the Gradient CLI. The process of creating the deployment specification is the same but in this case, we will create a .yaml file that holds our deployment spec and then send that in through the CLI to create our deployment. The deployment spec yaml file can be found in the project repository.
enabled: true
image: paperspace/resnet-fastapi:latest
port: 80
models:
  - id: mo6sz1arw1oyp3
    path: /opt/mo6sz1arw1oyp3
env:
  - name: MODEL_NAME
    value: resnet50
  - name: MODEL_FILE
    value: resnet50.pt
  - name: MODEL_DIR
    value: /opt/mo6sz1arw1oyp3
resources:
  replicas: 1
  instanceType: A4000
As we will notice, these are the same settings shown above in the deployment builder UI but in a yaml file.
To create our deployment, open a terminal in the location of our deployment-spec.yaml file, ensure we are logged in with our Gradient API key, and run the below command.
gradient deployments create \
  --name "resnet-fastapi" \
  --projectId "your-project-id" \
  --spec "deployment-spec.yaml"
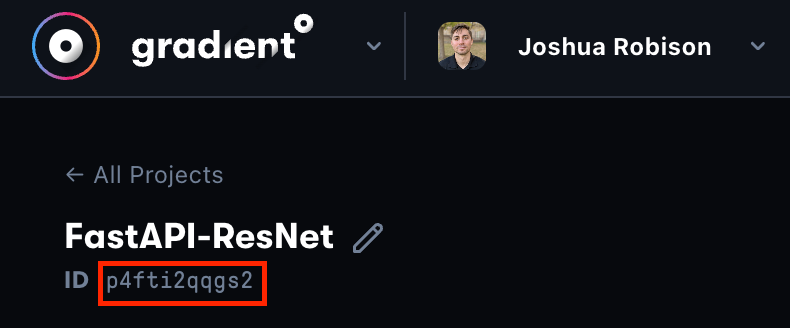
Note: we can find our project ID by navigating into our project in the Paperspace Console and copying the value in the top left corner of our screen like below.
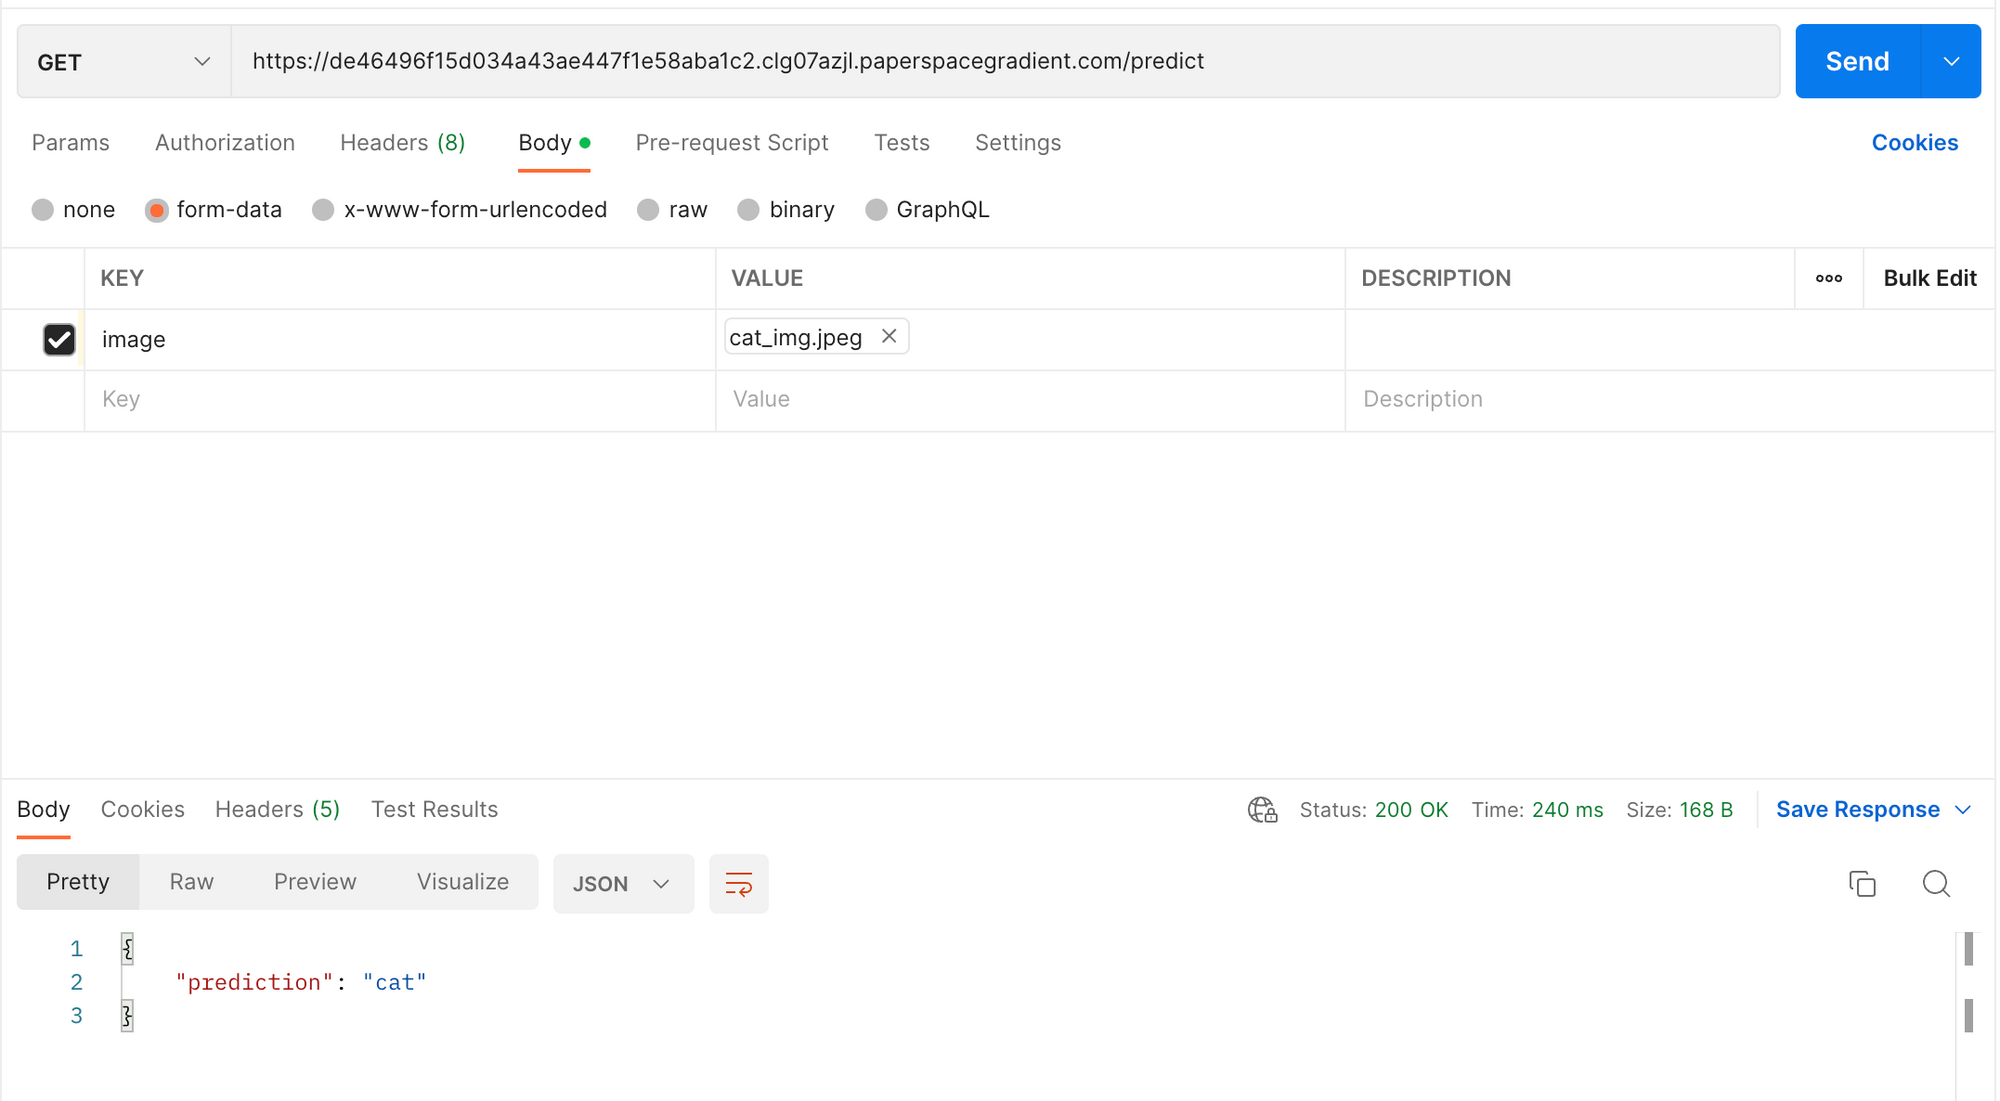
Serve Requests
Once our deployment is spun up, and the status shows as Ready, it is ready to serve requests. Below we are using Postman to send a GET request to our application endpoint and proper path /predict. We can find our deployments endpoint in the Paperspace console under the value Endpoint. In this case, we are attaching a file of a cat as part of the request we are sending to the deployed model. After we send the request, we in turn receive back the predicted classification of that image.
Turning off our deployment
When we are finished using our deployment, please ensure to turn it off by changing replicas: 0 or adding an enabled: false flag to the specification or deleting the Deployment entirely. Otherwise, we will be charged for compute as long as our deployment is running. We can confirm our deployment is offline by checking the status at the top of the deployment page in the Paperspace Console.
Conclusion
Great! Now we should be able to take our deep learning model, and deploy it on Gradient using the FastAPI framework. Remember that FastAPI is a lightweight, but high performance, web framework for building an API, and is a perfect way to easily deploy our models developed on Gradient.
Again, the relevant project files discussed in the above FastAPI deployment tutorial can be found in this GitHub repository.