Bring this project to life
In the past couple of months, the power of diffusion models has completely overtaken previous image synthesis frameworks, like DALL-E 2, DALL-E Mini, and GLIDE, as the go-to methodology for both personal and commercial image generation. In particular, Stable Diffusion, and its many spin off projects like Dreambooth and Textual Inversion, and Imagen represent the two highest performant examples of these models, but only Stable Diffusion has been released to the public. Thanks to the researchers at Stability AI, CompVis, and RunwayML, this free model has exploded in popularity both for researchers and casual users seeking get involved with this latest step towards transcending the limitations of machine learning based image synthesis.
New to the cast of frameworks is Versatile Diffusion, the first unified multi-flow multimodal diffusion framework for image synthesis tasks. This allows the Versatile Diffusion framework to handle a large variety of these tasks, including text-to-image synthesis, image-to-text synthesis, image-variation of existing inputs, text-variation, semantic-style disentanglement, image-text dual-guided generation, and latent image-to-text-to-image editing.
Follow this tutorial for a breakdown of the unified framework, a more thorough analysis of each of the capabilities listed above, and step by step instructions for running Versatile Diffusion from a Gradient Notebook.
The Versatile Diffusion Unified Framework
Before we jump into working with Versatile Diffusion with code, let's walk through the architecture and framework's capabilities to get a feel for how this process works.
Architecture
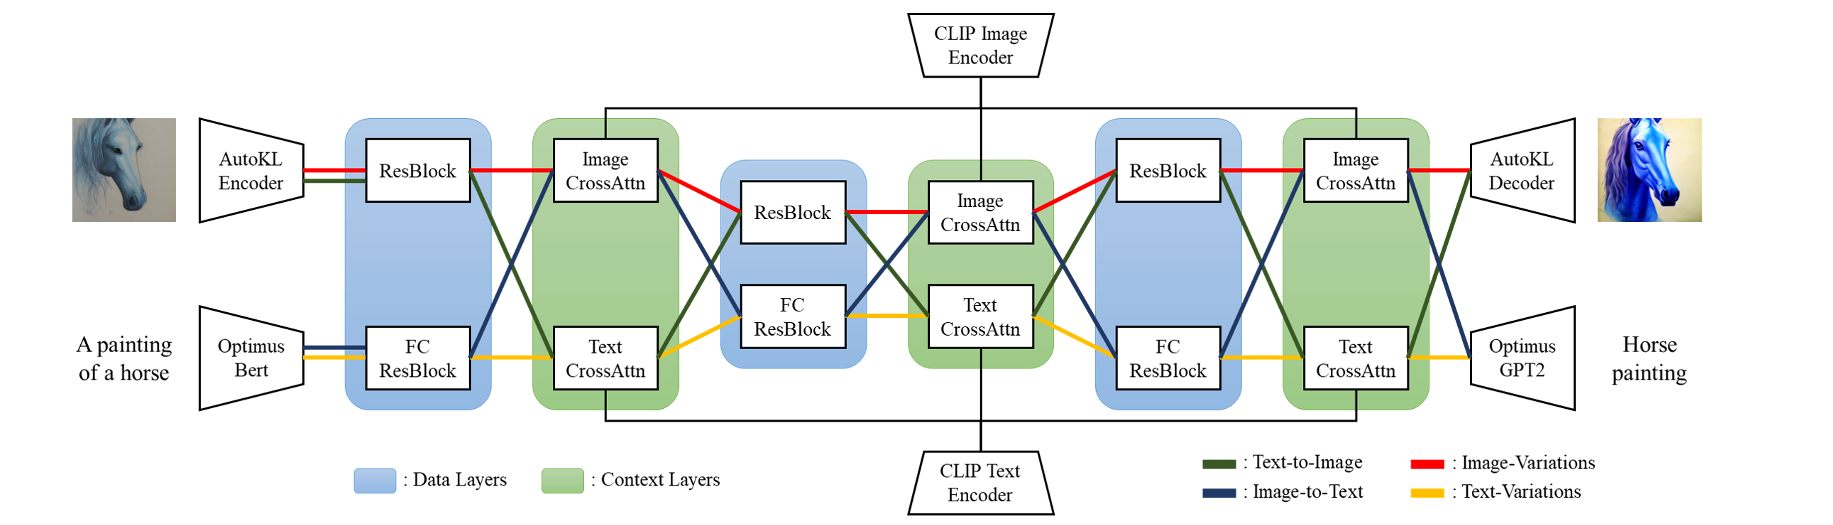
Let's start by walking through the architecture of the model suite. We start with the input layer, which is able to take both image and text inputs. The type of input, along with the chosen type of task to undergo, determine much of what happens next. This is what characterizes a multiflow model: using varied types of input and context data. The four primary flows the model can take are Text-to-Image (green), Image-to-Text (blue), Image-Variation (red), and Text-Variations (yellow).
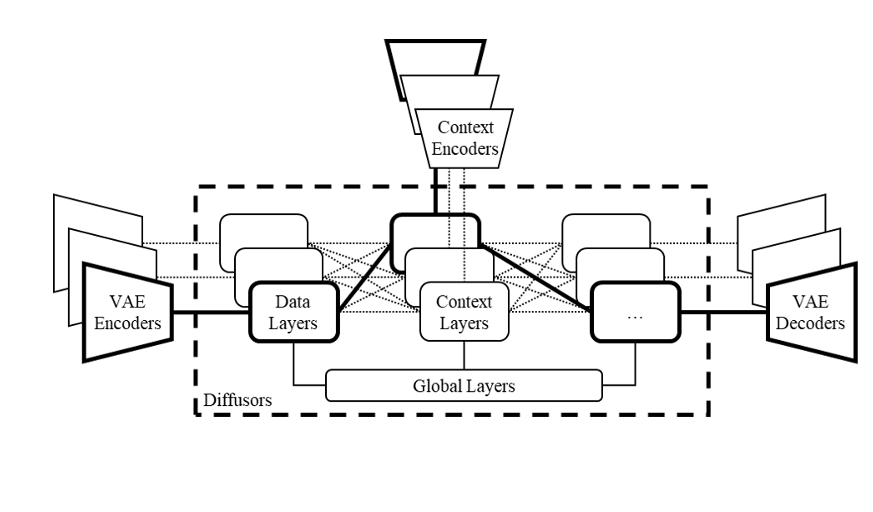
Before we go on, here is an additional graphic explanation of the proposed multi-flow multimodal diffusion framework with VAEs, diffusers and context encoders. The solid lines represents a typical flow of the model that handles a single task (i.e. text-to-image), while other dashed lines represents other possible flows and thus other possible tasks. The versatility of this flow allows for expanded applications of each flow, leading to potentially novel tasks that originate from this flexible framework. [Source]
In the input layer, images are encoded by an AutoKL Encoder, and the text input is processed by Optimus Bert. These are VAE Encoders that accurately encode each of the respective input types. From there, they are passed to the first data layer. There, we have two blocks: the ResBlock and FCResBlock. Depending on which flow is being followed, the text or the image could be passed to either block.
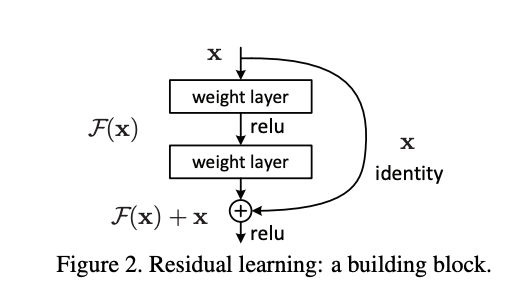
First, is what is typically referred to as a ResBlock, used for image data. In a ResBlock, we characterize the input as x and the output as H(x). ResBlock's use “skip connections”, which skip some of the layers in the neural network and feeds the output of one layer as the input to the next layers. Leveraging this, we can see that the output of H(x) is equal to F(x) + x. The block thus has an adjusted learning goal. It no longer tries to learn the complete output, but instead tries to minimize the difference between the target value H(x) and x, lowering the residual (F(x) = H(x) -x). [Source]
In practice, this allows the information to flow from initial to last layers, and enables a robust further encoding of the image information with progressively decreased spatial dimension and increased channel number, without significant further degradation.
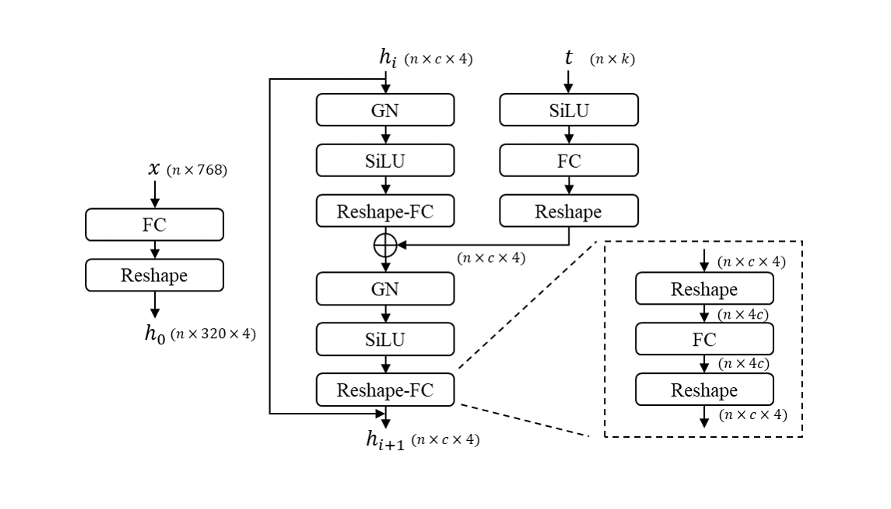
For the text data stream, the authors of Versatile Diffusion have created a novel fully connected residual block (FCResBlock) architecture. This is capable of expanding 768- dimensional text latent vectors into a 320-by-4 hidden feature, and follows a similar channel-increasing paradigm to the ResBlock for image data. The FCResBlock contains two sets of fully connected layers (FC), group normalizations (GN), and sigmoid linear units (SiLU). x is the input text latent code, t is the input time embedding, and hi are the intermediate features. [Source]
The encodings are then passed to the context layer. There, image or text Cross Attention is applied with a CLIP image or text encoder. It uses content embeddings to manipulate the data's features via projection layers, dot products, and sigmoids. The normalized and projected embeddings significantly minimize the CLIP contrastive loss for both the text and image encodings.
From there, for Text-to-Image and Image-to-Text flows, the process is flipped. The text encoding is passed through a ResBlock in the data layer, and the image encoding is passed through the FCResBlock. They are then passed to the other CrossAttention encoder layer, again alternating "sides" of the multi-modal flow.
One of the main goals stated by the authors of the paper is "to achieve better performance, [use] context encoders [to] jointly minimize the cross-modal statistical distance (e.g. KL-divergence) on all supported content types" [Source]. By alternating the data across the different types of ResBlocks in the data layers, they are able to connect the image and text to its encoding more accurately with CLIP. They found during their experiments that closing the embedding spaces between context types helps the model converge faster and perform better.
From this middle layer, the process is then reversed to decode the image or text encodings into their resultant image or text.
Capabilities
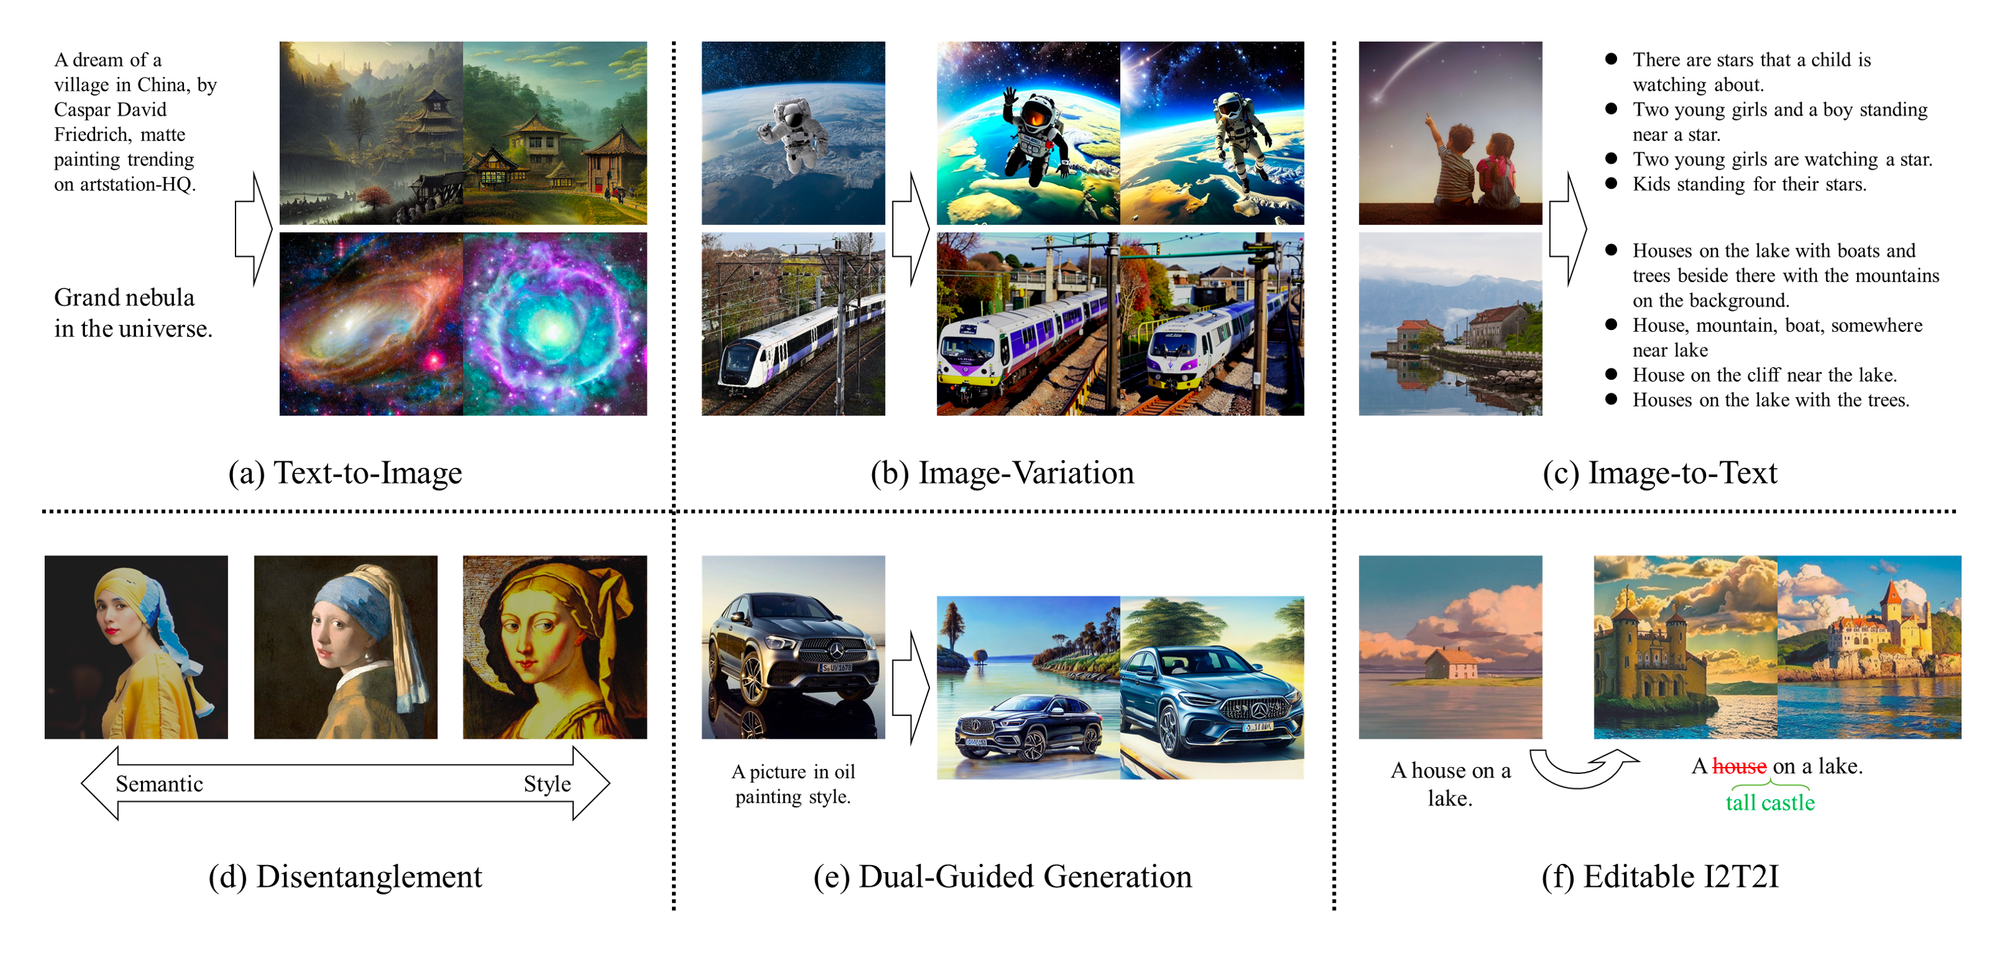
The Versatile Diffusion model is so named for its wide variety of capabilities. Let's talk a bit about each before showing each of them in the code demo.
A) Text-to-Image
This is the currently most common and useful flow for any model related to image generation: using a string of text to influence the output of the image generation process. Versatile Diffusion uses a similar process to standard Stable Diffusion.
Use Text-to-Image to generate accurate synthesized images guided by the text prompts.
B) Image-Variation
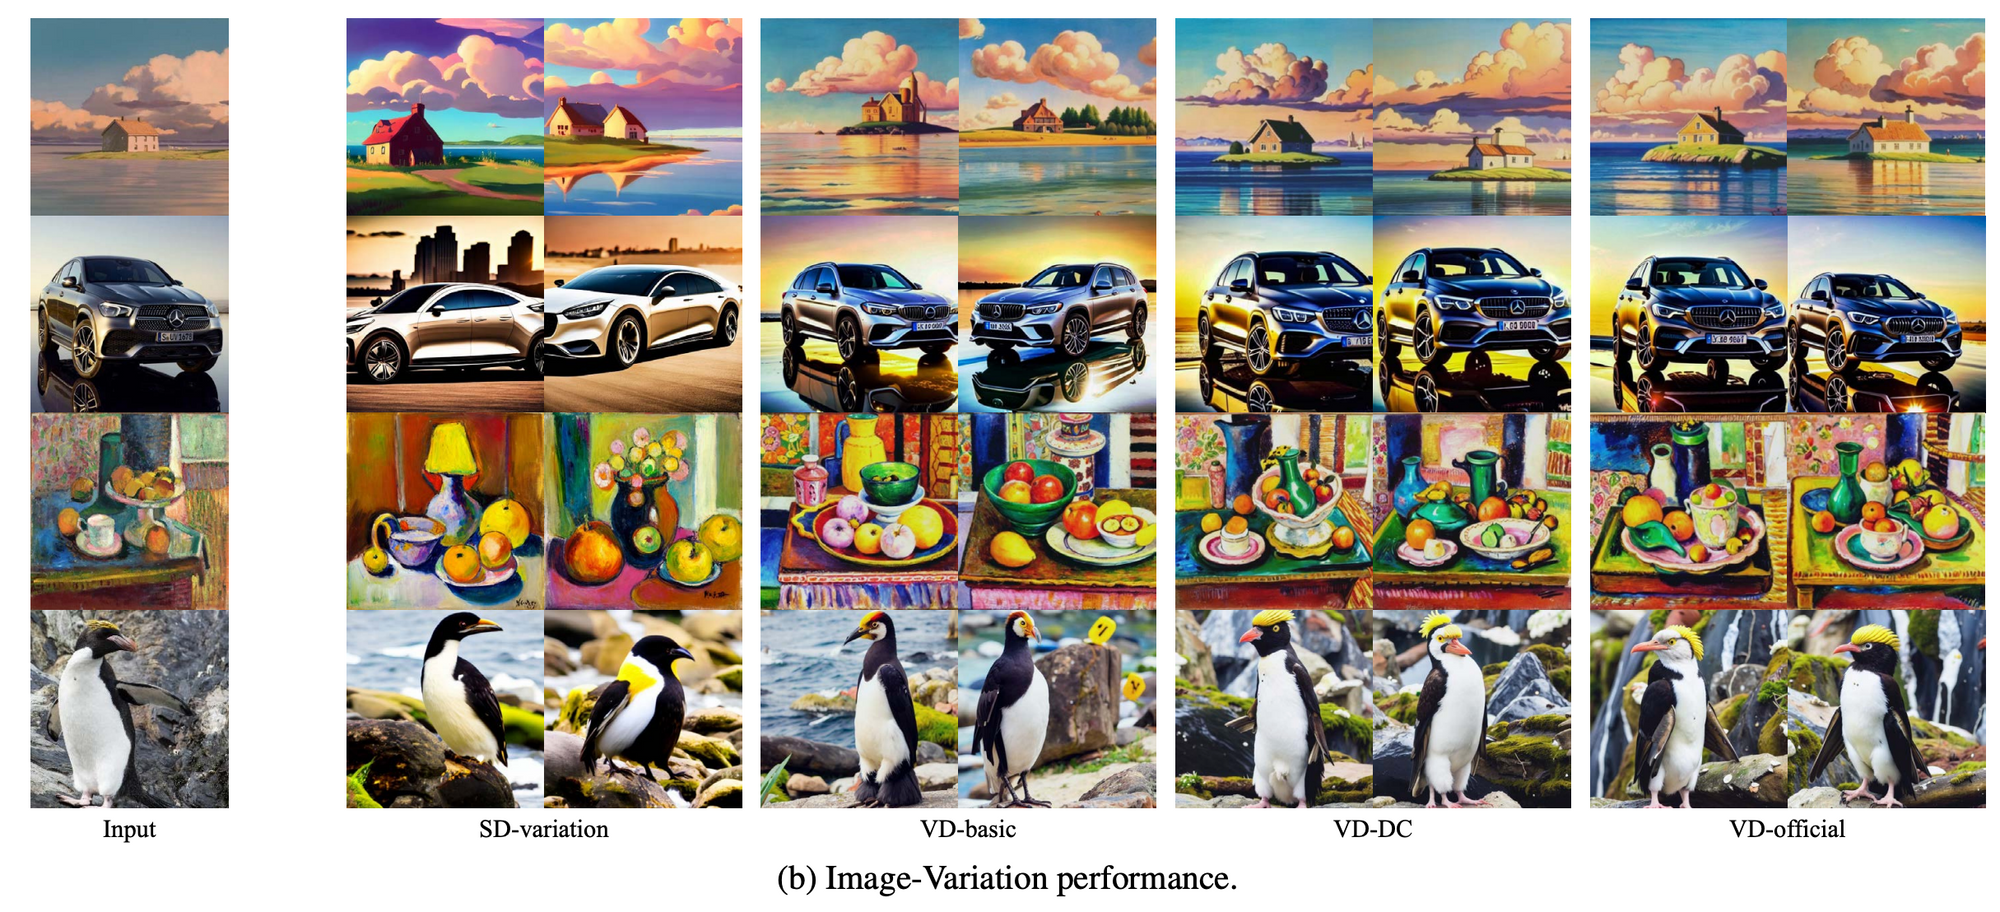
While Stable Diffusion doesn't have a native Image-Variation task, the authors recreated the effects of their Image-Variation script using the Stable Diffusion v1-4 checkpoint. The VD-basic is an image variation model with a single-flow. Next, VD-DC is a two-flow model that supports both text-to-image synthesis and image-variation. Its UNet diffuser contains one stream for data and two streams for context. Lastly, the VD-official is a four-flow model that includes two more tasks, i.e. image-to-text and text-variation, and its UNet diffuser has two streams for both data and context. We can see from the results that the VD models not only have higher apparent visual acuity and variety for the relevant features from the original input, both for the main object(s) and background features.
Use Image-Variation to create different angles of the same object, add minute changes to existing images, and create a plethora of potential options to choose from that accurately represent the features of the original.
C) Image-to-Text
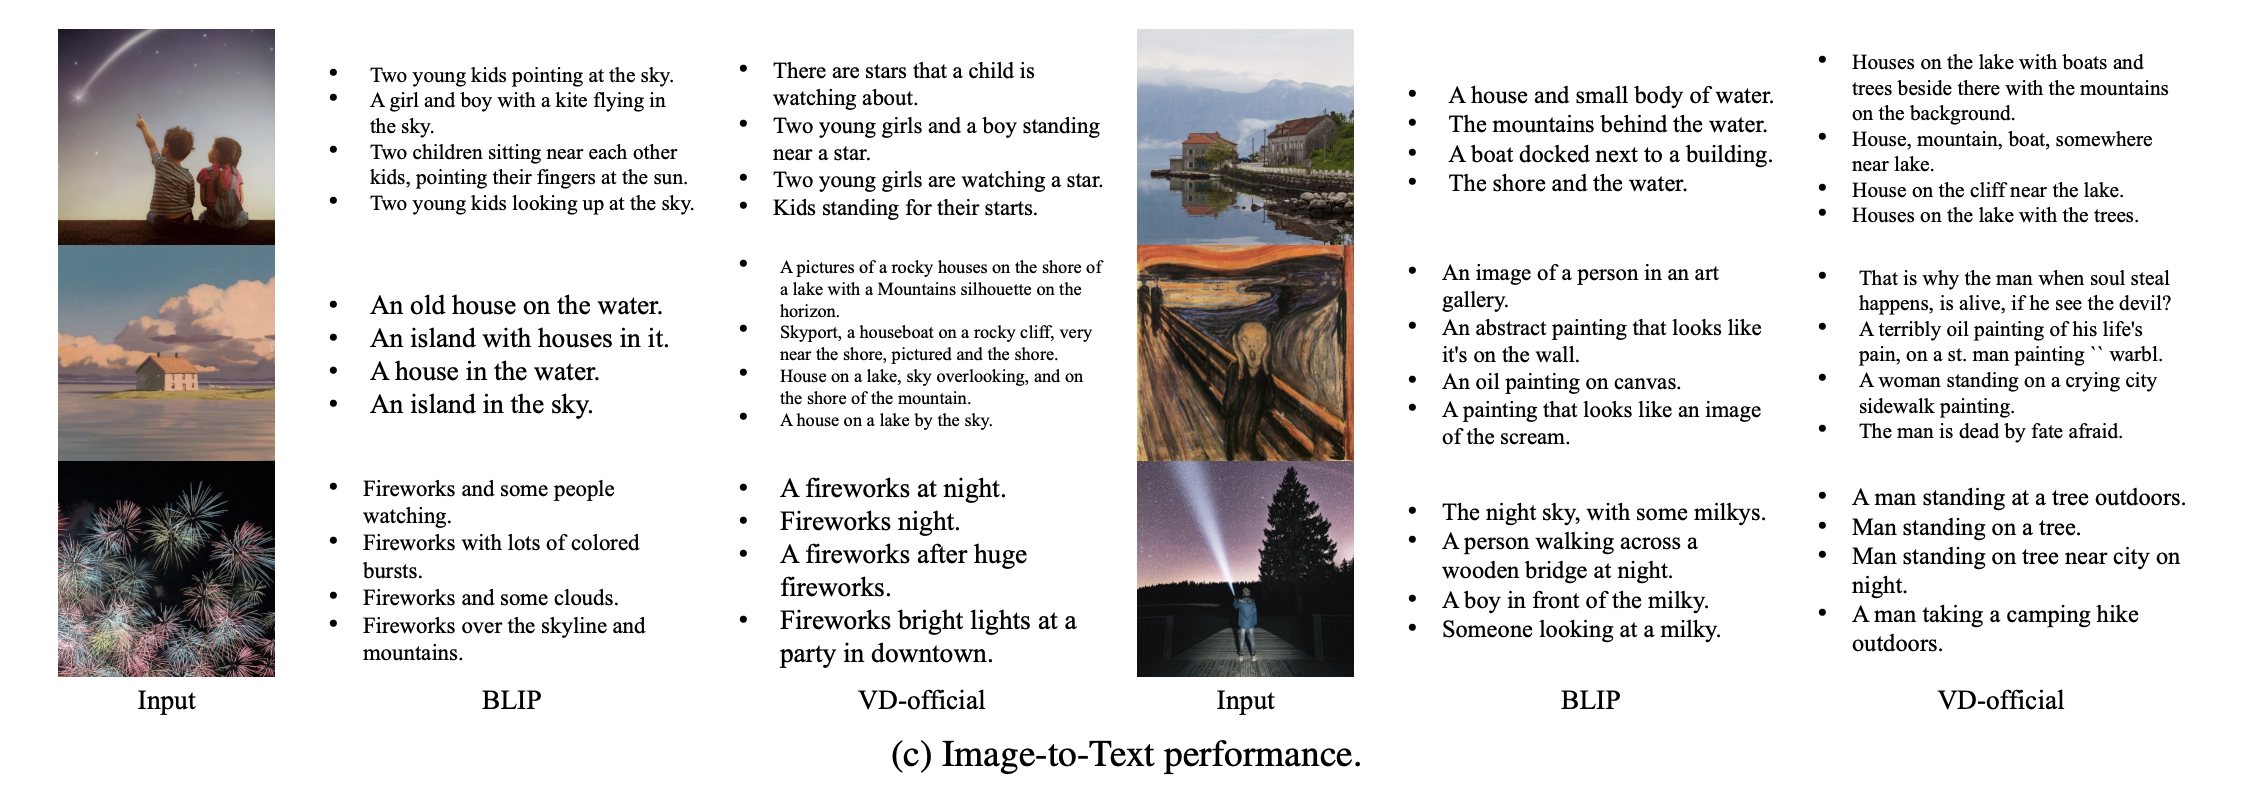
Above is a comparison of the qualitative performance of the VD-official flow versus the popular BLIP framework. They both aim to capture the features from the inputted image in a legible text format. Its difficult to compare these two results, but it could be argued that VD seems to be generating a larger amount of descriptive tokens for each of the sample inputs, which offers a higher degree of human readable accuracy.
This is useful for trying to determine what prompt will generate an exact image you are looking for. Be sure to save the seed for inference!
D) Disentanglement
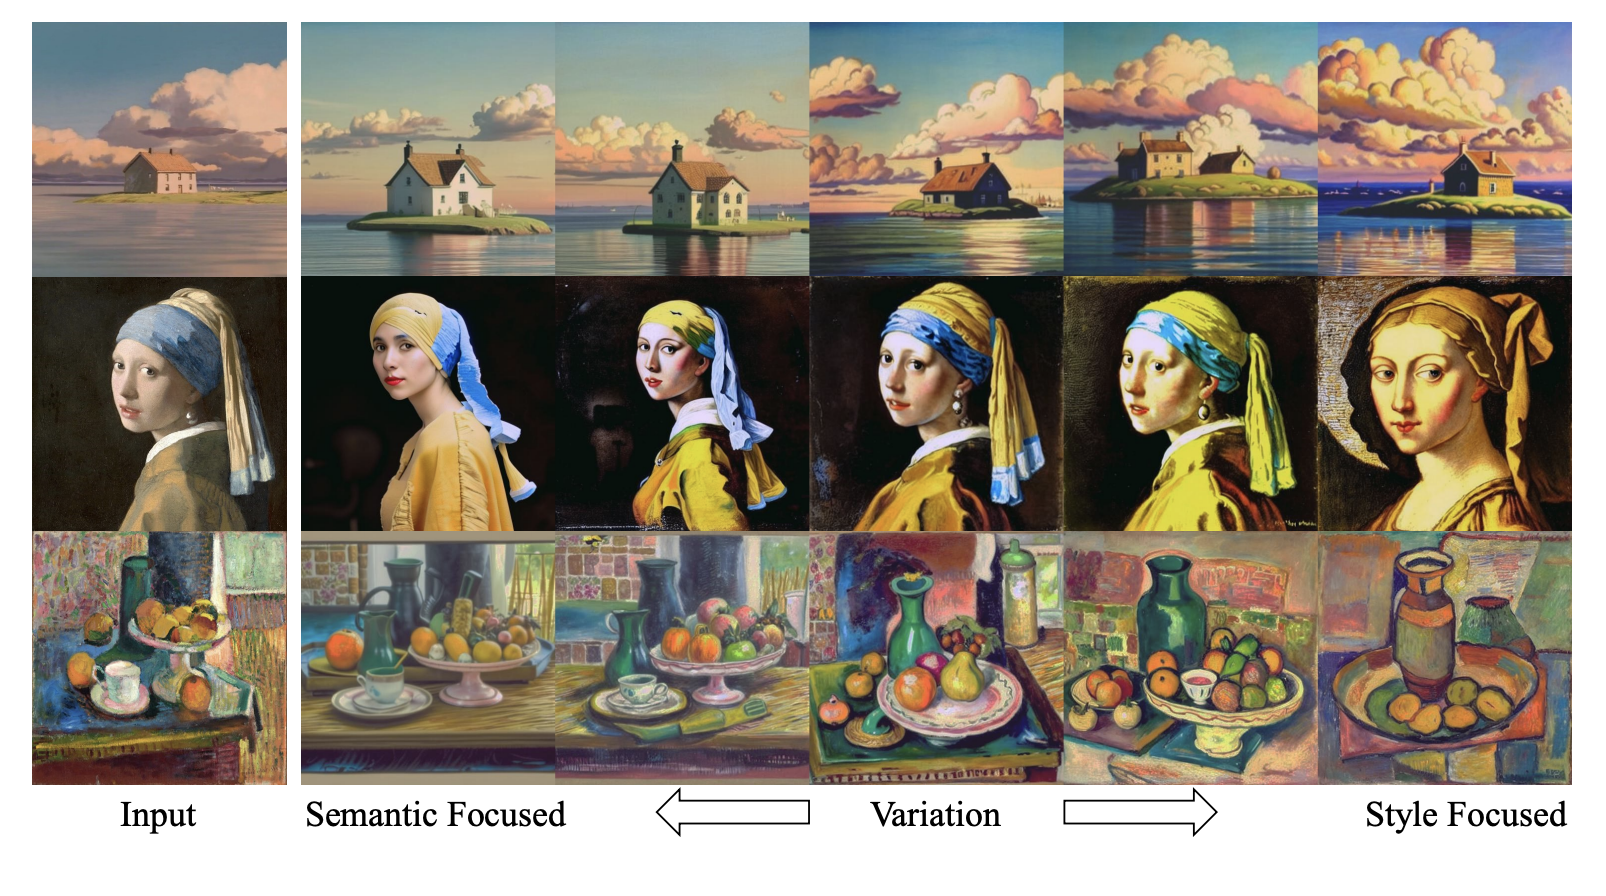
One interesting application of VD is that it can enhance or reduce image styles from semantics without further supervision. In practice, this allows researchers to explore a novel area of the latent space, where disentanglement between styles and semantics can happen on images with arbitrary contents in arbitrary styles. [Source]
Use this functionality to swap semantics and styles across synthesized images, or extract them to be applied elsewhere.
E) Dual-Guided Generation
Typically, it is not possible to condition on both text and image data simultaneously. The authors of the paper argue that this is a model-level mixing problem. Simply combining these effects creates a usable baseline, but at double the cost without significant improvements.
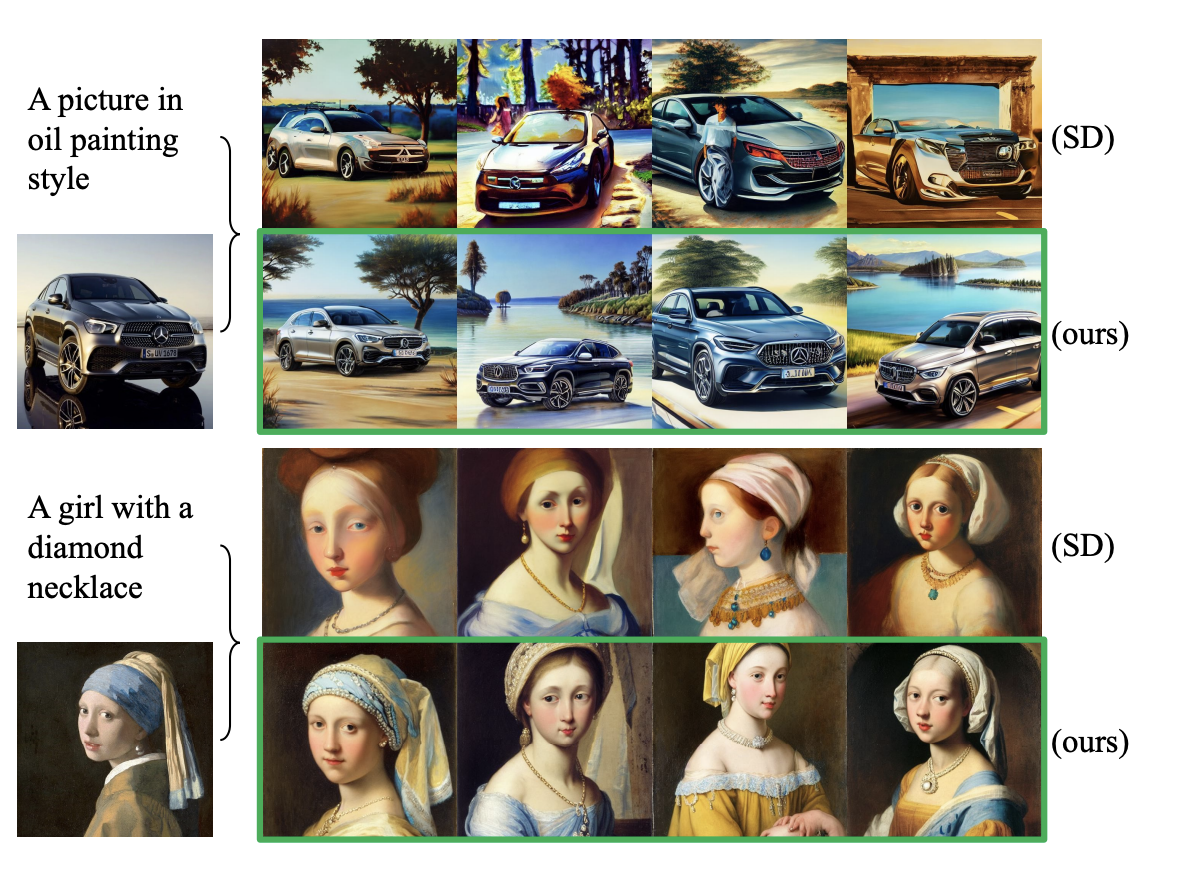
VD, however, can handle cross-modal conditionings on a much deeper level: the layer-level or attention-level. This allows the model to mix attributes in VD’s inter-changeable structure, making data layers that can adapt to all streams of context layers. They determined that using attention-level mixing on VD could maintain correct object structures and harmonize prompt and image contexts, thus yielding a high performance synthesis using both input types simultaneously.
F) Latent, editable Image to Text to Image
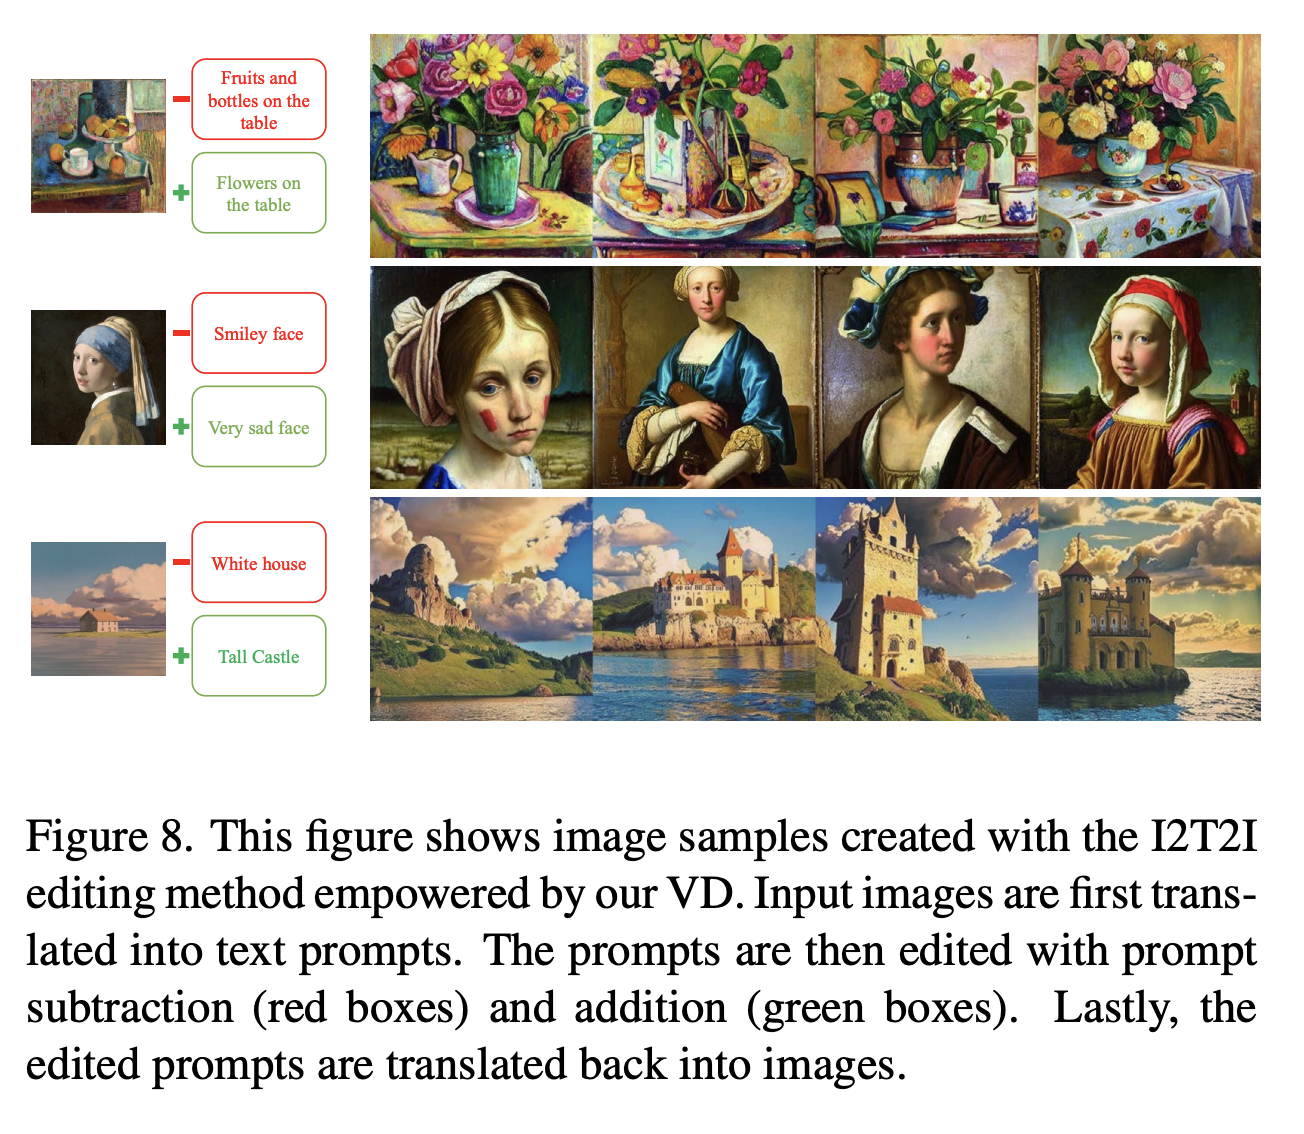
This is the process of using an image to generate a prompt, which is then modified, and used to synthesize a new image. This allows the user to impart an extremely high degree of control over the final output in an image-to-image editing context, and further allowing controlled, targeted editing of features.
Now that we understand Versatile Diffusion more thoroughly, let's jump into the Gradient Notebook code demo to see how this utility works in action.
Code Demo
Bring this project to life
Setup
!apt-get update && apt-get install git-lfs -y
!git-lfs clone https://huggingface.co/spaces/shi-labs/Versatile-Diffusion
!mv Versatile-Diffusion/pretrained ./
!rm -r Versatile-Diffusion
!pip install -r requirement.txt
!pip install -e git+https://github.com/CompVis/taming-transformers.git@master#egg=taming-transformers
!cp -r src/taming-transformers/taming ./
Before we get started, we need to first ensure all the relevant packages and model files are installed on the instance. First, we get the model files with git-lfs.
You may need to split the first two lines into their own cell, as apt seems to hang after completing the download. This can be resolved by waiting for it to say 100%, and restarting the kernel.
Know that the model files for Versatile Diffusion take up around a combined 15 GB of storage, so be wary of this if you are a Pro or Free account user and the possibility of storage overages.
After we have all the files, we install the required packages and move a copy of taming to our workspace directory.
Instantiate the vd_inference class
Now that our environment is set up, we can begin. We first need to import the relevant packages, and declare relevant variables.
Once that's done, the vd_inference class is our 'container' for the unified network. Calling vd_inference loads in all the relevant files to the kernel, setting the stage for the different flows to use them for inference. It also has helper functions and inference functions. The helper functions just do small tasks like optimizing the image inputs. On the other hand, the inference functions are used to carry out each of the different flows.
The first, inference(), is used for Text-to-Image and Image-to-Text synthesis. It checks what type of input is being used, and then carries out the synthesis process. There are then functions for each of the capabilities described above, integrated directly into the class.
As we can see, the vd_inference class holds the entire project in a single object, and contains a multitude of related functionalities for inference. Read through the code block below with particular attention to each of the inference functions to glean how this process works in more detail.
import os
import PIL
from PIL import Image
from pathlib import Path
import numpy as np
import numpy.random as npr
from contextlib import nullcontext

import torch
import torchvision.transforms as tvtrans
from lib.cfg_helper import model_cfg_bank
from lib.model_zoo import get_model
from lib.model_zoo.ddim_vd import DDIMSampler_VD, DDIMSampler_VD_DualContext
from lib.model_zoo.ddim_dualcontext import DDIMSampler_DualContext

from lib.experiments.sd_default import color_adjust

n_sample_image = 2
n_sample_text = 4
cache_examples = True

class vd_inference(object):
    def __init__(self, type='official'):
        if type in ['dc', '2-flow']:
            cfgm_name = 'vd_dc_noema'
            sampler = DDIMSampler_DualContext
            pth = 'pretrained/vd-dc.pth'
        elif type in ['official', '4-flow']:
            cfgm_name = 'vd_noema'
            sampler = DDIMSampler_VD
            pth = 'pretrained/vd-official.pth'
        cfgm = model_cfg_bank()(cfgm_name)
        net = get_model()(cfgm)

        sd = torch.load(pth, map_location='cpu')
        net.load_state_dict(sd, strict=False)

        self.use_cuda = torch.cuda.is_available()
        if self.use_cuda:
            net.to('cuda')
        self.model_name = cfgm_name
        self.net = net
        self.sampler = sampler(net)

    def regularize_image(self, x):
        BICUBIC = PIL.Image.Resampling.BICUBIC
        if isinstance(x, str):
            x = Image.open(x).resize([512, 512], resample=BICUBIC)
            x = tvtrans.ToTensor()(x)
        elif isinstance(x, PIL.Image.Image):
            x = x.resize([512, 512], resample=BICUBIC)
            x = tvtrans.ToTensor()(x)
        elif isinstance(x, np.ndarray):
            x = PIL.Image.fromarray(x).resize([512, 512], resample=BICUBIC)
            x = tvtrans.ToTensor()(x)
        elif isinstance(x, torch.Tensor):
            pass
        else:
            assert False, 'Unknown image type'

        assert (x.shape[1]==512) & (x.shape[2]==512), \
            'Wrong image size'
        if self.use_cuda:
            x = x.to('cuda')
        return x

    def decode(self, z, xtype, ctype, color_adj='None', color_adj_to=None):
        net = self.net
        if xtype == 'image':
            x = net.autokl_decode(z)

            color_adj_flag = (color_adj!='None') and (color_adj is not None)
            color_adj_simple = color_adj=='Simple'
            color_adj_keep_ratio = 0.5

            if color_adj_flag and (ctype=='vision'):
                x_adj = []
                for xi in x:
                    color_adj_f = color_adjust(ref_from=(xi+1)/2, ref_to=color_adj_to)
                    xi_adj = color_adj_f((xi+1)/2, keep=color_adj_keep_ratio, simple=color_adj_simple)
                    x_adj.append(xi_adj)
                x = x_adj
            else:
                x = torch.clamp((x+1.0)/2.0, min=0.0, max=1.0)
                x = [tvtrans.ToPILImage()(xi) for xi in x]
            return x

        elif xtype == 'text':
            prompt_temperature = 1.0
            prompt_merge_same_adj_word = True
            x = net.optimus_decode(z, temperature=prompt_temperature)
            if prompt_merge_same_adj_word:
                xnew = []
                for xi in x:
                    xi_split = xi.split()
                    xinew = []
                    for idxi, wi in enumerate(xi_split):
                        if idxi!=0 and wi==xi_split[idxi-1]:
                            continue
                        xinew.append(wi)
                    xnew.append(' '.join(xinew))
                x = xnew
            return x

    def inference(self, xtype, cin, steps, ctype, h = 512, w = 512, scale=7.5, n_samples=None, color_adj=None):
        net = self.net
        sampler = self.sampler
        ddim_steps = steps
        ddim_eta = 0.0

        if xtype == 'image':
            n_samples = n_sample_image if n_samples is None else n_samples
        elif xtype == 'text':
            n_samples = n_sample_text if n_samples is None else n_samples

        if ctype in ['prompt', 'text']:
            c = net.clip_encode_text(n_samples * [cin])
            u = None
            if scale != 1.0:
                u = net.clip_encode_text(n_samples * [""])

        elif ctype in ['vision', 'image']:
            cin = self.regularize_image(cin)
            ctemp = cin*2 - 1
            ctemp = ctemp[None].repeat(n_samples, 1, 1, 1)
            c = net.clip_encode_vision(ctemp)
            u = None
            if scale != 1.0:
                dummy = torch.zeros_like(ctemp)
                u = net.clip_encode_vision(dummy)

        if xtype == 'image':
            shape = [n_samples, 4, h//8, w//8]
            z, _ = sampler.sample(
                steps=ddim_steps,
                shape=shape,
                conditioning=c,
                unconditional_guidance_scale=scale,
                unconditional_conditioning=u,
                xtype=xtype, ctype=ctype,
                eta=ddim_eta,
                verbose=False,)
            x = self.decode(z, xtype, ctype, color_adj=color_adj, color_adj_to=cin)
            return x

        elif xtype == 'text':
            n = 768
            shape = [n_samples, n]
            z, _ = sampler.sample(
                steps=ddim_steps,
                shape=shape,
                conditioning=c,
                unconditional_guidance_scale=scale,
                unconditional_conditioning=u,
                xtype=xtype, ctype=ctype,
                eta=ddim_eta,
                verbose=False,)
            x = self.decode(z, xtype, ctype)
            return x

    def application_disensemble(self, cin, h = 512, w = 512, n_samples=None, level=0, color_adj=None,steps = None, scale = None):
        net = self.net
        scale = scale
        sampler = self.sampler
        ddim_steps = steps
        ddim_eta = 0.0
        n_samples = n_sample_image if n_samples is None else n_samples

        cin = self.regularize_image(cin)
        ctemp = cin*2 - 1
        ctemp = ctemp[None].repeat(n_samples, 1, 1, 1)
        c = net.clip_encode_vision(ctemp)
        u = None
        if scale != 1.0:
            dummy = torch.zeros_like(ctemp)
            u = net.clip_encode_vision(dummy)

        if level == 0:
            pass
        else:
            c_glb = c[:, 0:1]
            c_loc = c[:, 1: ]
            u_glb = u[:, 0:1]
            u_loc = u[:, 1: ]

            if level == -1:
                c_loc = self.remove_low_rank(c_loc, demean=True, q=50, q_remove=1)
                u_loc = self.remove_low_rank(u_loc, demean=True, q=50, q_remove=1)
            if level == -2:
                c_loc = self.remove_low_rank(c_loc, demean=True, q=50, q_remove=2)
                u_loc = self.remove_low_rank(u_loc, demean=True, q=50, q_remove=2)
            if level == 1:
                c_loc = self.find_low_rank(c_loc, demean=True, q=10)
                u_loc = self.find_low_rank(u_loc, demean=True, q=10)
            if level == 2:
                c_loc = self.find_low_rank(c_loc, demean=True, q=2)
                u_loc = self.find_low_rank(u_loc, demean=True, q=2)

            c = torch.cat([c_glb, c_loc], dim=1)
            u = torch.cat([u_glb, u_loc], dim=1)

        shape = [n_samples, 4, h//8, w//8]
        z, _ = sampler.sample(
            steps=ddim_steps,
            shape=shape,
            conditioning=c,
            unconditional_guidance_scale=scale,
            unconditional_conditioning=u,
            xtype='image', ctype='vision',
            eta=ddim_eta,
            verbose=False,)
        x = self.decode(z, 'image', 'vision', color_adj=color_adj, color_adj_to=cin)
        return x

    def find_low_rank(self, x, demean=True, q=20, niter=10):
        if demean:
            x_mean = x.mean(-1, keepdim=True)
            x_input = x - x_mean
        else:
            x_input = x

        u, s, v = torch.pca_lowrank(x_input, q=q, center=False, niter=niter)
        ss = torch.stack([torch.diag(si) for si in s])
        x_lowrank = torch.bmm(torch.bmm(u, ss), torch.permute(v, [0, 2, 1]))

        if demean:
            x_lowrank += x_mean
        return x_lowrank

    def remove_low_rank(self, x, demean=True, q=20, niter=10, q_remove=10):
        if demean:
            x_mean = x.mean(-1, keepdim=True)
            x_input = x - x_mean
        else:
            x_input = x

        u, s, v = torch.pca_lowrank(x_input, q=q, center=False, niter=niter)
        s[:, 0:q_remove] = 0
        ss = torch.stack([torch.diag(si) for si in s])
        x_lowrank = torch.bmm(torch.bmm(u, ss), torch.permute(v, [0, 2, 1]))

        if demean:
            x_lowrank += x_mean
        return x_lowrank

    def application_dualguided(self, cim, ctx, h = 512, w = 512, n_samples=None, mixing=0.5, color_adj=None, steps = None, scale = None):
        net = self.net
        scale = scale
        sampler = DDIMSampler_VD_DualContext(net)
        ddim_steps = steps
        ddim_eta = 0.0
        n_samples = n_sample_image if n_samples is None else n_samples

        ctemp0 = self.regularize_image(cim)
        ctemp1 = ctemp0*2 - 1
        ctemp1 = ctemp1[None].repeat(n_samples, 1, 1, 1)
        cim = net.clip_encode_vision(ctemp1)
        uim = None
        if scale != 1.0:
            dummy = torch.zeros_like(ctemp1)
            uim = net.clip_encode_vision(dummy)

        ctx = net.clip_encode_text(n_samples * [ctx])
        utx = None
        if scale != 1.0:
            utx = net.clip_encode_text(n_samples * [""])

        shape = [n_samples, 4, h//8, w//8]

        z, _ = sampler.sample_dc(
            steps=ddim_steps,
            shape=shape,
            first_conditioning=[uim, cim],
            second_conditioning=[utx, ctx],
            unconditional_guidance_scale=scale,
            xtype='image',
            first_ctype='vision',
            second_ctype='prompt',
            eta=ddim_eta,
            verbose=False,
            mixed_ratio=(1-mixing), )
        x = self.decode(z, 'image', 'vision', color_adj=color_adj, color_adj_to=ctemp0)
        return x

    def application_i2t2i(self, cim, ctx_n, ctx_p, steps, scale, h = 512, w = 512, n_samples=None, color_adj=None,):
        net = self.net
        scale = scale
        sampler = DDIMSampler_VD_DualContext(net)
        ddim_steps = steps
        ddim_eta = 0.0
        prompt_temperature = 1.0
        n_samples = n_sample_image if n_samples is None else n_samples

        ctemp0 = self.regularize_image(cim)
        ctemp1 = ctemp0*2 - 1
        ctemp1 = ctemp1[None].repeat(n_samples, 1, 1, 1)
        cim = net.clip_encode_vision(ctemp1)
        uim = None
        if scale != 1.0:
            dummy = torch.zeros_like(ctemp1)
            uim = net.clip_encode_vision(dummy)

        n = 768
        shape = [n_samples, n]
        zt, _ = sampler.sample(
            steps=ddim_steps,
            shape=shape,
            conditioning=cim,
            unconditional_guidance_scale=scale,
            unconditional_conditioning=uim,
            xtype='text', ctype='vision',
            eta=ddim_eta,
            verbose=False,)
        ztn = net.optimus_encode([ctx_n])
        ztp = net.optimus_encode([ctx_p])

        ztn_norm = ztn / ztn.norm(dim=1)
        zt_proj_mag = torch.matmul(zt, ztn_norm[0])
        zt_perp = zt - zt_proj_mag[:, None] * ztn_norm
        zt_newd = zt_perp + ztp
        ctx_new = net.optimus_decode(zt_newd, temperature=prompt_temperature)

        ctx_new = net.clip_encode_text(ctx_new)
        ctx_p = net.clip_encode_text([ctx_p])
        ctx_new = torch.cat([ctx_new, ctx_p.repeat(n_samples, 1, 1)], dim=1)
        utx_new = net.clip_encode_text(n_samples * [""])
        utx_new = torch.cat([utx_new, utx_new], dim=1)

        cim_loc = cim[:, 1: ]
        cim_loc_new = self.find_low_rank(cim_loc, demean=True, q=10)
        cim_new = cim_loc_new
        uim_new = uim[:, 1:]

        shape = [n_samples, 4, h//8, w//8]
        z, _ = sampler.sample_dc(
            steps=ddim_steps,
            shape=shape,
            first_conditioning=[uim_new, cim_new],
            second_conditioning=[utx_new, ctx_new],
            unconditional_guidance_scale=scale,
            xtype='image',
            first_ctype='vision',
            second_ctype='prompt',
            eta=ddim_eta,
            verbose=False,
            mixed_ratio=0.33, )

        x = self.decode(z, 'image', 'vision', color_adj=color_adj, color_adj_to=ctemp0)
        return x

vd_inference = vd_inference('official')
The main function
Now that we have instantiated our model code and loaded in the relevant model files to the Notebook, we can begin crafting our inputs to put into the main function. The main function is called to initiate inference using any of the different flows we described in the capabilities section of this blog. This is determined by the mode argument, and will lead to any of the 7 different optional flows currently made available by the model. Let's take a look at this in the cell below.
def main(mode,
         image=None,
         prompt=None,
         nprompt=None,
         pprompt=None,
         color_adj=None,
         disentanglement_level=None,
         dual_guided_mixing=None,
         seed=0,
         steps=50,
         n_samples = 1,
         scale = 7.5,
         h = 512,
         w = 512):

    if seed<0:
        seed = 0
    np.random.seed(seed)
    torch.manual_seed(seed+100)

    if mode == 'Text-to-Image':
        if (prompt is None) or (prompt == ""):
            return None, None
        with torch.no_grad():
            rv = vd_inference.inference(n_samples = n_samples, steps = steps,
                xtype = 'image',
                cin = prompt,
                ctype = 'prompt',
                scale = scale)
        return rv, None
    elif mode == 'Image-Variation':
        if image is None:
            return None, None
        with torch.no_grad():
            rv = vd_inference.inference(n_samples = n_samples, steps = steps,
                xtype = 'image',
                cin = image,
                ctype = 'vision',
                color_adj = color_adj,
                scale = scale)
        return rv, None
    elif mode == 'Image-to-Text':
        if image is None:
            return None, None
        with torch.no_grad():
            rv = vd_inference.inference(n_samples = n_samples, steps = steps,
                xtype = 'text',
                cin = image,
                ctype = 'vision',
                scale = scale)
        return None, '\n'.join(rv)
    elif mode == 'Text-Variation':
        if prompt is None:
            return None, None
        with torch.no_grad():
            rv = vd_inference.inference(n_samples = n_samples, steps = steps,
                xtype = 'text',
                cin = prompt,
                ctype = 'prompt',
                scale = scale)
        return None, '\n'.join(rv)
    elif mode == 'Disentanglement':
        if image is None:
            return None, None
        with torch.no_grad():
            rv = vd_inference.application_disensemble(
                n_samples = n_samples,
                cin = image,
                level = disentanglement_level,
                color_adj = color_adj,
                steps = steps,
                scale = scale)
        return rv, None
    elif mode == 'Dual-Guided':
        if (image is None) or (prompt is None) or (prompt==""):
            return None, None
        with torch.no_grad():
            rv = vd_inference.application_dualguided(
                n_samples = n_samples,
                cim = image,
                ctx = prompt,
                mixing = dual_guided_mixing,
                color_adj = color_adj,
                steps = steps,
                scale = scale)
        return rv, None
    elif mode == 'Latent-I2T2I':
        if (image is None) or (nprompt is None) or (nprompt=="") \
                or (pprompt is None) or (pprompt==""):
            return None, None
        with torch.no_grad():
            rv = vd_inference.application_i2t2i(
                n_samples = n_samples,
                cim = image,
                ctx_n = nprompt,
                ctx_p = pprompt,
                color_adj = color_adj,
                steps = steps,
                scale = scale)
        return rv, None
    else:
        assert False, "No such mode!"
Calling main for inference.
Now that we have everything set up, we can call main to begin inference with any of the flows. In addition to the mode argument, there are a number of additional parameters that it is important to consider here before starting to synthesize.
Namely, these are the:
- prompt (str) is used to guide the generation process. The model will try to create an image or text output corresponding to the prompt
- nprompt (str) is the negative prompt, and contains words we do not want represented in our synthesized outputs
- pprompt (str) the positive prompt containing features we do want represneted in the final output (used in Latent-I2T2I)
- seed (int) controls randomness of synthesis, and can be used to "recreate" images created by diffusion
- steps (int) number of ddim sampling steps
- n_samples (int) number of images generated each batch
- scale (int) guidance scale of the model, ranging from 0-30. 0 is equivalent to no guidance, and 30 is maximum guidance
- h (int) height, in pixels
- w (int) width, in pixels
Here is an example that could be used for all the text input based flows, but is currently set for Text-to-Image:
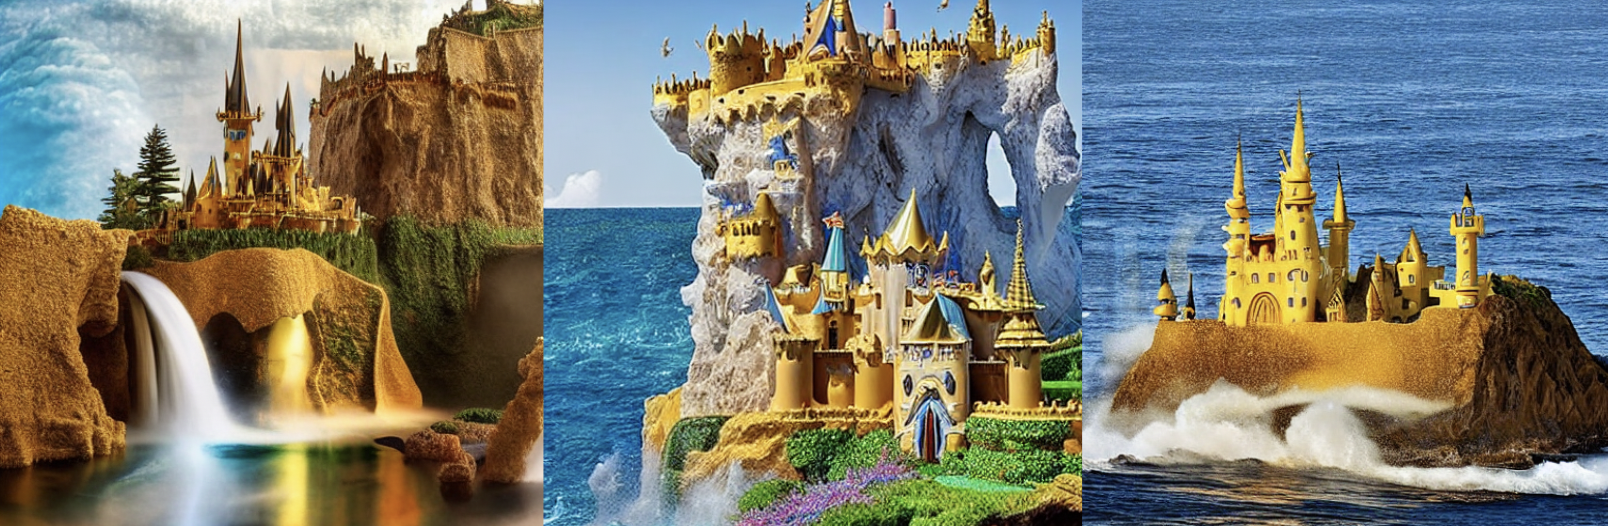
x = main(mode = 'Text-to-Image',
         image=None,
         prompt= 'a magical fantasy castle overlooking a golden gold colored oceans and giant crashing tsunami waves',
         nprompt='low contrast, blurry, out of frame, text, watermark, distortion, black and white, low resolution, low detail, closeup, out of focus, bad framing, tiling, grainy, grayscale, monotone, watermarked',
         pprompt='a magical fantasy castle overlooking a golden gold colored oceans and giant crashing tsunami waves',
         color_adj=None,
         disentanglement_level=None,
         dual_guided_mixing=None,
         seed=552523,
         steps = 50,
         n_samples = 1,
         scale = 7.5,
         h = 512,
         w = 512)
And that's done! If we followed the steps above, we should now be able to see a number of comical, fantastical castles sitting over a bay with crashing waves. Here are the sample outputs from our experiments:
Closing thoughts
In this blogpost, we examined in great detail the architecture and capabilities of the newly released Versatile Diffusion unified, multimodal and multiflow image synthesis framework. We then demonstrated how to use this model with Python in a Gradient Notebook to generate images of fantasy castles.
We encourage you to try all of the different modes/flows that main has available!
View the code for this project here.