We have talked a lot about the capabilities and potential of Deep Learning Image Generation here on the Paperspace by DigitalOcean Blog. Not only are image generation tools fun and intuitive to use, but they are one of the most widely democratized and distributed AI models available to the public. Really, the only Deep Learning technology with a larger social footprint are Large Language Models.
For the last two years, Stable Diffusion, the first publicly distributed and functional image synthesis model, has completely dominated the scene. We have written about competitors like PixArt Alpha/Sigma and done research into others like AuraFlow, but, at the time of each release, nothing has set the tone like Stable Diffusion models. Stable Diffusion 3 remains one of the best open source models out there, and many are still trying to emulate their success.
Last week, this paradigm changed with the release of FLUX from Black Forest Labs. FLUX represents a palpable step forward in image synthesis technologies in terms of prompt understanding, object recognition, vocabulary, writing capability, and much more. In this tutorial, we are going to discuss what little is available to the public about the two open-source FLUX models, FLUX.1 schnell and FLUX.1-dev, before the release of any Flux related paper from the research team. Afterwards, we will show how to run Flux on a Paperspace Core Machine powered by an NVIDIA H100 GPU.
The FLUX Model
FLUX was created by the Black Forest Labs team, which is comprised largely of former Stability AI staffers. The engineers on the team were directly responsible for the development/invention of both VQGAN and Latent Diffusion, in addition to the Stable Diffusion model suite.
Very little has been made public about the development of the FLUX models, but we do know the following:
- All public FLUX.1 models are based on a "hybrid architecture of multimodal and parallel diffusion transformer blocks and scaled to 12B parameters" (Source)
- They trained the model using flow matching, a training methodology alternative based on Continuous Normalizing Flows rather than diffusion paths that "lead[] to consistently better performance than alternative diffusion-based methods in terms of both likelihood and sample quality" (Source)
- Increased model performance and improved hardware efficiency via the incorporation of rotary positional embeddings and parallel attention layers (Source)
This is the most of what we know about the improvements to typical Latent Diffusion Modeling techniques they have added for FLUX.1. Fortunately, they are going to release an official tech report for us to read in the near future. In the meantime, they do provide a bit more qualitative and comparative information in the rest of their release statement.
Let's dig a bit deeper and discuss what information was made available in their official blog post:
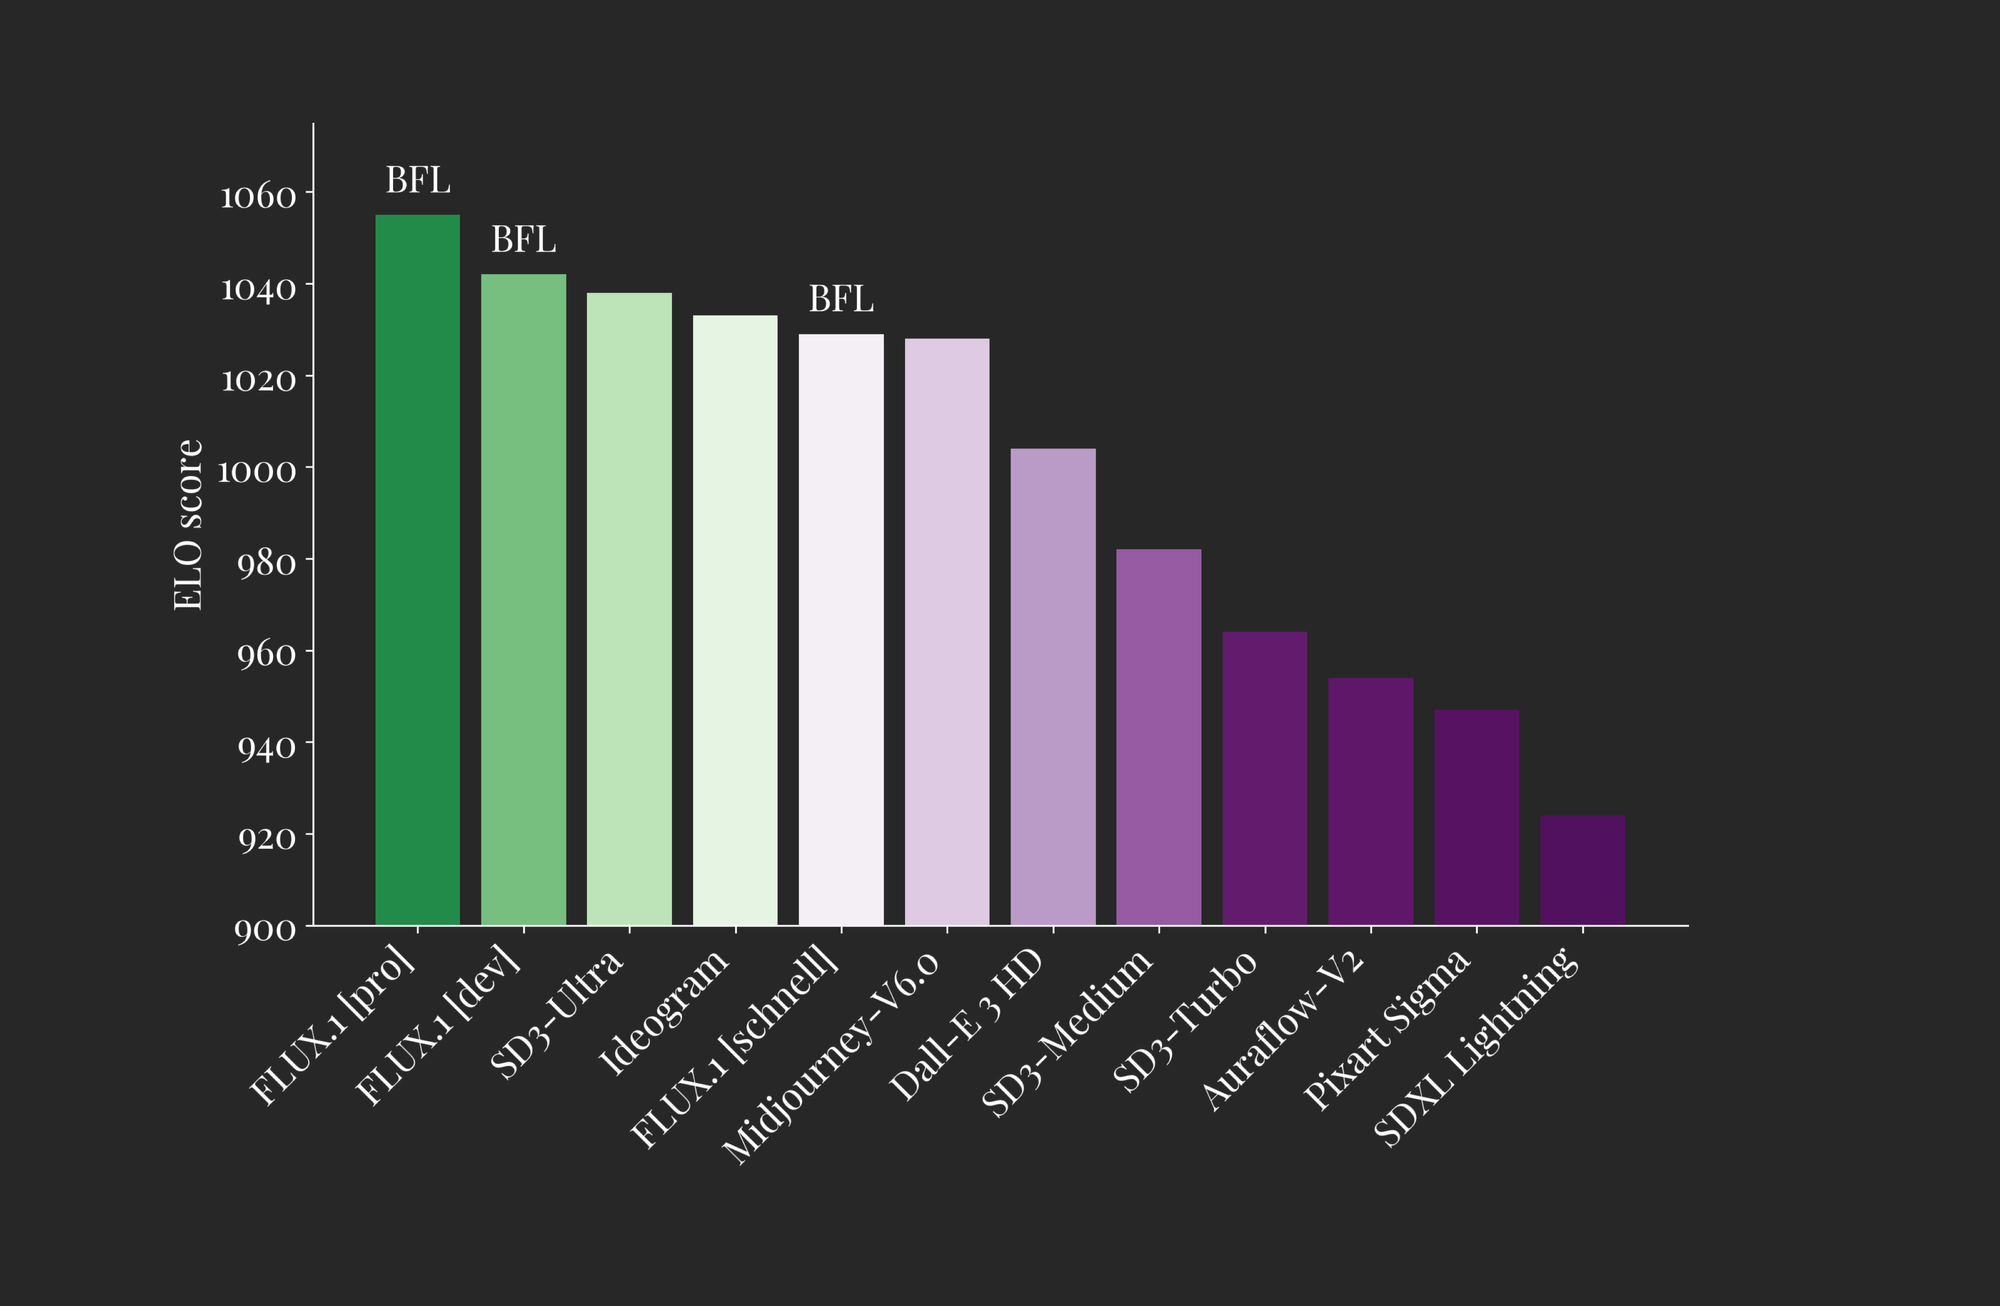
The release of FLUX is meant to "define a new state-of-the-art in image detail, prompt adherence, style diversity and scene complexity for text-to-image synthesis" (Source). To better achieve this, they have released three versions of FLUX: Pro, Dev, and Schnell.
The first is only available via API, while the latter two are open-sourced to varying degrees. As we can see from the plot above, each of the FLUX models performs comparably to the top performant models available both closed and open source in terms of quality of outputs (ELO Score). From this, we can infer that each of the FLUX models has peak quality image generation both in terms of understanding of the text input and potential scene complexity.
Let's look at their differences between these versions more closely:
- FLUX.1 pro: is their best performant version of the model. It offers state-of-the-art image synthesis that outmatches even Stable Diffusion 3 Ultra and Ideogram in terms of prompt following, detail, quality, and output diversity. (Source)
- FLUX.1 dev: FLUX.1 dev is an "open-weight, guidance-distilled model for non-commercial applications" (Source). It was distilled directly from the FLUX.1 pro model, and offers nearly the same level of performance at image generation in a significantly more efficient package. This makes FLUX.1 dev the most powerful open source model available for image synthesis. FLUX.1 dev weights are available on HuggingFace, but remember the license is restricted to only non-commercial use
- FLUX.1 schnell: Their fastest model, schnell is designed for local development and personal use. This model is capable of generating high quality images in as little as 4 steps, making it one of the fastest image generation models ever. Like dev, schnell is available on HuggingFace and inference code can be found on GitHub
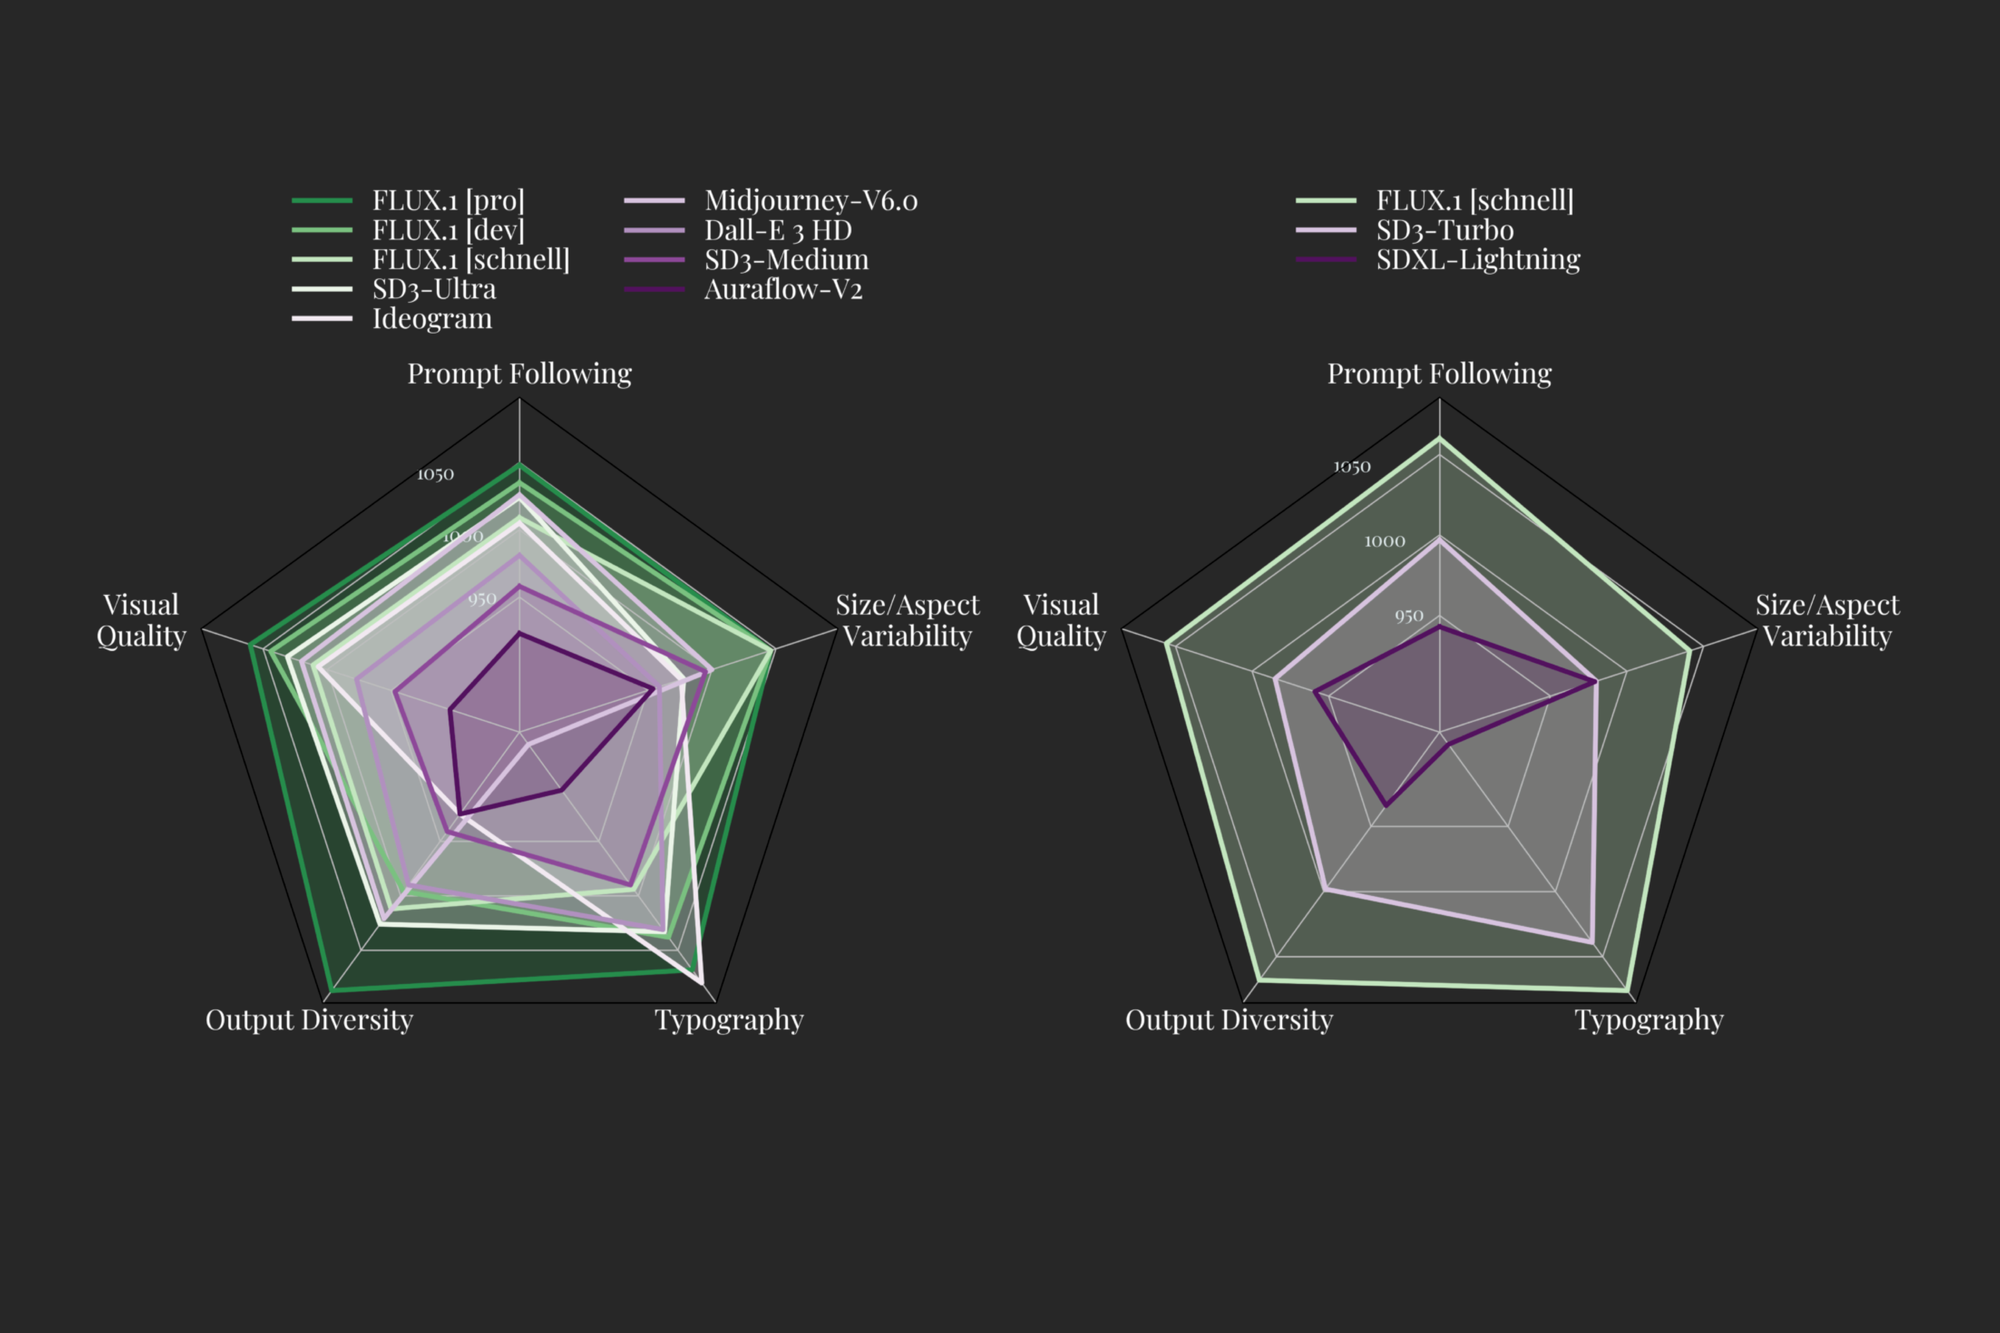
The researchers have identified 5 traits to measure Image Generation models more specifically on, namely: Visual Quality, Prompt Following, Size/Aspect Variability, Typography and Output Diversity. The above plot shows how each major Image Generation model compares, according to the Black Forest Team, in terms of their ELO Measure. They assert that each of the pro and dev versions of the models outperforms Ideogram, Stable Diffusion3 Ultra, and MidJourney V6 in each category. Additionally, they show in the blog that the model is capable of a diverse range of resolutions and aspect ratios.
All together, the release blog paints a picture of an incredibly powerful image generation model. Now that we have seen their claims, let's run the Gradio demo they provide on a Paperspace Core H100 and see how the model holds up to them.
FLUX Demo
To run the FLUX demos for schnell and dev, we first need to create a Paperspace Core Machine. We recommend using an H100 or A100-80G GPU for this task, but an A6000 should also handle the models without issue. See the Paperspace Documentation for details on getting started with Core and setting up SSH.
Setup
Once our machine is created and we have successfully SSH'd into our Machine from our local, we can navigate to the directory of our choice we would like to work in. We chose Downloads. From there, we can clone the official FLUX GitHub repository onto our Machine and move into the new directory.
cd Downloads
git clone https://github.com/black-forest-labs/flux
cd flux
Once the repository is cloned and we're inside, we can begin setting up the demo itself. First, we will create a new virtual environment, and install all the requirements for FLUX to run.
python3.10 -m venv .venv
source .venv/bin/activate
pip install -e '.[all]'
This will take a few moments, but once it is completed, we are almost ready to run our demo. All that is left is to log in to HuggingFace, and navigate to the FLUX dev page. There, we will need to agree to their licensing requirement if we want to access the model. Skip this step if you plan to only use schnell.
Next, go to the HuggingFace tokens page and create or refresh a new Read token. We are going to take this and run
huggingface-cli loginin our terminal to give the access token to the HuggingFace cache. This will ensure that we can download our models when we run the demo in a moment.
Starting the Demo
To begin the demo, all we need to do now is execute the associated python script for whichever demo we are wanting to run. Here are the examples:
## schnell demo
python demo_gr.py --name flux-schnell --device cuda

## dev demo
python demo_gr.py --name flux-dev --device cuda
We recommend starting with schnell, as the distilled model is actually much faster and more efficient to use. From our experience using it, dev requires a bit more fine-tuning and distillation, while schnell is actually able to take better advantage of the models capabilities. More on this later.
Once you run the code, the demo will begin spinning up. The models will be downloaded onto your Machine's HuggingFace cache. This process may take around 5 minutes in total for each model download (schnell and dev). Once completed, click on the shared Gradio public link to get started. Alternatively, you can open it locally in your browser using the Core Machine desktop view.
Running the Demo
Real time generation of images at 1024x1024 on H100 using FLUX.1 schnell
The demo itself is very intuitive, courtesy of Gradio's incredibly easy-to-use interface. At the top left, we have our prompt entry field where we can input our text prompt description of the image we would like. Both FLUX models are very robust in terms of prompt handling, so we encourage you to try some wild combinations of terms.
For the dev model, there is an image to image option next. As far as we can tell, this capability is not very strong with flux. It was not able to translate the image's objects from noise back into meaningful connections with the prompt in our limited testing.
Next, there is an optional toggle for Advanced Options. These allow us to adjust the height, width, and number of inference steps used for the output. On schnell, the guidance value is locked to 3.5, but this value can be adjusted for dev demoing. Finally, we can control the seed, which allows for reproduction of previously generated images.
When we fill in each of these, we are able to generate a single image:
First impressions with FLUX
We have now had about a week to experiment with FLUX, and we are very impressed. It is easy to see how this model has rapidly grown in popularity in success following its release given what it represents in genuine utility and progression.
We have been testing its efficacy across a wide variety of different artistic tasks, mostly with schnell. Take a look below:

As we can see, it captured most of the text we wanted written with a stunning rendition of the landscape described in the prompt. The people and dog are a bit uncanny valley looking with how they fit into the image, and "Rigel" is spelled as "Rigler" in the bottom corner. Nonetheless, this is a fantastic representation of the prompt.
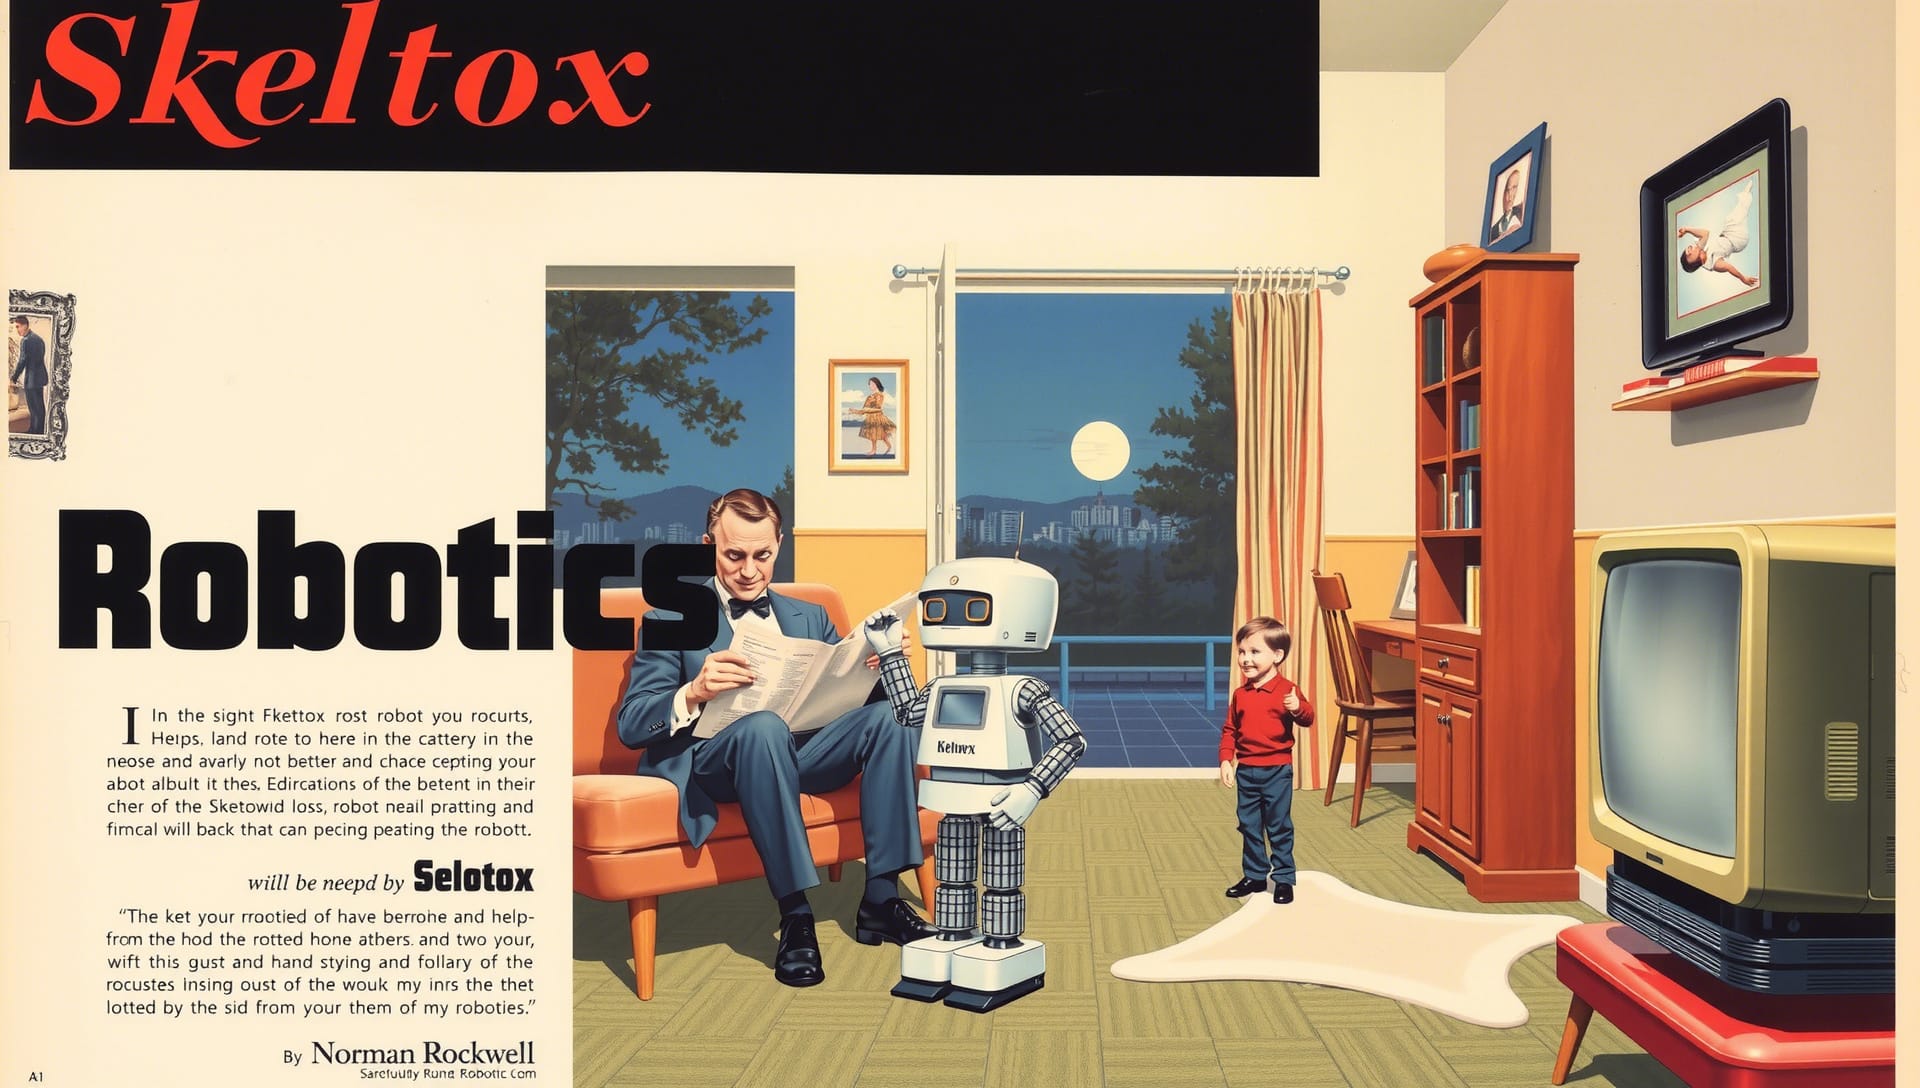
Here we show trying to capture a popular artist's, Norman Rockwell, style. It succeeds decently here. We had several generated options from this same prompt to choose from, but opted for it because of the astounding scene accuracy. The gibberish text and lack of a subtitle for the advertisement are glaring problems, but the composition is without a doubt impressive.

Trying for something in a different aspect ratio now, we see much of the same level of success as show before. Most of the prompt is capture accurately, but the figurine is missing shorts and coca cola, and they are holding the guitar instead. This shows that the model can still struggle with composition of multiple objects on a single subject. The prompt accuracy and writing still make this a very desirable final output for the prompt.

Finally, we have a tall image generated from a simple prompt. Without any text, we can see that the model still manages to generate an aesthetically pleasing image that captures the prompt well. Without additional text, there is notably less artifacting. This may indicate that simpler prompts will render better on FLUX models.
Tips for using FLUX
Prompting for text

Getting text to appear in your image can be somewhat tricky, as there is no deliberate trigger word or symbol to get FLUX to try and generate text. That being said, we can make it more likely to print text by adding quotation marks around our desired text in the prompt, and by deliberately writing out the type of text we would like to see appear. See the example above.
General Prompt Engineering
FLUX is incredibly intuitive to use compared to previous iterations of Diffusion models. Even compared to Ideogram or MidJourney, it can understand our prompts with little to no work to engineer the text towards machine understanding. We do have some tips for getting the best outcome, nonetheless.
Our first piece of advice is to order the terms in the prompt and to use commas. The order of the words in the prompt directly corresponds to their weight when generating the final image, so a main subject should always be near the start of the prompt. If we want to add more details, using commas helps separate the terms for the model to read. Like a human, it needs this punctuation to understand where to clauses start in stop. Commas seem to hold more weight in FLUX than they did with Stable Diffusion.
Additionally in our experience, there is a noticeable tradeoff between amount of detail (words) in our text prompt, the corresponding amount of detail in the image, and the resulting quality of scene composition. More words seems to translate to higher prompt accuracy, but that precludes the inclusion of more objects or traits for the model to generate on top of the original subject. For example, it would be simple to change the hair color of a person by changing a single word. In order to change their entire outfit, we need to add a phrase or sentence to the prompt with lots of detail. This phrase may disrupt the unseen diffusion process, and make it difficult for the model to correctly recreate the desired scene.
Aspect Ratios
FLUX was trained across a wide variety of aspect ratios and resolutions of images ranging from .2 to 2 MegaPixels in size. While this is true, it certainly seems to shine in certain areas and resolutions. In our experience practicing with the model, it performs well with 1024 x 1024 and larger resolutions. 512 x 512 images come out less detailed overall, even with the lowered number of pixels taken into account. We also found the following resolutions work extremely well compared to nearby values:
- 674 x 1462 (iPhone/common smart phone aspect ratio is 9:19.5)
- 768 x 1360 (default)
- 896 x 1152
- 1024 x 1280
- 1080 x 1920 (common wallpaper ratio)
Closing Thoughts
In this article, we looked at some of these capabilities in detail before demoing the model using H100s running on Paperspace. After looking at the release work and trying the model out ourselves, we can say for certain that FLUX is the most powerful and capable image generation model to ever be released. It represents a palpable step forward for these technologies, and the possibilities are growing more endless for what these sorts of models may one day be capable of doing.
We encourage everyone to try FLUX out on Paperspace as soon as possible! Paperspace H100s make generating images in just moments, easy, and it is a snap to setup the environment following the instructions in the demo above.