Bring this project to life
As we discussed in part one of this review series, the image synthesis revolution is nigh, and there are a plethora of new additional mechanisms to aid the user in applying greater degrees of control, versatility, and specificity to the Stable Diffusion image synthesis process.
In this article, we are going to look at three more of these guidance and versatility adding techniques: Universal Guided Diffusion, Plug and Play, and Self Attention Guidance. Each of these enables new functionality beyond the scope of the original Stable Diffusion pipeline, and each has its place and use case.
Read along for a breakdown of each technique, a quick demo to get them running on Paperspace Gradient, and our recommendation as to whether or not this should be added to your own image synthesis workflow.
Plug and Play
What is it?
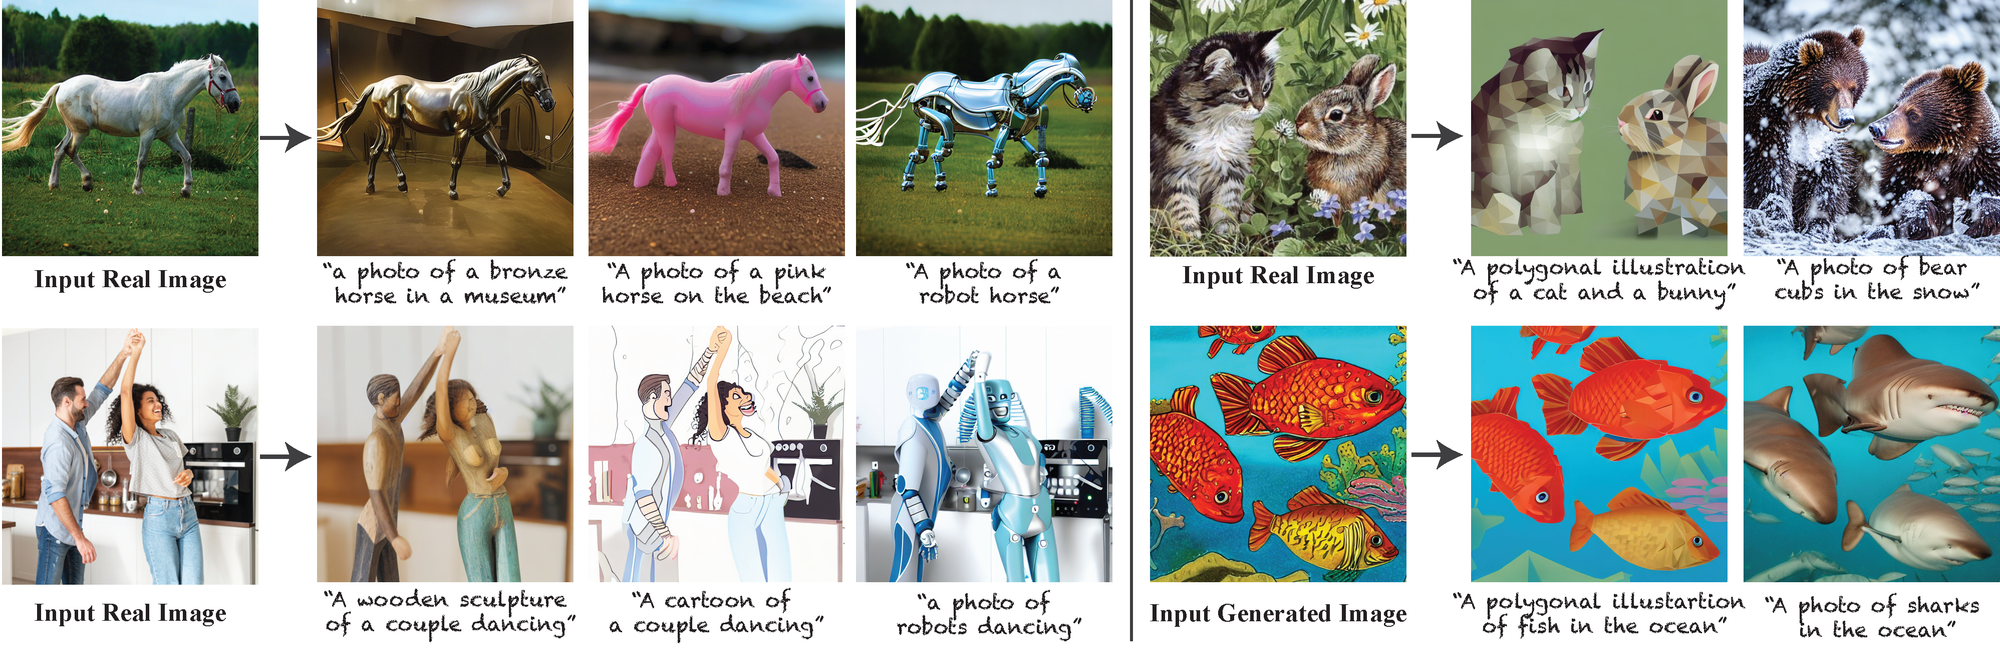
Plug and play is another great model infrastructure for laying over the features of the prompt during synthesis over a frame set by an initial image. Given one real image, the model is capable of retaining the features of the scene layout and feature structure in the provided image, and simultaneously altering the semantic meaning and appearance of the objects within.
The great thing about this framework is that it requires absolutely no training, but instead learns to represent the initial input's structure via self-attention and the manipulation of spatial features inside the model. This allows for a simplistic and relatively inexpensive process to extract the features of any image and inject those features directly into the synthesis process. Furthermore, this extends to generated images as well.
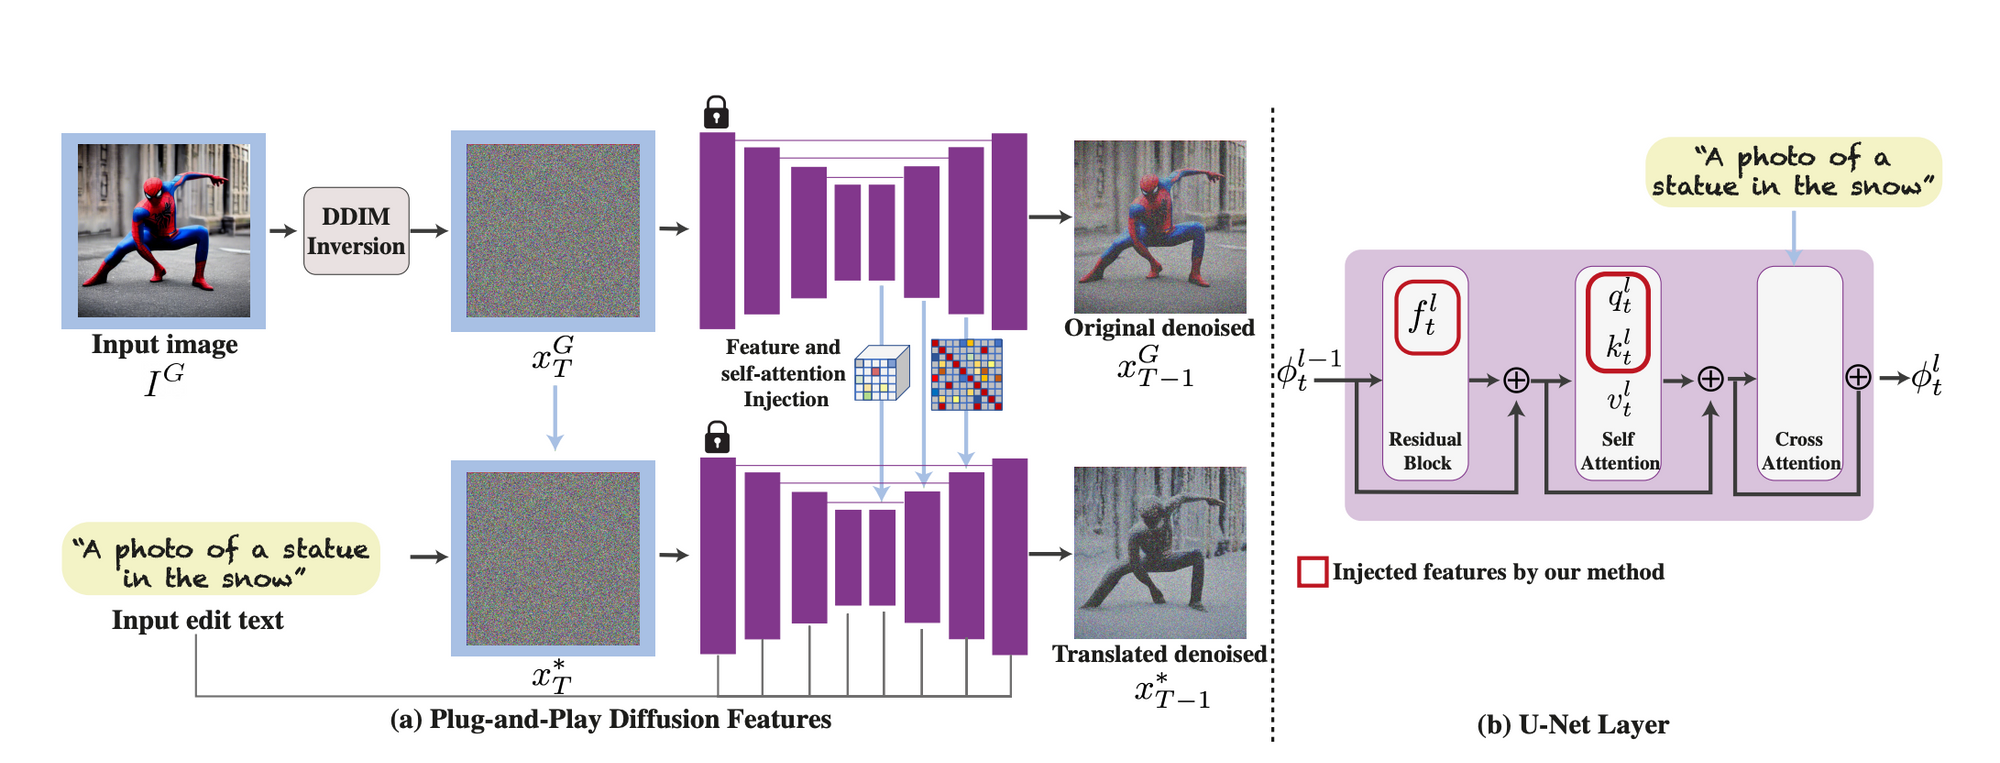
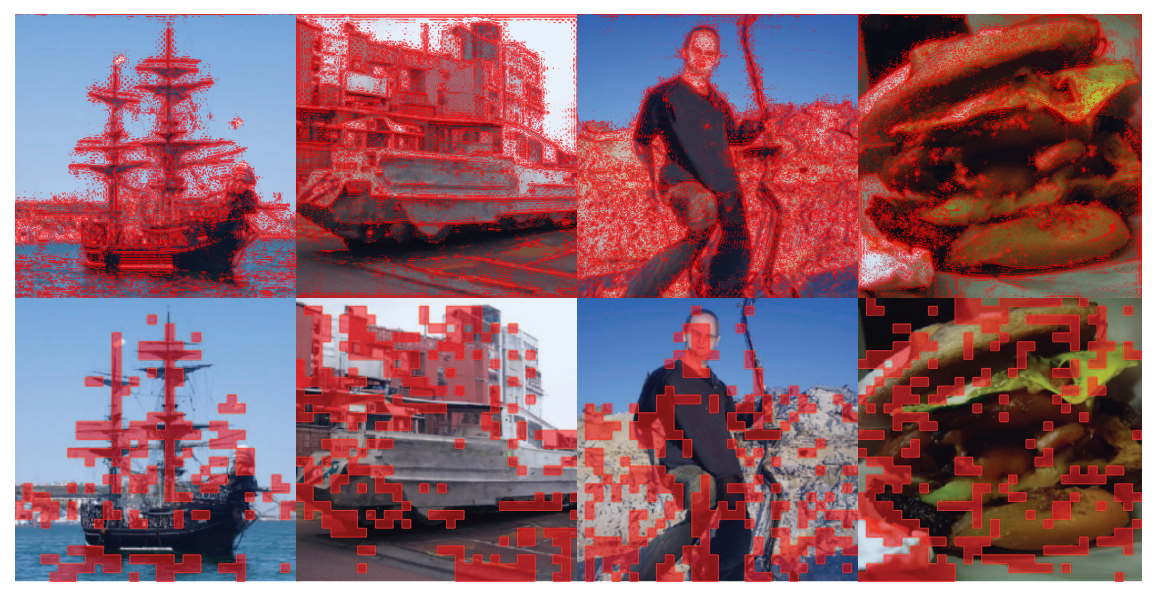
The framework takes as input the "guidance image" and a text prompt corresponding to the desired traits to translate into the new image. The guidance image is first inverted to an initial noise in a standard diffusion process, DDIM inversion. The noisy image is then progressively denoised using DDIM sampling. During this process, the model extract the spatial features from the decoder layers and their self-attention, as illustrated in the figure above (section b - U-Net Layer).
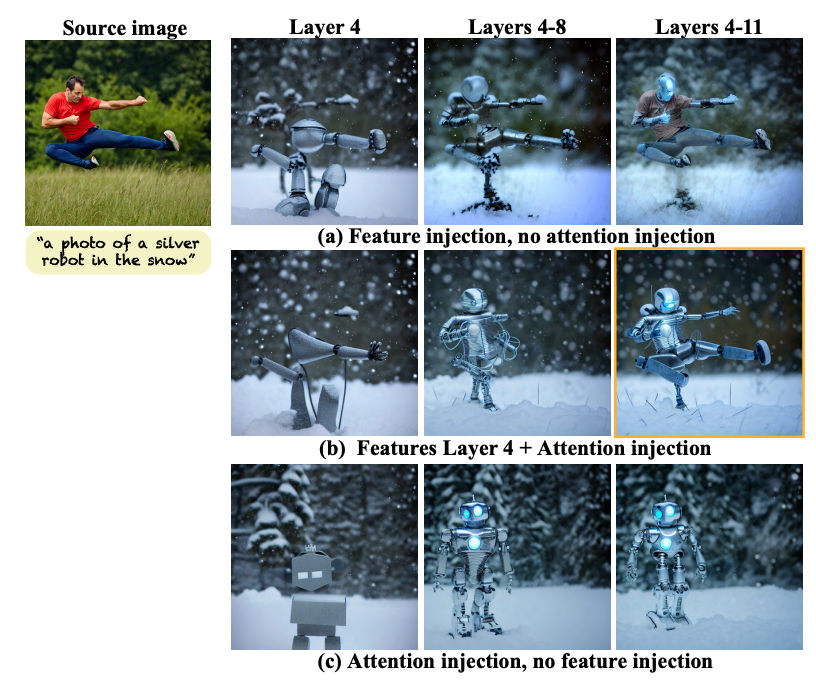
They found that "spatial features extracted from intermediate decoder layers encode localized semantic information and are less affected by appearance information, and the self-attention, representing the affinities between the spatial features, allows to retain fine layout and shape details." (source) In practice, this allowed them to inject guidance features at different layers to achieve a high degree of control over the final outputs.
Running on Gradient
To run Plug and Play on your Gradient Notebook, we are going to borrow from this unofficial Gradio application. This will make testing out different variations on images much more simple to run through.
We first need to set up the workspace. Run the cell below to get everything we need into the Notebook, including the package installations and retrieving application files.
!apt-get update && apt-get install git-lfs
!git-lfs clone https://huggingface.co/spaces/hysts/PnP-diffusion-features
%cd PnP-diffusion-features
!pip install -r requirements.txt
!git clone https://github.com/MichalGeyer/plug-and-play
!pip install git+https://github.com/CompVis/taming-transformers
!pip install -U transformers
Next, we are going to make a quick, automatic edit to the application file to make a shared link that we can access from our remote machines on our local.
import sys
import fileinput

# with is like your try .. finally block in this case
with open('app.py', 'r') as file:
    # read a list of lines into data
    data = file.readlines()

# now change the 2nd line, note that you have to add a newline
data[-1] = '\ndemo.launch(share=True)'

# and write everything back
with open('app.py', 'w') as file:
    file.writelines( data )
Finally, we can run the application:
!python app.py --share With that, the application will run its own setup and load procedure. This may take a while depending on your machine, but the samples will be able to load instantly once the app opens up. Once this initial action is done, we will receive a link to go into the Gradio application.
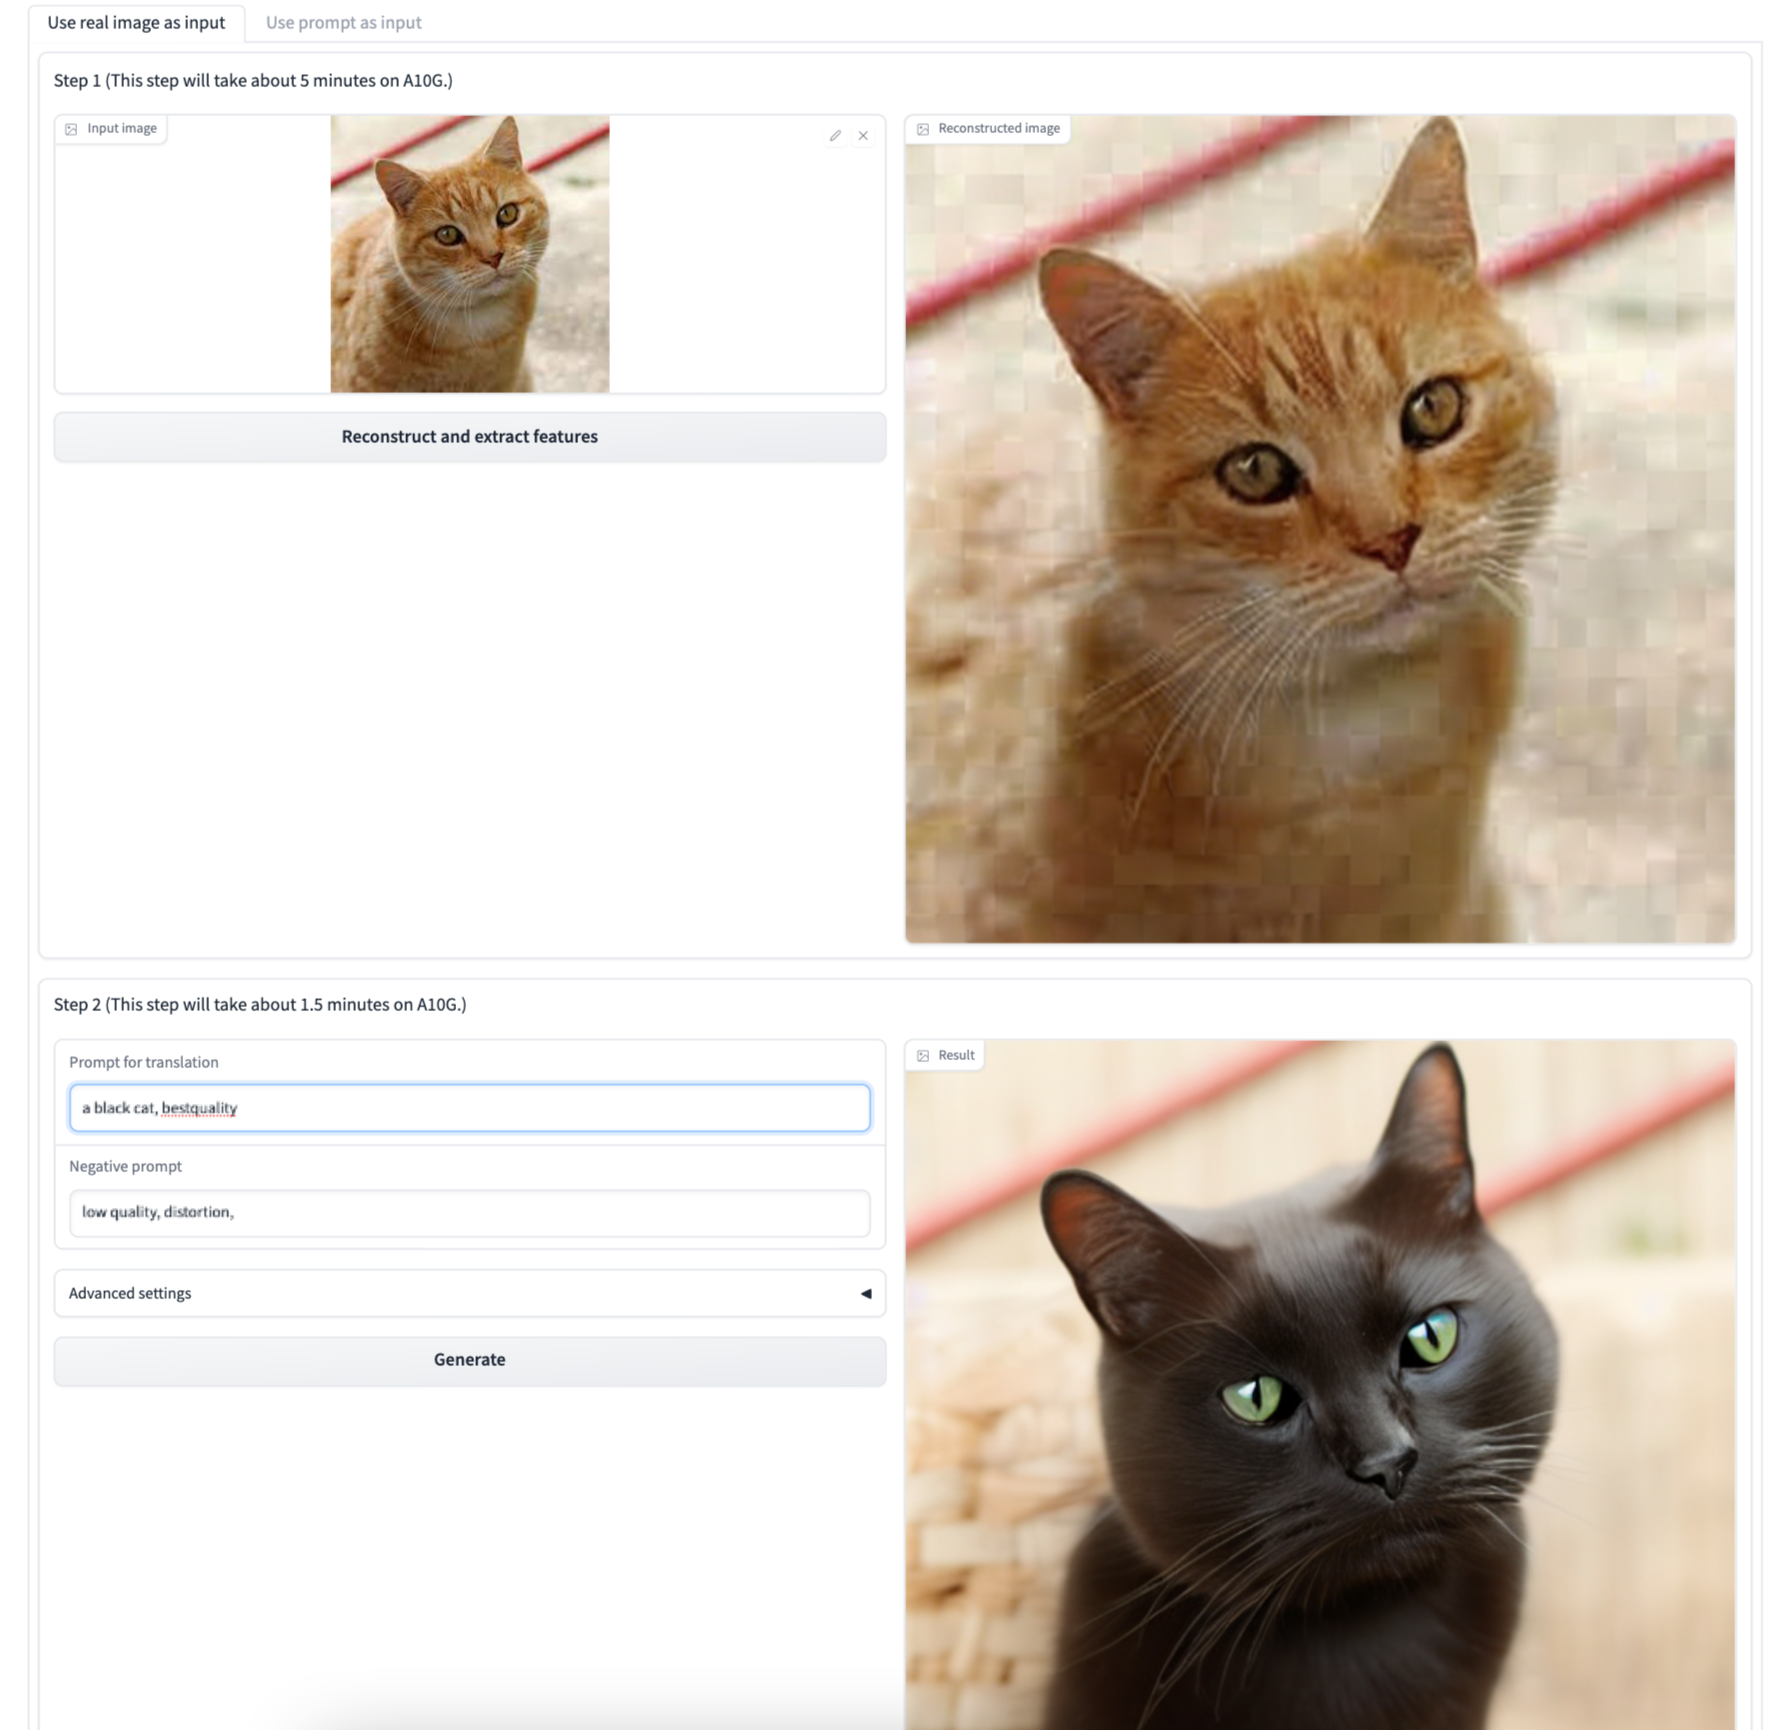
Here we can either input a prompt or image to run plug and play on to get image variety. We recommend using a square image if you want to make sure the entire subject is captured by the output, as it seems to basically crop out the additional regions. Here is an example we made using our own sample inputs to make
Do we recommend it?
This model is nice if we already have an existing image we want to capture in some new style, but it seems to perform less well than other contemporaries like ControlNet or T2IAdapter. We can assume it would work well when implemented in addition to other techniques.
Bring this project to life
Self-Attention Guidance

What is it?
Self-Attention Guidance is probably the most interesting application in this article. A lot of the efforts we have discussed in this series have been based around self-attention guidance. "The self-attention mechanism allows the inputs to interact with each other (“self”) and find out who they should pay more attention to (“attention”). The outputs are aggregates of these interactions and attention scores" (Source). In diffusion models, this is often implemented to ensure the fidelity of the final output.
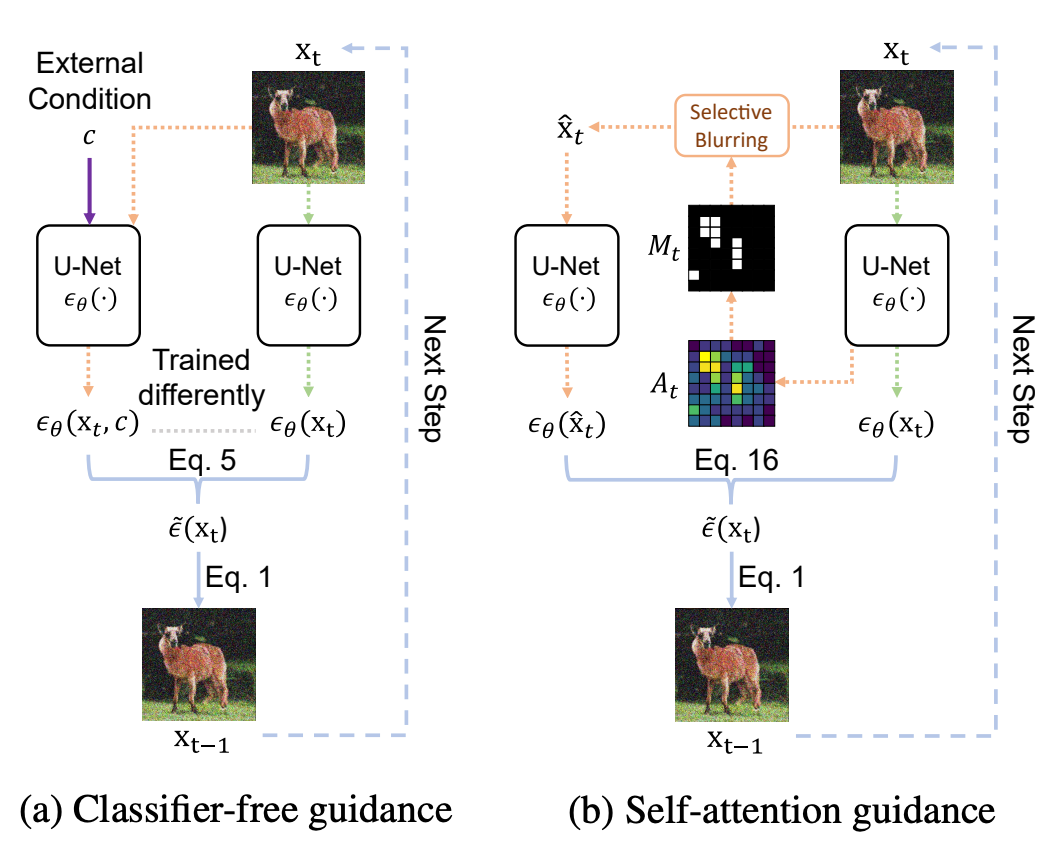
Self-Attention Guidance represents a novel improvement to typical self attention mechanisms. It is characterized by its utilization of intermediate self-attention maps to enhance the stability and efficacy of the image synthesis process. Specifically, SAG leverages intermediate attention maps of diffusion models at each iteration to capture essential information for the generative process and guide it accordingly. They found that their zero-shot method enhances the performance of various diffusion models, including ADM, IDDPM, and, most importantly, Stable Diffusion. Furthermore, they found that combining SAG with more conventional guidance methods, such as classifier-free guidance, results in further improvement. (Source)
Self-attention guidance works by adversarially blurring areas of the feature distribution that hold relevant information. This blurring enhances the suitability of intermediate samples for fine-scale information, and the model selectively iteratively blurs areas of interest to improve the efficacy and efficiency of this process. The model then orchestrates the synthesis process using the residual information. When the attention map is integrated during the denoising process, it significantly raises the quality by self-conditioning, neither requiring external information nor additional training.
In practice, this allows objects to more cleanly and accurately fit together within a scene. It works particularly well with Stable Diffusion.
Running on Gradient
To run SAG on Gradient, we first need to clone the library onto our Notebook and install the required packages. Run the cell below to do so.
!apt-get update && apt-get install git-lfs
!git-lfs clone https://huggingface.co/spaces/susunghong/Self-Attention-Guidance
%cd Self-Attention-Guidance
!pip install -U diffusers
Again, we will alter the app file to be shared to our local machine.
import sys
import fileinput

# with is like your try .. finally block in this case
with open('app.py', 'r') as file:
    # read a list of lines into data
    data = file.readlines()

# now change the 2nd line, note that you have to add a newline
data[-5] = '\n    demo.launch(share=True)'

# and write everything back
with open('app.py', 'w') as file:
    file.writelines( data )
Then we can simply execute the application file to get the link to the Gradio application.
!python app.py --shareNow, within the Gradio application, we can run SAG side by side a standard stable diffusion pipeline, and get a good idea for how the synthesis process runs do with and without it.
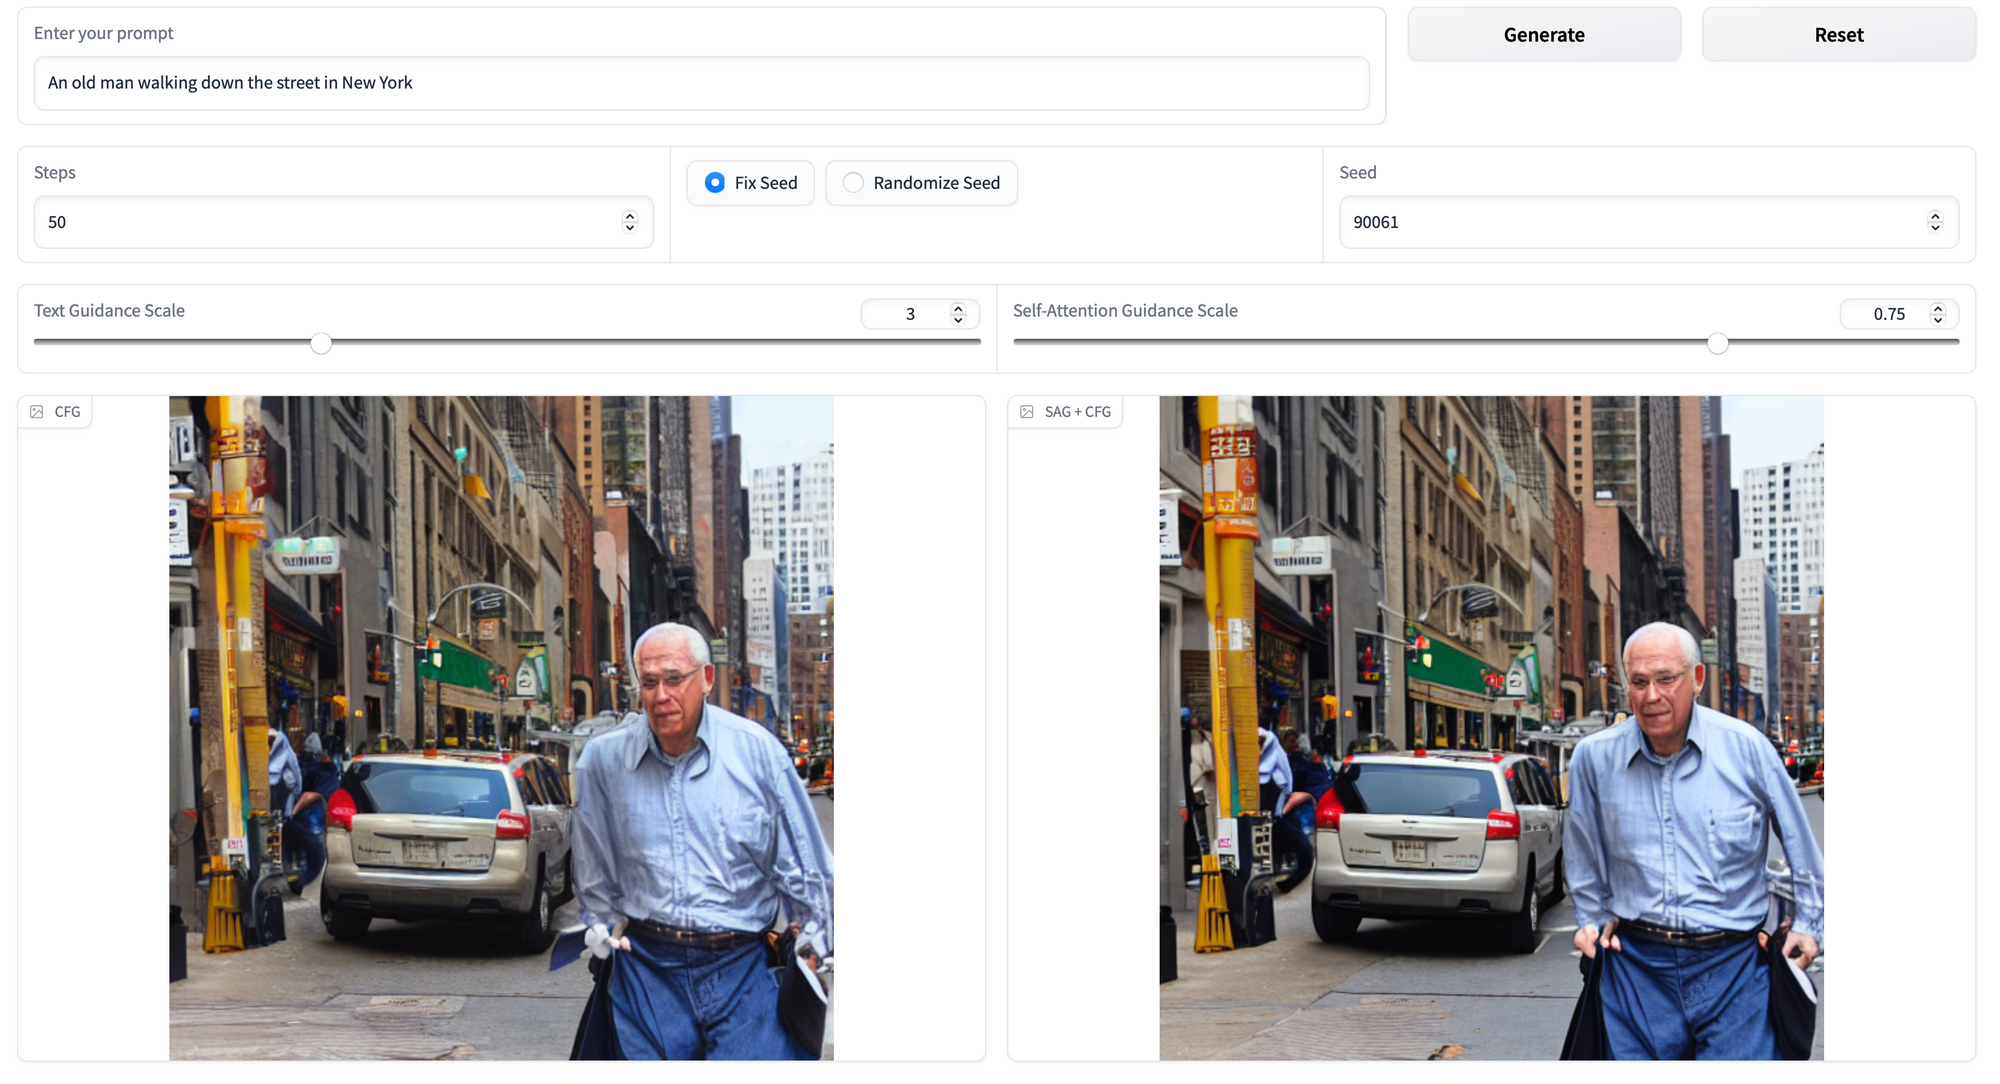
Here is an example showing a side by side display of "An old man walking down the street in New York." Zoom into the photo to see the differences more clearly. The back of the car, for example, is much cleaner and better defined.
Do we recommend it?
Yes, this is a powerful technique. It subtly improves any image synthesis procedure, and consistently produces better images than without it. In practice, we expect the Diffusers StableSAGDiffusionPipeline to supplant the diffusers StableDiffusionPipeline fairly quickly, and likely be integrated into other platforms like the Automatic1111 Web UI.
Universal Guided Diffusion
What is it?
Usually, diffusion models are trained on a particular form of conditioning. This is often text, and once conditioned in this way, the model cannot be conditioned on other modalities without retraining. Seeking to solve this problem, Universal Guided Diffusion is a a novel guidance algorithm that enables diffusion models to be controlled by arbitrary guidance modalities without the need to retrain any use-specific components. This capability extends to wide variety of functions including including segmentation, face recognition, object detection, and classifier signals.
This sampler doesn't ever evaluate the guidance models on noisy latent states. Instead, the sampler evaluates denoised images. In this way, the technique is able to straddle the domain gap that has prevented cross-modal guidance methods from proliferating. The author's strategy enables a wide variety of guidance modalities, and even mixed modality guidance without any additional training or fine tuning by the user. In practice, generated images are qualitatively far more accurate to the original input prompt.
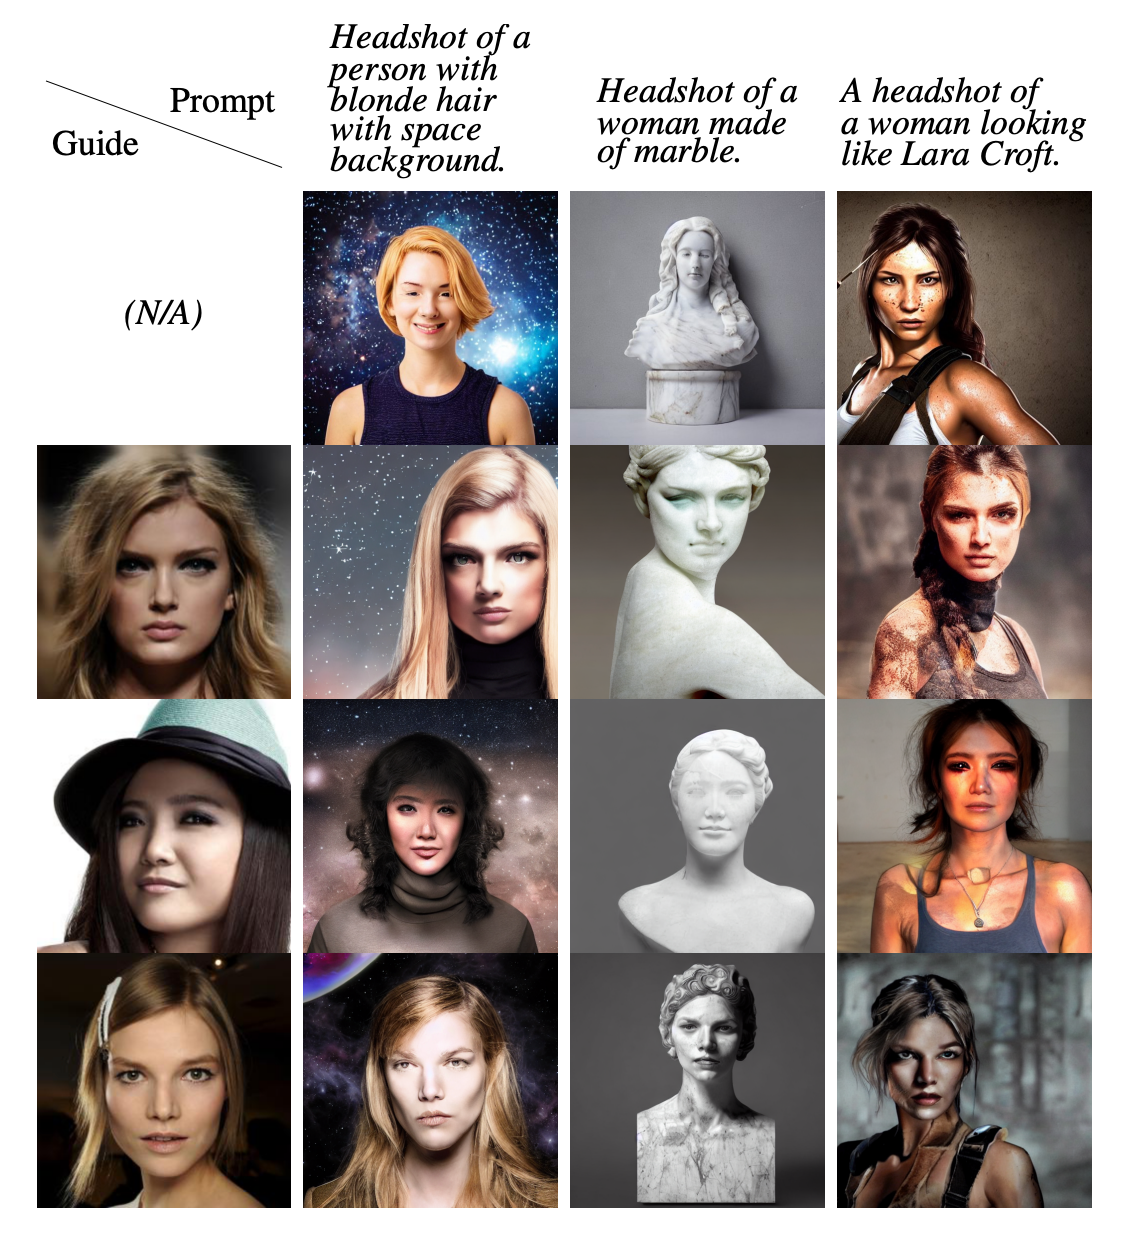
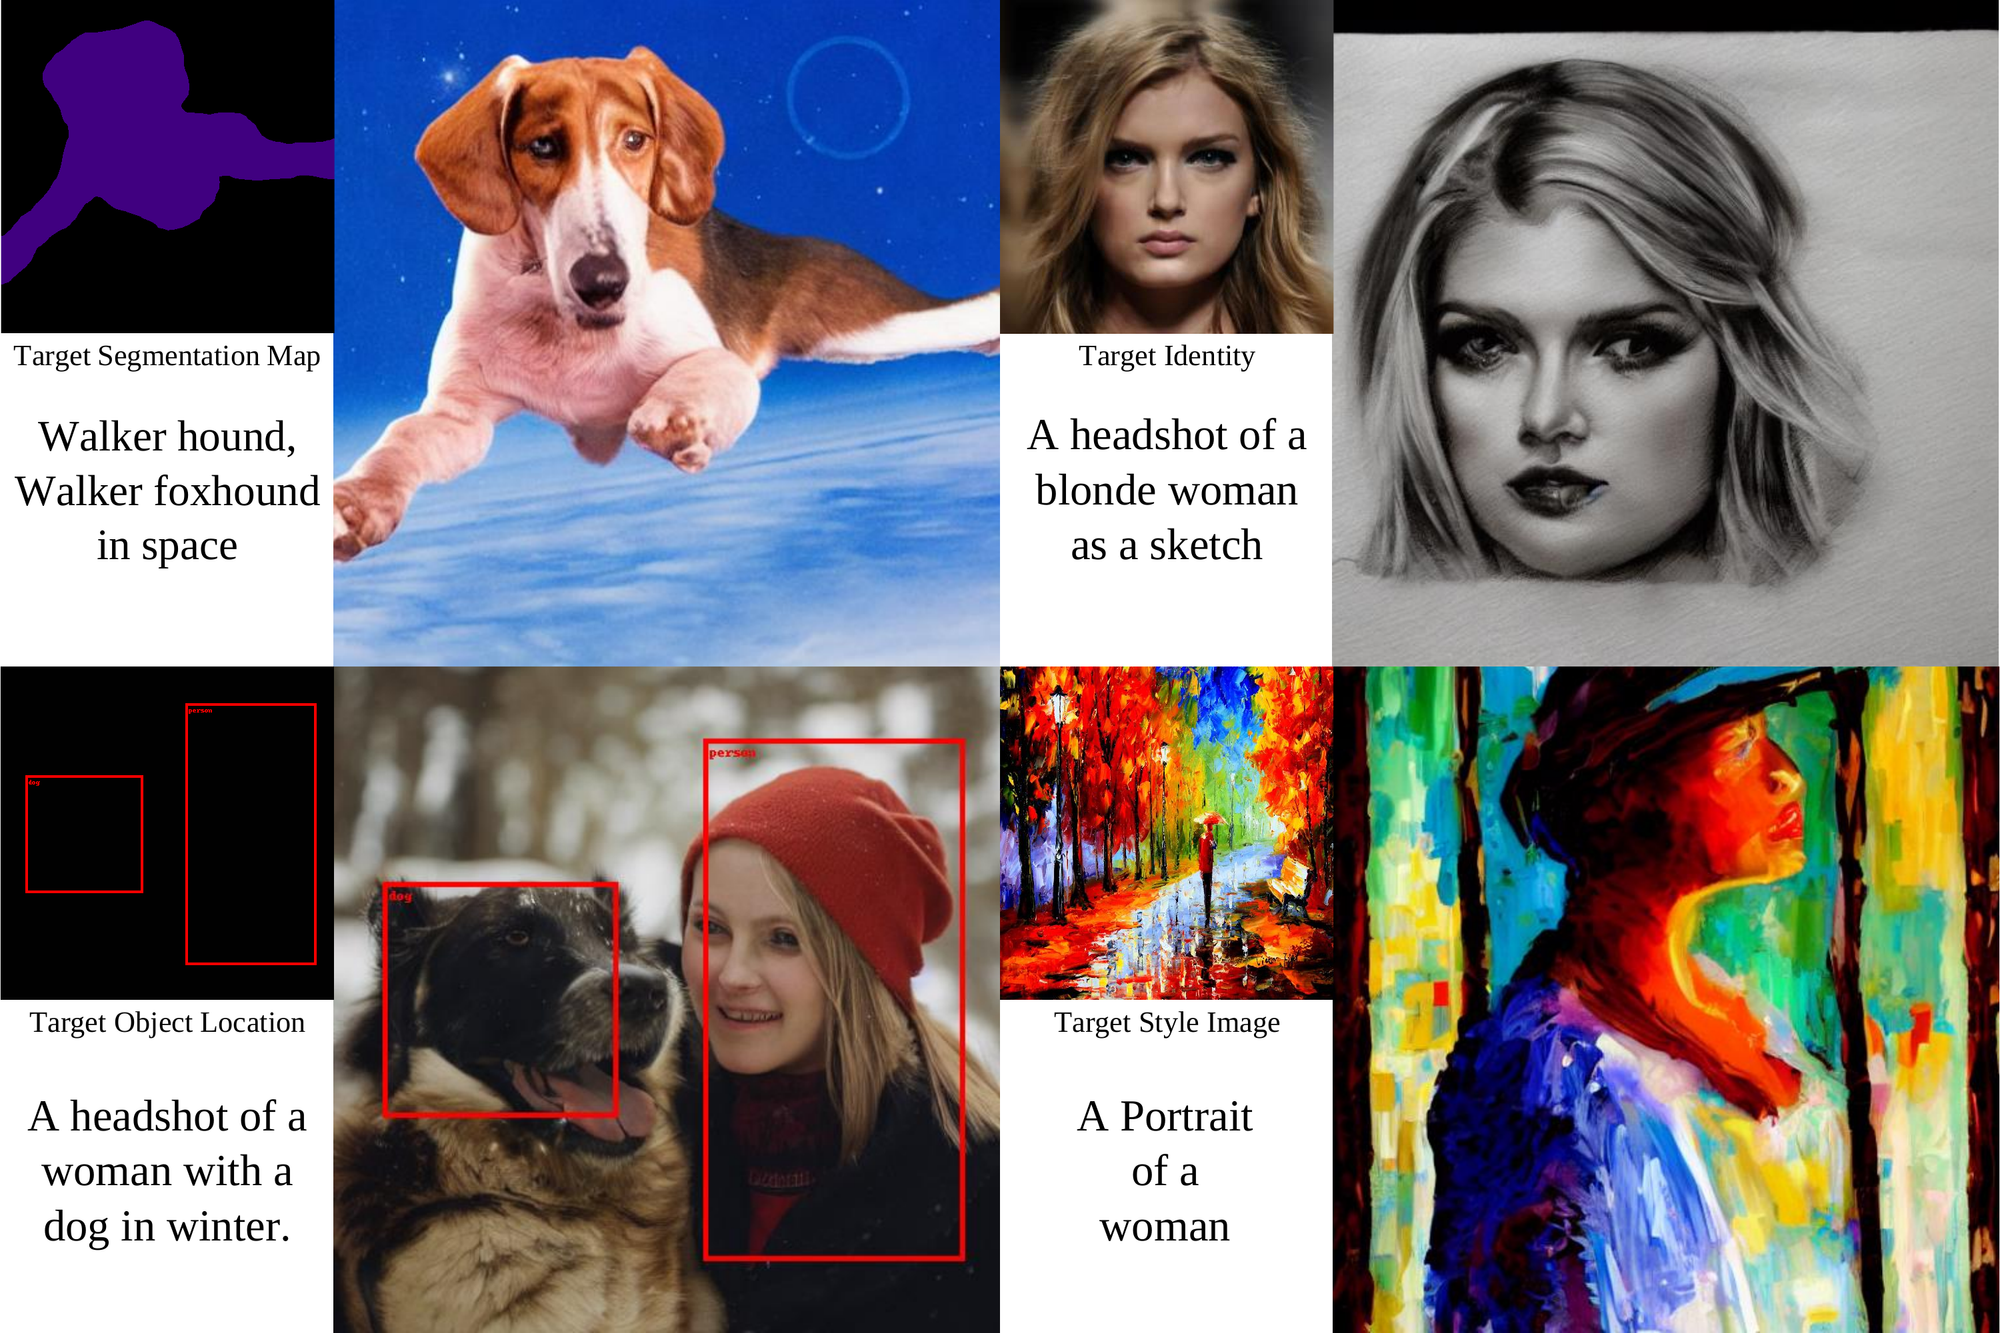
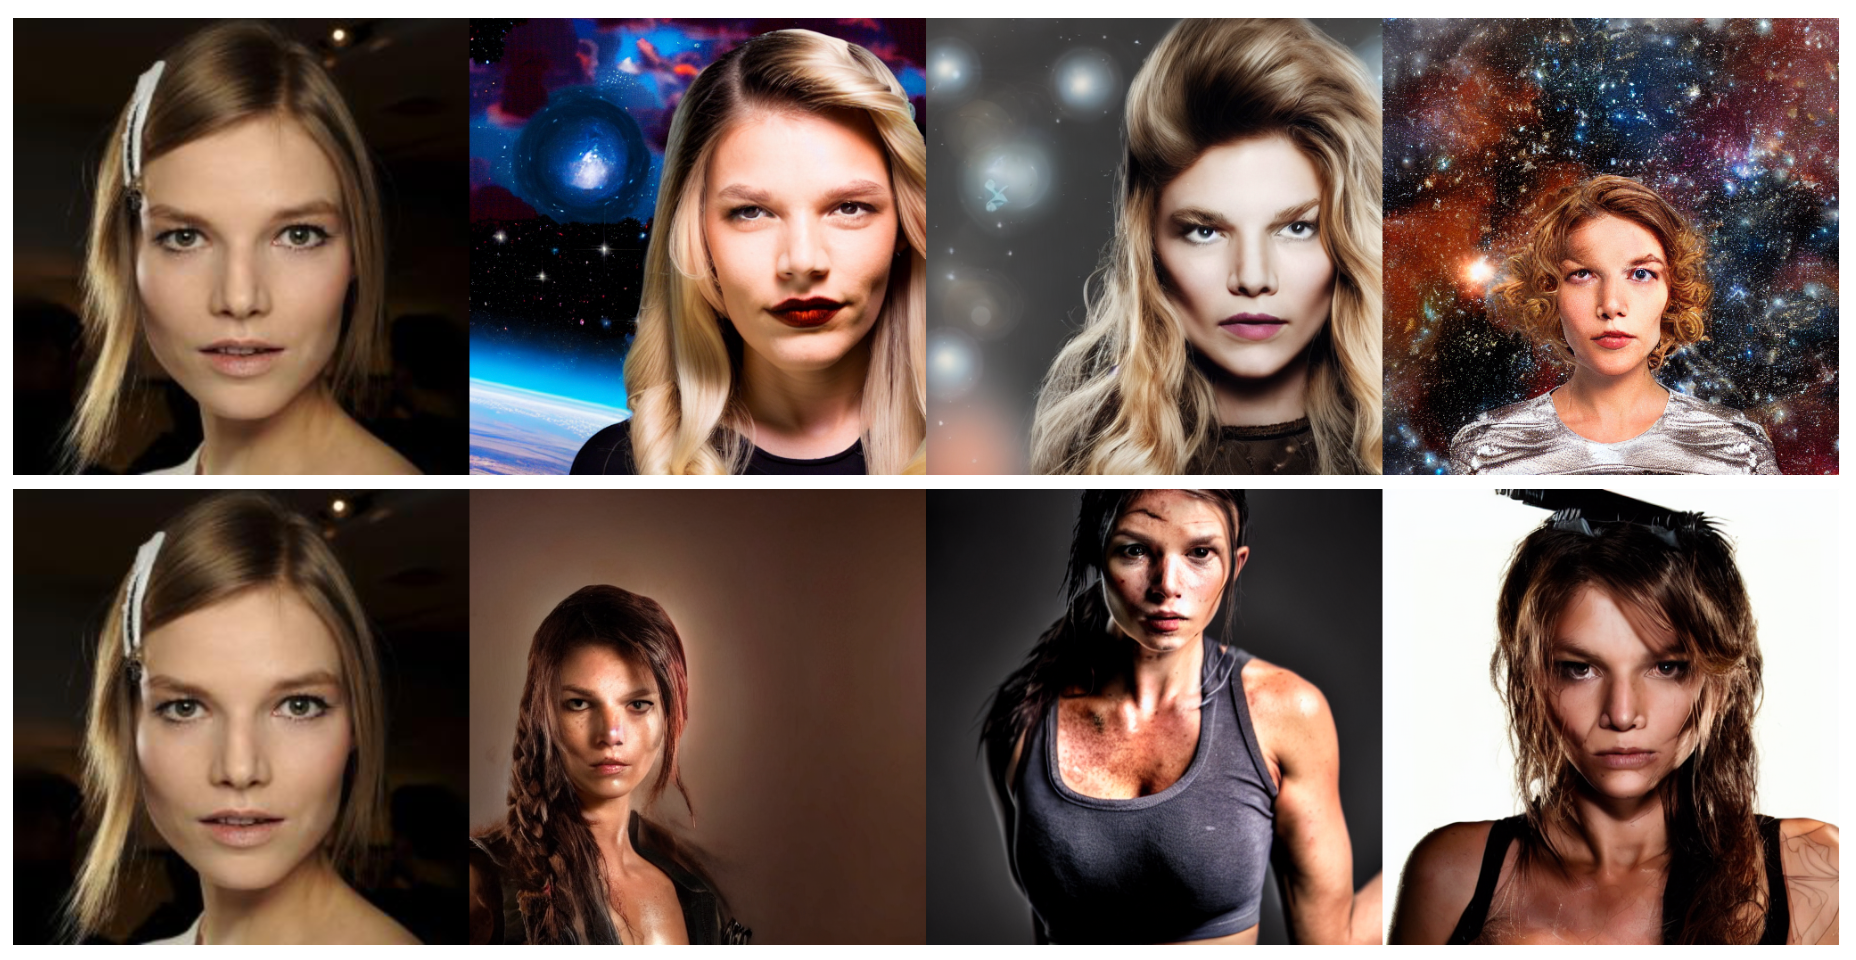
Above is an example of Universal Guidance using facial recognition systems. As we can see by comparing the top most row, those without any facial input for guidance, the facial recognition pattern identifies the faces and translates the facial features with the text prompt features into the final output.
Running on Gradient
This time, there is no Gradio application available. While the authors are working internally on developing a demo using Universal Guided Diffusion in Gradio, it is not currently available. Thus, we are going to run this within our Notebook directly.
First, let's install all the needed packages and clone the repos we need.
%cd ~/../notebooks
!git clone https://github.com/arpitbansal297/Universal-Guided-Diffusion
%cd Universal-Guided-Diffusion/stable-diffusion-guided
!pip install -e .
!pip install GPUtil blobfile facenet-pytorch invisible-watermark diffusers clip kornia deepface
!pip install -U transformers
!git clone https://github.com/CompVis/taming-transformers
!cp -r taming-transformers/taming ./
Face Recognition
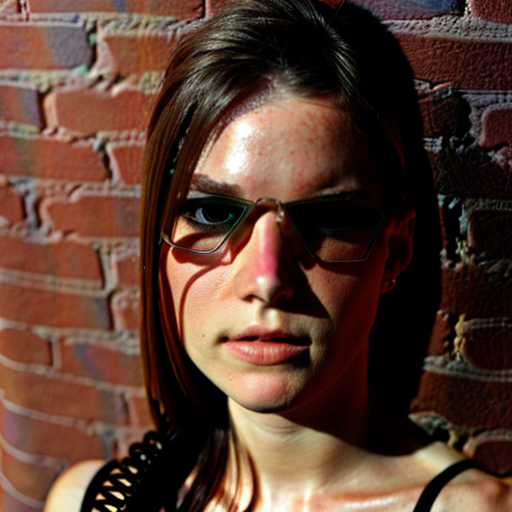
We will now show how to implement four of the possible guidance mechanisms. Namely, these are facial recognition, segmentation, object detection, and style transfer. First, let's run the facial recognition system. This will take a face sample from the data directory, and apply facial recognition guidance to the synthesis process. Run the cell below to generate the images.
note: this will take a very long time on Free GPU machines. We recommend at least 40 GB of VRAM.
!mkdir test_face
!cp scripts/* ./
!python face_detection.py --indexes 0 --text "Headshot of a person with blonde hair with space background" --optim_forward_guidance --fr_crop --optim_num_steps 2 --optim_forward_guidance_wt 20000 --optim_original_conditioning --ddim_steps 5 --optim_folder ./test_face/text_type_4/ --ckpt ../../../datasets/stable-diffusion-classic/v1-5-pruned-emaonly.ckpt
!python face_detection.py --indexes 0 --text "A headshot of a woman looking like a lara croft" --optim_forward_guidance --fr_crop --optim_num_steps 2 --optim_forward_guidance_wt 20000 --optim_original_conditioning --ddim_steps 500 --optim_folder ./test_face/text_type_11/ --ckpt ../../../datasets/stable-diffusion-classic/v1-5-pruned-emaonly.ckpt
We can then assess the quality of the generated faces using the provided script to get the best examples.
!python face_top_k.py --folder ./test_face/text_type_4/ --img_index 0 --img_saved 20 --top_k 5
!python face_top_k.py --folder ./test_face/text_type_11/ --img_index 0 --img_saved 20 --top_k 5
Segmentation
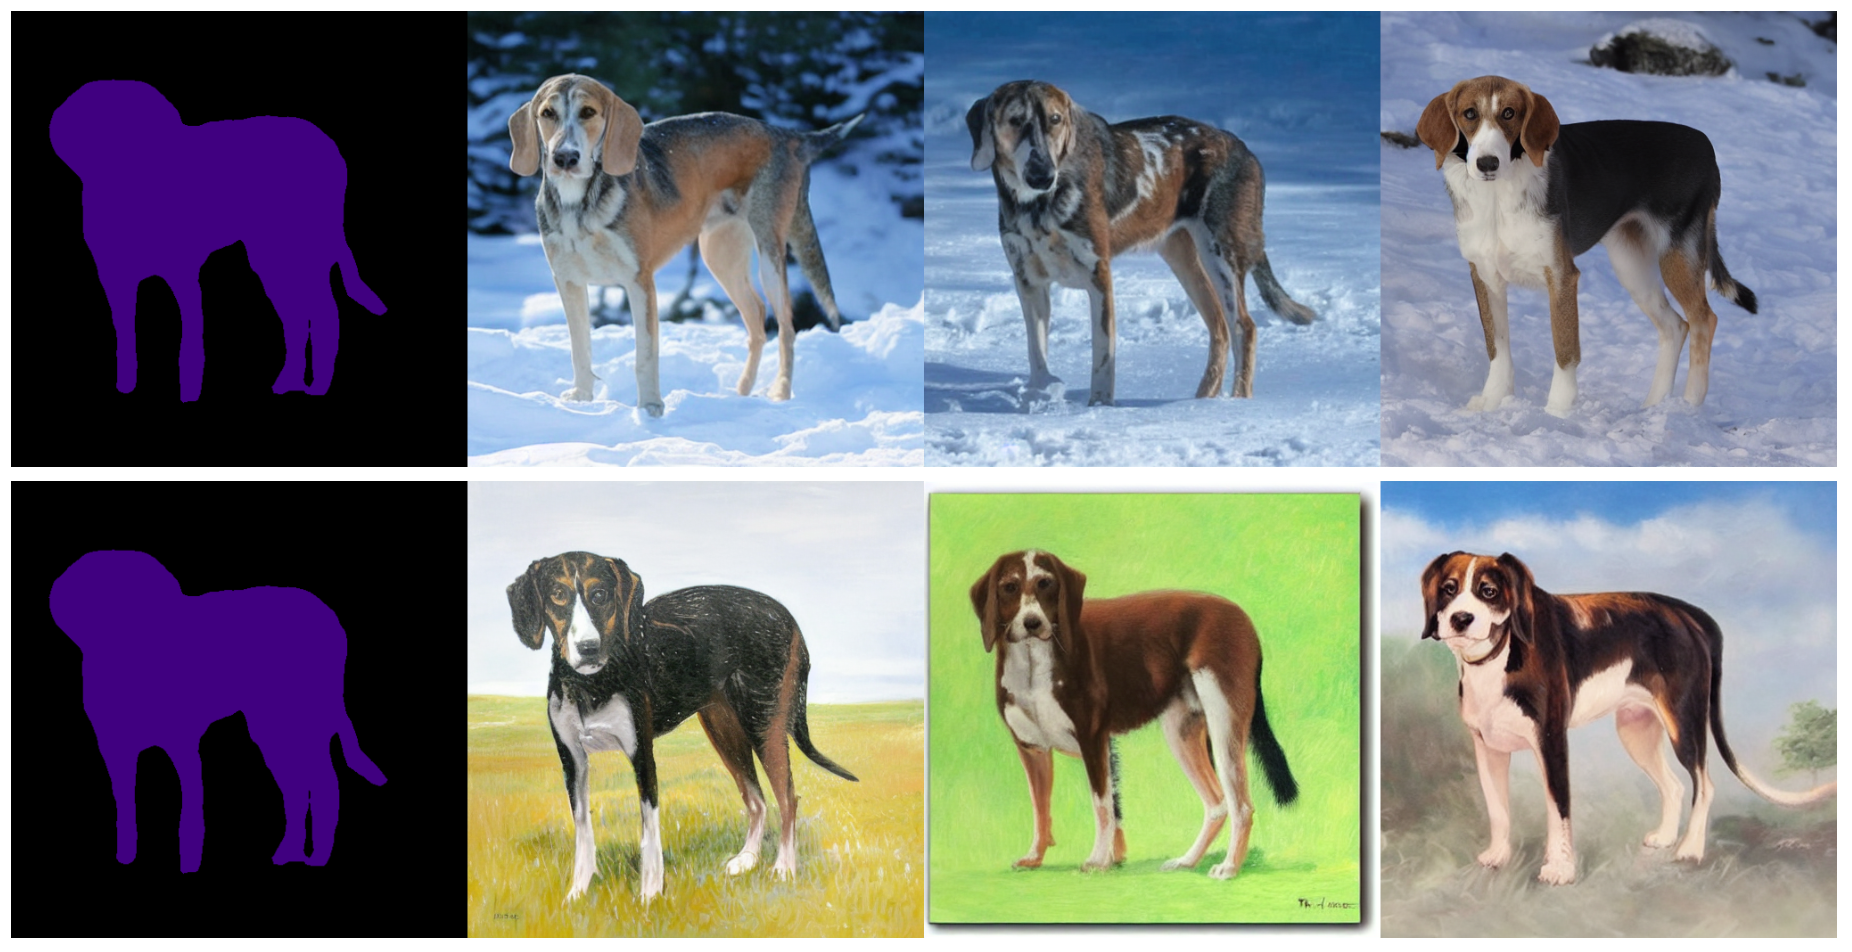
Next, we will run the image segmentation example. This will use an image of a dog from the ./data/segmentation_data/Walker/ directory to generate two images: one of a women's headshot with a dog, and the same prompt with a beach setting.
!mkdir test_segmentation
!python segmentation.py --indexes 1 --text "Walker hound, Walker foxhound on snow" --scale 1.5 --optim_forward_guidance --optim_num_steps 10 --optim_forward_guidance_wt 400 --optim_original_conditioning --ddim_steps 500 --optim_folder ./test_segmentation/text_type_4/ --ckpt ../../../datasets/stable-diffusion-classic/v1-5-pruned-emaonly.ckpt
!python segmentation.py --indexes 1 --text "Walker hound, Walker foxhound as an oil painting" --scale 2.0 --optim_forward_guidance --optim_num_steps 10 --optim_forward_guidance_wt 400 --optim_original_conditioning --ddim_steps 500 --optim_folder ./test_segmentation/text_type_3/ --ckpt ../../../datasets/stable-diffusion-classic/v1-5-pruned-emaonly.ckpt
Object Detection
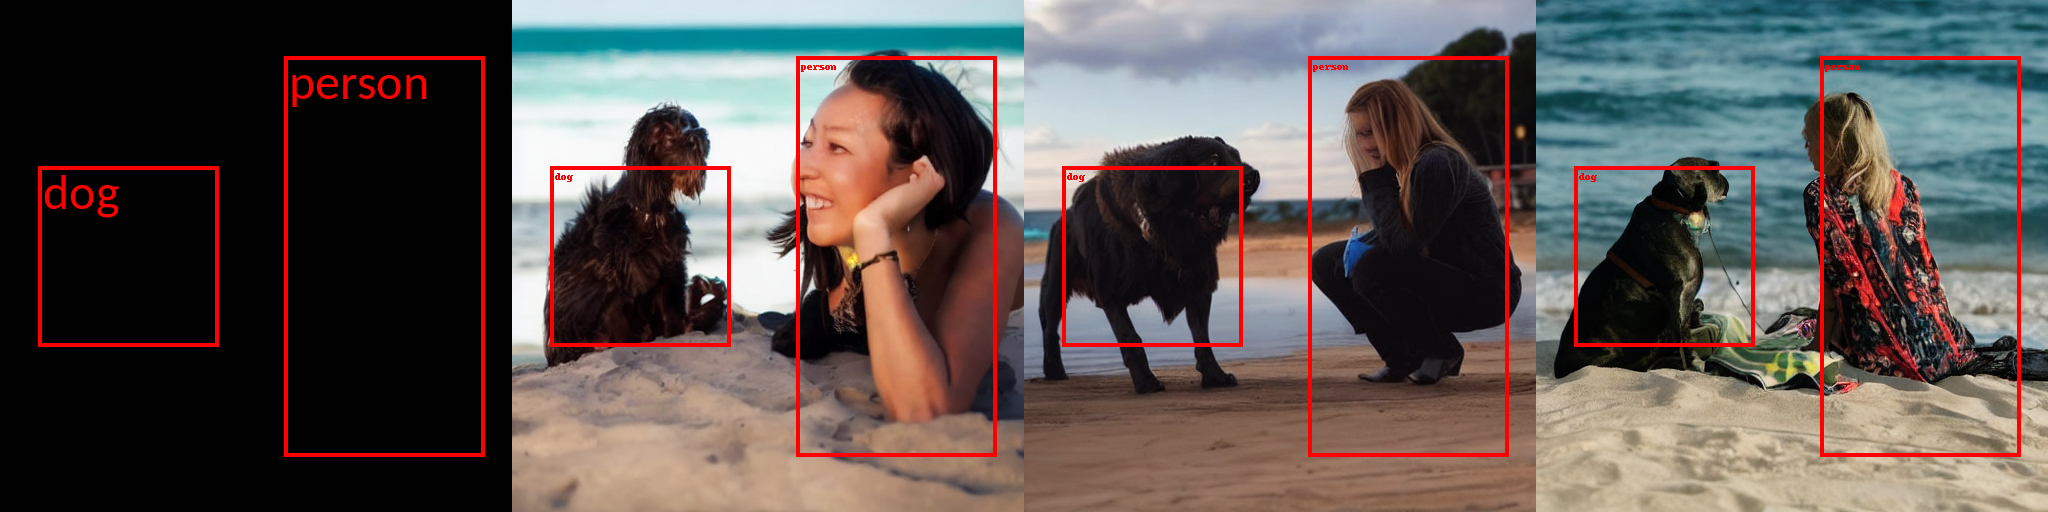
Using bounding boxes, Universal Guided Diffusion can determine the fixed locations of objects in the synthesized image. The following script will take the first sample bounding boxes in scripts/object_detection.py.
!mkdir test_od
!python segmentation.py --indexes 0 --text "a headshot of a woman with a dog" --scale 1.5 --optim_forward_guidance --optim_num_steps 5 --optim_forward_guidance_wt 100 --optim_original_conditioning --ddim_steps 250 --optim_folder ./test_od/ --ckpt ../../../datasets/stable-diffusion-classic/v1-5-pruned-emaonly.ckpt
!python segmentation.py --indexes 0 --text "a headshot of a woman with a dog on beach" --scale 1.5 --optim_forward_guidance --optim_num_steps 5 --optim_forward_guidance_wt 100 --optim_original_conditioning --ddim_steps 250 --optim_folder ./test_od/ --ckpt ../../../datasets/stable-diffusion-classic/v1-5-pruned-emaonly.ckpt
Style Transfer
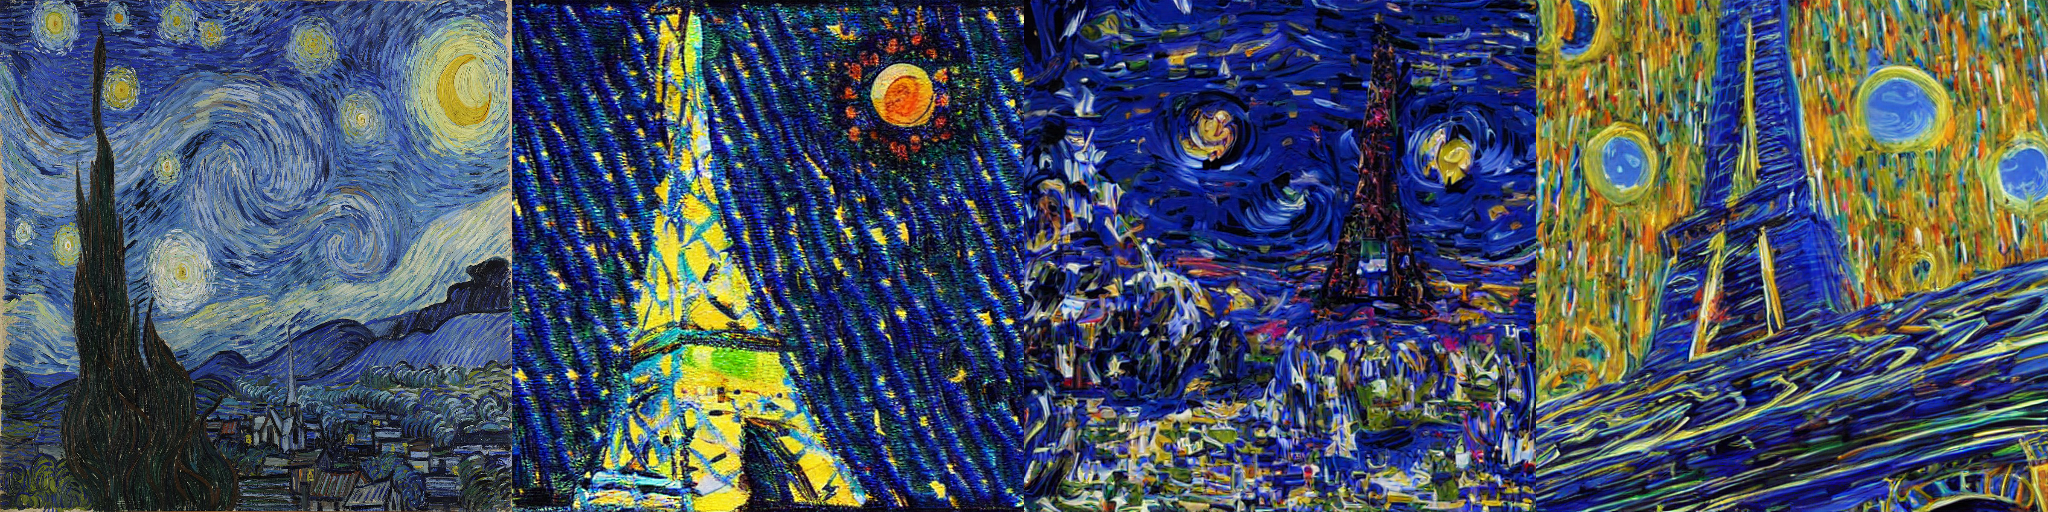
Finally, we can apply Universal Guidance to generate images from text prompts that are stylistically guided by some input form. The following take styling images from ./data/style_folder/styles/ , and use them to guide the image generation conditioned on the given text prompt. This will apply the classic "Starry Night" painting design to the inputted prompts.
!mkdir test_style
!python style_transfer.py --indexes 0 --text "A colorful photo of a eiffel tower" --scale 3.0 --optim_forward_guidance --optim_num_steps 6 --optim_forward_guidance_wt 6 --optim_original_conditioning --ddim_steps 500 --optim_folder ./test_style/text_type_1/ --ckpt ../../../datasets/stable-diffusion-classic/v1-5-pruned-emaonly.ckpt
!python style_transfer.py --indexes 0 --text "A fantasy photo of volcanoes" --scale 3.0 --optim_forward_guidance --optim_num_steps 6 --optim_forward_guidance_wt 6 --optim_original_conditioning --ddim_steps 500 --optim_folder ./test_style/text_type_2/ --ckpt ../../../datasets/stable-diffusion-classic/v1-5-pruned-emaonly.ckpt
Do we recommend it?
No, this method is extremely computationally expensive. Even on an A100-80GB GPU machine, a single image generation iteration took upwards of 12 minutes. Additionally, the results are decidedly less high quality than other methods.
Closing thoughts
In this article, we looked at three more guidance techniques for text to image synthesis frameworks: Plug and play, Self-Attention Guidance, and Universal Guided Diffusion. We then showed each working in a demo, either in Gradient on a Gradio application or Notebook. Each of these techniques add varying amounts of control, and has their place for using them.
We have now introduced 7 more major techniques for adding guidance, control, and versatility to Stable Diffusion to go along with ControlNet. Look out for our next article where we will start diving deeper into the first winner we found from this review series: T2I Adapter.