Face Transfer Using Deep Neural Nets
Introduction
In the previous article we looked at what style transfer was and how to use it to create your own art. Now, we will focus on how to extend the capabilities of style transfer beyond the art realm. Please jump to the resources section of this post to find out about the code used to generate the examples.
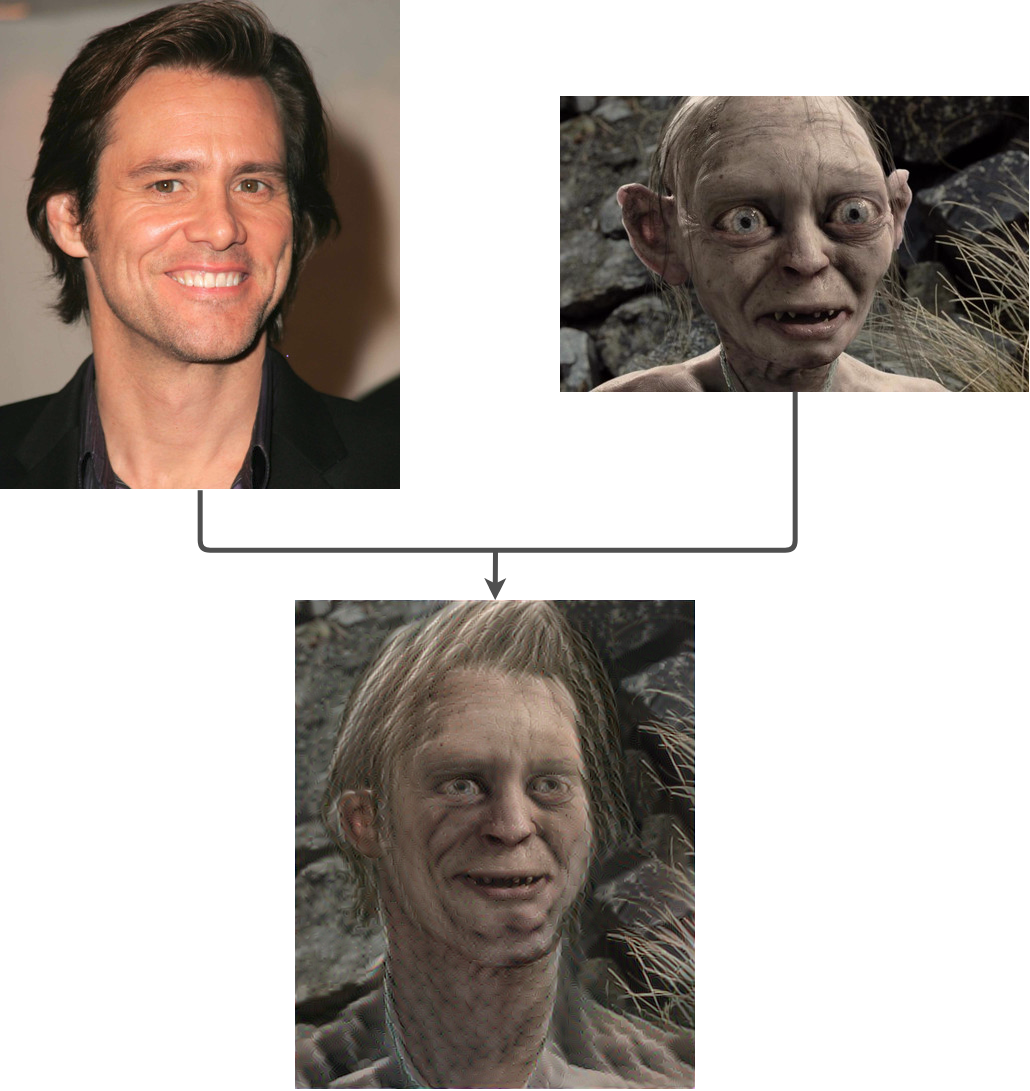
Suppose you are curious about how well Jim Carrey would fit in the Lord of the Rings. Furthermore, we will try to transfer the face of Jim Carrey into Gollum. One interesting way of doing this is using Gatys et al. style transfer method. But will this work properly? See the result for yourself:
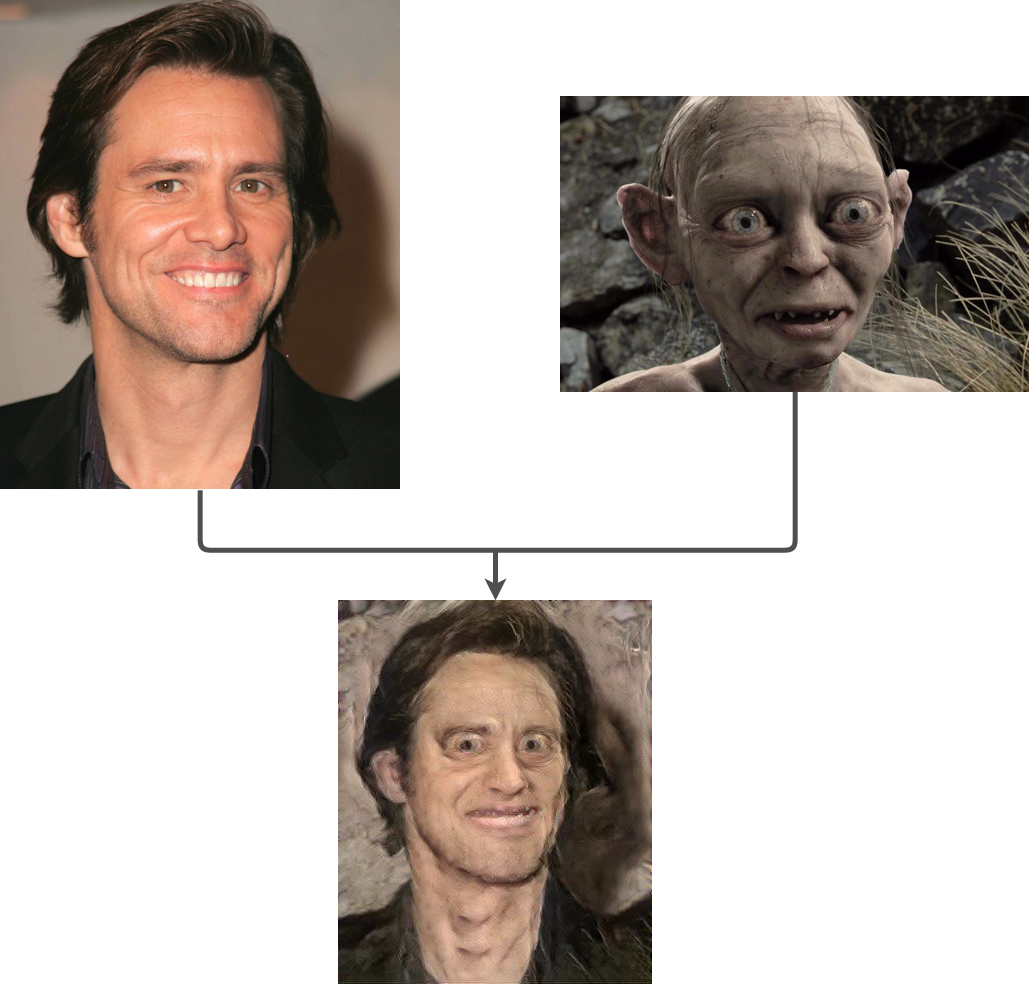
As you can see, the result is kind of a disaster. The output does not look at all like a face transfer from Jim to Gollum. On the contrary, it's just Jim's face with an annoying white texture and shades of brown and gray.
Seeing this result, a couple of questions arise. First of all, why did this happen? Second, how can we fix it?
In this article, we will guide you through the answer to both questions. We will pinpoint the limitations in Gatys et al. work and discover new techniques that improve the performance in tasks like face transfer.
Limitations in Gatys et al. style transfer approach
It is undeniable that Gatys et al. work on style transfer using deep neural nets was a pioneer. And, like all pioneer work, it's full of room for improvements. One aspect in which we could improve the original work is in the texture estimator. Recall from the first article that the authors propose it to be based on the Gram matrix.

The Gram matrix approach is great for artistic purposes, but it suffers when we want to have some control over which textures are transferred to each part of the result. The reason behind this is it destroys the semantics of the style image, only preserving the basic texture components. So we cannot, for example, transfer Gollum's nose style Carrey's one because the texture estimator has destroyed the hair information. We only have access to a global texture of the Morgan picture.
So let's go back to our face transfer example and try to rationalize what happened:
- Jim Carrey was used as content
- Gollum was used as style
- The semantic contents of the result and Carrey's image are very close
- The global texture of the result is also close to the global texture of Gollum's image. After all, the resulting face has a skin tone more similar to Gollum than the original Jim picture.
So we were able to pinpoint the problem right to the texture extractor. Now we need to know how to improve it, in order to make face transfer possible. We will make two improvements. The first is based on Li and Wand Combining Markov Random Fields and Convolutional Neural Networks for Image Synthesis paper. The second improvement is based on Alex Champandard's Semantic Style Transfer and Turning Two-Bit Doodles into Fine Artwork paper.
Li and Wand improvement
Li and Wand main contribution is spotting the limitations of the original texture extractor and propose a new one, based on Markov Random Fields (MRFs). For those not acquainted with the term, MRF is a probabilistic graphical model very used in image problems. In fact, it is considered a classic framework in image synthesis problems.
A natural question to have at this point is: what can MRF do that the Gram matrix can't? As it turns out, MRF does not destroy the semantic information of the style to transfer its texture to the final image. The new texture extractors work performing the following steps:
- Take higher level features of the style image and result image (using the output of the dCNN)
- Slice the features in small 'neural' patches (remember that high-level features are also images)
- Compare each patch of the resulting image with all patches of the style image
- For each patch of the resulting image choose the closest style patch and use its texture on the resulting patch
In our face transfer problem, the MRF method would do the following:
- Slice the resulting image (where a face is being synthesized)
- Choose a patch (e.g. patch with part of the chin on it)
- Find in Gollum's picture the patch more close to our current 'result patch'(hopefully Gollum's chin)
- Use the texture of this style patch on the resulting patch.
Observe that the texture transfer is occurring locally, patch by patch until the result is finished. We switched from the global Gram matrix texture transfer to the local patch MRF texture transfer. Regarding the mathematical formulation of the problem, the content extractor and the merging procedure by optimization remain the same. The only differences are the change in the style extractor and a prior term that is not that important to know.
Using this new approach in our face transfer problem, we get the following result:
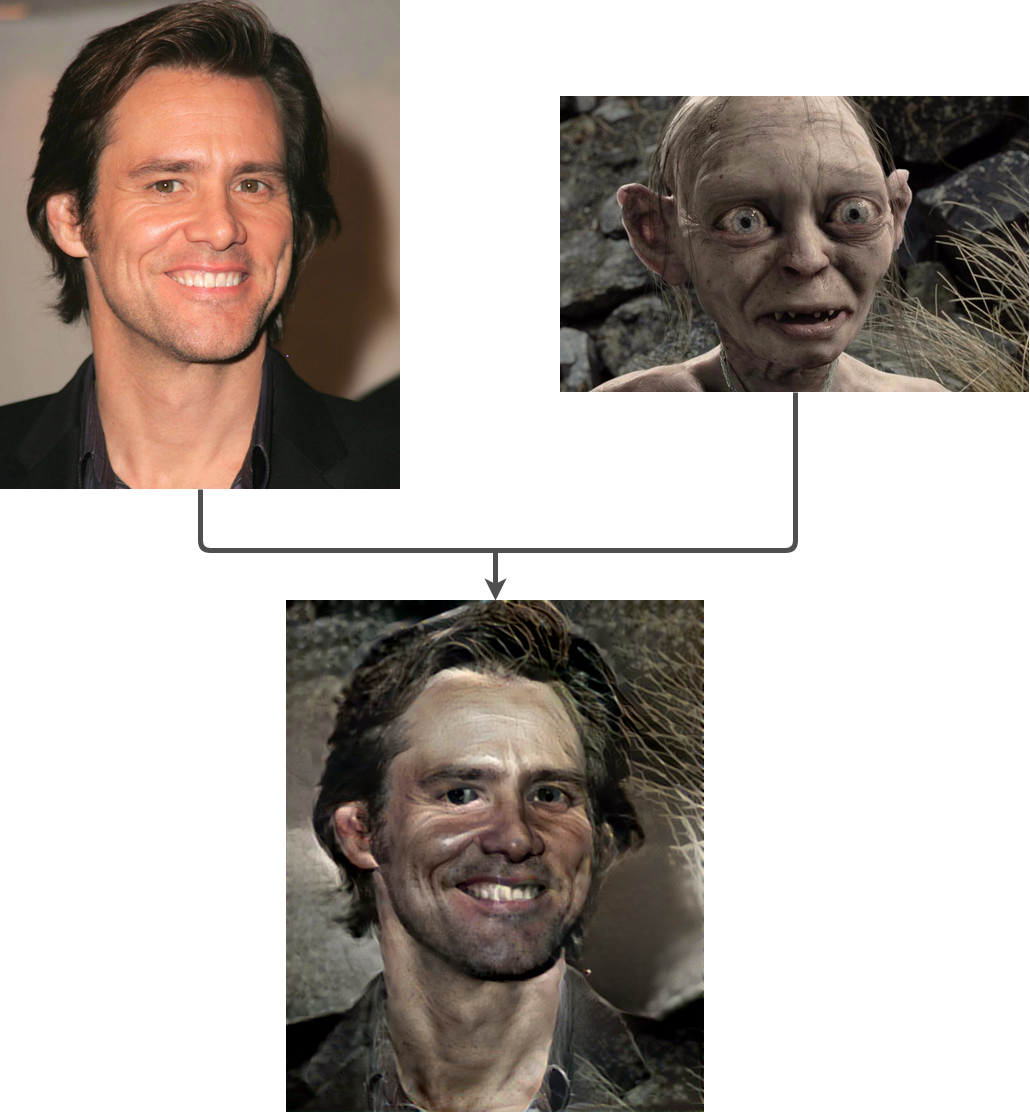
As you can see, the result is much better than our previous attempt. Now we have a proper face transfer, thanks to the new local texture extractor. Nevertheless, the result is not great yet. The picture has several artifacts, most of them take the form of the background of Gollum's image into Jim Carrey's hair.
The main reason behind this is patch mismatch, something that is quite difficult to control in the current method. Remember when we were looking for the best patch to match the chin of the resulting image? It would probably be Gollum's chin. However, due to differences in the images perspectives, the algorithm could select another part of the image as the best matching patch.
For improving our result, we could fine tune the optimization parameters and the size of the patches. This is definitely a way to go. Another option, which is more interesting for face transfer, would be using the method presented in Champandard paper. As we are going to see in the next section, this new approach improves the MRF suggestion of Li and Wand in a way that is ideal for our purpose.
Champandard improvement
Our last improvement is based on Champandard paper. The author main contribution is augmenting Li and Wand method to allow the user to control where each style transfer will occur. As it turns out, this is enough to solve the problem with patch mismatch.
To give the user more control over the style transfer process, Champandard the neural net to receive not only the content and style images but also their semantic maps. A semantic map is an image which highlights the features of the original image. Take a look at the example below:
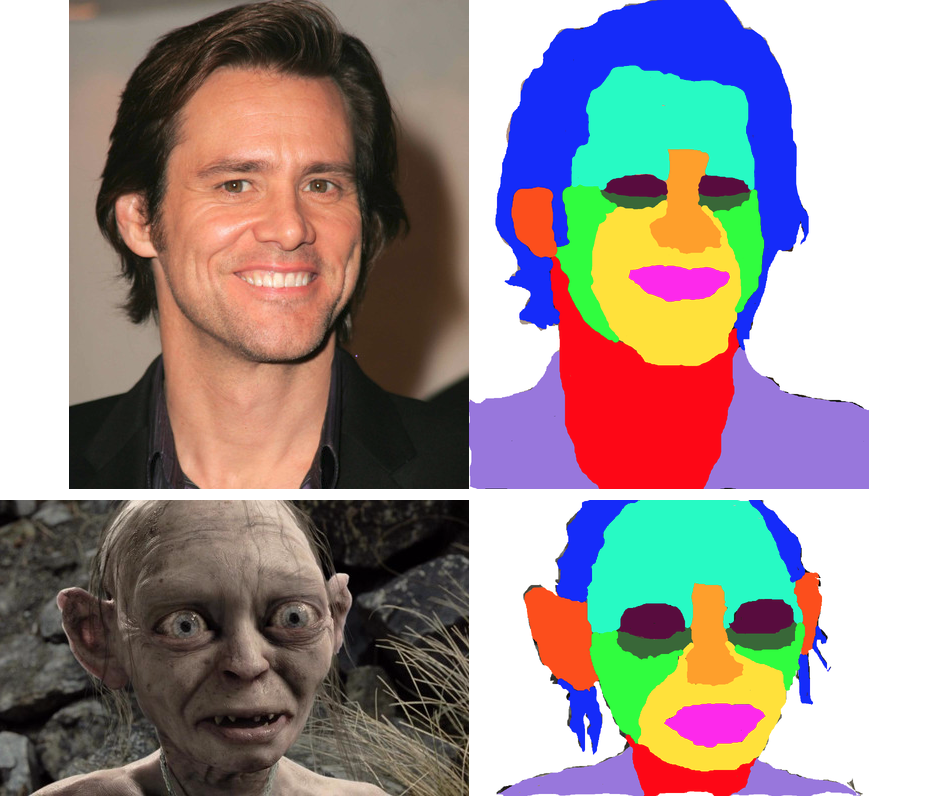
In the example, we can see a couple of semantic maps colored by hand, where ten features were encoded using different colors.
The idea behind the semantic map is to narrow down the space in which the algorithm looks for a patch match. For instance, if it is searching for the best mouth patch, it will put much more weight in the mouth patches of the style image. This way, it will be very unlikely that a patch mismatch occurs.
If we run Champandard method in our face transfer problem, we get the following result:
There is no doubt this is the best result we have seen so far. The output face looks like a face transfer from Jim Carrey into Gollum. Now that we have a good method to perform face transfer, let's see how it works in practice.
Running Champandard method for face transfer
To our luck, Champandard has shared the code for his paper on github. Just clone the repo, follow the installation guidelines or use the docker container and you're ready to go. Remember from the previous article that you must have a good GPU to be able to run it in a reasonable amount of time. Also, make sure you are using the recommended Theano and Lasagne versions. Lastly, I would strongly recommend not to use CuDNN v5. The recommended way to go is to use the virtual environment provided in the GitHub repo.
You will need to input the two images together with their semantic maps. If we are running with the default configurations, make sure you name the semantic maps as "original_image_name" + "_sem.png". You can control the style transferring by selecting the number of colors and painting the relevant areas. Also, for the particular case of face transfer, you should be careful with some parameters in order to get a good result. Regarding this aspect, a couple of friends and I did some investigation on how the parameters affect the result and we discovered some interesting guidelines:
- The most important parameters are: content-weight, style-weight and iterations
- If the number of iterations is low, the output will have a lot of neural noise (typical noise of convolutional neural nets)
- To get a really nice image, you should have a lot of iterations. The image converges really quickly, but it takes a fair amount of time to remove part of the neural noise. I recommend setting iterations = 1000. This takes about 40 - 50 minutes per image on a GTX 1080. So use it only when you already know what you want and you already did some testing
- To obtain the best transfer face, make sure that the content-weight/style-weight ratio is in the interval [0.6, 1].
For example, the command to run the example shown in this paper is:
python3 doodle.py --style samples/gollum.png --content samples/jim_carrey.png --output face_transfer.png --device=gpu0 --phases=4 --iterations=1000 --content-weight=10 --style-weight=10
Conclusion
Neural style transfer still is a new area of research. As such, there is plenty of room for improvements and new ideas. In this article, you got in touch with a new application of the method (face transfer). You learned:
- The traditional approach by Gatys and al. do not work properly for face transfer
- It took two improvements over Gatys et al. to get a method which worked well for face transfer
- To run your own face transfer projects, clone Champandard repo GitHub, follow the installation guidelines or open the docker container, create your semantic maps and make sure that the parameters are properly set.
As a suggestion for improvement, one could try to add to Champandard approach an algorithm to generate semantic maps automatically from the original images.
Resources
Below some further resources and the source code used to create the examples. Special thanks to the respective authors of the referenced code for the clarity in the implementation and wonderfully detailed readme's which makes it really easy to reproduce.
- Creating art with deep neural networks. First post of the series.
- Gatys et al. method, Neural Style transfer GitHub repo
- Li and Wand method, CNNMRF GitHub repo
- Champandard method, neural-doodle GitHub repo
To get started with your own ML-in-a-box setup, sign up here.