Introduction to image style transfer using deep learning
One of the most interesting discussions today around within machine learning is how it might impact and shape our cultural and artistic production in the next decades. Central to this discussion is the recent advances in image style transfer using deep learning. The main idea behind style transfer is to take two images, say, a photo of a person, and a painting, and use these to create a third image that combines the content of the former with the style of the later. The figure below shows an example using one photo of the author and the famous painting "The Scream" by Edvard Munch.
![]()
As we can imagine, this technique has tremendous potential -- it gives anyone the power to produce beautiful artwork, inspired by their favorite paintings, textures and etc. The technology that generates these images is also quite remarkable from a technology perspective and is worth understanding. In this article we will do a deep dive into how style transfer works and then use the power of deep learning style transfer to generate our own images. More specifically we will cover:
- What image style transfer is all about
- The original insight of using deep learning in this area
- How to run it on a Paperspace machine
Image style transfer
According to the academic literature, image style transfer is defined as follow: given two images on the input, synthesize a third image that has the semantic content of the first image and the texture/style of the second. To work properly we need a way to (1) determine the content and the style of any image (content/style extractor) and then (2) merge some arbitrary content with another arbitrary style (merger).

This definition of style transfer might seem a bit imprecise. Put another way, the central problem of style transfer revolves around our ability to come up with a clear way of computing the "content" of an image as distinct from computing the "style" of an image. Before deep learning arrived at the scene, researchers had been handcrafting methods to extract the content and texture of images, merge them and see if the results were interesting or garbage. Even in today's research of style transfer using deep learning there are high impact papers proposing new ways of using a neural network to extract the content, extract style or combine them.
Despite not having an exact idea of what content and style/texture are, we can develop a general idea of what we should expect in a good result to help narrow down our understanding of the problem. To help us in this task, take a look in the figure below. We see the original image of a wolf followed by a few synthesized images which use only the "content" of the wolf image and then merge with some well-known paintings styles. We can see that all images have the same high level attributes. They all contain the wolf and the landscape composed by some trees, the sky with some clouds and beautiful frozen mountains far way.
Even as the colors and the texture changes, the pictures still carry the same semantic content.

Now, take a look at the next series of images. Here we have the opposite situation. We have fixed one style (The Scream painting), and used several different images as content. As you can see, the final result always preserve the colors and the texture of our style.

This intuition developed above and the workflow explained at the beginning of the section are everything you need to know about transfer style to get started. Congratulations! You are one step closer of starting your own avant garde movement using computers as your brush. Now that we already know what transfer style is all about and that it has been researched before the dawn of deep learning, it is important to ask ourselves: why this subject got so much attention lately, when deep learning appeared in the scene? The two main reasons are that, before deep learning, texture transfer methods had at least one of these two shortcomings:
- did not preserve the semantic content of the content image well enough
- did not generalize well for images outside of a small subset of study cases
Deep Learning arrives
So what can deep learning offer us to improve style transfer? It turns out that deep learning techniques area really good at automated the extraction of high-level "features". Let's draw a parallel between what happened in the ML community and what happened in the texture transfer community. Imagine this scenario: people all around the world are training their ML algorithms without deep neural nets. Handcrafted feature engineering played a big role in the final performance of the algorithm. Then, deep learning arrives and suddenly you don't need the extract features anymore. The hidden layers of the neural net does all of the work for you and the results are better than ever!
Now, let's look at the texture transfer community. People were handcrafting ways of extracting content and texture of images to get better results. Then, one group of researchers led by Gatys asks the question: Why don't we let a deep neural network do the job for us, like the ML community did? So they tested this hypothesis and wrote an article called A Neural Algorithm of Artistic Style. The rest, as they say is history.
But hold on for a moment. Gatys et al. paper is full of equations, partial derivatives, correlations estimators and non-linear optimizations It does not seem so straightforward to read it or use it to produce new images. Specially for people without a strong mathematical background. Fortunately, you don't need to worry. Despite having a great deal of mathematics behind it, the idea of the paper comes down to the same workflow that we saw earlier: extract content, extract style, merge them and create a new image.
Gatys et al. paper explained
In order to fully explain Gatys et al. paper, we have to detail the three parts of the workflow: the content extractor, the style extractor and the merger. Let's begin with the content extractor.
Content extractor
We need a way to separate the semantic content of an image. Fortunately there is already a special kind of deep neural network suited for this job, called the convolutional neural network (CNN). This neural net has an architecture that is inspired by some of the mechanisms present in our visual system and its main use is in computer vision problems.
It is known that the hidden layers of a convolutional neural network extract high level features of an image (the deeper the layer, the more high level the attributes will be that the layer identifies). Knowing this, the researchers took a pre-trained VGG 19 neural net , made some slight tweaks in the weights to adapt to their problem and then used the output of one of the hidden layers as a content extractor.

The style extractor use the same idea of the content extractor (i.e. use the output of a hidden layer), but it adds one more step. It uses a correlation estimator based on the Gram matrix of the filters of a given hidden layer. Which is just a complicated sentence that means: it destroys semantics of the image, but preserves its basics components, making a good texture extractor.

Merger
As the final step, we need a way to blend the content of one image with the style of another. This is done with the help of an optimization problem. An optimization problem is a mathematical problem where we define a cost function, which we want to minimize. Generally, the cost function decreases in every iteration of the optimization, assuming it has not arrived at a minimum. Therefore, we can expect that each iteration of the optimization gets our cost function closer to our goal.
Now, how can we use optimization to merge arbitrary content with arbitrary style? Gatys et al. approach was to create a cost function which penalizes the synthesized image if its content was not equal to the desired content and its style was not equal to the desired style.
To help us understand the algorithm behind the optimization in more detail, let's create some name conventions:
- content image:
content_image - style image:
style_image - final synthesized image:
our_image
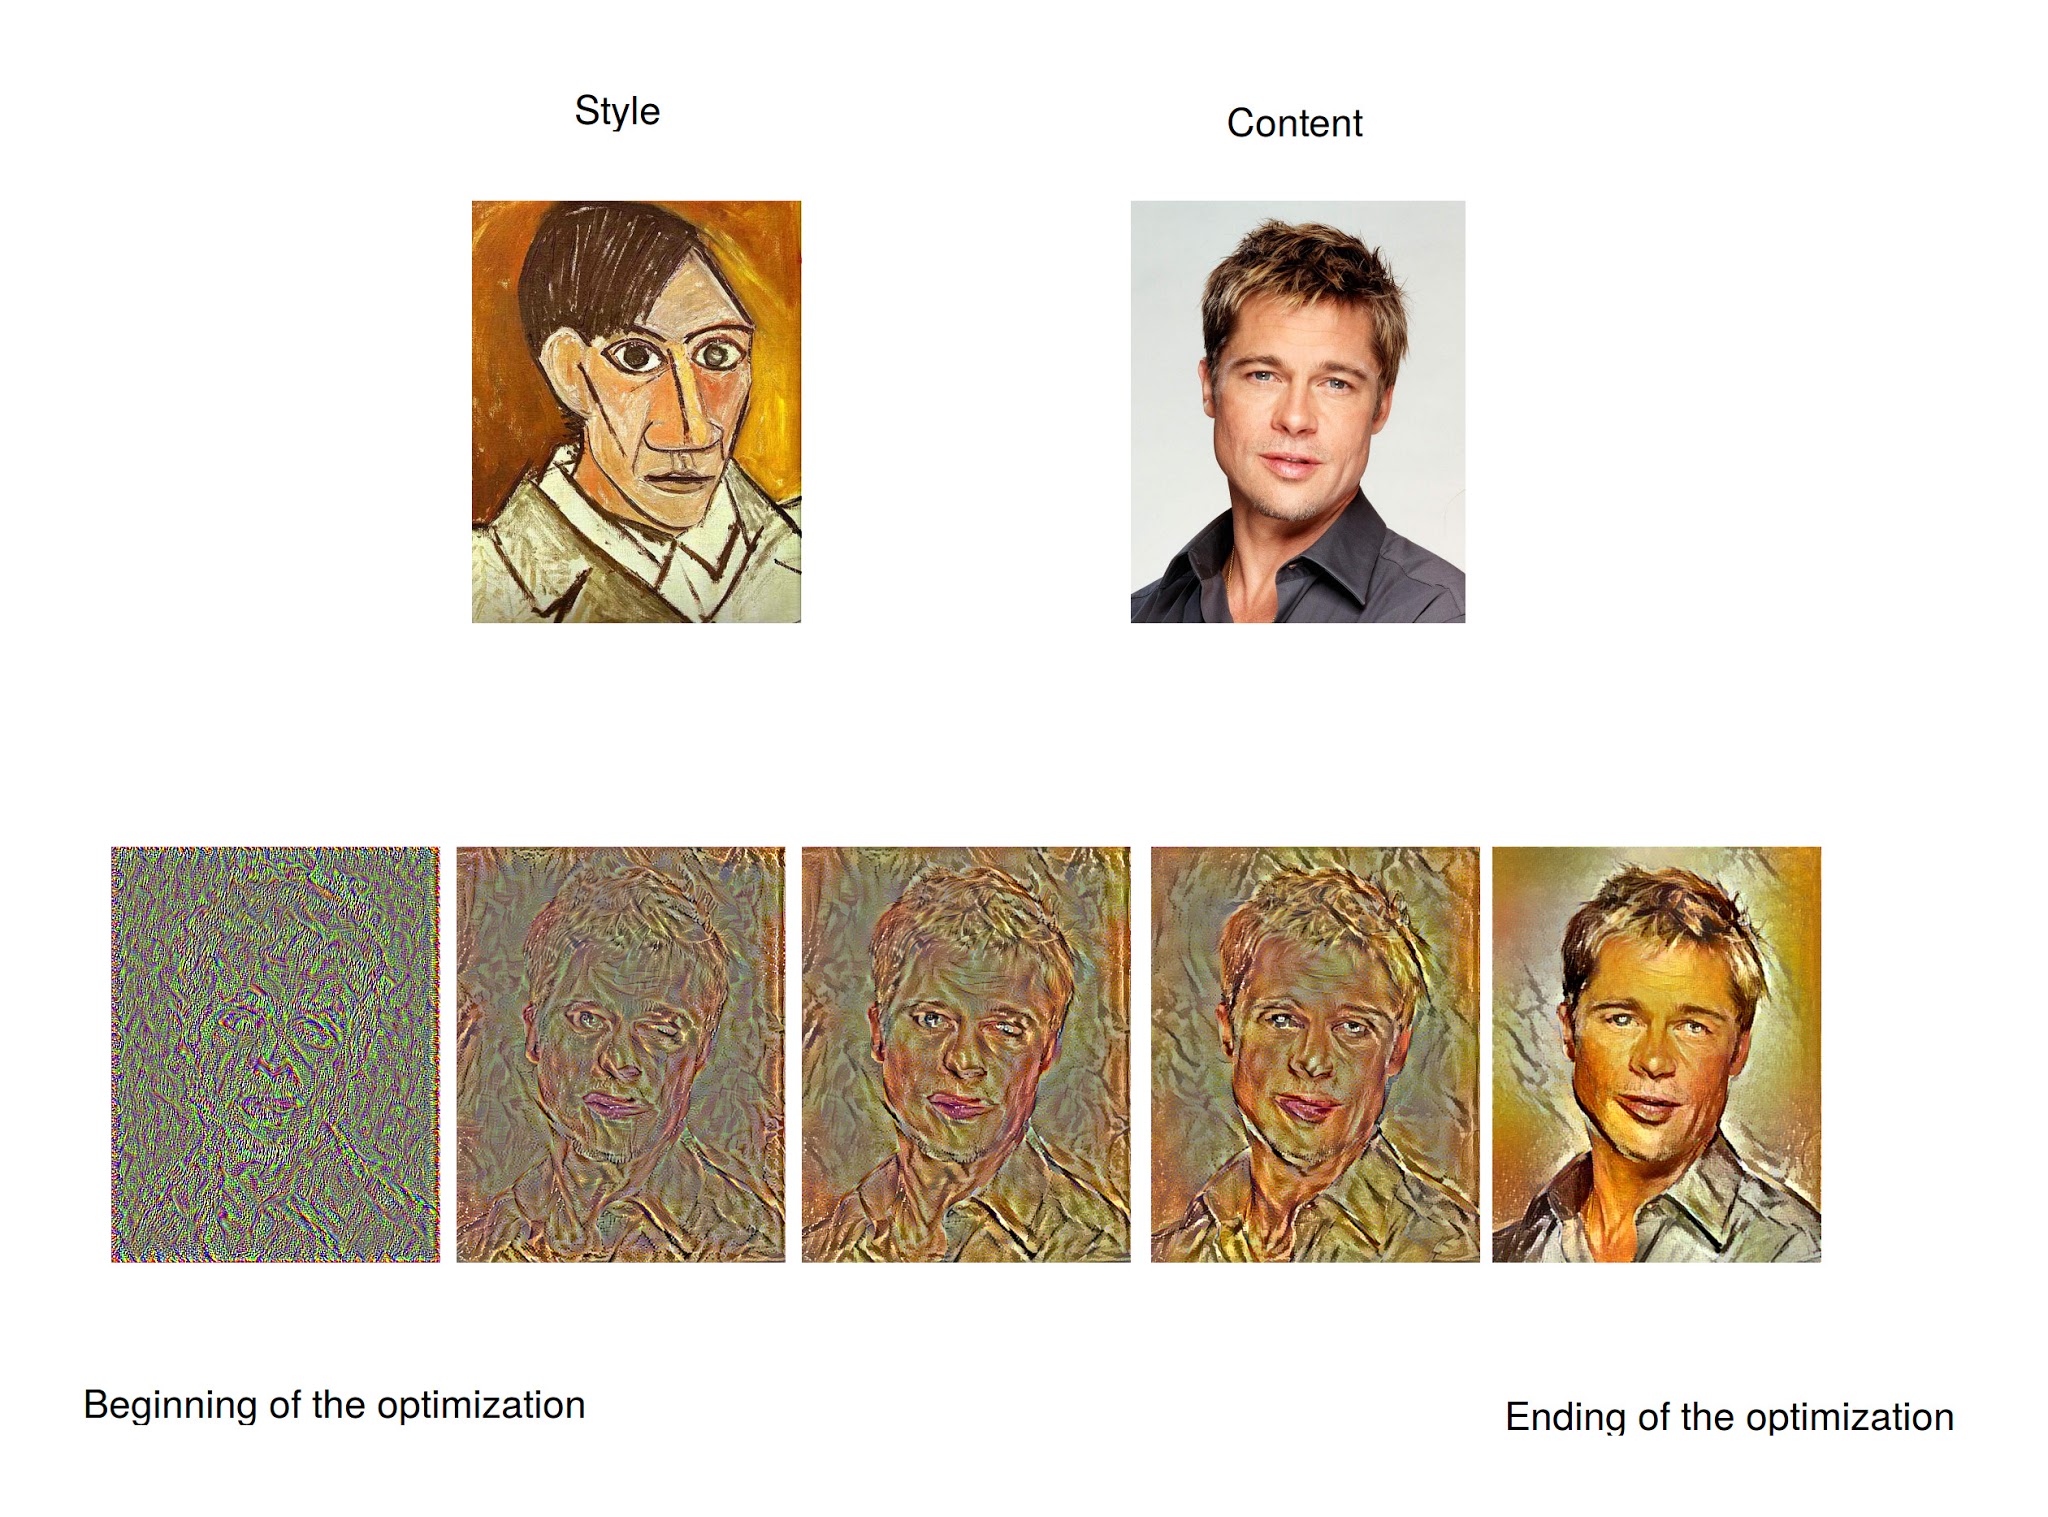
The steps behind the optimization are the following:
- synthesize a white noise image
- extract the content and the style of
our_image - calculate the distance between the content of
our_imageand the content ofcontent_image - calculate the distance between the style of
our_imageand the style ofstyle_image - calculate the cost function and the gradient
- If the gradient is zero, end the optimization
- If the gradient is not zero, run one more iteration of the optimization. This will generate a new
our_image, that is closer tocontent_imagecontent-wise, and is closer tostyle_imagestyle-wise. - If the preset number of iterations is achieved, finish. Otherwise, go back to
step 2.
And that's it! You are not equipped to understand the amazing ideas that were responsible for the birth of deep learning style transfer. There are just a couple of details that you should also know. The method gives you freedom to choose the hidden layer(s) you want to use as extractors. I would recommend the use of the layers suggested by the researchers, because they probably test a lot of options before writing the article. Furthermore, in the optimization problem you can set the relative weight between the content and the style. If you give more importance to the content, the final result will have more of the semantics of content_image at the cost of less texture of style_image. If you give more importance to the style, the contrary will happen.
Running style transfer on a Paperspace machine
Ok s now lets create some art ourselves and have some fun. In this section, we will download a repository with an implementation of Gatys el al. paper and use it to produce some cool images.
Assuming you are running a machine with Ubuntu and all the prerequisite deep learning packages, we can just clone the repository and use it. This particular implementation is built on Keras (a high-level library that wraps more low-level libraries) and has a lot of extra functionality, besides the original ideas of Gatys et al. For those more curious in implementation details it is worth noting that the code doesn't follow the exact recommendations of the Gatys et al method. Nevertheless, it stays loyal to the original ideas, while adding others of more recent papers. To clone the repository, just open the terminal and type:
git clone https://github.com/titu1994/Neural-Style-Transfer.git
After the download is finished, you already have everything you need to start creating. Let's see how to run the program. First, enter the folder of the project:
cd Neural-Style-Transfer
In this folder, we have the INetwork.py program. The simplest way of running it is:
python INetwork "/path/to/content_image" "path/to/style_image" "/path/to/result"
Let's see an example, using images already available at the repository:
python INetwork /images/inputs/content/winter-wolf.jpg /images/inputs/style/the_scream.jpg my_first_artwork
The final result will be the familiar winter wolf with the style of "The Scream".
A note about performance: Regarding performance, with the default setup and images with size equal to a few hundred KB, the algorithm takes only 6 minutes to finish on a modern 8 GB Nvidia GPU. Running the same model on an Intel i7 took an hour and a half! Using just a CPU is too slow and it takes away the fun of experimenting with new images or new algorithms so we recommend using a GPU if possible. Additionally, using bigger images will require more memory from the GPU and will take longer to produce the final result.
The program INetwork.py has a lot of parameters to use additional functionalities, control some aspects of the optimization and etc. Two that are worth mentioning here are the weight of the content and the weight of the style. These parameters have the default value of 0.025 and 1.0, respectively. If you want to change them, just follow the example below:
python INetwork /images/inputs/content/winter-wolf.jpg /images/inputs/style/the_scream.jpg my_second_artwork --style_weight="some_value" --content_weight="some_value"
You will see that the final image may change, as you give more priority to the content or the style.
Conclusion
Hopefully you now understand some of the insights that gave rise to transfer learning.
The best way to learn, of course, is to run these programs yourself so I recommend playing with the INetwork program and test some of its parameters. There are also other great open source style transfer projects available at GitHub, both in Python and Torch (Lua). To mention just a few: neural-doodle by alexjc (Python) and fast-neural-style by jcjohnson (Lua).
For those interested in additional technical details, I recommend the reading Image Style Transfer Using Convolutional Neural Networks which is the follow-up article to A Neural Algorithm of Artistic Style and gives more details about the original technique. Also, some new ideas on transfer style can be found on Perceptual Losses for Real-Time Style Transfer and Super-Resolution and Semantic Style Transfer and Turning Two-Bit Doodles into Fine Artwork. While the former deals with performing style transfer in real time, the latter deals with the addition of semantic annotations by using doodles.
To get started with your own ML-in-a-box setup, sign up here.