Bring this project to life
Last month, the release of Segment Anything opened the door to a whole new world of applications based on image segmentation and object detection deep learning techniques. A notable example of this is the work being done by IDEA Research with their line of Grounded Segment Anything models and applications. Their automatic label demo was the key inspiration and the framework which we based this project upon.
Segment Anything is a fantastic new model from Meta which is able to completely segment any input image down to it's component objects. While this process is undoubtedly powerful, it requires direct supervision in the form of object labels and coordinates to select an individual mask for object detection. On top of that, the SA model is fairly computationally expensive to run: extracting every mask from the image is costly and time consuming. These factors make it difficult for Segment Anything to replace the currently extant SOTA object detection models, like Ultralytics YOLOv8. Even the largest of these models are significantly less expensive to train and run inference with in comparison to SAM.
On the other hand, training object detection models like YOLO requires hours of work manually labeling images with accurate object annotations. This creates an immediate problem for users seeking to create their own, custom object detection models, as they need to use a third party service like the awesome RoboFlow to process the image data. While RoboFlow and similar tools are extremely powerful, they require manual work from human actors for accurate object labeling.
We noticed that these problems do not potentiate one another, but actually combine to represent an actionable path towards a fully automated object detection pipeline. By leveraging SAM and GroundingDINO with supporting text models, we can automatically annotate images without manual intervention. Then, we can pass those images onto train a less-expensive-to-run Ultralytics YOLOv8 model. Thanks to the innovative work Ultralytics has done to turn YOLOv8 into a more robust API, the YOLO model can then be applied in various applications where the computational expense of SAM would make it impractical to use in real-time applications.
In this article, we will look in depth at how we integrated these two frameworks together in a Gradio application. We will start with a discussion of the component deep learning models: YOLOv8, Segment Anything, BLIP-2, GroundingDINO, and Dolly v2. We will then walkthrough each of the application pages, and conclude by showing how to run the application from a Gradient Notebook.
The AutoYOLO application
The AutoYOLO application is a Gradio based application designed to run in a Paperspace Gradient Notebook. In this section, we will introduce the pipeline subcomponents used in the application, and then walkthrough an overview of the fully integrated pipeline. The overview contains selected highlights of the codebase. For a full look at the code used in this application and tutorial, be sure to check out the official Github repository.
Pipeline components
The AutoYOLO application is an integrated pipeline of several foundation models. The most important of these frameworks are BLIP-2, Dolly v2, GroundingDINO, Segment Anything, and Ultralytics YOLOv8.
In this section, we will discuss each of these to give some context to their capabilities in the pipeline.
BLIP-2
BLIP-2 can be used for conditional text generation given an image and an optional text prompt. It is what we use to determine the context of the image for Dolly v2 to later parse. BLIP-2 itself leverages frozen pre-trained image encoders and large language models (LLMs) by training a lightweight, 12-layer Transformer encoder in between them, achieving state-of-the-art performance on various vision-language tasks. (source)
Dolly v2
Databricks’ dolly-v2-12b, is an instruction-following LLM that is licensed for commercial use. It was initially based on pythia-12b. To improve upon pythia, Dolly was trained on a set of ~15k instruction/response fine tuning records (databricks-dolly-15k) generated by Databricks employees in capability domains from the InstructGPT paper, including brainstorming, classification, closed QA, generation, information extraction, open QA and summarization. dolly-v2-12b is not a state-of-the-art model, but does exhibit surprisingly high quality instruction following behavior not characteristic of the foundation model on which it is based. We chose to use this model as it was one of the highest performing, fully open-sourced LLM's available at the time of the start of the project. (source)
Grounding DINO
Grounding DINO is a powerful, open-set object detector. By marrying Transformer-based detector DINO with grounded pre-training, Grounding DINO can make detections of arbitrary objects with simple human inputs such as category names or expressions. To effectively fuse language and vision modalities, Grounding DINO conceptually divides a closed-set detector into three phases and utilizes a tight fusion solution. This includes a feature enhancer, a language-guided query selection, and a cross-modality decoder for cross-modality fusion. (source)
Segment Anything
Segment Anything (SA) is a new task, model, and dataset for image segmentation. This is currently the the largest segmentation dataset to date (by far), with over 1 billion masks on 11M licensed and privacy respecting images. To make it easy to use, the model is designed and trained to be promptable, so it can transfer its zero-shot understanding to new image distributions and tasks. The research team that created it found that it was often competitive with or even superior to prior fully supervised results.(source)
Ultralytics YOLOv8
UltralyticsYOLOv8 is a cutting-edge, state-of-the-art (SOTA) model that builds upon the success of previous YOLO versions and introduces new features and improvements to further boost performance and flexibility. YOLOv8 is designed to be fast, accurate, and easy to use, making it an excellent choice for a wide range of object detection and tracking, instance segmentation, image classification and pose estimation tasks. (source)
Read our full breakdown of Ultralytics YOLOv8 here, and see how you can train custom YOLOv8 models from a Gradient Notebook for a more granular approach or if we want to use datasets from providers like RoboFlow.
Application walkthrough
Overview:
In short, the application works by providing an interface to either automatically label images with Dolly v2, BLIP-2, Segment Anything, and GroundingDINO, or using our GLIGEN based manual labeler. From there, we can view our images in the Image Gallery tab. Once we are satisfied we have sufficient labeled image data, we can use the Ultralytics YOLOv8 training tab to train a model. Finally, the inference tab lets us quickly test our models on inputted videos and images.
Let's take a closer look at each section.
AutoLabel Images:
The first tab is the tab where most of the innovation in this app can be found. On this page, we can upload a large number of images to be automatically labeled with bounding boxes over the desired objects. To set which objects will be sought, we can fill in the field "Targeted annotation labels (seperated by semicolon with no spaces)" with the corresponding target labels. At each step of the loop, each of the images will be saved with their corresponding labels in the relevant subdirectories within /notebooks/datasets/<name>/.
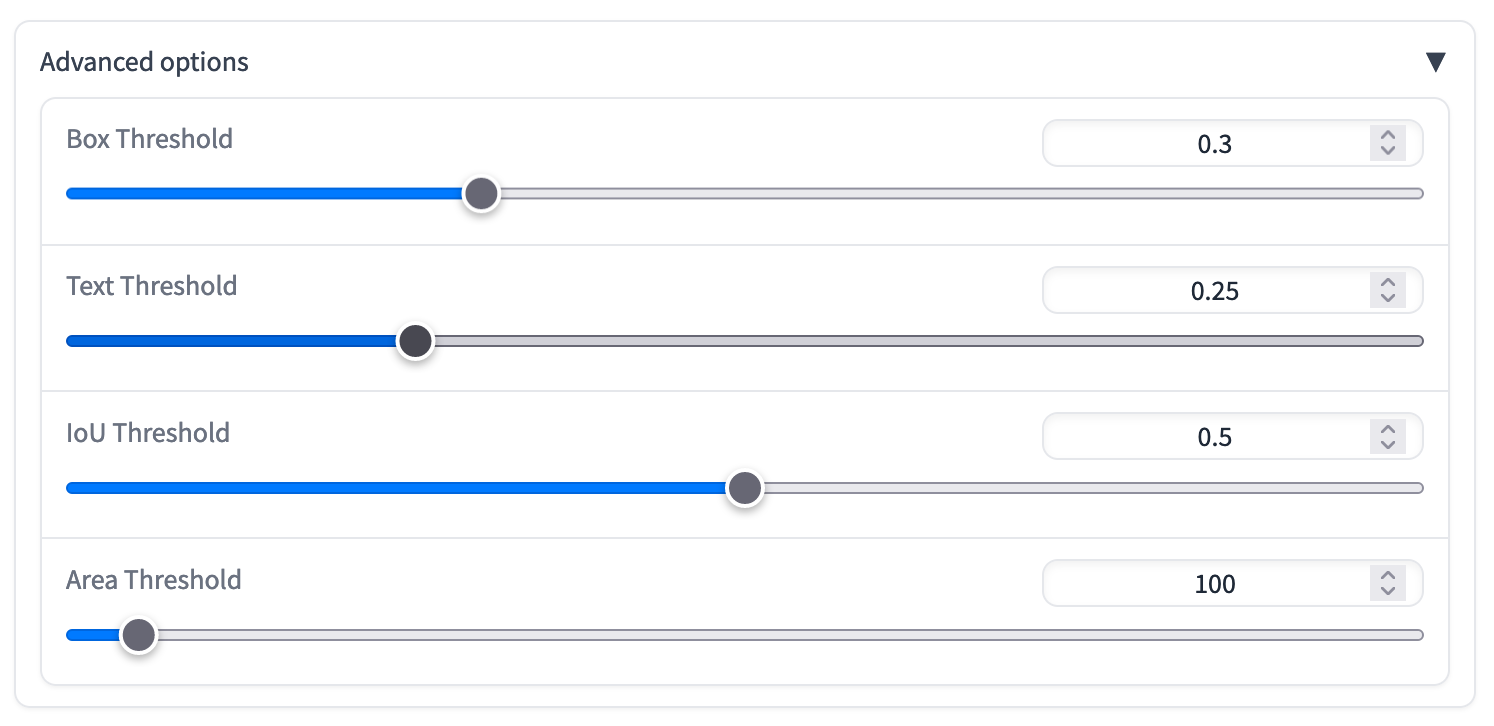
Just below this first section is the advanced options dropdown. Using these sliders, pictured above, we can adjust the following:
- Area threshold: Automatically removes the mask when detected object's area is less than the value of
area_thresh(in pixels) - Text threshold: This is the minimum score that SAM will consider the prediction for the text to be a true prediction. Those below will be removed
- IoU threshold: Intersection over Union (IoU) is an evaluation metric used to measure the accuracy of an object detector on a particular dataset. This measures how much area of predicted grounding box and the true box overlap, and removes any that are below that threshold. This helps to remove any examples that were out of scope for SAM and GroundingDINO to detect
- Area threshold: minimum size for a detected mask of an object. Any detected objects with area sizes below this value are removed. This helps prevent mistaken predictions with small objects that SAM cannot accurately segment in the initial processing stage
When we click the Run button, it will trigger the object label prediction loop. If this is a new dataset, which is set with the "Dataset Name" field, then it will create two new directories: /notebooks/<name> and notebooks/datasets/<name>. The former will be get a new, corresponding data.yaml config file with the target labels, number of categories, and image/label paths automatically filled in. In the latter, new directories for the labels, images, masks, and metadata (labeled_images) are created. These will be automatically filled in as the prediction loop progresses.
During annotation of an individual image, the target values will be passed to Dolly V2, which will process it using a specialized instruction, along with a BLIP-2 extracted caption of the input image for the desired objects. If those objects are found in the prompt, the corresponding bounding boxes for each will be determined using GroundingDINO and Segment Anything to locate the position of the object in question with a matching label. These values are then filled in a label text file. The corresponding images and label files are saved with the same name as .jpg and .txt files. Additionally, metadata is saved in the labeled_imgs directory, and masks are saved in masks. The app will use these for display purposes later. This continues through the entire list of submissions until completed.
Once the AutoLabeler has completed its run, we can now go through an interactive gallery of the labeled images on the right of the tab page. Selecting an image will pull up the unedited, original caption, the image masks, and the full list of possible tags present in the image.
Notice in the most recent video above, that there are some obvious errors from this autolabel run. For example, one of those two giraffes was labeled a person by the application. The limitations of SAM as a zero-shot model mean that there will be frequent errors, and large datasets are likely the only way to mitigate the effect of the occasional mislabeling. Of course, we can also go to the next tab, and do the labels manually. It's also worth noting that the top speed we have recorded for the autolabeler is around 2 images per minute on a high powered A100 GPU. We will seek to improve this speed in subsequent releases.
Manually Label Images
Sometimes, we may need to supplement the automatically labeled images with manually labeled images to make sure we have the exact bounding box coordinates we need with the correct labels. Perhaps this could happen on a more unique dataset that is out of scope for SAM in its current form, like detecting hand signs for American Sign Language or animal cell type detection.
This manual labeler is largely constructed using code adapted from the official GLIGEN demo, and we want to make sure credit is given for their awesome work creating the interactive sketchpad we use in this section.
To use the manual labeler, we can use the radio buttons to toggle single uploads or bulk uploads. For single uploads, simply drag and drop your image onto the field on the right. For bulk uploads, select the set of images to upload, and then click each file to move it to the sketchpad. Subsequent clicks will clear the sketchpad.
Once our image is in the sketchpad, we can begin drawing labels. Using our drawing, the sketchpad will determine and draw a corresponding bounding box. The labels for the bounding boxes will correspond to the semicolon separated list and the order of the drawings we make. Once the object is fully labeled, hit 'generate labels' to save the labels and image. If using the single uploader, hit the clear sketchpad button between uploads to clear the tab's state and enable the labeling of another image
Once again, if this a new dataset name is used, it will again generate a corresponding set of directories and YAML config file.
Image Gallery
This is the most straightforward tab. Here we can view the training and validation set galleries of images for each dataset. These are the unlabeled images, so use the gallery in 'AutoLabel Images' to view the masks.
Train YOLOv8
The training tab let's us use our newly labeled datasets to train YOLOv8 models. Each of the model types is available using the radio buttons, and we can select the dataset of choice using the dropdown on the left. We can then edit our batch size and total number of epochs using the sliders on the right.
After training is completed, an additional validation test is run, and recorded onto the table in the middle of the page. At the bottom, there is a dropdown we can use to select from previous training runs. Upon selection, the best.pt checkpoint will be made available for download. We can then use this checkpoint in any other context we so desire. If we want to test the checkpoint, we can do so using the infer tab.
Inference with YOLOv8
The inference with YOLOv8 tab is where we can test out the best models from our training runs. Next, we select the model you'd like to test from the dropdown list and it's model type using the radio buttons (it should override this if the wrong selection is made here, so don't worry if we can't remember which type we trained). Finally, to submit a photo or video, we can either use the file type radio button to toggle to uploading a video or image file, or we can submit a video URL from YouTube or image URL using the URL submission field. The application will know not to use the URL bar unless it is filled in, as well as the image and video upload boxes.
After running the prediction, we will get the full results output from YOLOv8 in a textbox on the left, and the image/video with the overlaid bounding box coordinates on the right. Here is an example output video we made using a "fruit" dataset with labels for oranges, apples, and bananas.
How to run AutoYOLO in Paperspace
Bring this project to life
Running AutoYOLO is actually very simple! Click the link above to open the repo in a Gradient Notebook on a Free GPU. We can later change to a more powerful GPU, if we need to, using the machine selection.
Once the Notebook has spun up, open up AutoYOLO.ipynb to begin setup. The first cell will download the required packages and model files onto our environment, as well us log us in anonymously to Weights and Biases. This is only to prevent a blocker from running the code in a notebook cell. We can log into our own weights and biases account, as well, if we want to.
Once set up is complete, the last Notebook cell will launch the application. This will then give us a public Gradio link that can be accessed from any internet browser. Click on the link to open up the application, and from there we can begin labeling!
Closing Thoughts
We plan to keep working on improving this project in the coming months, but are releasing the project open source so that others may iterate upon the initial work we have done here. Our goal is to create a means for users to easily train their own custom object detection models, and create an environment where even no-code users can succesfully train models on their own.
Look out for more updates on the project repo in the near future!
Next steps include:
- Integrating with RoboFlow to enable training on the application with existing projects and Universe datasets
- Streaming video object detection for real time viewing and interaction with the object detection model
- Add in additional text models (GPT4All, MTB-7B, Otter, etc.) to enable multimodal integration. This would potentially remove BLIP-2 from the pipeline and speed up processing