Identifying the ideal framework for running a distributed, multi-gpu deep learning script can be a challenge, to put it mildly. There are a wide variety of options out there, such as DeepSpeed, Horovod, or Apache Singha, and each offers different benefits and disadvantages. Many of these libraries are still in active development and improvement, rendering it premature for any superior option to rise above the competition. As a result, selecting which library to utilize takes both time and practice, as well as foreknowledge of the overall complications that come with adapting to the libraries usually distinct methodologies.
While it can be difficult to get started, parallel and distributed computing libraries are an amazingly powerful tool universal utility cannot be underestimated. Working with Big Data can be extremely computationally expensive, and the cost is only compounded when you are using deep learning techniques. In particular, DL tasks using large neural network architectures such as image generation GANs, can be impossible to run on a single GPU without running out of memory. As a result, it's increasingly inefficient to perform many base line DL tasks on a single machine.
One of the distributed deep learning libraries to we advocate you check out is Colossal AI from HPC-AI Tech, first introduced in "Colossal-AI: A Unified Deep Learning System For Large-Scale Parallel Training" by Bian et al. in October of 2021. Colossal AI is "a unified parallel training system designed to seamlessly integrate different paradigms of parallelization techniques including data parallelism, pipeline parallelism, multiple tensor parallelism, and sequence parallelism"(1). Colossal AI does an excellent job of simplifying and facilitating the adaptation of PyTorch deep learning code to a distributed system.
In this blogpost, we will look at an adaptation of a sample demo from the Colossal AI example repo that trains a ResNet34 classifier on the CIFAR10 dataset running on a Gradient Notebook. The provided method for executing the distributed training is highly modifiable, so readers can expect to be able to take this tutorial and apply the same thinking to a number of different applications.
Getting Started
Bring this project to life
Go to the Gradient Notebook creation page in a Team and Project space of your choice. There, select the PyTorch Runtime from the recommended selections, and then scroll down to the machine selection section. If you are on the Growth plan, you can access several multi-gpu Notebooks, including options for A4000 x 2 , A6000 x 2 , A6000 x 4, and A100 GPU x 2 instances. If you are not, don't worry! Colossal AI works both in single GPU and multi-GPU environments. Thus, free users can follow this tutorial even on a Free-GPU notebook.
We used an A6000 x 2. Once you've finished the machine selection, scroll to the bottom of the page before toggling the "Advanced Options" settings. Set the Workspace URL to the relevant GitHub repo: https://github.com/hpcaitech/ColossalAI-examples
Once you've finished pasting the URL, you can start the Notebook using the button on the bottom left. This will put you inside the running Notebook.
Once inside the running Notebook, first go to the terminal (or use line magic in a notebook) to make a new directory CIFAR10. We will need it for later. Next, navigate to the folder image/resnet, and click on the file run_resnet_cifar10_with_engine.py. We are going to make some edits to make this run smoothly when we call the training loop (in a moment).
The Colossal AI Methodology
from pathlib import Path
from colossalai.logging import get_dist_logger
import colossalai
import torch
import os
from colossalai.core import global_context as gpc
from colossalai.utils import get_dataloader
from torchvision import transforms
from colossalai.nn.lr_scheduler import CosineAnnealingLR
from torchvision.datasets import CIFAR10
from torchvision.models import resnet34
from tqdm import tqdm
Now that we are in the script, we can begin looking through the code. Let's walk through each of the steps used to first train, and then evaluate the dataset described in the file. Above are the relevant imports to run this script. Be sure to install Colossal AI and Torchvision before running the code below. You can install them easily by running the following in the terminal:pip install torchvision colossalai
def main():
    colossalai.launch_from_torch(config='./config.py')

    logger = get_dist_logger()

    # build resnet
    model = resnet34(num_classes=10)
Starting on Line 15, we have the main() function, which runs the entirety of the training and evaluation code. Our function first creates a wrapper for colossalai.launch for torch.distributed.launch by reading rank and world size from the environment variables set by PyTorch and the config.py file. This configuration for training by assigning the BATCH_SIZE to 128, NUM_EPOCHS to 2, and to use automatic mixed training.
We then instantiate a logger using the provided get_dist_logger() before building the ResNet34 model. Since we are going to train the dataset on CIFAR10, the number of classes is set to 10.
 # build dataloaders
    train_dataset = CIFAR10(
        root=Path('~/../CIFAR10/'),
        download=False,
        transform=transforms.Compose(
            [
                transforms.RandomCrop(size=32, padding=4),
                transforms.RandomHorizontalFlip(),
                transforms.ToTensor(),
                transforms.Normalize(mean=[0.4914, 0.4822, 0.4465], std=[
                    0.2023, 0.1994, 0.2010]),
            ]
        )
    )

    test_dataset = CIFAR10(
        root=Path('~/../CIFAR10/'),
        train=False,
        transform=transforms.Compose(
            [
                transforms.ToTensor(),
                transforms.Normalize(mean=[0.4914, 0.4822, 0.4465], std=[
                    0.2023, 0.1994, 0.2010]),
            ]
        )
    )

    train_dataloader = get_dataloader(dataset=train_dataset,
                                      shuffle=True,
                                      batch_size=gpc.config.BATCH_SIZE,
                                      num_workers=1,
                                      pin_memory=True,
                                      )

    test_dataloader = get_dataloader(dataset=test_dataset,
                                     add_sampler=False,
                                     batch_size=gpc.config.BATCH_SIZE,
                                     num_workers=1,
                                     pin_memory=True,
                                     )
Next, we load in the datasets for the test and train portions of CIFAR10. We chose to change the root variable for CIFAR10 (and therefore it's directory location) to the /notebooks directory so that it will be easy to interact with.
In each instance, we transform the images to tensors and normalize them. The provided means and standard deviations were calculated previously from the PyTorch CIFAR repo. Upon completion, the get_dataloader function instantiates the dataloaders that we will use in the training loop. The images are shuffled, and the batch size is 128 from the configuration file reading used earlier.
# build criterion
    criterion = torch.nn.CrossEntropyLoss()

    # optimizer
    optimizer = torch.optim.SGD(model.parameters(), lr=0.1, momentum=0.9, weight_decay=5e-4)

    # lr_scheduler
    lr_scheduler = CosineAnnealingLR(optimizer, total_steps=gpc.config.NUM_EPOCHS)

    engine, train_dataloader, test_dataloader, _ = colossalai.initialize(model,optimizer,criterion,train_dataloader,test_dataloader,)
We will use the CrossEntropyLoss() loss function as our criterion, and Stochastic Gradient Descent as our optimizer, with a relatively low initial learning rate of .1. We will then instantiate our LR_scheduler to decay the learning rate apropriately for every epoch on a Cosine schedule.
Finally, we finish set up by initializing Colossal AI using the ResNet34 model, the Stochastic Gradient Descent optimizer, Cross Entropy Loss criterion, and our train and test dataloaders. This will output the engine that will represent our model and the relevant dataloaders all operating within the Colossal AI distribution code.
for epoch in range(gpc.config.NUM_EPOCHS):
    engine.train()
    if gpc.get_global_rank() == 0:
        train_dl = tqdm(train_dataloader)
    else:
        train_dl = train_dataloader
    for img, label in train_dl:
        img = img.cuda()
        label = label.cuda()

        engine.zero_grad()
        output = engine(img)
        train_loss = engine.criterion(output, label)
        engine.backward(train_loss)
        engine.step()
    lr_scheduler.step()

    engine.eval()
    correct = 0
    total = 0
    for img, label in test_dataloader:
        img = img.cuda()
        label = label.cuda()

        with torch.no_grad():
            output = engine(img)
            test_loss = engine.criterion(output, label)
        pred = torch.argmax(output, dim=-1)
        correct += torch.sum(pred == label)
        total += img.size(0)
For the training loop, the number of epochs we set in the config determines the number of epochs the training loop will undergo. For each epoch, we must set the engine to training mode. We then set the loop to display the training progress for the engine on this node, which we can track as it works through the shuffled training data. For each image and label in the training dataloader, each image and label is first converted to CUDA so that we can make use of the GPUs.
For the next step we will use torch.no_grad() as our Context-manager, as disabling gradient calculation can be useful for inference, and from this we can generate a prediction output from the engine for the image. That, along with its original label, can be used to to calculate the test_loss. From there, we can then get our prediction using argmax. Finally, we add to the correct tensor a boolean that reflects whether or not the prediction is equivalent to the label and a count for the total to use in the accuracy calculation.
logger.info(
            f"Epoch {epoch} - train loss: {train_loss:.5}, test loss: {test_loss:.5}, acc: {correct / total:.5}, lr: {lr_scheduler.get_last_lr()[0]:.5g}", ranks=[0])
At the end of the images in the test dataloader, the logger outputs the epoch, train loss, test loss, accuracy, learning rate, and ranks to the log for our convenience. This then repeats for the number of epochs set in the config file, a defaulted value of 2.
Now that we have read through the code, we can run the training loop with a full understanding of what's going on under the hood!
Running the training loop
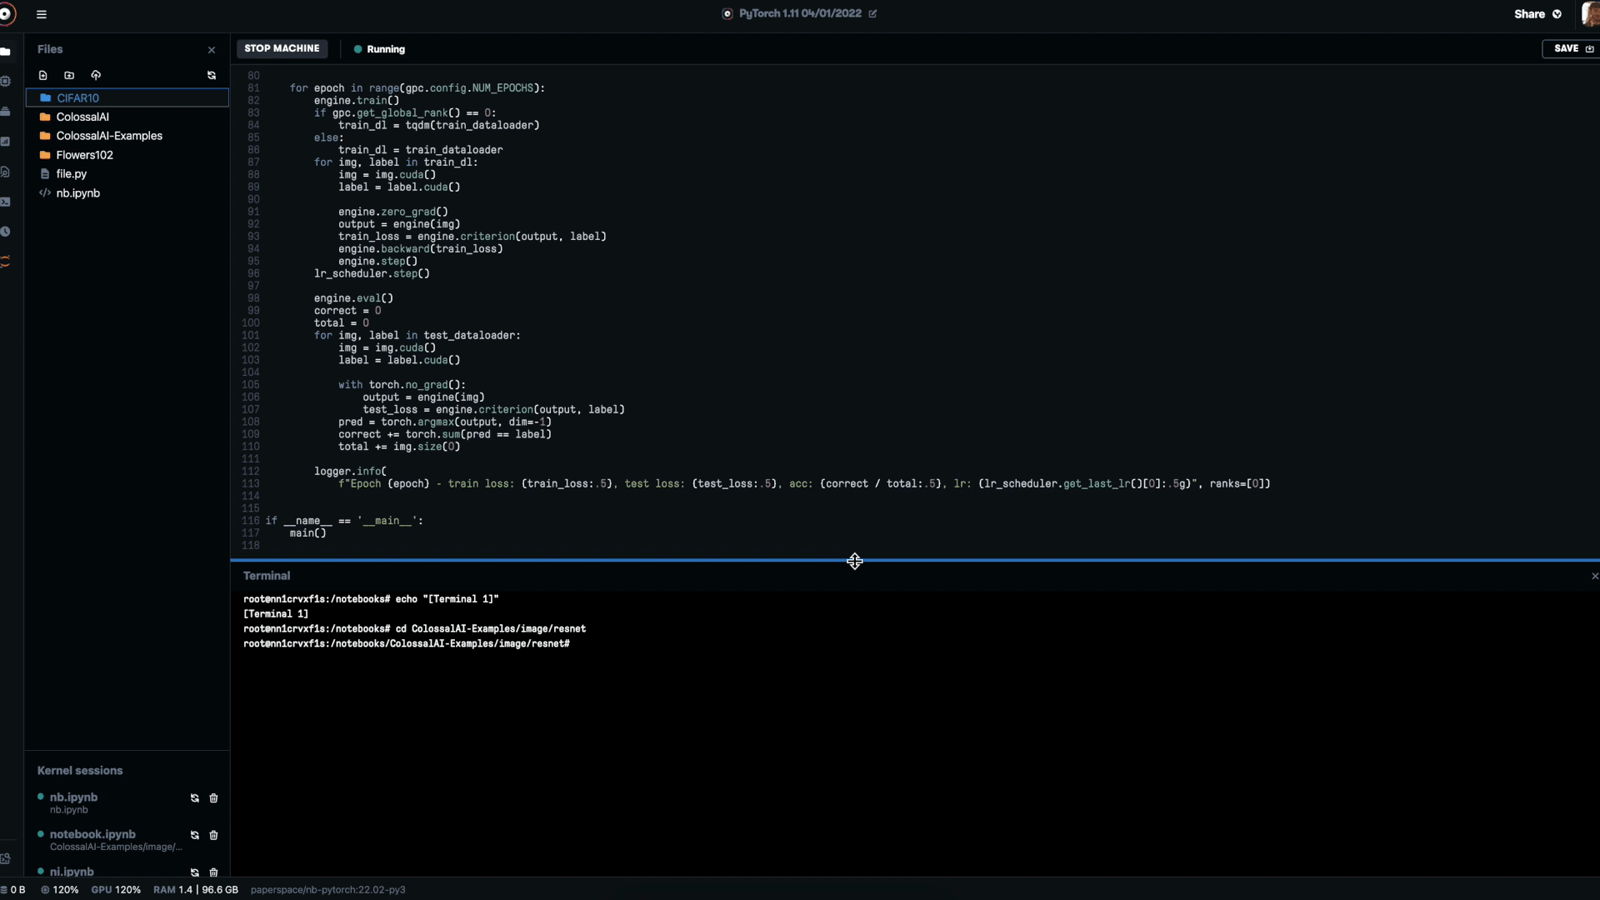
To run the run_resnet_cifar10_with_engine.py script, all we need to do is navigate to notebooks/ColossalAI-Examples/image/resnet in our terminal and enter the following code:
python -m torch.distributed.launch --nproc_per_node <number of GPU nodes you want to use> --master_addr localhost --master_port 29500 run_resnet_cifar10_with_engine.py
This will run your training loop for the predetermined number of epochs before outputting the accuracy and relevant loss metrics. I chose to run mine for two since I had two available, but this will run perfectly well on a single GPU instance as well.
Concluding thoughts
Since the code we used here is so versatile, it is easy to see how the same methodology might be applied to a number of different Deep Learning applications in computer vision such as a vision transformer, and even a in different domains like doing NLP with Colossal AI and GPT. Following the same workflows demonstrated in these scripts, it's easy to see how Colossal AI's native embrace of the PyTorch distributed packages really simplifies adapting various Deep Learning tasks to their distributed computing management system.
Be sure to try out some of these other examples or adapt your own personal work to Colossal AI with Gradient Notebooks!