Bring this project to life
In the worlds of computer vision research and layman's use of computer vision applications, DALL-E has become one of the seminal projects that is universally recognized. While the art quality suffers in some areas like compositionality, the trait of being able to do merging of multiple object properties like shape, displacement, or color in some meaningful manner, DALL-E is famed as one of the most accessible options for a user to generate their own artwork in a realistically short amount of time.
The problem is that DALL-E still requires one or often more high-level GPUs with significant memory to be able to do so in a way that is conducive to being used in some sort of application, and the server costs for using such powerful GPUs is unsustainable. The Craiyon team led by Boris Dayma in collaboration with Hugging Face saw this problem, and deduced a solution in rapid time.
In a few short weeks, their product, DALL-E Mini or Craiyon (renamed to avoid confusion with original DALL-E and DALL-E 2) was born. Built with Google's powerful JAX library, Craiyon is capable of nearly mimicking the generation of efficacy of its much larger cousins in very little time with relatively little GPU compute needed. Through this, Craiyon is able to rapidly generate decently high quality artwork from only a single text prompt. This is a true advancement worth celebration, and Craiyon is already taking the world by storm via their web application.
In today's tutorial, we will discuss how Craiyon works, some of the reasons Craiyon was written in JAX instead of the more conventional TensorFlow or Torch, break down some of the key functionalities of the Craiyon architecture at play to generate the art, and then compare and contrast Craiyon with DALL-E. We will then jump into a coding demo you can access in a Gradient Notebook, so you can start generating your own works with Craiyon or make your own DALL-E Mini application as soon as possible.
For the tutorial on running DALL-E Mini in a Gradient Notebook using the DALL-E Mini tile, skip to the section "Code Demo."
How does DALL-E Mini work?
The basic workflow for developing JAX was to first train a PyTorch model, VQGAN. This was a pre-trained, saved checkpoint that was first fine-tuned on ImageNet, with a reduction factor f=16 and a vocabulary size of 16,384. This is significant because it explains a lot of artifacting we will see later. This is because the model is extremely robust for dealing with a wide range of images, but poorly optimized for dealing with people or face encodings. The authors opted to try and train this problem out with more fine-tuning, but, likely due to mode collapse, this was a failure.
The rest of the code is in JAX, so let's talk about why JAX was used to implement this model in the first place.
JAX
Standing for Just After Execution, JAX is a relatively recent library developed by Google research. Unlike TensorFlow, it is not an official product, and thus has become very popular in the research community as it has grown in stability.
JAX leverages the capability of Just-In-Time compilation to allow the user to capture the maximum amount of FLOPs for generating optimized code. This Just-in-Time (JIT) compilation is able to vastly improve calculation speeds. Furthermore, JAX enables NumPy code to be run on GPUs/TPUs in addition to CPUs via autograd. In tandem, these three capabilities allow JAX to accelerate its tensor operations to a huge extent.
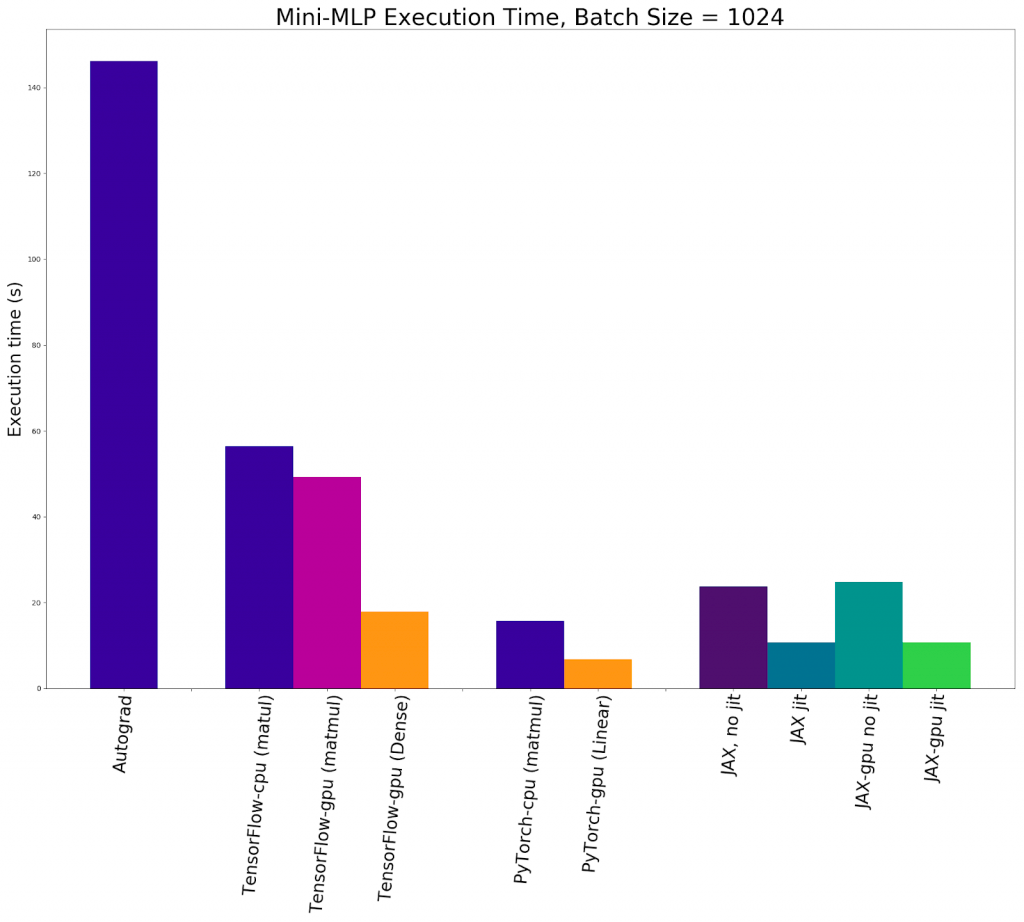
As you can see from the plot above, JAX on a GPU with jit represents a significant speed up over competing DL libraries for most use cases in this series of tests made using multilayer perceptrons. It is worth noting that the Pytorch nn.Linear MLP was the fastest overall, but we can assume that this is likely do to a particular edge case like using particularly linear data. For our case with computer vision, its very unlikely that linearity or any other confounding factor would overcome the speed and utility of JAX.
How does Craiyon work?
Now that we understand why JAX was used instead of PyTorch or TensorFlow, let's get started with Craiyon. Let's take a look at the architecture.
Architecture overview
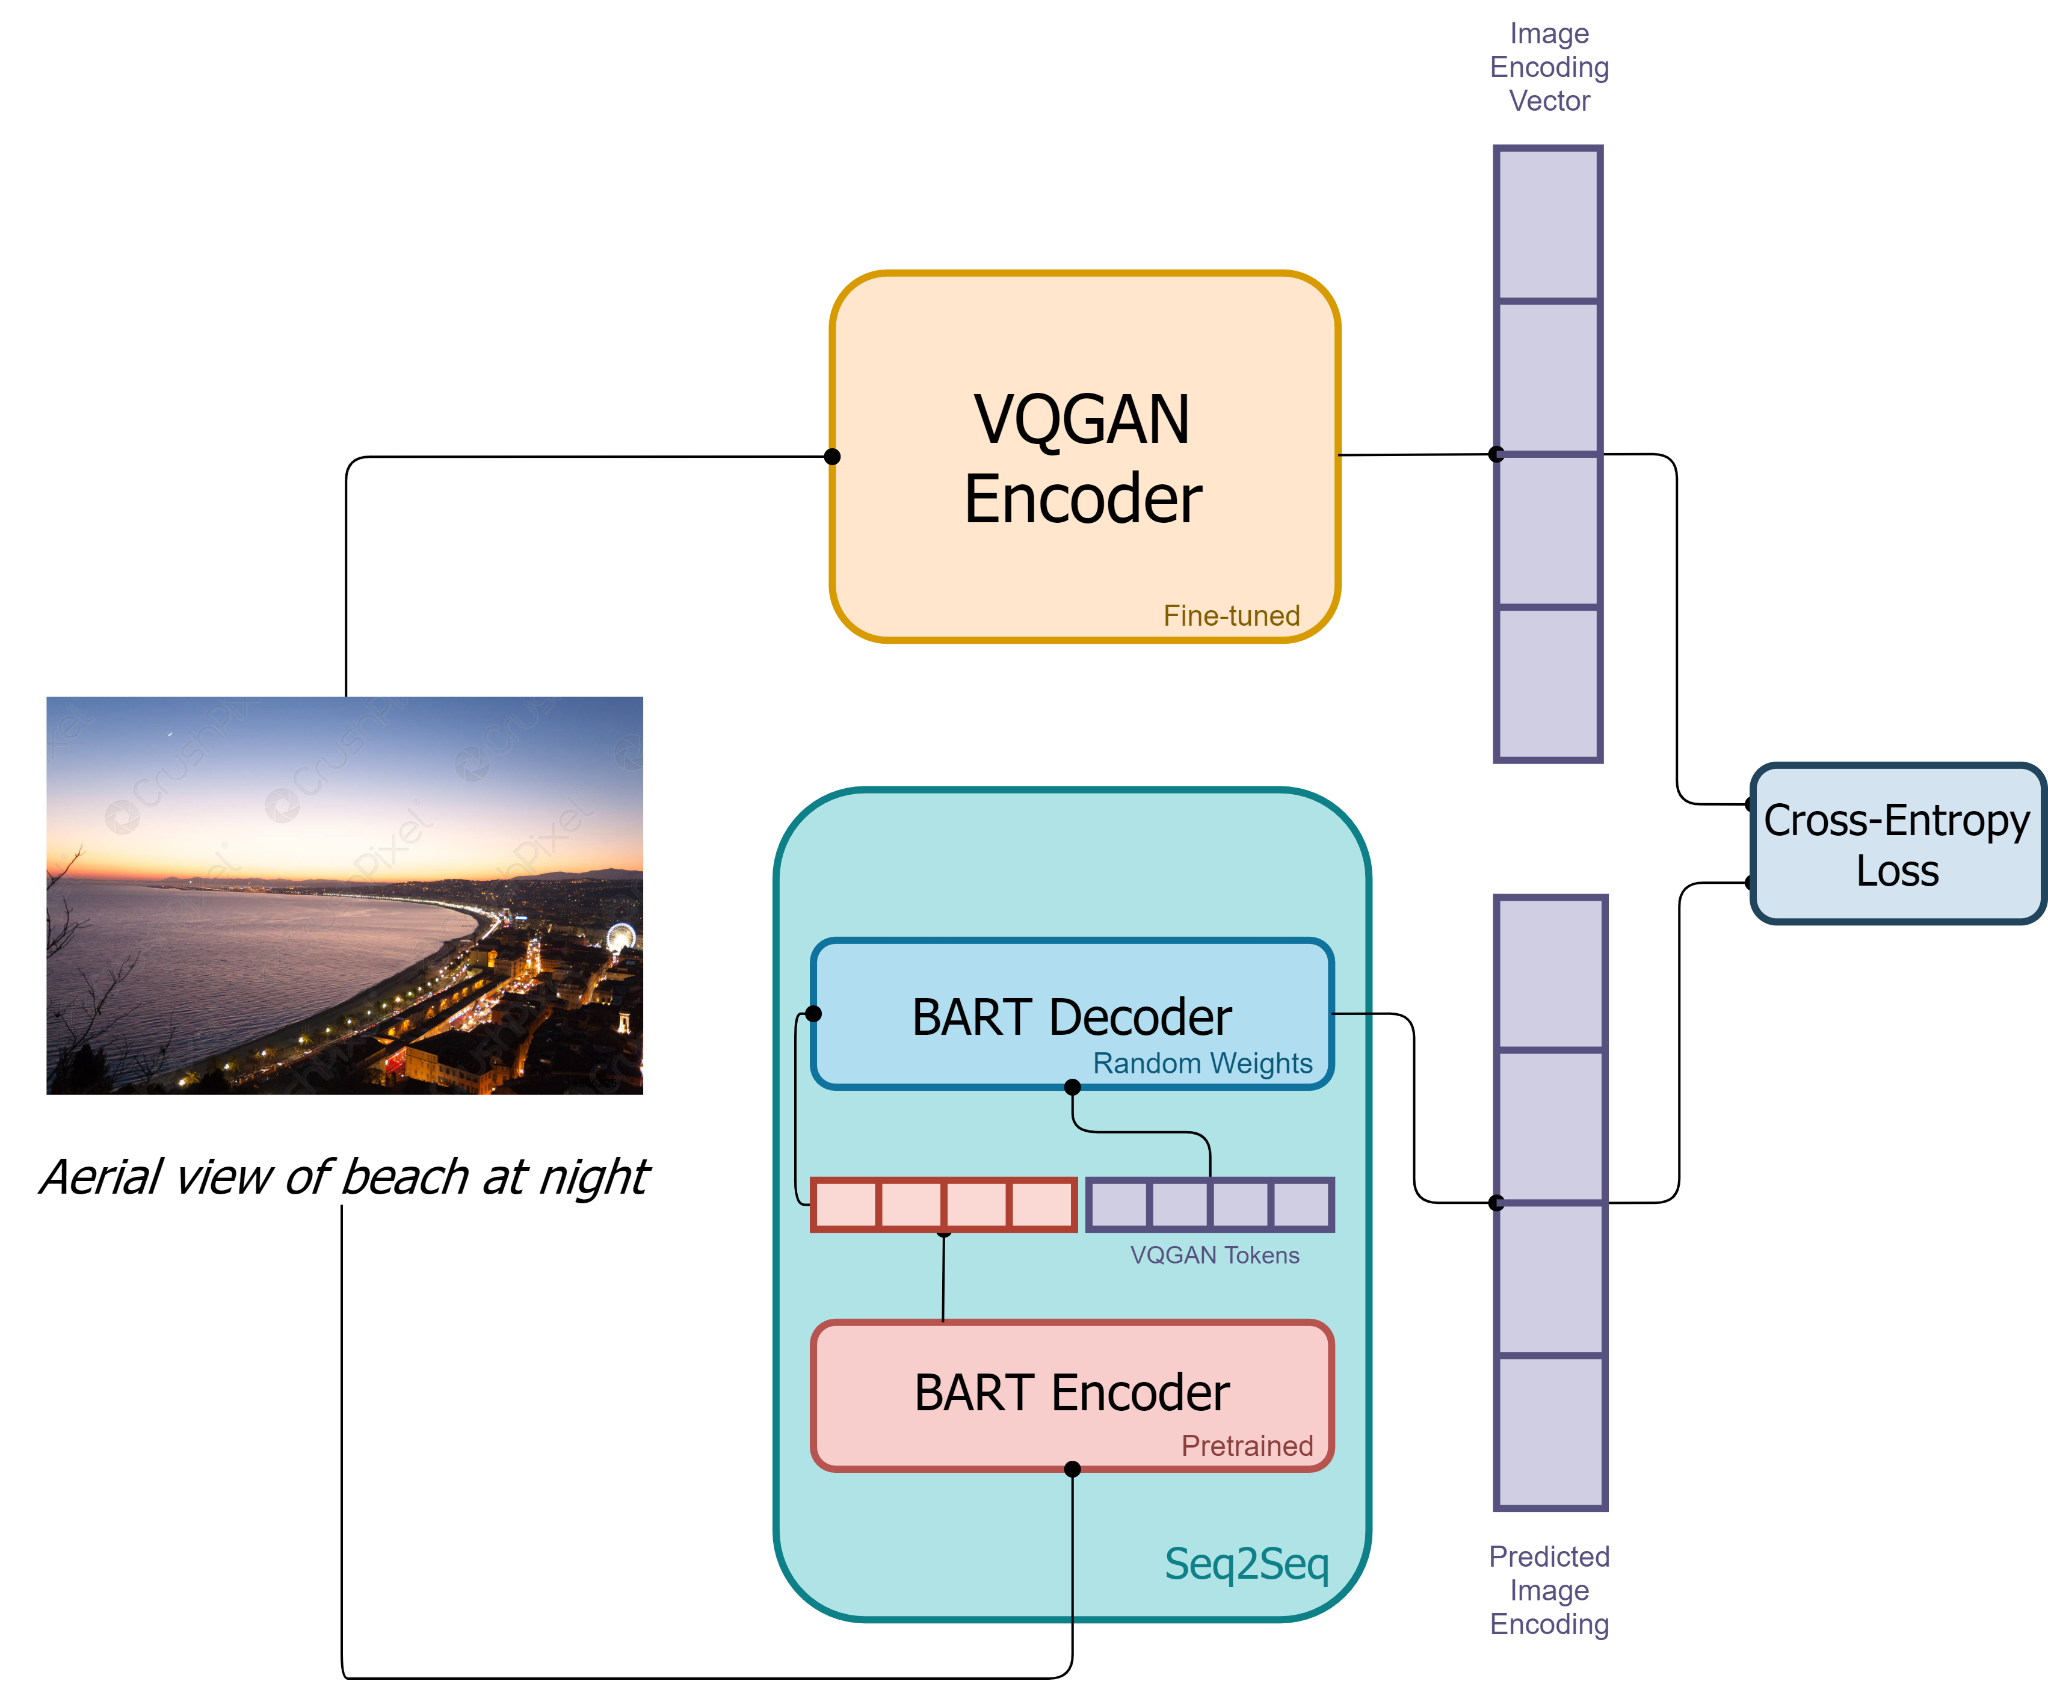
The Craiyon architecture is simplistic in its execution, but in that simplicity lies power. As we can see from the diagram above about training, images and descriptions are passed through a series of different algorithms to get an image output that resembles the inputted prompt.
First for training, the images are encoded through the VQGAN encoder to transform the images into tokens. Similarly, the text description will be taken to a BART encoder for transcription, as well. Next, the output of the BART encoder and the encoded images are passed through the BART decoder. This is an auto-regressive model that is able to take the information and attempt to accurately predict the next token in the sequence.
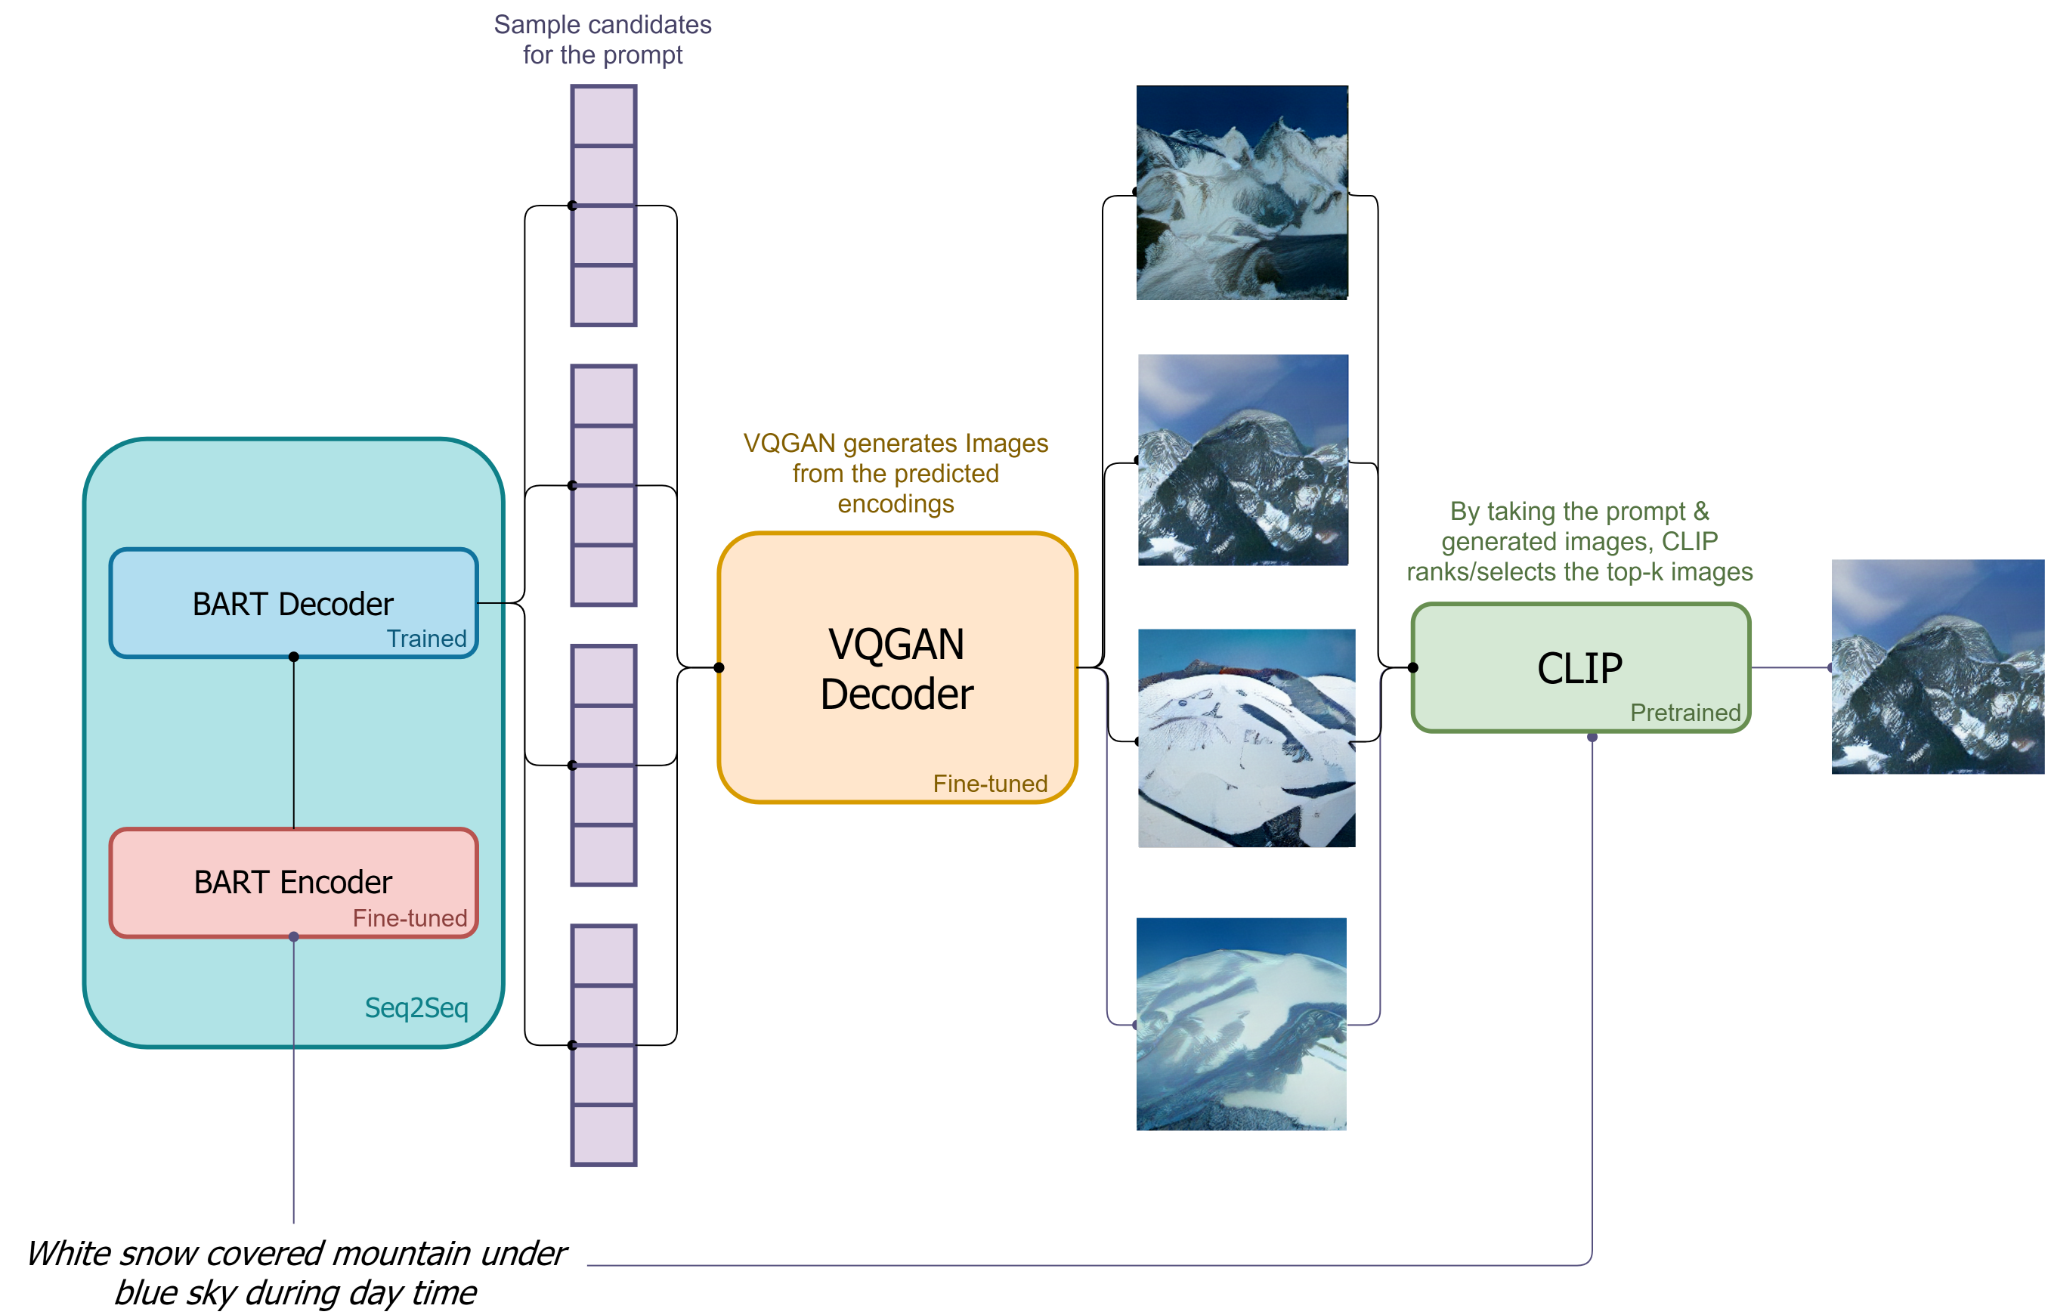
Now that the model has been trained to accurately predict these tokens, we can use captions to generate images. Using the inputted caption as a prompt, Image tokens are sampled sequentially based on the decoder's predicted distribution over the next token. The BART Decoder then outputs a series of sample candidate image encodings based on the Encodings from the BART Encoder and VQGAN encoder. These sequences are then decoded by the VQGAN decoder into images that approximate the sample sequence. Finally, CLIP orders and ranks the outputted images and selects the best generated image(s) to display [source]. VQGAN and CLIP have been shown again and again to be very effective at this task when used together.
How does Craiyon differ from DALL-E 2?

DALL-E 2 is one of the highest performing image generators publicly available right now, only surpassed by Imagen & Parti (FID of 7.3) for models not trained on the extremely robust MS-COCO dataset. It does this by using CLIP to guide the generation efforts of a modified version of another of OpenAI's computer vision models, GLIDE. Check out this article to learn more about how GLIDE generates images using a diffusion model Prior. Together they create a robust system with capabilities greater than the sum of its parts. Cumulatively, however, this makes the model large and expensive to run.
This was one of the main motivators behind the creation of Craiyon. Craiyon is 27 times smaller than the original DALL-E, and its because of the effort to make such a light model that Craiyon is so universally accessible.
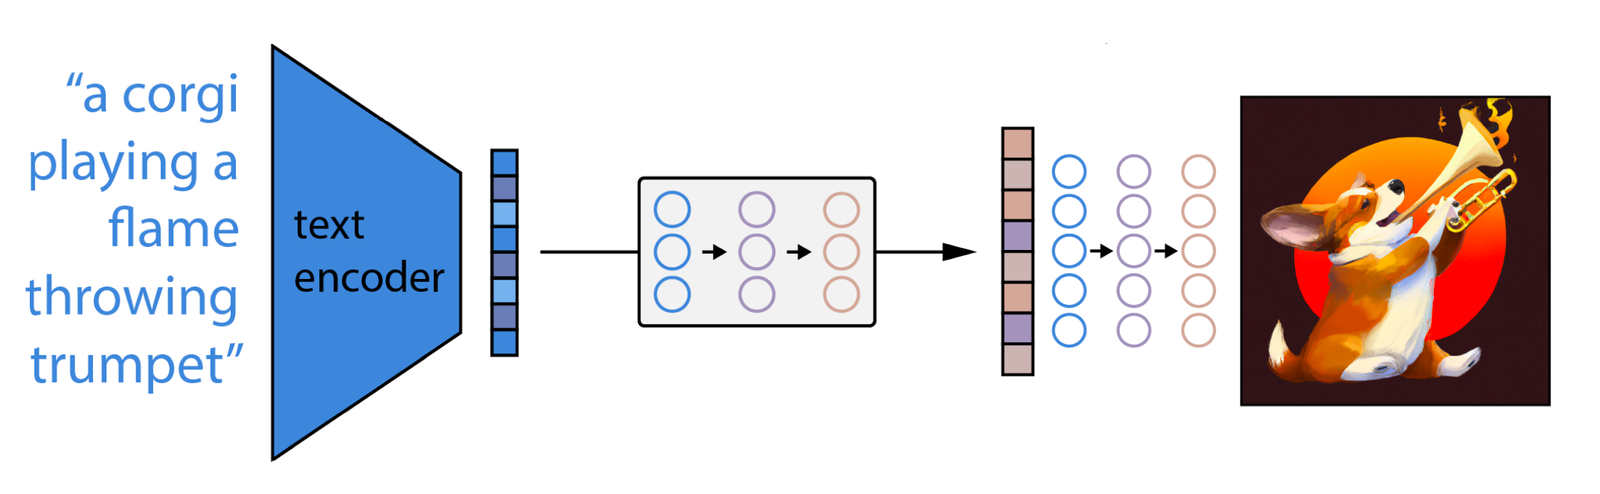
That being said, DALL-E 2 is not at all bloated. The extreme difference in model size can instead be attributed to major architectural differences that result in a similar output. The typical pipeline for a DALL-E 2 image generation task is pictured above in simple detail. As we can see, the architecture is outwardly similar only in terms of what it takes in and what it generates. The various processes that make this happen vary greatly between the two models.
What we are seeing is as follows:
- First, the CLIP text encoder maps the image description into the representation space
- Then the diffusion prior maps from the CLIP text encoding to a corresponding CLIP image encoding
- Finally, the modified-GLIDE generation model maps from the representation space into the image space via reverse-Diffusion, generating one of many possible images that conveys the semantic information within the input caption [source]
This framework is undoubtedly powerful, but requires significantly more computational expense to use than DALL-E Mini. Now that we understand what DALL-E Mini is and seen how it works in comparison to its namesake, let's look at the code that makes this all possible.
Code demo
Since DALL-E Mini/Craiyon requires JAX and GPU support to run, Gradient is a great place for you to get access to the compute needed. You can view a public version of this code here, and create your own by going to the Notebook Create page, selecting any GPU Machine, then toggling the "Advanced Options." Then, use this Github repo as the "Workspace URL" and the following tag as the "Container Name"
paperspace/gradient-base:pt112-tf29-jax0314-py39
The code we are using here is from the DALL-E Mini - Inference Pipeline notebook provided by the original research team. This can be found hosted on HuggingFace here.
Bring this project to life
Required installs
The first step is to install all the packages we need. Here are the appropriate JAX installs for the PyTorch container on Gradient. Note that these can be finicky, so if you are running this code on a machine using an earlier version of CUDA (<11.0) or a different version of cuDNN these may need to be reconfigured appropriately.
We will also install the DALL-E Mini library itself, along with the subcomponent vqgan-jax.
# Install required libraries
!pip install pyyaml==5.4.1 --ignore-installed
!pip install -q dalle-mini
!pip install -q git+https://github.com/patil-suraj/vqgan-jax.git

#setup for easy display
!pip install ipywidgets
!pip install --upgrade tqdm
Setup
To set up our inference and image generation space, normally we would first need to acquire versions of the models we are going to use from Weights & Biases or HuggingFace Hub. This version pulls from Weights & Biases, so you will need to make an account to access an API key. Fortunately, this can be done for free. Below is the code for pointing to the pre-trained DALL-E Mini and VQGAN models.
In Gradient Notebooks, we can access this data in a unique manner for the platform by mounting the Public Dataset that has been made available to users This method is recommended as it is much faster.
How to mount the dataset
To mount the dataset, simply navigate to the left side of the screen and select the third option, the "Data Sources" tab. Then, click "Public" to switch to Public Datasets, and then select the "dalle-mini-models" dataset and click "Mount." This will move the files into ../datasets/dalle-mini-models for easy access.
# Model references: pull from mounted public dataset

# imports
import jax
import jax.numpy as jnp

# dalle-mega
DALLE_MODEL = "../datasets/dalle-mini-models/dallebart"  # can be wandb artifact or 🤗 Hub or local folder or google bucket
DALLE_COMMIT_ID = None

# if the notebook crashes too often you can use dalle-mini instead by uncommenting below line
# DALLE_MODEL = "dalle-mini/dalle-mini/mini-1:v0"

# VQGAN model
VQGAN_REPO = "../datasets/dalle-mini-models/vqgan-jax"
VQGAN_COMMIT_ID = "e93a26e7707683d349bf5d5c41c5b0ef69b677a9"
If you choose to download the model data from the web, you can do so using the following code:
# Model references: pull entire model from web (~5 GB)

# dalle-mega
DALLE_MODEL = "dalle-mini/dalle-mini/mega-1-fp16:latest"  # can be wandb artifact or 🤗 Hub or local folder or google bucket
DALLE_COMMIT_ID = None

# if the notebook crashes too often you can use dalle-mini instead by uncommenting below line
# DALLE_MODEL = "dalle-mini/dalle-mini/mini-1:v0"

# VQGAN model
VQGAN_REPO = "dalle-mini/vqgan_imagenet_f16_16384"
VQGAN_COMMIT_ID = "e93a26e7707683d349bf5d5c41c5b0ef69b677a9"
To actually load in the models, we can use provided methods from the dalle_mini and vqgan_jax packages. DALL-E Mini, as we described in the previous section, makes use of VQGAN and BART. Run the code in the cell below to download the models into your Notebook.
# Load models & tokenizer
from ipywidgets import FloatProgress as IProgress
from dalle_mini import DalleBart, DalleBartProcessor
from vqgan_jax.modeling_flax_vqgan import VQModel
from transformers import CLIPProcessor, FlaxCLIPModel


# utils.logging.disable_progress_bar()
# Load dalle-mini
model, params = DalleBart.from_pretrained(
    DALLE_MODEL, revision=DALLE_COMMIT_ID, dtype=jnp.float16, _do_init=False
)

# Load VQGAN
vqgan, vqgan_params = VQModel.from_pretrained(
    VQGAN_REPO, revision=VQGAN_COMMIT_ID, _do_init=False
)
We then replicate the model parameters on each device for faster inference. This is to take advantage of any multi-machine instances you may be using. We tested on a 2 x A5000 Machine on Gradient.
from flax.jax_utils import replicate

params = replicate(params)
vqgan_params = replicate(vqgan_params)
We can do the same with our model functions. The following snippet will compile and parallelize them to take advantage of our multiple devices.
from functools import partial

# model inference
@partial(jax.pmap, axis_name="batch", static_broadcasted_argnums=(3, 4, 5, 6))
def p_generate(
    tokenized_prompt, key, params, top_k, top_p, temperature, condition_scale
):
    return model.generate(
        **tokenized_prompt,
        prng_key=key,
        params=params,
        top_k=top_k,
        top_p=top_p,
        temperature=temperature,
        condition_scale=condition_scale,
    )


# decode image
@partial(jax.pmap, axis_name="batch")
def p_decode(indices, params):
    return vqgan.decode_code(indices, params=params)
Finally, we generate random keys to pass on to our model to ensure the uniqueness of the generated images.
import random

# create a random key
seed = random.randint(0, 2**32 - 1)
key = jax.random.PRNGKey(seed)
Preparing the text inputs
In order to take in our text snippet prompts, our model requires processing functions to load the data in. We will use the provided DalleBartProcessor. This can either be created directly using our installed packages, or by downloading the entire model package from Weights & Biases (not recommended).
# Create the processor piece by piece

from dalle_mini.model.configuration import DalleBartConfig
from dalle_mini.model.text import TextNormalizer
from dalle_mini.model.tokenizer import DalleBartTokenizer
from dalle_mini.model.utils import PretrainedFromWandbMixin

tokenizer = DalleBartTokenizer.from_pretrained('dalle-mini/dalle-mega')
config = DalleBartConfig.from_pretrained('dalle-mini/dalle-mega')
processor = DalleBartProcessor(tokenizer, config.normalize_text, config.max_text_length)
You can also download the model data directly, but it forces a full download and may be time consuming:
# Download all model files (~5 GB)
from dalle_mini import DalleBartProcessor

processor = DalleBartProcessor.from_pretrained(DALLE_MODEL, revision=DALLE_COMMIT_ID)
We can then instantiate our prompts. We should endeavor to submit images that would have features familiar to the model, so avoid less well known proper nouns, jargon, and technical terms. You can use this to change the content of the generated image and modify its style. Here are some sample prompts I thought were interesting.
prompts = [
    "fine art painting of a foolish samurai warrior wielding a magic sword stepping forth to oppose the evil that is Aku",
    "Barack Obama holding up the World Cup trophy",
    "Obi Wan Kenobi standing over lava with a lightsaber"
]
We then finish set up by replicating the prompts onto each device. We could also use the same prompt multiple times for faster inference.
tokenized_prompts = processor(prompts)
tokenized_prompt = replicate(tokenized_prompts)
Inference
Now, we have set everything up to start generating our images. Let's set a few quick parameters for our inference process. In particular, changing n_predictions will affect how many times it will generate an image, and temperature will affect how many/the length of the ngrams that will be processed out from the prompts as tokens for encoding.
# number of predictions per prompt
n_predictions = 8

# We can customize generation parameters (see https://huggingface.co/blog/how-to-generate)
gen_top_k = None
gen_top_p = None
temperature = None
cond_scale = 10.0
Finally, we arrive at our training loop. For each step, we generate the image encodings using p_generate for each of the tokenized prompts using DALL-E BART encoder. The encoding then has the Beginning of Sequence (BOS) token removed, and is then passed to the VQGAN decoder. The decoder then takes the image encodings, which each correspond to a single prompt from the list of prompts, and generates image data for each. These are then displayed for us to view.
from flax.training.common_utils import shard_prng_key
import numpy as np
from PIL import Image
from tqdm.notebook import trange

print(f"Prompts: {prompts}\n")
# generate images
images = []
for i in trange(max(n_predictions // jax.device_count(), 1)):
    # get a new key
    key, subkey = jax.random.split(key)
    # generate images
    encoded_images = p_generate(
        tokenized_prompt,
        shard_prng_key(subkey),
        params,
        gen_top_k,
        gen_top_p,
        temperature,
        cond_scale,
    )
    # remove BOS
    encoded_images = encoded_images.sequences[..., 1:]
    # decode images
    decoded_images = p_decode(encoded_images, vqgan_params)
    decoded_images = decoded_images.clip(0.0, 1.0).reshape((-1, 256, 256, 3))
    for decoded_img in decoded_images:
        img = Image.fromarray(np.asarray(decoded_img * 255, dtype=np.uint8))
        images.append(img)
        display(img)
        print()
Output:
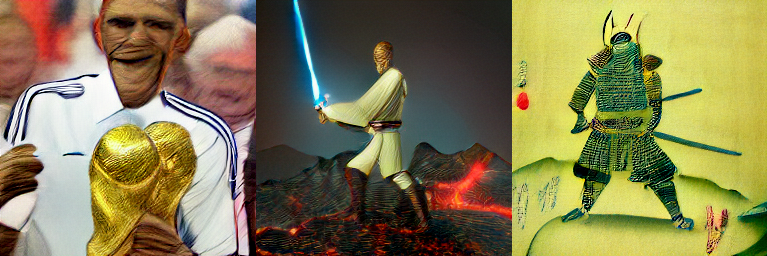
Success! If everything was done right, you should be given three very uncanny valley looking humanoid figures performing the actions we described. As you can see, many of the non-humanoid features appear to be significantly more realistic than the human features. The patterns, clothing, and objects being held are all reasonably close to our expectation for how they would look in low resolution. Faces and heads in particular are a real struggle though, and we can see from it's admirable attempt to recreate the head of Barack Obama that it performs best on faces that would be more likely to be in their training data thanks to his general popularity. The Craiyon team intends to further train their model to try and remedy this, but it is not available at the time of this articles posting.
Ranking the outputs
For the next step, we have the option of using CLIP to assess and rank the quality of our newly generated images. This is where ideas for productionizing this product may come in to play. Through this CLIP integration, we can remove the need for a human checker for assessing the quality of the generated images, and automate the use of Craiyon in practice.
To do so, you first need to load in the pretrained CLIP model and processor. We then create a short function p_clip to score our images.
# CLIP model
CLIP_REPO = "openai/clip-vit-base-patch32"
CLIP_COMMIT_ID = None

# Load CLIP
clip, clip_params = FlaxCLIPModel.from_pretrained(
    CLIP_REPO, revision=CLIP_COMMIT_ID, dtype=jnp.float16, _do_init=False
)
clip_processor = CLIPProcessor.from_pretrained(CLIP_REPO, revision=CLIP_COMMIT_ID)
clip_params = replicate(clip_params)

# score images
@partial(jax.pmap, axis_name="batch")
def p_clip(inputs, params):
    logits = clip(params=params, **inputs).logits_per_image
    return logits
Next, we use the clip_processor to prepare our images for the CLIP model, and then submit them to p_clip to calculate the scores we will use to rank the images.
from flax.training.common_utils import shard
# get clip scores
clip_inputs = clip_processor(
text=prompts * jax.device_count(),
images=images,
return_tensors="np",
padding="max_length",
max_length=77,
truncation=True,
).data
logits = p_clip(shard(clip_inputs), clip_params)
# organize scores per prompt
p = len(prompts)
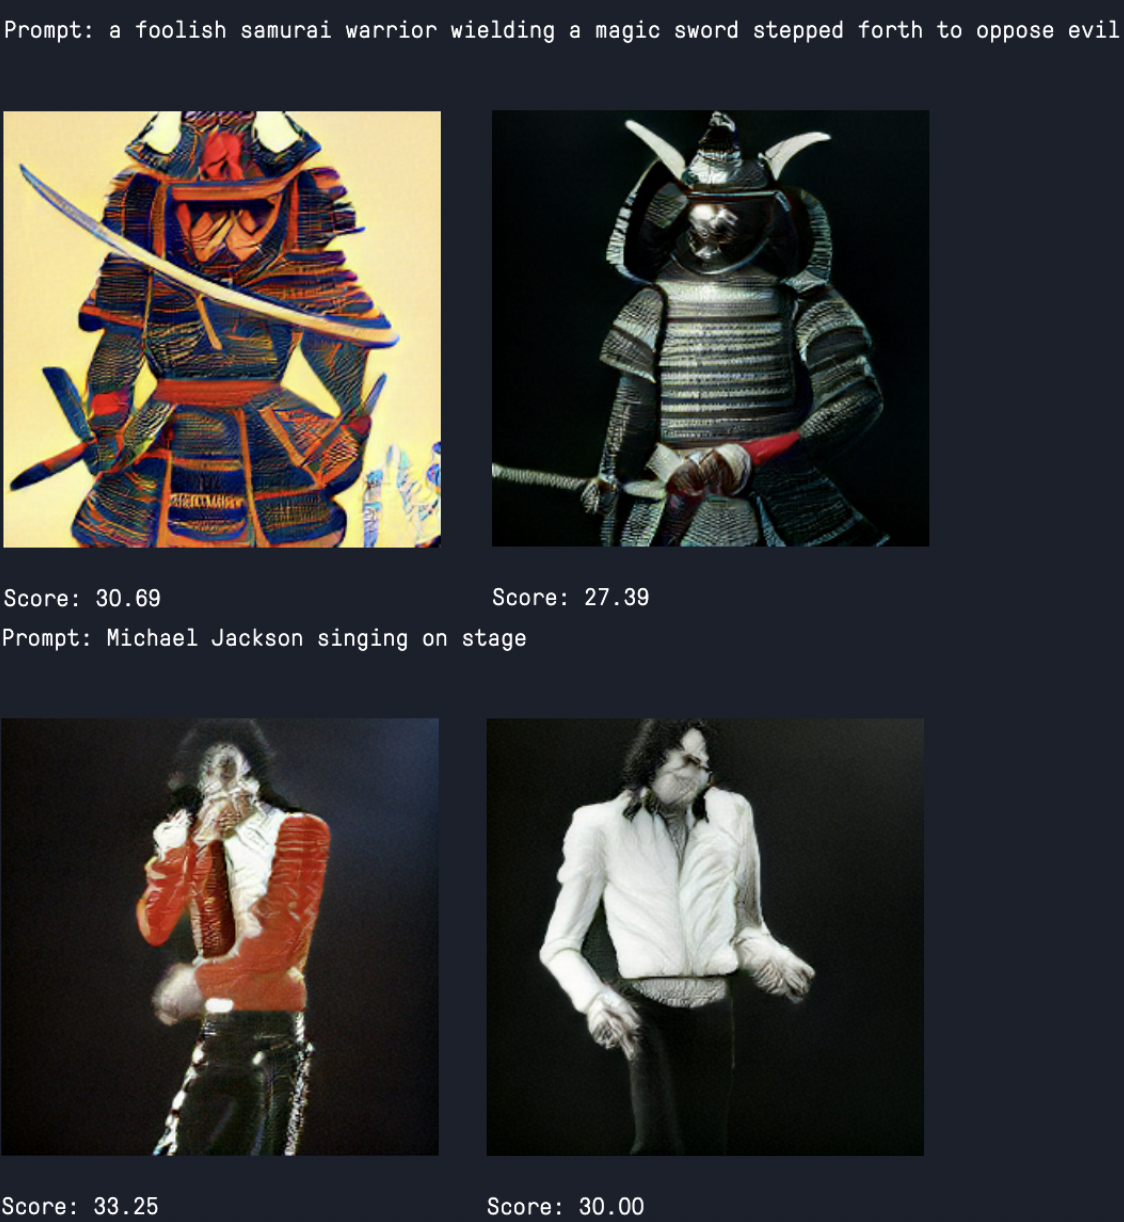
logits = np.asarray([logits[:, i::p, i] for i in range(p)]).squeeze()Finally, we can use this logits value with our prompts to display an ordered ranking of the images by their ranked proximity to the encoding of the original prompt.
for i, prompt in enumerate(prompts):
    print(f"Prompt: {prompt}\n")
    for idx in logits[i].argsort()[::-1]:
        display(images[idx * p + i])
        print(f"Score: {jnp.asarray(logits[i][idx], dtype=jnp.float32):.2f}\n")
    print()
Here are some examples from another set of prompts:
Conclusion
In this article, we broke down the justification and inspiration for DALL-E Mini/Craiyon, explored its predecessors for comparison's sake, and implemented the light image generator in Python code. The utility of such a lightweight model for image generation is already proving itself. The original team has rebranded the DALL-E Mini project to Craiyon, and achieved massive success across the internet thanks to its accessibility.
If you want to learn more about DALL-E Mini and its relationship with DALL-E 2, be sure to check out our Tech Talk on DALL-E on the HelloPaperspace YouTube channel.
You can find the code we used for this article in the Github repo here. You can also access the code in a GPU powered Gradient Notebook here.