Bring this project to life
In 1996, NVIDIA entered the 3D accelerator market initially behind the competition. However, through constant learning and improvement, they achieved major success in 1999 with the introduction of the GeForce 256, recognized as the first graphics card termed a GPU. Initially designed for gaming, GPUs later found a plethora of business applications in math, science, and engineering.
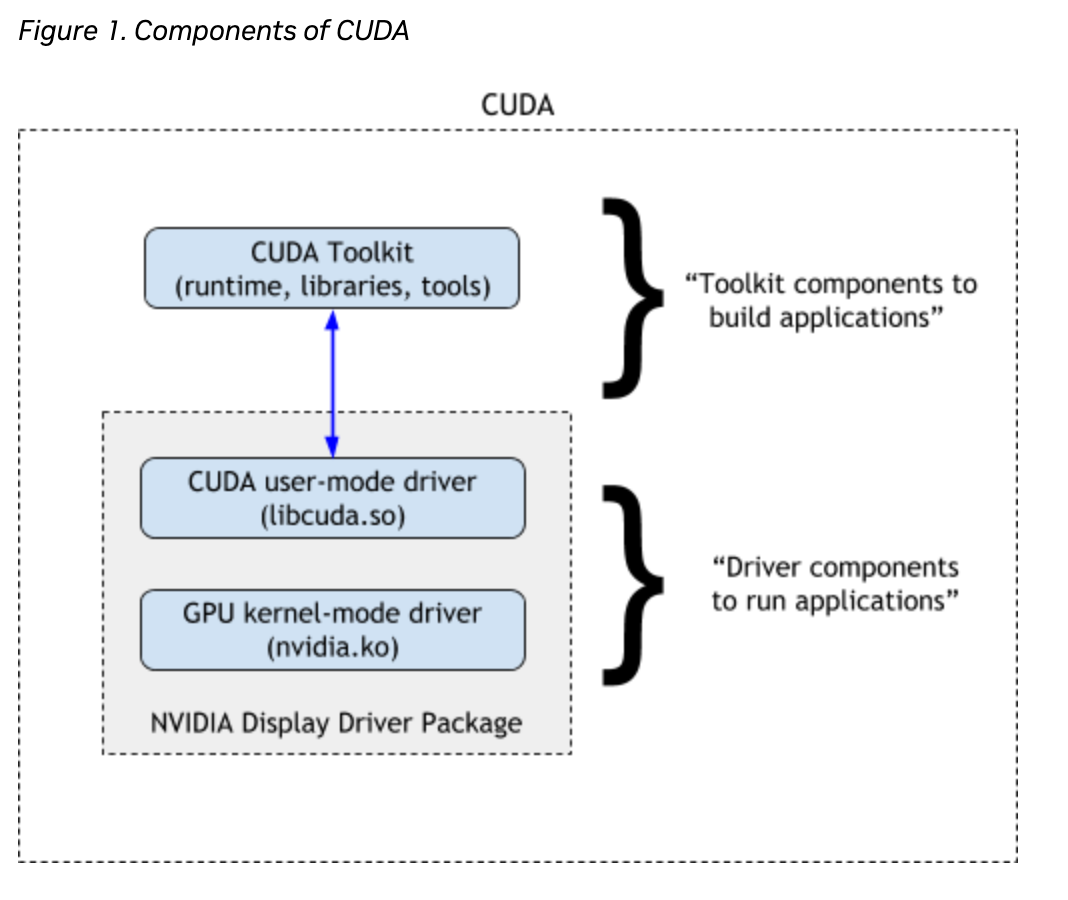
In 2003, Ian Buck and his team introduced Brook, the initial widely embraced programming model that expanded C by incorporating data-parallel constructs. Buck later played a key role at NVIDIA, leading the 2006 launch of CUDA, the first commercially available solution for general-purpose computing on GPUs.
CUDA serves as the connecting bridge between Nvidia GPUs and GPU-based applications, enabling popular deep learning libraries like TensorFlow and PyTorch to leverage GPU acceleration. This capability is crucial for optimizing deep learning tasks and underscores the importance of using GPUs in the field. Today, CUDA is widely considered essential for any AI development, and is a software component of any AI development pipeline.
What is Parallel Computing?
In simpler terms, parallel computing is a way of solving a single problem by breaking it down into smaller chunks and solving each one simultaneously. Instead of having one powerful computer complete one complex process, parallel computing involves using multiple computers or processors to work on different pieces of the problem at the same time. This concert approach speeds up the process of handling large tasks and efficiently handles the tasks. This is similar to the approach of a having a team of co-workers handling different assignments simultaneously in order to meet some goal together. Together, the smaller workers create an exponential increase in overall processing speeds.
CUDA in Simpler Terms
CUDA or Compute Unified Device Architecture created by Nvidia is a software platform for parallel computing. It has been used in many business problems since its popularization in the mid-2000s in various fields like computer graphics, finance, data mining, machine learning, and scientific computing. CUDA enables accelerated computing through its specialized programming language, compatible with most operating systems.
GPU vs CPU
A CPU, or central processing unit, serves as the primary computational unit in a server or machine, this device is known for its diverse computing tasks for the operating system and applications. The CPU is responsible for executing mathematical and logical calculations in our computer. The primary function of this unit is to run code, handling tasks such as copying files, deleting data, and processing user inputs. Moreover, the CPU acts as a mediator for communication between different computer peripherals, ensuring they don't directly interact but go through the CPU.
While it may appear that the CPU can multitask, each core of the CPU can only handle one task at a time. Each core operates as an independent processing unit, and the ability to multitask is determined by the number of cores in the hardware. Generally, two to eight cores per CPU is enough for whatever tasks a laymen may need, and performance of these CPUs are quite efficient to the point that humans can't even notice that our tasks are being executed in a sequence instead of all at once. This is the case for nearly all the things we use CPUs for on a daily basis.
Whereas, a graphics processing unit (GPU) is a specialized hardware component that is capable of efficiently handling parallel mathematical operations, surpassing the general-purpose capabilities of a CPU. Initially designed for graphics rendering in gaming and animation, GPUs have evolved now to perform a broader range of tasks beyond their original scope. However, both of them are computer hardware designed to handle certain tasks.
Let's take a look at some raw numbers. If we consider the most advanced, consumer CPU systems to generally be equipped with 16 cores, the most advanced, consumer-grade GPU (Nvidia RTX 4090) has 16,384 CUDA cores. This difference is only magnified when looking at H100s, which have 18,432 CUDA cores. Those CUDA cores are generally less powerful than individual CPU cores, and we cannot make direct comparisons. However, the sheer volume of the CUDA cores by comparison should show why they are comparatively ideal for handling large amounts of computations in parallel.
When comparing CPUs and GPUs, it might seem like a good idea to solely rely on GPUs due to their parallel processing capabilities. However, the need for CPUs continues, because multitasking isn't always the most efficient approach. We also use CPUs for general computing that would be almost too simple for GPUs. In certain scenarios, executing tasks sequentially can be more time and resource-effective than parallel processing. The advantage of CUDA lies in its ability to seamlessly switch between CPU and GPU processing for specific tasks. This flexibility allows programmers to strategically determine when to utilize which hardware component, providing enhanced control over the computer's operations.
CUDA's Role in GPU
Bring this project to life
Paperspace offers GPUs with preinstalled CUDA, hence users can skip the step to install CUDA. Let us confirm that by opening a Paperspace Notebook, please feel free to click the link provided above to run this demo. This will help to spin up the Paperspace platform and start the machine by clicking 'Start Machine.'
You can look at the CUDA version and GPU info by typing nvidia-smi into your terminal. In a Notebook cell, we can do this by adding a ! at the start of the line.
!nvidia-smiOnce we have confirmed our machine has everything we need set up, we can import the Torch package. It also has a nice CUDA checker function we can use to ensure that Torch was properly installed and can detect CUDA and the GPU.
# import the necessary libraries
import torch

# this line of code will true or false depending upon cuda availability
use_cuda = torch.cuda.is_available
In this case it will return 'True'
or,
if torch.cuda.is_available():
    device = torch.device('cuda')

else:
    device = torch.device('cpu')

print("using", device, "device")
With CUDA, programmers can design and implement parallel algorithms that take advantage of the thousands of cores present in modern GPUs. This parallelization is crucial for computationally intensive tasks such as scientific studies, machine learning, video editing and data processing. CUDA provides a programming model and a set of APIs that enable developers to write code that runs directly on the GPU, unlocking the potential for significant performance gains compared to traditional CPU-based computing. By offloading parallelizable workloads to the GPU, CUDA plays a central role in enhancing the computational capabilities of GPUs and driving advancements in high-performance computing applications.
Speed Test
Bring this project to life
Let us try to get some information about the cuda version and the GPU,
if device:
    print('__CUDA VERSION:', torch.backends.cudnn.version())
    print('__Number CUDA Devices:', torch.cuda.device_count())
    print('__CUDA Device Name:',torch.cuda.get_device_name(0))
    print('__CUDA Device Total Memory [GB]:',torch.cuda.get_device_properties(0).total_memory/1e9)
CUDA VERSION: 8302
__Number CUDA Devices: 1
__CUDA Device Name: NVIDIA RTX A4000
__CUDA Device Total Memory [GB]: 16.89124864
We will conduct three speed tests to compare the performance of CPU versus GPU. Additionally, for the fourth test, we will generate a synthetic dataset using stable diffusion and measure the speed at which the A4000 GPU can successfully complete the task.
For writing this demo, we chose to use an NVIDIA RTX A4000. This demo should work on any Paperspace GPU or CPU machine.
Matrix Divison
The Python code below performs matrix division using both CPU and GPU, and it measures the time it takes for the operation on each device.
The code creates random matrices, and performs the operation on the CPU, transfers the matrices to the GPU, and then measures the time taken for the same operation on the GPU. The loop repeats this process five times for more accurate timing results for the GPU. The torch.cuda.synchronize() ensures that the GPU computation is complete before measuring the time.
import time

matrix_size = 43*15

# create random matrix
x = torch.randn(matrix_size, matrix_size)
y = torch.randn(matrix_size, matrix_size)

print("######## CPU SPEED ##########")
start = time.time()
result = torch.div(x,y)

print(time.time() - start)
print("verify device:", result.device)

x_gpu = x.to(device)
y_gpu = y.to(device)
torch.cuda.synchronize()


for i in range(5):
    print("######## GPU SPEED ##########")
    start = time.time()
    result_gpu = torch.div(x_gpu,y_gpu)
    print(time.time() - start)
    print("verify device:", result_gpu.device)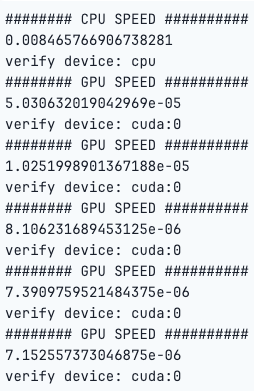
As we can see, the computations were significantly faster on the GPU than the CPU.
Build a Artificial Neural Network
The below python code will built a simple neural network model using both the CPU and GPU to demonstrate a basic speed test.
import tensorflow as tf
import time

# Generate random data
data_size = 10000
input_data = tf.random.normal([data_size, data_size])

# Define a simple neural network model
model = tf.keras.Sequential([
    tf.keras.layers.Dense(1000, activation='relu', input_shape=(data_size,)),
    tf.keras.layers.Dense(1000, activation='relu'),
    tf.keras.layers.Dense(1)
])

# Compile the model
model.compile(optimizer='adam', loss='mse')

# Function to test the speed of CPU and GPU
def speed_test(device):
    with tf.device(device):
        start_time = time.time()
        model.fit(input_data, tf.zeros(data_size), epochs=1, batch_size=32, verbose=0)
        end_time = time.time()
        return end_time - start_time

# Test CPU speed
cpu_time = speed_test('/CPU:0')
print("Time taken on CPU: {:.2f} seconds".format(cpu_time))

# Test GPU speed
gpu_time = speed_test('/GPU:0')
print("Time taken on GPU: {:.2f} seconds".format(gpu_time))
Build a Convolutional Neural Network (CNN)
The below code will train a Convolutional Neural Network (CNN) on the MNIST dataset using TensorFlow. The speed_test function measures the time taken for training on both CPU and GPU, allowing to compare their performance.
import tensorflow as tf
from tensorflow.keras import layers, models
import time

# Load MNIST dataset
(train_images, train_labels), (test_images, test_labels) = tf.keras.datasets.mnist.load_data()
train_images = train_images.reshape((60000, 28, 28, 1)).astype('float32') / 255
test_images = test_images.reshape((10000, 28, 28, 1)).astype('float32') / 255

# Define a simple CNN model
model = models.Sequential()
model.add(layers.Conv2D(32, (3, 3), activation='relu', input_shape=(28, 28, 1)))
model.add(layers.MaxPooling2D((2, 2)))
model.add(layers.Conv2D(64, (3, 3), activation='relu'))
model.add(layers.MaxPooling2D((2, 2)))
model.add(layers.Conv2D(64, (3, 3), activation='relu'))
model.add(layers.Flatten())
model.add(layers.Dense(64, activation='relu'))
model.add(layers.Dense(10, activation='softmax'))

# Compile the model
model.compile(optimizer='adam',
              loss='sparse_categorical_crossentropy',
              metrics=['accuracy'])

# Function to test the speed of CPU and GPU
def speed_test(device):
    with tf.device(device):
        start_time = time.time()
        model.fit(train_images, train_labels, epochs=5, batch_size=64, validation_data=(test_images, test_labels), verbose=0)
        end_time = time.time()
        return end_time - start_time

# Test CPU speed
cpu_time = speed_test('/CPU:0')
print("Time taken on CPU: {:.2f} seconds".format(cpu_time))

# Test GPU speed
gpu_time = speed_test('/GPU:0')
print("Time taken on GPU: {:.2f} seconds".format(gpu_time))
Create a Synthetic Emotions Dataset with Stable Diffusion
Next, let us try creating a synthetic dataset with Stable Diffusion by creating 10 images of different emotions such as angry, sad, lonely, happy. Follow the steps below to recreate the dataset.
First, we need to install the necessary libraries.
!pip install --upgrade diffusers transformers scipy
!pip install --quiet ipyplot
Please, make sure to restart the kernel once the libraries above are installed, or this may not work.
Install the necessary packages, and specify the model id of the pre-trained model.
We will assign the string "cuda" to the variable device. This indicates that the code intends to use a CUDA-enabled GPU for computation.
import torch
from torch import autocast
from diffusers import StableDiffusionPipeline
import ipyplot
import random
import os
import time

import matplotlib.pyplot as plt

model_id = "CompVis/stable-diffusion-v1-5"
device = "cuda"
Create an instance of the StableDiffusionPipeline class by loading the pre-trained model specified in the variable model_id. The from_pretrained method is commonly used in deep learning frameworks to instantiate a model and load pre-trained weights if available.
pipe = StableDiffusionPipeline.from_pretrained(model_id)
pipe = pipe.to(device)
Create the specific folder to store the images,
os.makedirs('/notebooks/happy', exist_ok=True)
os.makedirs('/notebooks/sad', exist_ok=True)
os.makedirs('/notebooks/angry', exist_ok=True)
os.makedirs('/notebooks/surprised', exist_ok=True)
os.makedirs('/notebooks/lonely', exist_ok=True)
The next lines of code will generate images using the StableDiffusionPipeline for different emotions and genders. It does so in a loop, creating 10 images for each emotion.
# create different ethnic groups images
genders = ['male', 'female']
# Create a dictionary that contains different emotions as keys, and the corresponding facial expressions as values.
emotion_prompts = {'happy': 'smiling',
'surprised': 'surprised, opened mouth, raised eyebrows',
'sad': 'frowning, sad face expression, crying',
'angry': 'angry, fierce, irritated',
'lonely': 'lonely, alone, lonesome'}
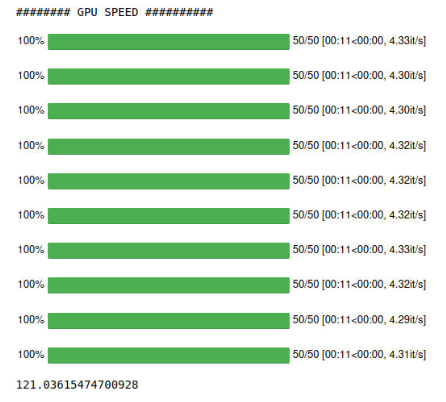
print("######## GPU SPEED ##########")
start = time.time()
# loop through each emotions and create different images based on the prompts
for j in range(10):
for emotion in emotion_prompts.keys():
emotion_prompt = emotion_prompts[emotion]
gender = random.choice(genders)
prompt = 'Medium-shot portrait of {}, {}, front view, looking at the camera, color photography, '.format(gender, emotion_prompt) + \
'photorealistic, hyperrealistic, realistic, incredibly detailed, crisp focus, digital art, depth of field, 50mm, 8k'
negative_prompt = '3d, cartoon, anime, sketches, (worst quality:2), (low quality:2), (normal quality:2), lowres, normal quality, ((monochrome)), ' + \
'((grayscale)) Low Quality, Worst Quality, plastic, fake, disfigured, deformed, blurry, bad anatomy, blurred, watermark, grainy, signature'
image = pipe(prompt=prompt, negative_prompt=negative_prompt).images[0]
image.save('/notebooks/{}/{}.png'.format(emotion, str(j).zfill(4)))
print(time.time() - start)Now, let's run the code, and look at how long the task takes for the A4000 GPU speeds, and then use a slight alteration to compare it with the CPU speeds.
And then, to put our pipeline onto the CPU, simply use the following snippet before running the same code:
pipe.to('cpu')This will get us our CPU times, shown below.

As we can see, the CPU was significantly slower. This is because images are represented by computers as arrays of numbers, and performing the multitude of parallel processes on a GPU is just much more efficient.
Results
Here is an overview of all of our analyses from this blog post. GPUs were consistently faster across all of these data operation and machine learning tasks.
Conclusion
The pairing of CUDA with NVIDIA GPUs holds a dominant position in various application domains, particularly in the field of deep learning. This combination serves as a cornerstone for powering some of the world's super computers.
CUDA and NVIDIA GPU have successfully powered industries such as Deep Learning, Data Science and Analytics, Gaming, Finance, Researches and many more. For instance Deep learning heavily relies on fast computing, particularly GPUs and specialized hardware like TPUs.
The use of GPUs significantly accelerates the training process, reducing it from months to a week. Various deep learning frameworks, including TensorFlow, PyTorch, and others, depend on CUDA for GPU support and cuDNN for deep neural network computations. Performance gains are shared across frameworks when these underlying technologies improve, but differences in scalability to multiple GPUs and nodes exist among frameworks.
In summary we can say that when picking a GPU for deep learning or any A.I. tasks one of the things to keep in mind is the GPU should support CUDA. We highly recommend using the Paperspace platform as it comes with pre-installed CUDA and one can skip the hassle of installing the package.
We hope you enjoyed reading the article.