Bring this project to life
On this blog, we have long espoused the utility of Stable Diffusion for a wide variety of computer vision tasks, not just text to image synthesis. Namely, Stable Diffusion has also proven to be an extremely capable tool for image editing, 3D modeling, and much more.
Furthermore, image upscaling and blind image restoration remain one of the most visible and utilitarian applications of AI available to a consumer today. Since last years GFPGAN and Real ESRGAN, efforts in this field have proven extremely capable in tasks like background detail restoration and face upscaling. Blind Image Restoration is the domain of AI that seeks to handle these and similar tasks.
In this blog post, we will look at one of the latest and greatest efforts to tackle this task: DiffBIR. By leveraging the extreme capability of the Stable Diffusion model, DiffBIR enables simplistic and easy to implement image restoration for both general image restoration and faces. Readers can expect to learn the basics of how the model works and was trained, and we will then jump into a walk through of the Gradio application the authors provided. We will finish with a few examples we made using the new technology to upscale our images.
DiffBIR Model Architecture

DiffBIR is comprised of two stage pipeline. In the first Stage, a series of operations are performed on the image to first generate a degraded representation of the original high quality image in low quality. The blur-resize-noise process occurs three times. The pretrained restoration model then works to first remove the degradations in the low quality images. The generative model then reproduces the lost information, which forces the latent diffusion model's restoration process to focus on the texture and detail generation without being affected by noise. This promotes a much more robust reconstruction.
To achieve this, they use a modified SwinIR as the restoration model. Specifically, they made several changes to utilize the pixel unshuffle operation to downsample the input ILQ by a factor of 8. Next, a 3 × 3 convolutional layer is adopted to improve shallow feature extraction. All the subsequent transformer operations are performed in low resolution space, which is similar to latent diffusion modeling. The deep feature extraction adopts several Residual Swin Transformer Blocks
(RSTB), and each RSTB has several Swin Transformer Layers (STL). Check out this blog post for a details breakdown on SwinIR for more information about what this entails. The shallow and deep features are added in order to maintain both the low-frequency and high-frequency information. To upsample the deep features back to the original image space, the model performs nearest interpolation three times. Each interpolation is followed by one convolutional layer as well as one Leaky ReLU activation layer. They also optimized the parameters of the restoration module by minimizing the L2 pixel loss. This process can be represented by the equation below:
For Stage 2, the pipeline uses the output from stage 1 obtained by regression learning and to use for the fine-tuning of the latent diffusion model. This is known as the condition latent when the diffusion model's VAE maps this into the latent space. This follows the standard diffusion model process, where the diffusion and denoising processes are performed in the latent space by adding Gaussian noise with variance at each step t to the encoded latent z = E(x) for
producing the noisy latent, as represented by:

A network ϵθ is learned by predicting the noise ϵ conditioned on c (i.e., text prompts) at a randomly picked time-step t. The optimization of latent diffusion model is defined as follows:
Since the stage 1 restoration process tends to leave an overly smoothed image, the pipeline then works to leverage the pre-trained Stable Diffusion for image reconstruction with the obtained Ireg -IHQ pairs. First, they utilize the encoder of Stable Diffusion’s pretrained VAE to map Ireg into the latent space, and obtain the condition latent E (equivalent to Ireg ). Then, the UNet runs typical latent diffusion. In parallel, there is an additional path that contains the same encoder and middle block as the UNet denoiser. There, it concatenates the condition latent E (Ireg ) with the randomly sampled noisy zt as the input for the
parallel module. The outputs of the parallel module are added to the original UNet decoder. Moreover, one 1 × 1 convolutional layer is applied before the addition operation for each scale.
During fine-tuning, the parallel module and these 1 × 1 convolutional layers are optimized simultaneously, where the prompt condition is set to empty. The model aims to minimize the following latent diffusion objective. The obtained result in this stage is denoted as Idiff, and represents the final restored output. Together, this process is called LAControlNet by the original authors.
To summarize the process, only the skip-connected features in the UNet denoiser are tuned for our specific task. This strategy alleviates overfitting when dealing with our small training dataset, while allowing inheritance of the capability for high-quality generation from Stable Diffusion. The conditioning mechanism is more straightforward and effective for image reconstruction task
compared to other methods like ControlNet, which utilizes an additional condition network trained from scratch for encoding the condition information.
In DiffBIR's LAControlNet, the well-trained VAE’s encoder is able to project the condition images into the same representation space as the latent variables. This
strategy significantly alleviates the burden on the alignment between the internal knowledge in latent diffusion model and the external condition information. In practice, directly utilizing ControlNet for image reconstruction leads to severe color shifts as shown in the ablation study. In practice, this full pipeline process allows for the extremely high quality blind image restoration that the model boasts.
Run DiffBIR in a Paperspace Notebook
Bring this project to life
Now that we went over the underlying concepts behind DiffBIR, lets take a look at the model in action. To do this, we are going to run the DiffBIR demo provided by the original repo authors in a Paperspace Notebook. Click the link above, and the demo will open in a new browser tab. Click the start button in the top left to start up the notebook, and navigate to the DiffBIR.ipynb notebook.
We ran our tests for this demo on a single A100-80GB machine. Users can click the link above to get access to this demo on a Free GPU. Consider upgrading to our growth or pro plans for access to a wider variety of free machines at the cost of a single monthly payment! This can accelerate your process greatly in comparison to the M4000 used by the Free GPUs.
Setup
Once our notebook is spun up and we are in the demo Ipython notebook, we can begin by running the first 2 code cell. The first will install the required packages to run the demo, and the second will download all the model checkpoints required. We recommend skipping the second cell on subsequent runs to avoid the roughly 5 minute download. The code for this cell may be found below:
!pip install -r requirements.txt
!pip install -U gradio
Then to download the models from HuggingFace, we run the next cell:
!mkdir weights
%cd weights
!wget https://huggingface.co/lxq007/DiffBIR/resolve/main/general_swinir_v1.ckpt
!wget https://huggingface.co/lxq007/DiffBIR/resolve/main/general_full_v1.ckpt
!wget https://huggingface.co/lxq007/DiffBIR/resolve/main/face_swinir_v1.ckpt
!wget https://huggingface.co/lxq007/DiffBIR/resolve/main/face_full_v1.ckpt
%cd ..
Running the demo
Now that we have everything setup, we can get started. In the next code cell, all we need to do is run the cell to get our demo spun up. Click the shared link to open the Gradio demo in your browser
!python gradio_diffbir.py \
--ckpt weights/general_full_v1.ckpt \
--config configs/model/cldm.yaml \
--reload_swinir \
--swinir_ckpt weights/general_swinir_v1.ckpt \
--device cuda
Testing with the demo

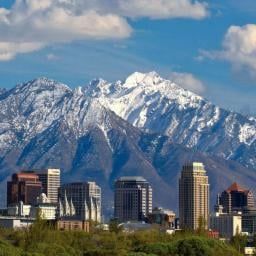
To test out the demo, we found a free icon image of a city with a mountainous background. We recommend recreating the demo to get a feel for how the model works. There is a copy of the image we used and its prompt below:
We ran our Blind Image Restoration test on the above image with the following settings:
- SR Scale (how many times larger to make the image): 4
- Image size (output size before scaling, in pixels): 512
- Positive prompt (for Stable Diffusion guidance): a city with tall buildings, forest trees, snowy mountain background
- Negative prompt: longbody, lowres, bad anatomy, bad hands, missing fingers, extra digit, fewer digits, cropped, worst quality, low quality
- Prompt Guidance Scale (how much effect the prompt has on upscaling, 0 will remove effect): 1
- Control Strength (how much original image guides reconstruction for LAControlNet): 1
- Steps: 50
- Seed: 231
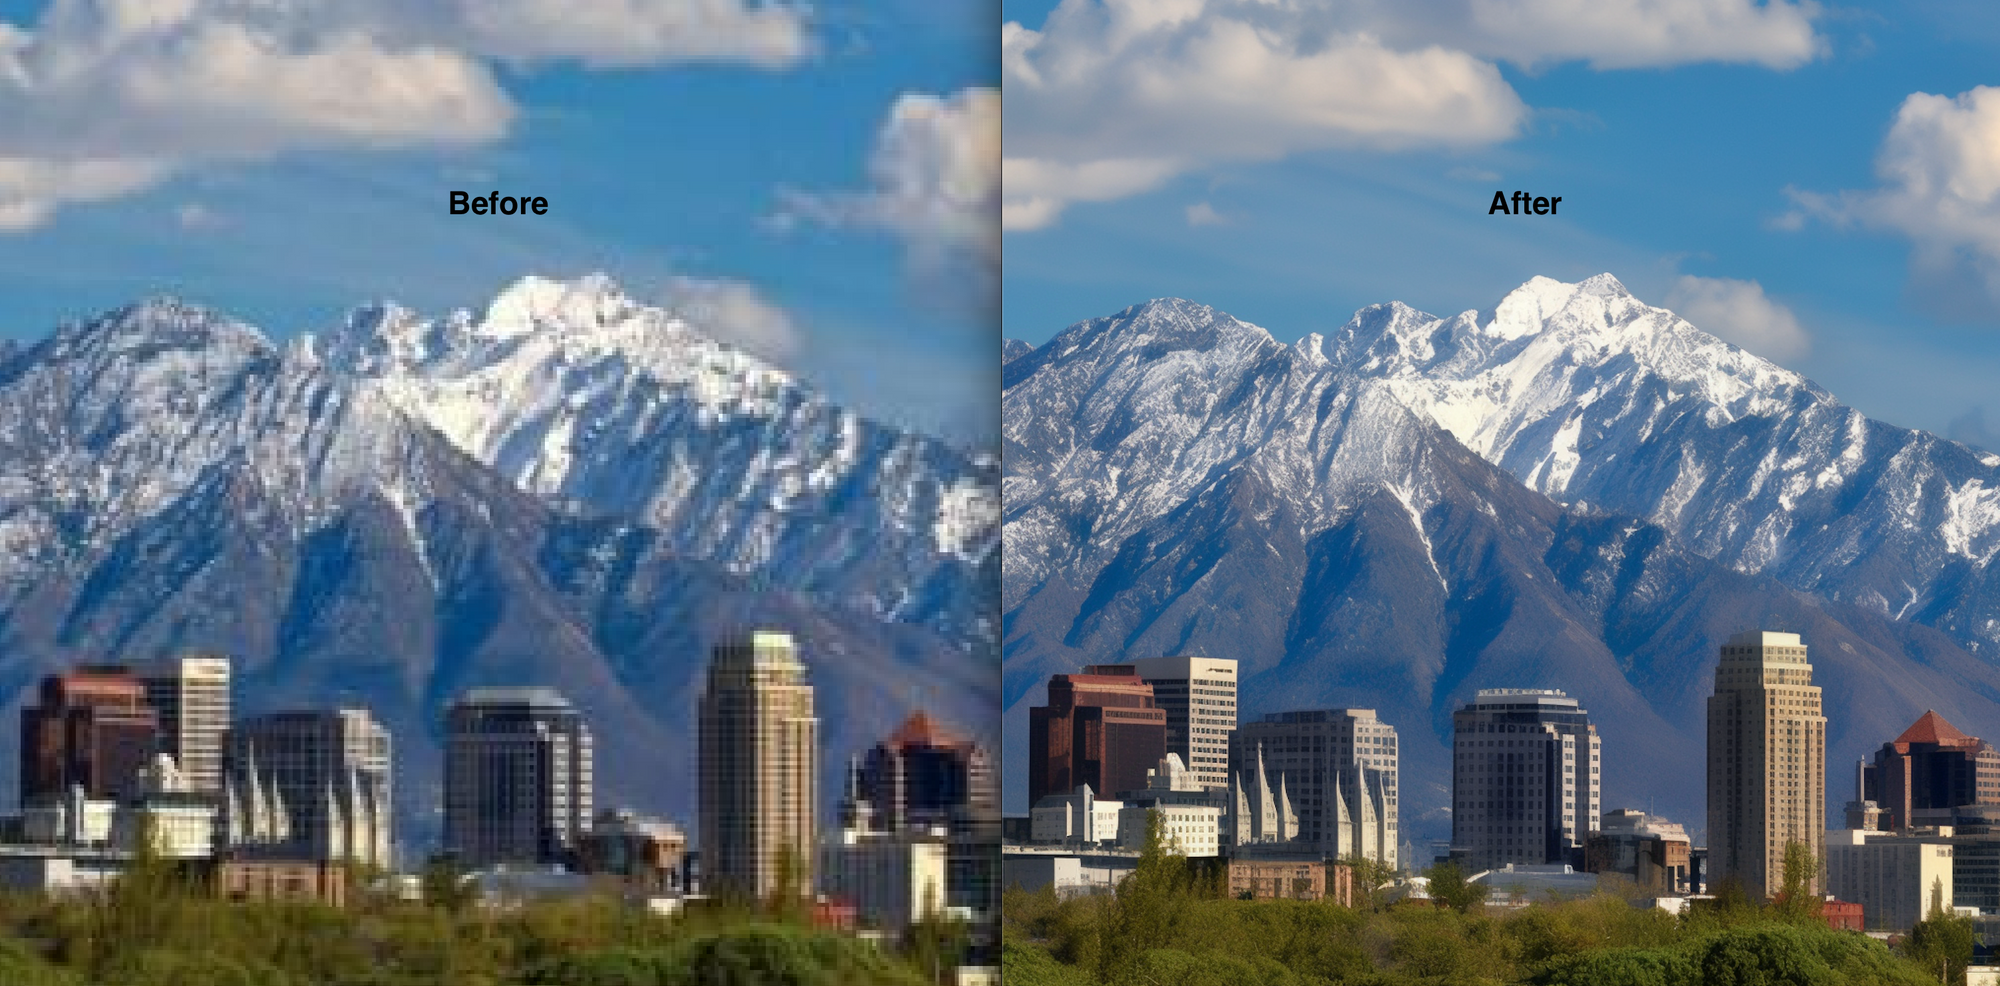
As we can see, the model succeeds in accomplishing a great deal of upscaling. For fine details, we can see evidence of the models efficacy especially by zooming in on the snowcaps of the mountains and the office windows. The level of detail there is very complete. Of course, it isn't perfect. Notice the pointed roof buildings towards the left of the image. In the blind image restoration version on the right, the roofs have taken on a strange slope and blending effect with the building behind it.
As for more coarse details, the shadows on the side of the mountain and contiguity of the blue sky are great evidence for the models efficacy. Again, the opposite can be seen in the forest greenery below the buildings. These appear almost like bushes rather than sets of full trees.
All in all, from a qualitative perspective, there is a minimal uncanny valley effect. The only real presence we can see of it is with those curved roofs. Otherwise, from our perspective, this seems like an excellent tool for quick photo upscaling. When combined with other tools like Real ESRGAN and GFPGAN, we may see these capabilities taken even further.
We recommend testing the full face and full models on a variety of test images with different parameters to get better results. We hope this tool can be a great new addition to users arsenals for image manipulation with AI.
Closing Thoughts
DiffBIR offers a really valuable new tool for image restoration with AI. For both faces and general images, the technique shows incredible promise. In the coming weeks, we plan to test this technique out on old family photos to see how its capabilities stack up.
For some inspiration, we recommend using the icon size search in google images. This model works best on smaller images. Anything larger than 720p will likely exceed the GPUs memory capacity. Enjoy using DiffBIR with Paperspace!