Huge amounts of data are generated each second. Users are viewing web pages or using applications where they frequently generate data by touching the screen, for example. The applications that use machine learning to enhance user experience might benefit from such data, as it contains information that could be useful to enhance future predictions.
That being said, due to privacy concerns, this data may not be shared with others. To keep the data private but still use it to train machine learning models, privacy-preserving machine learning has been on the rise.
This tutorial discusses how to use federated learning to train Keras models while keeping user data private. The code for this tutorial is available at the KerasFederated directory of this GitHub project, which comes with a GUI created using Kivy.
Here are the topics discussed:
- Quick Review of Federated Learning
- Getting Started
- Prepare the Training Data
- Building the Keras Model
- Building a Population of Solutions
- Listening to Connections at the Server
- Server Reply to Client Request
- Client Behavior
- Conclusion
Bring this project to life
Quick Review of Federated Learning
In traditional machine learning, the user data is collected into a central server where a model is trained. This is also called centralized machine learning because the user data (even when private) is uploaded to a central server.
As Lingjuan et al. (2020) mention in their paper, societies have become more aware of the danger of sharing data that encroaches on the privacy of the user. For example, training a model that recognizes one's face to log into an app, or sharing medical records that reveal private information about the patients.
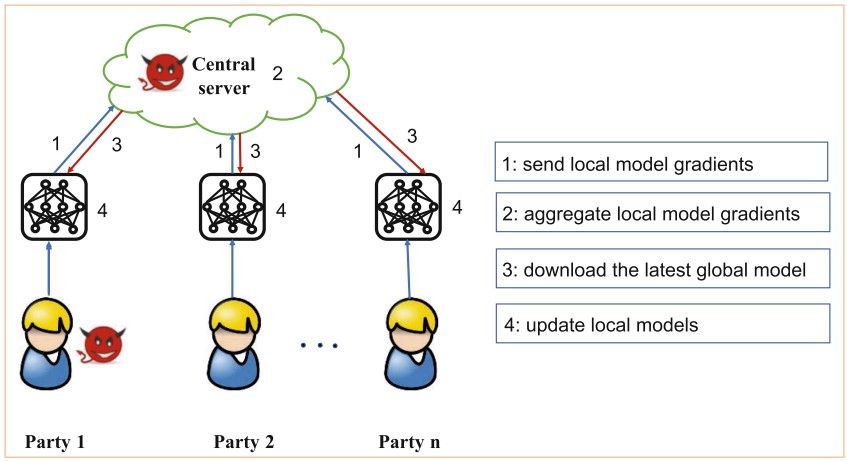
Federated learning (FL for short) comes to solve the privacy-related matters of centralized machine learning. FL uses a client-server architecture to train the model. The data is available at the client and the model is available at the server. How do we train the server's model using the clients' data? The next figure, obtained from the Threats to Federated Learning paper, shows how FL works.

A global model is available on the server. The latest version of the model is shared with the clients, where each client updates the model according to its private data. The client just shares the gradients of the trained model with the server where the global model is updated.
Federated learning is not coming from heaven, and still suffers from some privacy issues. This review paper summarized the FL attacks into:
- Poisoning Attacks: The model makes predictions that serve the attacker's purpose.
- Inference Attacks: The attacker restores the user's private data.
For more information about FL, please check out these resources:
- Introduction to Federated Learning
- Federated Learning: Collaborative Machine Learning Without Centralized Training Data
- Yang, Qiang. Federated Learning: Privacy and Incentive. Springer Nature, 2020
The remainder of this tutorial focuses on describing how to train our Keras model for federated learning.
Getting Started
Before working on building and training the Keras model using FL, let's get comfortable with the project we will use. The base project is available at this link. The example posted in the project shows how to train an XOR problem using a neural network trained using the genetic algorithm with the PyGAD library. The project has a GUI to simplify interaction.
After downloading the project there are three Python files in the root directory, which are:
server.py: The FL server that builds the model and sends it to the clients.client1.py: One client that has 2 training samples.client2.py: Another client that has another 2 training samples.
You can add more clients as you want. This project builds the clients and the server from scratch using Python socket programming.
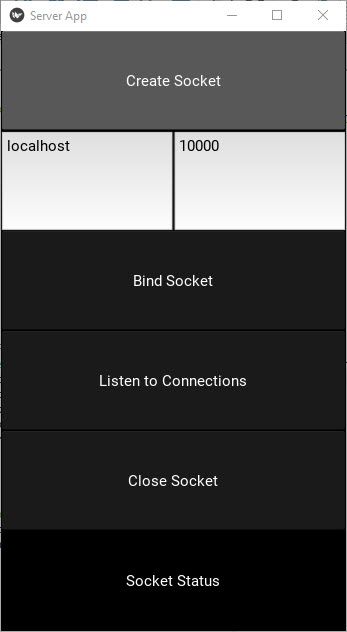
By running the server, the following Kivy window appears. Here is a description of the buttons in the GUI:
- Create Socket: Creates a socket.
- Bind Socket: Binds the socket to the IPv4 address and the port numbers entered in the 2 text fields.
- Listen to Connections: Open the socket for connections.
- Close Socket: Closes the socket.
- Socket Status: Shows some informational messages.

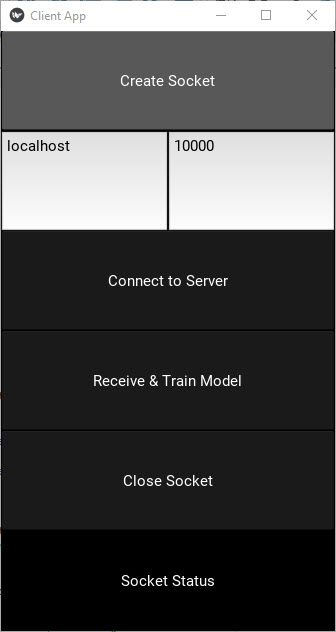
ِAfter the server runs, next is to run the clients. When a client runs, the GUI in the next figure appears with the following buttons:
- Create Socket: Creates a socket.
- Connect to Server: Connects the client's socket to the server's socket. Make sure the server's socket is accepting connections.
- Receive & Train Model: This is where the actual work takes place as the client receives the model from the server, trains it, and sends it back to the server.
- Close Socket: Closes the socket.

The server has a timeout timer that defaults to 5 seconds. If there is no data received within this timeout time, then the connection is closed. That means the server has to respond to the client within 5 seconds. If the client takes more than 5 seconds to train the model and respond to the server, please increase that time.
For the client, the timer time is specified while creating an instance of the RecvThread class. For the server, the time is a property of the SocketThread class.
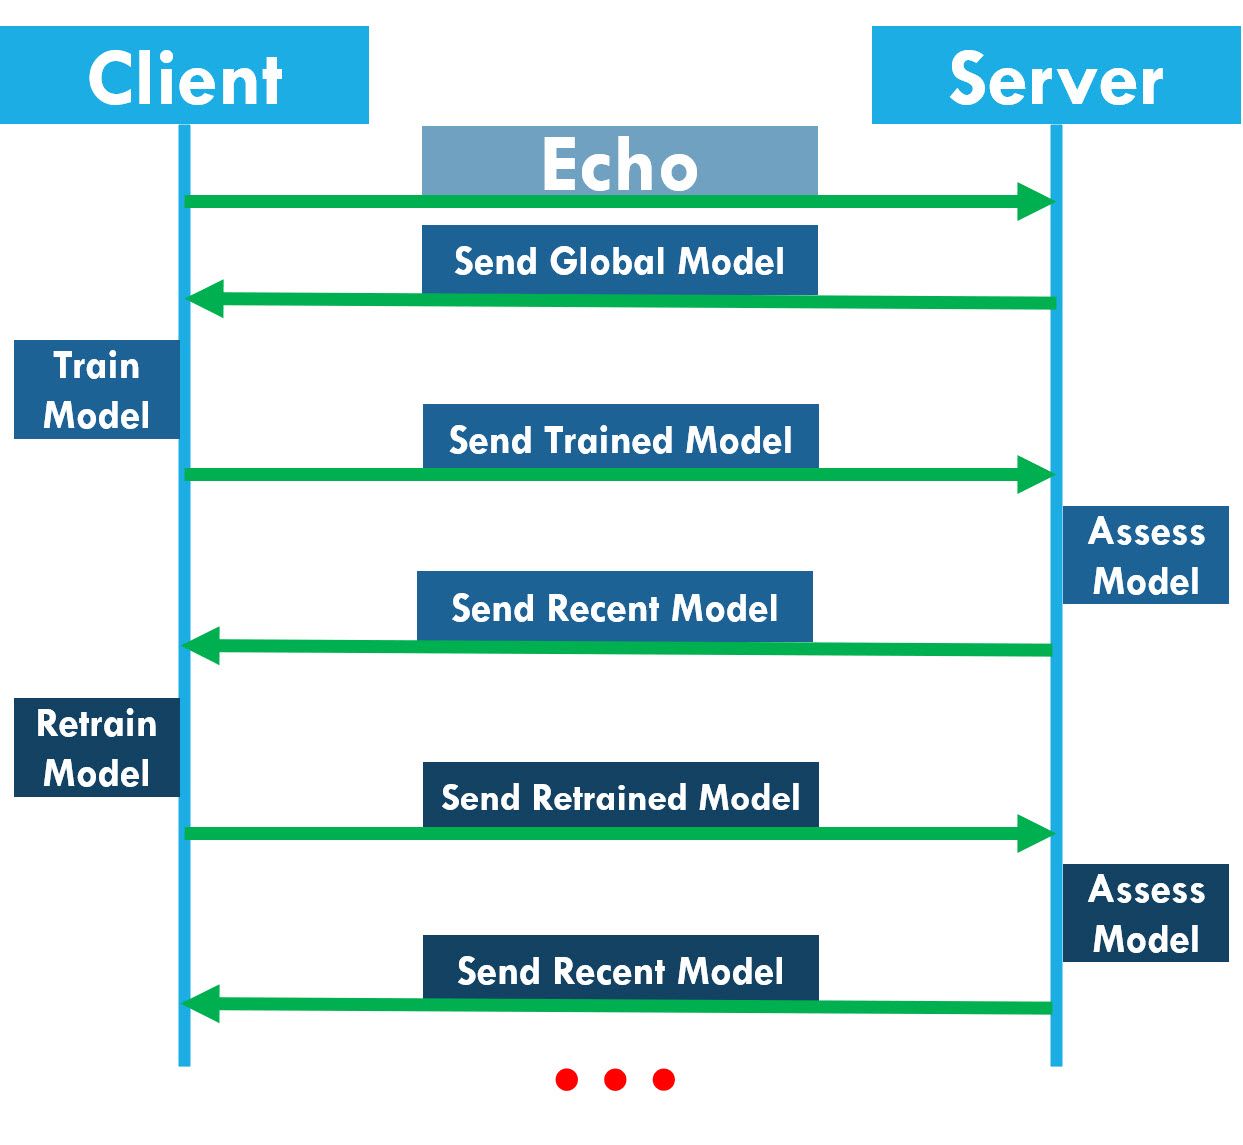
The server stops training the model once the error is $0.0$. As long as it is not $0.0,$ the server will keep sending the model to the client. The communication between the client and the server is summarized in the next diagram.

When the client first connects to the server, it sends an echo message. The server responds to the echo messages with a copy of its global model.
The client trains the model based on its local data and sends the trained model to the server. The server assesses the model based on its test data. If the server decides that more training is needed, the server responds with the most recent copy of the model to the client. This process continues until the server marks the model as trained. At this time, the connection between the client and the server closes.
After the model is trained, the server does not send the model to the clients anymore and the connection becomes IDLE. After the timeout timer expires, the connections between the server and the clients are automatically closed.
After making sure the project runs as expected, let's proceed to the next section that prepares the data used to train the model. Later, the Keras model is created and prepared for being trained using PyGAD.
Prepare the Training Data
To train a model using FL, the training data is distributed across the clients. The server itself does not have any training data, just test data to assess the model received from the clients.
The example discussed in this tutorial simply considers training a Keras model based on the training samples of the XOR problem. The XOR problem just has 4 samples as given in the code below.
The output of each sample is a vector of 2 elements. If the first element is $1$, then the output of the XOR for this sample is $1$. If the second element is $0$, then the XOR output for this sample is $1$. For example, the output vector assigned to the sample [1, 1] is [1, 0], which means the output is $0$.
data_inputs = numpy.array([[1, 1],
                           [1, 0],
                           [0, 1],
                           [0, 0]])

data_outputs = numpy.array([[1, 0],
                            [0, 1],
                            [0, 1],
                            [1, 0]])
In this tutorial, there will be just 2 clients, where each client has just 2 training samples. The first client has the following 2 samples:
data_inputs = numpy.array([[1, 1],
                           [1, 0]])

data_outputs = numpy.array([[1, 0],
                            [0, 1]])
The second client has the other 2 samples:
data_inputs = numpy.array([[0, 1],
                           [0, 0]])

data_outputs = numpy.array([[0, 1],
                            [1, 0]])
Because the XOR problem has no additional samples to be used as test data, the same training data is used as test data. If you're solving another problem where there's plenty of data, then use some test samples that are different from the training samples.
Given the training data, the next section builds the Keras model that works with the XOR problem.
Build the Keras Model
According to your preference, build the Keras model using either the Sequential or the Functional API. Here is an example that builds a simple Keras model for the XOR problem. The model has the following 3 layers:
- Input with 2 neurons.
- Hidden with 4 neurons.
- Output with 2 neurons and Softmax function.
The number of inputs is 2, as each sample of the XOR has just 2 inputs.
import tensorflow.keras

num_inputs = 2
num_classes = 2

input_layer  = tensorflow.keras.layers.Input(num_inputs)
dense_layer = tensorflow.keras.layers.Dense(4, activation="relu")(input_layer)
output_layer = tensorflow.keras.layers.Dense(num_classes, activation="softmax")(dense_layer)

model = tensorflow.keras.Model(inputs=input_layer, outputs=output_layer)
The next section uses the created model to create a population of solutions for the genetic algorithm.
Build Population of Solutions
This tutorial does not use gradient descent, but rather the genetic algorithm for training the Keras model. To understand how training works, check out this tutorial: How To Train Keras Models Using the Genetic Algorithm with PyGAD.
The next code block uses the pygad.kerasga.KerasGA class to build a population of solutions, where each solution holds some values for the Keras model's parameters. In this example, 10 solutions are used.
import pygad.kerasga

num_solutions = 10
keras_ga = pygad.kerasga.KerasGA(model=model,
                                 num_solutions=num_solutions)
The population of solutions is saved into the population_weights attribute of the KerasGA class. So, it can be accessed simply as follows:
keras_ga.population_weightsThe next section shows how the server listens to connections from the clients.
Listening to Connections at the Server
The server has a class named ListenThread, which is a thread that starts from the moment the server socket is opened. For each coming connection from a client, a new instance from the SocketThread class is created which serves the client.
Among the arguments in the constructor of the SocketThread class, there are 2 important ones:
buffer_size: The buffer size (in bytes). It defaults to 1,024, which means the model is split into chunks of 1,024 bytes each. If the model size is large, please use a larger value. Otherwise, the server might take a lot of time to receive the model from the client.recv_timeout: If nothing is received from the client after this number of seconds, the connection with the client will be closed. If the model takes a lot of time to be trained at the client, please allow the server to wait longer (more seconds). If this argument is not set properly, the connection might get closed while the client is training the model with its local data.
socket_thread = SocketThread(...,
                             buffer_size=1024,
                             recv_timeout=10)
The next section discusses how the server replies to the client's request.
Server Reply to Client Request
The server.py script has a class named SocketThread, which has 4 methods:
run(): This method runs an infinite loop to receive the client's message.recv(): This receives the client's message.reply(): Replies to the client.model_averaging(): Calculates the average between the current parameters in the model and the model received from the client.
This section focuses on the reply() and model_averaging() methods.
In the reply() method, the server decides its response based on what is received from the client. The client usually sends a nested dictionary of the following form:
data = {"subject": ...,
        "data": {"best_model_weights_vector": ...}}
It has two keys:
subject: Its value can be eitherechoormodel.data: Its value can be eitherNoneor a dictionary that, up to this time, has a single key namedbest_model_weights_vector.
If the subject is echo, this means the client just opened the connection to the server. The client may or may not send a model when the subject="echo". Thus, if the value assigned to the key best_model_weights_vector is None, the client did not send a model. In this case, the server replies with its recent model.
If the value assigned to the best_model_weights_vector key is not None when subject="echo", then the server only replies with the model if the current accuracy of the model is not 1.0, which means the model is 100% accurate. The message that the server replies with is a nested dictionary of the following form:
data = {"subject": ...,
        "data": {
            "population_weights": ...,
            "model_json": ...,
            "num_solutions": ...
                }
       }
Here is a description of what the keys mean:
subject: The message subject can be either"model"or"done". If it is set to"model", then the client knows that the server is sending a model. If it is set to"done", then the client knows that the model is trained.population_weights: The population that holds the parameters of all solutions.model_json: The architecture of the Keras model in JSON format.num_solutions: Number of solutions in the population.
The code block below implements what has been discussed thus far. First, it checks if the subject is "echo". If so, then it prepares a dictionary that holds the population, model architecture, and a number of solutions and sends it to the client.
If the subject is "model", then the client attached the model to its message. As a result, the value assigned to the key best_model_weights_vector contains the parameters of the model. If the subject is "done", then the model is trained and the data key will be set to None.
If the model is not None, this means the client attached a model to its message. The server first checks if the accuracy of its own model is 1.0. If so, then the server will not send the model (the data key set to None) to the client, as the server does not need to train the model anymore. If the accuracy is not 1.0, then the server replies with its model to be trained at the client.
def reply(self, received_data):

    ...

    if subject == "echo":
        if model is None:
            data_dict = {"population_weights": keras_ga.population_weights,
                         "model_json": model.to_json(),
                         "num_solutions": keras_ga.num_solutions}
            data = {"subject": "model", "data": data_dict}
        else:
            predictions = model.predict(data_inputs)
            ba = tensorflow.keras.metrics.BinaryAccuracy()
            ba.update_state(data_outputs, predictions)
            accuracy = ba.result().numpy()
            if accuracy == 1.0:
                data = {"subject": "done", "data": None}
            else:
                data_dict = {"population_weights": keras_ga.population_weights,
                             "model_json": model.to_json(),
                             "num_solutions": keras_ga.num_solutions}
                data = {"subject": "model", "data": data_dict}
    elif subject == "model":
        best_model_weights_vector = received_data["data"]["best_model_weights_vector"]
        best_model_weights_matrix = pygad.kerasga.model_weights_as_matrix(model=model, weights_vector=best_model_weights_vector)

        new_model = tensorflow.keras.models.clone_model(model)
        new_model.set_weights(weights=best_model_weights_matrix)
        predictions = model.predict(data_inputs)

        ba = tensorflow.keras.metrics.BinaryAccuracy()
        ba.update_state(data_outputs, predictions)
        accuracy = ba.result().numpy()

        if accuracy == 1.0:
            data = {"subject": "done", "data": None}
            response = pickle.dumps(data)
            return

        self.model_averaging(model, best_model_weights_matrix)

    predictions = model.predict(data_inputs)

    ba = tensorflow.keras.metrics.BinaryAccuracy()
    ba.update_state(data_outputs, predictions)
    accuracy = ba.result().numpy()

    if accuracy != 1.0:
        data_dict = {"population_weights": keras_ga.population_weights,
                     "model_json": model.to_json(),
                     "num_solutions": keras_ga.num_solutions}
        data = {"subject": "model", "data": data_dict}
        response = pickle.dumps(data)
    else:
        data = {"subject": "done", "data": None}
        response = pickle.dumps(data)

    ...
If the subject key is "model", then the client sent a model. In this case, the server fetches the Keras model parameters and prepares them in a matrix form inside the best_model_weights_matrix variable. Based on those parameters, the model accuracy is calculated.
If the accuracy is 1.0, then the model is trained successfully and the server will not send the model to the client. Otherwise, the parameters received from the client are averaged with the parameters at the server using the model_averaging() method.
The model accuracy is again calculated after the model_averaging() method is called. If the accuracy is not 1.0, then the server sends the new model parameters to the client. Otherwise, no model is sent.
The implementation of the model_averaging() method is given below. It receives the server's model and the parameters received from the client and averages them. Finally, the new parameters are set into the model.
def model_averaging(self, model, best_model_weights_matrix):
    model_weights_vector = pygad.kerasga.model_weights_as_vector(model=model)
    model_weights_matrix = pygad.kerasga.model_weights_as_matrix(model=model, weights_vector=model_weights_vector)

    new_weights = model_weights_matrix
    for idx, arr in enumerate(new_weights):
        new_weights[idx] = new_weights[idx] + best_model_weights_matrix[idx]
        new_weights[idx] = new_weights[idx] / 2

    model.set_weights(weights=new_weights)
Now, the server behavior is described. The server.py script is available here.
The next section discusses the client's behavior.
Client Behavior
The client has a class named RecvThread which creates a thread that works from the time the connection between the client and server is open, and keeps running until it is closed.
This class has 2 methods:
run(): This method uses an infinite loop to send and receive data between the client.recv(): Receives the server's message.
The important code parts of the run() method are given below. When the client makes its first request, then its subject is "echo" and the best_model_weights_vector key is set to None.
The client then receives the server's response and checks the subject of the response. If it is "model", then the server sent a model. If it is "done", then the client breaks the infinite loop to close the connection.
def run(self):

    ...

    subject = "echo"
    server_data = None
    best_model_weights_vector = None
    best_sol_idx = -1

    while True:
        data_dict = {"best_model_weights_vector": best_model_weights_vector}
        data = {"subject": subject, "data": data_dict}

        data_byte = pickle.dumps(data)

        try:
            self.kivy_app.soc.sendall(data_byte)
        except BaseException as e:
                break

        received_data, status = self.recv()

        subject = received_data["subject"]
        if subject == "model":
            server_data = received_data["data"]
        elif subject == "done":
            break
        else:
            break

        ga_instance = prepare_GA(server_data)

        ga_instance.run()

        subject = "model"
        best_sol_idx = ga_instance.best_solution()[2]
        best_model_weights_vector = ga_instance.population[best_sol_idx, :]

        ...
Based on the model sent by the server, a function called prepare_GA() is called which uses PyGAD to train the model using the genetic algorithm.
Once the training is done, the server replies to the client while setting the value of the subject key to "model" and the value of the best_model_weights_vector key to the parameters of the best model.
Note that all clients work the same way but only differ in the training data used. The project has 2 clients. In the KerasFederated directory, the clients' scripts are named client1.py and client2.py.
Conclusion
This tutorial discussed how to use federated learning to train a Keras model. Federated learning is a client-server paradigm in which some clients train a global model with their private data, without sharing it to a centralized server.
The example discussed just has 2 clients, where they work together to train a model that builds the XOR gate. The model is trained without sharing the clients' private data.
You can easily use the project with other data. All you need to do is set the data_inputs and data_outputs arrays at both the server and the clients.


