Using Deep Learning to generate art or to intelligently modify existing images is not a novel concept. Famous projects like Alexander Mordvintsev’s DeepDream architecture, which uses CNN’s to morph inputted images with algorithmic pareidolia to find and intensify patterns in the visual data, or Pix2Pix, which fills in and colorizes outlines of black and white drawings, have been around for half a decade. These technologies have immense potential, with use cases for security, marketing, shopping, and life in general all emerging from breakthroughs such as those listed above.
While the impact of advances in computer vision with deep learning begins to permeate the business world outside the ML community, the presence of DL techniques in the art world are becoming increasingly popular as well. The advent of NFT’s and virtual influencers, ai generated music and artwork, and much more offer clear proof that there is a substantial cultural impact being made by deep learning technologies.
In this article, we will look at one of the most promising image generators available, VQGAN-CLIP, and see how it can be applied with NLP and Gradient to generate novel clipart-work using a single prompt.
What is VQGAN-CLIP?
In short, VQGAN-CLIP is the interaction between two neural network architectures (VQGAN & CLIP) working in conjunction to generate novel images from text prompts. Each of the two work together to generate and qualify the pixel art for PixRay, with the VQGAN generating the images and CLIP assessing how well the image corresponds to the inputted text.
Our approach uses a convolutional VQGAN to learn a codebook of context-rich visual parts, whose composition is subsequently modeled with an autoregressive transformer architecture. A discrete codebook provides the interface between these architectures and a patch-based discriminator enables strong compression while retaining high perceptual quality. This method introduces the efficiency of convolutional approaches to transformer based high resolution image synthesis.
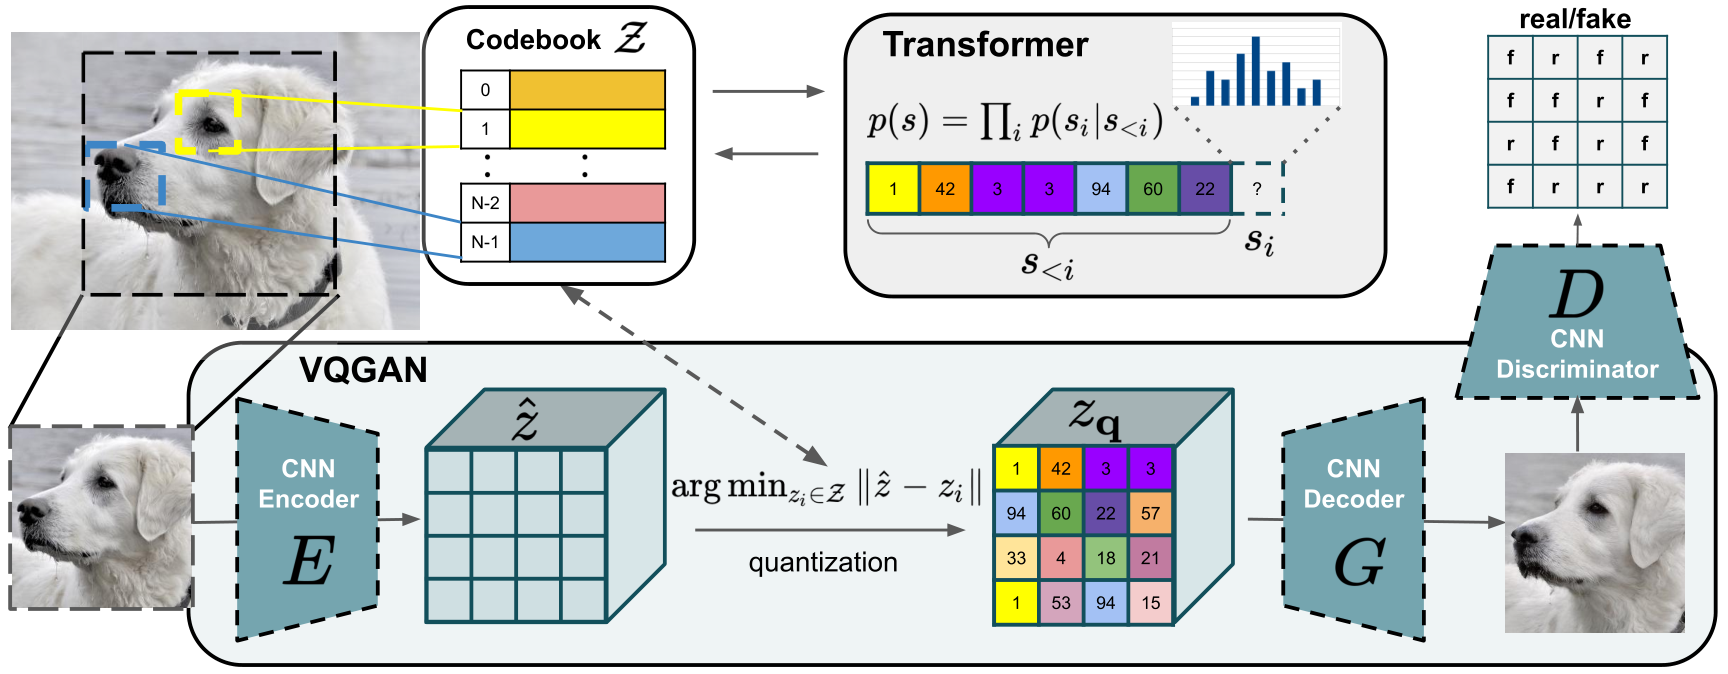
VQGAN (Vector Quantized Generative Adversarial Network): VQGAN is a GAN architecture which can be used to learn and generate novel images based on previously seen data. It was first introduced for the paper “Taming Transformers” (2021) by Esser, Rombach, and Ommer. It works by first having image data directly input to a GAN to encode the feature map of the visual parts of the images. This image data is then vector quantized: a form of signal processing which encodes groupings of vectors into clusters accessible by a representative vector marking the centroid called a “codeword.” Once encoded, the vector quantized data is recorded as a dictionary of codewords, also known as a codebook. The codebook acts as an intermediate representation of the image data, which is then input as a sequence to a transformer. The transformer is then trained to model the composition of these encoded sequences as high resolution images as a generator.
The main innovation of VQGAN - and what makes it so exciting - is the ability to input the image data directly into the transformer via the codebook encoding sequence autoregressively. In practice, the transformer is trained on a sequence of quantized tokens input from the codebook in an autoregressive way: it learns how to predict the next token's distribution based on a sequence of previous tokens.1 This step decreases the prospective cost of generating such images immensely, and allows for quicker processing of the image data.

The transformer also restricts the context of the image generation to “patches” of pixels via the sliding-window. This allows the transformer to only consider the local context of a patch: only “looking” at neighboring patches for information when generating the image and improving resource efficiency.
In the end, the transformer outputs a high resolution image generated either unconditionally or, as iterations of the training go on in something like VQGAN-CLIP go by, conditionally based on the context of the generation event.
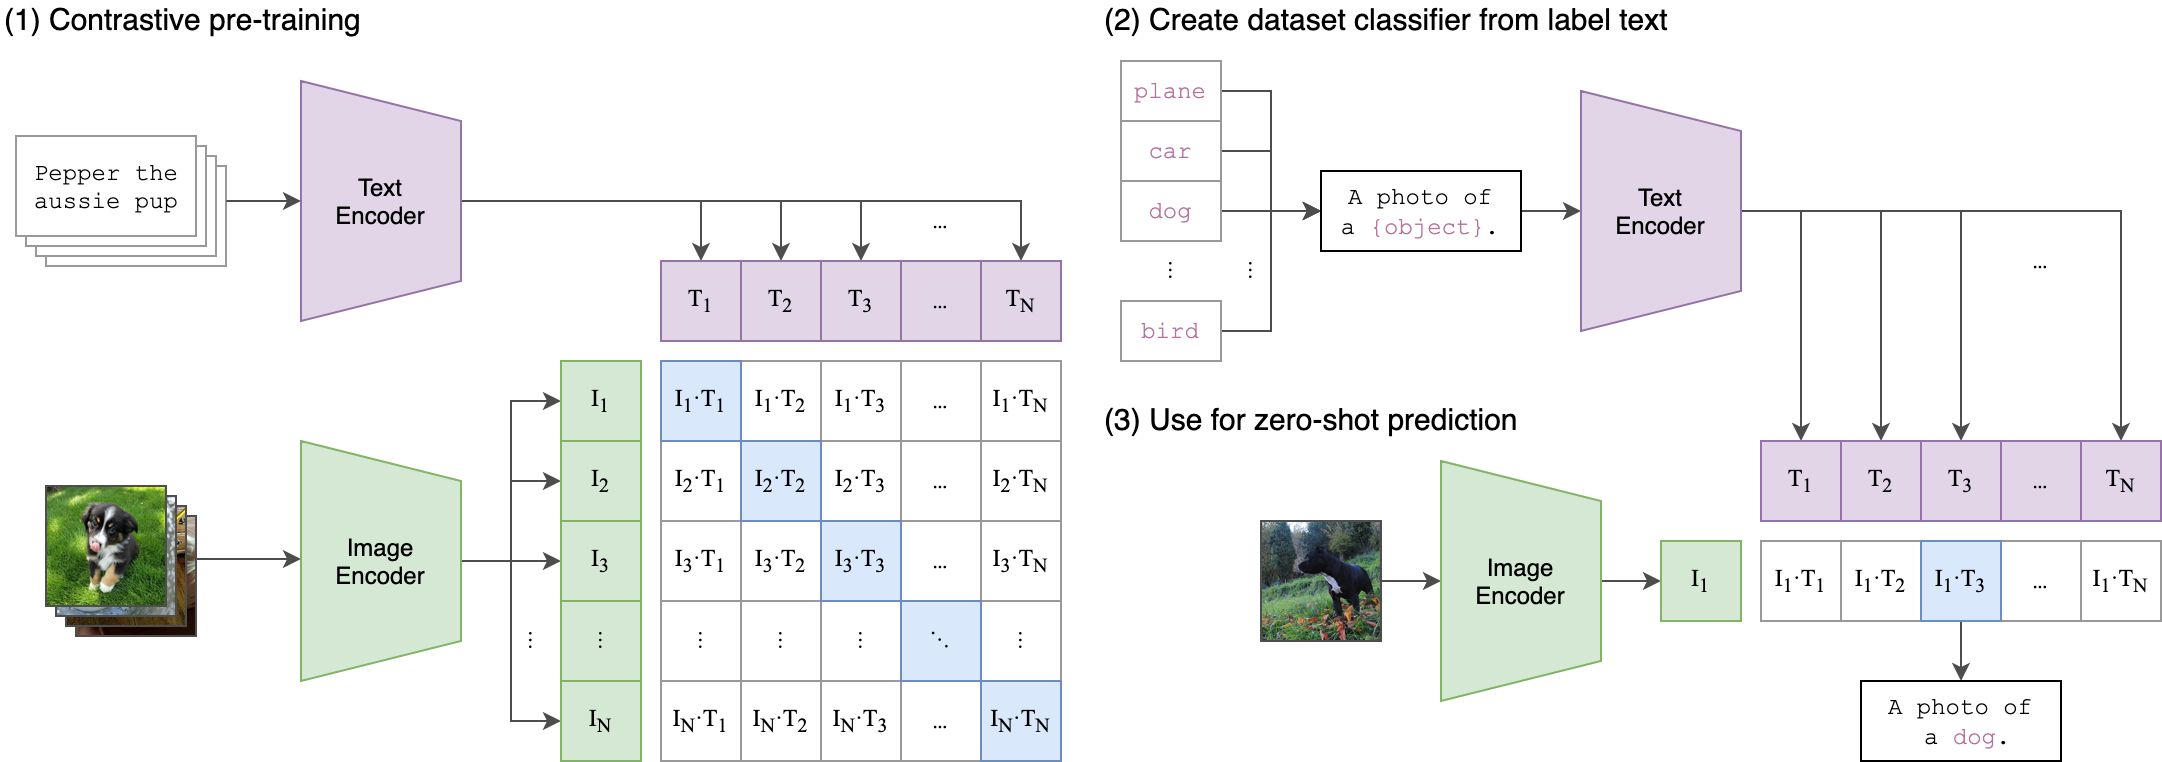
CLIP (Contrastive Language–Image Pre-training): In simple terms, CLIP is a model trained to assess the fit of a caption, compared to other captions in a set, to an image. CLIP is capable of zero-shot learning, enabling it to perform well even on unknown data. When applied in VQGAN-CLIP, CLIP is able to assess the quality of generated images compared to a user inputted caption, and the outputted scores can be used as weights to “guide” the learning of the VQGAN to more accurately match the subject matter through recursive iteration.2
Putting it together:
When used together, VQGAN-CLIP creates a series of models which can be used to generate images from a string of text. These images are created by having the VQGAN first generate a random noise image, which is vector quantized and encoded in a codebook, the codebook is then used as input to a transformer which generates the new image from the encoded signals, that output is then used to assess the accuracy of the image to the inputted prompt through CLIP, and then that scoring is sent back to the VQGAN to update the image generation model to more closely reflect the prompt.
What is PixelDraw?
The Gradient Notebook [Note: forking the supplied notebook is currently not working. Follow the video instructions at the top of the article to create your own, and we will remove this note when the issue is resolved] we used to create the image uses scripts written by the project team, lead by user Dribnet, for the opensource project PixRay. Launched in September of 2021, PixRay is a library that uses VQGAN-CLIP, Perception Engines, CLIPDraw, and sampling generative networks to create novel pixel art from a user submitted text prompt.
You can access the project's GitHub here, and can access a public demo notebook for the project here. This notebook is set up to generate pixel art using clipit (the predecessor to PixRay) and a component script of PixRay, PixelDraw. PixelDraw is used to generate PixelArt specifically.
Bring this project to life
The Notebook
Environment and requirements
PixRay is optimized to be run within a GPU context, and you must have one on either your local machine or remote access to one. If you have access to a GPU locally, you can then run PixRay through Docker using Cog.
The notebook we used for this project was running on a P6000 GPU, and training and image generation takes roughly 10 minutes. We recommend you follow the instructions in the video at the top of this article to set up your own Notebook. Note: Be sure to go to advanced options and set your workspace url to https://github.com/gradient-ai/ClipIt-PixelDraw.git and your container name to paperspace/clip-pixeldraw:jupyter.
To access this project on Gradient, click this link.
The code:
git clone https://github.com/openai/CLIP
git clone https://github.com/CompVis/taming-transformers.git
git clone https://github.com/dribnet/clipit
First, we need to install the relevant libraries. For PixelDraw to work properly, that means CLIP, clipit, and Taming Transformers. Go to your terminal and input the above snippet. Then open up the "pixeldraw.py" file.
#Setup Paths
import sys
sys.path.append("clipit")
sys.path.append("/clipit")
sys.path.append("CLIP")
sys.path.append("/CLIP")
sys.path.append("diffvg")
sys.path.append("/diffvg")
sys.path.append("taming-transformers")
sys.path.append("/taming-transformers")
When setting up the pixeldraw.py script itself, we must first setup the relevant paths to the libraries within our environment. After this initial setup, we can begin making settings for the PixelDrawer.py script itself. Here are some of the settings we use
# Settings: these are variables that can be used to adjust the output of the model
# prompts: the sentence the model will try to interpret to produce an image
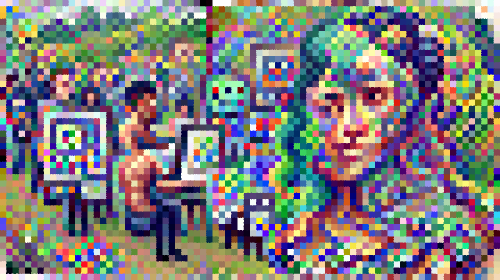
prompts = "Humans use Machine Learning to make art #pixelart" #@param {type:"string"}
# aspect: the shape/size of the outputted .png
aspect = "widescreen" #@param ["widescreen", "square"]
# use_pixeldraw: set to True to ensure ClipIt uses PixelDraw rather than other options, clipdraw or vqgandraw
use_pixeldraw = True #@param {type:"boolean"}
- Most important among these is the prompt. The prompt is a string of text that will guide our image generation, as CLIP uses that prompt as the test caption for assessing the quality of a generated image.
- The next setting to consider is aspect. Aspect is used to decide the shape of our generated image, and can either be set as 'widescreen,' indicating a wide rectangular image, or square, for images with even sizing across both dimensions.
- Finally, for this example, we want to ensure that the correct drawing script is used, so we set use_pixeldraw to be equal to True. The other options are clipdraw and vqgandraw, which would generate similar but ultimately different images from PixelDrawer.py.
Other settings we can apply include quality and scale, which affect the resolution and size of the image respectively. Iterations affects the number of training iterations that occur, and display_every tells an ipython widget to show the image at the end of n training periods.
Now that we have assigned our settings, clipit needs to be instantiated and the settings subsequently applied.
# Import clipit to access relevant functions
import clipit

# reset_settings() ensures we are using defaults
clipit.reset_settings()
# add_settings creates a dictionary of the settings we defined above, and make other adjustments to output
clipit.add_settings(prompts=prompts, aspect=aspect)
clipit.add_settings(quality="better", scale=2.5)
clipit.add_settings(use_pixeldraw=use_pixeldraw)

# Use iterations and display_every params to adjust training time and information display throughout
# This is the example of how to run longer with less frequent display
clipit.add_settings(iterations=300, display_every=50)

# apply_settings() to implement the settings from the add_settings() dict
settings = clipit.apply_settings()

# Run and create the image
clipit.do_init(settings)
clipit.do_run(settings)
To apply the settings to clipit, we first import the library.
- We then use the reset_settings() method first to ensure that there are no pre-set parameters and that we are using the default parameters.
- Next, we use add_settings() to input our settings into clipit. This stages the settings to be fully applied in the next step.
- Then, we use apply_settings() to create a dictionary containing our settings to be applied during the training run.
- Finally, we can run the model and generate the image by inputting clipit.do_init(settings) and clipit.do_run(settings) in succession to run clipit with our user input settings.
To actually run this script, simply enter it into either a Notebook cell or your terminal. If done successfully, the image generation training should then begin, and run for the inputted amount of training iterations.

The image will be output as a 500 x 280 pixel png file, and will be saved directly to your files as "output.png."
Concluding statement
The ability to generate novel art from a seemingly mundane source will always be an interesting one. Today, we looked at how a user could generate pixel art with nothing more than a GPU and a text input. The use cases for such a technique are nearly infinite, but i will list a few:
- Automated content generation (marketing and design): teams in the future will be able to use simple text inputs to generate interesting and new artworks for their content. This could save hundreds of hours for branding and artistic asset creation.
- Automated content generation (artists): This also extends to creatives, as artists can leverage AI art generation as a new tool at their disposal. The creative potential for text to image technology cannot be understated.
- Automated photo processing: A user can selectively choose the input photo. If the starting photo already has notable designs/patterns instead of random noise, that photo may be used as a guide template for the photo processing. in theory, once this has been sufficiently optimized, we could use a similar architecture to make appropriate edits to existing images rather than doing them manually. For example, if we gave the model an image of clowns with the text prompt "clowns without hats" we could expect the model to try and remove those hats. This is a long way off though.
Thank you for reading this guide to using PixelDrawer from PixRay! Look out for more tutorials like this one and our new guide to how we created the Adoro app on Gradient.
Code snippets for video
Imports
!pip install ftfy regex tqdm omegaconf pytorch-lightning
!pip install kornia
!pip install imageio-ffmpeg
!pip install einops
!pip install torch-optimizer
!pip install easydict
!pip install braceexpand
!pip install git+https://github.com/pvigier/perlin-numpy
Credits:
1: @casual_gan, "24: VQGAN Explained". https://www.casualganpapers.com/vqvae-discrete-vision-transformer/VQGAN.html
2: Alec Radford, Ilya Sutskever ,Jong Wook Kim, Gretchen Krueger, Sandhini Agarwal, "CLIP: Connecting Text and Images" https://openai.com/blog/clip/