Pose estimation is a computer vision task for detecting the pose (i.e. orientation and position) of objects. It works by detecting a number of keypoints so that we can understand the main parts of the object and estimate its current orientation. Based on such keypoints, we will be able to form the shape of the object in either 2D or 3D.
This tutorial covers how to build an Android app that estimates the human pose in standalone RGB images using the pretrained TFLite PoseNet model. The model predicts the locations of 17 keypoints of the human body, including the location of the eyes, nose, shoulders, etc. By estimating the locations of keypoints, we'll see in a second tutorial how you can use this app to do special effects and filters, like the ones you see on Snapchat.
The outline of this tutorial is as follows:
- Base Android Studio Project
- Loading a Gallery Image
- Cropping and Scaling the Image
- Estimating the Human Pose Using PoseNet
- Getting Information About the Keypoints
- Complete Code of the
PosenetActivity.kt
Let's get started.
Bring this project to life
Base Android Studio Project
We'll use the TensorFlow Lite PoseNet Android Demo as a starting point to save time. Let's first discuss how this project works. Then we'll edit it for our own needs.
The project uses the pretrained PoseNet model, which is a transferred version of MobileNet. The PoseNet model is available for download at this link. The model accepts an image of size (257, 257) and returns the locations of the following 17 keypoints:
- nose
- leftEye
- rightEye
- leftEar
- rightEar
- leftShoulder
- rightShoulder
- leftElbow
- rightElbow
- leftWrist
- rightWrist
- leftHip
- rightHip
- leftKnee
- rightKnee
- leftAnkle
- rightAnkle
For each keypoint there is an associated value representing the confidence, ranging from 0.0. to 1.0. So, the model returns two lists: one representing the keypoint locations, and another with the confidence for each keypoint. It's up to you to set a threshold for the confidence to classify a candidate keypoint as either accepted or rejected. Typically a good decision is made when the threshold is 0.5 and higher.
The project is implemented in the Kotlin programming language and accesses the Android camera for capturing images. For each captured image, the model predicts the positions of the keypoints and displays the image with these keypoints overlain.
In this tutorial we're going to simplify this project as much as possible. First of all, the project will be edited to work with single images selected from the gallery, not those taken with the camera. Once we have the results for a single image we'll add a mask over the eyes, which is a known effect in image-editing apps like Snapchat.
The next section discusses removing the unnecessary code from the project.
Removing the Unnecessary Code
The project is configured to work with images captured from the camera, which is not our current target. So, anything related to accessing or capturing images should be removed. There are three files to be edited:
PosetnetActivity.ktactivity file.activity_posenet.xmllayout resource file of thePosetnetActivity.ktactivity.AndroidManifest.xml
Starting with the PosenetActivity.kt file, here is a list of the lines of code to be removed:
CameraDevice.StateCallback()161:179CameraCaptureSession.CaptureCallback()184:198onViewCreated()216:219onResume()221:224onPause()232:236requestCameraPermission()243:249openCamera()327:345closeCamera()350:368startBackgroundThread()373:376stopBackgroundThread()381:390fillBytes()393:404OnImageAvailableListener407:451createCameraPreviewSession()598:655setAutoFlash()657:664
As a result of removing the previous code, the following variables are no longer needed:
PREVIEW_WIDTH: 97PREVIEW_HEIGHT: 98- All variables defined from line 104 to 158:
cameraId,surfaceView,captureSession,cameraDevice,previewSize,previewWidth, and more.
After making the previous changes, these three lines are also no longer needed:
- Line 228 inside the
onStart()method:openCamera() - Line 578 at the end of the
draw()method:surfaceHolder!!.unlockCanvasAndPost(canvas)
Below is the current form of the PosenetActivity.kt after making these changes.
package org.tensorflow.lite.examples.posenet

import android.Manifest
import android.app.AlertDialog
import android.app.Dialog
import android.content.pm.PackageManager
import android.graphics.Bitmap
import android.graphics.Canvas
import android.graphics.Color
import android.graphics.Paint
import android.graphics.PorterDuff
import android.graphics.Rect
import android.os.Bundle
import android.support.v4.app.ActivityCompat
import android.support.v4.app.DialogFragment
import android.support.v4.app.Fragment
import android.util.Log
import android.util.SparseIntArray
import android.view.LayoutInflater
import android.view.Surface
import android.view.View
import android.view.ViewGroup
import android.widget.Toast
import kotlin.math.abs
import org.tensorflow.lite.examples.posenet.lib.BodyPart
import org.tensorflow.lite.examples.posenet.lib.Person
import org.tensorflow.lite.examples.posenet.lib.Posenet

class PosenetActivity :
  Fragment(),
  ActivityCompat.OnRequestPermissionsResultCallback {

  /** List of body joints that should be connected.    */
  private val bodyJoints = listOf(
    Pair(BodyPart.LEFT_WRIST, BodyPart.LEFT_ELBOW),
    Pair(BodyPart.LEFT_ELBOW, BodyPart.LEFT_SHOULDER),
    Pair(BodyPart.LEFT_SHOULDER, BodyPart.RIGHT_SHOULDER),
    Pair(BodyPart.RIGHT_SHOULDER, BodyPart.RIGHT_ELBOW),
    Pair(BodyPart.RIGHT_ELBOW, BodyPart.RIGHT_WRIST),
    Pair(BodyPart.LEFT_SHOULDER, BodyPart.LEFT_HIP),
    Pair(BodyPart.LEFT_HIP, BodyPart.RIGHT_HIP),
    Pair(BodyPart.RIGHT_HIP, BodyPart.RIGHT_SHOULDER),
    Pair(BodyPart.LEFT_HIP, BodyPart.LEFT_KNEE),
    Pair(BodyPart.LEFT_KNEE, BodyPart.LEFT_ANKLE),
    Pair(BodyPart.RIGHT_HIP, BodyPart.RIGHT_KNEE),
    Pair(BodyPart.RIGHT_KNEE, BodyPart.RIGHT_ANKLE)
  )

  /** Threshold for confidence score. */
  private val minConfidence = 0.5

  /** Radius of circle used to draw keypoints.  */
  private val circleRadius = 8.0f

  /** Paint class holds the style and color information to draw geometries,text and bitmaps. */
  private var paint = Paint()

  /** An object for the Posenet library.    */
  private lateinit var posenet: Posenet

  /**
   * Shows a [Toast] on the UI thread.
   *
   * @param text The message to show
   */
  private fun showToast(text: String) {
    val activity = activity
    activity?.runOnUiThread { Toast.makeText(activity, text, Toast.LENGTH_SHORT).show() }
  }

  override fun onCreateView(
    inflater: LayoutInflater,
    container: ViewGroup?,
    savedInstanceState: Bundle?
  ): View? = inflater.inflate(R.layout.activity_posenet, container, false)

  override fun onStart() {
    super.onStart()
    posenet = Posenet(this.context!!)
  }

  override fun onDestroy() {
    super.onDestroy()
    posenet.close()
  }

  override fun onRequestPermissionsResult(
    requestCode: Int,
    permissions: Array<String>,
    grantResults: IntArray
  ) {
    if (requestCode == REQUEST_CAMERA_PERMISSION) {
      if (allPermissionsGranted(grantResults)) {
        ErrorDialog.newInstance(getString(R.string.request_permission))
          .show(childFragmentManager, FRAGMENT_DIALOG)
      }
    } else {
      super.onRequestPermissionsResult(requestCode, permissions, grantResults)
    }
  }

  private fun allPermissionsGranted(grantResults: IntArray) = grantResults.all {
    it == PackageManager.PERMISSION_GRANTED
  }

  /** Crop Bitmap to maintain aspect ratio of model input.   */
  private fun cropBitmap(bitmap: Bitmap): Bitmap {
    val bitmapRatio = bitmap.height.toFloat() / bitmap.width
    val modelInputRatio = MODEL_HEIGHT.toFloat() / MODEL_WIDTH
    var croppedBitmap = bitmap

    // Acceptable difference between the modelInputRatio and bitmapRatio to skip cropping.
    val maxDifference = 1e-5

    // Checks if the bitmap has similar aspect ratio as the required model input.
    when {
      abs(modelInputRatio - bitmapRatio) < maxDifference -> return croppedBitmap
      modelInputRatio < bitmapRatio -> {
        // New image is taller so we are height constrained.
        val cropHeight = bitmap.height - (bitmap.width.toFloat() / modelInputRatio)
        croppedBitmap = Bitmap.createBitmap(
          bitmap,
          0,
          (cropHeight / 2).toInt(),
          bitmap.width,
          (bitmap.height - cropHeight).toInt()
        )
      }
      else -> {
        val cropWidth = bitmap.width - (bitmap.height.toFloat() * modelInputRatio)
        croppedBitmap = Bitmap.createBitmap(
          bitmap,
          (cropWidth / 2).toInt(),
          0,
          (bitmap.width - cropWidth).toInt(),
          bitmap.height
        )
      }
    }
    return croppedBitmap
  }

  /** Set the paint color and size.    */
  private fun setPaint() {
    paint.color = Color.RED
    paint.textSize = 80.0f
    paint.strokeWidth = 8.0f
  }

  /** Draw bitmap on Canvas.   */
  private fun draw(canvas: Canvas, person: Person, bitmap: Bitmap) {
    canvas.drawColor(Color.TRANSPARENT, PorterDuff.Mode.CLEAR)
    // Draw `bitmap` and `person` in square canvas.
    val screenWidth: Int
    val screenHeight: Int
    val left: Int
    val right: Int
    val top: Int
    val bottom: Int
    if (canvas.height > canvas.width) {
      screenWidth = canvas.width
      screenHeight = canvas.width
      left = 0
      top = (canvas.height - canvas.width) / 2
    } else {
      screenWidth = canvas.height
      screenHeight = canvas.height
      left = (canvas.width - canvas.height) / 2
      top = 0
    }
    right = left + screenWidth
    bottom = top + screenHeight

    setPaint()
    canvas.drawBitmap(
      bitmap,
      Rect(0, 0, bitmap.width, bitmap.height),
      Rect(left, top, right, bottom),
      paint
    )

    val widthRatio = screenWidth.toFloat() / MODEL_WIDTH
    val heightRatio = screenHeight.toFloat() / MODEL_HEIGHT

    // Draw key points over the image.
    for (keyPoint in person.keyPoints) {
      Log.d("KEYPOINT", "" + keyPoint.bodyPart + " : (" + keyPoint.position.x.toFloat().toString() + ", " + keyPoint.position.x.toFloat().toString() + ")");
      if (keyPoint.score > minConfidence) {
        val position = keyPoint.position
        val adjustedX: Float = position.x.toFloat() * widthRatio + left
        val adjustedY: Float = position.y.toFloat() * heightRatio + top
        canvas.drawCircle(adjustedX, adjustedY, circleRadius, paint)
      }
    }

    for (line in bodyJoints) {
      if (
        (person.keyPoints[line.first.ordinal].score > minConfidence) and
        (person.keyPoints[line.second.ordinal].score > minConfidence)
      ) {
        canvas.drawLine(
          person.keyPoints[line.first.ordinal].position.x.toFloat() * widthRatio + left,
          person.keyPoints[line.first.ordinal].position.y.toFloat() * heightRatio + top,
          person.keyPoints[line.second.ordinal].position.x.toFloat() * widthRatio + left,
          person.keyPoints[line.second.ordinal].position.y.toFloat() * heightRatio + top,
          paint
        )
      }
    }

    canvas.drawText(
      "Score: %.2f".format(person.score),
      (15.0f * widthRatio),
      (30.0f * heightRatio + bottom),
      paint
    )
    canvas.drawText(
      "Device: %s".format(posenet.device),
      (15.0f * widthRatio),
      (50.0f * heightRatio + bottom),
      paint
    )
    canvas.drawText(
      "Time: %.2f ms".format(posenet.lastInferenceTimeNanos * 1.0f / 1_000_000),
      (15.0f * widthRatio),
      (70.0f * heightRatio + bottom),
      paint
    )
  }

  /** Process image using Posenet library.   */
  private fun processImage(bitmap: Bitmap) {
    // Crop bitmap.
    val croppedBitmap = cropBitmap(bitmap)

    // Created scaled version of bitmap for model input.
    val scaledBitmap = Bitmap.createScaledBitmap(croppedBitmap, MODEL_WIDTH, MODEL_HEIGHT, true)

    // Perform inference.
    val person = posenet.estimateSinglePose(scaledBitmap)
    val canvas: Canvas = surfaceHolder!!.lockCanvas()
    draw(canvas, person, scaledBitmap)
  }

  /**
   * Shows an error message dialog.
   */
  class ErrorDialog : DialogFragment() {

    override fun onCreateDialog(savedInstanceState: Bundle?): Dialog =
      AlertDialog.Builder(activity)
        .setMessage(arguments!!.getString(ARG_MESSAGE))
        .setPositiveButton(android.R.string.ok) { _, _ -> activity!!.finish() }
        .create()

    companion object {

      @JvmStatic
      private val ARG_MESSAGE = "message"

      @JvmStatic
      fun newInstance(message: String): ErrorDialog = ErrorDialog().apply {
        arguments = Bundle().apply { putString(ARG_MESSAGE, message) }
      }
    }
  }

  companion object {
    /**
     * Conversion from screen rotation to JPEG orientation.
     */
    private val ORIENTATIONS = SparseIntArray()
    private val FRAGMENT_DIALOG = "dialog"

    init {
      ORIENTATIONS.append(Surface.ROTATION_0, 90)
      ORIENTATIONS.append(Surface.ROTATION_90, 0)
      ORIENTATIONS.append(Surface.ROTATION_180, 270)
      ORIENTATIONS.append(Surface.ROTATION_270, 180)
    }

    /**
     * Tag for the [Log].
     */
    private const val TAG = "PosenetActivity"
  }
}
All of the elements in the activity_posenet.xml file should also be removed, as they are no longer needed. So, the file should look like this:
<?xml version="1.0" encoding="utf-8"?>
<RelativeLayout xmlns:android="http://schemas.android.com/apk/res/android"
    android:layout_width="match_parent"
    android:layout_height="match_parent">


</RelativeLayout>
For the AndroidManifest.xml file, because we are no longer accessing the camera, the following 3 lines should be removed:
<uses-permission android:name="android.permission.CAMERA" />
<uses-feature android:name="android.hardware.camera" />
<uses-feature android:name="android.hardware.camera.autofocus" />
After removing all of the unnecessary code from the three files PosenetActivity.kt, activity_posenet.xml, and AndroidManifest.xml, we'll still need to make some changes in order to work with single images. The next section discusses editing the activity_posenet.xml file to be able to load and show an image.
Editing the Activity Layout
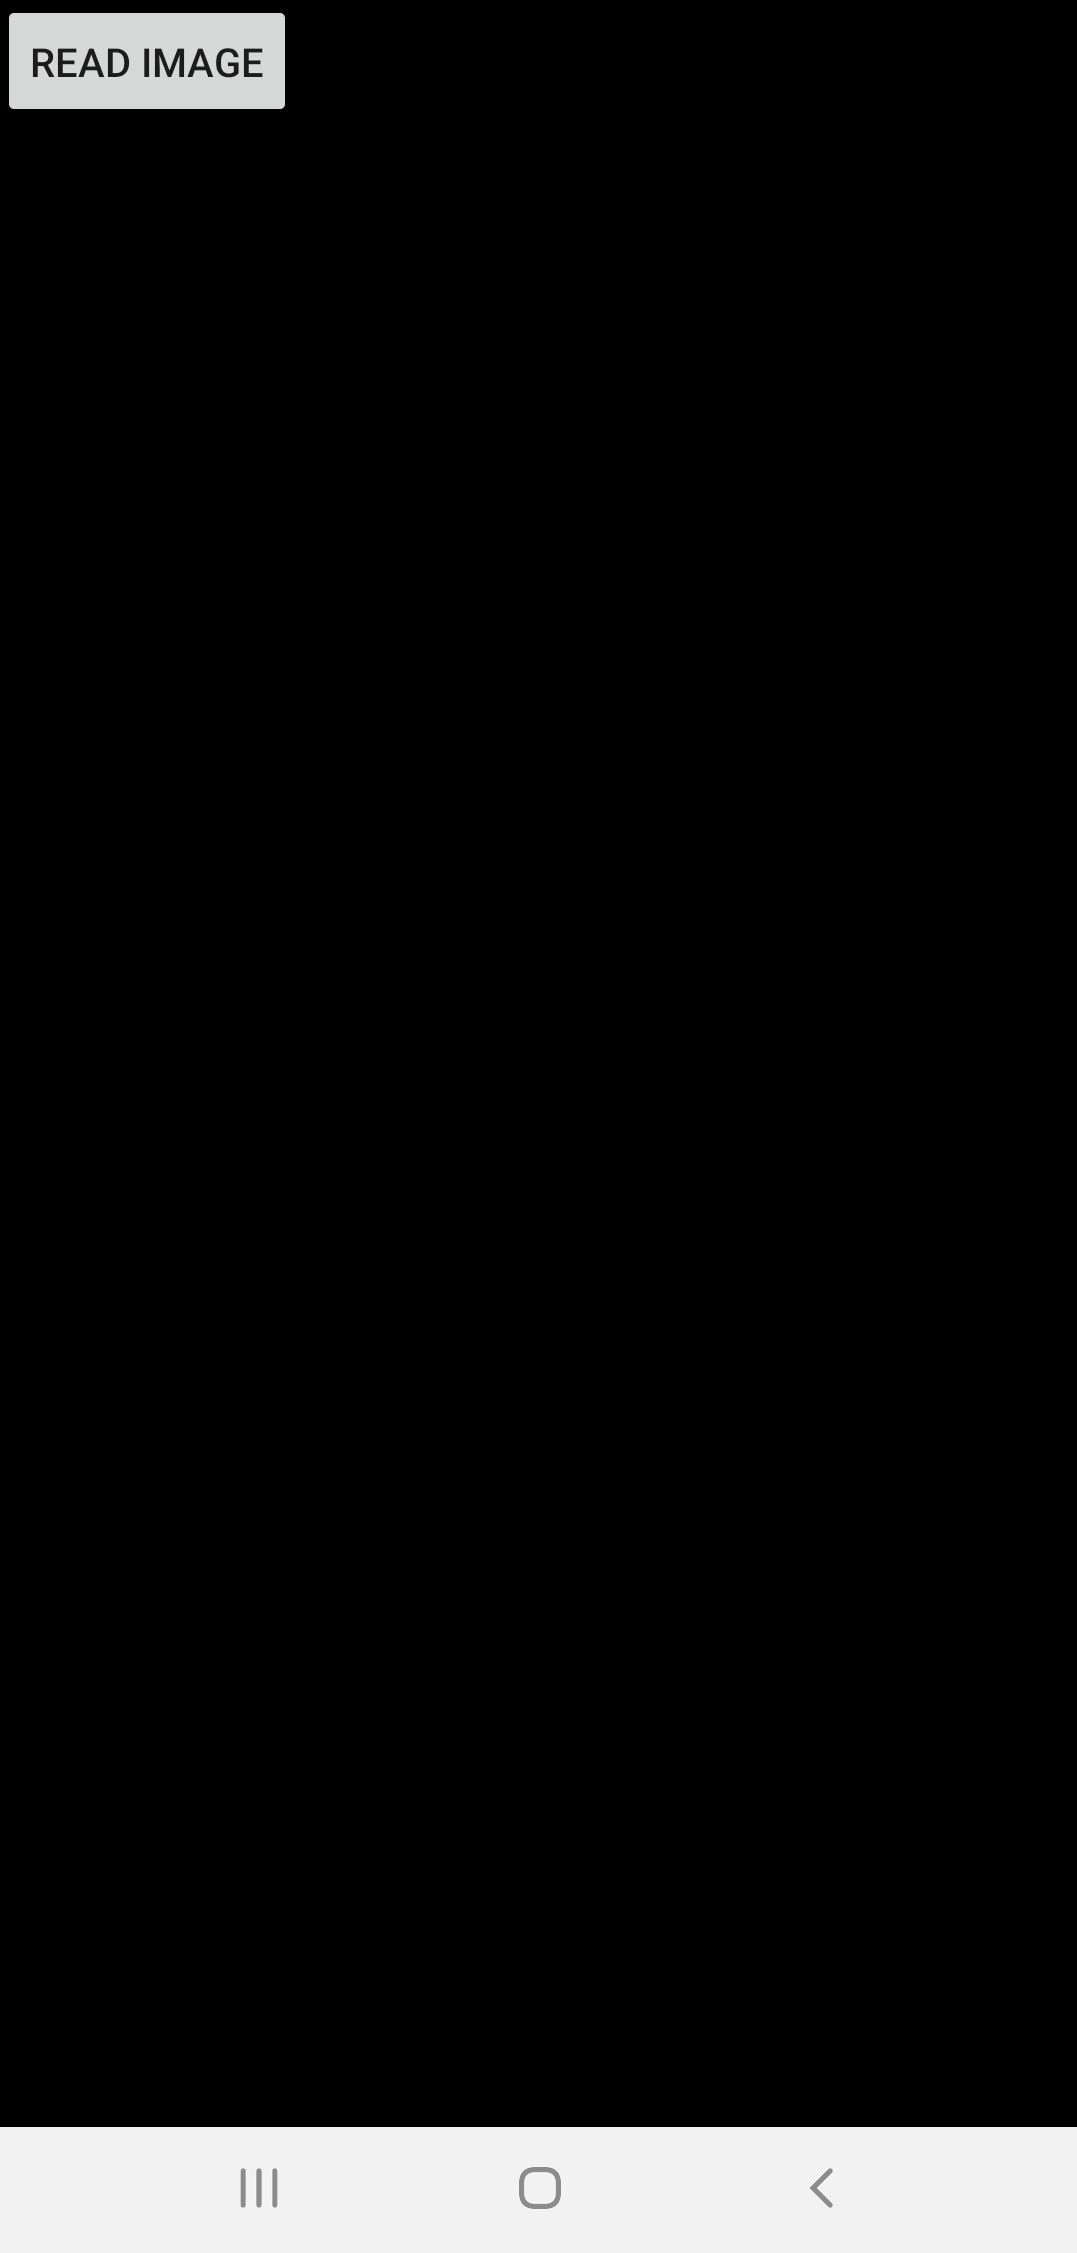
The content of the activity layout file is listed below. It just has two elements: Button and ImageView. The button will be used to load an image once clicked. It is given an ID of selectImage to be accessed inside the activity.
The ImageView will have two uses. The first is to show the selected image. The second is to display the result after applying the eye filter. The ImageView is given the ID imageView to be accessed from within the activity.
<?xml version="1.0" encoding="utf-8"?>
<RelativeLayout xmlns:android="http://schemas.android.com/apk/res/android"
    android:layout_width="match_parent"
    android:layout_height="match_parent">

    <Button
        android:id="@+id/selectImage"
        android:layout_width="wrap_content"
        android:layout_height="wrap_content"
        android:text="Read Image" />

    <ImageView
        android:id="@+id/imageView"
        android:layout_width="match_parent"
        android:layout_height="match_parent" />

</RelativeLayout>
The next figure shows what the activity layout looks like.
Before implementing the button click listener, it is essential to add the next line inside the AndroidManifest.xml file to ask for permission to access the external storage.
<uses-permission android:name="android.permission.READ_EXTERNAL_STORAGE"/>The next section discusses implementing the button click listener for loading an image from the gallery.
Loading a Gallery Image
The current implementation of the onStart() callback method is given below. If you did not already do so, please remove the call to the openCamera() method since it is no longer needed. The onStart() method just creates an instance of the PoseNet class so that it can be used later for predicting the locations of the keypoints. The variable posenet holds the created instance, which will be used later inside the processImage() method.
override fun onStart() {
  super.onStart()
  posenet = Posenet(this.context!!)
}
Inside the onStart() method, we can bind a click listener to the selectImage button. Here is the new implementation of such a method. Using an Intent, the gallery will be opened asking the user to select an image. The startActivityForResult() method is called where the request code is stored in the REQUEST_CODE variable, which is set to 100.
override fun onStart() {
    super.onStart()

    posenet = Posenet(this.context!!)

    selectImage.setOnClickListener(View.OnClickListener {
        val intent = Intent(Intent.ACTION_PICK)
        intent.type = "image/jpg"
        startActivityForResult(intent, REQUEST_CODE)
    })
}
Once the user returns to the application, the onActivityResult() callback method will be called. Here is its implementation. Using an if statement, the result is checked to make sure the image is selected successfully. If the result is not successful (e.g. the user did not select an image), then a toast message is displayed.
override fun onActivityResult(requestCode: Int, resultCode: Int, data: Intent?) {
    if (resultCode == Activity.RESULT_OK && requestCode == REQUEST_CODE) {
        imageView.setImageURI(data?.data)

        val imageUri = data?.getData()
        val bitmap = MediaStore.Images.Media.getBitmap(context?.contentResolver, imageUri)

        processImage(bitmap)

    } else {
        Toast.makeText(context, "No image is selected.", Toast.LENGTH_LONG).show()
    }
}
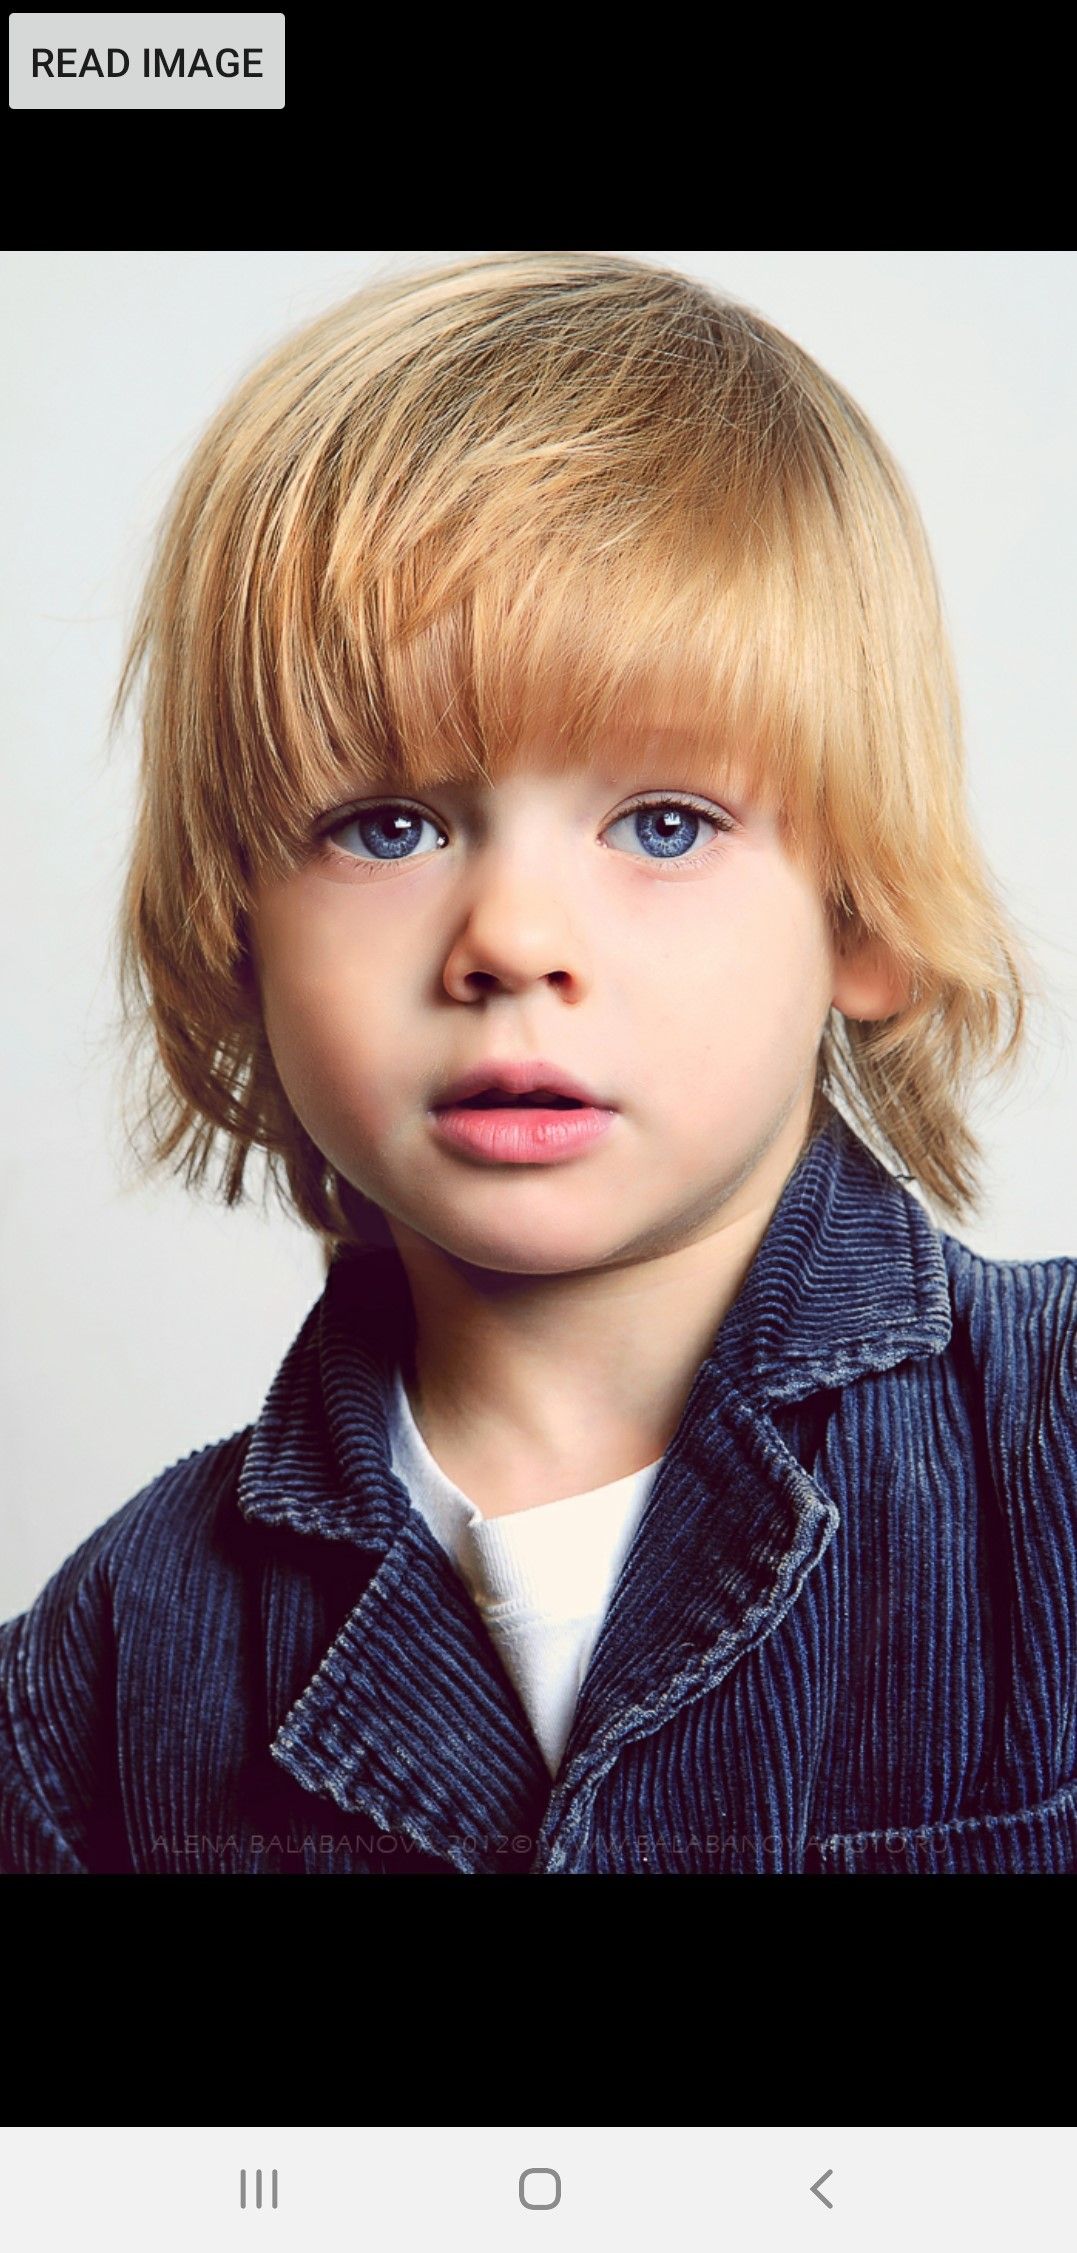
If the result is successful, then the selected image is displayed on the ImageView using the setImageURI() method.
To be able to process the selected image, it needs to be available as a Bitmap. For this reason, the image is read as a Bitmap based on its URI. First the URI is returned using the getData() method, then the Bitmap is returned using the getBitmap() method. After the bitmap is available, the processImage() method is called for preparing the image and estimating the human pose. This will be discussed in the next two sections.
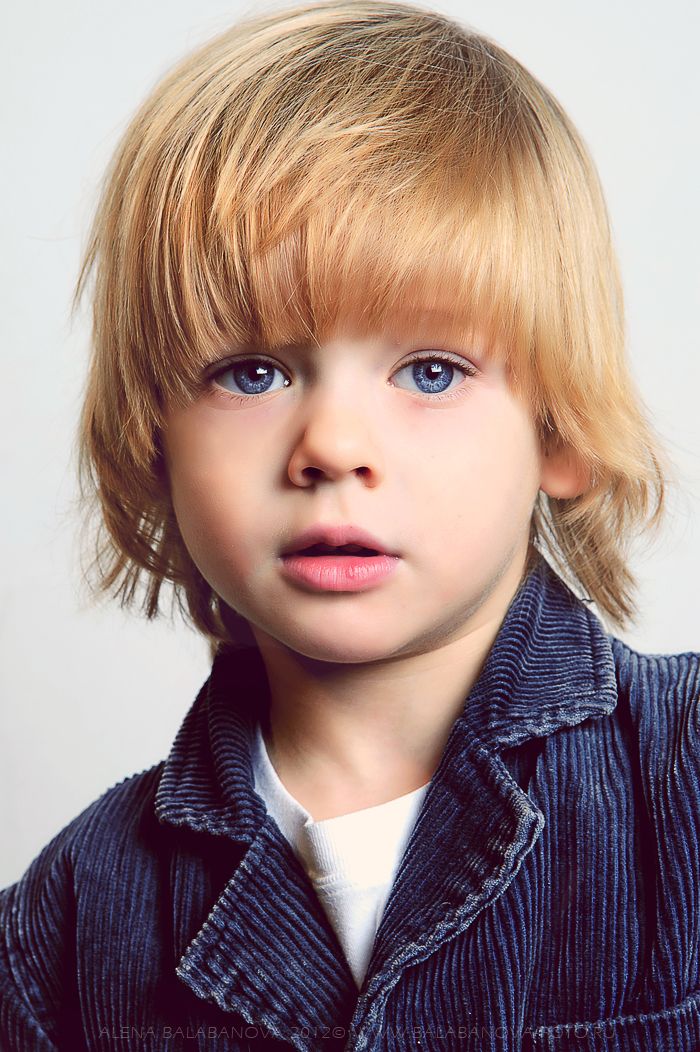
The image that will be used throughout this tutorial is shown below.
After such an image is selected from the gallery, it will be displayed on the ImageView as shown below.
After the image is loaded as a Bitmap, and before estimating the human pose, there are two extra steps needed: cropping and scaling the image. We'll discuss those now.
Cropping and Scaling the Image
This section covers preparing the image before applying the PoseNet model.
Inside the project there's a method called processImage() which calls the necessary methods for doing four important tasks:
- Cropping the image by calling the
cropBitmap()method. - Scaling the image by calling the
Bitmap.createScaledBitmap()method. - Estimating the pose by calling the
estimateSinglePose()method. - Drawing the keypoints over the image by calling the
draw()method.
The implementation of the processImage() method is listed below. In this section we'll focus on the first two tasks, cropping and scaling the image.
private fun processImage(bitmap: Bitmap) {
  // Crop bitmap.
  val croppedBitmap = cropBitmap(bitmap)

  // Created scaled version of bitmap for model input.
  val scaledBitmap = Bitmap.createScaledBitmap(croppedBitmap, MODEL_WIDTH, MODEL_HEIGHT, true)

  // Perform inference.
  val person = posenet.estimateSinglePose(scaledBitmap)

  // Draw keypoints over the image.
  val canvas: Canvas = surfaceHolder!!.lockCanvas()
  draw(canvas, person, scaledBitmap)
}
Why do we need to crop or scale the image? Is it required to apply both the crop and scale operations, or is just one enough? Let's discuss.
The PoseNet model accepts an image of size (257, 257). Inside the Constants.kt file there are two variables defined, MODEL_WIDTH and MODEL_HEIGHT, to represent the model input width and height respectively. Both are set to 257.
If an image is to be passed to the PoseNet model, then its size must be (257, 257). Otherwise, an exception will be thrown. If the image read from the gallery is, for example, of size (547, 783), then it must be resized to the model input's size of (257, 257).
Based on this, it seems that only the scale (i.e. resize) operation is necessary to convert the image to the desired size. The Bitmap.createScaledBitmap() method accepts the input bitmap, the desired width, and the desired height, and returns a new bitmap of the desired size. Why, then, is the cropping operation also applied? The answer is to preserve the model's aspect ratio. Otherwise we can easily have image quality problems. The next figure shows the result after both the cropping and resizing operations are applied.
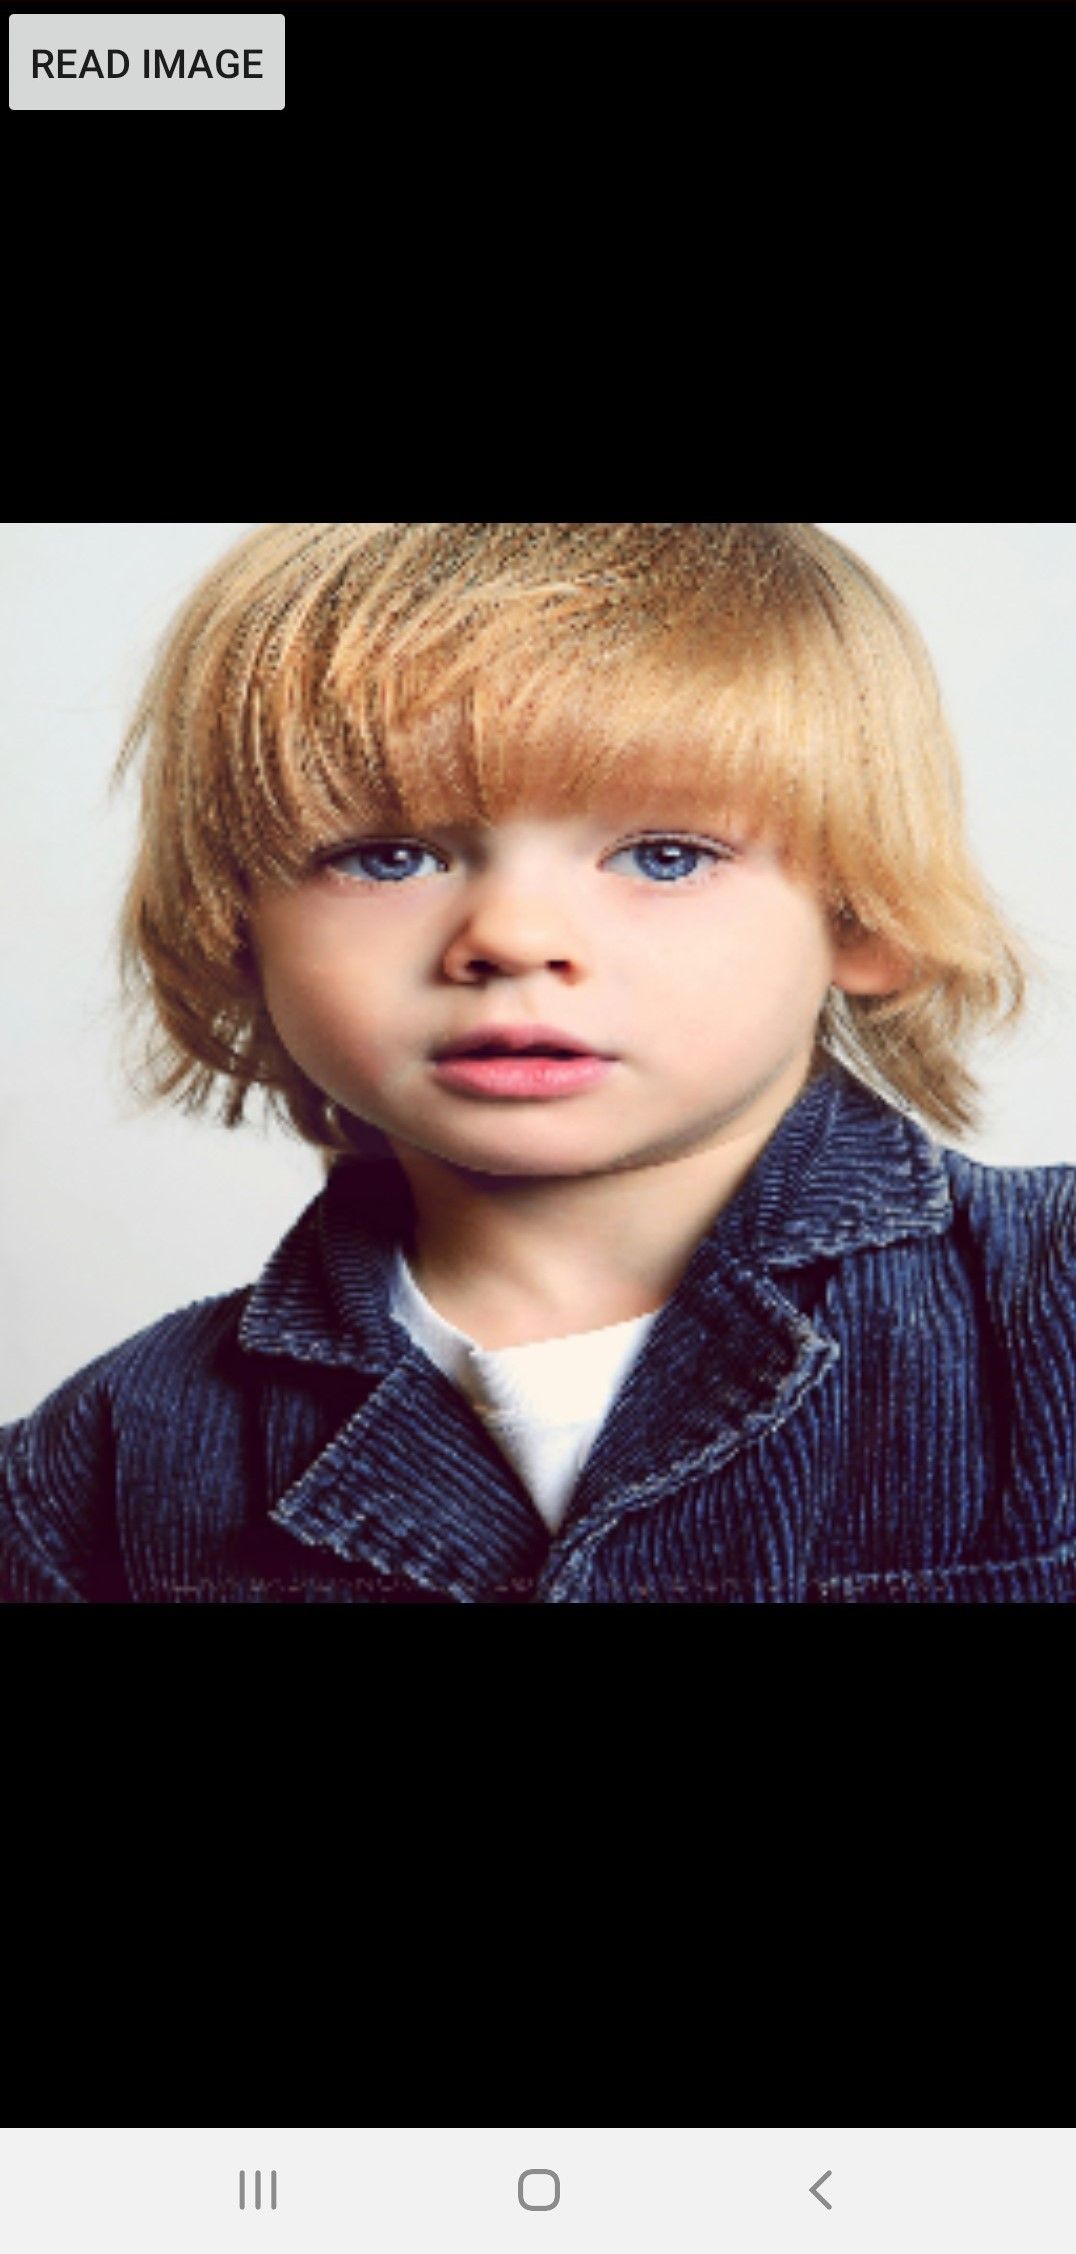
Due to cropping the image, some of its rows at the top are lost. This will not be an issue as long as the human body appears at the center of the image. You can check the implementation of the cropBitmap() method for how it works.
After discussing the purpose of the first two tasks of the processImage() method, let's now discuss the remaining two: pose estimation and keypoint drawing.
Estimating the Human Pose Using PoseNet
To estimate the human pose of the selected image, all you need to do is to call the estimateSinglePose() method, shown below. This method accepts the scaled image as an input, and returns an object in the person variable holding the model predictions.
val person = posenet.estimateSinglePose(scaledBitmap)Based on the model predictions, the keypoints will be drawn over the image. To be able to draw over the image a canvas must first be created. The line below (inside the processImage() method) uses the surfaceHolder to draw the canvas, but we'll remove this:
val canvas: Canvas = surfaceHolder!!.lockCanvas()And replace it with this:
val canvas = Canvas(scaledBitmap)Now we're ready to call the draw() method to draw the keypoints over the image. Don't forget to remove this line from the end of the draw() method: surfaceHolder!!.unlockCanvasAndPost(canvas).
draw(canvas, person, scaledBitmap)Now that we've discussed all of the method calls inside the processImage() method, here is its implementation.
private fun processImage(bitmap: Bitmap) {
  // Crop bitmap.
  val croppedBitmap = cropBitmap(bitmap)

  // Created scaled version of bitmap for model input.
  val scaledBitmap = Bitmap.createScaledBitmap(croppedBitmap, MODEL_WIDTH, MODEL_HEIGHT, true)

  // Perform inference.
  val person = posenet.estimateSinglePose(scaledBitmap)

  // Draw keypoints over the image.
  val canvas = Canvas(scaledBitmap)
  draw(canvas, person, scaledBitmap)
}
The next figure shows the result after drawing the keypoints that the model is confident about. The points are drawn as circles. Here is the part of the code from the draw() method that is responsible for drawing circles over the image. You can edit the value of the variable circleRadius to increase or decrease the circle size.
if (keyPoint.score > minConfidence) {
    val position = keyPoint.position
    val adjustedX: Float = position.x.toFloat() * widthRatio
    val adjustedY: Float = position.y.toFloat() * heightRatio
    canvas.drawCircle(adjustedX, adjustedY, circleRadius, paint)
}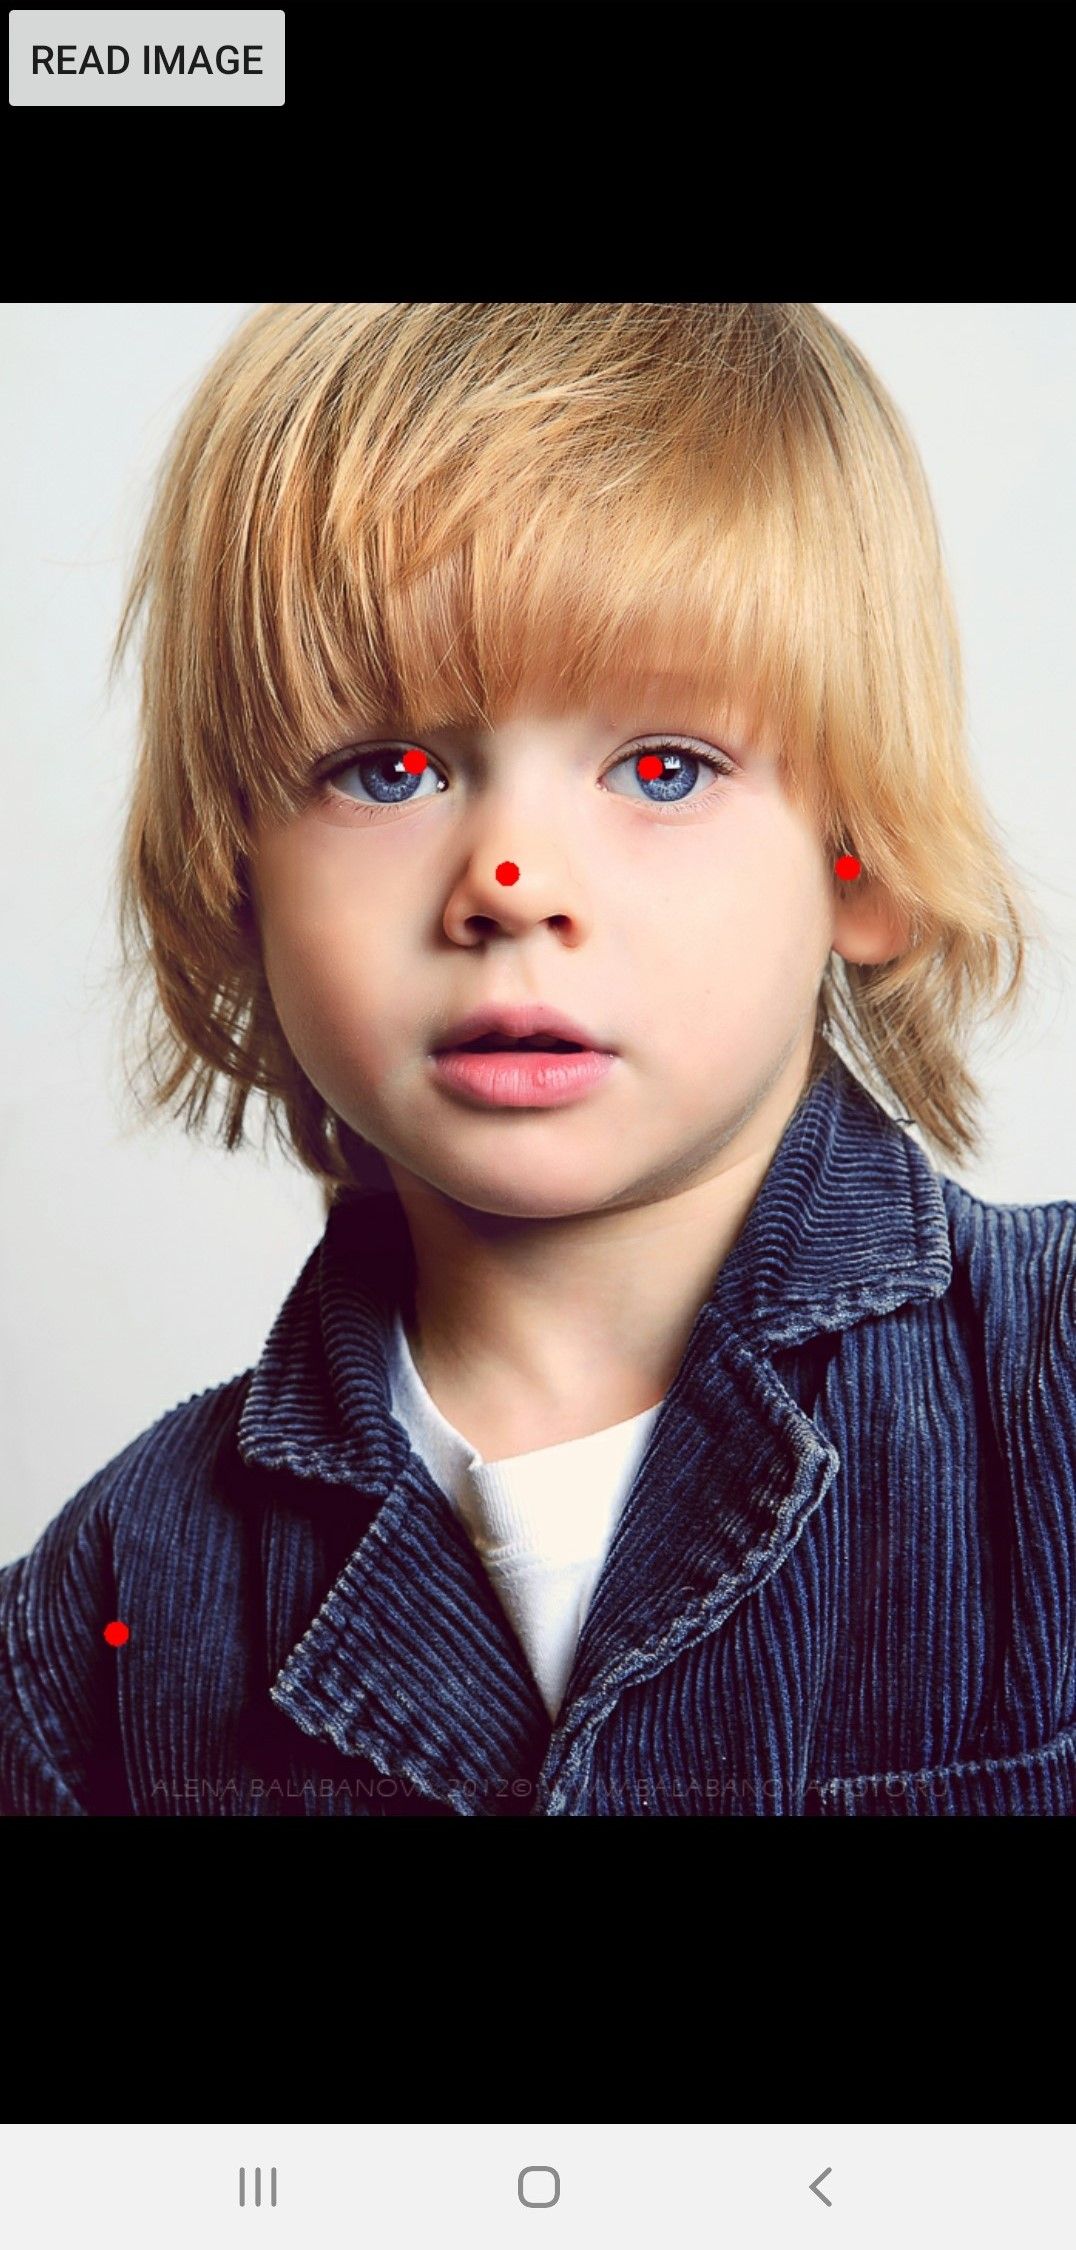
Note that the drawn keypoints are the ones with a confidence greater than the value specified in the minConfidence variable, which was set to 0.5. You can change this to whatever works best for you.
The next section shows how to print some information about the keypoints.
Getting Information About Keypoints
The returned object person from the estimateSinglePose() method holds some information about the detected keypoints. This information includes:
- Location
- Confidence
- Body part that the keypoint represents
The next code creates a for loop for looping through all the keypoints and printing the previous three properties about each in a log message.
for (keyPoint in person.keyPoints) {
    Log.d("KEYPOINT", "Body Part : " + keyPoint.bodyPart + ", Keypoint Location : (" + keyPoint.position.x.toFloat().toString() + ", " + keyPoint.position.y.toFloat().toString() + "), Confidence" + keyPoint.score);
}
Here is the result of running the loop. Note that the body parts such as LEFT_EYE, RIGHT_EYE and RIGHT_SHOULDER have a confidence greater than 0.5, and this is why they are drawn on the image.
D/KEYPOINT: Body Part : NOSE, Keypoint Location : (121.0, 97.0), Confidence : 0.999602
D/KEYPOINT: Body Part : LEFT_EYE, Keypoint Location : (155.0, 79.0), Confidence : 0.996097
D/KEYPOINT: Body Part : RIGHT_EYE, Keypoint Location : (99.0, 78.0), Confidence : 0.9952989
D/KEYPOINT: Body Part : LEFT_EAR, Keypoint Location : (202.0, 96.0), Confidence : 0.9312741
D/KEYPOINT: Body Part : RIGHT_EAR, Keypoint Location : (65.0, 105.0), Confidence : 0.3558412
D/KEYPOINT: Body Part : LEFT_SHOULDER, Keypoint Location : (240.0, 208.0), Confidence : 0.18282844
D/KEYPOINT: Body Part : RIGHT_SHOULDER, Keypoint Location : (28.0, 226.0), Confidence : 0.8710659
D/KEYPOINT: Body Part : LEFT_ELBOW, Keypoint Location : (155.0, 160.0), Confidence : 0.008276528
D/KEYPOINT: Body Part : RIGHT_ELBOW, Keypoint Location : (-22.0, 266.0), Confidence : 0.009810507
D/KEYPOINT: Body Part : LEFT_WRIST, Keypoint Location : (196.0, 161.0), Confidence : 0.012271293
D/KEYPOINT: Body Part : RIGHT_WRIST, Keypoint Location : (-7.0, 228.0), Confidence : 0.0037742765
D/KEYPOINT: Body Part : LEFT_HIP, Keypoint Location : (154.0, 101.0), Confidence : 0.0043469984
D/KEYPOINT: Body Part : RIGHT_HIP, Keypoint Location : (255.0, 259.0), Confidence : 0.0035778792
D/KEYPOINT: Body Part : LEFT_KNEE, Keypoint Location : (157.0, 97.0), Confidence : 0.0024392735
D/KEYPOINT: Body Part : RIGHT_KNEE, Keypoint Location : (127.0, 94.0), Confidence : 0.003601794
D/KEYPOINT: Body Part : LEFT_ANKLE, Keypoint Location : (161.0, 194.0), Confidence : 0.0022431263
D/KEYPOINT: Body Part : RIGHT_ANKLE, Keypoint Location : (92.0, 198.0), Confidence : 0.0021493114
Complete Code of the PosenetActivity.kt
Here is the complete code of the PosenetActivity.kt.
package org.tensorflow.lite.examples.posenet

import android.app.Activity
import android.app.AlertDialog
import android.app.Dialog
import android.content.Intent
import android.content.pm.PackageManager
import android.graphics.*
import android.os.Bundle
import android.support.v4.app.ActivityCompat
import android.support.v4.app.DialogFragment
import android.support.v4.app.Fragment
import android.util.Log
import android.util.SparseIntArray
import android.view.LayoutInflater
import android.view.Surface
import android.view.View
import android.view.ViewGroup
import android.widget.Toast
import kotlinx.android.synthetic.main.activity_posenet.*
import kotlin.math.abs
import org.tensorflow.lite.examples.posenet.lib.BodyPart
import org.tensorflow.lite.examples.posenet.lib.Person
import org.tensorflow.lite.examples.posenet.lib.Posenet
import android.provider.MediaStore
import android.graphics.Bitmap

class PosenetActivity :
    Fragment(),
    ActivityCompat.OnRequestPermissionsResultCallback {

    /** List of body joints that should be connected.    */
    private val bodyJoints = listOf(
        Pair(BodyPart.LEFT_WRIST, BodyPart.LEFT_ELBOW),
        Pair(BodyPart.LEFT_ELBOW, BodyPart.LEFT_SHOULDER),
        Pair(BodyPart.LEFT_SHOULDER, BodyPart.RIGHT_SHOULDER),
        Pair(BodyPart.RIGHT_SHOULDER, BodyPart.RIGHT_ELBOW),
        Pair(BodyPart.RIGHT_ELBOW, BodyPart.RIGHT_WRIST),
        Pair(BodyPart.LEFT_SHOULDER, BodyPart.LEFT_HIP),
        Pair(BodyPart.LEFT_HIP, BodyPart.RIGHT_HIP),
        Pair(BodyPart.RIGHT_HIP, BodyPart.RIGHT_SHOULDER),
        Pair(BodyPart.LEFT_HIP, BodyPart.LEFT_KNEE),
        Pair(BodyPart.LEFT_KNEE, BodyPart.LEFT_ANKLE),
        Pair(BodyPart.RIGHT_HIP, BodyPart.RIGHT_KNEE),
        Pair(BodyPart.RIGHT_KNEE, BodyPart.RIGHT_ANKLE)
    )

    val REQUEST_CODE = 100

    /** Threshold for confidence score. */
    private val minConfidence = 0.5

    /** Radius of circle used to draw keypoints.  */
    private val circleRadius = 8.0f

    /** Paint class holds the style and color information to draw geometries,text and bitmaps. */
    private var paint = Paint()

    /** An object for the Posenet library.    */
    private lateinit var posenet: Posenet

    override fun onCreateView(
        inflater: LayoutInflater,
        container: ViewGroup?,
        savedInstanceState: Bundle?
    ): View? = inflater.inflate(R.layout.activity_posenet, container, false)

    override fun onStart() {
        super.onStart()

        posenet = Posenet(this.context!!)

        selectImage.setOnClickListener(View.OnClickListener {
            val intent = Intent(Intent.ACTION_PICK)
            intent.type = "image/jpg"
            startActivityForResult(intent, REQUEST_CODE)
        })
    }

    override fun onActivityResult(requestCode: Int, resultCode: Int, data: Intent?) {
        if (resultCode == Activity.RESULT_OK && requestCode == REQUEST_CODE) {
            imageView.setImageURI(data?.data) // handle chosen image

            val imageUri = data?.getData()
            val bitmap = MediaStore.Images.Media.getBitmap(context?.contentResolver, imageUri)

            processImage(bitmap)
        } else {
            Toast.makeText(context, "No image is selected.", Toast.LENGTH_LONG).show()
        }
    }

    override fun onDestroy() {
        super.onDestroy()
        posenet.close()
    }

    override fun onRequestPermissionsResult(
        requestCode: Int,
        permissions: Array<String>,
        grantResults: IntArray
    ) {
        if (requestCode == REQUEST_CAMERA_PERMISSION) {
            if (allPermissionsGranted(grantResults)) {
                ErrorDialog.newInstance(getString(R.string.request_permission))
                    .show(childFragmentManager, FRAGMENT_DIALOG)
            }
        } else {
            super.onRequestPermissionsResult(requestCode, permissions, grantResults)
        }
    }

    private fun allPermissionsGranted(grantResults: IntArray) = grantResults.all {
        it == PackageManager.PERMISSION_GRANTED
    }

    /** Crop Bitmap to maintain aspect ratio of model input.   */
    private fun cropBitmap(bitmap: Bitmap): Bitmap {
        val bitmapRatio = bitmap.height.toFloat() / bitmap.width
        val modelInputRatio = MODEL_HEIGHT.toFloat() / MODEL_WIDTH
        var croppedBitmap = bitmap

        // Acceptable difference between the modelInputRatio and bitmapRatio to skip cropping.
        val maxDifference = 1e-5

        // Checks if the bitmap has similar aspect ratio as the required model input.
        when {
            abs(modelInputRatio - bitmapRatio) < maxDifference -> return croppedBitmap
            modelInputRatio < bitmapRatio -> {
                // New image is taller so we are height constrained.
                val cropHeight = bitmap.height - (bitmap.width.toFloat() / modelInputRatio)
                croppedBitmap = Bitmap.createBitmap(
                    bitmap,
                    0,
                    (cropHeight / 5).toInt(),
                    bitmap.width,
                    (bitmap.height - cropHeight / 5).toInt()
                )
            }
            else -> {
                val cropWidth = bitmap.width - (bitmap.height.toFloat() * modelInputRatio)
                croppedBitmap = Bitmap.createBitmap(
                    bitmap,
                    (cropWidth / 5).toInt(),
                    0,
                    (bitmap.width - cropWidth / 5).toInt(),
                    bitmap.height
                )
            }
        }
        Log.d(
            "IMGSIZE",
            "Cropped Image Size (" + croppedBitmap.width.toString() + ", " + croppedBitmap.height.toString() + ")"
        )
        return croppedBitmap
    }

    /** Set the paint color and size.    */
    private fun setPaint() {
        paint.color = Color.RED
        paint.textSize = 80.0f
        paint.strokeWidth = 5.0f
    }

    /** Draw bitmap on Canvas.   */
    private fun draw(canvas: Canvas, person: Person, bitmap: Bitmap) {
        setPaint()

        val widthRatio = canvas.width.toFloat() / MODEL_WIDTH
        val heightRatio = canvas.height.toFloat() / MODEL_HEIGHT

        // Draw key points over the image.
        for (keyPoint in person.keyPoints) {
            Log.d(
                "KEYPOINT",
                "Body Part : " + keyPoint.bodyPart + ", Keypoint Location : (" + keyPoint.position.x.toFloat().toString() + ", " + keyPoint.position.x.toFloat().toString() + "), Confidence" + keyPoint.score
            );

            if (keyPoint.score > minConfidence) {
                val position = keyPoint.position
                val adjustedX: Float = position.x.toFloat() * widthRatio
                val adjustedY: Float = position.y.toFloat() * heightRatio
                canvas.drawCircle(adjustedX, adjustedY, circleRadius, paint)
            }
        }

        for (line in bodyJoints) {
            if (
                (person.keyPoints[line.first.ordinal].score > minConfidence) and
                (person.keyPoints[line.second.ordinal].score > minConfidence)
            ) {
                canvas.drawLine(
                    person.keyPoints[line.first.ordinal].position.x.toFloat() * widthRatio,
                    person.keyPoints[line.first.ordinal].position.y.toFloat() * heightRatio,
                    person.keyPoints[line.second.ordinal].position.x.toFloat() * widthRatio,
                    person.keyPoints[line.second.ordinal].position.y.toFloat() * heightRatio,
                    paint
                )
            }
        }
    }

    /** Process image using Posenet library.   */
    private fun processImage(bitmap: Bitmap) {
        // Crop bitmap.
        val croppedBitmap = cropBitmap(bitmap)

        // Created scaled version of bitmap for model input.
        val scaledBitmap = Bitmap.createScaledBitmap(croppedBitmap, MODEL_WIDTH, MODEL_HEIGHT, true)
        Log.d(
            "IMGSIZE",
            "Cropped Image Size (" + scaledBitmap.width.toString() + ", " + scaledBitmap.height.toString() + ")"
        )

        // Perform inference.
        val person = posenet.estimateSinglePose(scaledBitmap)

        // Making the bitmap image mutable to enable drawing over it inside the canvas.
        val workingBitmap = Bitmap.createBitmap(croppedBitmap)
        val mutableBitmap = workingBitmap.copy(Bitmap.Config.ARGB_8888, true)

        // There is an ImageView. Over it, a bitmap image is drawn. There is a canvas associated with the bitmap image to draw the keypoints.
        // ImageView ==> Bitmap Image ==> Canvas

        val canvas = Canvas(mutableBitmap)

        draw(canvas, person, mutableBitmap)
    }

    /**
     * Shows an error message dialog.
     */
    class ErrorDialog : DialogFragment() {

        override fun onCreateDialog(savedInstanceState: Bundle?): Dialog =
            AlertDialog.Builder(activity)
                .setMessage(arguments!!.getString(ARG_MESSAGE))
                .setPositiveButton(android.R.string.ok) { _, _ -> activity!!.finish() }
                .create()

        companion object {

            @JvmStatic
            private val ARG_MESSAGE = "message"

            @JvmStatic
            fun newInstance(message: String): ErrorDialog = ErrorDialog().apply {
                arguments = Bundle().apply { putString(ARG_MESSAGE, message) }
            }
        }
    }

    companion object {
        /**
         * Conversion from screen rotation to JPEG orientation.
         */
        private val ORIENTATIONS = SparseIntArray()
        private val FRAGMENT_DIALOG = "dialog"

        init {
            ORIENTATIONS.append(Surface.ROTATION_0, 90)
            ORIENTATIONS.append(Surface.ROTATION_90, 0)
            ORIENTATIONS.append(Surface.ROTATION_180, 270)
            ORIENTATIONS.append(Surface.ROTATION_270, 180)
        }

        /**
         * Tag for the [Log].
         */
        private const val TAG = "PosenetActivity"
    }
}
Conclusion
This tutorial discussed using the pretrained PoseNet for building an Android app that estimates the human pose. The model is able to predict the location of 17 keypoints in the human body such as the eyes, nose, and ears.
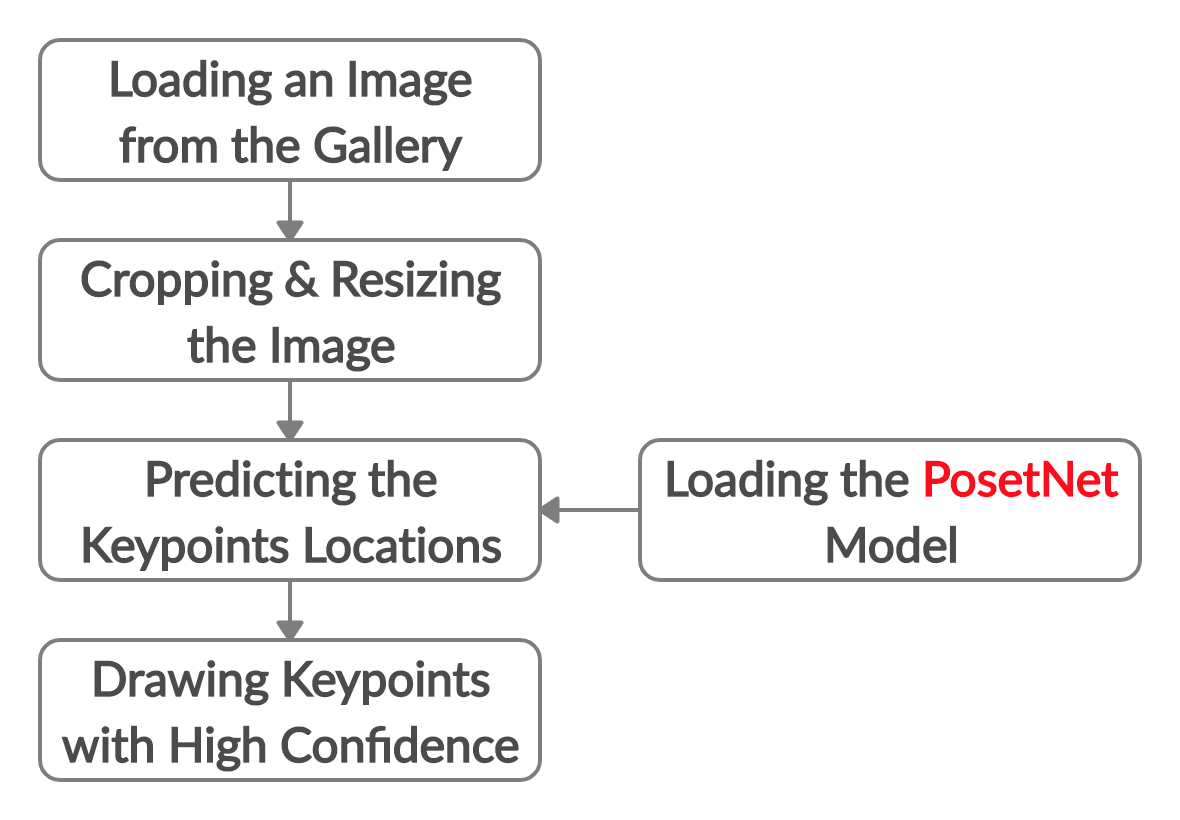
The next figure summarizes the steps applied in this project. We started by loading an image from the gallery, cropping and resizing it to (257, 257). After the PoseNet model is loaded, the image is fed to it for predicting the keypoint locations. Finally, the detected keypoints with a confidence above 0.5 are drawn on the image.
The next tutorial continues this project to put filters over the locations of the keypoints, applying effects like those seen in Snapchat.


