PoseNet is a computer vision deep learning model used for estimating a person's physical position. Based on MobileNet, it can be deployed to mobile devices and takes even less time to respond to an input image.
In a previous tutorial we saw how to use the PoseNet model to detect the positions of the various keypoints of the human body, such as the eyes, ears, and nose. Based on these detected keypoints, we can apply effects like those available in popular apps like Snapchat. In this tutorial we'll continue the project to apply an eye filter over an image.
The outline is as follows:
- Quick Overview of the Project Pipeline
- Preparing the Filter
- Locating Keypoints for the Left and Right Eyes
- Loading and Drawing the Eye Filter
- Dynamically Setting the Eye Filter Size
- Complete Implementation of the
PosenetActivity.kt
Let's get started.
Bring this project to life
Quick Overview of the Project Pipeline
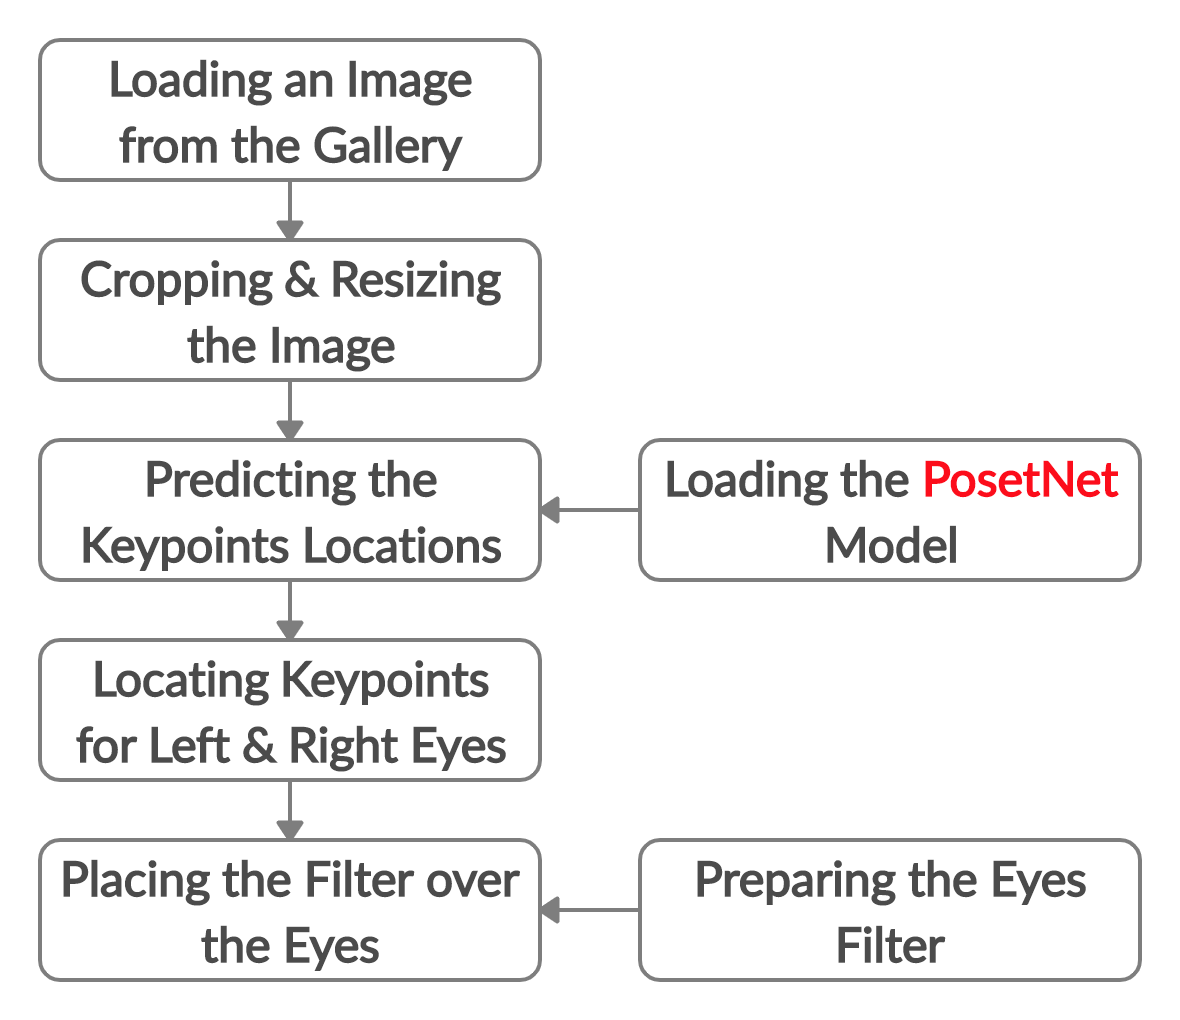
This project consists of two parts: keypoint detection using PoseNet (what we covered in the previous tutorial), and applying this to the use case of creating an eye filter.
The next figure summarizes what we accomplished in the previous tutorial. We started by loading, cropping and resizing an image so that its size matches the size of the model's input (257, 257). The image is then fed to the PoseNet model for predicting the keypoint locations.
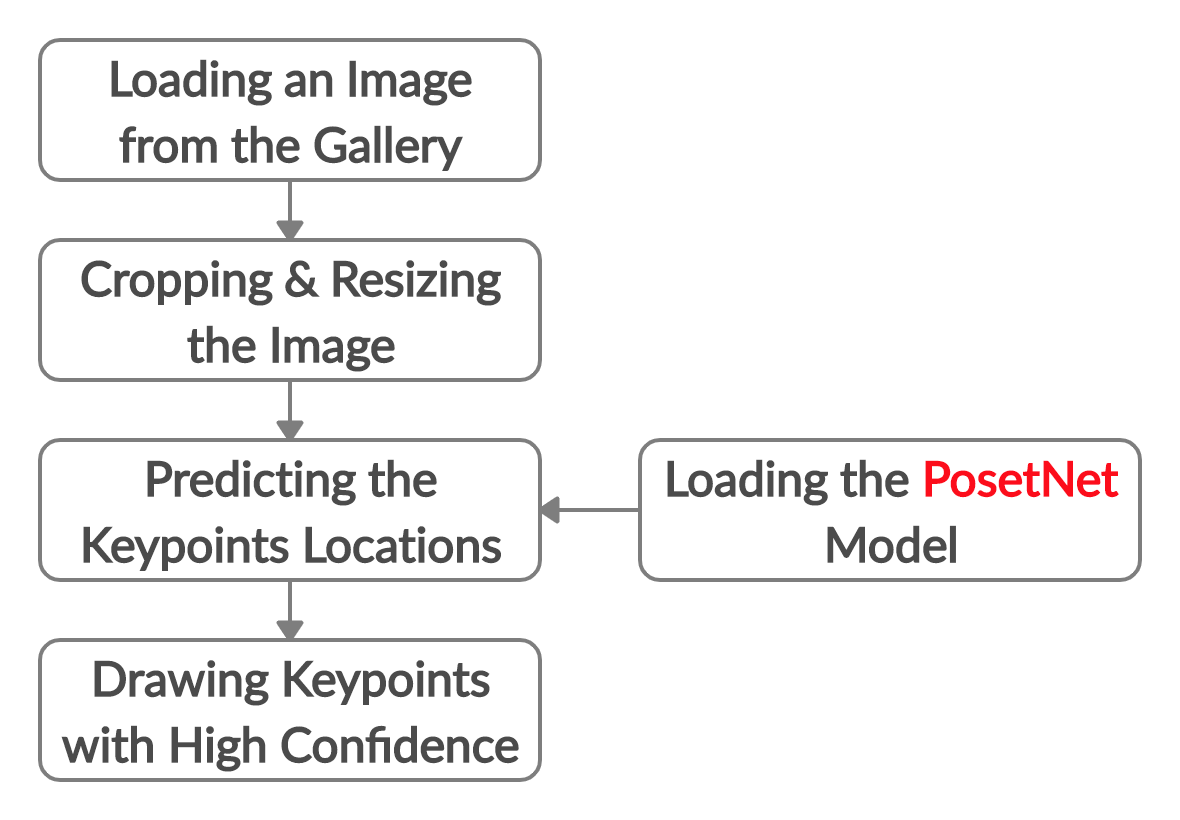
There are some cases in which the model may not be able to detect body parts accurately, or the image might not contain a human at all. That's why there is an associated score (between 0.0 and 1.0) for each keypoint, representing the model's confidence. If the score is, for example, above 0.5, then the keypoint will be accepted for further processing. In the previous tutorial we saw how to draw circles over the detected keypoints with a confidence score higher than 0.5.
The current tutorial continues where the previous one stopped; after detecting all of the keypoints, we will be honing in on the location of the eyes. After the filter image is loaded and prepared, it is then placed over the target keypoint. This is demonstrated below.
We'll start by downloading and preparing the filter image.
Preparing the Eye Filter
The eye filter is just an image to be placed over our target image. You can use whatever filter image you want, but you need to follow the instructions for preparing it that we'll cover here.
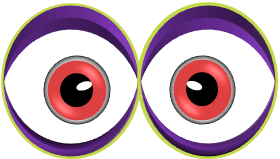
The filter that we'll use can be downloaded from CleanPNG.com. It's not just a single eye filer, but a collection of nine different potential filters as shown below.
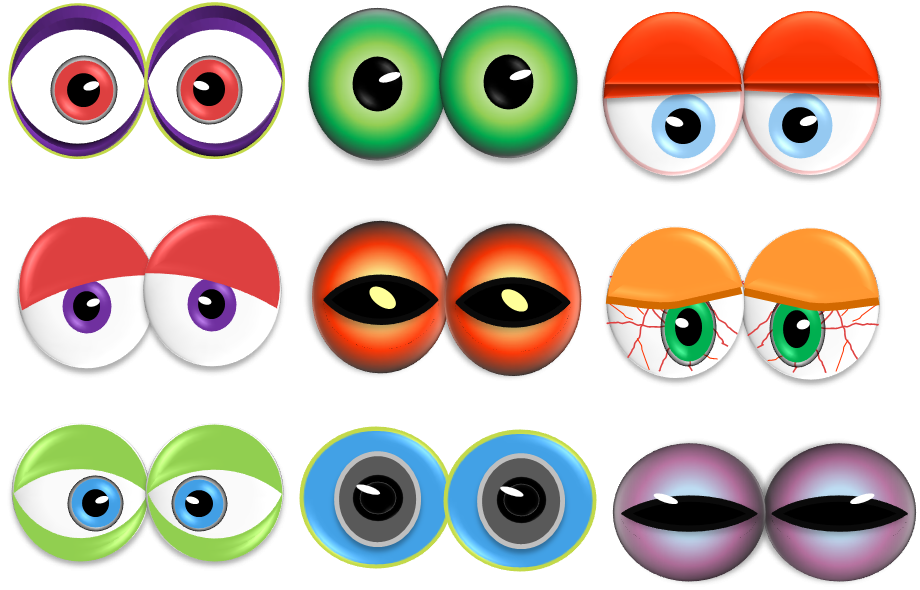
Let's start from the top-left.
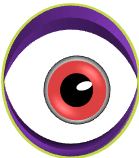
The left and right eyes appear connected, so to make things easier, we'll separate them. Here's the left eye:
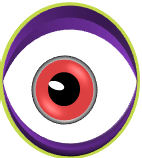
And here's the right:
After the filter is prepared, we'll review how to locate the keypoints for the left and right eyes as they're returned by the PoseNet model.
Locating Keypoints for the Left and Right Eye
In the Android Studio project discussed in the previous tutorial, the activity PosenetActivity.kt has a method named processImage() which is responsible for all of the work done for preparing the gallery image (i.e. cropping and resizing), predicting the keypoint locations, and drawing them. Its implementation is shown below.
private fun processImage(bitmap: Bitmap) {
  // Crop bitmap.
  val croppedBitmap = cropBitmap(bitmap)

  // Created scaled version of bitmap for model input.
  val scaledBitmap = Bitmap.createScaledBitmap(croppedBitmap, MODEL_WIDTH, MODEL_HEIGHT, true)

  // Perform inference.
  val person = posenet.estimateSinglePose(scaledBitmap)

  // Draw keypoints over the image.
  val canvas = Canvas(scaledBitmap)
  draw(canvas, person, scaledBitmap)
}
The object person holds the information about the detected keypoints, including their location, confidence score, and the body parts that they represent. This object is given as an argument to the draw() method along with the canvas and the bitmap.
Here is the minimum code for the draw() method to draw circles at the keypoint locations. The variables MODEL_WIDTH and MODEL_HEIGHT represent the model's input width and height, respectively. Both are assigned the value 257 inside the Constants.kt file of the Android Studio project.
private fun draw(canvas: Canvas, person: Person, bitmap: Bitmap) {
    setPaint()

    val widthRatio = canvas.width.toFloat() / MODEL_WIDTH
    val heightRatio = canvas.height.toFloat() / MODEL_HEIGHT

    // Draw key points over the image.
    for (keyPoint in person.keyPoints) {
        if (keyPoint.score > minConfidence) {
            val position = keyPoint.position
            val adjustedX: Float = position.x.toFloat() * widthRatio
            val adjustedY: Float = position.y.toFloat() * heightRatio
            canvas.drawCircle(adjustedX, adjustedY, circleRadius, paint)
        }
    }
}
The next figure shows an image after drawing the keypoints.

From the person object we can retrieve the following information for all 17 keypoints returned by the model:
- Body Part:
keyPoint.bodyPart - Location:
keyPoint.position.x - Confidence Score:
keyPoint.position.y
The next for loop prints this information as log messages.
for (keyPoint in person.keyPoints) {
    Log.d("KEYPOINT", "Body Part : " + keyPoint.bodyPart + ", Keypoint Location : (" + keyPoint.position.x.toFloat().toString() + ", " + keyPoint.position.y.toFloat().toString() + "), Confidence" + keyPoint.score);
}
We're not interested in all of the keypoints, just the ones for the eyes. Inside this loop, we can use the following if statement to check for the left eye:
if (keyPoint.bodyPart == BodyPart.LEFT_EYE) {
}
And then for the right eye.
if (keyPoint.bodyPart == BodyPart.RIGHT_EYE) {
}
Note that the previous two if statements just check for the body part, and neglect the confidence score. The following code also takes the confidence score into consideration. Note that the minConfidence variable is defined in PosenetActivity.kt and has the value 0.5, which means that a keypoint must have a confidence of 0.5 or higher to be accepted.
for (keyPoint in person.keyPoints) {
    if (keyPoint.bodyPart == BodyPart.LEFT_EYE && keyPoint.score > minConfidence) {
    }

    if (keyPoint.bodyPart == BodyPart.RIGHT_EYE && keyPoint.score > minConfidence) {
    }
}
Now that we can locate the eyes, we'll see how to load the filter.
Loading and Drawing the Eye Filter
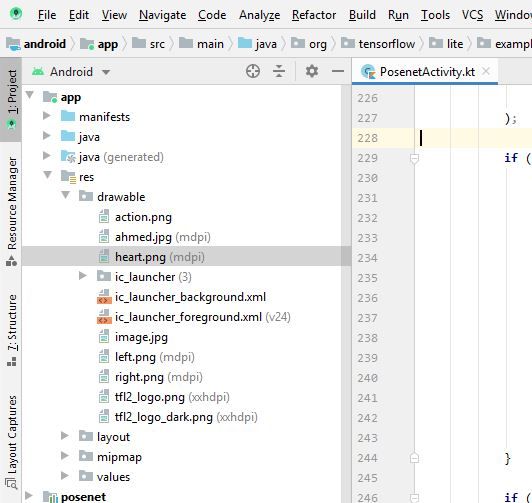
The filters for the two eyes will be added as resource images to the Android Studio project. Just copy both images and paste them inside the drawable folder of the project. To locate the images easily, select the Android view and then navigate to the app/res/drawable directory as explained in the next figure. In my case, I named the two images left.png and right.png.

The next line uses the decodeResource() method to load the images. For loading the filter of the left eye, just replace the current ID R.drawable.right by R.drawable.left. Remember to replace the words right and left according to the names you selected for the two images.
var filterImage = BitmapFactory.decodeResource(context?.getResources(), R.drawable.right)After the left and right eye filters are loaded and before drawing them over the image, we need to resize them. The next line uses the Bitmap.createScaledBitmap() method for resizing each to (100, 100).
filterImage = Bitmap.createScaledBitmap(filterImage, 100, 100, true)Finally, the filter is drawn over the canvas according to the following code. The value 50 subtracted from the x and y coordinates are used to center the filter of size (100, 100) over the eye.
canvas.drawBitmap(
    filterImage,
    keyPoint.position.x.toFloat() * widthRatio - 50,
    keyPoint.position.y.toFloat() * heightRatio - 50,
    null
)
We've now loaded, resized, and drawn the filters over the image. The complete implementation of the draw() method, including the if statements, is listed below.
private fun draw(canvas: Canvas, person: Person, bitmap: Bitmap) {
setPaint()
val widthRatio = canvas.width.toFloat() / MODEL_WIDTH
val heightRatio = canvas.height.toFloat() / MODEL_HEIGHT
// Draw key points over the image.
for (keyPoint in person.keyPoints) {
if (keyPoint.bodyPart == BodyPart.LEFT_EYE) {
var filterImage = BitmapFactory.decodeResource(context?.getResources(), R.drawable.left)
filterImage = Bitmap.createScaledBitmap(filterImage, 100, 100, true)
canvas.drawBitmap(
filterImage,
keyPoint.position.x.toFloat() * widthRatio - 50,
keyPoint.position.y.toFloat() * heightRatio - 50,
null
)
}
if (keyPoint.bodyPart == BodyPart.RIGHT_EYE) {
var filterImage = BitmapFactory.decodeResource(context?.getResources(), R.drawable.right)
filterImage = Bitmap.createScaledBitmap(filterImage, 100, 100, true)
canvas.drawBitmap(
filterImage,
keyPoint.position.x.toFloat() * widthRatio - 50,
keyPoint.position.y.toFloat() * heightRatio - 50,
null
)
}
}
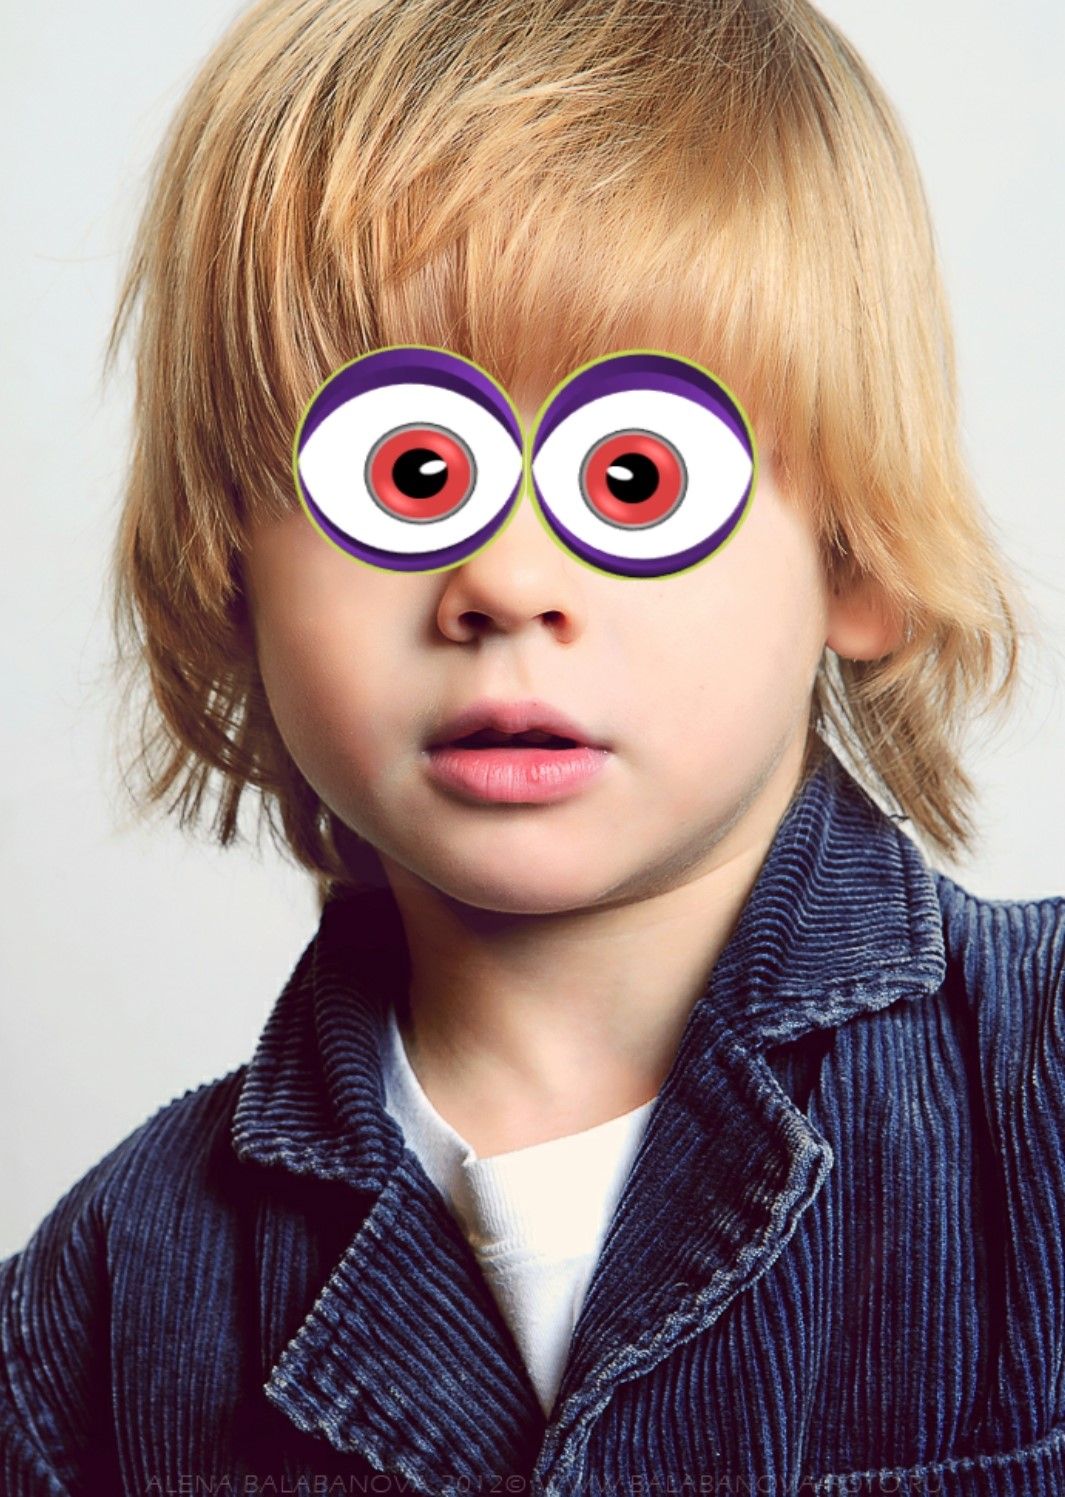
}The next figure shows how the filter looks over the image. The results look pretty good.
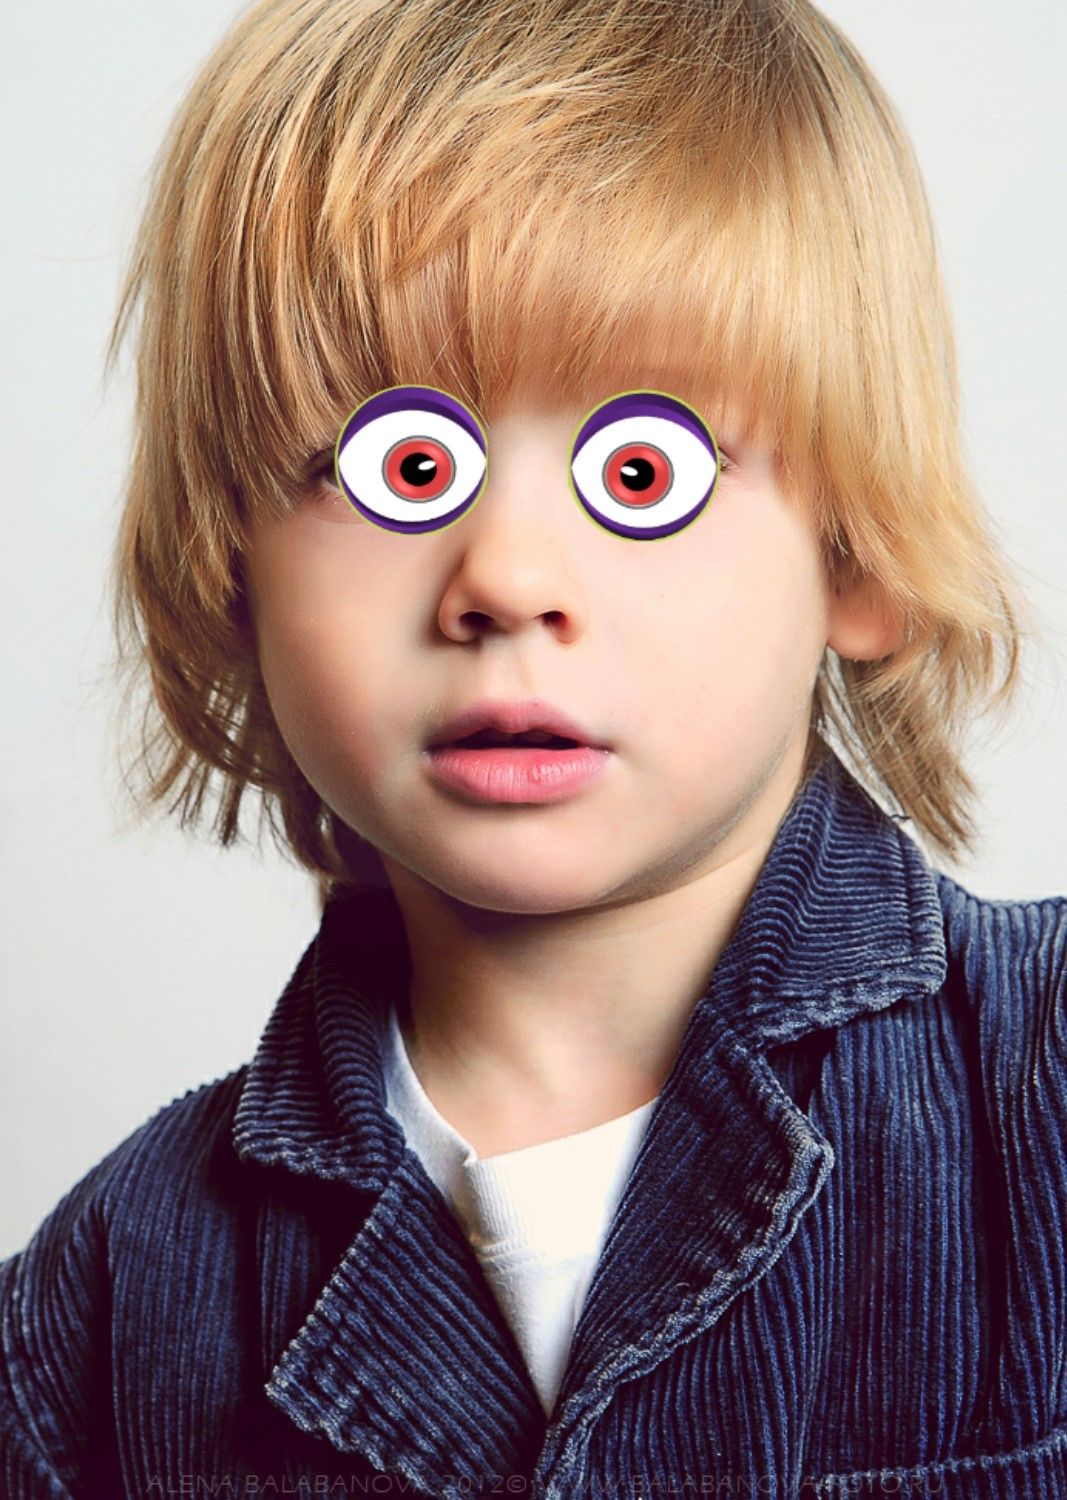
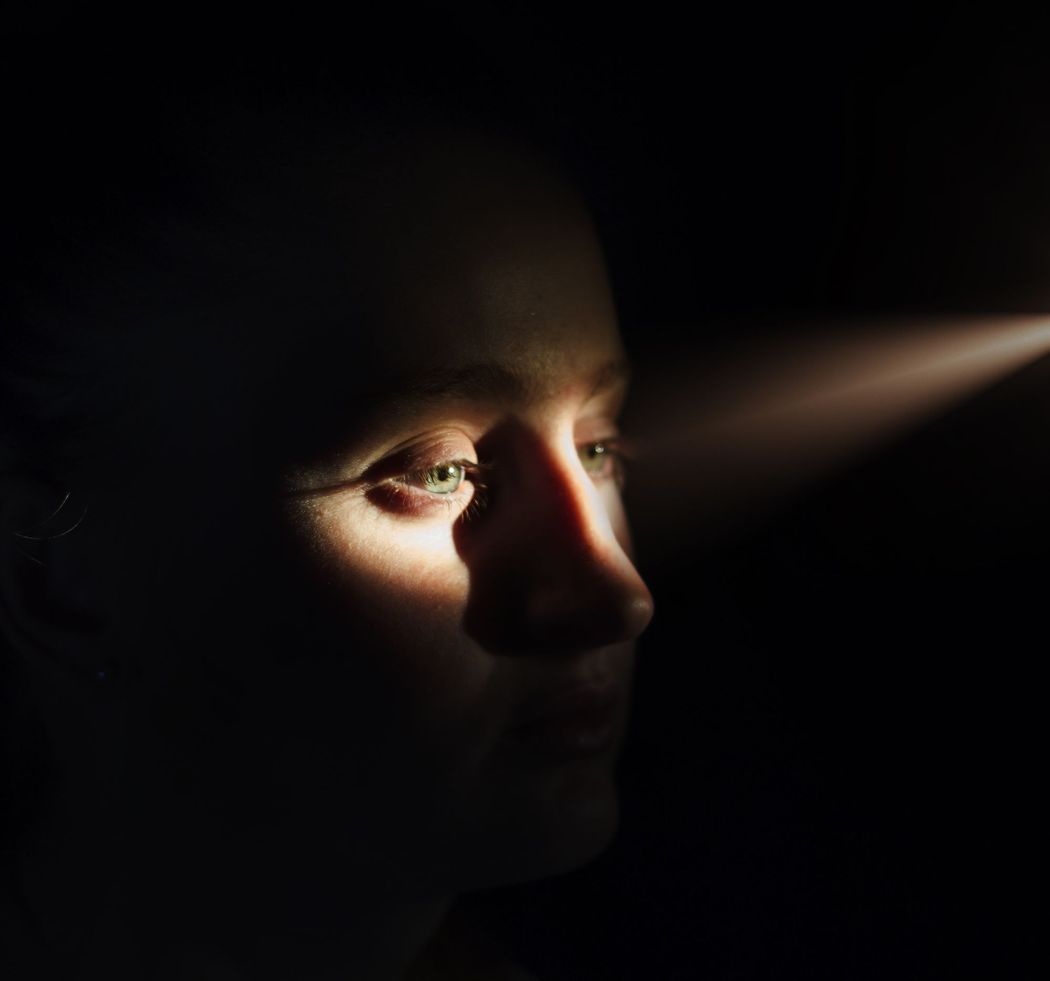
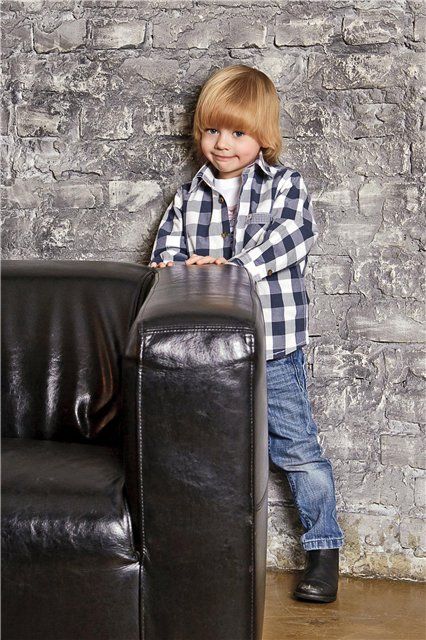
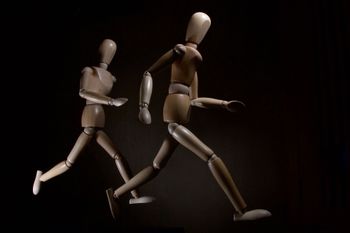
Let's have another try with an image like the one given below.
The next figure shows how the filter is applied. In this case the filter is much too large.
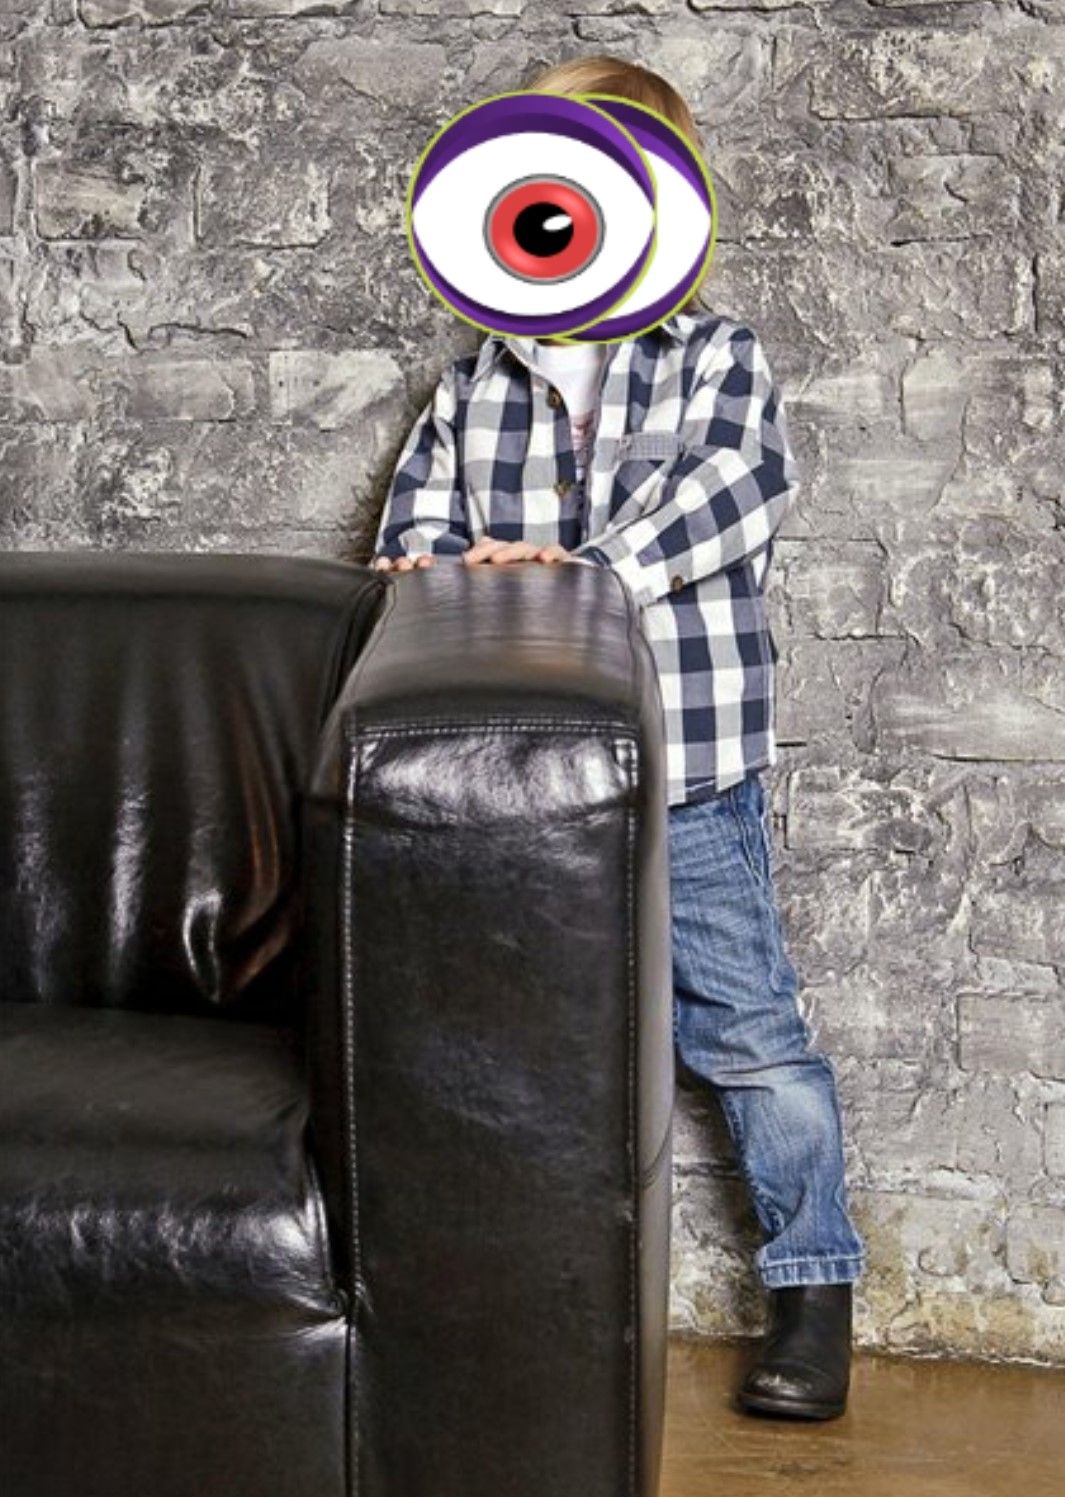
The problem is that the size of the filter is always (100, 100), independent of the eye size. In some cases, like the one in the previous image, the eyes might be far from the camera and thus their size is much less than (100, 100). As a result, the filter covers not only the eyes but maybe the entire face.
We'll solve this problem in the next section by resizing the eye filter according to the distance between the two eyes.
Dynamically Setting the Eye Filter Size
To resize the filter image relative to the eye size, the X location of the two eyes will be saved to an array. The next line creates an array named eyesXLocation for holding the eyes' X locations.
var eyesXLocation = FloatArray(2)Using the for loop given below, the X location of the two keypoints associated with the two eyes will be fetched and saved to the array.
for (keyPoint in person.keyPoints) {
    if (keyPoint.bodyPart == BodyPart.LEFT_EYE) {
        eyesXLocation[0] = keyPoint.position.x.toFloat() * widthRatio
    }

    if (keyPoint.bodyPart == BodyPart.RIGHT_EYE) {
        eyesXLocation[1] = keyPoint.position.x.toFloat() * widthRatio
    }
}
Based on the values stored in the eyesXLocation array, the horizontal absolute distance between the two eyes will be calculated according to the next line.
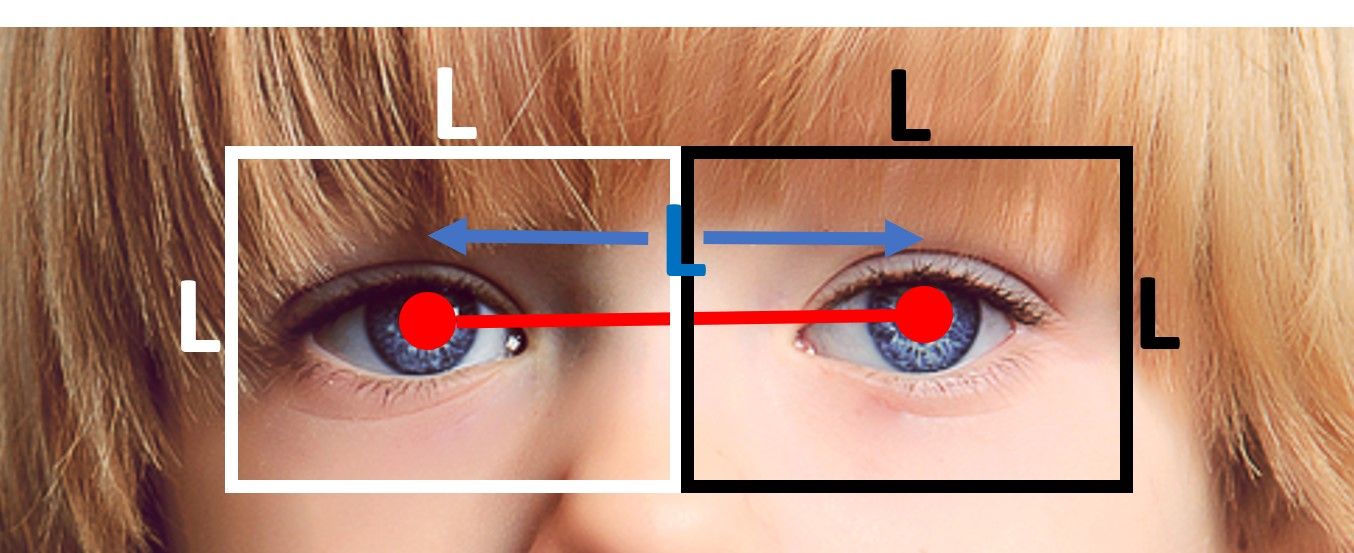
var eyeFilterSize = abs(eyesXLocation[1] - eyesXLocation[0])The next figure should help clarify how the distance is calculated. The keypoint locations are marked with red circles. The distance between the keypoints is the length of the red line connecting them. If the length of the line is L, then the eye filter size will be (L, L). Here, L is the variable eyeFilterSize. Each eye filter is centered at the keypoint.
The value in the eyeFilterSize will be fed to the Bitmap.createScaledBitmap() method to resize the loaded filter image as given below.
filterImage = Bitmap.createScaledBitmap(
    filterImage,
    eyeFilterSize.toInt(),
    eyeFilterSize.toInt(),
    true
)
The new implementation of the draw() method is shown below.
private fun draw(canvas: Canvas, person: Person, bitmap: Bitmap) {
setPaint()
val widthRatio = canvas.width.toFloat() / MODEL_WIDTH
val heightRatio = canvas.height.toFloat() / MODEL_HEIGHT
var eyesXLocation = FloatArray(2)
for (keyPoint in person.keyPoints) {
if (keyPoint.bodyPart == BodyPart.LEFT_EYE) {
eyesXLocation[0] = keyPoint.position.x.toFloat() * widthRatio
}
if (keyPoint.bodyPart == BodyPart.RIGHT_EYE) {
eyesXLocation[2] = keyPoint.position.x.toFloat() * widthRatio
}
}
var eyeFilterSize = abs(eyesXLocation[1] - eyesXLocation[0])
// Draw key points over the image.
for (keyPoint in person.keyPoints) {
if (keyPoint.bodyPart == BodyPart.LEFT_EYE) {
var filterImage = BitmapFactory.decodeResource(context?.getResources(), R.drawable.left)
filterImage = Bitmap.createScaledBitmap(
filterImage,
eyeFilterSize.toInt(),
eyeFilterSize.toInt(),
true
)
canvas.drawBitmap(
filterImage,
keyPoint.position.x.toFloat() * widthRatio - eyeFilterSize / 2,
keyPoint.position.y.toFloat() * heightRatio - eyeFilterSize / 2,
null
)
}
if (keyPoint.bodyPart == BodyPart.RIGHT_EYE) {
var filterImage = BitmapFactory.decodeResource(context?.getResources(), R.drawable.right)
filterImage = Bitmap.createScaledBitmap(
filterImage,
eyeFilterSize.toInt(),
eyeFilterSize.toInt(),
true
)
canvas.drawBitmap(
filterImage,
keyPoint.position.x.toFloat() * widthRatio - eyeFilterSize / 2,
keyPoint.position.y.toFloat() * heightRatio - eyeFilterSize / 2,
null
)
}
}
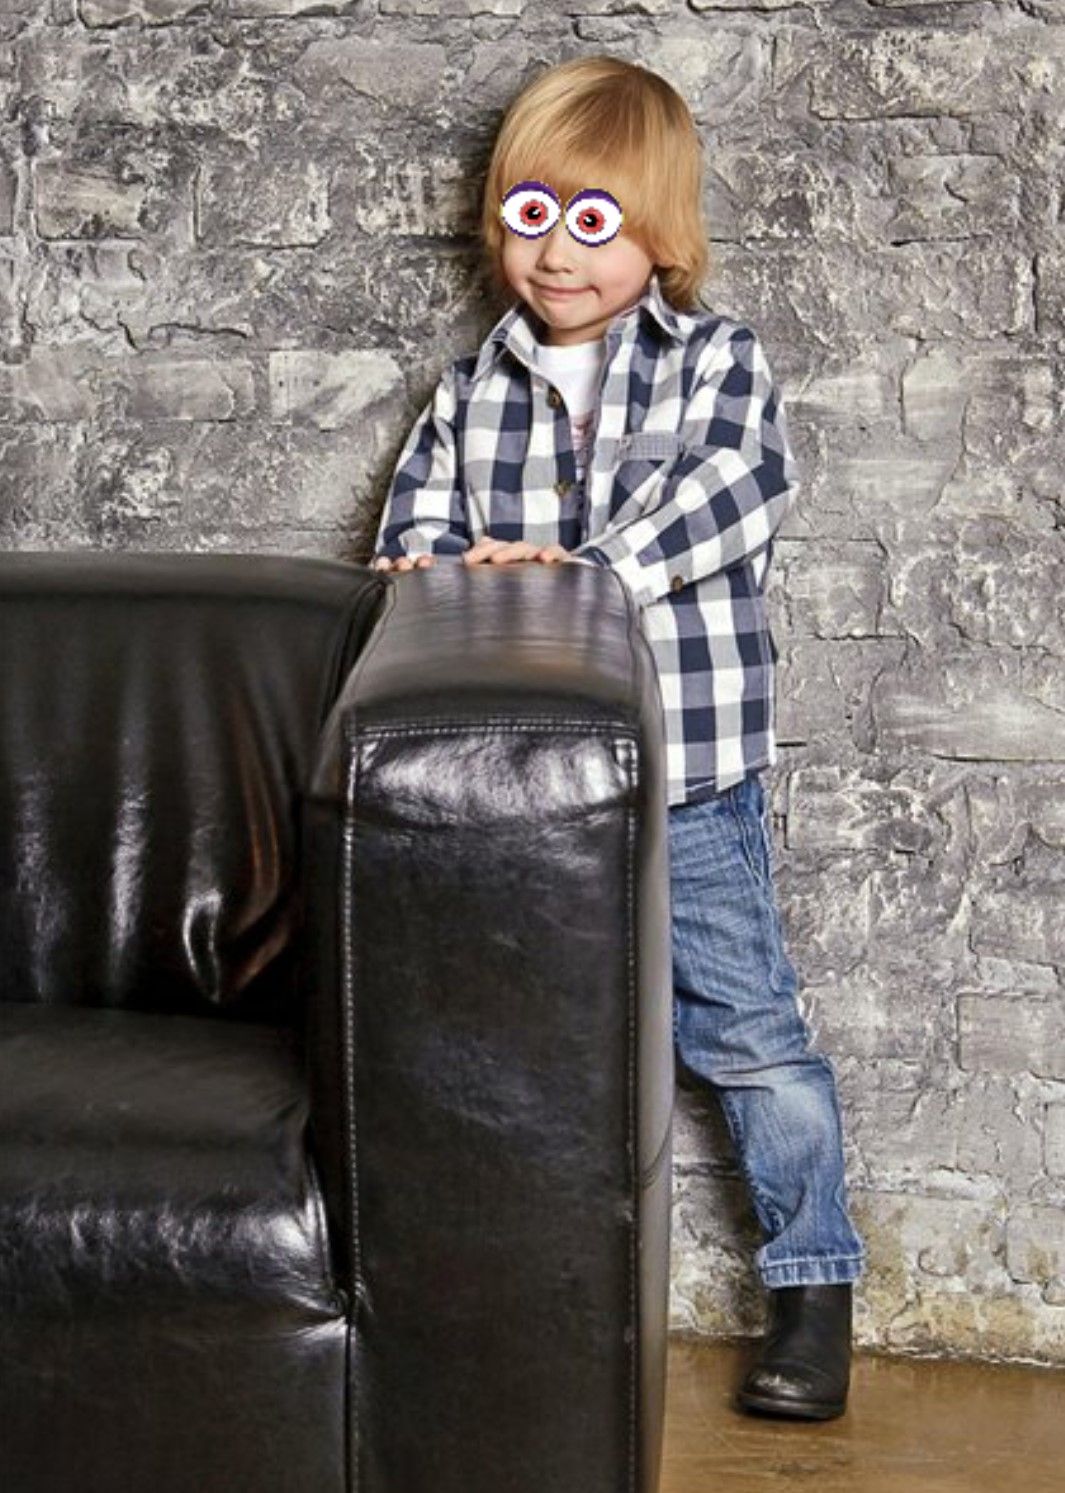
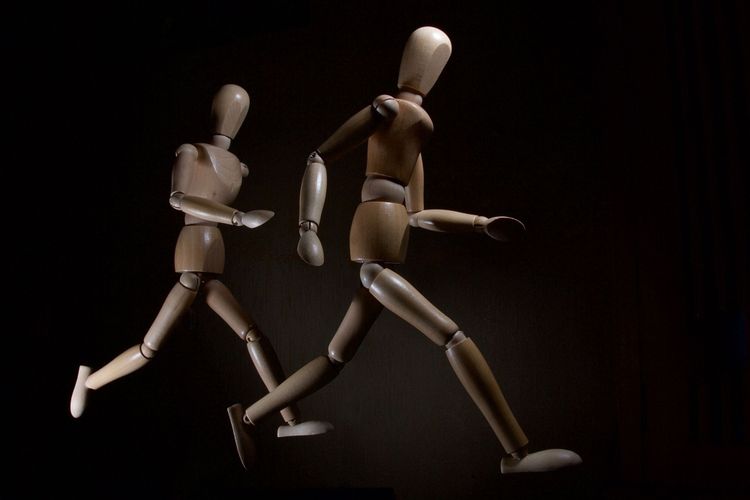
}Here's the result from testing the app with the previous image. The filter size is now much more suitable for the eye size.
Note that dynamically calculating the filter size based on the distance between the eye keypoints also helps to make the filters fully cover the eyes. This can be seen in the next figure.
Now we can automatically resize any filter to fit an image. Before we finish the tutorial, let's take a look at using other eye filters as well.
Using Different Eye Filters
We can easily change the filter we use. All you need to do is add the image as a resource file in the Android Studio project, and load it inside the draw() method. Let's use the following heart image instead of the previous filter.

After downloading the image, simply add it as a drawable resource in the Android Studio project according to the next figure. I named the resource file heart.png.
Now we'll load it with the draw() method in replacement of the previous filter, according to the next line.
var filterImage = BitmapFactory.decodeResource(context?.getResources(), R.drawable.heart)If you want to use another filter, just add it as a resource and feed its ID to the decodeResource() method.
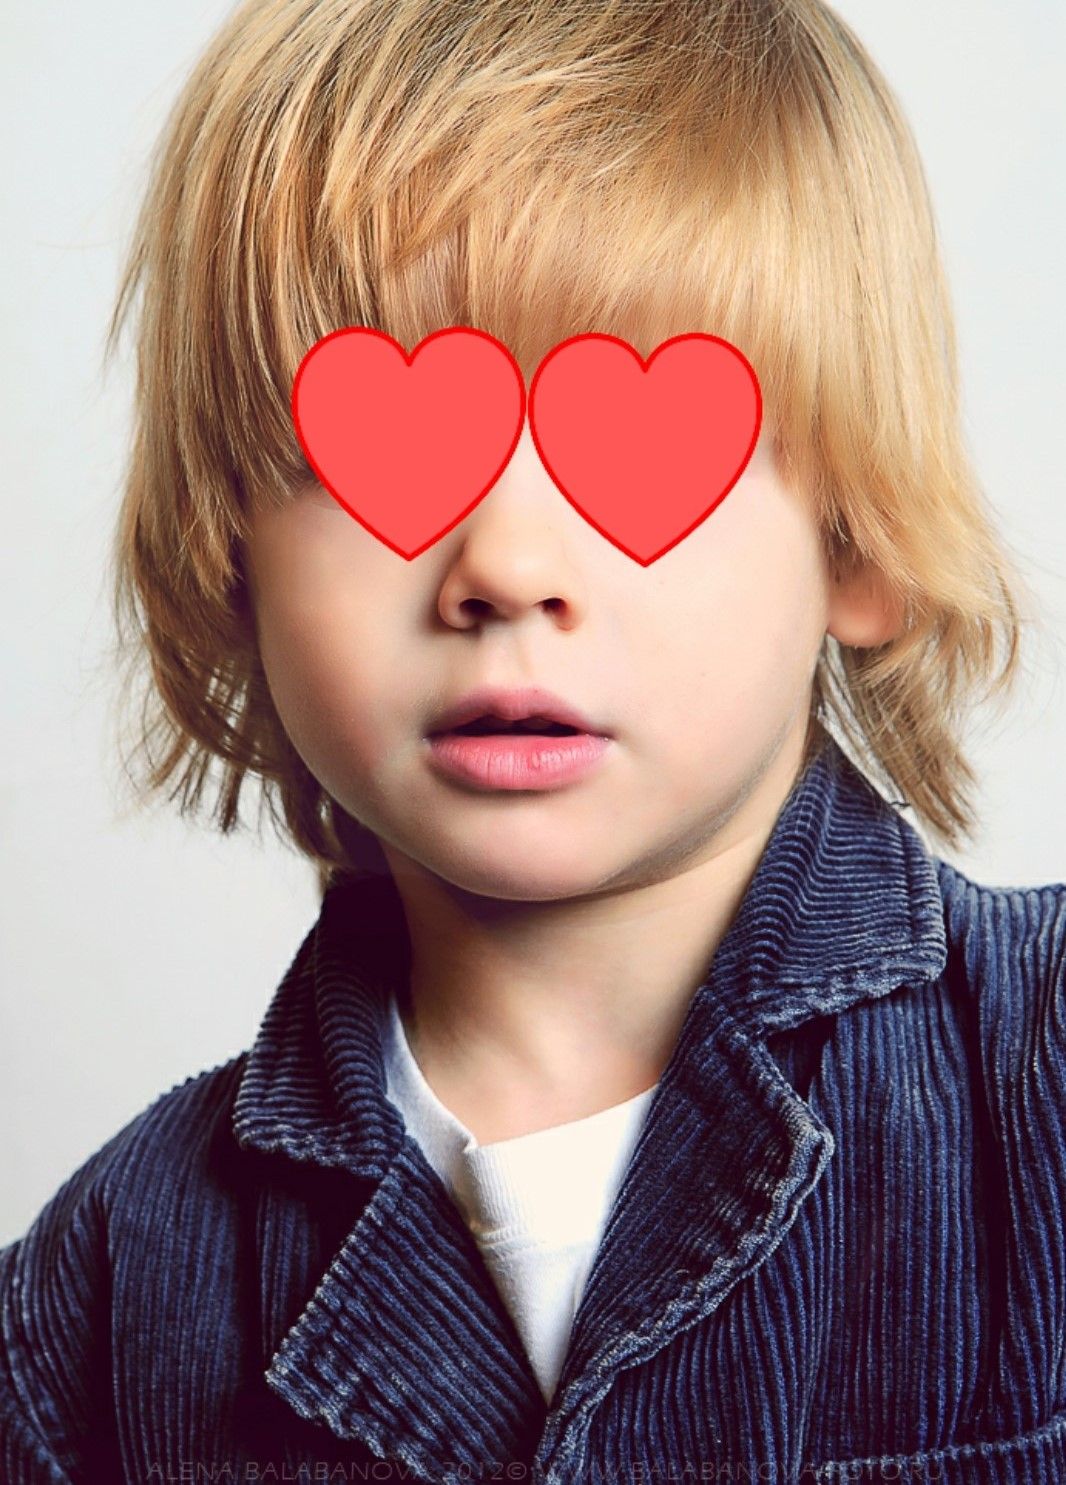
The next figure shows the result after using the heart filter.
Complete Implementation of the PosenetActivity.kt
The complete code for the PosenetActivity.kt is listed below. You can also download the project here.
package org.tensorflow.lite.examples.posenet

import android.app.Activity
import android.app.AlertDialog
import android.app.Dialog
import android.content.Intent
import android.content.pm.PackageManager
import android.graphics.*
import android.os.Bundle
import android.support.v4.app.ActivityCompat
import android.support.v4.app.DialogFragment
import android.support.v4.app.Fragment
import android.util.Log
import android.util.SparseIntArray
import android.view.LayoutInflater
import android.view.Surface
import android.view.View
import android.view.ViewGroup
import android.widget.Toast
import kotlinx.android.synthetic.main.activity_posenet.*
import kotlin.math.abs
import org.tensorflow.lite.examples.posenet.lib.BodyPart
import org.tensorflow.lite.examples.posenet.lib.Person
import org.tensorflow.lite.examples.posenet.lib.Posenet
import android.provider.MediaStore
import android.graphics.Bitmap

class PosenetActivity :
    Fragment(),
    ActivityCompat.OnRequestPermissionsResultCallback {

    val REQUEST_CODE = 100

    /** Threshold for confidence score. */
    private val minConfidence = 0.5

    /** Radius of circle used to draw keypoints.  */
    private val circleRadius = 8.0f

    /** Paint class holds the style and color information to draw geometries,text and bitmaps. */
    private var paint = Paint()

    /** An object for the Posenet library.    */
    private lateinit var posenet: Posenet

    override fun onCreateView(
        inflater: LayoutInflater,
        container: ViewGroup?,
        savedInstanceState: Bundle?
    ): View? = inflater.inflate(R.layout.activity_posenet, container, false)

    override fun onStart() {
        super.onStart()

        posenet = Posenet(this.context!!)

        selectImage.setOnClickListener(View.OnClickListener {
            val intent = Intent(Intent.ACTION_PICK)
            intent.type = "image/jpg"
            startActivityForResult(intent, REQUEST_CODE)
        })
    }

    override fun onActivityResult(requestCode: Int, resultCode: Int, data: Intent?) {
        if (resultCode == Activity.RESULT_OK && requestCode == REQUEST_CODE) {
            imageView.setImageURI(data?.data) // handle chosen image

            val imageUri = data?.getData()
            val bitmap = MediaStore.Images.Media.getBitmap(context?.contentResolver, imageUri)

            processImage(bitmap)
        } else {
            Toast.makeText(context, "No image is selected.", Toast.LENGTH_LONG).show()
        }
    }

    override fun onDestroy() {
        super.onDestroy()
        posenet.close()
    }

    override fun onRequestPermissionsResult(
        requestCode: Int,
        permissions: Array<String>,
        grantResults: IntArray
    ) {
        if (requestCode == REQUEST_CAMERA_PERMISSION) {
            if (allPermissionsGranted(grantResults)) {
                ErrorDialog.newInstance(getString(R.string.request_permission))
                    .show(childFragmentManager, FRAGMENT_DIALOG)
            }
        } else {
            super.onRequestPermissionsResult(requestCode, permissions, grantResults)
        }
    }

    private fun allPermissionsGranted(grantResults: IntArray) = grantResults.all {
        it == PackageManager.PERMISSION_GRANTED
    }

    /** Crop Bitmap to maintain aspect ratio of model input.   */
    private fun cropBitmap(bitmap: Bitmap): Bitmap {
        val bitmapRatio = bitmap.height.toFloat() / bitmap.width
        val modelInputRatio = MODEL_HEIGHT.toFloat() / MODEL_WIDTH
        var croppedBitmap = bitmap

        // Acceptable difference between the modelInputRatio and bitmapRatio to skip cropping.
        val maxDifference = 1e-5

        // Checks if the bitmap has similar aspect ratio as the required model input.
        when {
            abs(modelInputRatio - bitmapRatio) < maxDifference -> return croppedBitmap
            modelInputRatio < bitmapRatio -> {
                // New image is taller so we are height constrained.
                val cropHeight = bitmap.height - (bitmap.width.toFloat() / modelInputRatio)
                croppedBitmap = Bitmap.createBitmap(
                    bitmap,
                    0,
                    (cropHeight / 5).toInt(),
                    bitmap.width,
                    (bitmap.height - cropHeight / 5).toInt()
                )
            }
            else -> {
                val cropWidth = bitmap.width - (bitmap.height.toFloat() * modelInputRatio)
                croppedBitmap = Bitmap.createBitmap(
                    bitmap,
                    (cropWidth / 5).toInt(),
                    0,
                    (bitmap.width - cropWidth / 5).toInt(),
                    bitmap.height
                )
            }
        }
        Log.d(
            "IMGSIZE",
            "Cropped Image Size (" + croppedBitmap.width.toString() + ", " + croppedBitmap.height.toString() + ")"
        )
        return croppedBitmap
    }

    /** Set the paint color and size.    */
    private fun setPaint() {
        paint.color = Color.RED
        paint.textSize = 80.0f
        paint.strokeWidth = 5.0f
    }

    private fun draw(canvas: Canvas, person: Person, bitmap: Bitmap) {
        setPaint()

        val widthRatio = canvas.width.toFloat() / MODEL_WIDTH
        val heightRatio = canvas.height.toFloat() / MODEL_HEIGHT

        var eyesXLocation = FloatArray(2)
        for (keyPoint in person.keyPoints) {
            if (keyPoint.bodyPart == BodyPart.LEFT_EYE) {
                eyesXLocation[0] = keyPoint.position.x.toFloat() * widthRatio
            }

            if (keyPoint.bodyPart == BodyPart.RIGHT_EYE) {
                eyesXLocation[2] = keyPoint.position.x.toFloat() * widthRatio
            }
        }

        var eyeFilterSize = abs(eyesXLocation[1] - eyesXLocation[0])

        // Draw key points over the image.
        for (keyPoint in person.keyPoints) {
            if (keyPoint.bodyPart == BodyPart.LEFT_EYE) {
                var filterImage = BitmapFactory.decodeResource(context?.getResources(), R.drawable.left)
                filterImage = Bitmap.createScaledBitmap(
                    filterImage,
                    eyeFilterSize.toInt(),
                    eyeFilterSize.toInt(),
                    true
                )
                canvas.drawBitmap(
                    filterImage,
                    keyPoint.position.x.toFloat() * widthRatio - eyeFilterSize / 2,
                    keyPoint.position.y.toFloat() * heightRatio - eyeFilterSize / 2,
                    null
                )
            }

            if (keyPoint.bodyPart == BodyPart.RIGHT_EYE) {
                var filterImage = BitmapFactory.decodeResource(context?.getResources(), R.drawable.right)
                filterImage = Bitmap.createScaledBitmap(
                    filterImage,
                    eyeFilterSize.toInt(),
                    eyeFilterSize.toInt(),
                    true
                )
                canvas.drawBitmap(
                    filterImage,
                    keyPoint.position.x.toFloat() * widthRatio - eyeFilterSize / 2,
                    keyPoint.position.y.toFloat() * heightRatio - eyeFilterSize / 2,
                    null
                )
            }
        }
    }

    /** Process image using Posenet library.   */
    private fun processImage(bitmap: Bitmap) {
        // Crop bitmap.
        val croppedBitmap = cropBitmap(bitmap)

        // Created scaled version of bitmap for model input.
        val scaledBitmap = Bitmap.createScaledBitmap(croppedBitmap, MODEL_WIDTH, MODEL_HEIGHT, true)
        Log.d(
            "IMGSIZE",
            "Cropped Image Size (" + scaledBitmap.width.toString() + ", " + scaledBitmap.height.toString() + ")"
        )

        // Perform inference.
        val person = posenet.estimateSinglePose(scaledBitmap)

        // Making the bitmap image mutable to enable drawing over it inside the canvas.
        val workingBitmap = Bitmap.createBitmap(croppedBitmap)
        val mutableBitmap = workingBitmap.copy(Bitmap.Config.ARGB_8888, true)

        // There is an ImageView. Over it, a bitmap image is drawn. There is a canvas associated with the bitmap image to draw the keypoints.
        // ImageView ==> Bitmap Image ==> Canvas

        val canvas = Canvas(mutableBitmap)

        draw(canvas, person, mutableBitmap)
    }

    /**
     * Shows an error message dialog.
     */
    class ErrorDialog : DialogFragment() {

        override fun onCreateDialog(savedInstanceState: Bundle?): Dialog =
            AlertDialog.Builder(activity)
                .setMessage(arguments!!.getString(ARG_MESSAGE))
                .setPositiveButton(android.R.string.ok) { _, _ -> activity!!.finish() }
                .create()

        companion object {

            @JvmStatic
            private val ARG_MESSAGE = "message"

            @JvmStatic
            fun newInstance(message: String): ErrorDialog = ErrorDialog().apply {
                arguments = Bundle().apply { putString(ARG_MESSAGE, message) }
            }
        }
    }

    companion object {
        /**
         * Conversion from screen rotation to JPEG orientation.
         */
        private val ORIENTATIONS = SparseIntArray()
        private val FRAGMENT_DIALOG = "dialog"

        init {
            ORIENTATIONS.append(Surface.ROTATION_0, 90)
            ORIENTATIONS.append(Surface.ROTATION_90, 0)
            ORIENTATIONS.append(Surface.ROTATION_180, 270)
            ORIENTATIONS.append(Surface.ROTATION_270, 180)
        }

        /**
         * Tag for the [Log].
         */
        private const val TAG = "PosenetActivity"
    }
}
Conclusion
This tutorial continued the project started in a previous tutorial to allow adding an eye filter over an image.
Based on the detected keypoints using the PoseNet deep learning model, it is possible to locate the left and right eyes. After being located, a filter image is loaded and prepared to be drawn over the detected eyes.
To make the filter image size dependent on the eye size, the distance between the 2 eyes is calculated and used to resize the filter.


