
In the second part of the reinforcement article series, we will gain a piece of further knowledge on the numerous methods to implement the reinforcement learning algorithms and policies to achieve the best results possible. If you haven't already, I would highly recommend checking it out as we have covered some of the essential basics required to understand the theoretical knowledge related to these reinforcement learning methodologies. We have covered the beginner reinforcement learning concepts, understand a few of the useful algorithms and policies, and finally, implemented a simple project with deep reinforcement learning. In this article, our objective is to expand this knowledge further.
In this article, we will understand the complete details related to the implementation of the project structure, mainly the numerous concepts such as OpenAI gym, other necessary installation requirements like PyTorch and stable baselines, and other essential requirements. We will also look at potential bug fixes that one might encounter during the execution of these projects. We will then proceed to work on two projects, namely the cart pole project and the self-driving car. We will use a different approach in the PyTorch virtual environment to solve the cart pole project and also learn how to construct a trained model to approach the autonomous driving problem with reinforcement learning. Check out the table of contents for a further understanding of the numerous topics and concepts that we will be dealing with in the following article.
Table of Contents:
- Introduction
- Getting started with the project structure
1. Understanding OpenAI Gym and
2. Installation procedure
3. Fixing potential bugs - Developing a Cartpole project with Reinforcement learning
1. Importing the essential libraries
2. Creating the environment
3. Training an RL algorithm
4. Saving and loading the model
5. Evaluating and testing the model - Developing the Self-Driving car project with Reinforcement learning
1. Importing the essential libraries
2. Testing the environment
3. Training the model
4. Saving the trained model
5. Evaluating and testing the model - Conclusion
Introduction:
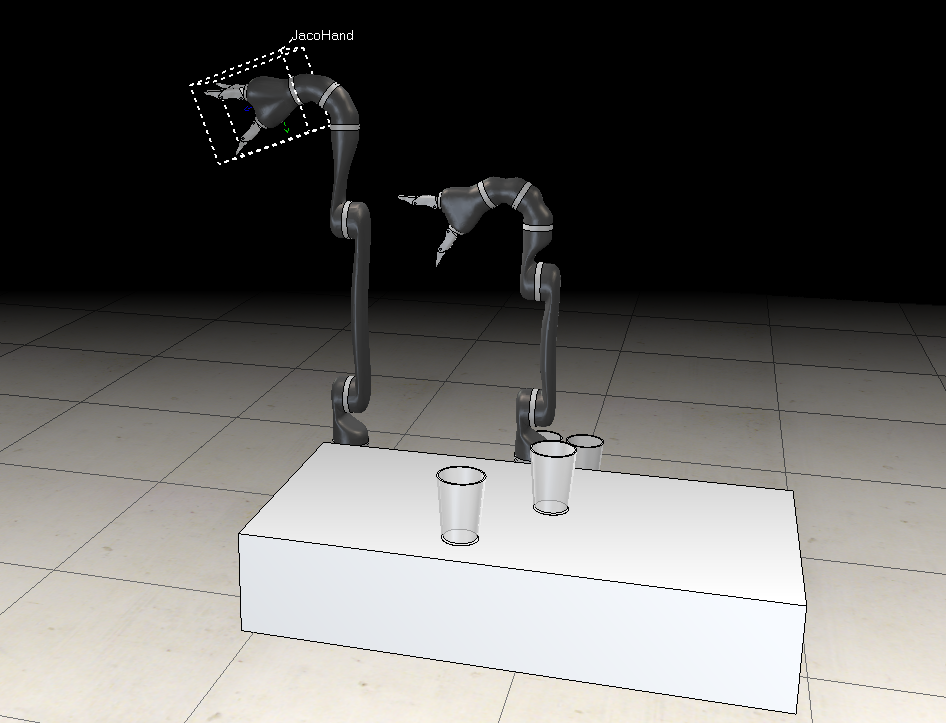
From robotic simulations to training AI bots in gaming to the construction of high-level chess engines, reinforcement learning finds utility in all these tremendous applications. The figure displayed above includes one of the screenshots from one of the software that I use for different types of robotics simulations and projects. It is critical to check and test such models before they are deployed on an industrial scale. Hence, we can utilize the OpenAI gym environments to construct our reinforcement algorithms to train the models effectively while effectively testing the particular project. Our objective is to help the robot (or the specific object of significance) in performing complex tasks with high precision.
Once you have successfully tested your development models in the specific environment, you can deploy both the robotic model and its respective trained reinforcement learning model. Apart from industrial robotic applications, these reinforcement learning models are also deployed for analyzing and monitoring trading figures, business intelligence, and other similar practices. In this article, our primary focus will be to learn and train these RL models on mainly two programs, namely, the cart pole game and the self-driving autonomous driving car simulation. Before we dive straight into these fabulous projects, let us explore the OpenAI gym environment and other essential requirements and dependencies for them.
Getting Started with the Project Structure:
Assuming the viewers have followed through the beginning segments of the previous article on getting started with reinforcement learning, you should have a brief idea of the types of dependencies that we will require for building our deep learning models. We will make use of the OpenAI gym for creating the necessary environments where we can train our reinforcement learning models. We will utilize the PyTorch installation in the virtual environment as opposed to our previous TensorFlow and Keras support. Hence, I would recommend checking out "The Ultimate Guide To PyTorch" to get comfortable with the PyTorch deep learning framework. Finally, we will utilize the Stable-Baselines3 development toolkit, which is a reliable method for the implementation of Reinforcement Learning algorithms and policies.
The stable-baselines3 is inspired from the original baselines version, which was originally developed by OpenAI. It is a set of reliable implementations of reinforcement learning algorithms in PyTorch. It is the next major version of Stable Baselines. For further study on this fantastic library for reinforcement learning, I would recommend checking out the following starter guide for the documentation. The following library is simple to install. Ensure that you have PyTorch installed in your virtual environment, and then proceed to run the following command.
pip install stable-baselines3[extra]
The OpenAI gym is one of the best toolkits for exploring a variety of reinforcement learning algorithms. The environment with no previous assumptions on its type provides the users with a base platform to perform experiments on different types of problems due to its large collection of numerous environments. It is highly compatible with any numerical computation library and deep learning frameworks such as TensorFlow, PyTorch, or Theano. The stable-baselines3 provides the users with an improved set of algorithms and policies to train reinforcement learning models with high simplicity. They help the research community to replicate, refine, and identify new ideas easily.
Another major installation that we will require for the second autonomous self-driving project is the installation of the SWIG for the particular platform (Windows, Mac, or Linux). Download the swig package from this website and ensure that you add the path to your environment variables. The Simplified Wrapper and Interface Generator (SWIG) is one of the best open-source tools that will allow you to wrap computer scripts written in C or C++ code into other scripting languages. Once the download is complete, and you have installed it, close the command prompt and reopen it for any additional installs. The version I downloaded and installed was swigwin-4.0.2 and swigwin-3.0.12. Please verify and check which versions work best for you and if there are any future updates.
Another couple of final installations that you will require for running the second project is the box-2D. The box-2D environment is a must for running the self-driving experiment in the OpenAI gym. Another major install is the Pyglet library that is extremely useful for game development. Run the following command mentioned below in the virtual environment containing all the other dependencies, and you should be able to download both the requirements accordingly. If you run into errors during installation like I did, check the following stack overflow website for solutions. It is best to download, install, and add the various versions of SWIG to the environment variables to avoid such issues.
!pip install gym[box2d] pyglet==1.3.2
Developing a Cart Pole project with Reinforcement learning:
We have already discussed the cart pole project in our previous article of getting started with reinforcement learning. As a quick recap, let us understand the inherent details of how this task works. The cart pole project is basically defined as follows -
"A pole is attached by an un-actuated joint to a cart, which moves along a frictionless track. The system is controlled by applying a force of +1 or -1 to the cart. The pendulum starts upright, and the goal is to prevent it from falling over. A reward of +1 is provided for every timestep that the pole remains upright. The episode ends when the pole is more than 15 degrees from vertical, or the cart moves more than 2.4 units from the center."
- Source
In this project, our objective is to utilize a reinforcement learning model to achieve a good result on the following project such that the cart pole is balanced for a long time and the model is able to achieve a score of at least 200 for each episode that the model is tested on. Let us get started with this project by understanding all the essential concepts and developing our reinforcement learning model accordingly.
Importing the essential libraries:
In the first step, we will import some of the essential libraries that we will require to access the environment as well as develop the required reinforcement learning model for the cart pole project. We will utilize the PPO algorithm for this experiment. The Proximal Policy Optimization algorithm combines ideas from A2C (having multiple workers) and TRPO (it uses a trust region to improve the actor). The viewers can choose the respective algorithm accordingly. The next import helps to wrap up the environment as desired, while the evaluation policy will help us to analyze the required metrics.
import gym
from stable_baselines3 import PPO
from stable_baselines3.common.vec_env import DummyVecEnv
from stable_baselines3.common.evaluation import evaluate_policy
import os
Creating the environment:
In the next step, we will proceed to create our training environment using the OpenAI gym support system. In this step, we will test the working mechanism of the cart pole and evaluate the scores accordingly without the training of any model to see how it performs. This step is also covered in the previous article, and I would recommend checking it out for a better understanding of the low scores that are achieved.
environment_name = "CartPole-v0"
env = gym.make(environment_name)

episodes = 5

for episode in range(1, episodes+1):
    state = env.reset()
    done = False
    score = 0

    while not done:
        env.render()
        action = env.action_space.sample()
        n_state, reward, done, info = env.step(action)
        score+=reward
    print('Episode:{} Score:{}'.format(episode, score))

env.close()
Bring this project to life
Training an RL algorithm:
In this step, we will choose the preferred reinforcement learning algorithm and policy that we will utilize for approaching this task. For both the tasks and projects in this article, we will utilize the Proximal Policy Optimization Reinforcement Learning Algorithm. Feel free to experiment with the different types of algorithms and policies that are provided by the stable-baselines3 library. Some of the other options include A2C, DQN, SAC, and other similar algorithms.
Before we start training our reinforcement learning model, we will focus on adding and creating a few essential callbacks, including the Tensorboard callback for viewing the respective logs. For this step, we will need to create the appropriate directories to store the logs generated by the tensorboard. Create the folders either with Python code or directly in the respective platform. Once these folders are created, we can join the path of the logs and model.
training_log_path = os.path.join(log_path, 'PPO_3')
!tensorboard --logdir={training_log_path}
In the next step, we will utilize some of the other callbacks to stop the train once our required threshold is reached. We will also define the save paths and log paths for the trained models and the logs generated by them. For training the model, we will define the PPO algorithm with the MLP policy and define the Tensorboard path. We will then proceed to train the model for a total of 20000 timesteps with the defined callbacks. Our goal is to achieve a score of at least 200 on the cart pole problem at each episode. Finally, train the model with the code snippet provided below.
from stable_baselines3.common.callbacks import EvalCallback, StopTrainingOnRewardThreshold
import os


save_path = os.path.join('Training', 'Saved Models')
log_path = os.path.join('Training', 'Logs')

env = gym.make(environment_name)
env = DummyVecEnv([lambda: env])

stop_callback = StopTrainingOnRewardThreshold(reward_threshold=190, verbose=1)
eval_callback = EvalCallback(env,
                             callback_on_new_best=stop_callback,
                             eval_freq=10000,
                             best_model_save_path=save_path,
                             verbose=1)

model = PPO('MlpPolicy', env, verbose = 1, tensorboard_log=log_path)

model.learn(total_timesteps=20000, callback=eval_callback)
You can now proceed to directly evaluate the model or proceed to save the model to load and reuse it later. You can perform following actions as shown below. We will discuss these couple of steps in further detail in the next sections.
model_path = os.path.join('Training', 'Saved Models', 'best_model')
model = PPO.load(model_path, env=env)

evaluate_policy(model, env, n_eval_episodes=10, render=True)
env.close()
Note that you can also use different algorithms and change the policies accordingly for the particular project that you are working on. I would recommend experimenting and trying out numerous combinations to see how quickly the model converges as well as which model adapts better to the particular problem.
Saving and loading the model:
As discussed previously, we can create the save path where we will save the trained model once the training is completed. This action can be performed with the model.save() function. However, since we have used callbacks for the following action, we don't have to worry about this step. However, the code below shows an alternate approach to saving your desired models.
PPO_path = os.path.join('Training', 'Saved Models', 'PPO_model')
model.save(PPO_path)
If you want to load the same model, then you can make use of the code shown below.
model = PPO.load('Training/Saved Models/PPO_model', env=env)Evaluating and testing the model:
In the last section of this project, we will evaluate and test the trained model. The below code shows how to evaluate the particular policy for a total of ten episodes.
from stable_baselines3.common.evaluation import evaluate_policy
evaluate_policy(model, env, n_eval_episodes=10, render=True)
env.close()
Finally, we need to test and evaluate the performance of our trained models. For this step, we will utilize the evaluation policy and test the model for a total of ten episodes. The environment is rendered, and the model is tested upon the rendered environment. Ideally, the trained model should be able to achieve a score of 200 for every interval (episode) that we run the trained model. Once the evaluation is completed, we can proceed to close the testing environment.
obs = env.reset()
while True:
    action, _states = model.predict(obs)
    obs, rewards, done, info = env.step(action)
    env.render()
    if done:
        print('info', info)
        break

 env.close()
If you want to test the trained model and run the saved model, the complete code for the following is provided below. We are basically importing all the required libraries, creating the gym environment for the cart pole problem, loading the trained model, and performing the evaluation to check the results that we have achieved on the trained model.
import gym
from stable_baselines3 import PPO
from stable_baselines3.common.vec_env import DummyVecEnv
from stable_baselines3.common.evaluation import evaluate_policy
import os

environment_name = "CartPole-v0"
env = gym.make(environment_name)

model = PPO.load('Training/Saved Models/PPO_model')

obs = env.reset()
while True:
    action, _states = model.predict(obs)
    obs, rewards, done, info = env.step(action)
    env.render()
    if done:
        print('info', info)
        break

env.close()
With that completed, let us proceed to the next section of this article. We will now construct a reinforcement learning model for the self-driving car project.
Developing the Self-Driving car project with Reinforcement learning:
In the second project of this article, we will understand how to develop a reinforcement learning model for an autonomous self-driving car. As we can see from the above image, we can train our reinforcement learning model to achieve a desirable score for every moment the car is on the track. However, when the car goes off track, we will negate some of its progress. Using this learning curve, we can train the car accordingly to achieve the required results and ensure that the car follows the right track without going off. Note that while we are working on this project, there will be several situations where the car goes off track and does a continuous burnout. That is usually fine, even though it might last for a few seconds.
Importing the essential libraries:
Before importing the essential libraries, ensure that you have checked out the previous Getting Started with the Project Structure section of this article. Ensure that you have installed box-2D, Pyglet, SWIG, and other necessary requirements for the project. Once all the dependencies are successfully installed, we will proceed to call the libraries for approaching this task. The OpenAI gym to create our environments, stable baselines to import our policy, vectorize the environment, and evaluate the policy. Check the below code snippet to understand the proceedings.
import gym
from stable_baselines3 import PPO
from stable_baselines3.common.vec_env import VecFrameStack
from stable_baselines3.common.evaluation import evaluate_policy
import os
gym.logger.set_level(40)
Testing the environment:
The reward is -0.1 every frame and +1000/N for every track tile visited, where N is the total number of tiles visited in the track. For example, if you have finished in 732 frames, your reward is 1000 - 0.1*732 = 926.8 points. The game is considered to be solved when the agent consistently gets 900+ points. However, the track that is generated in each episode is completely random. To achieve the best results, we will need to train the reinforcement learning model for quite a long time, depending on the type of system components you have. Hence, patience is required for achieving the best result for this task as you will face several car burnouts during the training process.
In the next code snippet, we will test the required environment for the self-driving car. Similar to how we tested the cart pole experiment, we will construct the testing environment for the self-driving car problem. We will construct the environment using OpenAI gym and proceed to render the environment to evaluate the scores and performance of the default car. We will notice that the car isn't able to perform as desired, and our task is to improve its overall performance using reinforcement learning.
environment_name = "CarRacing-v0"

env = gym.make(environment_name)

episodes = 5
for episode in range(1, episodes+1):
    state = env.reset()
    done = False
    score = 0

    while not done:
        env.render()
        action = env.action_space.sample()
        n_state, reward, done, info = env.step(action)
        score+=reward
    print('Episode:{} Score:{}'.format(episode, score))

env.close()
Sample Output:
Track generation: 1207..1513 -> 306-tiles track
Episode:1 Score:-34.426229508197295
Track generation: 1180..1479 -> 299-tiles track
Episode:2 Score:-36.2416107382556
Track generation: 1170..1467 -> 297-tiles track
Episode:3 Score:-32.43243243243292
Track generation: 1012..1269 -> 257-tiles track
Episode:4 Score:-25.781250000000323
Track generation: 1181..1482 -> 301-tiles track
Episode:5 Score:-33.333333333333876
If you want further information about the environment, you can view the action samples as follows.
env.action_space.sample()And the observation space as follows.
env.observation_space.sample()The source code for the complete detailed annotation is also provided by OpenAI for the self-driving car problem. With the help of this link, the viewers can access the source code.
Training the model:
In the next step, we will train the Proximal Policy Optimization Reinforcement Learning Algorithm for solving the task of an autonomous self-driving car that we have previously defined in earlier sections. The first step is to ensure that you have created a training directory with a logs folder in it. You can either perform this action with the os.makedirs command or directly create the new directories in the platform. We will assign the path of these logs for storing the Tensorboard evaluation results. We will then proceed to create the PPO algorithm with the CNN policy and train the model for a total of 20000 steps. If your computational resource system allows you to train for more time steps in a desired period of time, it is recommended to extend the time steps accordingly. The more you train, the better it is for the model to learn and adapt. The code block below is how you can run the following code.
log_path = os.path.join('Training', 'Logs')
model = PPO("CnnPolicy", env, verbose=1, tensorboard_log=log_path)
model.learn(total_timesteps=20000)
Saving the trained model:
Once you have finished training the model, it is highly recommended that you save these models accordingly. Create the directories for the saved models where you will store the model that you have trained successfully. This saving of models not only allows you to reuse the model but also reconstruct and re-train them for a further number of epochs when required. This step is helpful, especially in the following scenario where you will require multiple timesteps to perfect the model to always achieve a score of 900+. Below is the code snippet to save the trained model.
ppo_path = os.path.join('Training', 'Saved Models', 'PPO_Driving_model')
model.save(ppo_path)
Evaluating and testing the model:
Once we have trained and saved our reinforcement learning model, we will proceed to evaluate the policy and test it accordingly. Below is the code snippet to evaluate the trained model.
evaluate_policy(model, env, n_eval_episodes=10, render=True)
env.close()
In the next code block, we will verify the performance of the trained model by testing it. We will use the predict function on the model to concur the actions on the rendered environment. Check the code below for analyzing the model.
obs = env.reset()
while True:
    action, _states = model.predict(obs)
    obs, rewards, dones, info = env.step(action)
    env.render()

env.close()
If you want to just run the saved trained model in a different notebook or python file, you can use the code snippet below once the training is completed. Import all the essential libraries that we will require for this task, similar to the previous imports. We will then create the racing car environment with the OpenAI gym, load the Proximal Policy Optimization (PPO) model that we previously trained and evaluate the model accordingly. Once the evaluation process is complete, we can close the environment.
import gym
from stable_baselines3 import PPO
from stable_baselines3.common.vec_env import VecFrameStack
from stable_baselines3.common.evaluation import evaluate_policy
import os
gym.logger.set_level(40)

environment_name = "CarRacing-v0"
env = gym.make(environment_name)

model = PPO.load('Training/Saved Models/PPO_Driving_model_2')

evaluate_policy(model, env, n_eval_episodes=10, render=True)
env.close()
Note that for a better performance of the trained model, it is recommended to run the RL model for a large number of time steps so that the trained model can adapt to multiple scenarios and achieve a high score each time the evaluation is performed. With a lower of time steps, it is easy to run into a lot of car burnouts, and that is completely fine. Ensure that you save the model at each interval of training, and then proceed to re-train whenever you have the time and resources. Feel free to experiment with numerous variations of projects and try out different experiments for gaining a deeper understanding of reinforcement learning.
Conclusion:

With these two articles on reinforcement learning, we can perform almost any type of project with a variety of RL algorithms and policies. The OpenAI gym environment has a ton more environments, such as the Atari games, robot simulation, and so much more that researchers and enthusiasts of this field can explore and learn more about. I would encourage checking out other stuff and projects related to the various possibilities that we can develop with reinforcement learning. I would suggest revisiting the OpenAI gym and stable-baselines3 libraries for further information on these topics and trying out more experiments. I also highly recommend checking out the following YouTube channel that covers reinforcement learning in great depth.
In this article, we had a brief introduction to some of the useful applications of reinforcement learning. We then understood the significance of OpenAI gym and the utility of the third version of stable baselines in the PyTorch environment. We also looked into some of the other major installations required for the completion of the project mentioned in this blog, such as SWIG, box-2D, and Pyglet. We then proceed to construct the cart pole project similar to the one covered in the previous article. However, we noticed a different method of implementation and utilized PyTorch instead of TensorFlow. Finally, we tackled how to train an autonomous self-driving car with reinforcement learning.
In future articles, we will work on some natural language processing projects with transformers and BERT. We will also understand concepts of autoencoders and constructing neural networks from scratch. Until then, keep exploring the world of reinforcement learning and the numerous amazing projects that you can construct with it!