

With the rise in technological advancements in the field of artificial neural networks, there have been several libraries that are used to solve and compute modern deep learning tasks. In my previous articles, I have covered some other deep learning frameworks, such as TensorFlow and Keras, in detail. It is recommended that the viewers who are new to this topic to out the following link for TensorFlow and this particular link for Keras. In this article, we will cover another spectacular deep learning framework in PyTorch, which is also widely used for performing a variety of complex tasks.
PyTorch, since its release in September 2016, has always offered stiff competition to TensorFlow due to its Pythonic style of coding archetypes and comparatively more simple coding methodologies in some cases. The table of contents for the concepts we will discuss in this article is provided on the right. For starters, we will get accustomed to PyTorch with a basic introduction. We will then proceed to install the PyTorch framework in a virtual environment for the construction of deep learning projects. We will understand the concepts of tensors and the numerous possible operations that a user can compute with the various functionalities offered in PyTorch. Once we have a basic understanding of tensor operations, we will discuss all the basic steps and necessities to construct a PyTorch model. Finally, we will briefly discuss the differences between TensorFlow and PyTorch.
Introduction To PyTorch:
PyTorch is one of the best options for deep learning, which is available as an open-source deep learning framework that was first introduced and developed by Facebook's AI Research lab (FAIR). The primary aim of the torch environment library developed was to construct highly effective models that could produce the best possible results and solutions for a particular task. The applications of the PyTorch library extend from machine learning applications to natural language processing and computer vision tasks. Apart from these use cases, they are also utilized in a number of software structures. Some of the examples include Uber's Pyro, Tesla Autopilot, Hugging Face Transformers, PyTorch Lightning, and Catalyst.
The main ability of PyTorch is to support basic numpy operations by making use of tensors which they can utilize for computing complex operations with a Graphics Processing Unit (GPU). This ability of PyTorch to make use of tensors to perform complicated tasks and computations with ease, thanks to its access to GPU support, is one of the significant characteristics of PyTorch. We will discuss the topic of these tensor operations in further detail in a later section in this article. Apart from its ability to compute operations faster, it also utilizes a system of automatic differentiation that allows its users to directly compute the backpropagation values for their neural networks in an extremely simplified manner. Due to some of these popular PyTorch functions, users don't need to do any manual calculations in favor of using the given functions to calculate the desired derivatives accordingly.
Although PyTorch is supported in languages like C++, the primary focus of PyTorch is to provide the users with a solid foundation and complete support with the Python programming language. Most of the code written in PyTorch can seamlessly be integrated into Python. PyTorch also bonds well with most of the Python libraries, such as numpy. Since most of the code is so Pythonic, it becomes easier for newer developers who have experience with Python to learn PyTorch. It also allows the user to debug more efficiently, hence leading to higher developer productivity. As discussed before, it also has graphical support as CUDA was one of the languages in which the PyTorch library was written. And finally, PyTorch is also supported by a multitude of Cloud platforms for model development and deployment similar to TensorFlow. With this basic introduction of PyTorch, we can proceed with the major steps involved in the installation of this deep learning framework.
Installation procedure of PyTorch:

My recommendation for the first step will be to get started with the download of the Anaconda development environment. Anaconda is a distribution that supports a multitude of libraries, programming languages, and tons of useful materials for beginners and experts. It is suitable across all platforms of operating systems such as Windows, macOS, and Linux. This software is widely considered as one of the best tools that a data science enthusiast must possess to achieve the best and most desired results on any particular task. You can download the latest suitable version for your desktop from the following link.
Once you have downloaded and installed the Anaconda distribution, you can choose the editor accordingly. Your main choices are PyCharm, Microsoft Visual Studio Code, Sublime Text, Jupyter Notebooks, and many others. I would recommend sticking to the Jupyter Notebook for the purpose of this article. Ensure that you have all the setup for the Anaconda distribution completed. Once you have everything ready, please make sure that you create a virtual environment with a name of your preference. This virtual environment will contain all the future installations that we will install. The next step is to go to the official PyTorch website and set up the build according to your system. Please follow this link to reach the website.
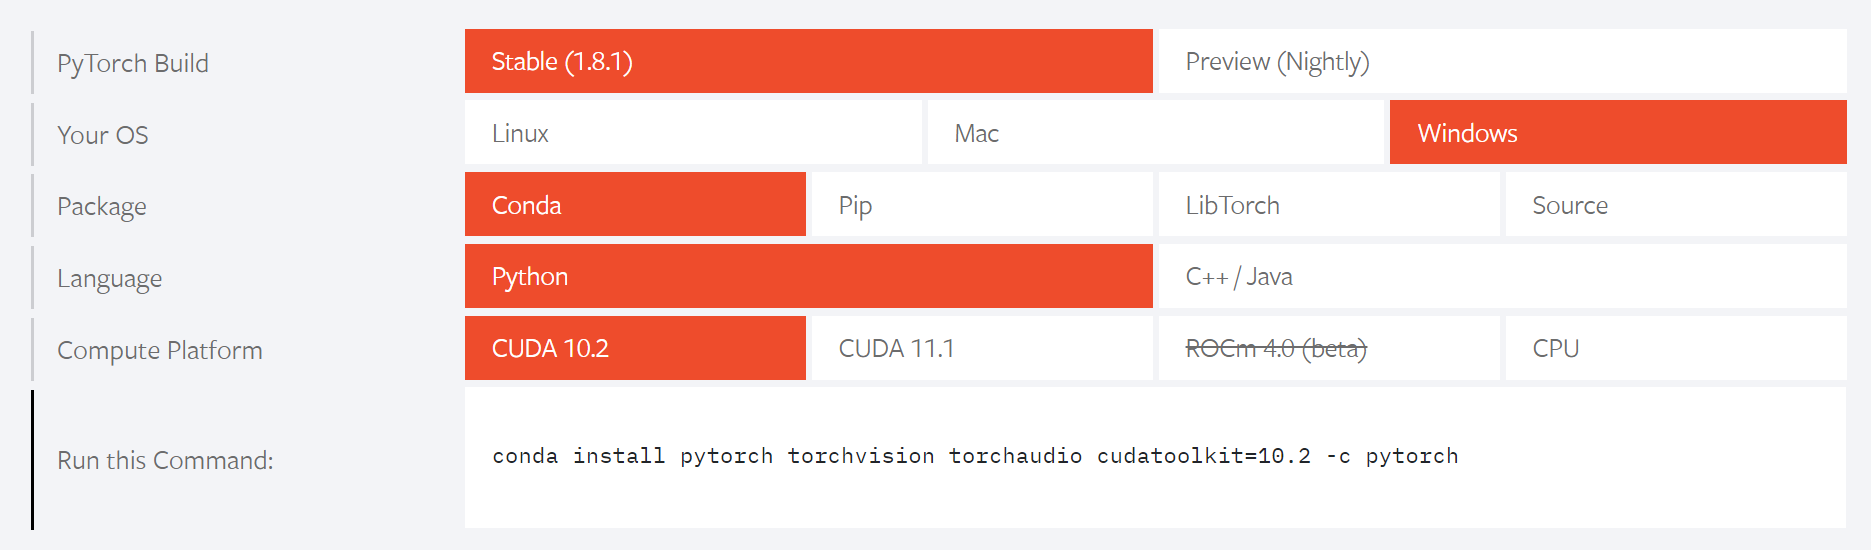
Once you reach the website, set up your custom settings according to your requirements. The above image is an example of the settings that are best suitable for my PC. The appropriate Anaconda command for the installation of PyTorch is also provided accordingly. Activate your virtual environment and copy-paste the given code in your command prompt. It is crucial to note that if you do not have a GPU on your system, then please select the CPU option to install PyTorch on your system. However, it is highly recommended that you do have a GPU for faster computations of PyTorch models.
Don't have access to a GPU? Sign up for Gradient and get access to the compute you need now!
Below is the command that I entered in my command prompt (or windows shell) in my virtual environment to install the PyTorch deep learning framework.
conda install pytorch torchvision torchaudio cudatoolkit=10.2 -c pytorch
If you are having issues with the installation procedure, then visit Stack Overflow or GitHub. One of the alternate commands that worked for me is as follows:
conda install pytorch torchvision torchaudio cudatoolkit=11.1 -c pytorch -c conda-forge
Once you are able to successfully install PyTorch GPU or CPU version on your system, please check the availability of the same in your command prompt, windows shell, or whatever else you choose to use (This could include any Integrated Development Environment of your choice, like Visual Studio or Gradient). Activate the virtual environment you work in and enter the following commands. Firstly, we will enter the Python console and try to import torch to check if there were no errors in the installation process, and finally, check the downloaded version of PyTorch.
(torchy) C:\Users\Admin>python
Python 3.9.5 (default, May 18 2021, 14:42:02) [MSC v.1916 64 bit (AMD64)] :: Anaconda, Inc. on win32
Type "help", "copyright", "credits" or "license" for more information.
>>> import torch
>>> torch .__version__
'1.8.1'
Once you are able to run the following commands without any errors (sometimes warnings are fine, just look into it and try to fix them), we can start constructing numerous PyTorch projects.
Understanding PyTorch Tensors in Detail:
In this section, we will describe and examine all the details required for getting started with PyTorch. The performance of tensors in PyTorch is similar to the way they perform in TensorFlow. In this section of the article, we will learn how to initialize the tensors, convert them accordingly, perform mathematical computations, and look into some other basic operations.
1. Initialization of tensors
The first significant step to learn for deep learning is the process of understanding tensors. A tensor is basically an n-dimensional array and is an object that describes a multilinear relationship between sets of algebraic objects related to a vector space. In this section, we will check out how to initialize the tensors in PyTorch to proceed with further operations.
To get started with the initialization of tensors and any other type of operation, we will import the torch module and quickly verify the version.
# Importing PyTorch and checking its version

import torch
torch.__version__
Output:
'1.8.1'
Let us look at a couple of ways in which we can initialize tensors. In the code block below, we can view a variable 'a', which stores a list of numbers, and 'a_' stores a numerical array containing the same numbers. In the first method, we can use the from_array() function to convert the numpy array into a PyTorch tensor. For converting a list into a PyTorch tensor, the process is quite simple as you can complete the following operation with the tensor() function. The code and results are as shown below.
import numpy as np

a = [1,2,3]
a_ = np.array(a)
print(a_)

# Method-1
b = torch.from_numpy(a_)
print(b)

# Method-2
c = torch.tensor(a)
print(c.dtype)
print(c)
Output:
[1 2 3]
tensor([1, 2, 3], dtype=torch.int32)
torch.int64
tensor([1, 2, 3])
In the next few blocks of code, we will learn some essential aspects to note about PyTorch. Firstly, the device variable is often used to set the computational environment for PyTorch. If you have GPU support with CUDA, all the operations will be performed on the GPU, and otherwise it will default to a CPU. You can also assign a tensor some essential properties and proceed to check them accordingly, as shown in the code block below.
# Some must know parameters for tensor() function

device = torch.device('cuda' if torch.cuda.is_available() else cpu)

d = torch.tensor([1,2,3], dtype = torch.float32,
                 device = device, requires_grad = True)

print(d.shape)
print(d.dtype)
print(d.device)
print(d.requires_grad)
Output:
torch.Size([3])
torch.float32
cuda:0
True
Three of the major assigning operations that you will mostly perform with the initialization of tensors are assigning them a particular shape of zeros, ones, or random numbers. An application of initializing tensors is useful for managing and declaring weights.
torch.zeros(3, 4, dtype=torch.float64)
torch.ones(4, 2, dtype=torch.float64)
torch.rand(3, 3, dtype=torch.float64)
Output:
tensor([[0., 0., 0., 0.],
        [0., 0., 0., 0.],
        [0., 0., 0., 0.]], dtype=torch.float64)

tensor([[1., 1.],
        [1., 1.],
        [1., 1.],
        [1., 1.]], dtype=torch.float64)

tensor([[0.3741, 0.7208, 0.4353],
        [0.7368, 0.9386, 0.9840],
        [0.2983, 0.7320, 0.6277]], dtype=torch.float64)
There are multiple other methods to initialize tensors with functions such as eye, linspace, arrange, and many more. Feel free to explore these options on your own and find out how you can exactly utilize these initialization techniques in your PyTorch projects for achieving efficient results. Also, it becomes more crucial to understand when a particular function has more utility than its other counterparts. This topic will be covered in future articles as we start to work on more projects.
2. Tensor Conversions
In this section, we will look at some tensor conversion operations that you can perform with the help of PyTorch tensors. Some of the basic tensor conversions include the various data types such as Boolean, short, long, half, and double. The codes and their respective outputs are as shown below.
a = torch.tensor([0, 1, 2, 3])

# boolean values
print(a.bool())

# Integer type values
print(a.short()) # int16
print(a.long()) # int64

# float type values
print(a.half()) # float16
print(a.double()) # float64
Output:
tensor([False,  True,  True,  True])
tensor([0, 1, 2, 3], dtype=torch.int16)
tensor([0, 1, 2, 3])
tensor([0., 1., 2., 3.], dtype=torch.float16)
tensor([0., 1., 2., 3.], dtype=torch.float64)
Another simple conversion operation, as discussed in the previous initialization of the tensors section, is the ability to convert a list into a tensor, a numpy array into a tensor, and vice versa. The application for the following is as shown in the below code blocks.
# Conversion from numpy array to tensor and vice-versa

import numpy as np

a = [1,2,3]
a_ = np.array(a)
print(a_)

# Numpy to Tensor
b = torch.from_numpy(a_)
print(b)

# Tensor to Numpy
c = b.numpy()
print(c)
Output:
[1 2 3]
tensor([1, 2, 3], dtype=torch.int32)
[1 2 3]
3. Tensor Math Operations
Since tensors are basically n-dimensional arrays, there are numerous, useful computations that we can perform with them. These operations include mathematical calculations similar to those that you can perform on numpy arrays, such as the addition of tensors, subtraction of tensors, multiplications of tensors, and so much more. Let us explore each of these individual aspects accordingly and see how they can be performed with PyTorch.
Addition of Tensors:
You can perform the addition operation in three different ways with PyTorch. Firstly, initialize your tensor variables with the appropriate values and set the data type as a float. There are three ways in which you can add these tensors. In the first method, you can directly add them with the help of the plus '+' symbol. With the second method, you can use the add function in the torch library to perform the addition of the assigned tensors.
You can extend this step by adding an empty variable with the same shape as the defined arrays and store the output in the following variable. Finally, you also have the operations for adding the sums and computing the sum of all the individual elements in the entire tensor matrix.
a = torch.tensor([1, 2, 3], dtype=torch.float)
b = torch.tensor([7, 8, 9], dtype=torch.float)

# Method-1
print(a + b)

# Method-2
print(torch.add(a, b))

# Method-3
c = torch.zeros(3)
c = torch.add(a, b, out=c)
print(c)

# Cumulative Sum
print(torch.add(a, b).sum())
Output:
tensor([ 8., 10., 12.])
tensor([ 8., 10., 12.])
tensor([ 8., 10., 12.])
tensor(30.)
Subtraction of Tensors:
Similar to the addition operation, you can perform subtraction of tensors. You can either find their appropriate differences with the sequential or the intermediate order of the elements. The absolute function can come in handy if you only want the absolute value of the variables. The code and output are as shown below.
a = torch.tensor([1, 2, 3], dtype=torch.float)
b = torch.tensor([7, 8, 9], dtype=torch.float)

# Method-1
print(a + b)

# Method-2
print(torch.subtract(b, a))

# Method-3 (Variation)
c = torch.zeros(3)
c = torch.subtract(a, b, out=c)
print(c)

# Cumulative Sum of differences
torch.subtract(a, b).sum()

#Absolute cumulative Sum of differences
torch.abs(torch.subtract(a, b).sum())
Output:
tensor([ 8., 10., 12.])
tensor([6., 6., 6.])
tensor([-6., -6., -6.])
tensor(-18.)
tensor(18)
Multiplication of Tensors:
Multiplication of tensors is one of the most important operations that you can perform. The operation is computable with either the '*' symbol between the declared variables or by making use of the mul() function. It is also possible to compute the dot multiplication with PyTorch tensors. This process can be done as follows.
a = torch.tensor([1, 2, 3], dtype=torch.float)
b = torch.tensor([7, 8, 9], dtype=torch.float)

# Method-1
print(a * b)

# Method-2
print(a.mul(b))

# Calculating the dot product
print(a.dot(b))
Output:
tensor([ 7., 16., 27.])
tensor([ 7., 16., 27.])
tensor(50.)
Another key computation to keep in mind is the ability of PyTorch Tensors to perform matrix multiplication. They can be computed as follows.
# Matrix multiplication
# a shape of (m * n) and (n * p) will return a shape of (m * p)

a = torch.tensor([[1, 4, 2],[1, 5, 5]], dtype=torch.float)
b = torch.tensor([[5, 7],[8, 6],[9, 11]], dtype=torch.float)

# 3 ways of performing matrix multiplication

print("Method-1: \n", torch.matmul(a, b))
print("\nMethod-2: \n", torch.mm(a, b))
print("\nMethod-3: \n", a@b)
Output:
Method-1:
 tensor([[55., 53.],
        [90., 92.]])

Method-2:
 tensor([[55., 53.],
        [90., 92.]])

Method-3:
 tensor([[55., 53.],
        [90., 92.]])
Division of Tensors:
You can perform the division operation as well with either the '/' symbol or using the true_divide function that is available in PyTorch. The code and output below show how you can compute them accordingly.
a = torch.tensor([1, 2, 3], dtype=torch.float)
b = torch.tensor([7, 8, 9], dtype=torch.float)

# Method-1
print(a / b)

# Method-2
c = torch.true_divide(a, b)
print(c)

# Variation
c = torch.true_divide(b, a)
print(c)
Output:
tensor([0.1429, 0.2500, 0.3333])
tensor([0.1429, 0.2500, 0.3333])
tensor([7., 4., 3.])
Other math operations that the users must consider are the in-place operations, exponentiation, simple comparisons between variables, and other similar mathematical operations that are useful for specific use cases. Feel free to explore the various possible options.
4. Other basic tensor operations
Some of the other operations that you can perform on tensors include operations of indexing the respective label and slicing the array from the given starting point to the respective end point. These computations are computed as follows.
a = torch.tensor(np.arange(0,10).reshape(2,5))
print(a)

# Indexing of tensors
print(a[0])
print(a[0][0])

# Tensor slicing
print(a[:, 0:2])
Output:
tensor([[0, 1, 2, 3, 4],
        [5, 6, 7, 8, 9]], dtype=torch.int32)
tensor([0, 1, 2, 3, 4], dtype=torch.int32)
tensor(0, dtype=torch.int32)
tensor([[0, 1],
        [5, 6]], dtype=torch.int32)
There is so much more that you can accomplish with PyTorch tensors. If you are interested to learn more, I would highly recommend checking out more information by yourself from their official website.
Steps to construct a PyTorch model:
In this section of the article, we will discuss how to construct a typical model architecture with the help of the PyTorch deep learning framework. The basic steps involved in the process of building any model with PyTorch is to import the essential libraries, analyze the type of problem, construct the model accordingly to solve the particular task, train the model for a certain number of epochs to achieve high accuracy and low loss, and finally evaluate the saved model. Let us cover some code snippets for three of the most significant steps involved in the process of constructing these models.
Importing the libraries:
One of the more essential steps to create PyTorch models is to import the suitable libraries with the help of which we can successfully construct the desired model that we are trying to accomplish. We will understand the specific details of each of these imports when we look at future articles on how to construct high-level projects with the help of PyTorch.
# Importing all the essential libraries

import torch
import torchvision
import torch.nn as nn
import torch.nn.functional as F
from torch.utils.data import DataLoader
import numpy as np
import matplotlib.pyplot as plt
Once you import the essential libraries required for completing your particular task, the next step is to define all the requirements for the specific problem accordingly. Once all the basic parameters for the required task are specified, the process of construction of the model and training the created model can be successfully completed.
Construction of the model:
PyTorch uses a Pythonic way of coding. This is incredibly helpful for learning their technology due to how simple it is to understand the inherent process of constructing our deep learning model with the help of this deep learning framework. For constructing the model, you can define your desired model in the form of a class, and then use functions inside your defined function to create all the elementary operations to perform. The code snippet provided below is one of the best examples of how you can construct a simple neural network architecture by making use of PyTorch programming.
# Constructing the model

class neural_network(nn.Module):
    def __init__(self, input_size, num_classes):
        super(neural_network, self).__init__()
        self.fc1 = nn.Linear(in_features=input_size, out_features=50)
        self.fc2 = nn.Linear(in_features=50, out_features=num_classes)

    def forward(self, x):
        x = self.fc1(x)
        x = F.relu(x)
        x = self.fc2(x)
        return x
The init block in the defined class can have the super inheritance to allow all the significant elements of the parent class to be accessible. We can then proceed to define a couple of deep learning hidden layers that be built with the nn library of PyTorch. Once you define the essential requirements in the init section of the class, you can proceed to move on to the forward function to construct the primary model. By making use of the previously defined hidden layers (or convolutional or any other layer), you can proceed to construct the final structure of the model and return it accordingly.
Training The Model:
The final step to complete the construction of your model is to train the model. Below is a sample code that covers the process of running the model for a specific number of epochs. The main steps involved are to set the main parameters, run the forward propagation, and finally use the last three in-built commands for completing the backpropagation process.
# Train the network

for epoch in range(epochs):
    for batch, (data, target) in enumerate(train_loader):
        # Obtaining the cuda parameters
        data = data.to(device=device)
        target = target.to(device=device)

        # Reshaping to suit our model
        data = data.reshape(data.shape[0], -1)

        # Forward propogation
        score = model(data)
        loss = criterion(score, target)

        # Backward propagation
        optimizer.zero_grad()
        loss.backward()
        optimizer.step()
Once the training process is complete, you can evaluate the performance of your models, and once you deem it suitable for the particular task, we can deploy these models to perform a specific task. In future articles related to PyTorch, we will look at more specific examples and cover a detailed approach to constructing our models to solve numerous tasks with this amazing deep learning framework. Let us now look at a brief comparison between TensorFlow and PyTorch.
Differences Between TensorFlow and PyTorch:

Before we conclude this article, it would be interesting to draw a quick comparison between TensorFlow and PyTorch to understand their differences as well as their similarities. Both these libraries are fantastic deep learning frameworks and have successfully amassed immense popularity through the years. They offer stiff competition to each other and have some similar working patterns as in both cases we deal with tensors to accomplish a wide array of tasks.
However, there are still a lot of differences between these two popular frameworks. PyTorch uses a more Pythonic style of coding, which is more suitable for newer developers or someone who is looking to adapt to learning deep learning neural networks. TensorFlow can sometimes be quite complicated for a new programmer aiming to develop deep learning models because of some of the complex and unintuitive code structures.
One of the primary benefits of PyTorch is the dynamic state of computation, while TensorFlow makes use of a state for computational graphs. PyTorch is highly compatible with research projects due to its dynamic state and fast training methodologies. However, it lacks majorly in the department in the area of performing visualizations. TensorBoard is the preferable method for most visualization processes. To learn more about the analysis of PyTorch and TensorFlow, I would recommend checking out the article from the following link.
Conclusion:

PyTorch is one of the best deep learning frameworks in modern deep learning. It is extensively used for the development of neural networks for solving various applications and is a great alternative to TensorFlow. It has many beneficial features, such as supporting dynamic computational graphs and allowing data parallelism, which means that it can distribute and divide the work among numerous CPUs or GPUs accordingly. It is also an extremely simplistic library granting the users access to better-debugging capabilities, more transparency, and the ability to code easily with more efficiency.
In this article, we covered most of the topics related to the basics of PyTorch. We briefly discussed most of the essential aspects of why the PyTorch deep learning framework works so well for most deep learning computations and its rising popularity. Firstly we looked into the installation procedure of PyTorch. And then, we understood most of the basic operations of tensors with PyTorch, including tensor conversions, mathematical operations, and other basic tensor operations. We then discussed the steps to construct a PyTorch model. Finally, we concluded with the differences between TensorFlow and PyTorch.
In future articles, we will work on more projects from scratch with PyTorch. Until then, keep learning and coding new stuff!


