Bring this project to life
Fans of this blog will know well that we are huge fans of Stable Diffusion here at Paperspace. Our friends at RunwayML and Stability AI outdid themselves releasing such powerful models to the AI community, and their work has gone a long way in popularizing many of the Deep Learning technologies people are starting to see more and more often in every day life.
From exciting projects early on like custom textual inversion notebooks and Dreambooth model training tips - to more recent work like facilitating the creation of a Fast Stable Diffusion code base for Gradient - there is so much we can do with Latent Diffusion models with Paperspace.
One of the more interesting things about the development history of these models is the nature of how the wider community of researchers and creators have chosen to adopt them. Notably, Stable Diffusion v1-5 has continued to be the go to, most popular checkpoint released, despite the releases of Stable Diffusion v2.0 and v2.1. For example, on HuggingFace, v1-5 was downloaded 5,434,410 times last month, while v2-1 was only downloaded 783,664 times. This is for various reasons, but that is a topic in its own right. What is relevant to these facts and this article is that there is a new contender for the best Stable Diffusion model release: Stable Diffusion XL.
Stable Diffusion XL has been making waves with its beta with the Stability API the past few months. In the last few days, the model has leaked to the public. Now, researchers can request to access the model files from HuggingFace, and relatively quickly get access to the checkpoints for their own workflows.
In this article, we will start by going over the changes to Stable Diffusion XL that indicate its potential improvement over previous iterations, and then jump into a walk through for running Stable Diffusion XL in a Gradient Notebook. We will be using a sample Gradio demo.
Stable Diffusion XL
Architecture

Following development trends for LDMs, the Stability Research team opted to make several major changes to the SDXL architecture. To start, they adjusted the bulk of the transformer computation to lower-level features in the UNet. To facilitate these changes, they opted to use a heterogenous distribution of transformer blocks for the purpose of efficiency. To summarize the changes in comparison to the previous Stable Diffusion, the highest feature level transformer block was removed, use size 2 and 10 blocks at the lower levels, and remove the 8 x downsampling lowest level in the UNet entirely.
For the text encoder, they upgraded to the OpenCLIP ViT-bigG combined with CLIP's ViT-L encoder. They do this by concatenating the second to lest text encoder outputs along the channel axis. Additionally, they condition both on the text input from the cross-attention layers and the pooled text embedding from the OpenCLIP model. These changes cumulatively result in the massive size increase to 2.6 billion parameters for the UNet and 817 million parameters for the text encoder's total size.
Training
To compensate for problems in training, they made two additional adjustments: conditioning the UNet model on the original image resolutions and training with multi-aspect images.
For the former, they provide the model with the original height and width of the images before any rescaling as additional parameters for conditioning the model. Since each component is embedded independently using a Fourier feature encoding, and these are then concatenated into a single vector to be fed into the model with the timestep embedding.
For the multi-aspect training, they realized that most real world image sets will be comprised of images from a wide variety of sizes and resolutions. To compensate for this, they apply multi-aspect training as a finetuning stage after pretraining the model at a fixed aspect-ratio and resolution and combined it with the aforementioned conditioning techniques via concatenation along the channel axis. Together, this training paradigm ensures a far more robust learning capability during training.
Improved AutoEncoder

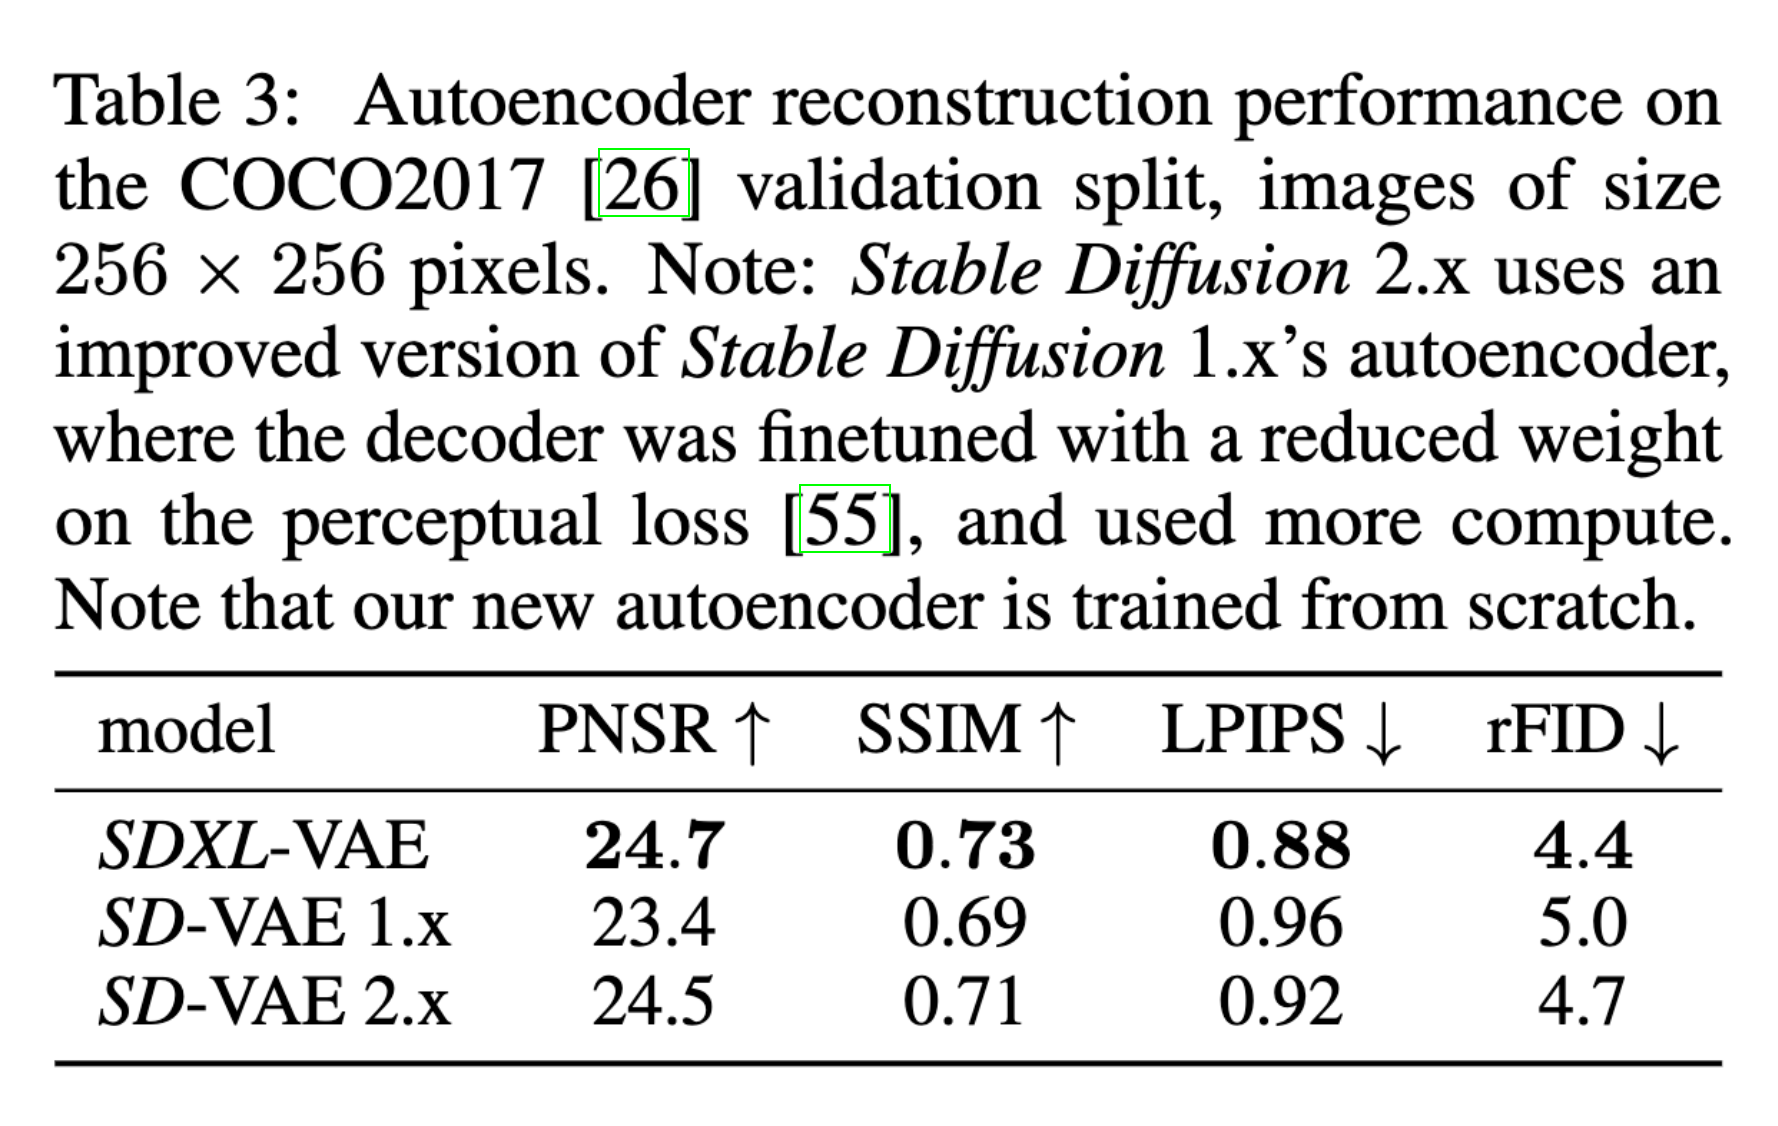
While Stable Diffusion is a traditional LDM, and does the bulk of semantic composition itself, the researchers at Stability AI found that they could improve local, high-frequency details in generated images by improving the AutoEncoder. To do this, they trained the same AutoEncoder as the original Stable Diffusion at a significantly larger batch size of 256 compared to the original 9. They then track the weights with an exponential moving average.
The resulting autoencoder, they found, outperformed the original in all available metrics.
Demo
Bring this project to life
We have created an adaptation of the TonyLianLong Stable Diffusion XL demo with some small improvements and changes to facilitate the use of local model files with the application. In this demo, we will walkthrough setting up the Gradient Notebook to host the demo, getting the model files, and running the demo.
Setup
The simplest part of the process should be the setup. All we need to do to launch the code in a Gradient Notebook is click the Run On Gradient link at the start of this demo section or top of this page. Once that is done, click start machine to spin up the model. Note that this model is too large to run on a Free GPU, and it would be our recommendation to use a 16 GB plus GPU such as the A5000 for running this demo. We will still offer the Free-GPU link here, but it can be edited to any use of our GPU offerings.
Once the Notebook has spun up, open up the notebook Stable_Diffusion_XL_Demo.ipynb . In this notebook, there is a quick setup guide for running the Gradio web application. Follow the checkpoint download section below to get the model files, and then simply click the run all button at the top right of the screen and scroll to the bottom. This will run the following code cells to set everything up to work.
access_token="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"

!pip install -r requirements.txt
!pip install -U omegaconf einops transformers pydantic open_clip_torch
Getting the Model checkpoint files
We are going to obtain the model checkpoints from HuggingFace.co. On their site, the Stability AI research team has released the Stable Diffusion XL model checkpoint files in both safetensors and diffusers formats. We have the choice of either downloading these models directly, or using them from the cache. Note that we still need to be approved to access the models to use them in the cache.
Here are the links to the base model and the refiner model files:
If we want to download these models, once you have been approved, use git-lfs to clone the repos like so:
!apt-get update
!apt-get install git-lfs
!mkdir SDXL
%cd SDXL
!git-lfs clone https://huggingface.co/stabilityai/stable-diffusion-xl-base-0.9
!git-lfs clone https://huggingface.co/stabilityai/stable-diffusion-xl-refiner-0.9
%cd /notebooks
While there are other, likely illicit ways we can find to download these models, please follow the steps on the download pages here, so that we are sure to sign the SDXL 0.9 Research License Agreement. We recommend users avoid using torrents or other sources, as the HuggingFace source can be guaranteed for both security and having the correct files.
Running the demo
Now that setup is complete and we have optionally downloaded the checkpoint files, we can run the Web UI demo. Run the final notebook cell to get a shareable link to the Gradio app.
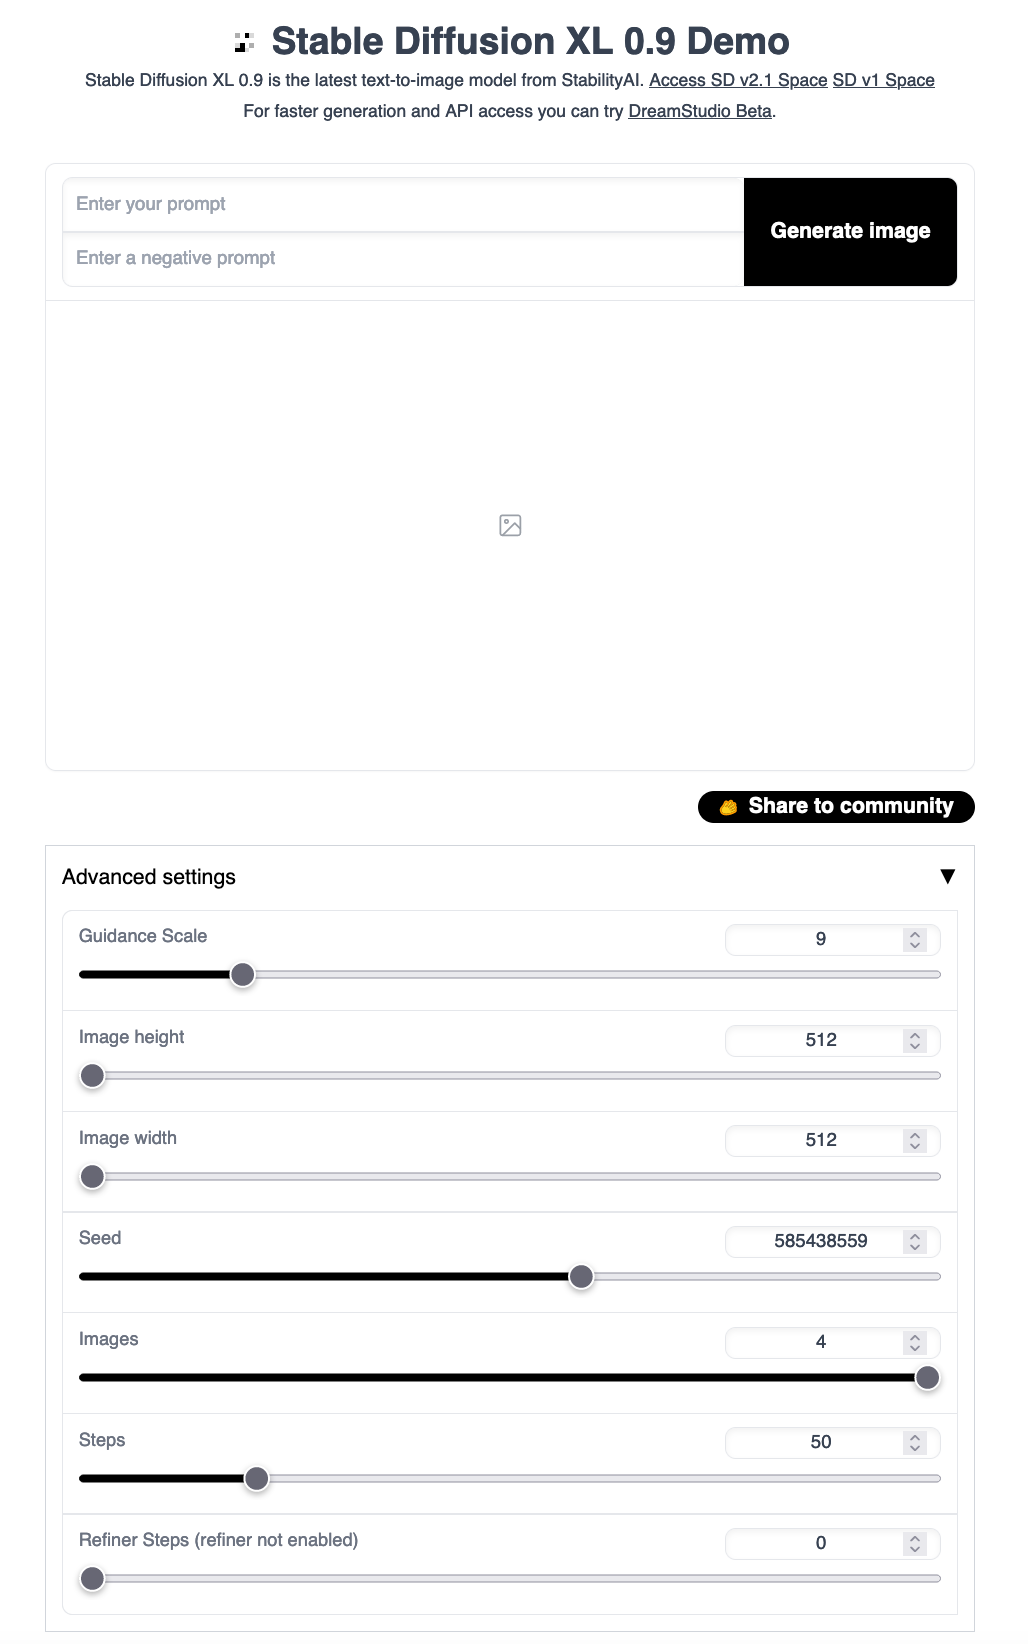
In addition to the features enabled by the original version of this application, we have added the ability to change the image size parameters and seed. This will allow us to get a better feel for how the model performs on the variety of tasks we need to run it on, and iterate on existing prompts. Let's take a look at the UI:

As we can see, there are options for inputting text prompt and negative prompts, controlling the guidance scale for the text prompt, adjusting the width and height, and the number of inference and refinement steps. If we launched the web UI with the refiner, we can also adjust the number of refinement steps.
Here are some sample photos we generated on a P4000 powered Gradient Notebook using the first provided example prompts:

Try recreating these results yourself at different seeds, sizes, and guidance scales, and see how SDXL could end up being the next step in powerful text-to-image synthesis modeling with Deep Learning.
Closing Thoughts
We are going to keep looking out for work done with Stable Diffusion XL in the coming weeks, so be sure to watch this blog for more updates. We look forward to seeing it implemented with the Automatic1111 family of Stable Diffusion Web UI applications. Thanks for reading!


