If you've been on any sort of social media this year, you've probably seen people uploading a recent picture of themselves right next to another picture of what they'll look like in 30 years.
This has become possible due to an application called FaceApp, which went viral across the world. Although there have been different attempts at approaching face-aging in the past, they confronted limitations like needing a lot of data, producing ghosting artifacts (not looking natural), and an inability to do the inverted operation, i.e. reverting from old to young. Simply put, the results fell short of our expectations.
With the recent success of GAN-based architectures, we can now generate high-resolution and natural-looking output. In this tutorial we will train CycleGAN, one of today's most interesting architectures, to do forward aging from 20s to 50s and reverse aging from 50s to 20s. Let's get started.
Bring this project to life
Generative Algorithms
If you've ever trained a neural network such as a simple classification network, you probably trained a discriminative network whose only task is to differentiate between classes (like a dogs vs. cats classifier). Popular neural network architectures such as VGG and Resnet fall under this category.
Generative algorithms, on the other hand, are an interesting set of algorithms which can do much more than a simple classification task. They can generate data which looks similar to the domain on which the model was trained. For example, if the model is trained on pictures of horses, a generative algorithm can create new horses which look real yet different from the training examples. Think of this like how humans can imagine anything in the world, just by closing their eyes and thinking about it.
How GANs Work
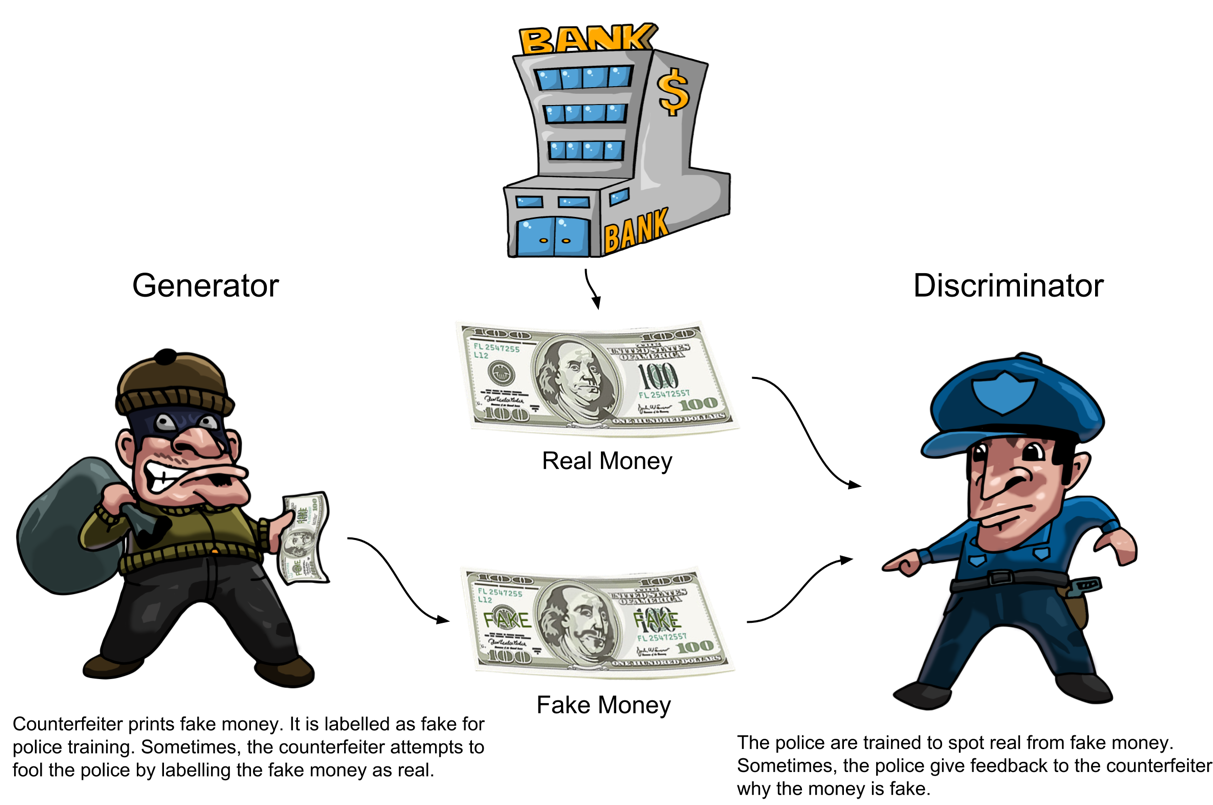
Generative Adversarial Networks (GANs) are one of the most popular generative algorithms. They have many interesting applications (some of which are explored here). A GAN consists of two neural networks: a generator and a discriminator. The task of the generator network is to create realistic images, while the discriminator network must differentiate between real images and the fake ones created by the generator.
Both the generator and discriminator compete with each other in a minimax game until a stage comes when the generator creates images so realistic that the discriminator cannot determine which image is real, and which is artificially generated. At this stage equilibrium is reached, and the training is stopped.
Both networks are trained simultaneously until reaching equilibrium. Since both networks compete with one another and try to better themselves on every iteration, the loss won't decrease continuously like in a general classification network. We'll discuss how to monitor the network's performance below.
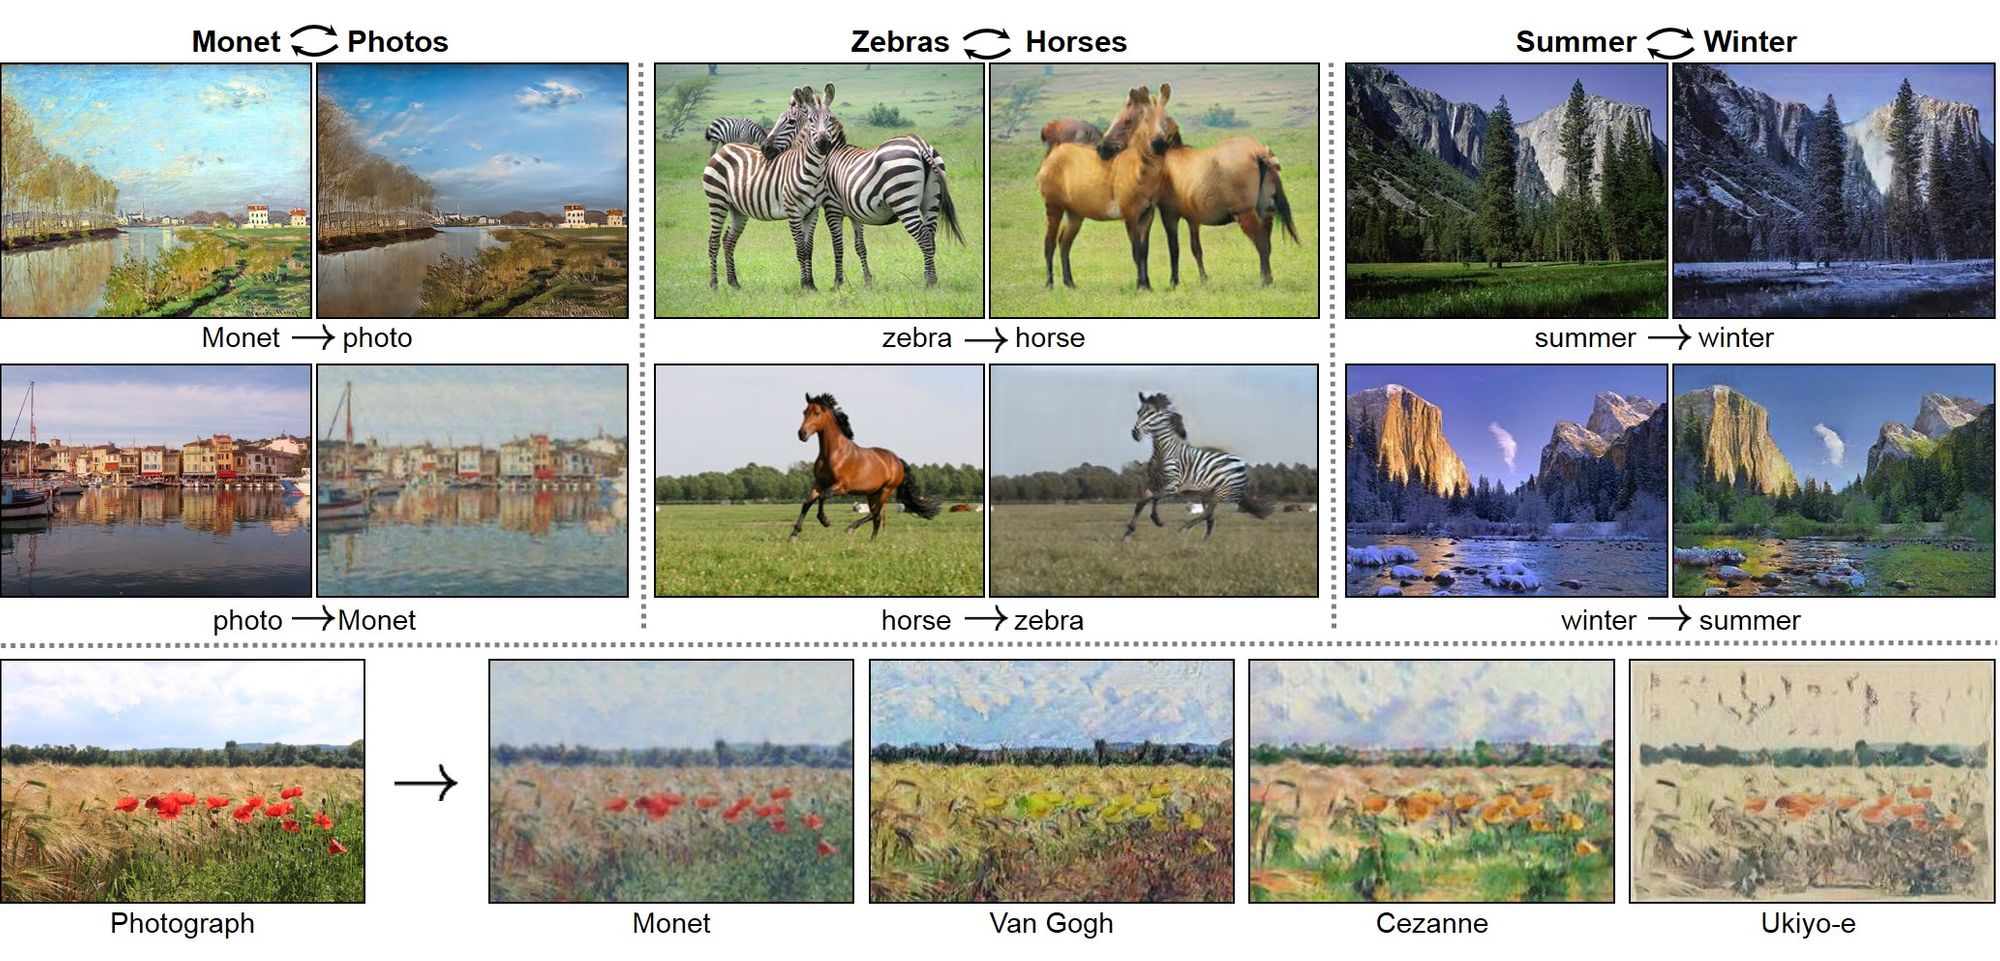
There are many new architectures being developed constantly to achieve different use cases, the popular ones being DCGAN, StyleGAN, CGAN, BigGAN, etc. For the case of face aging, we are interested in one particular architecture which specializes in domain transfer, known as CycleGAN. It can take an image from one domain (for example, a horse) and can convert it to another domain (like a zebra), while keeping the features of the input domain (i.e. looking similar to the input horse).
How CycleGAN Is Different
CycleGAN is a variant of the general GAN architecture we discussed above, with the difference being that it has two generator and discriminator pairs. It was developed to solve the problem of requiring a huge number of images when trying to translate from one domain to another. For example, if we want a general GAN to modify a horse image to look like a zebra, it would need a lot of labelled horse images and the corresponding similar zebra images. This kind of data collection is not only cumbersome, it's almost impossible since you cannot always obtain paired images across different domains.

CycleGAN solves the problem of needing a data set of labelled images from both domains. It does this by proposing a simple yet clever trick. Instead of having a single network for converting from horse to zebra, it has two networks: one which converts from horse to zebra, and another which converts from zebra to horse. This is demonstrated in the figure below.
Consider the two generator-discriminator pairs as G1-D1 and G2-D2. G1 takes the input horse image and converts it into an image which should look like a zebra. The task of D1 is then to consider whether the image from G1 is a real zebra, or a generated zebra from the generator network. The generated image from G1 is now passed to generator G2. The task of G2 is to convert the generated zebra image to a horse-like image. So we are taking a horse, converting it to zebra with G1, and then converting it back to a horse with G2. The task of D2 is then to discriminate the image from G2 as a real horse, or a generated one.
Now the network is trained using multiple losses. We use the losses of the two generator-discriminator pairs, just like a general GAN, but we also add a cyclic loss. This loss is used when the image is cycled back after passing through both generators; the final image should look like the original input image (i.e. when going from Horse → Zebra → Horse, the final horse should look like the original horse). The need for this cyclic loss comes from our requirement that the image translated from one domain to another should retain the distinguishing features from the original domain.
If a zebra is generated from a horse using CycleGAN, it should not only look like a zebra, but should also give the same feel as the original horse which was modified to look like a zebra.
Now we can see that there is no need for a labelled data set to map each horse to a corresponding similar-looking zebra. We just need to provide a set of horse images and a set of zebra images, and the network will learn by itself how to do the translation. Since the domain transfer is bi-directional, we can also convert these zebra images back to horse images with the second generator, G2.
Using CycleGAN to Alter Faces
With this theory in mind let's dive into building the application. By looking at the architecture discussed above, we should have an idea of how we'll approach this problem. We'll take a set of face images from people in their 20s-30s, and another set from people in their 50s-60s. We will then use CycleGAN to do the domain transfer to convert a 20-year-old to a 50-year-old, and vice versa.
For the full notebook, please refer to the GitHub repository CycleGAN for Age Conversion.
We'll use the UTKFace data set, which contains over 20,000 face images of people of various races and genders, ranging from 0 to 116 years old. Since we are only concerned about people in their 20s-30s and 50s-60s, we'll filter the images and remove those falling in other age groups.
We'll use the CycleGAN Keras base code, and modify it to suit our use case. The discriminator is a simple network with 4 convolutional layers, each of stride 2, and a final aggregation convolutional layer. So if we provide an input image of size (256 x 256), we will get an output of (16 x 16). This incorporates one of the suggestions proposed by Pix2Pix, namely the PatchGAN discriminator. The output of PatchGAN maps to a patch of the input image, discriminating whether or not that patch of the input image is real or fake. The expected output would be (16 x 16) matrix of numbers with each number equal to 1 in the case that the image is determined to be real, and 0 if it is determined to be artificially generated.
This is more advantageous since now instead of classifying the entire image as one class, we are classifying multiple patches of the image as belonging to the same class or not. Hence we are providing more signal/gradient/information during training, and can produce sharper features as compared to using a softmax output for the entire image.
def build_discriminator(self):
        def d_layer(layer_input, filters, f_size=4, normalization=True):
            """Discriminator layer"""
            d = Conv2D(filters, kernel_size=f_size, strides=2, padding='same')(layer_input)
            d = LeakyReLU(alpha=0.2)(d)
            if normalization:
                d = InstanceNormalization()(d)
            return d
        img = Input(shape=self.img_shape)
        d1 = d_layer(img, self.df, normalization=False)
        d2 = d_layer(d1, self.df*2)
        d3 = d_layer(d2, self.df*4)
        d4 = d_layer(d3, self.df*8)
        validity = Conv2D(1, kernel_size=4, strides=1, padding='same')(d4)
        return Model(img, validity)
The code which we have taken from Keras GAN repo uses a U-Net style generator, but it needs to be modified. We're going to use a ResNet-style generator since it gave better results for this use case after experimentation. The input to the generator is an image of size (256 x 256), and in this scenario it's the face of a person in their 20s.
The image is downsampled by 4 times (i.e to 64 x 64) by passing through 2 convolutional layers of stride 2, followed by 9 residual blocks which preserve the size. Then we upsample back to the original size of (256 x 256) by performing transposed convolution. The final output we get should be a transformed image of the same person, now looking as if they were in their 50s.
# Resnet style generator
        c0 = Input(shape=self.img_shape)
        c1 = conv2d(c0, filters=self.gf, strides=1, name="g_e1", f_size=7)
        c2 = conv2d(c1, filters=self.gf*2, strides=2, name="g_e2", f_size=3)
        c3 = conv2d(c2, filters=self.gf*4, strides=2, name="g_e3", f_size=3)

        r1 = residual(c3, filters=self.gf*4, name='g_r1')
        r2 = residual(r1, self.gf*4, name='g_r2')
        r3 = residual(r2, self.gf*4, name='g_r3')
        r4 = residual(r3, self.gf*4, name='g_r4')
        r5 = residual(r4, self.gf*4, name='g_r5')
        r6 = residual(r5, self.gf*4, name='g_r6')
        r7 = residual(r6, self.gf*4, name='g_r7')
        r8 = residual(r7, self.gf*4, name='g_r8')
        r9 = residual(r8, self.gf*4, name='g_r9')

        d1 = conv2d_transpose(r9, filters=self.gf*2, f_size=3, strides=2, name='g_d1_dc')
        d2 = conv2d_transpose(d1, filters=self.gf, f_size=3, strides=2, name='g_d2_dc')

        output_img = Conv2D(self.channels, kernel_size=7, strides=1, padding='same', activation='tanh')(d2)
We will have two such pairs of generator and discriminator: one for forward aging, and one for backward aging.
The Loss Function
We've finally arrived to the loss function. The discriminator loss is the mean square error of the patch that we discussed above. The generator loss will be the negative of the discriminator loss, since the generator tries to maximize discriminator error.
As mentioned previously, with CycleGAN we have the addition of the cyclic loss. We take the mean square error between the original image and the recycled image as the loss term.
A generator which does age conversion from 20s to 50s shouldn't change/convert an image, if an image of age 50 is provided as input. Since the input is already of the desired age, the network should act as identity in this case.
Of course, if the input image is already of the desired age, the network should know to return that image as the output without any modifications. To make sure the network behaves this way, an identity loss is added to the loss function. This is again the mean square difference between output image and input image. Both the forward and backward generators have this additional loss term.
In summary, we have the general generator and discriminator losses just like a conventional GAN. In addition, we have the cyclic loss for matching the input when converted from domain A to B, and then back to domain A. We also have the identity losses to ensure that the network does not change the input if it's already of the proper domain (in this case, age).
\\Loss = discriminative_loss + Λ1 * cyclic_loss + Λ2 * identity_loss\\
Here Λ1, Λ2 are hyperparameters
valid = np.ones((batch_size,) + self.disc_patch)
fake = np.zeros((batch_size,) + self.disc_patch)
fake_B = self.g_AB.predict(imgs_A)
fake_A = self.g_BA.predict(imgs_B)

dA_loss_real = self.d_A.train_on_batch(imgs_A, valid)
dA_loss_fake = self.d_A.train_on_batch(fake_A, fake)
dA_loss = 0.5 * np.add(dA_loss_real, dA_loss_fake)

dB_loss_real = self.d_B.train_on_batch(imgs_B, valid)
dB_loss_fake = self.d_B.train_on_batch(fake_B, fake)
dB_loss = 0.5 * np.add(dB_loss_real, dB_loss_fake)

# Total disciminator loss
d_loss = 0.5 * np.add(dA_loss, dB_loss)

g_loss = self.combined.train_on_batch([imgs_A, imgs_B],
                                        [valid, valid,
                                        imgs_A, imgs_B,
                                        imgs_A, imgs_B])
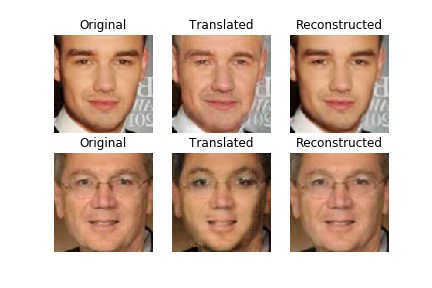
We take a batch of pair of images from age 20's(Image A) and age 50's(Image B) while training. Generator g_AB converts age 20 to age 50, discriminator d_A classifies it as real or generated image. g_BA and d_B do similar work for age 50 to age 20 conversion. Image A is passed to g_AB and reconstructed via g_BA and vice-versa for Image B.
We train the combined model of discriminator and generator together and try to reduce all the 3 losses i.e discriminative loss, cyclic loss and identity loss at the same time.
Hacks to Stabilize Training
- Follow advice from Jeremy Howard and use progressive resizing while training. I couldn't stress more on the importance of this. When I started out training with size 256 × 256 I had to use batch size 1 since otherwise my GPU would die. It took a lot of time to see the results and believe me you need to tinker a lot. If you wait hours for every experiment it would take ages. So start with a smaller size say 64 × 64 and gradually increase the input image size. This helped me to run at batch size 32 (32 times faster). This trick works since initial feature layers of network learns the same concepts irrespective of image size.
- Keep a close tab on each of discriminator, generator, cyclic , identity loss. If one loss is dominating other, try to play around with the coefficients Λ1, Λ2. Otherwise model might concentrate on optimizing one loss at the expense of other. For example if cyclic loss dominates then the cyclic image looks same as input image but the generated image wouldn't be as we desired i.e age progression might not have happened since the network kept more focus on cyclic loss.
Debugging
Unlike a traditional classification task one can't say the performance of the network by looking at the loss and stating the model has improved if the loss went down since in GAN the loss wouldn't always decrease. There is discriminator which is trying to reduce the loss and then generator which works opposite and tries to increase the discriminator loss and hence the loss goes in a topsy-turvy path.
But then how do we know the networks are getting trained ? We do this by observing the output of the generators over the course of the training. At every few iterations sample few images and pass it through generator to see what results are being produced. If you feel that the results doesn't look appealing or if you feel only loss is getting optimised, you can try tinkering few parts, fix it and restart training again.
Also this way of looking at output and inspecting it is much more rewarding and addictive than looking at a plain number in a classification task. When I was developing the application I couldn't stop waiting for every few iterations to complete so that I can see the output getting generated all the while cheering for the generator to win(Sorry discriminator).
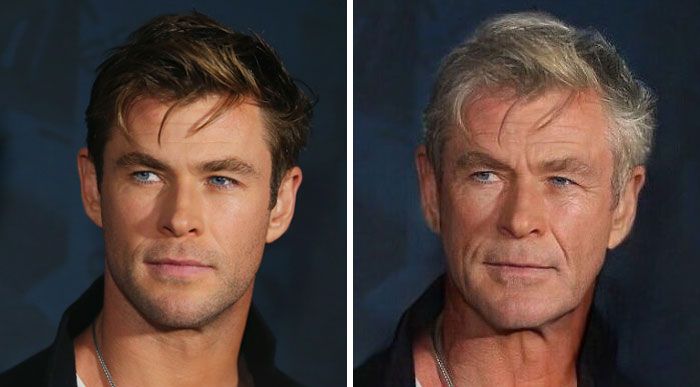
After training for around 50 epochs by using the above techniques and hacks, the results look like below which is pretty decent
Usage in real-world
As you can see above the images used for training are perfectly captured headshots but in real-world it might not always be possible to get such images to use our Cyclegan for face-aging. We need to be able to find where a face is present in an image and modify that part of the image.
For this we will run a face detector before passing the image to cyclegan. The face detector gives bounding boxes of the various faces in an image. We will then write a script to take crops of those boxes to send it to our network. We will then take the outputs to place it back on the input image. This way we can deal with any image from real world
For this we will be using opencv face-detector from here which is based on resnet-ssd architecture.
def detectFaceOpenCVDnn(net, frame, ctype):
frameOpencvDnn = frame.copy()
frameHeight = frameOpencvDnn.shape[0]
frameWidth = frameOpencvDnn.shape[1]
blob = cv2.dnn.blobFromImage(frameOpencvDnn, 1.0, (frameHeight, frameWidth), [104, 117, 123], False, False)
net.setInput(blob)
detections = net.forward()
bboxes = []
for i in range(detections.shape[2]):
confidence = detections[0, 0, i, 2]
if confidence > conf_threshold:
x1 = int(detections[0, 0, i, 3] * frameWidth)
y1 = int(detections[0, 0, i, 4] * frameHeight)
x2 = int(detections[0, 0, i, 5] * frameWidth)
y2 = int(detections[0, 0, i, 6] * frameHeight)
bboxes.append([x1, y1, x2, y2])
if not(x1<30 or y1<30 or x2>frameWidth-30 or y2>frameHeight-30):
y1, y2 = y1-20, y2+20
x1, x2 = x1-20, x2+20
else:
continue
crop_img = frameOpencvDnn[y1:y2, x1:x2]
crop_img = cv2.cvtColor(crop_img, cv2.COLOR_BGR2RGB).astype("float32")
cv2.imwrite("cropped"+str(i)+".jpg", crop_img)
inp = np.array([gan.data_loader.get_img(crop_img)])
case1 = np.ones(gan.condition_shape)
case2 = np.zeros(gan.condition_shape)
if ctype==0:
case = case1
else:
case = case2
case1stack = np.array([case]*1)
old_img = gan.g_AB.predict([inp, case1stack])
new_img = revert_img(old_img[0], (y2-y1, x2-x1))
new_img = cv2.cvtColor(new_img, cv2.COLOR_RGB2BGR).astype("float32")
frameOpencvDnn[y1:y2, x1:x2] = new_img
scipy.misc.imsave("old"+str(i)+".jpg", new_img)
return frameOpencvDnn, bboxes
conf_threshold = 0.8
modelFile = "opencv_face_detector_uint8.pb"
configFile = "opencv_face_detector.pbtxt"
net = cv2.dnn.readNetFromTensorflow(modelFile, configFile)
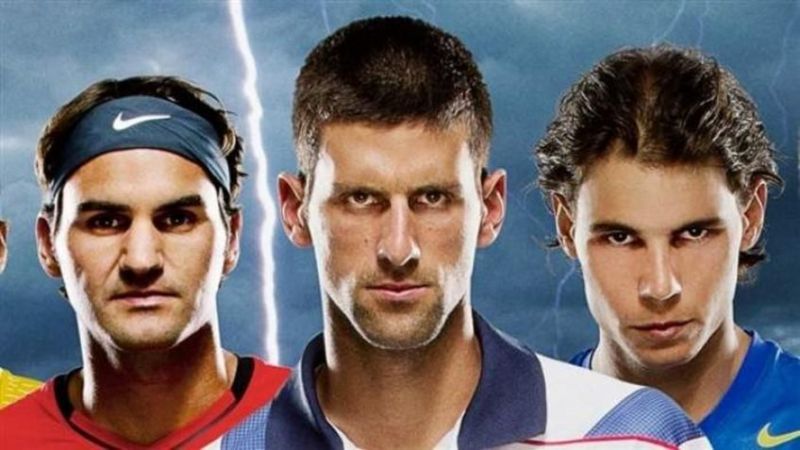
frame = cv2.imread("big3.jpg")
outOpencvDnn, bboxes = detectFaceOpenCVDnn(net,frame,0)
cv2.imwrite("big3_old.jpg", outOpencvDnn)
outOpencvDnn, bboxes = detectFaceOpenCVDnn(net,frame,1)
cv2.imwrite("big3_black.jpg", outOpencvDnn)
Original Image
Age converted
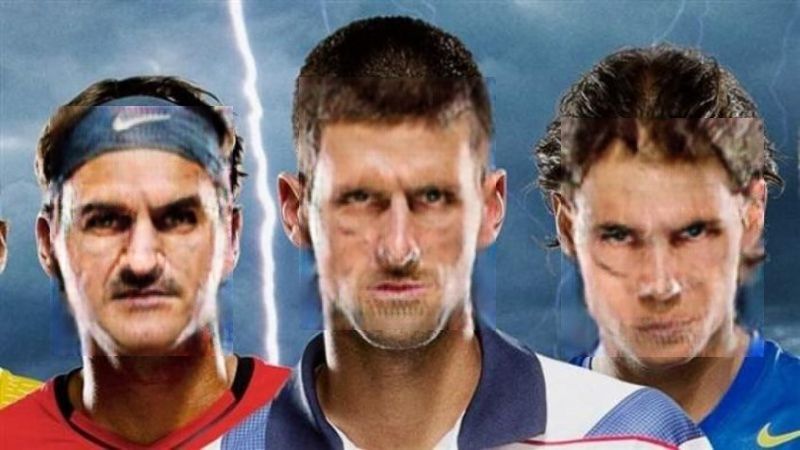
As we can see the results are pretty decent for the limited data and image size we trained on. Also the image from above looks much different from the data the model is trained on but still the model works pretty decent, hence the model isn't overfitting. The results can further be improved by training the network on bigger images(UTKFace is 256x256) and on more real-world images like above and then we will have a production-ready Faceapp like application.
Summary
We have gone through what is a GAN and how we can use a variant CycleGAN to build an application like FaceApp. Similarly we discussed few hacks to stabilize the training. We devised an experiement to make the generator capable enough to perform multiple tasks.
Where to go from here ?. We can experiment more on the conditional part to try and see if we can achieve things like performing multiple tasks at the same time, try and see how the generator behaves with different conditional input. There is a lot of scope for experimentation and improvement.
Also you can have a look at this where similar results are achieved by using a variant of Variational AutoEncoder (another popular Generative Algorithm).