Bring this project to life
We recently covered the release of Whisper, a brand new speech-to-text transcription model from Open AI. This incredible model comes with a host of useful capabilities including multilingual speech recognition, transcription, and translation. This extends across the 97 languages included in the training dataset, to varying degrees of success.
The holy grail of speech integrated NLP is the ability to directly transcribe audio into words in real time with a high degree of precision. Whisper represents an evidentiary step in that technological evolution, proving it is possible to quickly generate transcriptions at relatively low cost.
In our last article, we showed how we can make use of the powerful tool in a Gradient Notebook or deploy it with Gradient Deployments in a simple Flask interface. In this tutorial, we will extend that work by integrating Whisper with Flask and MoviePy to automatically generate English subtitles for any video.
Follow this tutorial to get insights into developing with Whisper, integrating ML/DL with the Flask application environment, and deploying ML/DL applications to the cloud on Gradient Deployment's powerful GPUs.
This code can be run in both a Gradient Notebook and a Deployment. Be sure to try out both methodologies!
Whisper review
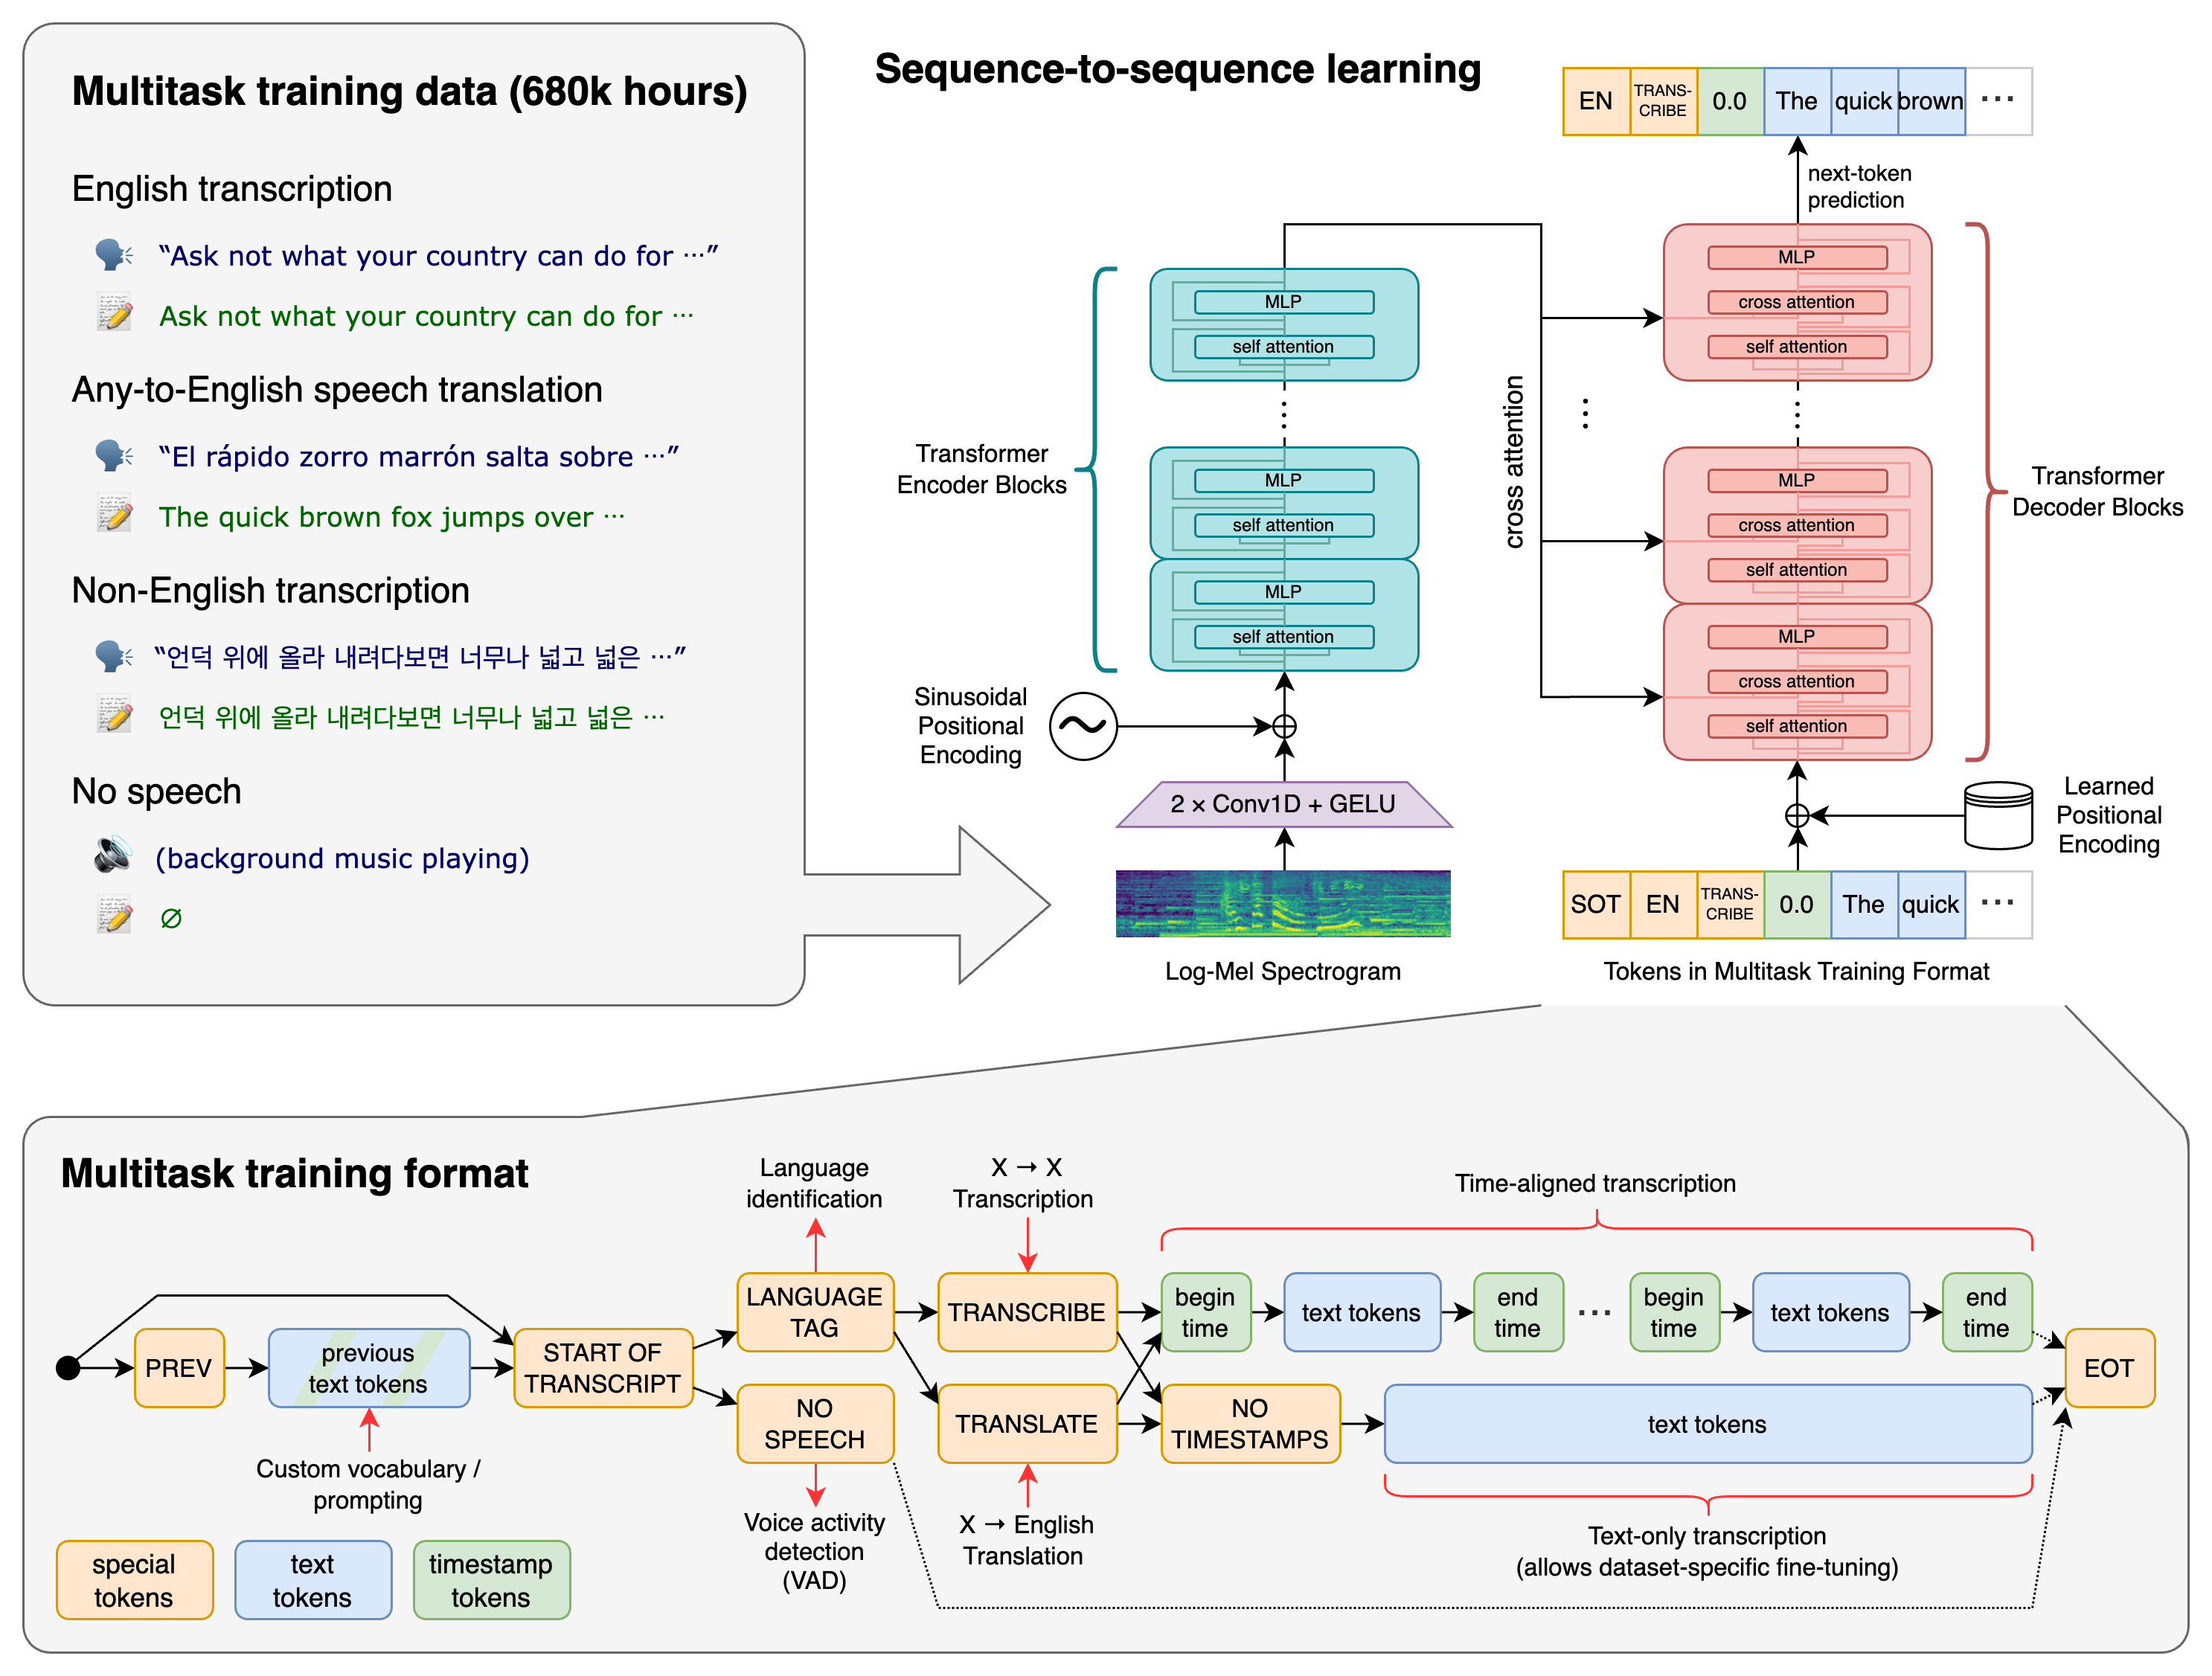
The Whisper transformer sequence-to-sequence model was trained on various speech processing tasks. These include multilingual speech recognition, speech translation, spoken language identification, and voice activity detection. These tasks are represented as a sequence of tokens that are then predicted by the decoder.
Functionally, this allows a single model to replace a multitude of different stages of the typical speech processing pipeline. This multitask training format uses a set of special tokens that serve as task specifiers or classification targets, which imparts much of the versatility at play. This process is explained in detail in the image above.
To achieve this, they trained on audio-speech pair data corresponding to 680,000 hours of audio. 117,000 hours of this data covered 96 languages in addition to English. This dataset also included 125,000 hours of various languages to English translation data. The result of this substantial training dataset has made Whisper generally robust when dealing with peculiar language traits like accents, jargon, or noisy samples.
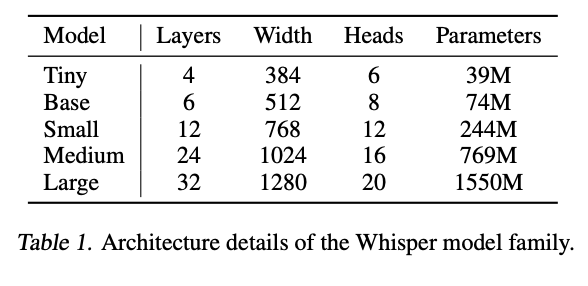
These models come in 9 varieties. These range in size from 1550 million parameters to 39 million parameters, and the Tiny, Base, Small, and Medium sized models come with a version for multilingual and English only tasks. The English only tasks boast substantial improvements on English only language tasks, but this difference is more minor as the model size increases. Additionally, while the Large model is the best performant in terms of precision, the smaller models correspond to sharp increases in efficiency.
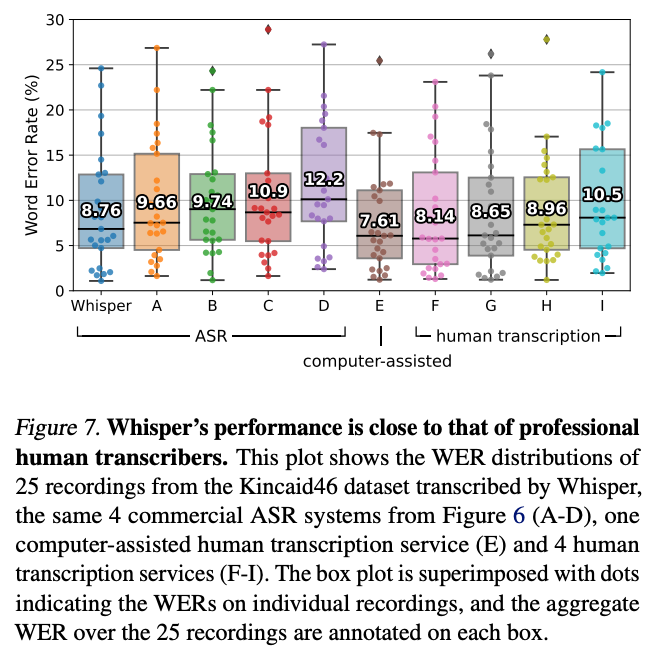
All together, these traits make Whisper arguably the best publicly available model for transcription, translation, and speech recognition/language detection tasks. This goes both in terms of quantitative machine analysis, and in qualitative human tasks. In fact, Whisper even outperformed some of the human agents in their research in terms of auditory comprehension as measured by Word Error Rate.
For a more in depth look at Whisper, be sure to check out our previous look at the model where we dive more deeply into the architecture and capabilities of the model. Let's next look at how we can make use of Whisper in both Notebook and Flask application Deployment format.
Whisper AutoCaption
Whisper AutoCaption uses MoviePy and Whisper to automatically generate translated English subtitles for any video file. The application rips the audio from the input video, uses Whisper to generate timestamped subtitles, and then MoviePy overlays these subtitles into the video. These subtitles scale in size with the original video input. You can find the source code for both the notebook and Flask app Deployment in the Github repo here.
Check out this example using the famous Steamed Hams scene from the Simpsons.
Let's first walkthrough the code in a Gradient Notebook, and see how this plays together. Afterwards, we will show how to put this together in an application for Deployment.
Notebook demo walkthrough
Click the link below to open this Gradient Notebook on a Free GPU.
Bring this project to life
Setup
To get started, we first need to install the required packages for this application. Additionally, we will remove a single line from the ImageMagick policy that would have prevented this code from running, create our experiments directory, and restart the kernel. We need to restart the kernel due to an odd behavior from MoviePy that stops this from working in the same session as the install. Restarting the kernel resolves this problem.
We should be especially wary of this if we intend to 'Run All' cells, as it will catch here.
import os
!pip install -r requirements.txt
!pip install git+https://github.com/openai/whisper.git
!pip install yt-dlp
!pip install moviepy --upgrade
!apt-get update
!apt install imagemagick -y
# remove line 88 of vim ~/../etc/ImageMagick-6/policy.xml to run MoviePy
!sed -i '88d' ~/../etc/ImageMagick-6/policy.xml
!mkdir experiments
os._exit(00)
The Function
The subtitle_video function does all the work for us to AutoCaption the supplied video with the generated text captions from Whisper at the correct time stamps.
This works for both Youtube links and videos uploaded directly to the Notebook workspace. Additionally, it automatically scale the size of the captions to the video size.
## Imports
from __future__ import unicode_literals
from yt_dlp import YoutubeDL
import yt_dlp
from IPython.display import Video
import whisper
import cv2
import pandas as pd
from moviepy.editor import VideoFileClip
import moviepy.editor as mp
from IPython.display import display, Markdown
from moviepy.editor import *
from moviepy.video.tools.subtitles import SubtitlesClip
import os

import cv2

def subtitle_video(download, url, aud_opts, vid_opts, model_type, name, audio_file, input_file, output, uploaded_vid = None):
    ## First, this checks if your expermiment name is taken. If not, it will create the directory.
    ## Otherwise, we will be prompted to retry with a new name
    try:
        os.mkdir(f'experiments/{name}')
        print('Starting AutoCaptioning...')
        print(f'Results will be stored in experiments/{name}')

    except:
        return print('Choose another folder name! This one already has files in it.')

    ## Use audio and video options for youtube-dl if downloading from youtube
    vid_opts['outtmpl'] = f'experiments/{name}/{input_file}'
    aud_opts['outtmpl'] = f'experiments/{name}/{audio_file}'

    URLS = [url]
    if download:
        with YoutubeDL(aud_opts) as ydl:
            ydl.download(url)
        with YoutubeDL(vid_opts) as ydl:
            ydl.download(URLS)
    else:
        # Use local clip if not downloading from youtube
        my_clip = mp.VideoFileClip(uploaded_vid)
        my_clip.audio.write_audiofile(f'experiments/{name}/{audio_file}')

    # Instantiate whisper model using model_type variable
    model = whisper.load_model(model_type)

    # Get text from speech for subtitles from audio file
    result = model.transcribe(f'experiments/{name}/{audio_file}', task = 'translate')

    # create Subtitle dataframe, and save it
    dict1 = {'start':[], 'end':[], 'text':[]}
    for i in result['segments']:
        dict1['start'].append(int(i['start']))
        dict1['end'].append(int(i['end']))
        dict1['text'].append(i['text'])
    df = pd.DataFrame.from_dict(dict1)
    df.to_csv(f'experiments/{name}/subs.csv')
    vidcap = cv2.VideoCapture(f'experiments/{name}/{input_file}')
    success,image = vidcap.read()
    height = image.shape[0]
    width =image.shape[1]

    # Instantiate MoviePy subtitle generator with TextClip, subtitles, and SubtitlesClip
    generator = lambda txt: TextClip(txt, font='P052-Bold', fontsize=width/50, stroke_width=.7, color='white', stroke_color = 'black', size = (width, height*.25), method='caption')
    # generator = lambda txt: TextClip(txt, color='white', fontsize=20, font='Georgia-Regular',stroke_width=3, method='caption', align='south', size=video.size)
    subs = tuple(zip(tuple(zip(df['start'].values, df['end'].values)), df['text'].values))
    subtitles = SubtitlesClip(subs, generator)

    # Ff the file was on youtube, add the captions to the downloaded video
    if download:
        video = VideoFileClip(f'experiments/{name}/{input_file}')
        final = CompositeVideoClip([video, subtitles.set_pos(('center','bottom'))])
        final.write_videofile(f'experiments/{name}/{output}', fps=video.fps, remove_temp=True, codec="libx264", audio_codec="aac")
    else:
        # If the file was a local upload:
        video = VideoFileClip(uploaded_vid)
        final = CompositeVideoClip([video, subtitles.set_pos(('center','bottom'))])
        final.write_videofile(f'experiments/{name}/{output}', fps=video.fps, remove_temp=True, codec="libx264", audio_codec="aac")
First, we check if the directory storing the outputs has been created and if it is empty. If not, it creates it for us to use. It then will try to download a video from the submitted Youtube URL if one was submitted and its corresponding audio. We control this with the download parameter. If no URL was submitted, it checks for a local file as input, and then rips the audio directly from it to input to Whisper.
Next, we instantiate the Whisper model. This can be any of the model types we mentioned earlier in this article. This is then used to translate and transcribe the audio input into timestamped subtitles. We then put this data into a Dataframe, where each row holds the start time, end time, and text for a subtitle snippet.
We then use these subtitles as the inputs for a subtitle generator from MoviePy using TextClip. MoviePy then iterates across each frame of the input video, and overlays the correct subtitles for those regions on the original video. We then save the video.
subtitle_video(
    download=True,
    uploaded_vid=None,     # path to local file
    url = URL,
    name = 'run1',
    aud_opts = opts_aud,
    vid_opts = opts_vid,   # Video download settings
    model_type = 'medium', # change to 'large' if you want more accurate results,
                           #change to 'medium.en' or 'large.en' for all english language tasks,
                           #and change to 'small' or 'base' for faster inference
    audio_file = "audio.mp3",
    input_file = 'video.mp4',
    output = 'output.mp4')
To call the model for generation, we can input our own arguments as desired to change the paths, model types, and Youtube download options as needed. One thing to try for certain is changing the model type. The tiny model can generate decent quality captions at ~32x the rate of the large model. We should consider upsizing to the large model, as well, if we have more than 10 GB of RAM on our machine.
# Display your video output in markdown
<video controls src="experiments/run1/output.mp4" />
Finally, we can display the now subtitled video in Markdown, and see how the captions hold up to the original audio. In the example below, we can see how Whisper handles the variety of languages used in this mashup of the classic "Monorail scene" from the Simpsons in different languages.
Guide to deploying and using the application
Now that we have seen them code running under the hood, let's take a look at the app version to see how we can integrate ML/DL code with Flask in Gradient Deployments to create interactive applications.
Setup
To get started, we will need a paid account with Paperspace Gradient. Log into the console, navigate to a project of choice, and open the deployments tab. Click 'Create' to make a new deployment.
In the deployment creation page, fill the fields in the web page with the values correspondingly held in spec.yaml
image: paperspace/whisper-autocaption:v1.0
port: 5000
resources:
  replicas: 1
  instanceType: A6000
We can alternatively run this Deployment from the terminal using the Gradient CLI. Once logged in, navigate to the Github repo's directory in the terminal, and run the following.
gradient deployments create --projectId <your id> --name <name for deployment> --spec spec.yamlLet's take a look at what's running under the hood.
Application code
from __future__ import unicode_literals
from cgitb import text
from yt_dlp import YoutubeDL
import yt_dlp
import whisper
import pandas as pd
from moviepy.editor import VideoFileClip
import moviepy.editor as mp
from moviepy.editor import *
from moviepy.video.tools.subtitles import SubtitlesClip
import os
import cv2
from os import listdir
from os.path import isfile, join
from werkzeug.utils import secure_filename
import shutil
import argparse
import torch
import torchvision.transforms as transforms
from PIL import Image
from flask import Flask, jsonify, request, render_template, redirect, url_for, send_from_directory
import sys
We start off by importing all the necessary packages. We are notably going to use yt_dlp to download the Youtube videos, Whisper to translate and transcribe the audio files into text, and MoviePy to make changes to the video files and generate the subtitles.
UPLOAD_FOLDER = 'inputs/vids'
OUTPUT_FOLDER = 'results/subbed_vids'

ALLOWED_EXTENSIONS = {'mp4', 'mov', 'webm', 'ts', 'avi', 'y4m', 'mkv'}

app = Flask(__name__,static_folder='results')
app.config['UPLOAD_FOLDER'] = UPLOAD_FOLDER
app.config['OUTPUT_FOLDER'] = OUTPUT_FOLDER
Next, we will set some of the variables we will be needing throughout the application run. We then configure our flask app to use these as needed.
# Helpers Flask
@app.route("/", methods = ['GET', 'POST'])
def index():
    return redirect(url_for('upload_file'))

def allowed_file(filename):
    return '.' in filename and \
           filename.rsplit('.', 1)[1].lower() in ALLOWED_EXTENSIONS

# Helpers display video
@app.route("/playvideourl/<filename>")
def playvideourl(filename):
    return render_template('index.html',
        movie_name='video.mp4',
        movie_ext='mp4')

@app.route("/media_video/<filename>")
def media_video(filename):
   # config_any_dir
   return send_from_directory(app.config['OUTPUT_FOLDER'],
                               filename, as_attachment=True)
Following the variable assignment and configuration, we define helper functions to direct the application flow across the web pages, redirect a user to the homepage if a file hasn't been submitted, and parse the input files to make sure they are compatible with MoviePy. Next, we have two helper functions that enable us to display our final video output within the Flask interface.
@app.route("/upload", methods = ['GET', 'POST'])
def upload_file():
    # set variables
    source = 'inputs/vids'
    audio = 'inputs/audio'
    out = 'results/subbed_vids/'
    # set options for youtube download
    opts_aud = {'format': 'mp3/bestaudio/best','keep-video':True, 'outtmpl': f'inputs/audio/audio.mp3', 'postprocessors': [{'key': 'FFmpegExtractAudio','preferredcodec': 'mp3'}]}
    vid_opts = {'format': 'mp4/bestvideo/best','outtmpl': f'{source}/video.mp4'}

    # Empty out input and output folders to prevent conflict
    for f in os.listdir(source):
        os.remove(os.path.join(source, f))
    for f in os.listdir(audio):
        os.remove(os.path.join(audio, f))
    for f in os.listdir(out):
        os.remove(os.path.join(out, f))
    # Try to download the Youtube URL, if one exists
    try:
        text1 = request.form.values()
        text1 = list(text1)
        with YoutubeDL(vid_opts) as ydl:
            ydl.download(text1)
        with YoutubeDL(opts_aud) as ydl:
            ydl.download(text1)
    except:
        None

    if request.method == 'POST':
        # check if the post request has the file part
        if 'file' not in request.files:
            if 'video.mp4' in os.listdir('inputs/vids/'):
                return redirect(url_for('main', name='inputs/vids/video.mp4'))
            print('No file part')
            return redirect(request.url)
        file = request.files['file']

        # If the user does not select a file, the browser submits an
        # empty file without a filename.
        if file.filename == '':
            print('No selected file')
            return redirect(request.url)
        # pass the file onto main
        if file and allowed_file(file.filename):
            filename = secure_filename(file.filename)
            file.save(os.path.join(app.config['UPLOAD_FOLDER'], 'video.mp4'))
            return redirect(url_for('main', name='video.mp4'))
    return render_template('index2.html')
The upload_file function detects whether a local file or Youtube URL is being submitted, and then performs the corresponding work to either download the file from Youtube or upload it from our local machine. Each time we run this, it will clear the input and output folders to prevent mismatched subtitling from left over files.
Afterwards, the function checks that the upload/download was successful. If everything is in the right place, then it will pass on our file to the main function. This will be where the subtitle generation and overlaying will take place.
@app.route('/main', methods=['POST','GET'])
def main():
    my_clip = mp.VideoFileClip('inputs/vids/video.mp4')
    if len(os.listdir('inputs/audio')) == 0:
        my_clip.audio.write_audiofile('inputs/audio/audio.mp3', codec="libmp3lame")


    # Instantiate whisper model using model_type variable
    model = whisper.load_model('medium')

    # Get text from speech for subtitles from audio file
    result = model.transcribe(f'inputs/audio/audio.mp3', task = 'translate')

    # create Subtitle dataframe, and save it
    dict1 = {'start':[], 'end':[], 'text':[]}
    for i in result['segments']:
        dict1['start'].append(int(i['start']))
        dict1['end'].append(int(i['end']))
        dict1['text'].append(i['text'])
    df = pd.DataFrame.from_dict(dict1)
    # df.to_csv(f'experiments/{name}/subs.csv')
    vidcap = cv2.VideoCapture('inputs/vids/video.mp4')
    success,image = vidcap.read()
    height = image.shape[0]
    width =image.shape[1]

    # Instantiate MoviePy subtitle generator with TextClip, subtitles, and SubtitlesClip
    generator = lambda txt: TextClip(txt, font='P052-Bold', fontsize=width/20, stroke_width=1, color='white', stroke_color = 'black', size = (width, height*.25), method='caption')
    # generator = lambda txt: TextClip(txt, color='white', fontsize=20, font='Georgia-Regular',stroke_width=3, method='caption', align='south', size=video.size)
    subs = tuple(zip(tuple(zip(df['start'].values, df['end'].values)), df['text'].values))
    subtitles = SubtitlesClip(subs, generator)

    # Ff the file was on youtube, add the captions to the downloaded video

    video = VideoFileClip('inputs/vids/video.mp4')
    final = CompositeVideoClip([video, subtitles.set_pos(('center','bottom'))])
    final.write_videofile(f'results/subbed_vids/video.mp4', fps=video.fps, remove_temp=True, codec="libx264", audio_codec="aac")

    onlyfiles = [f for f in listdir('results/subbed_vids') if isfile(join('results/subbed_vids', f))]
    try:
        # onlyfiles.remove('.DS_Store')
        return playvideourl('results/subbed_vids/video.mp4')
        # return render_template("index.html", variable = onlyfiles[0])
    except:
        return playvideourl('results/subbed_vids/video.mp4')
        # return render_template("index.html", variable = onlyfiles[0])
The main function is where the bulk of the work done by the application takes place. First, it loads the video input into a MoviePy variable. If no audio file was detected, the case for uploaded videos, then it will create one using write_audiofile.
Next, we instantiate our Whisper model. Since all Gradient GPU powered machines have greater than 8GB of VRAM, we will use the 'medium' sized model for all of our tasks. We will then use it to generate a translated transcription of the inputted audio. We then put this data into a Dataframe, where each row holds the start time, end time, and text for a subtitle snippet.
To ensure our subtitles are aesthetically attractive, we can use CV2's VideoCap method to detect the original input video dimensions. From there, these are used to instantiate a TextClip generator from MoviePy. This ensures our font size and spacing fits the input video size, as they will scale to the size of any input video.
Finally, we use the write_videofile method to add the subtitles in, frame by frame, to the center bottom of the original input video. The Flask app will then redirect us to a page with the video rendered in HTML. This player allows for downloads with a right click. If we want to subtitle a new video, then we can simply click the "Return to Home" link to start over.
Here is an example using the same line from the Simpsons Movie, repeated in various languages:
Closing thoughts
In this tutorial, we showed how Whisper can be used with MoviePy to automatically generate and overlay translated subtitles from any video sample. This process is versatile, and can work across a plethora of different video file types. We walked through setting up this process to run both within a Notebook context and from an application served with Gradient Deployments. Be sure to try using both!
For more information about this project, visit the Github repo here.
The original paper and Github repo are also worth viewing.