Games can have complex environments, where many different factors contribute to making a decision. An entire area of artificial intelligence is devoted to building game-playing agents that can make the correct decisions, playing like a professional would.
In this tutorial we'll see how to build a game-playing agent using only the genetic algorithm to play a game called CoinTex, which is developed in the Kivy Python framework. The objective of CoinTex is to collect the randomly distributed coins while avoiding collision with fire and monsters (that move randomly). The source code of CoinTex can be found on GitHub.
The genetic algorithm is the only AI used here; there is no other machine/deep learning model used with it. We'll implement the genetic algorithm using PyGad. This tutorial starts with a quick overview of CoinTex followed by a brief explanation of the genetic algorithm, and how it can be used to create the playing agent. Finally, we'll see how to implement these ideas in Python.
The source code of the genetic algorithm agent is available here, and you can download the code used in this tutorial from here.
Bring this project to life
The outline of this tutorial is as follows:
- CoinTex Overview
- How Does the Game Work?
- Getting Screen Reference
- Getting Coins Positions
- Getting Monster Positions
- Getting Fire Positions
- Installing PyGAD
- How Does the Agent Work?
- Building the Generation Callback Function
- Creating an Instance of the Genetic Algorithm Using PyGAD
- Further Reading
To skip straight to the sections involving the genetic algorithm, click here.
CoinTex Overview
CoinTex is an open-source cross-platform Python 3 game created using the Kivy framework. The source code of the game is available on GitHub–feel free to download and run the game as well.
CoinTex was developed as part of the book Building Android Apps in Python Using Kivy with Android Studio. CoinTex is documented from A to Z in chapters 5 and 6, so this tutorial will not cover everything about developing the game; just the details that might help in building the agent using the genetic algorithm.
The single Python script in the game is called main.py. This game has a class named CointexApp which extends the kivy.app.App class of the Kivy framework. The GUI (widget tree) of the game is built in a KV file named cointex.kv.
To run the game, just run the main.py Python script. To run the game from a Mac/Linux terminal use python3, not python, because CoinTex is developed in Python 3.
Running a Kivy app is all about creating a new instance of the class that extends the base class kivy.app.App, and calling its run() method. Here are the lines that run the game at the end of the main.py file. The variable app is an instance of the CointexApp class.
app = CointexApp()
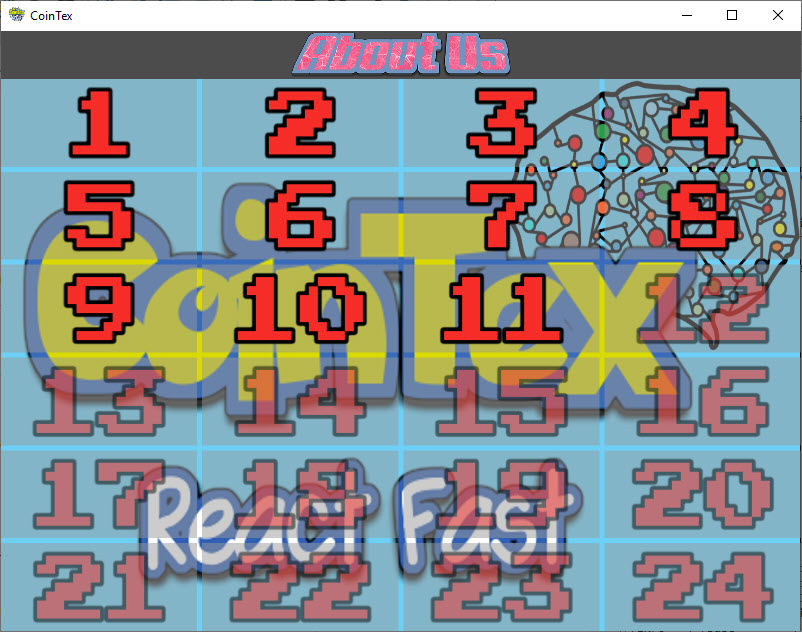
app.run()After running the game, a window appears as shown below. The game currently has 24 levels. A level is activated after you beat the preceding one. In the example below I only passed 10 levels, and thus those 10 levels are activated plus the next one, Level 11.
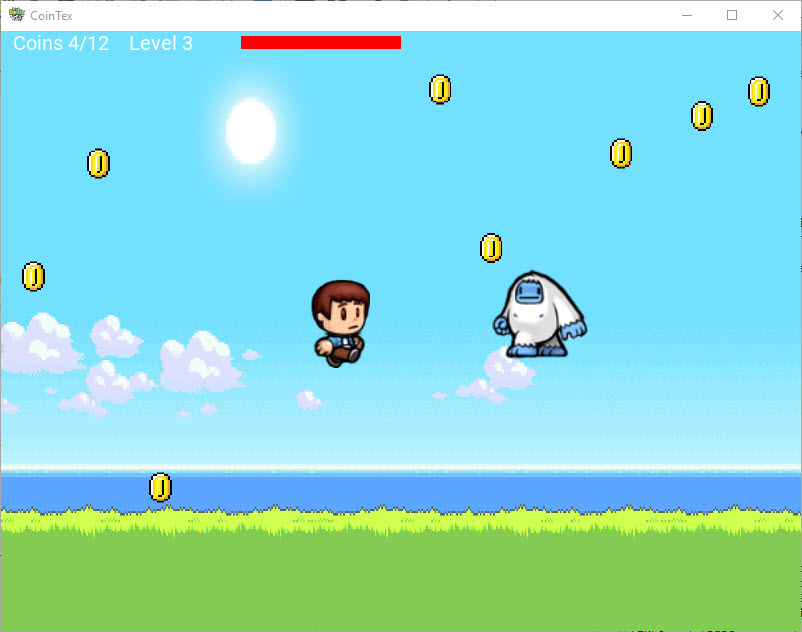
Once a level is selected, a new screen appears. The next windows show screenshots from Level 3. The player moves by touching the screen, which causes the character to move to the touched position.
At the top of the screen there is a label that shows the number of collected coins, in addition to the total number of coins in the level. You can see that I just collected 4 coins from a total of 12. Next to that you can see the current level number, as well as the player's health indicated by the red bar. Once there is no more health, the player dies.
To pass the level, all the coins must be collected. Once a level is passed, the next is activated.
The movement of a monster is random, as is the distribution of the coins on the screen. That means that the coins could be located differently each time a level is played. The player faces two obstacles when collecting the coins: the monsters, and fire that are thrown across the screen in a predefined path. The next figure shows some of this fire in level 20.
The next section gives some brief details about the callback functions for the game actions, from starting the game to level completion or death of the player.
How Does the Game Work?
After the game runs, the first method to be called is on_start(). This method activates the levels based on the last level passed, after which the grid of activated levels opens.
Once a user selects a level and before entering it, the callback method screen_on_pre_enter() is called. Within this method, the coins' locations on the screen are randomly selected.
After a level is entered, the method screen_on_enter() is called. This method starts the movement of the monsters and fire. The method responsible for starting the monster's movement is called start_monst_animation(), and the one for the fire is start_fire_animation(). Once the monster/fire movement begins, they will not stop unless the character dies or the level is completed.
Once a monster/fire moves, then a new position is assigned to its pos_hint property. In the KV file named cointex.kv, there is a callback method assigned to each monster/fire that is called when there is a change in the pos_hint property. The callback method for the monster is named monst_pos_hint(). For the fire, the method is named fire_pos_hint().
Within each of those callback methods, the position of the monster and the fire is compared to the position of the player. If the player is too close to a monster/fire, then a collision occurs and the health of the player is reduced. If the health becomes 0, then the player dies. The player's mission is to collect all the coins while keeping its health above 0.
The pos_hint property takes as a value a dictionary with 2 items as listed below. The keys for the 2 items are 'x' and 'y'. Their values specify the x-axis and y-axis locations of the widget. Their values are between 0.0. and 1.0.
pos_hint = {'x': 0.2, 'y': 0.4}For the x-axis, the value 0.0. means at the left-most side of the screen while 1.0 means the right-most side of the screen. For the y-axis, 0.0. means the bottom of the screen while 1.0 means the top of the screen. When a widget is at the center of the screen, then the value of the pos_hint property is {'x': 0.5, 'y': 0.5}.
Similar to the monsters/fires, there is a pos_hint property for the player. When changed, a callback method named char_postion_hint() is called. This method compares the position of the player and all the uncollected coins to check if a collision occurs. Once the player collides a coin, the coin is collected.
According to the above discussion, the player should collect all coins while avoiding collision with the monsters and the fire.
Thinking of building an agent that plays the game itself, there are 2 tasks the agent should do:
- The agent should change the player's position to be closer to the coins to collect them.
- The agent should change the player's position to be far away from the monsters and the fire to avoid being killed.
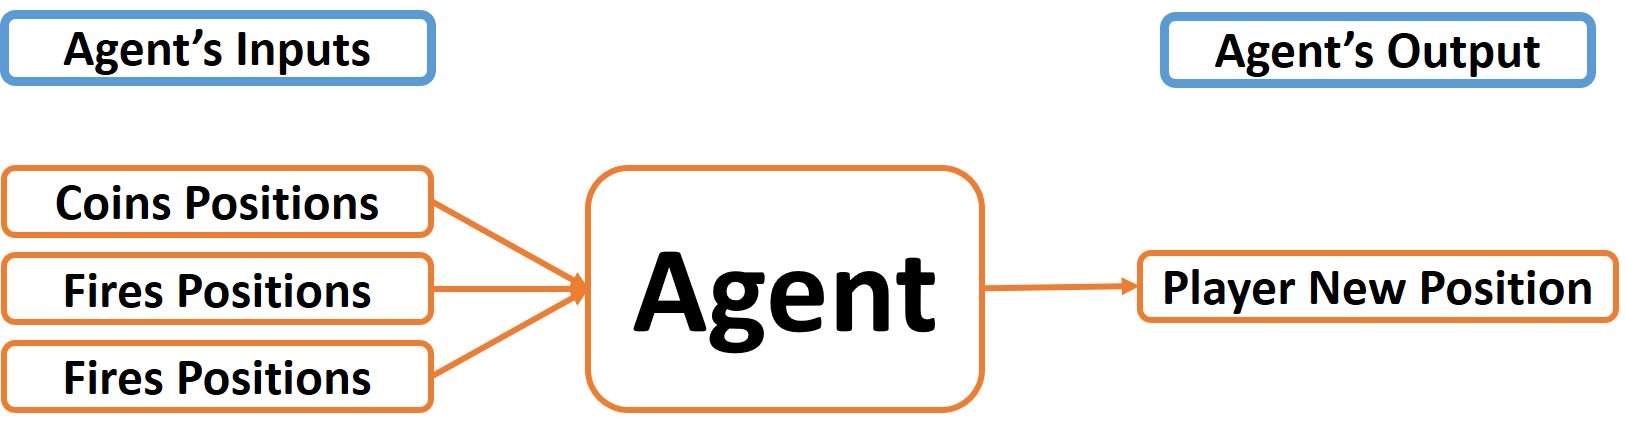
So, the inputs to the agent that helps to make a decision are:
- The coins positions.
- The monsters positions [if available].
- The fire positions [if available].
The output from the agent is the new player's position.
Note that some levels may have monsters, fire, both, or none.
The next figure summarizes the inputs and the output of the agent.
Before discussing how to get the positions of the coins, monsters, and fire, the next section discusses how to get a reference to the level's screen.
Getting the Screen Reference
For each level, there is a corresponding Kivy screen. This screen holds all information about the level. This includes information about the player, coins, monsters, fire, and more. So, to get some information about a level, the first thing to do is to get a reference to that level.
Generally, a reference to a level is returned according to the next line where app is an instance of the CointexApp class created using this line app = CointexApp(). lvl_num refers to the level number which starts from 1.
curr_screen = app.root.screens[lvl_num]Once the screen reference is available, then any type of information could be accessed.
The next 3 sections discuss how to get the positions of the coins, monsters, and fire.
Getting Coin Positions
Within the screen, there is a dictionary named coins_ids which holds the positions of the uncollected coins. The coin that gets collected is removed from the dictionary.
The dictionary is returned from the current screen according to the next line.
coins = curr_screen.coins_idsEach item in the dictionary holds the position of the coin. The next code returns the position of the first coin in the dictionary.
curr_coin = coins[list(coins.keys())[0]]
curr_coin_center = [curr_coin.pos_hint['x'], curr_coin.pos_hint['y']]
This is what is needed to be known about the coins to proceed. The next section discusses how to get the monsters positions.
Getting Monster Positions
For each screen, there is a property named num_monsters which holds the number of monsters on the screen. The next line prints the value of this property.
print(curr_level.num_monsters)The monster's widget is given an ID of this form where monst_num is the monster number within the screen and lvl_num is the level number.
monster{monst_num}_image_lvl{lvl_num}For example, the name of the first monster in the 5th screen/level is monster1_image_lvl5.
The next line returns a reference to a monster given the monster number and the level number.
monster_image = curr_screen.ids['monster'+str(monst_num)+'_image_lvl'+str(lvl_num)]The next code creates a list named monsters_pos that holds the positions of all monsters in the screen with number lvl_num.
monsters_pos = []
for i in range(curr_screen.num_monsters):
    monster_image = curr_screen.ids['monster'+str(i+1)+'_image_lvl'+str(lvl_num)]
    monsters_pos.append([monster_image.pos_hint['x'], monster_image.pos_hint['y']])
By obtaining the positions of the monsters, the agent will be able to suggest a position that is far away from them to avoid killing the player.
The next section discusses getting the positions of the fire.
Getting the Fire Positions
Fire are treated similar to the monsters. The only change is to use the word fire rather than monster. The next code creates a list named fires_pos that holds the positions of all fire in the screen with number lvl_num.
fires_pos = []
for i in range(curr_screen.num_fires):
    fire_image = curr_screen.ids['fire'+str(i+1)+'_lvl'+str(lvl_num)]
    fires_pos.append([fire_image.pos_hint['x'], fire_image.pos_hint['y']])
Based on the positions of the coins, monsters, and fire, the agent will be able to select the new position of the player that takes into consideration collecting the coins without colliding with a monster or a fire.
By preparing all the required inputs to the agent, next is to discuss the idea behind building a game-playing agent for CoinTex using the genetic algorithm.
It is recommended to have an idea about the genetic algorithm before reading the next section. Read the tutorial Introduction to Optimization with Genetic Algorithm to get started.
How Does the Agent Work?
The game-playing agent is built using only the genetic algorithm. The genetic algorithm itself is used to make decisions to tell where to move the player. There is no machine/deep learning model used.
The mission of the game-playing agent is to collect all coins while avoiding collision with monsters and fire. This section discusses how the agent decides the next position to which the player moves taking into consideration the positions of the coins, monsters, and fire.
Let's start by discussing how the agent uses the positions of the coins to contribute to deciding the player's next position.
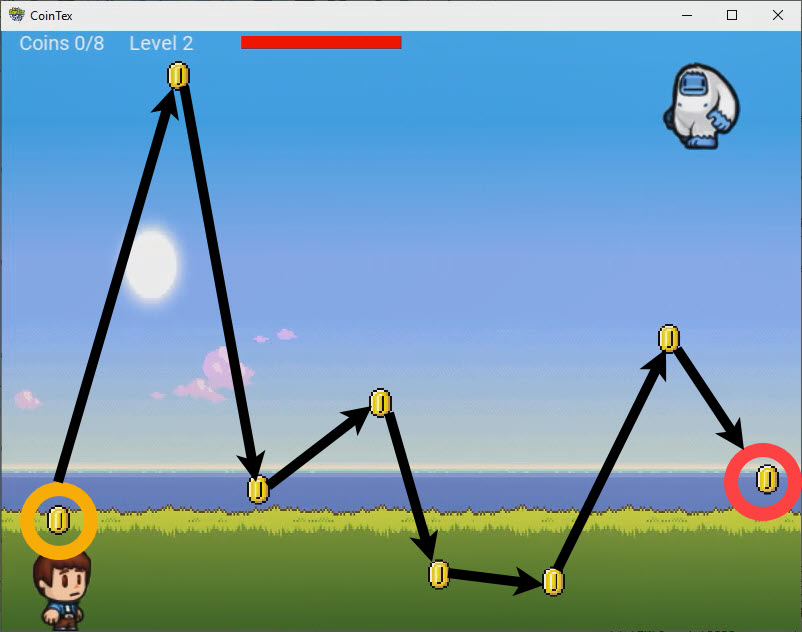
As given in the next GIF image, there is more than 1 coin available on the screen. The agent does not consider all coins at once. Instead, the agent sets only 1 coin as a target. After this coin is collected, a new coin is set as the target. The process continues until collecting all coins.
Generally, the agent collects the coins from left to right but this might change based on the positions of the monsters and fire.
The next figure shows the order of collecting the coins where the first targeted coin is highlighted with an orange circle and the last coin is highlighted with a red circle.
After collecting the current targeted coin, the agent sets a new coin as a target. The process continues by collecting the current targeted coin and setting a new coin as a target until collecting all the coins.
Assuming that the first coin's position is (x, y)=(0.1, 0.15), then based on the solutions available in the current population of the genetic algorithm, the agent selects the solution that places the player in a position as close as possible to the target coin. This is accomplished by calculating the distance between each solution/position in the population and the targeted coin position.
Assuming that the variable solution is a list holding a position from the population and the variable curr_coin_center is a list of the targeted coin's position, then the distance is calculated as follows:
output = abs(solution[0] - curr_coin_center[0]) + abs(solution[1] - curr_coin_center[1])Assuming there are 4 solutions in the population as listed below.
Solution 1 : 0.2, 0.3
Solution 2 : 0.1, 0.9
Solution 3 : 0.7, 0.4
Solution 4 : 0.8, 0.7
As calculated below, the distances between these 4 solutions and the targeted coin position (0.1, 0.15) are 0.25, 0.95, 0.85, and 1.25. Based on these distances, the preferred solution is the first solution (0.6, 0.3) because it has the least distance (0.25). As a result, the next position of the player will be (0.6, 0.3).
Solution 1 : abs(0.2 - 0.1) + abs(0.3 - 0.15) = 0.1 + 0.15 = 0.25
Solution 2 : abs(0.1 - 0.1) + abs(0.9 - 0.15) = 0.2 + 0.75 = 0.95
Solution 3 : abs(0.7 - 0.1) + abs(0.4 - 0.15) = 0.6 + 0.25 = 0.85
Solution 4 : abs(0.8 - 0.1) + abs(0.7 - 0.15) = 0.7 + 0.55 = 1.25
Remember that the fitness function of the genetic algorithm should be a maximization function so that a solution with a higher fitness value is preferred. For this reason, the calculated distances are inverted. The next code shows how the fitness value (inverted distance) is calculated. The fitness value is saved in the variable output.
output = abs(solution[0] - curr_coin_center[0]) + abs(solution[1] - curr_coin_center[1])
output = 1.0 / output
The fitness values for the 4 solutions are listed below. According to the inverted distances, the best solution of the population is still first solution with value 4.0. This means the player's new position is (0.6, 0.3).
Solution 1 : 1 / 0.25 = 4.0
Solution 2 : 1 / 0.95 = 1.05
Solution 3 : 1 / 0.85 = 1.18
Solution 4 : 1 / 1.25 = 0.8
According to the above discussion, it is clear how the coin position is used to decide the player's next position. But the positions of the coins are not the only factor and there still the position of the monsters and the fire.
The agent's goal is not only about collecting the coins but also avoiding collisions with the monsters and the fire. The arrow in the next figure marks the targeted coin to be collected by the agent. If the agent selects the closets solution [from the population] to that coin, then it may collide with the monster which causes a reduction in the player's health and may kill it. Thus, the agent should consider the positions of the monsters while deciding the player's next position.

To avoid going to the positions that may cause a reduction to the player's health, the fitness values of the solutions that are close to at least one monster are penalized by reducing their values. This is how the monsters' positions help to decide the player's next position.
Assuming that monsters_pos is a nested list holding the positions of all monsters, here is the code that calculates the distance between a solution and the monsters' positions and updates the calculated fitness value in the output variable.
If the solution is within a box of width and height of 0.3 around the monster, then the fitness value is reduced by 300 to mark the solution as dangerous. Otherwise, the fitness value is increased by 100 to mark the solution as safe. The user is free to select other values and see how they affect the agent.
for monst_pos in monsters_pos:
    char_monst_h_distance = abs(solution[0] - monst_pos[0])
    char_monst_v_distance = abs(solution[1] - monst_pos[1])
    if char_monst_h_distance <= 0.3 and char_monst_v_distance <= 0.3:
        output -= 300
    else:
        output += 100
The fire are treated similarly to the monsters. Assuming that the nested list fires_pos holds the positions all fire, then the next code updates the fitness value based on the positions of the fire. If the solution suggested by the genetic algorithm is within a box of width and height of 0.3 around the fire, then the fitness value is reduced by 300. Otherwise, it is increased by 100.
for fire_pos in fires_pos:
    char_fire_h_distance = abs(solution[0] - fire_pos[0])
    char_fire_v_distance = abs(solution[1] - fire_pos[1])
    if char_fire_h_distance <= 0.3 and char_fire_v_distance <= 0.3:
        output -= 300
    else:
        output += 100
After discussing how the agent uses the positions of the coins, monsters, and fire to calculate the fitness value of the solution, here is the code that puts the codes discussed in this section in a single block.
# solution: A potential position to the player suggested by the genetic algorithm.
# curr_coin_center: The position of the targeted coin.
# monsters_pos: A nested list of the monsters' positions.
# fires_pos: A nested list of the fires' positions.

output = abs(solution[0] - curr_coin_center[0]) + abs(solution[1] - curr_coin_center[1])
output = 1.0 / output

for monst_pos in monsters_pos:
    char_monst_h_distance = abs(solution[0] - monst_pos[0])
    char_monst_v_distance = abs(solution[1] - monst_pos[1])
    if char_monst_h_distance <= 0.3 and char_monst_v_distance <= 0.3:
        output -= 300
    else:
        output += 100

for fire_pos in fires_pos:
    char_fire_h_distance = abs(solution[0] - fire_pos[0])
    char_fire_v_distance = abs(solution[1] - fire_pos[1])
    if char_fire_h_distance <= 0.3 and char_fire_v_distance <= 0.3:
        output -= 300
    else:
        output += 100
Now, everything is clear about how the agent works. Next is to build the agent using the genetic algorithm.
In this project, the genetic algorithm is built using a library named PyGAD. The next section discusses installing PyGAD.
Installing PyGAD
PyGAD must be installed to continue with this project. You can either download its wheel file from PyPI, or use the pip installer, as shown below.
pip install pygad>=2.4.0For Linux/Mac, use pip3 because PyGAD is developed in Python 3. Check out the docs for more information on parameters, classes, and submodules in PyGAD. You can also check out my tutorial, 5 Genetic Algorithm Applications Using PyGAD, which covers the library in greater depth and shows how to use it for 5 different use cases.
Each problem solved using the genetic algorithm has a fitness function. This is a critical parameter that must be designed carefully, since it is used to judge whether a solution is good or bad.
Building the Fitness Function
The fitness function in the genetic algorithm is a function that accepts, as input, the solution produced by the algorithm and returns a fitness value as output. The higher the fitness value, the better the solution.
In PyGAD, the fitness function is a regular Python function that accepts 2 parameters as input:
- The solution.
- Index of the solution in the population.
The function should return a numeric value representing the solution's fitness value. It is the user's job to build the fitness function properly so that it represents the problem is solved well.
Here is a template for building the fitness function for PyGAD:
def fitness_function(solution, solution_idx):
    ...

    fitness = ...

    return fitness
As agreed previously, the agent decides the next position of the player based on the current positions of the coins, monsters, and fire. The fitness function uses such positions to calculate the fitness value.
The complete implementation of the fitness function is listed below. Note that 90% of its code was discussed previously.
The first line returns a reference to the current level's screen. The value of the lvl_num variable is set inside the screen_on_enter() callback method which will be discussed later.
The dictionary coins_ids is returned which holds the positions of all uncollected coins. If there is at least an uncollected coin, then the function proceeds into calculating the fitness value. The dictionary item for the target coin is returned into the curr_coin variable which is then used to calculate the coin's center into the curr_coin_center variable.
The remaining code of the function calculates the fitness value based on the positions of the target coin, monsters, and fire. At the end of the function, the calculated fitness value is returned.
def fitness_func(solution, solution_idx):
    curr_screen = app.root.screens[lvl_num]

    coins = curr_screen.coins_ids
    if len(coins.items()) == 0:
        return 0

    curr_coin = coins[list(coins.keys())[0]]

    curr_coin_center = [curr_coin.pos_hint['x'], curr_coin.pos_hint['y']]

    output = abs(solution[0] - curr_coin_center[0]) + abs(solution[1] - curr_coin_center[1])
    output = 1.0 / output

    monsters_pos = []
    for i in range(curr_screen.num_monsters):
        monster_image = curr_screen.ids['monster'+str(i+1)+'_image_lvl'+str(lvl_num)]
        monsters_pos.append([monster_image.pos_hint['x'], monster_image.pos_hint['y']])

    for monst_pos in monsters_pos:
        char_monst_h_distance = abs(solution[0] - monst_pos[0])
        char_monst_v_distance = abs(solution[1] - monst_pos[1])
        if char_monst_h_distance <= 0.3 and char_monst_v_distance <= 0.3:
            output -= 300
        else:
            output += 100

    fires_pos = []
    for i in range(curr_screen.num_fires):
        fire_image = curr_screen.ids['fire'+str(i+1)+'_lvl'+str(lvl_num)]
        fires_pos.append([fire_image.pos_hint['x'], fire_image.pos_hint['y']])

    for fire_pos in fires_pos:
        char_fire_h_distance = abs(solution[0] - fire_pos[0])
        char_fire_v_distance = abs(solution[1] - fire_pos[1])
        if char_fire_h_distance <= 0.3 and char_fire_v_distance <= 0.3:
            output -= 300
        else:
            output += 100

    fitness = output
    return fitness
In PyGAD, there is a parameter named fitness_func in the constructor of the pygad.GA class of which accepts the prepared fitness function.
After building the fitness function, there is another function to be created in the next section. This function is called after each generation completes.
Building the Generation Callback Function
This section discusses building a callback function to be called after completing a generation of the genetic algorithm. Let's discuss why there is a need for such a function.
For each generation, PyGAD uses the fitness function to calculate the fitness values for all solutions within the population. After a generation completes, there must be a way to find the best solution within the population that evolved in the last generation. This best solution is used to move the player.
In the pygad.GA class of PyGAD, there is a parameter named callback_generation which accepts a function to be called after each generation. The function must accept a single parameter which refers to the instance of the pygad.GA class.
In this project, this function will be used to find the best solution the genetic algorithm created and moves the player according to the solution's position. The implementation of the function is listed below.
Simply, the function moves the player to the position of the best solution in the current generation if there still some coins remaining to be collected and the fitness value changed from the best one in the previous generation.
The best_solution() method in the pygad.GA class is called to get information about the best solution in the current generation. best_solution()[0] returns the best solution and best_solution()[1] returns the best solution's fitness value.
Outside the function, a global variable named last_fitness is defined. It is assigned the best solution's fitness in the previous generation.
Based on the fitness values of the best solution in the current and previous generations, the change in the fitness values is calculated in the fitness_change variable. If the value of fitness_change is 0, then there is no need no move the player.
Once there are no more coins to be collected or when the character is killed, the method returns the string stop which in turn stops the genetic algorithm.
The method start_char_animation() method defined in the CointexApp class is called to move the player to the best solution's position. It accepts the current screen number and the position.
last_fitness = 0
def callback_generation(ga_instance):
    global last_fitness

    best_sol_fitness = ga_instance.best_solution()[1]
    fitness_change = best_sol_fitness - last_fitness
    curr_screen = app.root.screens[lvl_num]

    last_fitness = best_sol_fitness

    coins = curr_screen.coins_ids

    if len(coins.items()) == 0 or curr_screen.character_killed:
        # After either the level is completed or the character is killed, then stop the GA by returning the string "stop".
        return "stop"
    elif len(coins.items()) != 0 and fitness_change != 0:
        best_sol = ga_instance.best_solution()[0]
        app.start_char_animation(lvl_num, [float(best_sol[0]),  float(best_sol[1])])
Once the fitness and callback functions are prepared, it is time to use PyGAD to create an instance of the genetic algorithm and run it. This is discussed in the next section.
Creating an Instance of the Genetic Algorithm Using PyGAD
PyGAD has a class named GA that is used to create instances of the genetic algorithm. The constructor of the pygad.GA class accepts 20 parameters in PyGAD 2.4.0. Among these parameters, the next code uses the required ones for this project to create an instance.
Note that the fitness_func parameter is assigned the fitness function created previously. Similarly, the callback_generation parameter accepts the generation callback function.
The num_genes parameter is given a value of 2 because each solution has only 2 values (the x and y positions of the player).
The random_mutation_min_val and random_mutation_max_val parameters are given the values 0.0 and 1.0 because the x and y positions are bound in this range. It is important to set the mutation_by_replacement parameter to True to keep the x and y positions within the range 0.0 to 1.0.
The delay_after_gen parameter is used to specify the delay in seconds between every 2 subsequent moves to the player. If the player made a move at time 0.0 and the delay_after_gen parameter is set to 0.3 seconds, then the next position of the player will be specified after 0.3 seconds.
Note that the 0.3 seconds are not wasted but used to start the animation that moves the player to the selected position. For the best experience, the time assigned to the delay_after_gen parameter should be equal to the time elapsed to animate the character. The animation time is available at each level in the char_anim_duration attribute.
For detailed information about the parameters in the pygad.GA class constructor, check the PyGAD documentation.
import pygad

ga_instance = pygad.GA(num_generations=9999,
                       num_parents_mating=300,
                       fitness_func=fitness_func,
                       sol_per_pop=1000,
                       num_genes=2,
                       init_range_low=0.0,
                       init_range_high=1.0,
                       random_mutation_min_val=0.0,
                       random_mutation_max_val=1.0,
                       mutation_by_replacement=True,
                       callback_generation=callback_generation,
                       delay_after_gen=app.root.screens[lvl_num].char_anim_duration)
To run the created instance of the pgad.GA class, then call the run() method.
ga_instance.run()It is not a good idea to run the genetic algorithm in the main thread of the application to avoid handing it. Instead, run the algorithm in a new thread. The next code creates a new thread named CollectCoinThread which creates an runs the instance of the pygad.GA class.
The constructor of this calls accepts a single parameter named screen which refers to the current screen/level.
import threading

class CollectCoinThread(threading.Thread):

    def __init__(self, screen):
        super().__init__()
        self.screen = screen

    def run(self):
        ga_instance = pygad.GA(num_generations=9999,
                               num_parents_mating=300,
                               fitness_func=fitness_func,
                               sol_per_pop=1000,
                               num_genes=2,
                               init_range_low=0.0,
                               init_range_high=1.0,
                               random_mutation_min_val=0.0,
                               random_mutation_max_val=1.0,
                               mutation_by_replacement=True,
                               callback_generation=callback_generation,
                               delay_after_gen=self.screen.char_anim_duration)
        ga_instance.run()
The next section discusses starting the genetic algorithm when a level/screen starts.
Starting the Genetic Algorithm
An important question to answer is where to start the CollectCoinThread thread? The answer is within the screen_on_enter() callback method of the CointexApp class. The screen_on_enter() method is called when a screen (i.e. level) opens.
At the end of this method, just place the next code. It creates a global variable named lvl_num that holds the number of the current level/screen. Then, a new instance of the CollectCoinThread thread is created. Finally, the thread starts by calling the start() method.
global lvl_num

lvl_num = screen_num

collectCoinThread = CollectCoinThread(screen=curr_screen)
collectCoinThread.start()
At this time, the project is complete. The next section refers to the GitHub project that hosts the code of both CoinTex and the agent.
Project on GitHub
The source code of CoinTex is available at the ahmedfgad/CoinTex GitHub project.
The source code of the genetic algorithm agent is available at the ahmedgad/CoinTex/PlayerGA directory. This directory might be updated after publishing the tutorial. The exact code that is discussed in the tutorial is available under the ahmedfgad/CoinTex/PlayerGA/TutorialProject directory.
Further Reading
- Article: Introduction to Optimization with the Genetic Algorithm
- Tutorial: 5 Genetic Algorithm Applications Using PyGAD
- Tutorial: Genetic Algorithm Implementation in Python
- Book: Practical Computer Vision Applications Using Deep Learning with CNNs
- Tutorial: Python for Android: Start Building Kivy Cross-Platform Applications
- Book: Building Android Apps in Python Using Kivy with Android Studio
Conclusion
The tutorial discussed how to use the genetic algorithm to create a game-playing agent for a game called CoinTex. The game is open-source and cross-platform, developed in Python using Kivy, and available for Android.
PyGAD, an open-source Python library, is used for implementing the genetic algorithm.
We saw that our agent can work efficiently even in hard levels, where there are many coins, monsters, and fire.