Currently there are many available deep learning frameworks for researchers and engineers to implement their desired deep models. Each deep learning framework has its own advantages and disadvantages. For example, TensorFlow has a great community, PyTorch is an excellent framework to easily develop models in a short time and also it provides a fantastic C++ API for production level tasks, MXNet is a great framework for extremely large-scale training (i.e., it is an ultra-scalable framework which can speedup training time on distributed systems and multiple GPUs), and so on.
As a deep learning researcher/engineer it is commonplace to find a fantastic GitHub repository which share a pre-trained model on a framework which you are not familiar with. For example, you are an expert PyTorch deep learning code developer, meanwhile you find a great code with its pre-trained model on MXNet; and you want to modify this model according to your needs. At this moment, deep learning model conversion tools will help you to do that in a short period of time.
As a high level view point each model in a deep learning framework consists some layers (e.g., convolution, fully connected, etc.) with their associated weights, and it is a feasible task to convert a pre-trained model between different frameworks. However, as each framework has its own structure, converting a model between two different frameworks requires a great knowledge of both of them. In order to speed up this process some engineers and companies provides helper deep learning model conversion tools, by which code developers can tackle this issue more easily.
There are many model conversion tools such as ONNX, MMdnn, and etc. You can find a great collection of deep learning model convertors on this GitHub repository:
https://github.com/ysh329/deep-learning-model-convertor
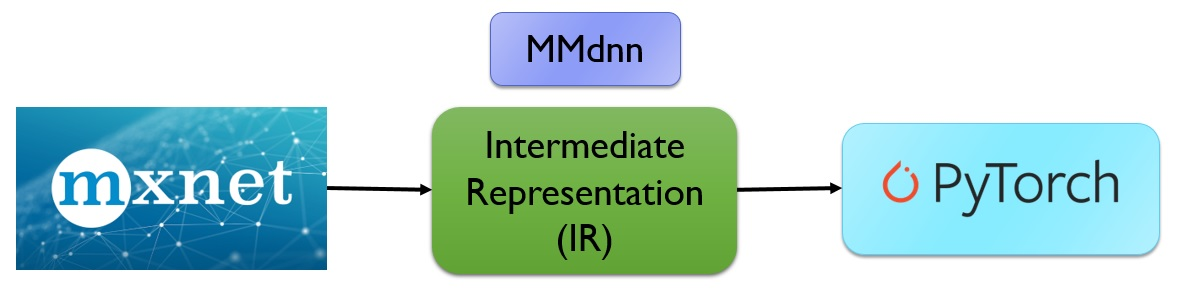
Between available model convertors, MMdnn (Model Management Deep Neural Network), which is supported by Microsoft, provides fantastic tools for converting and visualizing deep models between a wide collection of frameworks. By using MMdnn, one can convert each model from the origin framework to a standard Intermediate Representation (a.k.a., IR), and then convert the IR format to the target framework structure. In this tutorial, I want to convert the Full ImageNet pre-trained model from MXNet to PyTorch via MMdnn convertor. This would be an appropriate example for getting familiar with MMdnn.
ImageNet is an image database organized according to the WordNet hierarchy, in which each node of the hierarchy is depicted by hundreds and thousands of images. Currently it has an average of over five hundred images per node (Reference). The lexicon (i.e., set of its labels and words) of full version of ImageNet data set contains 21,841 labels (a.k.a., synonym set (synset)) with their associated 14,197,122 images. Since 2010, the annual ImageNet Large Scale Visual Recognition Challenge (ILSVRC) is a competition where research teams evaluate their algorithms on the given data set, and compete to achieve higher accuracy on several visual recognition tasks (Reference). The ILSVRC uses a "trimmed" list of only 1,000 image categories or classes, with 1,281,167 training images (Reference). In other words, the ILSVRC introduces a sub-set of full version of ImageNet.
A common reason to train a network on ImageNet data is to use it for transfer learning (including feature extraction or fine-tuning other models) (Reference). In this aspect, many deep learning frameworks, for famous and state-of-the-art convolutional neural networks (e.g., ResNet, DenseNet, etc.), provides pre-trained models on the ImageNet ILSVRC data set (Reference). To the best of my knowledge, except the MXNet, none of the other deep learning frameworks provides a pre-trained model on the full ImageNet data set. Fortunately, the MXNet team introduced a nice tutorial for training the ResNet model on the full ImageNet data set. You can refer to the below link for more details:
https://mxnet.incubator.apache.org/versions/master/tutorials/vision/large_scale_classification.html
It is worth noting that, having a pre-trained model which is trained on such a huge training data set (i.e., full ImageNet), would be a really valuable network. It can speed up the convergence early in the training phase, and also improves the target task accuracy in some scenarios (e.g., fine-tuning or feature extraction). In other words, having the mentioned valuable model (i.e., full ImageNet pre-trained model) in different frameworks, would be a great initialized network for further modifications.
Prerequisites
In order to follow up this tutorial, at first, you should install the MMdnn tool. There are several ways to install it (you can refer to its GitHub page). Among different ways to install it, I prefer doing it via pip. To this end, fire up your terminal and enter the command:
sudo pip3 install --upgrade mmdnn
You will also need PyTorch for testing the converted model. You can also install the stable version of PyTorch using the below command:
sudo pip3 install --upgrade torch torchvision
Another thing which you will need, is the original full ImageNet pre-trained model on the MXNet, as well as its synonym set (a.k.a., synset or its category list). You can download these files via the below python code:
import os
import errno


_base_model_url = 'http://data.mxnet.io/models/'
_default_model_info = {
    'imagenet11k-resnet-152': {'symbol':_base_model_url+'imagenet-11k/resnet-152/resnet-152-symbol.json',
                             'params':_base_model_url+'imagenet-11k/resnet-152/resnet-152-0000.params'},
}


def download_file(url, local_fname=None, force_write=False):
    # requests is not default installed
    import requests
    if local_fname is None:
        local_fname = url.split('/')[-1]
    if not force_write and os.path.exists(local_fname):
        return local_fname

    dir_name = os.path.dirname(local_fname)

    if dir_name != "":
        if not os.path.exists(dir_name):
            try:  # try to create the directory if it doesn't exists
                os.makedirs(dir_name)
            except OSError as exc:
                if exc.errno != errno.EEXIST:
                    raise

    r = requests.get(url, stream=True)
    assert r.status_code == 200, "failed to open %s" % url
    with open(local_fname, 'wb') as f:
        for chunk in r.iter_content(chunk_size=1024):
            if chunk:  # filter out keep-alive new chunks
                f.write(chunk)
    return local_fname


def download_model(model_name, dst_dir='./', meta_info=None):
    if meta_info is None:
        meta_info = _default_model_info
    meta_info = dict(meta_info)
    if model_name not in meta_info:
        return (None, 0)
    if not os.path.isdir(dst_dir):
        os.mkdir(dst_dir)
    meta = dict(meta_info[model_name])
    assert 'symbol' in meta, "missing symbol url"
    model_name = os.path.join(dst_dir, model_name)
    download_file(meta['symbol'], model_name+'-symbol.json')
    assert 'params' in meta, "mssing parameter file url"
    download_file(meta['params'], model_name+'-0000.params')
    return (model_name, 0)


if __name__ == "__main__":
    # ***** Download synset (i.e., Synonym Set):
    synset_url = 'http://data.mxnet.io.s3-website-us-west-1.amazonaws.com/models/imagenet-11k/synset.txt'
    download_file(synset_url, 'synset.txt')

    # ***** Download Model:
    download_model('imagenet11k-resnet-152', dst_dir='./')
Converting Full ImageNet Pre-trained Model from MXNet to PyTorch
In order to convert the downloaded full ImageNet pre-trained model from MXNet to PyTorch, you need to move into the directory of the download model, and then entered 3 below commands (I have also shared the outputs of each step):
Command 1 [it takes a few minutes (~ 3-5 minutes)]:
python3 -m mmdnn.conversion._script.convertToIR -f mxnet -n imagenet11k-resnet-152-symbol.json -w imagenet11k-resnet-152-0000.params -d resnet152 --inputShape 3,224,224
Output of Command 1:
IR network structure is saved as [resnet152.json].
IR network structure is saved as [resnet152.pb].
IR weights are saved as [resnet152.npy].
Command 2:
python3 -m mmdnn.conversion._script.IRToCode -f pytorch --IRModelPath resnet152.pb --dstModelPath kit_imagenet.py --IRWeightPath resnet152.npy -dw kit_pytorch.npy
Output of Command 2:
Parse file [resnet152.pb] with binary format successfully.
Target network code snippet is saved as [kit_imagenet.py].
Target weights are saved as [kit_pytorch.npy].
Command 3:
python3 -m mmdnn.conversion.examples.pytorch.imagenet_test --dump resnet152Full.pth -n kit_imagenet.py -w kit_pytorch.npy
Output of Command 3:
PyTorch model file is saved as [resnet152Full.pth], generated by [kit_imagenet.py] and [kit_pytorch.npy].
Testing the Converted Model
Now, we have the full ImageNet pre-trained ResNet-152 converted model on PyTorch. In order to use it (i.e., classifying images with it) you can use the below implemented code. Note that its image pre-processing is a little tricky (i.e., when you use the model convertors the pre-processing between the origin and target frameworks, must be the same).
import torch
import numpy as np
from tensorflow.contrib.keras.api.keras.preprocessing import image


# ************** Parameters:
num_predictions = 5  # Top-k Results
model_address = 'resnet152Full.pth'  # for loading models
lexicon_address = 'synset.txt'
test_image_address = 'seagull.jpg'
device = torch.device("cuda:0" if torch.cuda.is_available() else "cpu")


# Load Converted Model:
model = torch.load(model_address).to(device)
model.eval()


# Read Input Image and Apply Pre-process:
img = image.load_img(test_image_address, target_size=(224, 224))
x = image.img_to_array(img)
x = x[..., ::-1]  # transform image from RGB to BGR
x = np.transpose(x, (2, 0, 1))
x = np.expand_dims(x, 0).copy()
x = torch.from_numpy(x)
x = x.to(device)


# Load Full-ImageNet Dictionary (i.e., lexicon):
with open(lexicon_address, 'r') as f:
    labels = [l.rstrip() for l in f]


# Make prediction (forward pass):
with torch.no_grad():
    output = model(x)
max, argmax = output.data.squeeze().max(0)
class_id = argmax.item()
class_name = labels[class_id]


# Print the top-5 Results:
h_x = output.data.squeeze()
probs, idx = h_x.sort(0, True)
print('Top-5 Results: ')
for i in range(0, num_predictions):
    print('{:.2f}% -> {}'.format(probs[i] * 100.0, labels[idx[i]]))
str_final_label = 'The Image is a ' + class_name[10:] + '.'
print(str_final_label)
Here are some samples with their associated results:
Sample 1:

Top-5 Results:
48.38% -> n02041246 gull, seagull, sea gull
26.61% -> n02041085 larid
10.03% -> n01517966 carinate, carinate bird, flying bird
2.76% -> n02021795 seabird, sea bird, seafowl
2.59% -> n02042180 laughing gull, blackcap, pewit, pewit gull, Larus ridibundus
Final Result: The Image is a gull, seagull, sea gull.
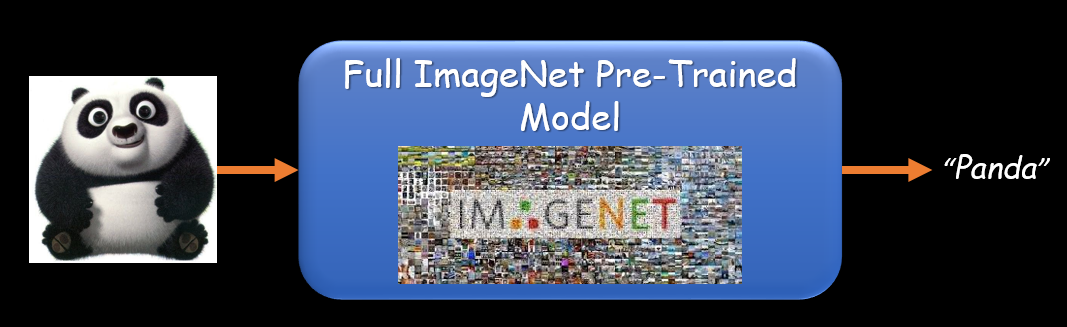
Sample 2:

Top-5 Results:
86.02% -> n02510455 giant panda, panda, panda bear, coon bear, Ailuropoda melanoleuca
3.74% -> n02131653 bear
1.82% -> n01322983 bear cub
1.19% -> n02075612 omnivore
1.05% -> n01322685 cub, young carnivore
Final Result: The Image is a giant panda, panda, panda bear, coon bear, Ailuropoda melanoleuca.
Sample 3:

Top-5 Results:
21.54% -> n04026813 push-bike
21.42% -> n03792782 mountain bike, all-terrain bike, off-roader
17.56% -> n04126066 safety bicycle, safety bike
13.79% -> n02836035 bicycle wheel
7.76% -> n02834778 bicycle, bike, wheel, cycle
Final Result: The Image is a push-bike.
Conclusion
In this tutorial you have gotten familiar with deep learning model conversion tools, especially MMdnn. You have converted the valuable full ImageNet pre-trained model from MXNet to PyTorch, and now having it in PyTorch!
Next Step
As a next step, I encourage you to try out the converted full ImageNet model for fine-tuning or feature extraction on problems that you will have, via Paperspace machines.
About the Author:
I am a Senior Deep Learning Researcher and CTO of Bayan Vision Group. I am experienced in Machine Learning, Deep Learning, and Computer Vision. I have done a lot of projects in these domains for the industry.
You can follow me on
(my LinkedIn Profile)
(my GitHub Profile)
(my Google Scholar Profile)