Introduction to Part 5
In the fifth part of this six-part series, we will show how to deploy the model using Gradient Workflows and its integration with TensorFlow Serving.
Series parts
Part 1: Posing a business problem
Part 2: Preparing the data
Part 3: Building a TensorFlow model
Part 4: Tuning the model for best performance
Part 5: Deploying the model into production
Part 6: Summary, conclusions, and next steps
Accompanying material
- The main location for accompanying material to this blog series is the GitHub repository at https://github.com/gradient-ai/Deep-Learning-Recommender-TF .
- This contains the notebook for the project,
deep_learning_recommender_tf.ipynb, which can be run in Gradient Notebooks or the JupyterLab interface, and 3 files for the Gradient Workflow:workflow_train_model.py,workflow-train-model.yamlandworkflow-deploy-model.yaml. - The repo is designed to be able to be used and followed along without having to refer to the blog series, and vice versa, but they compliment each other.
NOTE
Model deployment support in the Gradient product on public clusters and from Workflows is currently pending, expected in 2021 Q4. Therefore section 5 of the Notebook deep_learning_recommender_tf.ipynb on model deployment is shown but will not yet run.
Deploying models
Now that we have our trained model, we are ready to deploy it into production.
Production is different from experimentation and training because the emphasis changes from solving the problem (which we might accomplish in a notebook, for example) to engineering a solution for the model to be deployed reliably.
When it is time to deploy the model we are no longer concerned only with the correctness of the analysis but rather with the robustness of the architecture that serves the solution.
An intermediate step to production which may be undertaken during the experimentation and training phase is to send unseen testing data to the model. Usually we would do this if we have some ground truth available still against which to measure model performance.
However, this is more or less like actual production depending upon how much this data has been prepared in the same way as the training and validation data during the training phase. In TensorFlow this might be running .predict on the model with the testing set.
To our standards, full production means sending raw, unseen data to the model setup and having the model return correct and actionable outputs such as predictions.
The setup needs to be robust to unexpected changes in inputs. It needs to be able to detect both application issues such as latency and data science issues such as model drift. And it needs to be able to deal with retraining the model when needed.
There are likely no ground truth labels to compare to the model's outputs, so other ways have to be utilized to ensure that the model's outputs are making sense.
Machine learning models are highly nonlinear, so small changes in inputs can lead to big changes in outputs. It's possible to change outputs from valuable business information to nonsense in a fraction of a second. The team in charge of the deployment is likely not in charge of the data that is being sent to them so it's critical to take care not to disrupt the underlying model during deployment.
A major strength of Gradient is that it makes a production (or production-like) deployment step easier than otherwise by supplying hardware, configured Kubernetes cluster, containers, and, for TensorFlow, integration with TF Serving.
Deployments can be created and managed via the GUI, SDK, or command line. If the user does not wish to use cloud resources and needs an on-premise setup, then the company can assist with that too.
In some enterprises, particularly larger ones, final production deployment may be subject to lengthy approvals, processes, checks, security, etc., that are not required for the training and experimentation stage, and it may be the case that a different software stack is used.
In this case, the team that does the experimentation and training is likely different from the one that does deployment.
Because Gradient encompasses both Notebooks and Workflows and furthermore includes MLOps and deployment functions in one tool, models can be trained and deployed to follow good software engineering practices.
In particular, Gradient facilitates iteration, which is a key component of data science not just between data preparation, feature engineering, and model training, but between model training and model deployment.
Gradient Deployments
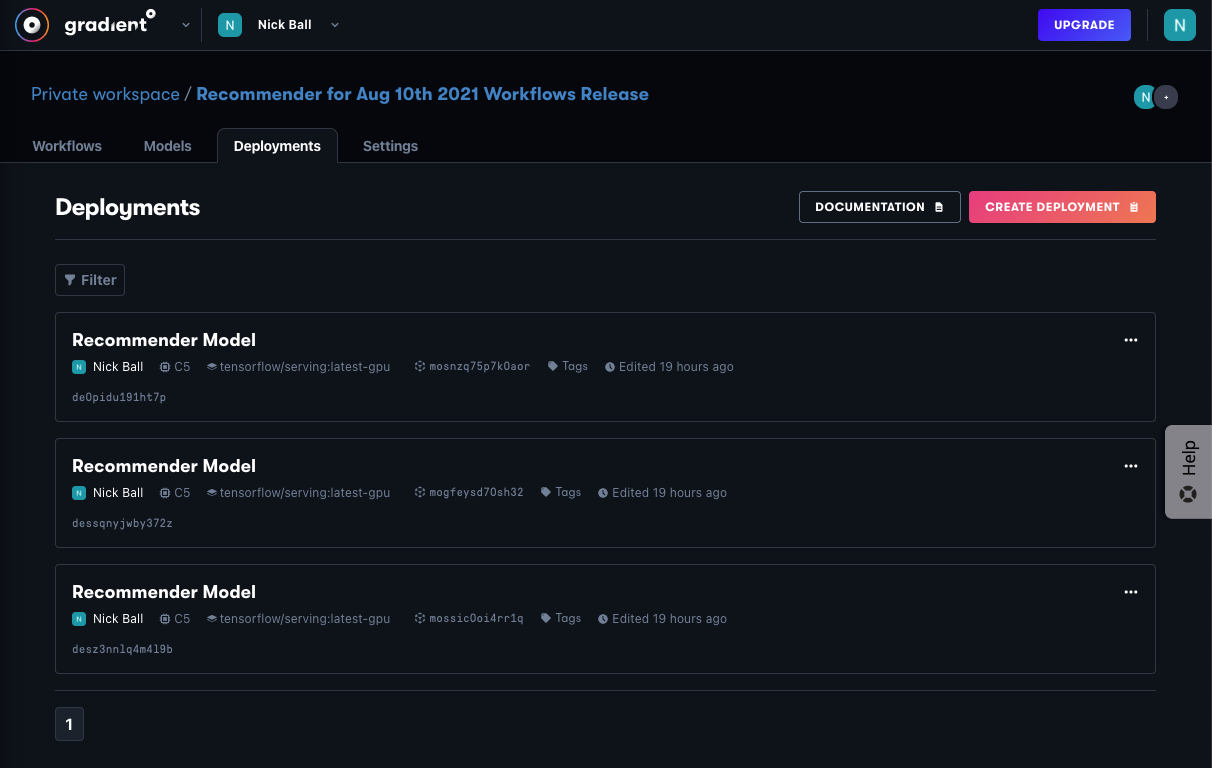
Gradient enables deployment of models that are in its registry, meaning either they have been uploaded by the user, or created by Gradient Workflows, as we did in Part 4.
When deploying a model, the user selects the following:
- Model
- Container – either a container provided by Gradient or a custom one
- Machine – either a public cluster or a private cluster
- Accelerator – either a CPU or GPU machine
- Instances – either a single machine or distributed machines
- Command to run in the container
- Various advanced options if needed
This is still quite a lot of options to choose, but it shouldn't be overwhelming. Gradient seeks to provide intelligent defaults for settings the user does not wish to alter, or does not know how to alter, and in so doing enables a user to get up and running quickly.
When required, the user can exercise fine-grained control of their desired setup.
In this series, the recommender deployment is relatively simple. We are using a custom model and the subclassing API, but the SavedModel is the same format as the simpler APIs, so the deployment is the same.
We're not using a large dataset so we don't need distributed computing, and a CPU machine is sufficient for our stated purpos of demonstrating a model that returns correct predictions.
Deployments can be done via the GUI, SDK from the notebook or a .py, the command line, or, as we will see here, via Workflows.
Deployment implementation
Workflows can be invoked via the command line (or in future the GUI), and also using the SDK from the notebook. Here we use the latter method.
As for model training in Workflows, we need to import the Gradient SDK and pass our API key to it to access the system securely:
from gradient import sdk_client
workflows_client = sdk_client.WorkflowsClient(api_key)
We then point to the specific Workflow to be run and invoke it:
spec_path = './workflow-train-model.yaml'

yaml_spec = open(spec_path, 'r')
spec = yaml.safe_load(yaml_spec)

workflow_param = {
    'workflow_id' : workflow_id_train,
    'spec': spec,
    'inputs': None
}

workflow_run = workflows_client.run_workflow(**workflow_param) # "**" is used because parameters is a dictionary
This process will be friendlier in the future as the Workflows product matures.
The Workflow YAML looks similar to that shown for model training in Part 4. Here we invoke a job to get the model, a job to create the deployment, and a job to start the deployment.
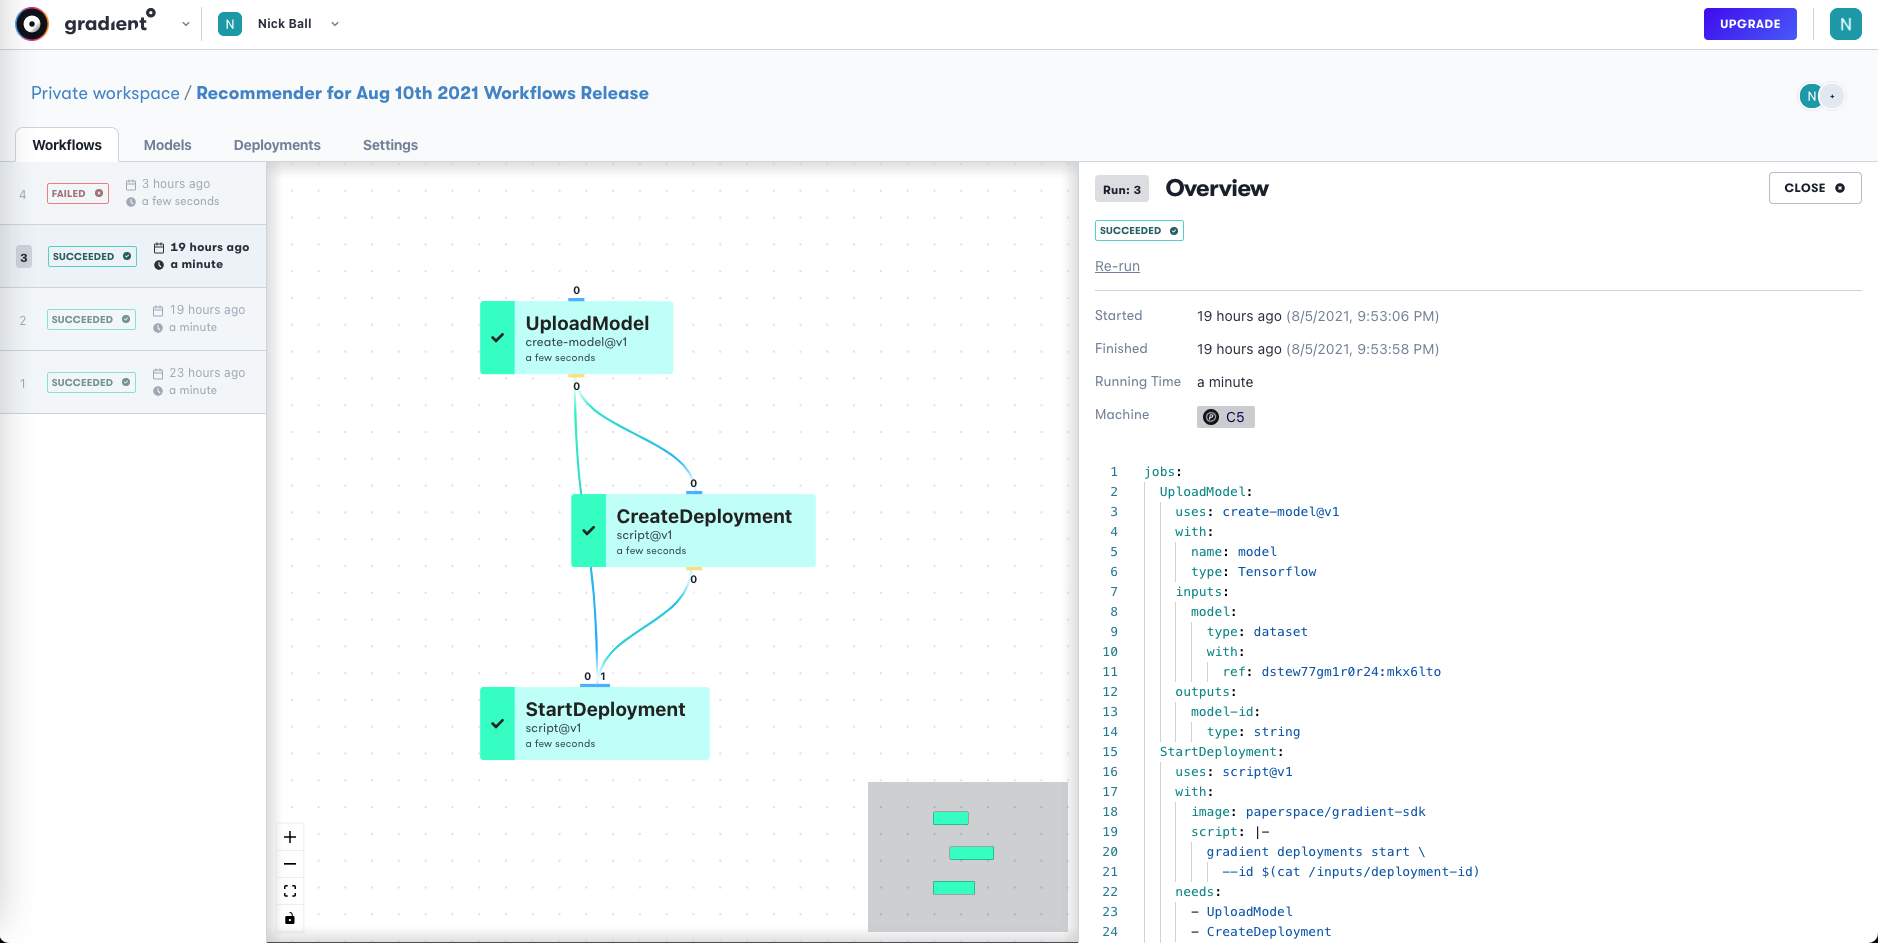
Once the deployment is started, the model is on an endpoint in the same way as if it had been started using any of the other methods in Gradient Deployments.
We can therefore send some data to it and see the model's response. If we send it some users and movies, we should see what ratings it predicts the users will give them!
Sending data to the model
In the training stage, the data was passed as a TensorFlow cached dataset. For model deployment it has to be passed as JavaScript Object Notation or JSON, which is a a subset of YAML.
In a full-scale production environment, millions of points per second might be being streamed to the models.
We do not attempt to replicate that here, but rather we will send a few rows of data to see the model response. Rows on a larger scale could be sent in the same way, perhaps to a distributed deployment (supported by Gradient) instead of a single endpoint.
Given test data in the form of per-row dictionaries:
test_rows_1 = {'movie_title': 'Devils Advocate, The (1997)',
 'timestamp': 892870992,
 'user_id': '587'}

test_rows_2 = {'movie_title': 'Donnie Brasco (1997)',
 'timestamp': 891499278,
 'user_id': '782'}

test_rows_3 = {'movie_title': 'Craft, The (1996)',
 'timestamp': 891700850,
 'user_id': '280'}

...
Let's first convert to JSON as follows:
data = json.dumps({'signature_name': 'serving_default', 'instances': [test_rows_1, test_rows_2, test_rows_3, ... ]})
And then send to the model on its API endpoint:
endpoint = deployment[0].endpoint
headers = {'content-type': 'application/json'}
json_response = requests.post(endpoint, data=data, headers=headers)
Returned predictions are visible via:
predictions = json.loads(json_response.text)['predictions']
print(predictions[0]["output_3"])
...
The predicted ratings are given in the range of 0-5 if this given user were to watch this given movie:
[3.42430091]
[3.71842861]
[2.88263416]
...
So user 587 is more likely to like The Devils Advocate than user 280 is to like The Craft, and so on.
We now have a deployed model that is returning rating predictions for new combinations of users and movies!
These predictions can be used to make recommendations of what movies the user should watch next. While we might add components to stream data in at a larger scale (which we have not attempted to show), this architecture can confidently be used for production.
Further steps
As with the experimentation stage, we can benefit from the sensible defaults given to us in this setup. We can also take advantage of the fact that it's easy to set up clusters, containers and so on, and to do proper versioning via GitHub.
Gradient also makes it easy to extend the above setup to distributed training and deployment – including with the GPUs already available on the Paperspace platform.
Another obvious step after this is to do model monitoring. Since the model is on an API endpoint as a containerized microservice, any tool that can see it can be used. This and many other extensions are discussed in Part 6.
Next
In the final part of the series - Discussion, conclusions, and next steps, we will discuss the main points from what has been shown in the series, draw some conclusions about our recommender model, and, in particular, detail a number of improvements that can be made on this project going forward.