Bring this project to life
Historically, object detection was one of the first deep learning technologies that became viable for consumer use. This was largely thanks to the incredible work of Joseph Redmon and his research team to develop the first generations of You Only Look Once (YOLO) models. There powerful framework enabled people with more casual computing setups to get started with YOLO object detection, and begin to integrate the AI framework into their existing applications.
This tradition was continued with the devlopment of YOLOv5 and YOLOv8 at Ultralytics. They have continued to push the envelope in developing SOTA object detection models with increasingly better options for interfacing the framework. The latest of these comes with the YOLO package from Ultralytics, which makes it much easier to integrate YOLO with existing python code and run in Notebooks.
In this article, we are excited to introduce the YOLOv8 Web UI. Inspired by the work of Automatic1111 and their many contributors to develop an all-in-one application for running Stable Diffusion, we sought to develop a single Gradio application interface for YOLOv8 that can serve all of the model's key functionalities. In our new application, users can label their images, view those images in ordered galleries, train the full gamut of YOLOv8 models, and generate image label predictions on image and video inputs - all in one easy to use application!
Follow this tutorial to learn how to run the application in Gradient.
Intro to YOLOv8
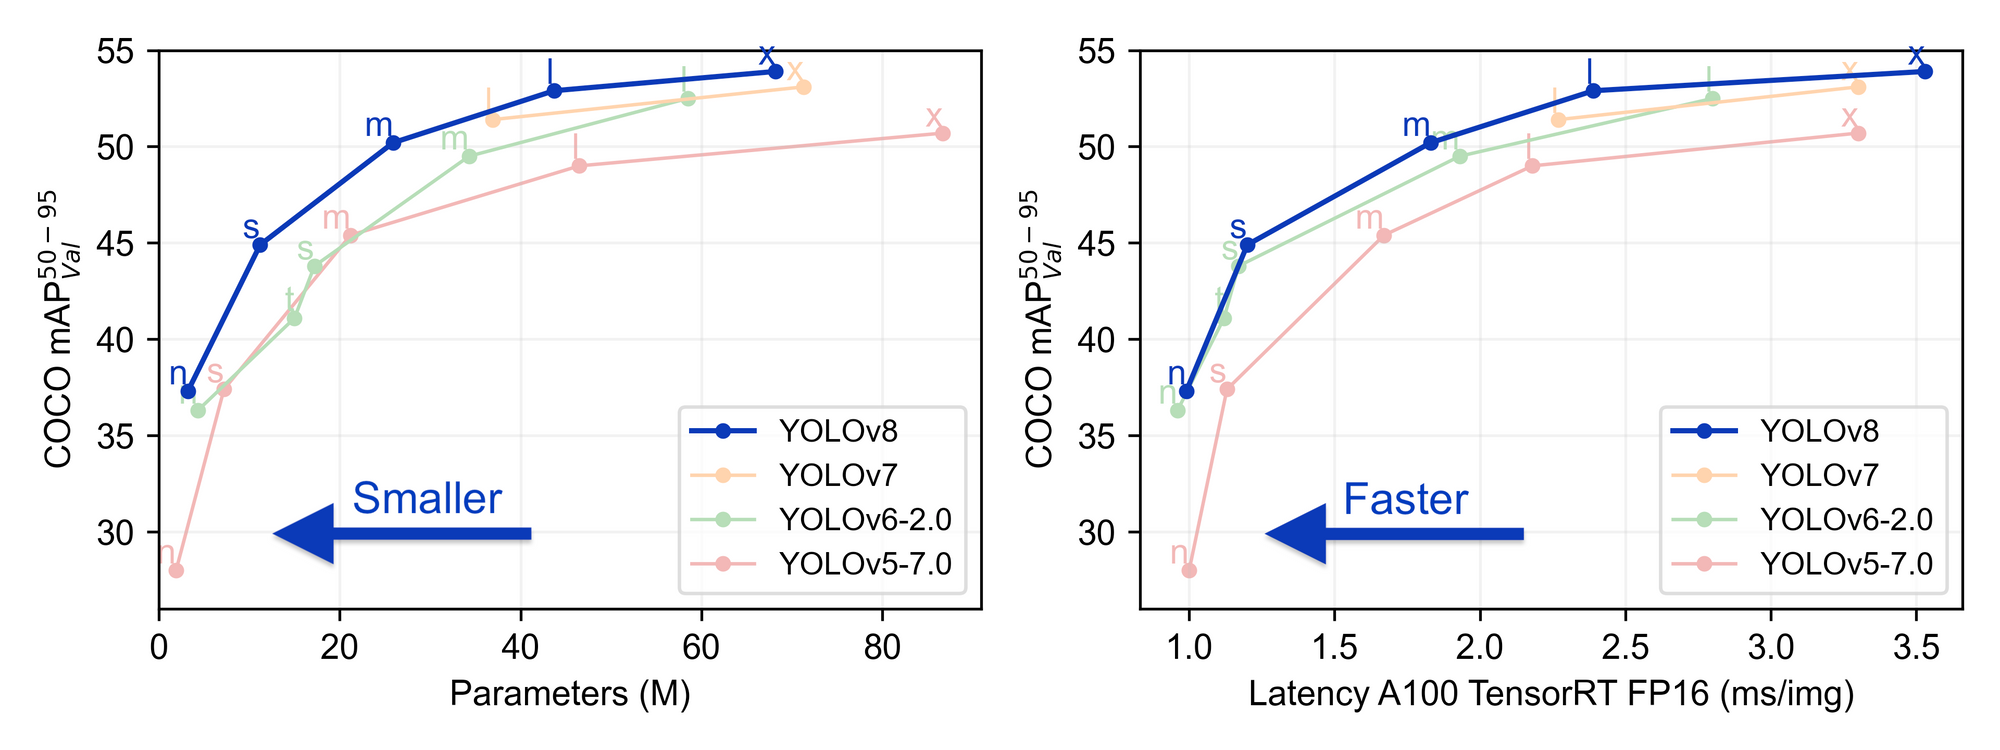
YOLOv8 is the latest object detection model from the YOLO family and Ultralytics. YOLOv8 offers SOTA object detection in a package that has been significantly simplified to use compared to previous iterations. Additionally, YOLOv8 represents a significant step forward in detection accuracy.
To learn more about YOLOv8, be sure to read some of the other pieces on this blog covering the topic:
- https://blog.paperspace.com/damaged-car-parts-detection-using-yolov8n-an-end-t/
- https://blog.paperspace.com/yolov8/
How to run the application
We have made the application available for anyone on Github, and from there, it is simple to launch a Gradient Notebook to run the app. Alternatively, we can launch the application in a stand alone deployment, and turn this into a proper API.
Run it in a Notebook
Bring this project to life
To run the application in a Gradient Notebook, first click the Run on Gradient link here or at the top of the page. This will open the YOLO Notebook on a Free GPU machine.
Once in the Notebook, navigate to the first code cell and execute it to install the dependencies:
!pip install -r requirements.txtThen execute the following cell to spin up the application. Click the live link to access the app on any web browser!
!python app-final.pyRun it in a Deployment
To deploy this application with Gradient, we simply need to fill in the required values in the Deployment creation page. Open up the Gradient console, and navigate to the deployments tab. Hit 'Create' to start a new Deployment.
From this page, we can fill in the spec so that it holds the following values:
enabled: true
image: paperspace/yolo:v1.01
port: 7860
command:
  - python
  - app-final.py
env:
  - name: GRADIO_SERVER_NAME
    value: 0.0.0.0
resources:
  replicas: 1
  instanceType: A100-80G
Be sure to declare the environment variable GRADIO_SERVER_NAME as '0.0.0.0'. Otherwise, the application will point the server to the default value, 127.0.0.2, and the app will not function as intended.
Once we have filled in the right information, hit 'Deploy' at the bottom of the page, and you will be redirected to the Deployment's details page. Here we can get the API endpoint URL and edit the existing YAML spec, if we need to. The Deployment will take a minute or two to spin up, and we will know its ready by the green 'Ready' symbol being displayed on the page.
Application demo
Now that we have spun up the application, let's walk through its capabilities.
Label images
The first tab is the image labeling tab. Here we are able to submit images either in bulk or in single uploads. There we can name the directory to hold our data. If there is no existing directory by that name, generating labels will trigger the creation of a new directory and a data.yaml file with the corresponding paths to the training, testing, and validation images. Whichever values are in the label inputs are separated by semicolons, and will correspond to the label indexes in the data.yaml file. This will allow us to train on the images, per the required YOLOv8 file structure.
We can iteratively select images from the dropdown by uploading them with the 'Bulk upload' radio option. This will open up a file uploader and dropdown. Load the images in, refresh the dropdown, and then select each image one by one to load them into the sketchpad. Single images may also be uploaded directly by clicking on the sketchpad.
Using the sketchpad object here, we can draw over existing images to create the bounding boxes for our images. These are automatically detected. Upon generating the labels, a copy of the image is moved to the assigned split directories image folder, and a corresponding labels text file will be exported to the labels directory.
Once we are done labeling our images, we can look at them using the gallery tab.
View your images in galleries
In the Gallery tab, we can view our labeled images. The bounding boxes are not currently applied to these images, but we aim to add that feature in the future. For now, it is an effective way to see what images have been submitted to what directory.
Run training
The training tab lets us run YOLOv8 training on the images we have labeled. We can use the radio buttons and sliders to adjust the model type, number of training epochs, and batch size. The training will output the results of a validation test and the path to the best model, best.pt.
Generate predicted image and video labels
Finally, now that we have trained our model, we can use it to infer labels on inputted images and videos. The interface in the app allows for directly uploading these inputs, or they can be submitted as a URL. After running prediction, at the bottom of the page there will be the metrics output and the inputted image or video now with any detected bounding boxes overlaid.
Closing thoughts
We are hoping that this application will make it simple for anyone to get started with YOLO on Gradient. In the future, we plan to update this GUI with additional features like in-app RoboFlow dataset acquisition and live object detection on streaming video, like a webcam.
Be sure to check out our repo and add in your own suggestions!