Machine learning models can produce great results on data, but to show their full value outside the research setting they need to be deployed into production.
Within Gradient, it is easy to put our models into production as API endpoints using the functionality built into the Deployments resource. In this article, we will introduce the basics of Deployments on Gradient, and show that a model created within Gradient can be deployed in Gradient, by:
- Creating and training a TensorFlow deep learning model using Workflows
- Deploying the model using Deployments
- Sending inference data to the model and receiving the correct output
This gives us a fully specified setup that is reproducible and can be used in production, combined with Gradient's other functionality like GitHub integration and easy access to GPUs.
We can also bring our own models from outside of Gradient and use them within Deployments.
The Deployments Resource
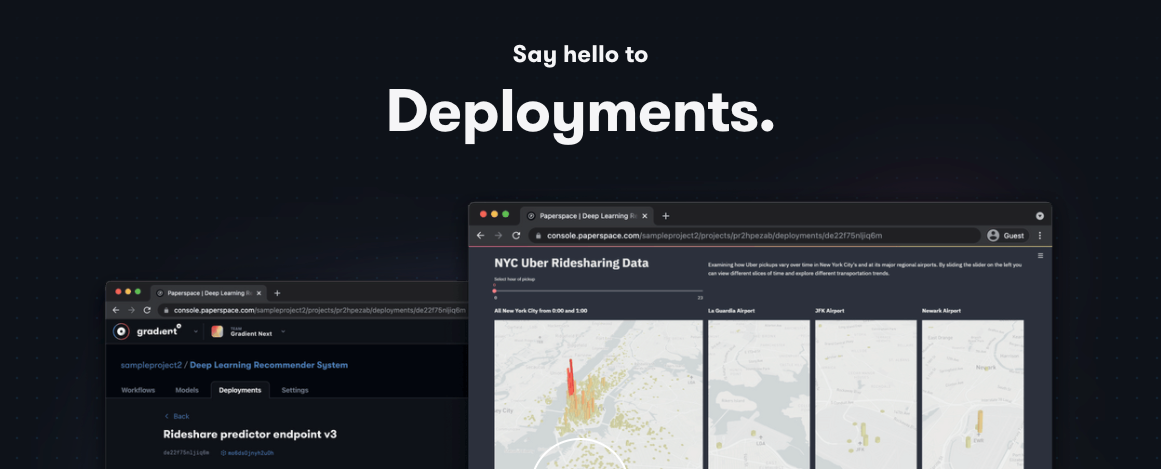
A model deployment is an instance of a trained model that can receive new data, known as inference data, and send back an appropriate response such as a prediction. An example would be to send the model an image and the model returning the correct classification of that image.
In modern production setups, models are typically deployed as a microservice, running within a container such as Docker, on a system where the containers are orchestrated, such as with Kubernetes. The model's location is on an endpoint, and the method of communicating with it is via an API, most often REST or gRPC.
Setting up this whole stack to work correctly to provide value is typically a lot of work, requiring knowledge of a large number of tools and concepts, from both software engineering and data science. By providing an existing hardware and software infrastructure, Gradient greatly lessens the burden of reaching production.
We implement the modern microservice/Docker/Kubernetes structure described above, and provide integration with our Workflows so that, as a user, we can reduce deployment to simply saying what model we want to deploy. We can also specify our own container if the model comes from outside of our Workflows.
Models can be from prominent machine learning (ML) frameworks such as TensorFlow, or generic, such as ONNX.
Workflow-Deployment-Inference Example
For our example, we will perform these 3 steps:
- Train a small deep learning model on the Fashion-MNIST dataset using TensorFlow 2.6.
- Deploy this model using the TensorFlow TFServing Docker container
- Send inference data to the model and check the model's predictions
Step 1: Train the model using Workflows
Our purpose here is to demonstrate that Workflows and Deployments work end-to-end on Gradient for a widely-used ML library, so we are building a simple model on a well-known dataset rather than anything large or complicated. The code is quite similar to TensorFlow's Basic classification tutorial, but we use Workflows and Deployments respectively to train and deploy the model.
The Workflow for step 1 clones the GitHub repository from our gradient-ai space, trains the model with the simple hyperparameters specified, and outputs it as a versioned Gradient Dataset. The training runs on our TensorFlow Docker container.
The training portion of the Workflow looks like this:
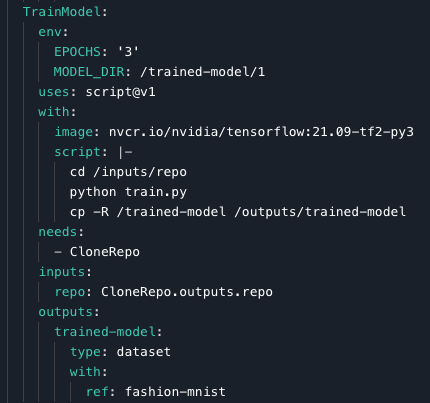
We can see that the model is trained for 3 epochs (the other hyperparameters are left on default), using the train.py script from our repository, then run on our TensorFlow container, and output to the Dataset trained-model.
The model upload portion of the Workflow looks like this:
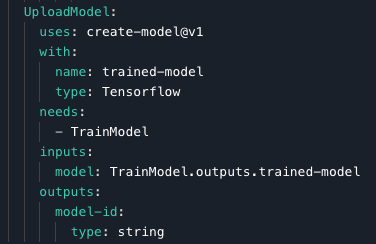
We generate a unique model ID, and use the Gradient Action create-model@v1, part of our integration of models with Workflows. The result is that the model is placed in our Model Registry, and we can see it in Gradient:
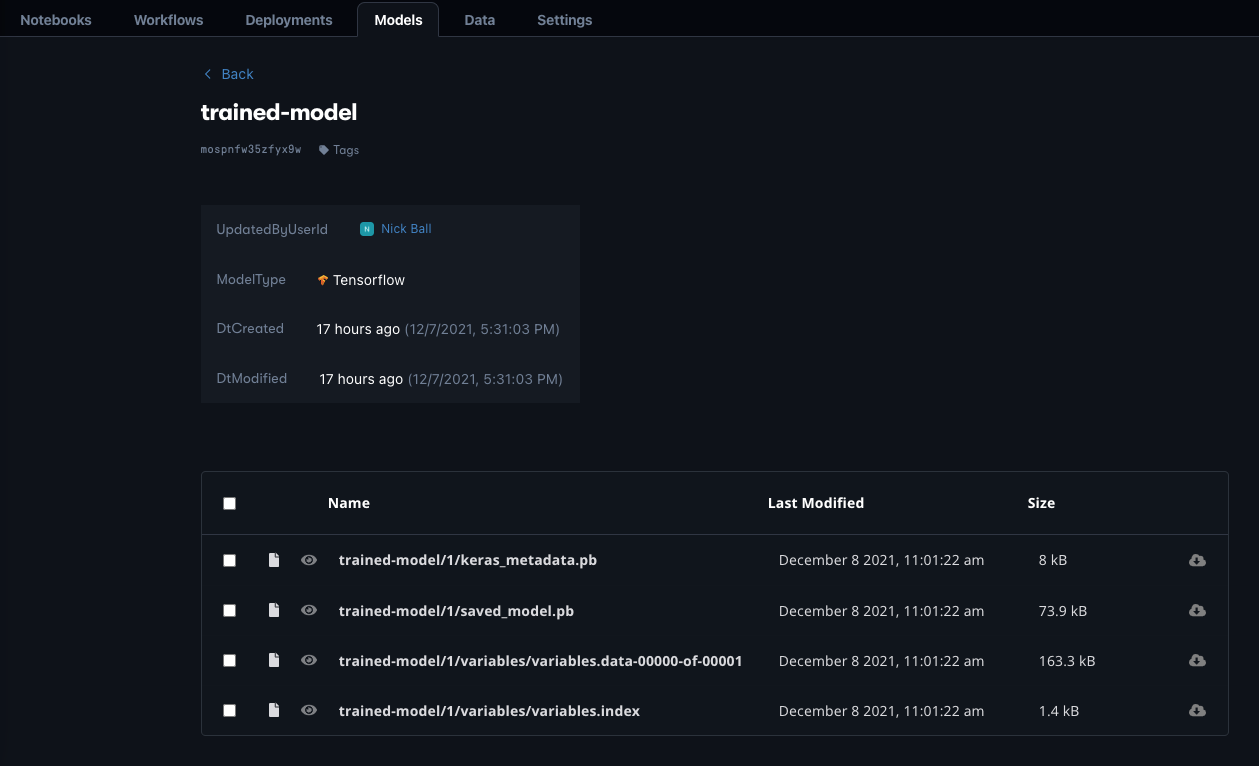
We can see the files within it, its version (1), its unique ID, and that Gradient recognizes it as a TensorFlow model. We can upload our own models to the Model Registry as well.
To view the full Workflow, and the train.py script that it calls to do the model training, see the GitHub repository for this project.
Bring this project to life
Step 2: Deploy the model using Deployments
In the Gradient GUI, Deployments live under the tab of the same name, which can be seen in the above screenshot of the trained model. For now, the best way to create the Deployment for this model is to use gradient in the command line interface:
gradient deployments create \
  --name fashion-mnist \
  --projectId pqrstuvwx \
  --spec fashion-mnist-deployment-spec.yaml
To create our API endpoint, we use the deployments command with the subcommand create, give the model a name of fashion-mnist, specify the project ID pqrstuvwx (yours would be different), and a YAML file of the model specification fashion-mnist-deployment-spec.yaml.
The YAML file works in much the same way as for Workflows, and indeed a Workflow is auto-generated and used to launch the Deployment. The YAML looks like this:
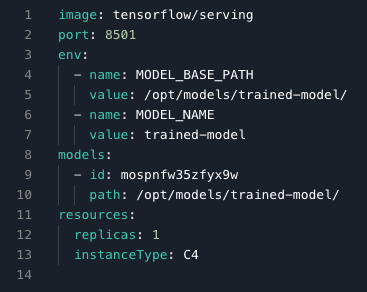
The use of a model specification reflects the fact that we can have many different models (specifications), and in turn there may be many instances of these deployed (runs).
We are using the latest TensorFlow TFServing Docker image tensorflow/serving, the REST API on port 8501 (gRPC is also available, typically on port 8500), the unique ID of the model, its location in the container, a single replica, and our C4 CPU instance type as the hardware.
For the environment variables and paths, we have
- The model training Workflow from the previous section outputs to
data/$MODEL_DIR=data/my-trained-model/1/ - In the Paperspace deployment we put the registered model in
path=/opt/models/trained-model/ - TFServing knows where this is via its
MODEL_BASE_PATH=/opt/models/trained-model/ - The location of the particular model under this is
MODEL_NAME=trained-model/and it automatically looks for the subdirectories1/, 2/etc. So here it is looking forsaved_model.pbunder$MODEL_BASE_PATH/$MODEL_NAME/1/saved_model.pb.
This looks a bit complicated at first, but it allows for larger and more powerful production setups with many models, and other necessities such as pre- and post-processing.
In the GUI, the deployment looks like this:
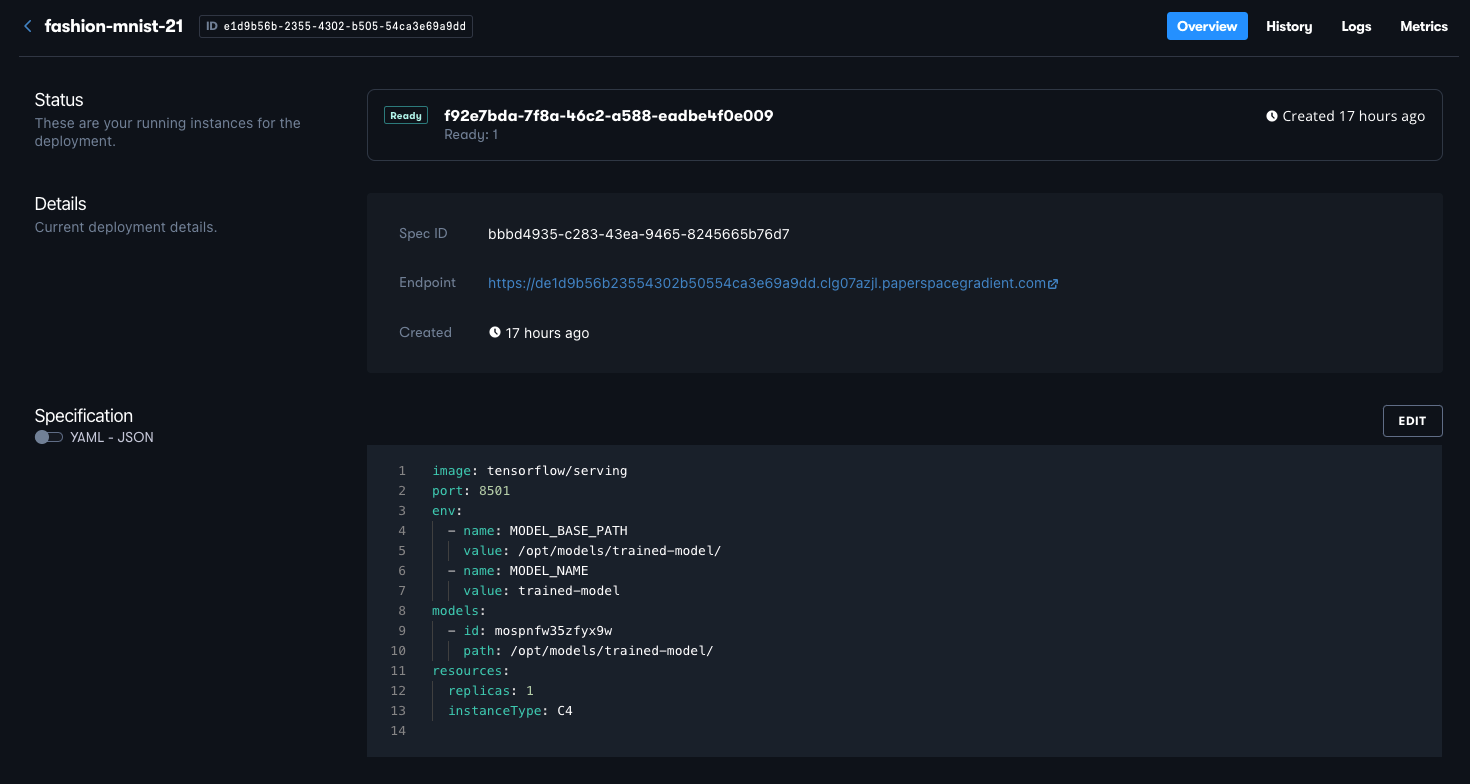
Here we can see that other information such as the deployment metrics are also available. Currently, these are system metrics; full model monitoring for performance and drift is forthcoming.
Step 3: Send inference data to the model
Once the model has been deployed to an endpoint, inference data can be sent to it. This can potentially be done in several different ways, including using the command line, Notebook SDK, or Workflow.
Here we use a Workflow so that it is easy to send data in the correct form, Fashion-MNIST images, and see the model's correct response. The inference data is loaded, followed by the lines to send them to the model for 5 images:
data = json.dumps({"signature_name": "serving_default", "instances": test_images[0:5].tolist()})
headers = {"content-type": "application/json"}
json_response = requests.post(SERVE_URL, data=data, headers=headers)
predictions = json.loads(json_response.text)['predictions']
We are using the REST API via POST, but gRPC could be used in the same way just by changing the code lines as needed.
For the data here, there are known ground truth labels, so we can compare the model's predictions to the true classes to see if they are correct:
# Script
for i in range(0,5):
  print('\nThe model predicted this as a {}, and it was actually a {}'.format(class_names[np.argmax(predictions[i])], class_names[test_labels[i]]))

# Output
The model predicted this as a Ankle boot, and it was actually a Ankle boot
The model predicted this as a Pullover, and it was actually a Pullover
The model predicted this as a Trouser, and it was actually a Trouser
The model predicted this as a Trouser, and it was actually a Trouser
The model predicted this as a Shirt, and it was actually a Shirt
Fashion-MNIST is fairly easy to get high accuracy on, so even with our small model the predictions are correct, as expected.
Besides viewing it in our log, the output from a model deployed on an endpoint in this way is generically accessible, and so it can be both used at larger scale and directed as appropriate to the next stage in our production setup. This could be post-processing, model monitoring, taking action on the outputs, an app, or something else.
Conclusions
We have shown that in Gradient we can
- Train a small deep learning model on the Fashion-MNIST dataset using TensorFlow 2.6.
- Deploy this model using the TensorFlow TFServing Docker container
- Send inference data to the model and receive correct results
Note: the thing we didn't do in this blog entry, which is set up any infrastructure! The necessary setup to run our Workflows, put our Deployment on an endpoint, send the inference data, and orchestrate everything, was all in place already.
Next Steps
We plan to show more Gradient Deployments functionality in future posts, such as canary deployments, model metrics, and triggering model redeployment via our integration between Gradient Projects and GitHub repositories.
Now that you have read this blog entry, you can:
- Try Deployments out for yourself, via this project's GitHub repository
- See our documentation
- Create and run your own Deployments
See you next time!