The styling of images to create modern and unique art has always been a perspective of interest for a few centuries. The type of art one was able to generate with their skills and mixture of artistic styles bound an intrigue amount audiences and enthusiasts of the field and other business contractors. The creative works of art such as paintings, sculptures, model designing, architecture designing, and other works of art were sold for high-profit margins at auctions since the renaissance. However, as of recently, Artificial Intelligence has emerged to be one of the unique ways of image styling, designing, and working with art.
There is a wide range of unique tasks in the field of art that AI can successfully accomplish. In our previous articles, we have looked into the working procedures of Generative Adversarial Networks (GANs). We have explored the capabilities of these competing neural networks to engage against each other while consistently improving to produce high-quality results. An example is the face generation with GANs, where we are creating realistic faces of humans that have never existed. You can check out this article from the following link.
In this article, we will cover the introduction to some of the underlying concepts behind the approach. We will then proceed to breakdown neural style transfer along with the basic conceptual understanding of this algorithm. We will develop a simple project using this neural style transfer method. For the development of this project, we will discuss two methods. In the first method, we will develop the entire architectural build of neural style transfer from scratch. In the second method, we will use a pre-trained model that is available in TensorFlow Hub to obtained the desired results.
Introduction:
One of the most fun applications of artificial intelligence recently is the art of neural style transfer. We can generate unique artwork by mixing up two or more images together to create something new and creative. There has been tremendous improvement in the fields of face recognition and object detection, where techniques such as one-shot learning are employed to obtain the best results with ease. However, until recently, there wasn't a lot of attention paid to the artistic innovations that were possible with neural networks. In 2015, with the introduction of "A Neural Algorithm of Artistic Style" research paper, the scene of artworks with AI and deep learning blew up.
We are introduced to a class of deep neural networks that can effectively compute most image processing tasks in the convolutional neural networks. They consist of layers of small computational units with which they can process visual information hierarchically in a feed-forward manner. Each of the layers of a convolutional neural network contains several of these computational units where they have a collection of image filters, each of which extracts a certain feature from the input image. We will discuss more on the methodology of its working in the next section of this article.
For following along with the rest of the article, working with deep learning frameworks such as TensorFlow and Keras is an essential requirement. If the viewer doesn't have detailed information on any of these libraries, I would recommend checking them out from two of my previous blogs that cover these entire topics in enormous detail. The viewers can check out the TensorFlow article from this link and the Keras blog from the following link. In the next section, we will proceed to understand the methodology of the working of the neural style transfer model and most of the significant concepts related to it.
Understanding Neural Style Transfer:
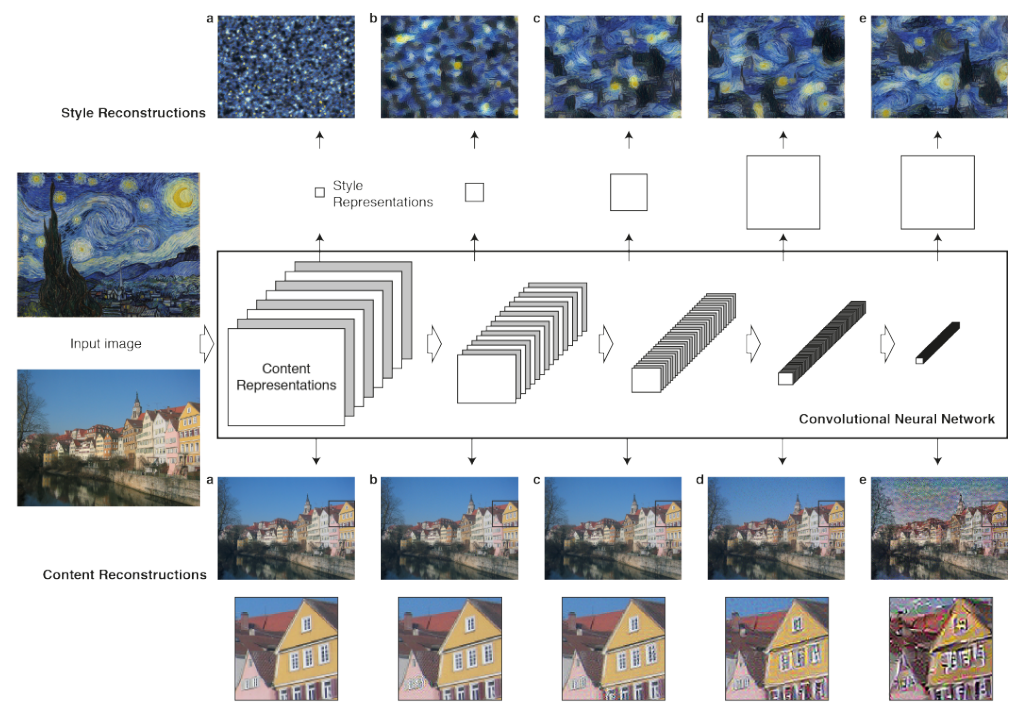
For the generation of a neural style transfer image, we usually have three main essential components. One of the components is the primary image, which functions as the "Content" image, upon which we might add the modification. It is the base upon which we will add the desired artwork. The modification picture is the second component of the neural style transfer model, referred to as the "Style" image. The Style is the flavor or variation that you can add to the Content, leading to the creation of a new picture. This new image formed by the neural style transfer algorithm utilizing the components of the "Content" and "Style" is called the "Generated" image.
Each of these three major components can be denoted with their starting letters. The "Content" (c) is the base upon which we will add the modification of art, the "Style" (s) refers to the addition of a new design to the primary image. And finally, we have the "Generated" (g) image, which is the resulting component of the mixture of the "Content" (c) and "Style" (s). In the above image representation, we can notice that the buildings act as the "Content" (c), whereas the other image of Van Gogh Starry Night is "Style" (s) that we will combine together to create a new combination of "Generated" (g) image.
The approach we utilize for solving this problem is with the help of deep conv nets, especially the VGG-19 transfer learning model. There will be three parameters that will be sent through the VGG-19 model, namely the original image, the content image, and the generated image. The generated image is initially initialized as the noise. After the training process, we want this generated image to become similar to the combination of the content and style pictures. While passing our input to the VGG-19 layers, we will ensure that we remove the output and dense layers so that it is a fully connected dense conv net containing only convolutional layers and pooling layers.

The output of the dense conv net is passed through the total loss function. The above image shows an accurate representation of this loss function. The total loss function is equal to the sum of the loss of the content image and the style image, where the alpha and beta represent the hyperparameters. For a more detailed analysis and understanding of neural style transfer, I would recommend looking into the following research paper.
Developing Neural Style Transfer Project From Scratch:
In this section of the article, we will uncover one of the first methods to construct the neural style transfer project. We will perform the actions for the construction of this project from scratch. We will import the essential libraries, perform the image manipulations, create the total loss function, develop the convolutional neural network, and create the training loop.
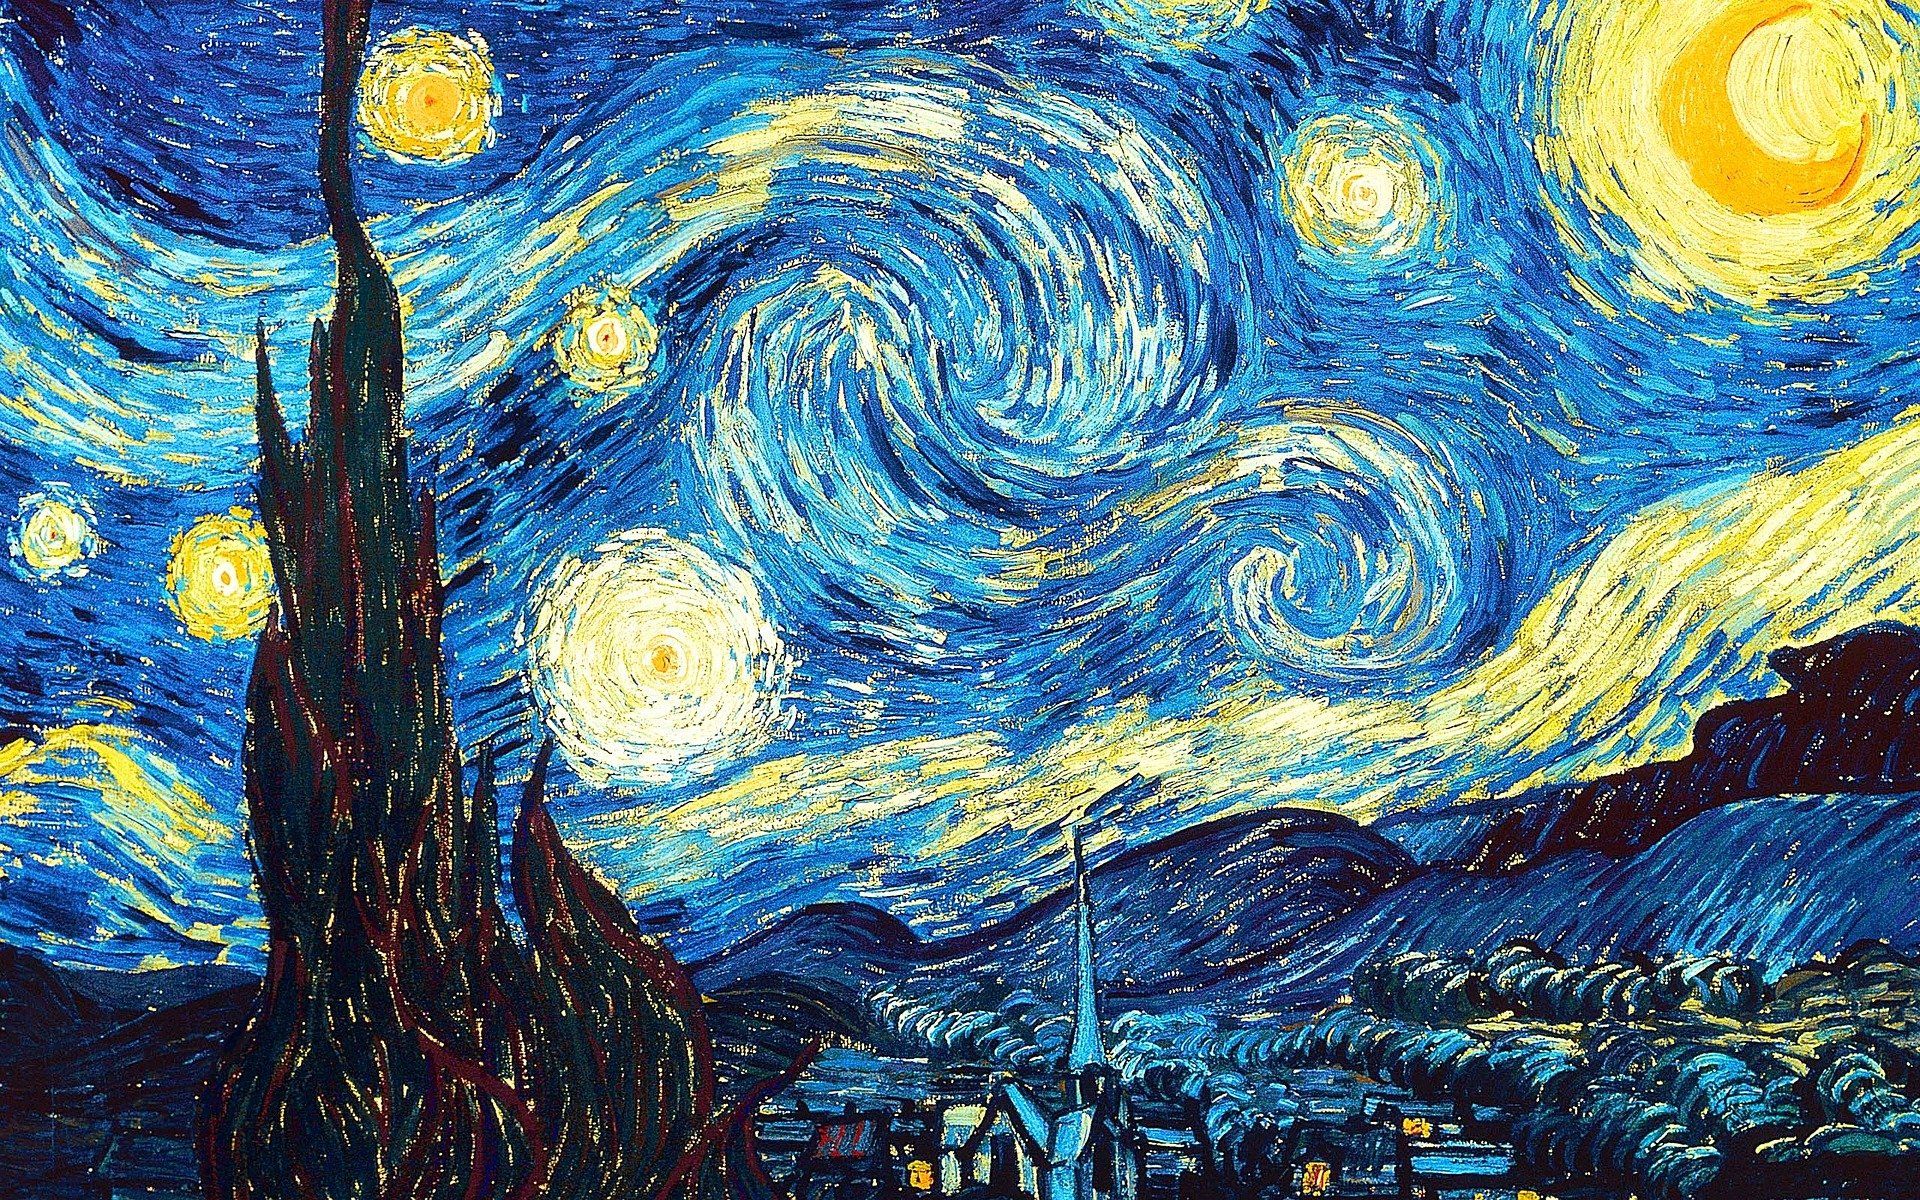
The references we will utilize for the development of this project are the official websites of Keras and TensorFlow. For the style image, we will use the Van Gogh Starry Night image for both sections of constructing this project. The below image shows the representation of the Starry Night style. You can download and use any content and style image of your choice.
Importing the essential libraries:
For getting started with the project, we will import all the essential libraries required for the computation of this project. We will import the TensorFlow and Keras deep learning frameworks for building the neural style transfer model. We will import the VGG-19 transfer learning model for the feature extraction procedure. To learn more about transfer learning, I would recommend checking out the following links for my previous articles - "A Complete Intuitive Guide To Transfer Learning (Part 1)" and "A Complete Practical Guide to Transfer Learning (Part 2)." We will also import the numpy library for performing the numerical operations.
import tensorflow as tf
from tensorflow import keras
from tensorflow.keras.applications import vgg19
import numpy as np
Once we finish successfully importing the essential libraries, we can proceed to Define the required parameters. We will set the paths for the three paramount components, namely the path to the content, style, and generated images. All these three parameters need to be passed through our deep convolutional network for achieving the desired result. We will also set some of the hyperparameters, such as the content weight and style weight. Finally, we will also set some of the dimension requirements for the generated images. Below is the code snippet for performing the following actions.
base_image_path = keras.utils.get_file("paris.jpg", "https://i.imgur.com/F28w3Ac.jpg")
style_reference_image_path = keras.utils.get_file("starry_night.jpg", "https://i.imgur.com/9ooB60I.jpg")
result_prefix = "paris_generated"

# Weights of the different loss components
total_variation_weight = 1e-6
style_weight = 1e-6
content_weight = 2.5e-8

# Dimensions of the generated picture.
width, height = keras.preprocessing.image.load_img(base_image_path).size
img_nrows = 400
img_ncols = int(width * img_nrows / height)
Image Manipulations:
The next step after importing the required libraries and image paths is to ensure to define some functions for pre-processing the images accordingly. We will construct two functions. The first function is to pre-process the images and load them accordingly with the help of the VGG-19 transfer learning model. We will convert the images into a tensor format capable of computing the required operations as desired. We will also build a function to recreate the pre-processed image once all the required computations have been performed as desired. Below is the code snippet for performing both these actions.
def preprocess_image(image_path):
    # Util function to open, resize and format pictures into appropriate tensors
    img = keras.preprocessing.image.load_img(
        image_path, target_size=(img_nrows, img_ncols)
    )
    img = keras.preprocessing.image.img_to_array(img)
    img = np.expand_dims(img, axis=0)
    img = vgg19.preprocess_input(img)
    return tf.convert_to_tensor(img)


def deprocess_image(x):
    # Util function to convert a tensor into a valid image
    x = x.reshape((img_nrows, img_ncols, 3))
    # Remove zero-center by mean pixel
    x[:, :, 0] += 103.939
    x[:, :, 1] += 116.779
    x[:, :, 2] += 123.68
    # 'BGR'->'RGB'
    x = x[:, :, ::-1]
    x = np.clip(x, 0, 255).astype("uint8")
    return x
Creating the total loss function:
The next step is to create the total loss function, which will be a combination of the content loss and the style loss. The significance of the following loss function is as defined in the previous section. In the below code snippet, we are defining four functions that will be paramount to compute the overall loss. The gram matrix function is used for computing the style loss.
The style loss function keeps the generated image close to the local textures of the style reference image, while the content loss function keeps the high-level representation of the generated image close to that of the base image. The total loss function is used to keep the generated locally coherent, which means we want to keep the loss in a logically consistent way.
def gram_matrix(x):
	# The gram matrix of an image tensor (feature-wise outer product)
    x = tf.transpose(x, (2, 0, 1))
    features = tf.reshape(x, (tf.shape(x)[0], -1))
    gram = tf.matmul(features, tf.transpose(features))
    return gram

def style_loss(style, combination):
    S = gram_matrix(style)
    C = gram_matrix(combination)
    channels = 3
    size = img_nrows * img_ncols
    return tf.reduce_sum(tf.square(S - C)) / (4.0 * (channels ** 2) * (size ** 2))

def content_loss(base, combination):
    return tf.reduce_sum(tf.square(combination - base))

def total_variation_loss(x):
    a = tf.square(x[:, : img_nrows - 1, : img_ncols - 1, :] - x[:, 1:, : img_ncols - 1, :])
    b = tf.square(x[:, : img_nrows - 1, : img_ncols - 1, :] - x[:, : img_nrows - 1, 1:, :])
    return tf.reduce_sum(tf.pow(a + b, 1.25))
Developing the deep convolutional network:
Once we finish defining our total loss function accordingly, we can proceed to create and develop the entire architecture of the deep convolutional network required for completing the task of neural style transfer. Similar to the architecture discussed in the previous section, we will utilize the VGG-19 architecture, which will contain the five essential convolutional blocks required for this project.
The fully connected layers are ignored and discarded in this transfer learning architecture. We will utilize the deep convolutional network with only convolution layers and pooling layers. Once the features are extracted, the output of this network will be passed with the appropriate loss function, which is a combination of the content and the style loss.
# Build a VGG19 model loaded with pre-trained ImageNet weights
model = vgg19.VGG19(weights="imagenet", include_top=False)

# Get the symbolic outputs of each "key" layer (we gave them unique names).
outputs_dict = dict([(layer.name, layer.output) for layer in model.layers])

# Set up a model that returns the activation values for every layer in
# VGG19 (as a dict).
feature_extractor = keras.Model(inputs=model.inputs, outputs=outputs_dict)

# List of layers to use for the style loss.
style_layer_names = [
    "block1_conv1",
    "block2_conv1",
    "block3_conv1",
    "block4_conv1",
    "block5_conv1",
]
# The layer to use for the content loss.
content_layer_name = "block5_conv2"


def compute_loss(combination_image, base_image, style_reference_image):
    input_tensor = tf.concat(
        [base_image, style_reference_image, combination_image], axis=0
    )
    features = feature_extractor(input_tensor)

    # Initialize the loss
    loss = tf.zeros(shape=())

    # Add content loss
    layer_features = features[content_layer_name]
    base_image_features = layer_features[0, :, :, :]
    combination_features = layer_features[2, :, :, :]
    loss = loss + content_weight * content_loss(
        base_image_features, combination_features
    )
    # Add style loss
    for layer_name in style_layer_names:
        layer_features = features[layer_name]
        style_reference_features = layer_features[1, :, :, :]
        combination_features = layer_features[2, :, :, :]
        sl = style_loss(style_reference_features, combination_features)
        loss += (style_weight / len(style_layer_names)) * sl

    # Add total variation loss
    loss += total_variation_weight * total_variation_loss(combination_image)
    return loss
Creating the training loop:
The final step we will perform in part-1 of the development of neural style transfer models from scratch is the creation of the training loop. The first step involved in building this section is by creating the decorator training loop. Once we create the decorator function, our task will be to define the optimizer. We will use the stochastic gradient descent optimizer with a learning rate and momentum for this project.
We will then proceed to pre-process and load all the three required images for the training process. Finally, we will begin to train the loop for around 2000 iterations. You can choose to train the following neural style transfer for more epochs and iterations if you want. We will also ensure that once the training process is complete, we will proceed to recreate the generated image using the de-process image function that we have previously defined. You can run the entire project of the Gradient Platform on Paperspace.
Bring this project to life
@tf.function
def compute_loss_and_grads(combination_image, base_image, style_reference_image):
    with tf.GradientTape() as tape:
        loss = compute_loss(combination_image, base_image, style_reference_image)
    grads = tape.gradient(loss, combination_image)
    return loss, grads

optimizer = keras.optimizers.SGD(
    keras.optimizers.schedules.ExponentialDecay(
        initial_learning_rate=100.0, decay_steps=100, decay_rate=0.96
    )
)

base_image = preprocess_image(base_image_path)
style_reference_image = preprocess_image(style_reference_image_path)
combination_image = tf.Variable(preprocess_image(base_image_path))

iterations = 2000
for i in range(1, iterations + 1):
    loss, grads = compute_loss_and_grads(
        combination_image, base_image, style_reference_image
    )
    optimizer.apply_gradients([(grads, combination_image)])
    if i % 100 == 0:
        print("Iteration %d: loss=%.2f" % (i, loss))
        img = deprocess_image(combination_image.numpy())
        fname = result_prefix + "_at_iteration_%d.png" % i
        keras.preprocessing.image.save_img(fname, img)
Output:
Iteration 100: loss=11024.51
Iteration 200: loss=8518.99
.
.
.
Iteration 1900: loss=5496.66
Iteration 2000: loss=5468.01
Once the training is completed, ensure that you check the results. You can choose to run the following program for an increased number of iterations and epochs to reduce the loss and generate an even better result.
In the next section of this article, we will cover how to develop the same project more directly with lesser code requirements using TensorFlow Hub. However, it is always best to understand the detailed working of most architectural neural network builds to gain a more intuitive understanding.
Developing Neural Style Transfer with TensorFlow Hub:
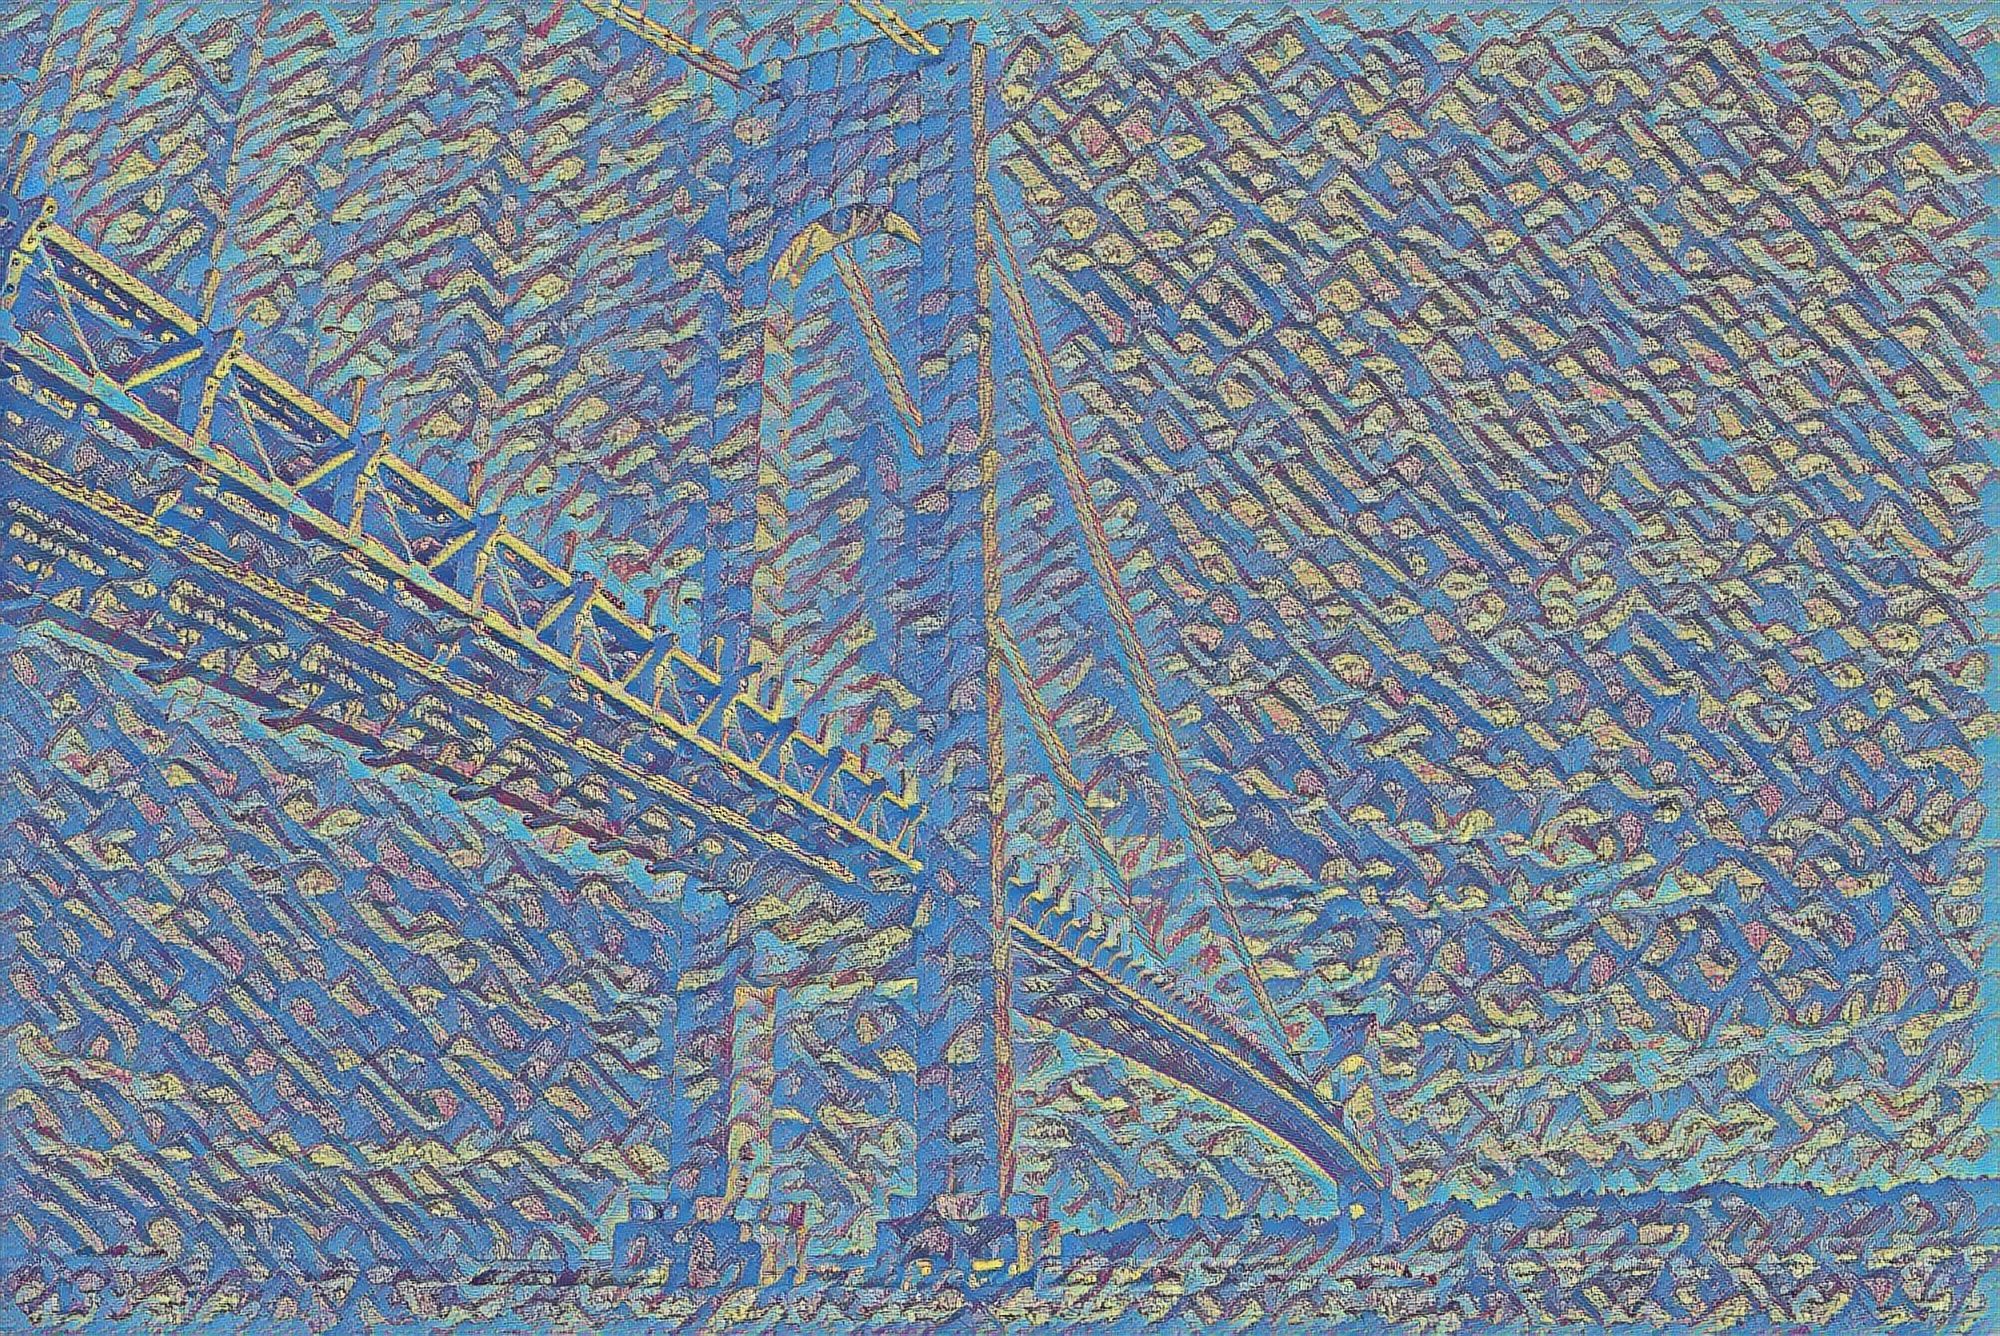
Now that we have understood how to construct neural style transfer models from scratch with the help of TensorFlow and Keras, let us look into one of the simpler methods to compute such a project. I would recommend learning the construction of the neural style transfer algorithm from scratch before proceeding to the TensorFlow-Hub pre-trained model method. For this experiment, we will utilize the below picture of a bridge to act as our content image, while we will make use of the Van Gogh Starry Night image to perform as the style image to generate a new stylized generated image.

Before we proceed with constructing our project, let us understand what TensorFlow Hub exactly is. TensorFlow Hub consists of a bunch of pre-trained deep learning models for a variety of tasks such as BERT, Faster R-CNN, and so much more that we can reuse over and over again to generate results quickly for particular purposes. For the available models, you can fine-tune them accordingly and deploy them anywhere for performing the specific task. For further information on this topic, check out the official landing page of TensorFlow Hub, where you can construct projects on natural language processing, object detection, style transfer, and so much more.
Importing the essential libraries:
The first step is to import all the essential libraries that we will utilize for the construction of this project. We will load the TensorFlow deep learning framework along with the TensorFlow Hub for accessing the pre-trained neural style transfer model. We will also import the matplotlib library to visualize the output of the generated images. You can also visualize the content or style images accordingly. The numpy library will help us to squeeze the dimensions of the generated images so that the matplotlib library can access the generated picture. Finally, we will import the computer vision cv2 library for exporting and saving the generated image if required.
import tensorflow as tf
import tensorflow_hub as hub
import matplotlib.pyplot as plt
import numpy as np
import cv2
After importing all the required libraries, we can also access the pre-trained neural style transfer model from TensorFlow Hub. The model link variable represents the link to the TensorFlow Hub website that contains the path to the stored and trained neural style transfer model. The NST model variable will load the respective link with which we can access and perform the action of applying the neural style transfer algorithm directly without too many coding requirements. Below is the code snippet for accessing the pre-trained model.
# Access the pre-trained model from TensorFlow-Hub

model_link = "https://tfhub.dev/google/magenta/arbitrary-image-stylization-v1-256/2"
NST_model = hub.load(model_link)
Passing and interpreting the data:
In the next code snippet, we will create a function to obtain the data, load them, and operate on them accordingly. The following function will read the image path to the saved images in the respective directory. We will then detect and decode the particular image, convert it into our desired data type, and expand the dimension. Finally, the function returns the operated image. We will use the constructed function for loading, accessing, and operating on both the content and style images.
# Function to load and operate on the content and style images

def get_data(img_path):
    img = tf.io.read_file(img_path)
    img = tf.image.decode_image(img, channels=3)
    img = tf.image.convert_image_dtype(img, tf.float32)
    img = img[tf.newaxis, :]
    return img
Let us load the content and style images in the next code block. I have labeled the above image as 'Bridge' stored in the .jfif format, which will act as the content image, and Van Gogh Starry Night as stored as 'Style Image' in the .jpg format will act as the style image. We will use these two entities to create a newly generated image with the neural style transfer model.
content_image = get_data('Bridge.jfif')
style_image = get_data('Style Image.jpg')
Obtaining results through the loaded model:
Finally, we can proceed to generate the new image that will be performed by the loaded pre-trained neural style transfer model. We need to pass the two primary parameters to the model to evaluate them and generate a resulting image. We will pass the content image (the bridge) as the first parameter and the style image (Van Gogh Starry Night) as the second parameter. We will store the resulting picture in the generated image variable. Below is the code block that will perform the following action.
generated_image = NST_model(tf.constant(content_image), tf.constant(style_image))[0]You can make use of the matplotlib library to visualize the generated image and the numpy library to squeeze the dimensions for visualization purposes. If you want to save the image, you can make use of the computer vision cv2 library and write the generated image into a directory you want to save with a file extension of either .png, .jpg, .jpeg, or any other similar format. Below is the generated image that I was able to achieve upon running the pre-trained neural style transfer model from TensorFlow Hub. It is recommended to try out numerous combinations with different content images and style images for generating unique pictures and artistic works.
Conclusion:
In this article, we covered most of the essential concepts required for understanding the neural style transfer algorithm. We understood the basic conceptual knowledge of how exactly these neural networks work. After gaining a detailed description of this concept, we looked into two methods of constructing a project with neural style transfer. In the first method, we constructed the entire architecture from scratch and used the model obtained to evaluate and generate the modified images. In the second method, we made use of a pre-trained model from TensorFlow Hub for generating a combination of two pictures to create a newly generated image.
These sets of deep learning networks, which work with the help of two primary constituents, namely the content picture and the style picture, when combined together produce a generated image. We can generate a bunch of unique stylish artworks with these neural networks. It is highly recommended that the viewers experiment with different types of Content and Styles accordingly to generate new variations. There are numerous possibilities of interpretations for these neural network models, and you could end up generating something that is extremely aesthetically soothing and visually pleasing.
In future articles, we will cover topics such as WGANs, transformers, neural networks from scratch, reinforcement learning, and so much more. Until then, I would highly recommend experimenting with the neural style transfer algorithm and keep creating your own artistic generations and keep exploring!