[12/2/2021 Update: This article contains information about Gradient Experiments. Experiments are now deprecated, and Gradient Workflows has replaced its functionality. Please see the Workflows docs for more information.]
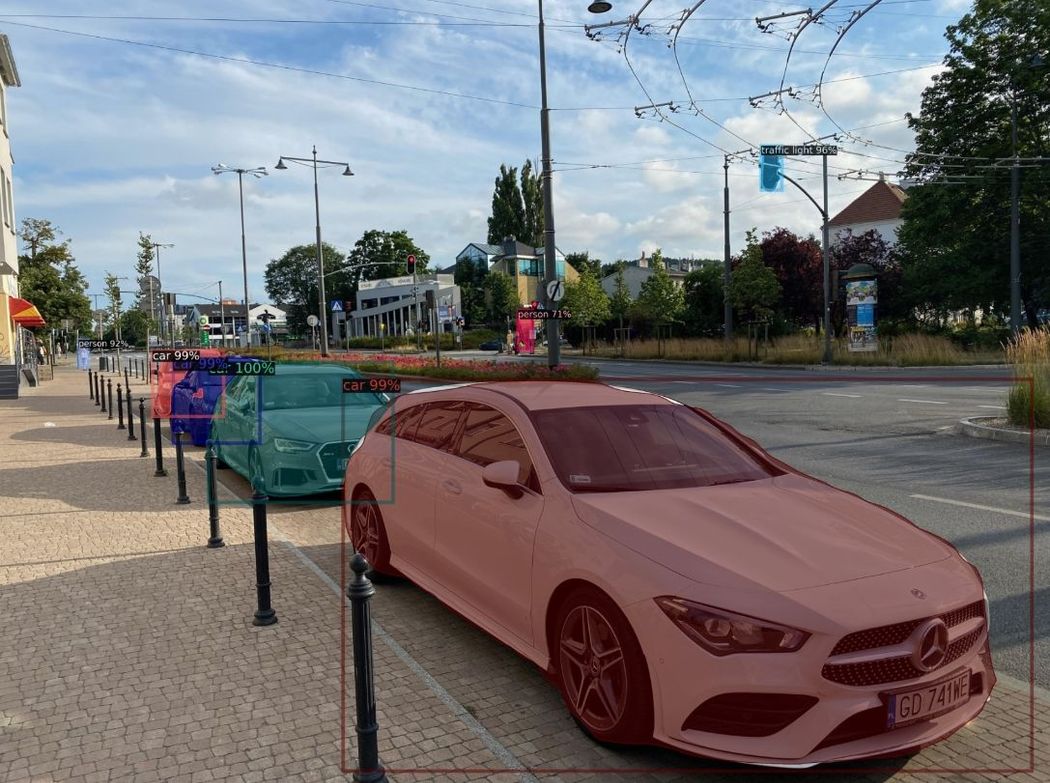
In this post, we will show you how to train Detectron2 on Gradient to detect custom objects ie Flowers on Gradient. We will show you how to label custom dataset and how to retrain your model. After we train it we will try to launch a inference server with API on Gradient.
Reference Repo https://github.com/Paperspace/object-detection-segmentation
Article Outline
- Overview of Detectron2
- Overview of building your custom dataset
- How to label your custom dataset
- Register custom Detectron2 object detection data
- Run Detectron2 training on Gradient
- Run Detectron2 inference on Gradient
Overview of Detectron2
Detectron2 is a popular PyTorch based modular computer vision model library. It is the second iteration of Detectron, originally written in Caffe2. The Detectron2 system allows you to plug in custom state of the art computer vision technologies into your workflow. Quoting the Detectron2 release blog:
Detectron2 includes all the models that were available in the original Detectron, such as Faster R-CNN, Mask R-CNN, RetinaNet, and DensePose. It also features several new models, including Cascade R-CNN, Panoptic FPN, and TensorMask, and we will continue to add more algorithms. We’ve also added features such as synchronous Batch Norm and support for new datasets like LVIS
Overview of building your custom dataset
Download Dataset
https://public.roboflow.com/classification/flowers_classification
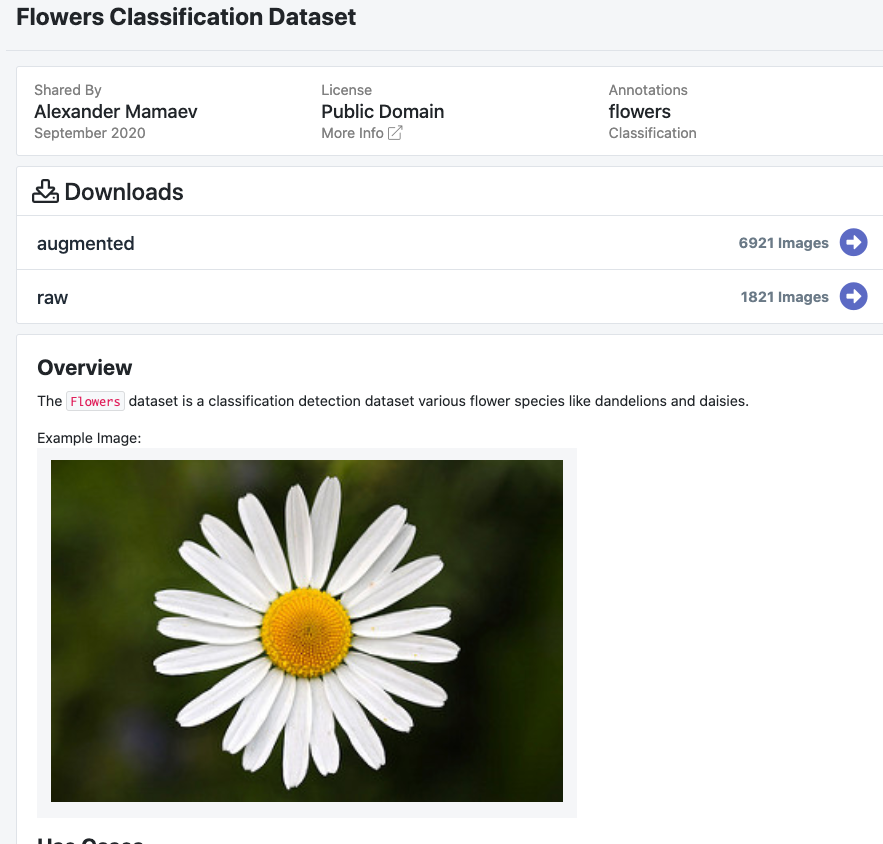
We will be training our custom Detectron2 detector on public flower detection data hosted for free at Roboflow.
The Flowers dataset is a classification detection dataset various flower species like dandelions and daisies. Notably, blood cell detection is not a capability available in Detectron2 — we need to train the underlying networks to fit our custom task.
Label your Dataset with LabelImg
https://github.com/tzutalin/labelImg
Accurately labeled data is essential to successful machine learning, and computer vision is no exception.
In this section, we’ll demonstrate how you can use LabelImg to get started with labeling your own data for object detection models.
About LabelImg
LabelImg is a free, open source tool for graphically labeling images. It’s written in Python and uses QT for its graphical interface. It’s an easy, free way to label a few hundred images to try out your next project.
Installing LabelImg
sudo apt-get install pyqt5-dev-tools
sudo pip3 install -r requirements/requirements-linux-python3.txt
make qt5py3
python3 labelImg.py
python3 labelImg.py [IMAGE_PATH] [PRE-DEFINED CLASS FILE]
Labeling Images with LabelImg
LabelImg supports labelling in VOC XML or YOLO text file format. At Paperspace, we strongly recommend you use the default VOC XML format for creating labels. Thanks to ImageNet, VOC XML is a more universal standard as it relates to object detection whereas various YOLO implementations have slightly different text file formats.
Open your desired set of images by selecting “Open Dir” on the left-hand side of LabelImg
To initiate a label, type w, and draw the intended label. Then, type ctrl (or command) S to save the label. Type d to go to the next image (and a to go back an image).
Save VOX XML into coco dataset JSON
Inside our https://github.com/Paperspace/object-detection-segmentation in datasets you will find a coco_labelme.py script that will create a COCO dataset json from the xml files we have generated earlier.
In order to run it:
python3 datasets/coco_labelme.py /path_to_your_images/ " --output="trainval.json"
Upload your custom dataset
Now we have to upload our custom dataset to s3 bucket.
Here you will find instructions on how to use AWS-CLI or web console to upload your data to S3
Register a Dataset
To let detectron2 know how to obtain a dataset named "my_dataset", users need to implement a function that returns the items in your dataset and then tell detectron2 about this function:
def my_dataset_function():
...
return list[dict] in the following format
from detectron2.data import DatasetCatalog
DatasetCatalog.register("my_dataset", my_dataset_function)
# later, to access the data:
data: List[Dict] = DatasetCatalog.get("my_dataset")
Here, the snippet associates a dataset named "my_dataset" with a function that returns the data. The function must return the same data if called multiple times. The registration stays effective until the process exits.
How to register the my_dataset dataset to detectron2, following the detectron2 custom dataset tutorial.
from detectron2.data.datasets import register_coco_instances
register_coco_instances("my_dataset", {}, "./data/trainval.json", "./data/images")
Each dataset is associated with some metadata. In our case, it is accessible by calling my_dataset_metadata = MetadataCatalog.get("my_dataset"), you will get
Metadata(evaluator_type='coco', image_root='./data/images', json_file='./data/trainval.json', name=my_dataset,
thing_classes=[‘type1’, ‘type2’, ‘type3’], thing_dataset_id_to_contiguous_id={1: 0, 2: 1, 3: 2})
To get the actual internal representation of the catalog stores information about the datasets and how to obtain them, you can call dataset_dicts = DatasetCatalog.get("my_dataset"). The internal format uses one dict to represent the annotations of one image.
To verify the data loading is correct, let's visualize the annotations of randomly selected samples in the dataset:
import random
from detectron2.utils.visualizer import Visualizer
for d in random.sample(dataset_dicts, 3):
img = cv2.imread(d["file_name"])
visualizer = Visualizer(img[:, :, ::-1], metadata=my_dataset_metadata, scale=0.5)
vis = visualizer.draw_dataset_dict(d)
cv2_imshow(vis.get_image()[:, :, ::-1])
Train the model
Now, let's fine-tune a coco-pretrained R50-FPN Mask R-CNN model on the my_dataset dataset. Depending on the complexity and size of your dataset it can take anything from 5 mins to hours.
Pretrained model can be downloaded from:
detectron2://COCO-InstanceSegmentation/mask_rcnn_R_50_FPN_3x/137849600/model_final_f10217.pkl
from detectron2.engine import DefaultTrainer
from detectron2.config import get_cfg
import os
cfg = get_cfg()
cfg.merge_from_file(
"./detectron2_repo/configs/COCO-InstanceSegmentation/mask_rcnn_R_50_FPN_3x.yaml"
)
cfg.DATASETS.TRAIN = ("my_dataset",)
cfg.DATASETS.TEST = ()
cfg.DATALOADER.NUM_WORKERS = 2
cfg.MODEL.WEIGHTS = "detectron2://COCO-InstanceSegmentation/mask_rcnn_R_50_FPN_3x/137849600/model_final_f10217.pkl"  # initialize from model zoo
cfg.SOLVER.IMS_PER_BATCH = 2
cfg.SOLVER.BASE_LR = 0.02
cfg.SOLVER.MAX_ITER = (
300
)  # 300 iterations seems good enough, but you can certainly train longer
cfg.MODEL.ROI_HEADS.BATCH_SIZE_PER_IMAGE = (
128
)  # faster, and good enough for this toy dataset
cfg.MODEL.ROI_HEADS.NUM_CLASSES = 3  # 3 classes (data, fig, hazelnut)
os.makedirs(cfg.OUTPUT_DIR, exist_ok=True)
trainer = DefaultTrainer(cfg)
trainer.resume_or_load(resume=False)
trainer.train()
Run Training on Gradient
Gradient CLI Installation
How to install Gradient CLI - docs
pip install gradient
Then make sure to obtain an API Key, and then:
gradient apiKey XXXXXXXXXXXXXXXXXXX
Train on a single GPU
Note: training on a single will take a long time, so be prepared to wait!
gradient experiments run singlenode \
--name mask_rcnn \
--projectId <some project> \
--container devopsbay/detectron2-cuda:v0 \
--machineType P4000 \
--command "sudo python training/train_net.py --config-file training/configs/mask_rcnn_R_50_FPN_1x.yaml --num-gpus 1 SOLVER.IMS_PER_BATCH 2 SOLVER.BASE_LR 0.0025 MODEL.WEIGHTS https://dl.fbaipublicfiles.com/detectron2/COCO-Detection/faster_rcnn_R_50_FPN_1x/137257794/model_final_b275ba.pkl  OUTPUT_DIR /artifacts/models/detectron" \
--workspace https://github.com/Paperspace/object-detection-segmentation.git \
--datasetName my_dataset \
--datasetUri <Link_to_your_dataset> \
--clusterId <cluster id>
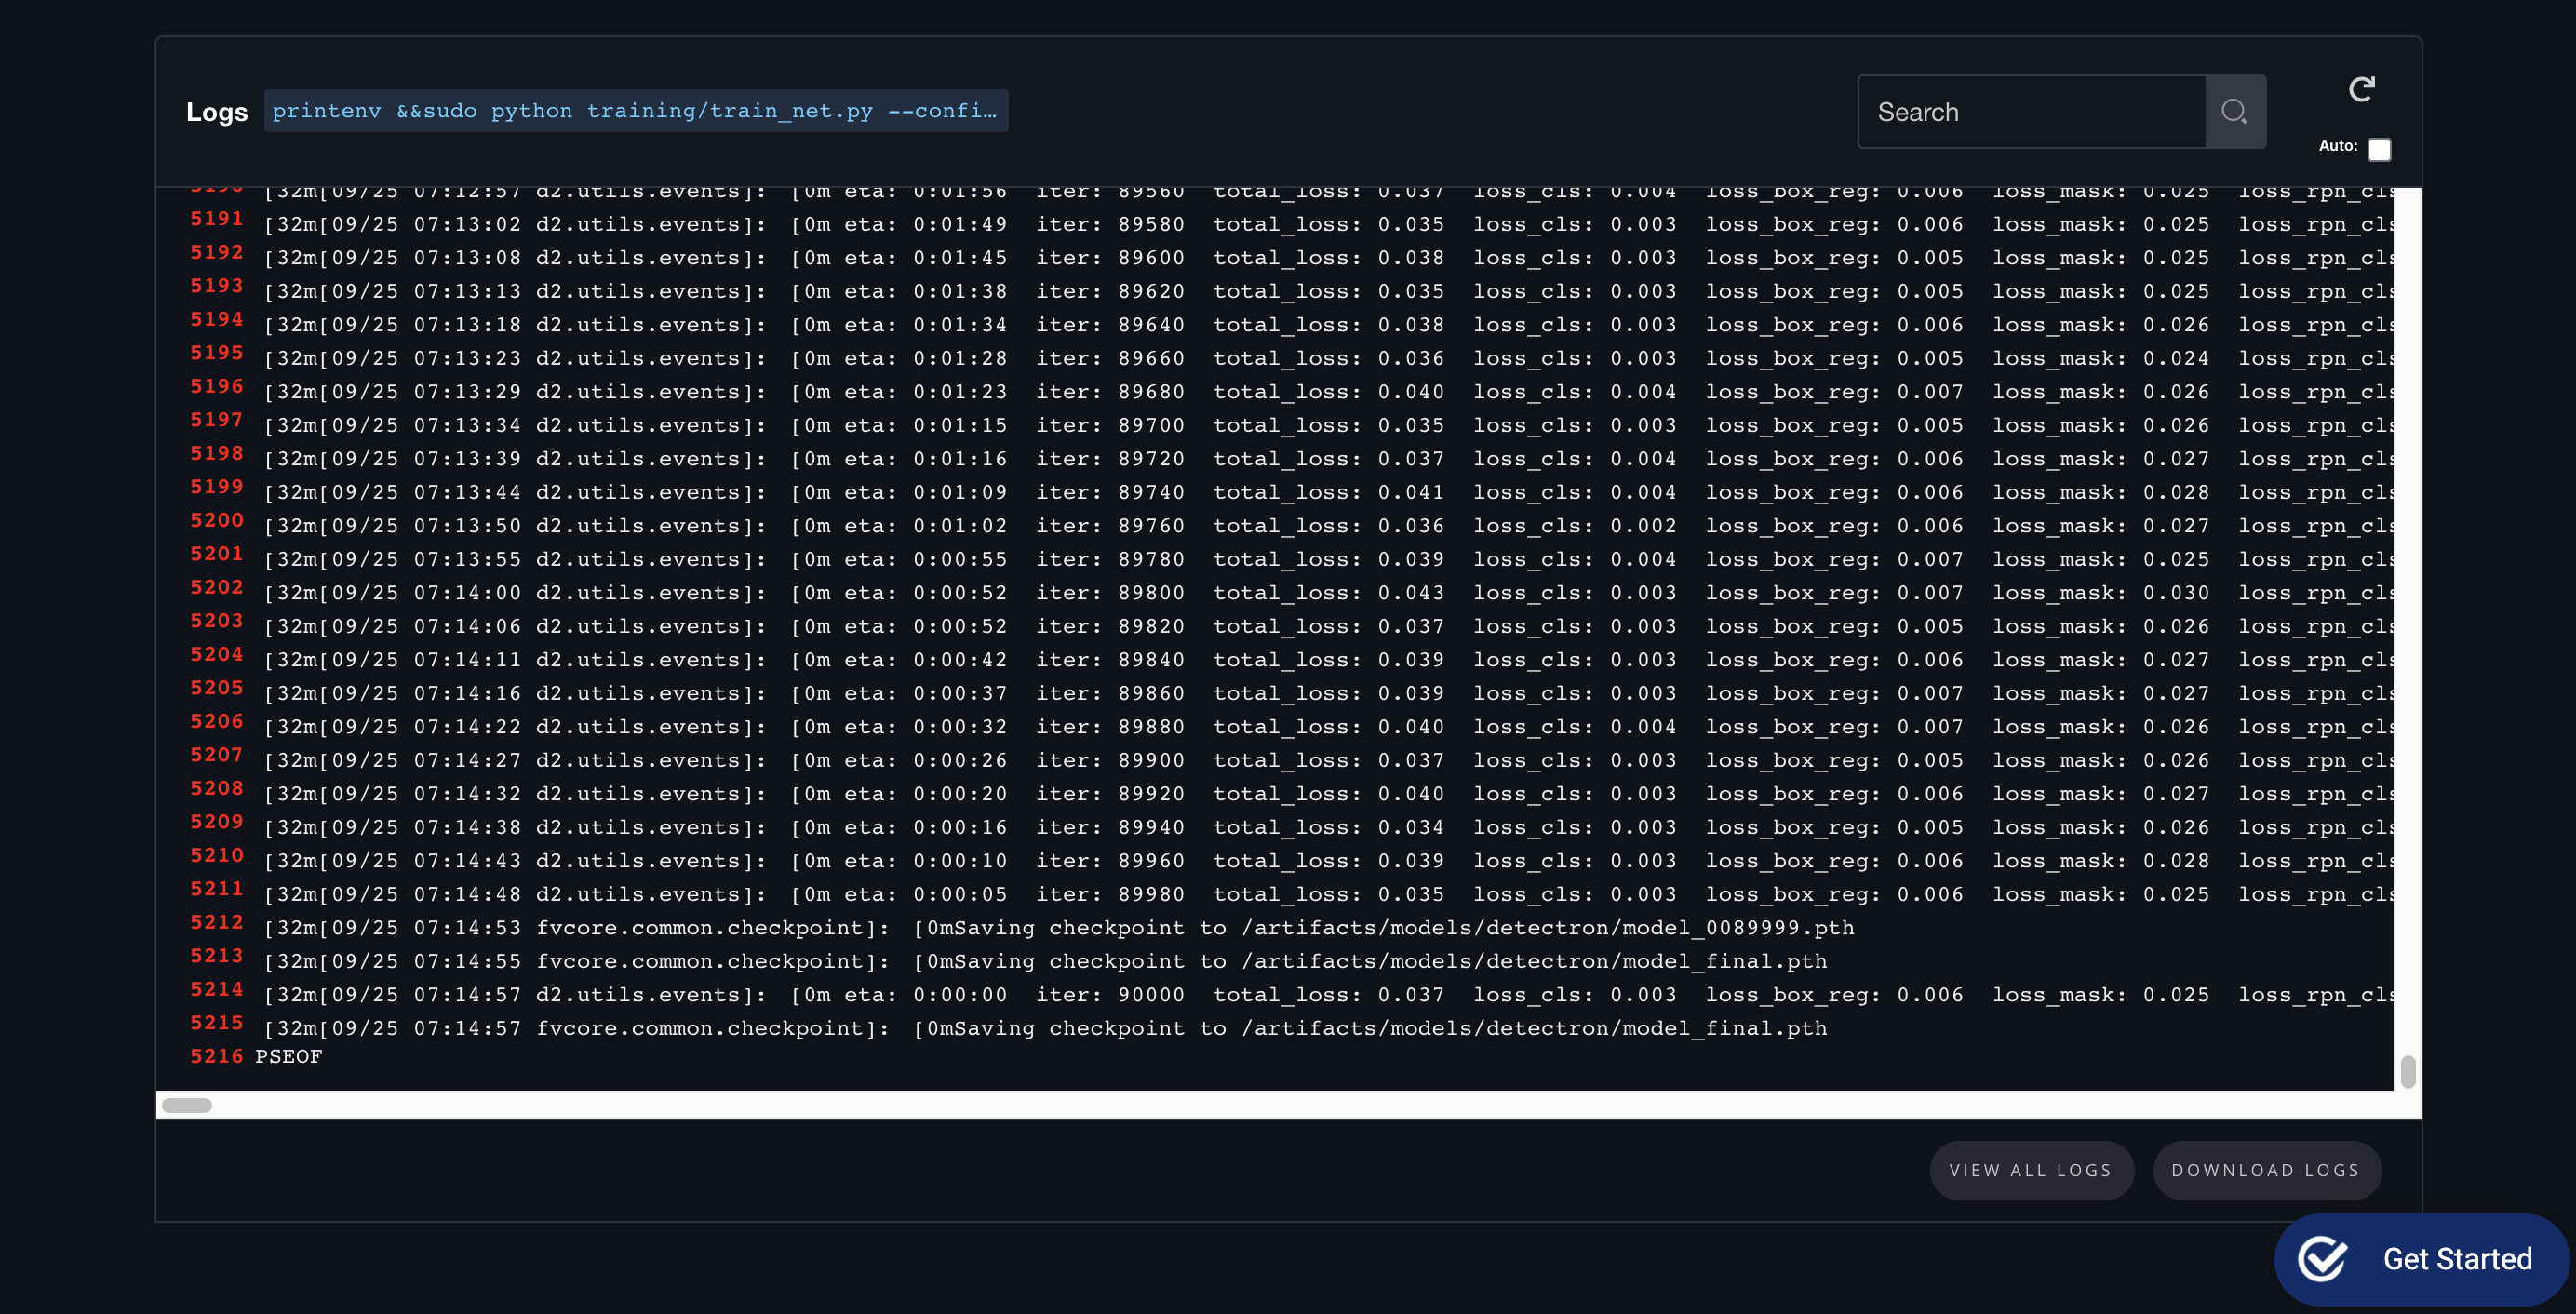
The dataset is downloaded to the ./data/<your dataset> directory. Model results are stored in the ./models directory.
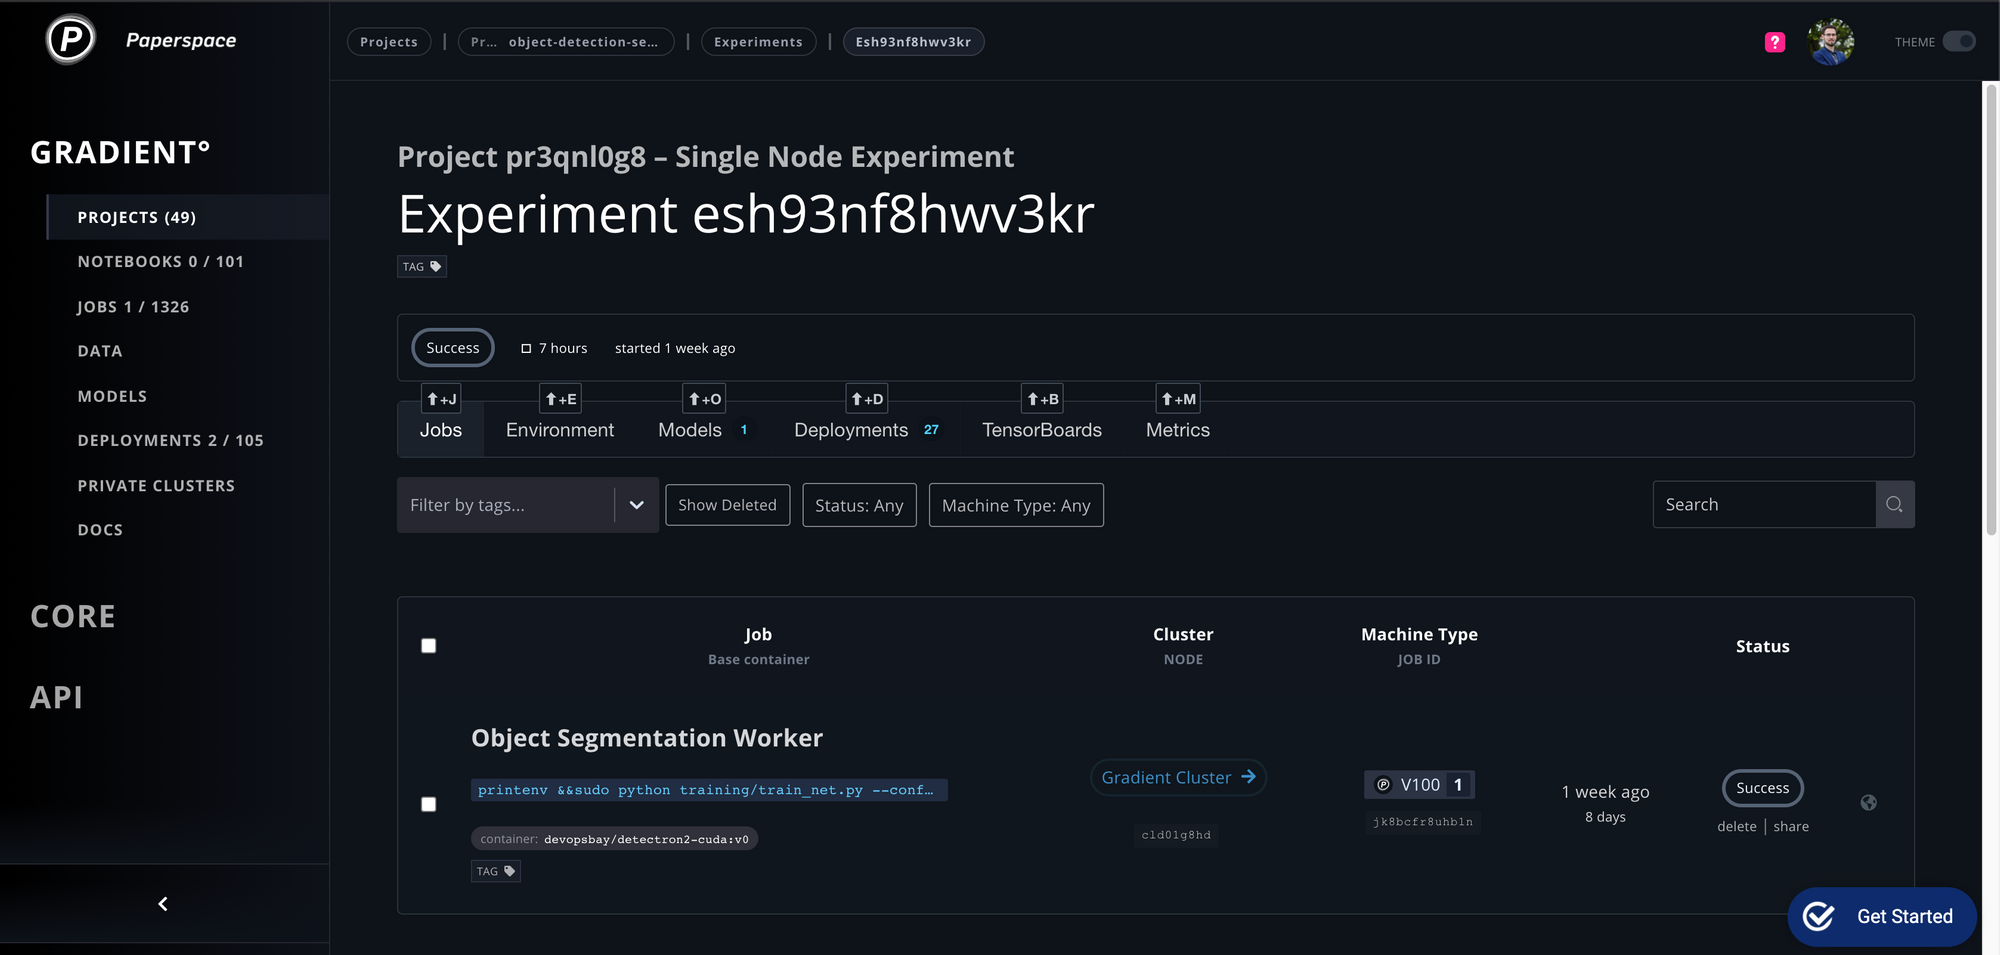
If everything is setup correctly you should see something like this:
Tensorboard Support
Gradient support Tensorboard out-of-the box

On the Experiment page you can create new Tensorboard and simply click "Add to Tensorboard" to view the data in real time even during the training is still going.

In the Tensorboard you can view among others Accuracy:
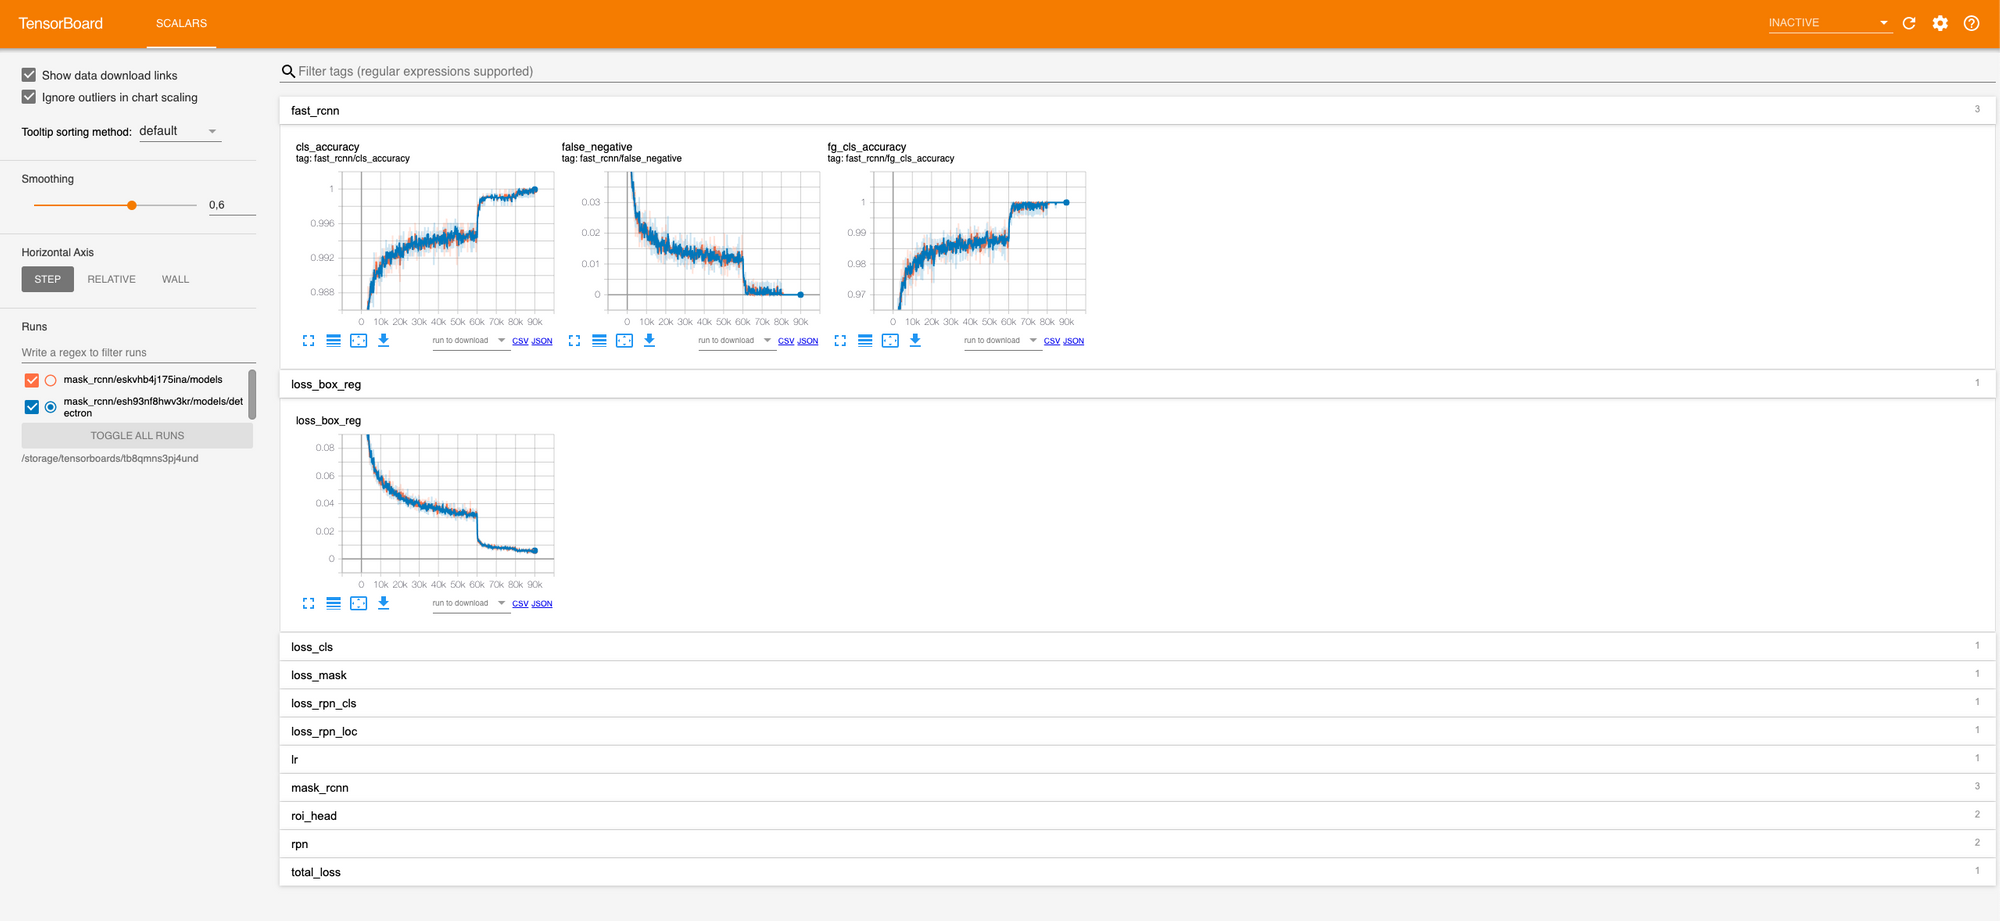
You can also compare multiple models live during their training!
Multi-GPU Training
Scale matters
To speed up the process we have to run the training in a multi-GPU setup.
For that end lets run an experiment on a Gradient private cluster, for that we need to add few additional parameters:
gradient experiments run multinode \
  --name mask_rcnn_multinode \
  --projectId <some project> \
  --workerContainer devopsbay/detectron2:v1 \
  --workerMachineType P4000 \
  --workerCount 7 \
  --parameterServerContainer devopsbay/detectron2:v1 \
  --parameterServerMachineType P4000 \
  --parameterServerCount 1 \
  --experimentType GRPC \
  --workerCommand "python training/train_net.py --config-file training/configs/mask_rcnn_R_50_FPN_3x.yaml MODEL.WEIGHTS https://dl.fbaipublicfiles.com/detectron2/COCO-Detection/faster_rcnn_R_50_FPN_1x/137257794/model_final_b275ba.pkl  OUTPUT_DIR /artifacts/models/detectron" \
  --parameterServerCommand "python training/train_net.py --config-file training/configs/mask_rcnn_R_50_FPN_3x.yaml MODEL.WEIGHTS https://dl.fbaipublicfiles.com/detectron2/COCO-Detection/faster_rcnn_R_50_FPN_1x/137257794/model_final_b275ba.pkl  OUTPUT_DIR /artifacts/models/detectron" \
  --workspace https://github.com/Paperspace/object-detection-segmentation.git \
  --datasetName small_coco \
  --datasetUri s3://paperspace-tiny-coco/small_coco.zip \
  --clusterId <cluster id>
This will launch multi-GPU distributed training on 8x P4000.
python training/train_net.py --config-file training/configs/mask_rcnn_R_50_FPN_3x.yaml --num-gpus 1 MODEL.WEIGHTS https://dl.fbaipublicfiles.com/detectron2/COCO-Detection/faster_rcnn_R_50_FPN_1x/137257794/model_final_b275ba.pkl OUTPUT_DIR /artifacts/models/detectron
This function must be called on all machines involved in the training. It will spawn child processes (defined by num-gpus) on each machine.
Parameters
How to scale your config to get best possible speedup?
When the config is defined for certain number of workers (according to cfg.SOLVER.REFERENCE_WORLD_SIZE) that’s different from the number of workers currently in use, returns a new cfg where the total batch size is scaled so that the per-GPU batch size stays the same as the original IMS_PER_BATCH // REFERENCE_WORLD_SIZE.
Other config options are also scaled accordingly: * training steps and warmup steps are scaled inverse proportionally. * learning rate are scaled proportionally.
For example, with the original config like the following:
IMS_PER_BATCH: 16
BASE_LR: 0.1
REFERENCE_WORLD_SIZE: 8
MAX_ITER: 5000
STEPS: (4000,)
CHECKPOINT_PERIOD: 1000
When this config is used on 16 GPUs instead of the reference number 8, calling this method will return a new config with:
IMS_PER_BATCH: 32
BASE_LR: 0.2
REFERENCE_WORLD_SIZE: 16
MAX_ITER: 2500
STEPS: (2000,)
CHECKPOINT_PERIOD: 500
Note that both the original config and this new config can be trained on 16 GPUs. It’s up to user whether to enable this feature (by setting REFERENCE_WORLD_SIZE).
How does it compare?
In this example we are comparing single P4000 vs 4x P4000s.
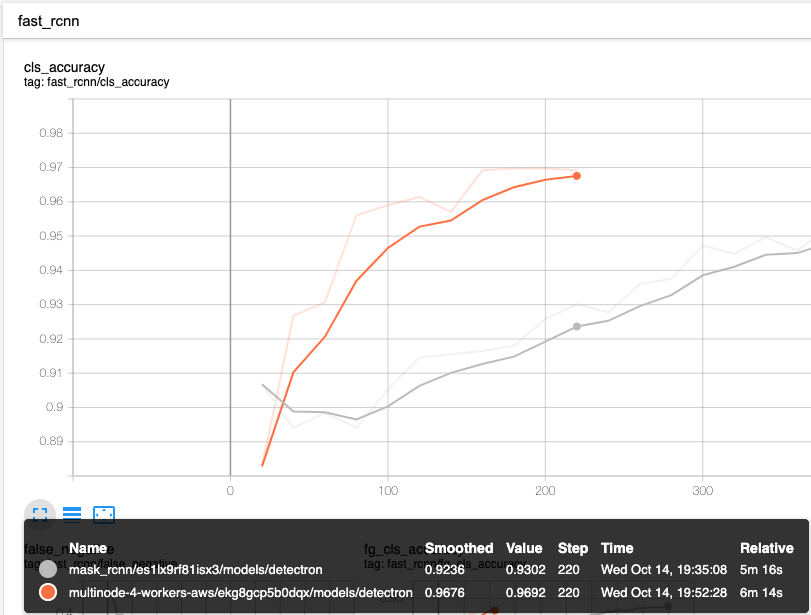
You can see the speed difference on retraining the model - due to the fact the model was already trained earlier the accuracy for the start is very high around 90%.
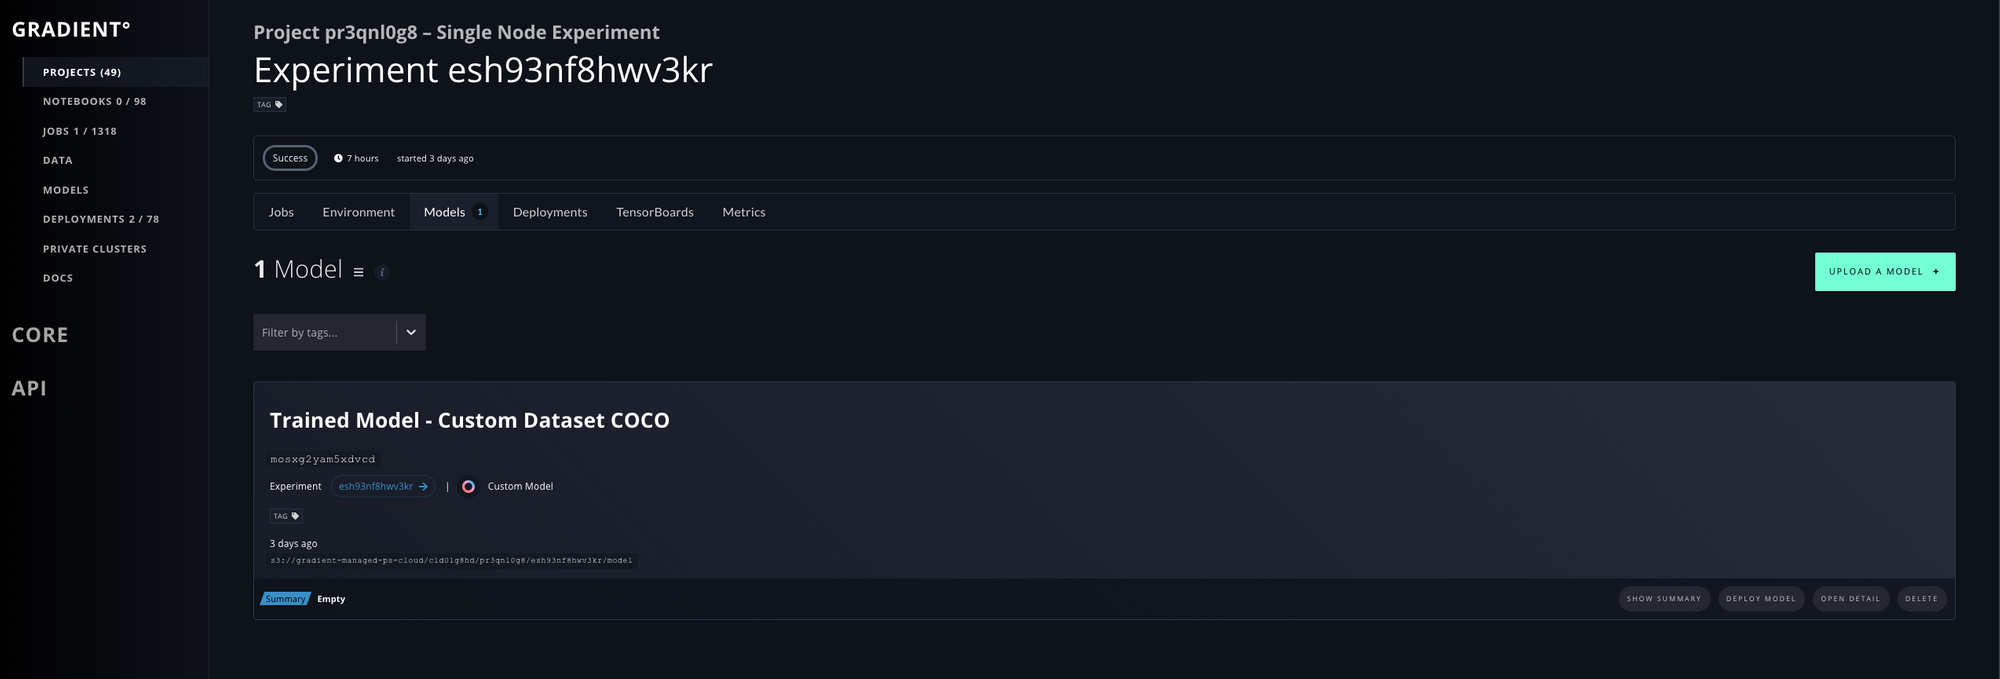
Deploying Trained Model
If everything is running correctly at the end of the training part we should see a trained model in our Gradient Dashboard
How to deploy model on Gradient
This example will load previously trained model and launch a web app application with simple interface. Before we explain on how it works lets launch it on the platform!
deployments create /
--name paperspace-detectron-demo-app /
--instanceCount 1 /
--imageUrl devopsbay/detectron2-cuda:v0 /
--machineType V100 /
--command "pip3 install -r demo/requirements.txt && python demo/app.py" /
--workspace https://github.com/Paperspace/object-detection-segmentation.git
--deploymentType Custom
--clusterId <cluster id>
--modelId <model id>
--ports 8080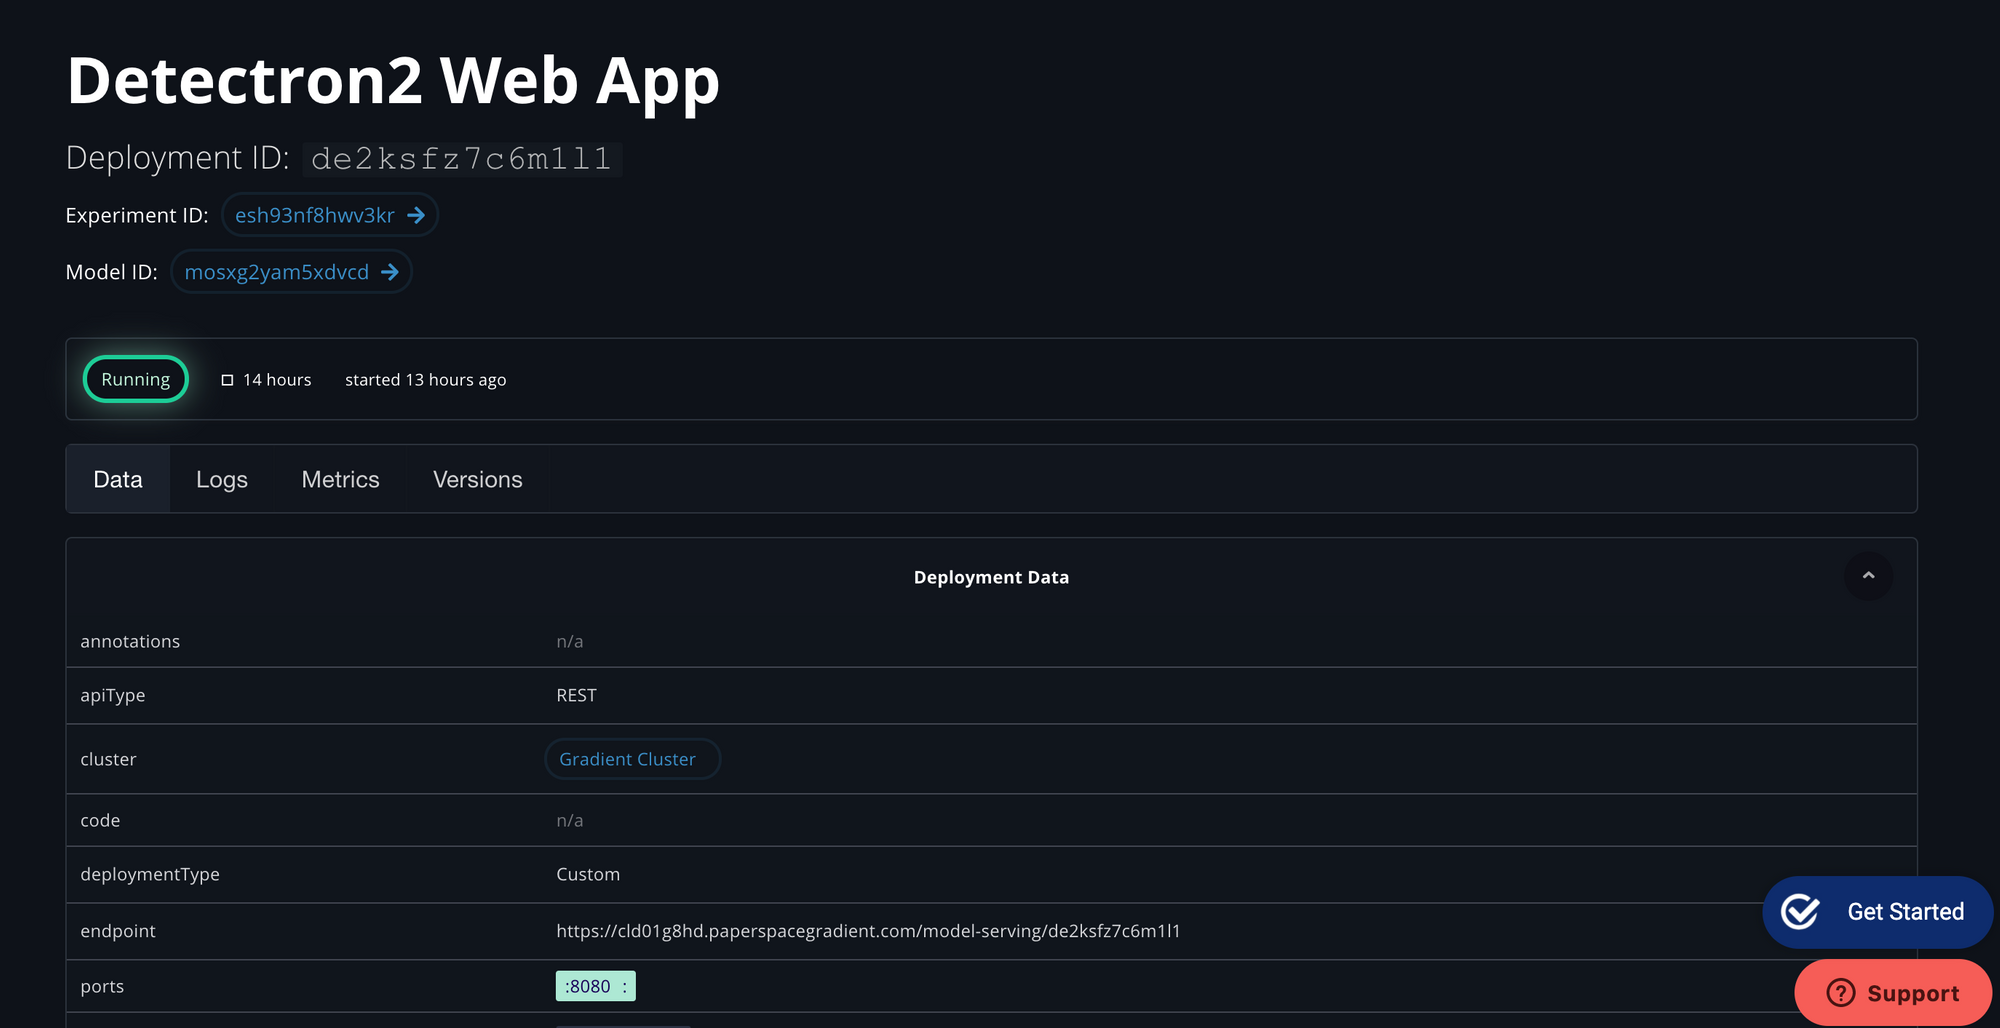
So, in this post we’ll create a web app for detectron2’s instance segmentation.
Backend
First, we’ll create the machine learning backend. This will use basic flask. We’ll start from some fairly standard boilerplate code.
import io
from flask import Flask, render_template, request, send_from_directory, send_file
from PIL import Image
import requests
import os
import urllib.request

app = Flask(__name__)

@app.route("/")
def index():

	# render the index.html template
	return render_template('index.html')

if __name__ == "__main__":

	# get port. Default to 8080
	port = int(os.environ.get('PORT', 8080))

	# set debug level
	logging.basicConfig(level=logging.DEBUG)

	# run app
	app.run(host='0.0.0.0', port=port)
This app will simply render the template index.html. I’ve specified the port manually.
Next we’ll add functions to get the image. We want to be able to upload an image to the website. We also want to be able to supply the website with a url and the image will be downloaded automatically. I’ve created the code do to exactly that below.
@app.route("/detect", methods=['POST', 'GET'])
def upload():
    if request.method == 'POST':

        try:

            # open image
            file = Image.open(request.files['file'].stream)

            # remove alpha channel
            rgb_im = file.convert('RGB')
            rgb_im.save('file.jpg')

        # failure
        except:

            return render_template("failure.html")

    elif request.method == 'GET':

        # get url
        url = request.args.get("url")

        # save
        try:
            # save image as jpg
            # urllib.request.urlretrieve(url, 'file.jpg')
            rgb_im = load_image_url(url)
            rgb_im = rgb_im.convert('RGB')
            rgb_im.save('file.jpg')

        # failure
        except:
            return render_template("failure.html")

    # run inference
    # result_img = run_inference_transform()
    try:
        result_img = run_inference('file.jpg')

        # create file-object in memory
        file_object = io.BytesIO()

        # write PNG in file-object
        result_img.save(file_object, 'PNG')

        # move to beginning of file so `send_file()` it will read from start
        file_object.seek(0)
    except Exception as e:
        app.logger.critical(str(e))
        return render_template("failure.html")

    return send_file(file_object, mimetype='image/jpeg')
This piece of code allows us to upload an image into the backend (POST request). Or we can supply the backend with a url and it will download the image automatically (GET request). The code also converts the image to a jpg. I couldn’t do inference on a png image using detectron2. So we’ll have to convert to a jpg.
If the code can’t download the image for whatever reason - It will return the failure.html template. This will basically just be a simple html page saying there was an error in retrieving the image.
Also, I’ve specified a different @app.route. This will need to reflected in the index.html file.
Frontend
Now I’ll create the frontend html code. This interface allows the user to upload an image or specify a URL to an image.
<h2>Detectron2 Instance Segmentation</h2>
<p>Upload your file</p>
<form action="/model-serving/{{ model_id}}/detect" method="POST" enctype="multipart/form-data">

<div class="form-group">
<label for="file1">File</label>
<input type="file" class="form-control" id="file1" aria-describedby="file">
<small id="file1help" class="form-text text-muted">Select Image</small>
</div>
<button type="submit" class="btn btn-primary">Submit</button>
</form>
The Model
In this part, we’ll get a detectron2 model we trained earlier to do inference on an image. Then we’ll link it to our existing backend.
This part is slightly more involved. We’ll create a new class called Detector. In that we’ll create the cfg that is required for detectron2. Then we’ll create another function that will do the inference on an image.
First we have to load model config from the repo:
# obtain detectron2's default config
self.cfg = get_cfg()

# Load Model Config
self.model = os.getenv('MODEL_CONFIG', 'mask_rcnn_R_50_FPN_3x.yaml')
# load values from a file
self.cfg.merge_from_file(model_zoo.get_config_file("COCO-InstanceSegmentation/"+self.model))
Then we have to set if we want to run inference on CPU or GPU. Be aware that model trained on GPUs will not work correctly on a CPU.
# Additional Info when using cuda
if torch.cuda.is_available():
    self.cfg.MODEL.DEVICE = "cuda"
else:
# set device to cpu
    self.cfg.MODEL.DEVICE = "cpu"
Next phase is to load trained model file we have trained earlier:
# get Model from paperspace trained model directory
model_path = os.path.abspath('/models/model/detectron/model_final.pth')
if os.path.isfile(model_path):
    print('Using Trained Model {}'.format(model_path), flush=True)
else:
    # Load default pretrained model from Model Zoo
    print('No Model Found at {}'.format(model_path), flush=True)
    model_path = model_zoo.get_checkpoint_url("COCO-InstanceSegmentation/"+self.model)

self.cfg.MODEL.WEIGHTS = model_path
That's it!
Now lets create inference function
# detectron model
def inference(self, file):

    predictor = DefaultPredictor(self.cfg)
	im = cv.imread(file)
	rgb_image = im[:, :, ::-1]
	outputs = predictor(rgb_image)

	# get metadata
	metadata = MetadataCatalog.get(self.cfg.DATASETS.TRAIN[0])
	# visualise
	v = Visualizer(rgb_image[:, :, ::-1], metadata=metadata, scale=1.2)
	v = v.draw_instance_predictions(outputs["instances"].to("cpu"))

	# get image
	img = Image.fromarray(np.uint8(v.get_image()[:, :, ::-1]))

	return img
We also want to keep track of how many requests were made to our service - we use built-in metric system from Paperspace Utils
if logger:
    # Push Metrics
    logger["inference_count"].inc()
    logger.push_metrics()
    print('Logged Inference Count', flush=True)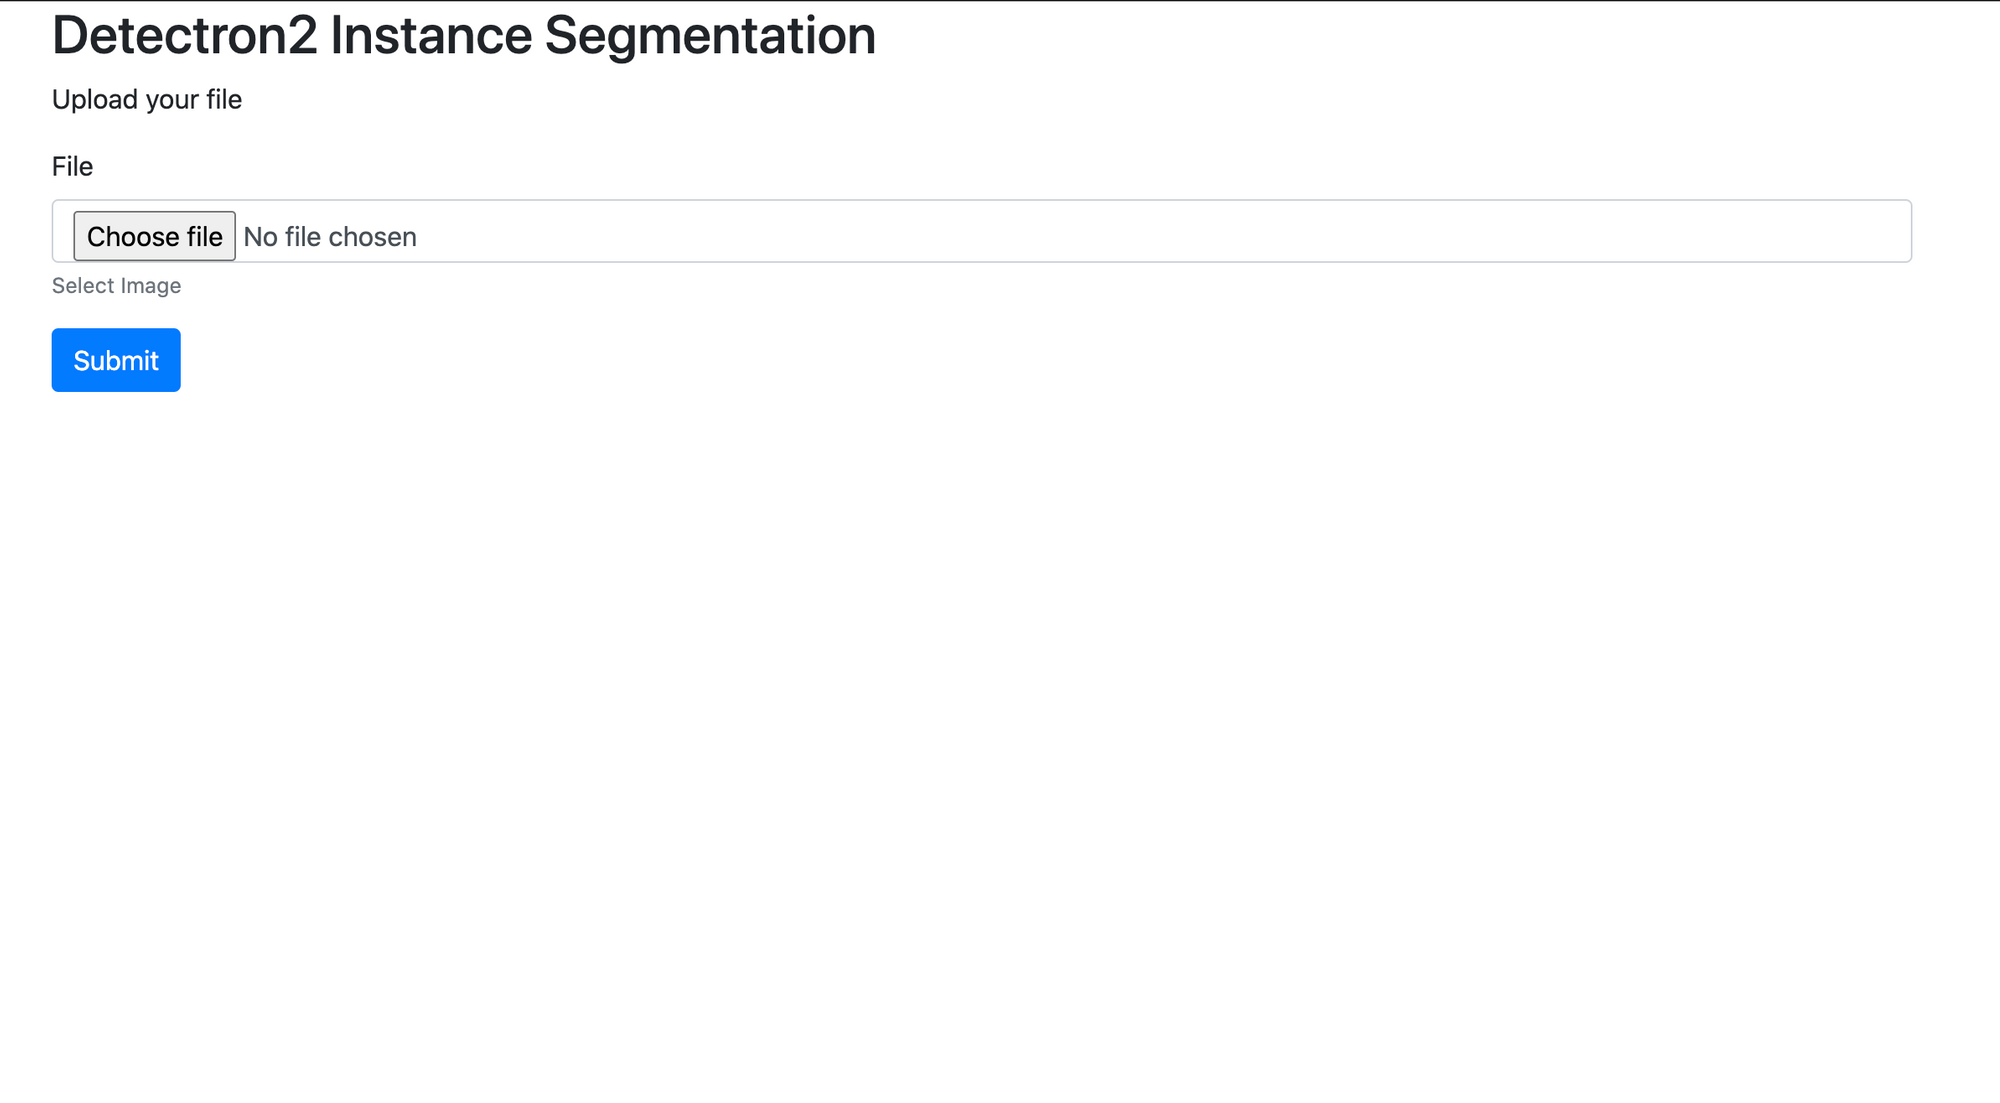
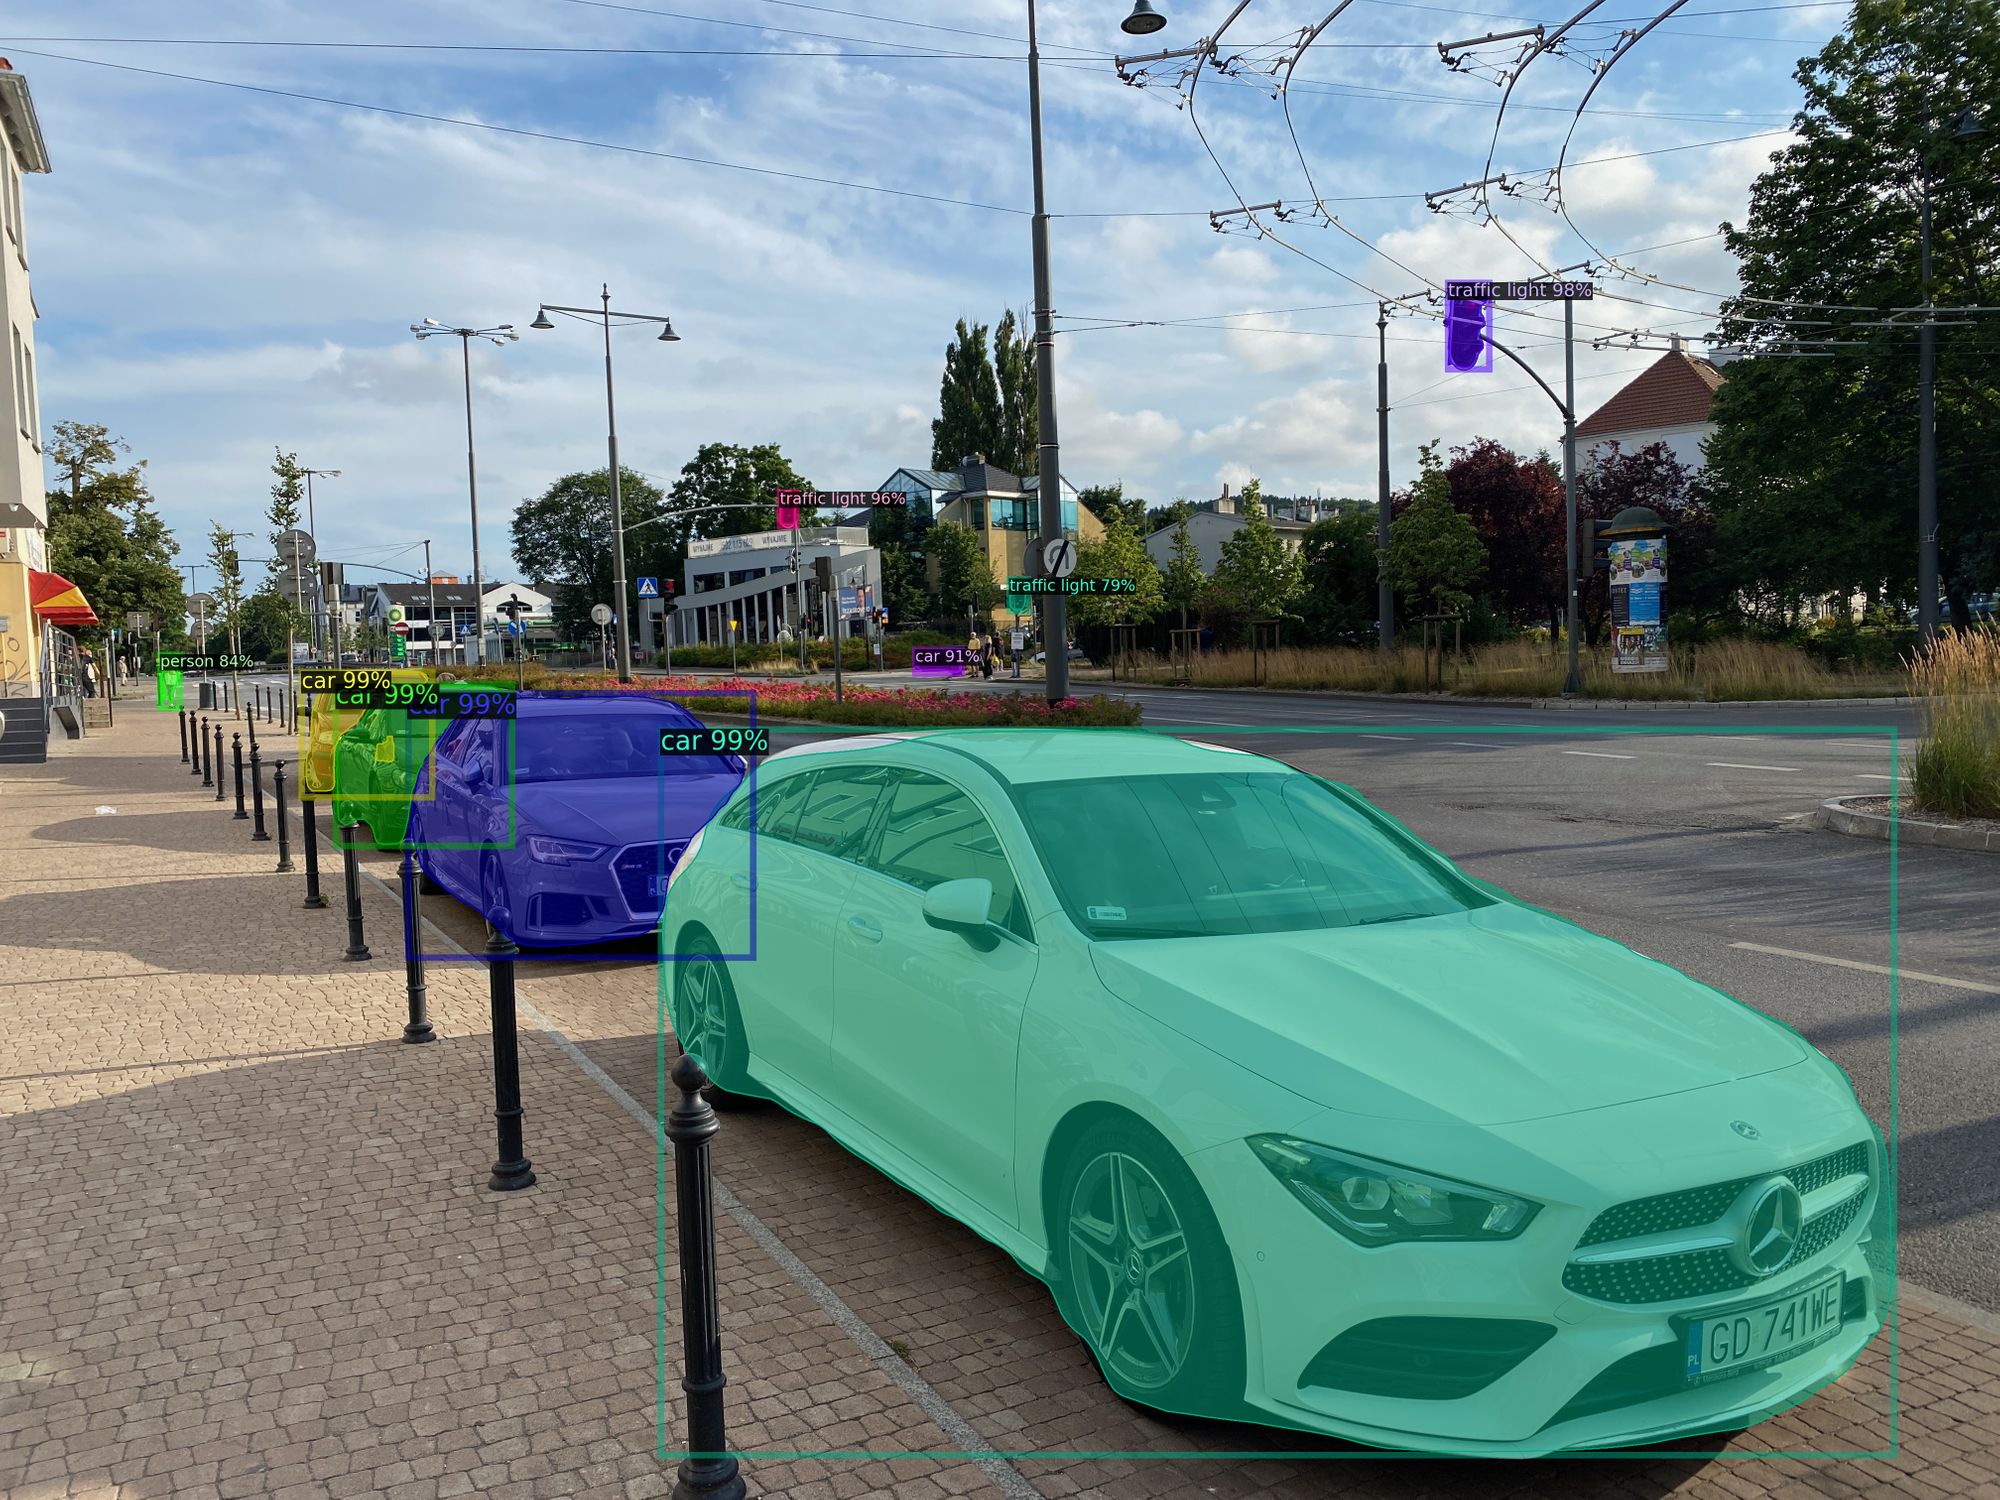
End result: