Style transfer is one of the hottest topics around deep learning media these days. There are a number of reasons for this, including the demonstrability of the method leaning well into publication and the potential utility of making quick stylistic edits to photos. This combination of utility and ease of demonstration make style transfer one of the most popular first computer vision projects many data scientists, ML engineers, and AI enthusiasts undertake, such as imparting the style of Vincent van Gogh's "Starry Night" to a previously mundane landscape photograph.
That being said, it is a rough science. Like many computer vision tasks, the challenge of transferring style on to the rougher and larger areas of an image is far easier than transferring that same style to the finer features of a face. Regions like the eyes and mouth in particular are very difficult to get an AI to approximate for generation correctly.

In this tutorial, we will look at JoJoGAN - a novel approach to conducting one-shot style transfer for facial images. This PyTorch-written architecture was constructed with the goal of capturing the stylistic details that have been historically difficult to account for, such as transferring style effects that conserve facial details like eye shape or mouth details. JoJoGAN aims to solve this problem by first approximating a paired training dataset and then finetuning a StyleGAN to perform one-shot face stylization.
JoJoGAN is capable of intaking any single image of a face (ideally a high quality head shot of some kind), approximating the paired real data using GAN inversion, and using the data to minutely adjust a pre-trained StyleGAN2 model. The StyleGAN2 model is then made generalizable so that the imparted style can be subsequently applied to new images. Previous one and few shot attempts have approached their level of success, but JoJoGAN has managed to achieve an extremely high level of quality for the images it generates.
Follow the steps below to see how to run JoJoGAN on Gradient Notebooks!
Bring this project to life
Requirements and Setup
JoJoGAN is a PyTorch based package, and it leverages a number of libraries to achieve its functionality. When you go to create your notebook for JoJoGAN, be sure to select the PyTorch tile as well as a GPU instance. Once you've done so, scroll to the bottom of the page and select the advanced options toggle. For your workspace URL, be sure to enter https://github.com/gradient-ai/JoJoGAN. Once that's done and your instance has spun up, go ahead and open the stylize.ipynb file. This is where we will be doing most of our work.
!pip install gdown scikit-learn==0.22 scipy lpips dlib opencv-python-headless tensorflow
!wget https://github.com/ninja-build/ninja/releases/download/v1.8.2/ninja-linux.zip
!unzip ninja-linux.zip -d /usr/local/bin/
!update-alternatives --install /usr/bin/ninja ninja /usr/local/bin/ninja 1 --force
This first code cell contains the libraries that are required but were not installed on the official PyTorch image we used to create the instance. Be sure to run this cell first to make sure everything will work properly going forward.
#imports
import torch
torch.backends.cudnn.benchmark = True
from torchvision import transforms, utils
from util import *
from PIL import Image
import math
import random
import os

import numpy as np
from torch import nn, autograd, optim
from torch.nn import functional as F
from tqdm import tqdm
import lpips
import wandb
from model import *
from e4e_projection import projection as e4e_projection
from copy import deepcopy


os.makedirs('inversion_codes', exist_ok=True)
os.makedirs('style_images', exist_ok=True)
os.makedirs('style_images_aligned', exist_ok=True)
os.makedirs('models', exist_ok=True)
This next cell imports the packages to the notebook now that they have been installed on the machine. Notably, we are using both local and python installed packages. Be sure not to change the location of the .ipynb file to ensure this works properly. The following os.makedirs() statements then create and check for the inclusion of the directories we will be using for JoJoGAN.
!gdown https://drive.google.com/uc?id=1s-AS7WRUbL3MzEALxM8y4_XO3n3panxH
!tar -xf pretrained_models.tar.gz
!mv pretrained_models/stylegan2-ffhq-config-f.pt ~/../notebooks
!gdown https://drive.google.com/uc?id=1O8OLrVNOItOJoNGMyQ8G8YRTeTYEfs0P
!mv e4e_ffhq_encode.pt models/
It is critical that you run the cell that follows these imports as well, because this is where we will be getting the checkpoints for the StyleGAN2 and e4e model we will be using as the basis for our generator.
#Finish setup
device = 'cuda' #@param ['cuda', 'cpu']

latent_dim = 512

# Load original generator
original_generator = Generator(1024, latent_dim, 8, 2).to(device)
ckpt = torch.load('stylegan2-ffhq-config-f.pt')
original_generator.load_state_dict(ckpt["g_ema"], strict=False)
mean_latent = original_generator.mean_latent(10000)

# to be finetuned generator
generator = deepcopy(original_generator)

transform = transforms.Compose(
    [
        transforms.Resize((1024, 1024)),
        transforms.ToTensor(),
        transforms.Normalize((0.5, 0.5, 0.5), (0.5, 0.5, 0.5)),
    ]
)
To conclude setup, we need to instantiate our generators. We specify the device as cuda because we are working with GPU's. We also set the latent dimension for both generators as 512.
For set up, we first instantiate an untrained generator to be finetuned as we go through the process. It is matched to the state dictionary from the ffhq StyleGAN2 model checkpoint, so that we can then update a copy of it to reflect the styles we want to impart through training. The copy can then be used to compare outputs with the original version. Finally, we define a transform to use on the images to help facilitate the style transfer itself.
Bring this project to life
Align Faces
%matplotlib inline

filename = 'iu.jpeg' #@param {type:"string"}
filepath = f'test_input/{filename}'

# uploaded = files.upload()
# filepath = list(uploaded.keys())[0]
name = strip_path_extension(filepath)+'.pt'

# aligns and crops face
aligned_face = align_face(filepath)

# my_w = restyle_projection(aligned_face, name, device, n_iters=1).unsqueeze(0)
my_w = e4e_projection(aligned_face, name, device).unsqueeze(0)

display_image(aligned_face, title='Aligned face')
Before we go forward with training the model or generating images, let's check the helper functions we have been provided here. The most important is the align_face function. It will take any photo of suitable size, check to see if there is a face of clear quality in the image, and then rotate it so the eyeline runs parallel to the bottom plane of the image. This ensures that each of the submitted photos for training or style transfer are of suitable type.
Generating Images Using the Pretrained Style Models Checkpoints
Loading in More Models
!gdown https://drive.google.com/uc?id=15V9s09sgaw-zhKp116VHigf5FowAy43f

# To download more pretrained style models, use the gdown script above with the corresponding id's (the values)
# drive_ids = {
#     "stylegan2-ffhq-config-f.pt": "1Yr7KuD959btpmcKGAUsbAk5rPjX2MytK",
#     "e4e_ffhq_encode.pt": "1o6ijA3PkcewZvwJJ73dJ0fxhndn0nnh7",
#     "restyle_psp_ffhq_encode.pt": "1nbxCIVw9H3YnQsoIPykNEFwWJnHVHlVd",
#     "arcane_caitlyn.pt": "1gOsDTiTPcENiFOrhmkkxJcTURykW1dRc",
#     "arcane_caitlyn_preserve_color.pt": "1cUTyjU-q98P75a8THCaO545RTwpVV-aH",
#     "arcane_jinx_preserve_color.pt": "1jElwHxaYPod5Itdy18izJk49K1nl4ney",
#     "arcane_jinx.pt": "1quQ8vPjYpUiXM4k1_KIwP4EccOefPpG_",
#     "arcane_multi_preserve_color.pt": "1enJgrC08NpWpx2XGBmLt1laimjpGCyfl",
#     "arcane_multi.pt": "15V9s09sgaw-zhKp116VHigf5FowAy43f",
#     "disney.pt": "1zbE2upakFUAx8ximYnLofFwfT8MilqJA",
#     "disney_preserve_color.pt": "1Bnh02DjfvN_Wm8c4JdOiNV4q9J7Z_tsi",
#     "jojo.pt": "13cR2xjIBj8Ga5jMO7gtxzIJj2PDsBYK4",
#     "jojo_preserve_color.pt": "1ZRwYLRytCEKi__eT2Zxv1IlV6BGVQ_K2",
#     "jojo_yasuho.pt": "1grZT3Gz1DLzFoJchAmoj3LoM9ew9ROX_",
#     "jojo_yasuho_preserve_color.pt": "1SKBu1h0iRNyeKBnya_3BBmLr4pkPeg_L",
#     "supergirl.pt": "1L0y9IYgzLNzB-33xTpXpecsKU-t9DpVC",
#     "supergirl_preserve_color.pt": "1VmKGuvThWHym7YuayXxjv0fSn32lfDpE",
#     "art.pt": "1a0QDEHwXQ6hE_FcYEyNMuv5r5UnRQLKT",
# }
The first cell in this section contains a gdown command and a dictionary of corresponding pretrained StyleGAN2 models along with their Google drive ids. Use the script above to download any of the different available styles by replacing pasting the id after the command gdown https://drive.google.com/uc?id={id}
Transferring the 'arcane_multi' Style to the Provided Sample Images
plt.rcParams['figure.dpi'] = 150
pretrained = 'arcane_multi' #@param ['art', 'arcane_multi', 'supergirl', 'arcane_jinx', 'arcane_caitlyn', 'jojo_yasuho', 'jojo', 'disney']
#@markdown Preserve color tries to preserve color of original image by limiting family of allowable transformations. Otherwise, the stylized image will inherit the colors of the reference images, leading to heavier stylizations.
preserve_color = False #@param{type:"boolean"}

ckpt = torch.load('arcane_multi.pt')
generator.load_state_dict(ckpt["g"], strict=False)
The next cell has been split up for ease of understanding. In this first subsection, we instantiate the new model from its checkpoint and load the state dictionary into our generator. This sets up our generator to create images using that style.
#@title Generate results
n_sample =  5#@param {type:"number"}
seed = 3000 #@param {type:"number"}

torch.manual_seed(seed)
with torch.no_grad():
    generator.eval()
    z = torch.randn(n_sample, latent_dim, device=device)

    original_sample = original_generator([z], truncation=0.7, truncation_latent=mean_latent)
    sample = generator([z], truncation=0.7, truncation_latent=mean_latent)

    original_my_sample = original_generator(my_w, input_is_latent=True)
    my_sample = generator(my_w, input_is_latent=True)

# display reference images
if pretrained == 'arcane_multi':
    style_path = f'style_images_aligned/arcane_jinx.png'
else:
    style_path = f'style_images_aligned/{pretrained}.png'
style_image = transform(Image.open(style_path)).unsqueeze(0).to(device)
face = transform(aligned_face).unsqueeze(0).to(device)

my_output = torch.cat([style_image, face, my_sample], 0)
display_image(utils.make_grid(my_output, normalize=True, range=(-1, 1)), title='My sample')
plt.show()

output = torch.cat([original_sample, sample], 0)
display_image(utils.make_grid(output, normalize=True, range=(-1, 1), nrow=n_sample), title='Random samples')
plt.show()
In the next subsection, we use our original generator and the newly trained arcane multi generator to create the images from a combination of the original face input with the effect of the style on the image generation. We do this both for the provided face image iu.jpeg as well as a random sampling of StyleGAN2 faces generated at seed 3000.
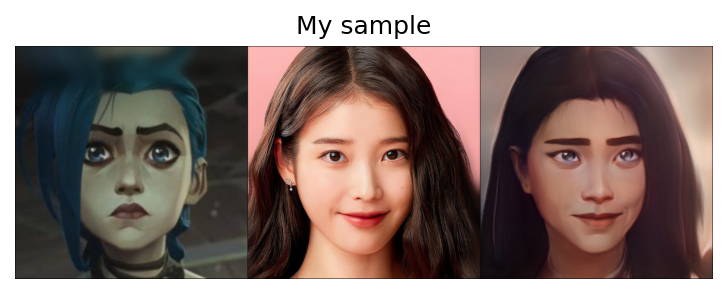
As you can see, JoJoGAN was able to impart a lot of the characteristics of the training subject to the photo. Noticeably, the blue eyes, heavy eyebrows, a slight rise in the philtrum, cheek discoloration, the darker color palette, and heavier shadows are all passed on to the new image. Let's also look at the randomly generated faces and see if the same traits are present:
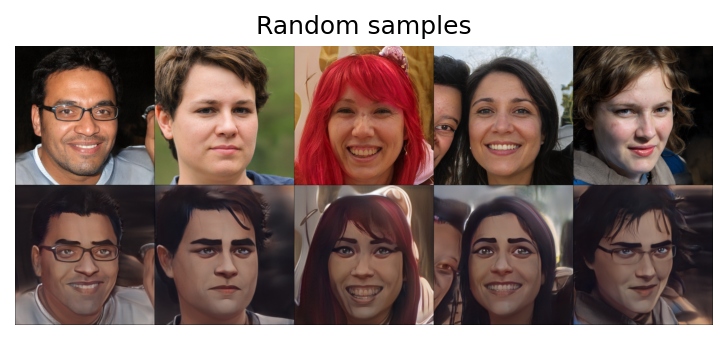
As we can see in the above photo, the effect of the style transfer is very consistent. This shows that JoJoGAN can effectively transfer style to a single photo, and it is highly generalized to the point that it is able to work on a wide variety of faces, skin tones, and facial structures. Now that we have confirmed JoJoGAN's efficacy, let's look at the next section to see how we can train JoJoGAN on our own images.
Training a New Style Model for JoJoGAN
To train a novel JoJoGAN generator, we first need to get a good image dataset. For this example, we will train the model using the provided images from the Arcane tv show.
Before we do that though, there is a critical step we need to take. The installs earlier have caused there to be conflicting libjpeg libraries. Navigate to the ~/usr/lib and delete the conflicting libraries by running the following in your terminal:
cd ../usr/lib/
rm libturbojpeg.a
rm libturbojpeg.la
rm libturbojpeg.so
rm libturbojpeg.so.0
rm libturbojpeg.so.1.0
rm libjpeg.a
rm libjpeg.la
rm libjpeg.so
rm libturbojpeg.so.0
rm libturbojpeg.so.0.1.0
Now that that's out of the way, all that is left is to run the final two cells. These will run a python script, Run_Stylizer.py, that trains our generator on the specified inputs for a number of iterations, specified by the num_iters variable, on line 110. Also, be sure add your folder name to line 75 after where it says style_images/. Set these parameters for the training sequence within the script file before running the cells. If you run into an OOM error, try reducing the size of the training image set.
Conclusion
This tutorial showed us how we can use JoJoGAN to generate high quality images with the input style transferred onto the inputted images. This process is easily modulated, with all thats needed being adding the names for the files into the python script when its time to be run. Be sure to try it out yourself for free on Gradient's free GPU Notebooks.
The needed notebooks and scripts for JoJoGAN to run on Gradient can all be found here.