Bring this project to life
On this blog, we have often discussed the versatility and capability of object detection models. These, since the advent of the first YOLO model release, have been one of the most evidentiary examples for the utility of Deep Learning technologies used in daily life. Models like YOLOv8 can be built into simple applications that are simple even for low code users to take advantage of.
Recently, a revolutionary step forward in image segmentation, a downstream application of object detection technologies, has been released by Meta AI: Segment Anything. In short, "The Segment Anything Model (SAM) produces high quality object masks from input prompts such as points or boxes, and it can be used to generate masks for all objects in an image. It was trained on a dataset of 11 million images and 1.1 billion masks, and has strong zero-shot performance on a variety of segmentation tasks." (source). Notably, this enables recognition and segmentation of novel entities in image/video format.
In part one of this blog series, we will explore the capabilities and theory behind the Segment Anything model in detail. We will begin by looking at the underlying architecture used by the framework, examine different segmentation tasks enabled by the framework, and then run a short demo on using SAM on our own inputs. We will conclude by introducing SAM-Dolly-AutoLabeler.py: a Gradio web GUI that integrates SAM with Dolly v2. to make a robust application for automatic object detection and labeling using. In part 2 of this series, we will explore the application capabilties in more detail.
Segment Anything
How it works
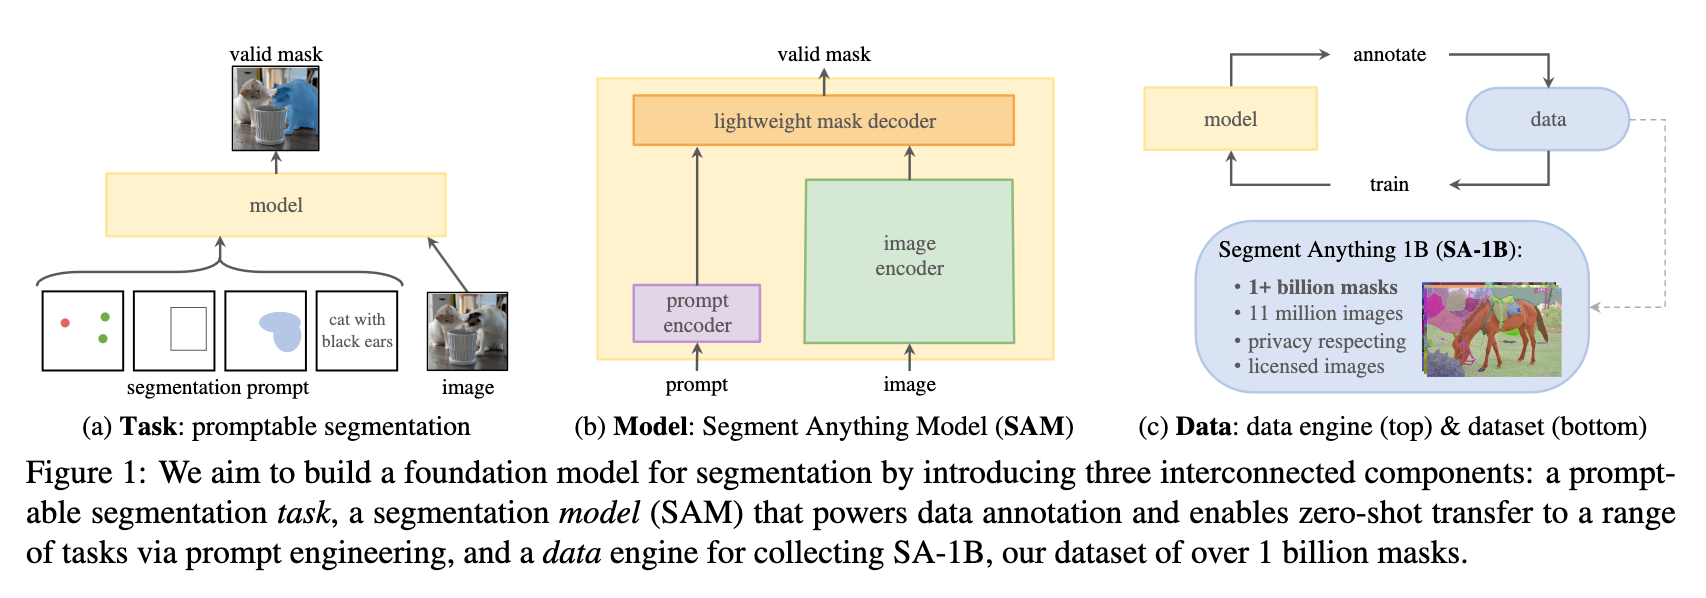
The Segment Anything model can be broken down like follows:
The model starts by translating the idea of a "prompt" which indicates what should be segmented from NLP to image segmentation, where a prompt can be points in the image, a text description, a box plot, etc. The model then attempts to return a valid mask for any given prompt - the 'valid' requirement indicating that the prompt could refer to multiple objects (e.g., shirt vs person example), but the output will still make sense and represent at least one of those objects in an image. This type of pre-training algorithm can be used as a general methodology for zero-shot transfer to downstream segmentation tasks via "prompting". (Source)
In practice, this makes it possible to generate masks from any image with little to no manual input.
Architecture
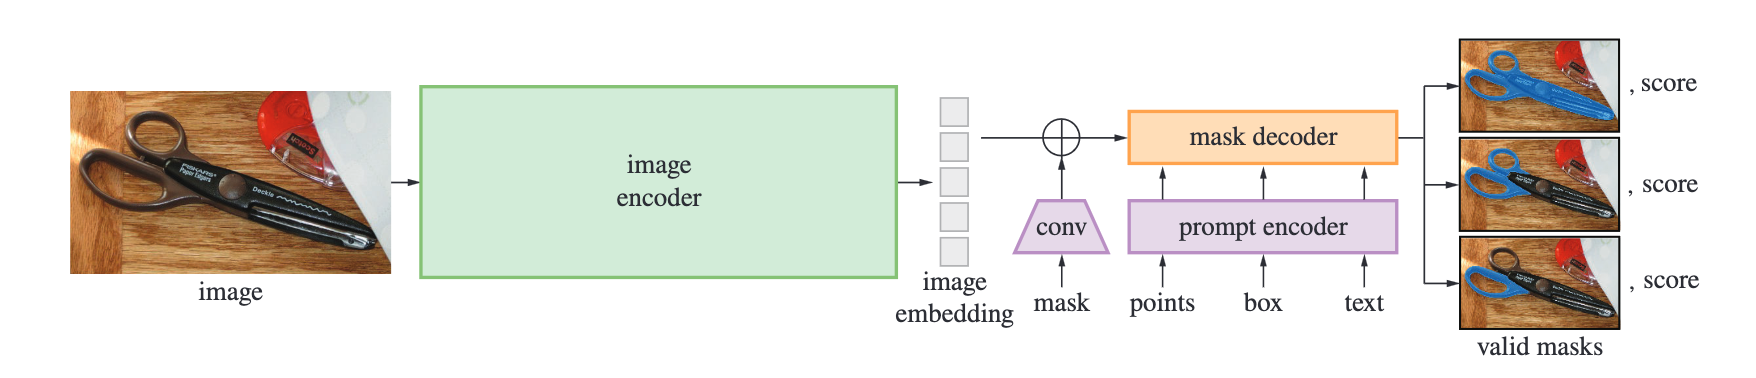
SAM is comprised of three primary components:
- The first is an image encoder: it is a pre-trained Vision Transformer (ViT) minimally adapted to process high resolution inputs. The image encoder runs once per image, and can be applied prior to prompting the model. The embedding is then passed onto a flexible prompt encoder. (source)
- The prompt encoder represents points and boxes using the positional encodings summed with learned embeddings for each prompt type and free-form text with an off-the-shelf text encoder from CLIP. "Dense prompts (i.e., masks) are embedded using convolutions and summed element-wise with the image embedding." (source)
- The mask decoder efficiently maps the image embedding, prompt embeddings, and an output token to a mask. The model's modified decoder block uses prompt self-attention and cross-attention in two directions (prompt-to-image embedding and vice-versa) to update all embeddings. After running two blocks, it upsamples the image embedding and an MLP maps the output token to a dynamic linear classifier, which then computes the mask foreground probability at each image location. (source)
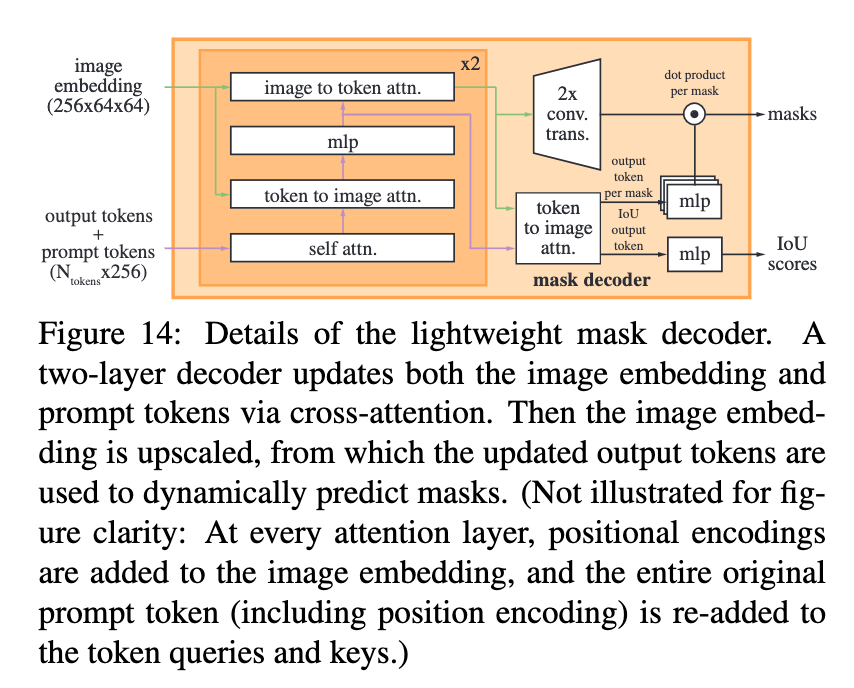
The novel part of this encoder-decoder flow is the lightweight mask decoder. This two layer component works to update the image embedding and prompt tokens with cross-attention. The embedding is then upscaled so that the updated output tokens can be used to dynamically predict masks. At every attention layer, the positional encodings are added to the image embedding, and the original prompt token with the position encoding is re-added to the token queries and keys. (source)
Demo
Using SAM in a Gradient Notebook
Bring this project to life
Using SAM in a Gradient Notebook is simple. Click the Run on Gradient link above to open the original repo in a Gradient Notebook. Navigate to the notebook.ipynb file, and run the first cell to install the required packages and download the SAM model checkpoint onto your machine.
!pip install -e .
!wget https://dl.fbaipublicfiles.com/segment_anything/sam_vit_h_4b8939.pth
Once that is completed, we can import the needed packages.
import numpy as np
import torch
import matplotlib.pyplot as plt
import cv2
And then, we construct helper functions, courtesy of the original demo notebooks, to help us show the results of the model predictions. show_mask displays the mask overlaid in a random transparent color over the original image. show_points displays the marker coordinate on the image. show_box shows the bounding box coordinates, though we won't make use of it in this demo.
def show_mask(mask, ax, random_color=False):
    if random_color:
        color = np.concatenate([np.random.random(3), np.array([0.6])], axis=0)
    else:
        color = np.array([30/255, 144/255, 255/255, 0.6])
    h, w = mask.shape[-2:]
    mask_image = mask.reshape(h, w, 1) * color.reshape(1, 1, -1)
    ax.imshow(mask_image)

def show_points(coords, labels, ax, marker_size=375):
    pos_points = coords[labels==1]
    neg_points = coords[labels==0]
    ax.scatter(pos_points[:, 0], pos_points[:, 1], color='green', marker='*', s=marker_size, edgecolor='white', linewidth=1.25)
    ax.scatter(neg_points[:, 0], neg_points[:, 1], color='red', marker='*', s=marker_size, edgecolor='white', linewidth=1.25)

def show_box(box, ax):
    x0, y0 = box[0], box[1]
    w, h = box[2] - box[0], box[3] - box[1]
    ax.add_patch(plt.Rectangle((x0, y0), w, h, edgecolor='green', facecolor=(0,0,0,0), lw=2))
Get mask from a specific point in the image
Our first task will be to get a mask generated from a specific point on the input image. SAM requires an input coordinate or bounding box to focus on, if we want it to make a particular mask. We will look at generating every possible mask later in the demo.
For this demonstration, we have provided a photo of a woman, dog, and horse sitting on a lawn we found in a quick search. We will declare a point marker on the image near the woman's position using np.array. The model will attempt to find and predict each of the possible masks for physical objects that surround that point.
import cv2
import numpy as np
from segment_anything import SamPredictor, sam_model_registry
sam = sam_model_registry["vit_h"](checkpoint="/notebooks/sam_vit_h_4b8939.pth")
predictor = SamPredictor(sam)
image = cv2.imread('''/notebooks/39eba0b35fec815252e3f24b3888e118.jpg''')
image = cv2.cvtColor(image, cv2.COLOR_BGR2RGB)
predictor.set_image(image)

input_point = np.array([[500, 375]])
input_label = np.array([1])
masks, scores, logits = predictor.predict(
    point_coords=input_point,
    point_labels=input_label,
    multimask_output=True,
)
Now that we have generated the predictions, we can display each possible mask beside each other. At the top of each image is the corresponding mask index/label and the prediction accuracy score. Each mask output is an array of boolean terms reflecting the presence of the mask in the shape of the original input image. We can then map these values
# Print out each of the masks overlaid on the original image

for i, (mask, score) in enumerate(zip(masks, scores)):
    plt.figure(figsize=(10,10))
    plt.imshow(image)
    show_mask(mask, plt.gca())
    show_points(input_point, input_label, plt.gca())
    plt.title(f"Mask {i+1}, Score: {score:.3f}", fontsize=18)
    plt.axis('off')
    plt.show()
Let's take a look at a possible outcome from our own prediction attempt:
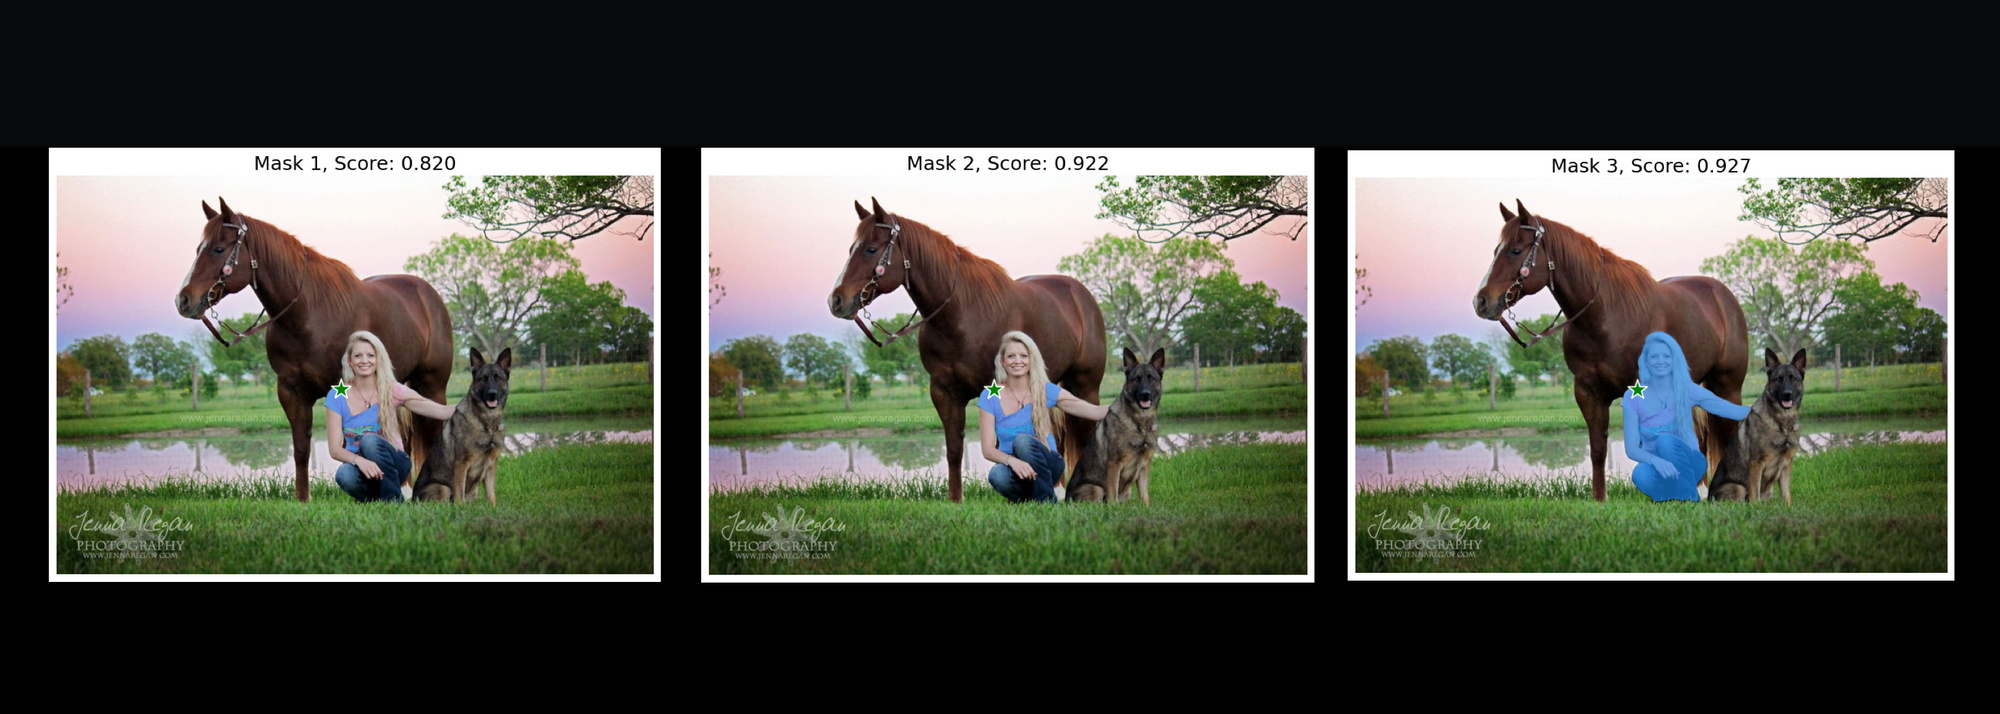
The first mask tries to mask the shirt, the second mostly successfully masks the shirt, and the third mask (the most high probability) marks the entire woman. This zero-shot demonstration of the model's segmentation capabilities show's its incredible utility for image segmentation and object detection tasks.
Get all possible masks from image
In certain cases, it can be advantageous to extract every possible mask from the image using SAM. We can then ween down the selection to a desired mask as desired. Let's look at how to generate each possible mask in the image using the code below.
We use similar code to above, but don't specify any sort of targets for the model to extract.
from segment_anything import SamAutomaticMaskGenerator, sam_model_registry
import cv2
sam = sam_model_registry["vit_h"](checkpoint="/notebooks/sam_vit_h_4b8939.pth")
mask_generator = SamAutomaticMaskGenerator(sam)
i = cv2.imread('''/notebooks/39eba0b35fec815252e3f24b3888e118.jpg''')
masks = mask_generator.generate(i)
Once we have predicted all of the possible masks, we are left with an array of arrays of boolean terms that reflect the original shape of the image input. We can then use the show_mask function again to overlay each of the masks on the original image.
import matplotlib.pyplot as plt
import numpy as np
def show_anns(anns):
    if len(anns) == 0:
        return
    sorted_anns = sorted(anns, key=(lambda x: x['area']), reverse=True)
    ax = plt.gca()
    ax.set_autoscale_on(False)
    polygons = []
    color = []
    for ann in sorted_anns:
        m = ann['segmentation']
        img = np.ones((m.shape[0], m.shape[1], 3))
        color_mask = np.random.random((1, 3)).tolist()[0]
        for i in range(3):
            img[:,:,i] = color_mask[i]
        ax.imshow(np.dstack((img, m*0.35)))


plt.figure(figsize=(20,20))
plt.imshow(i)
show_anns(masks)
plt.axis('off')
plt.show()
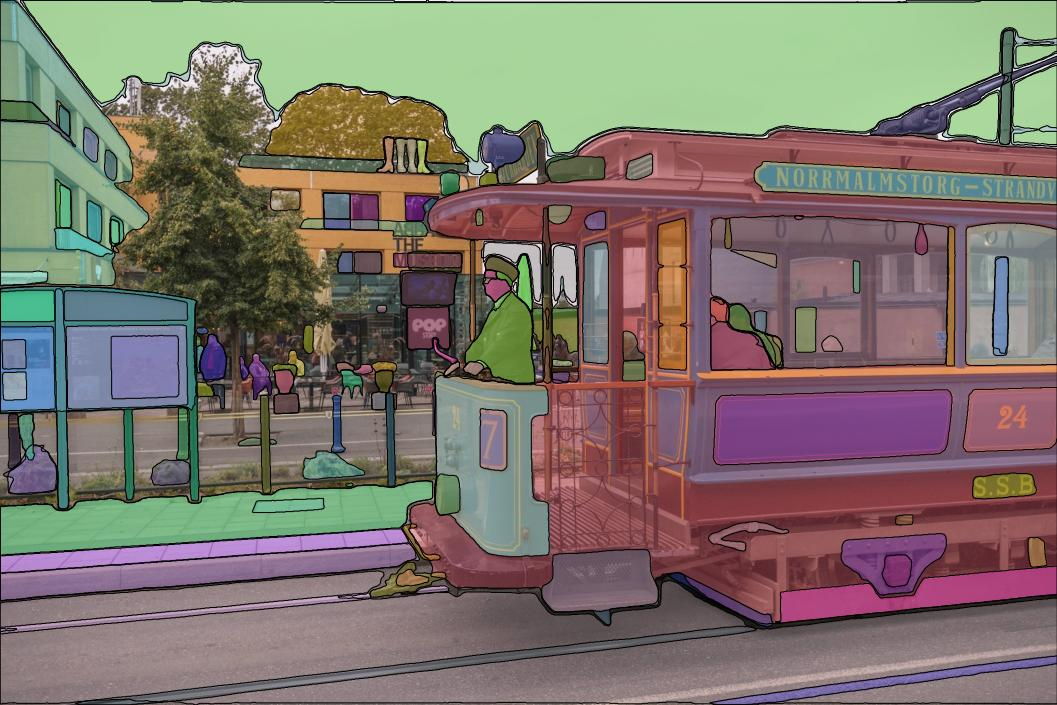
Let's take a look at another example we made using the code above and the sample photo:
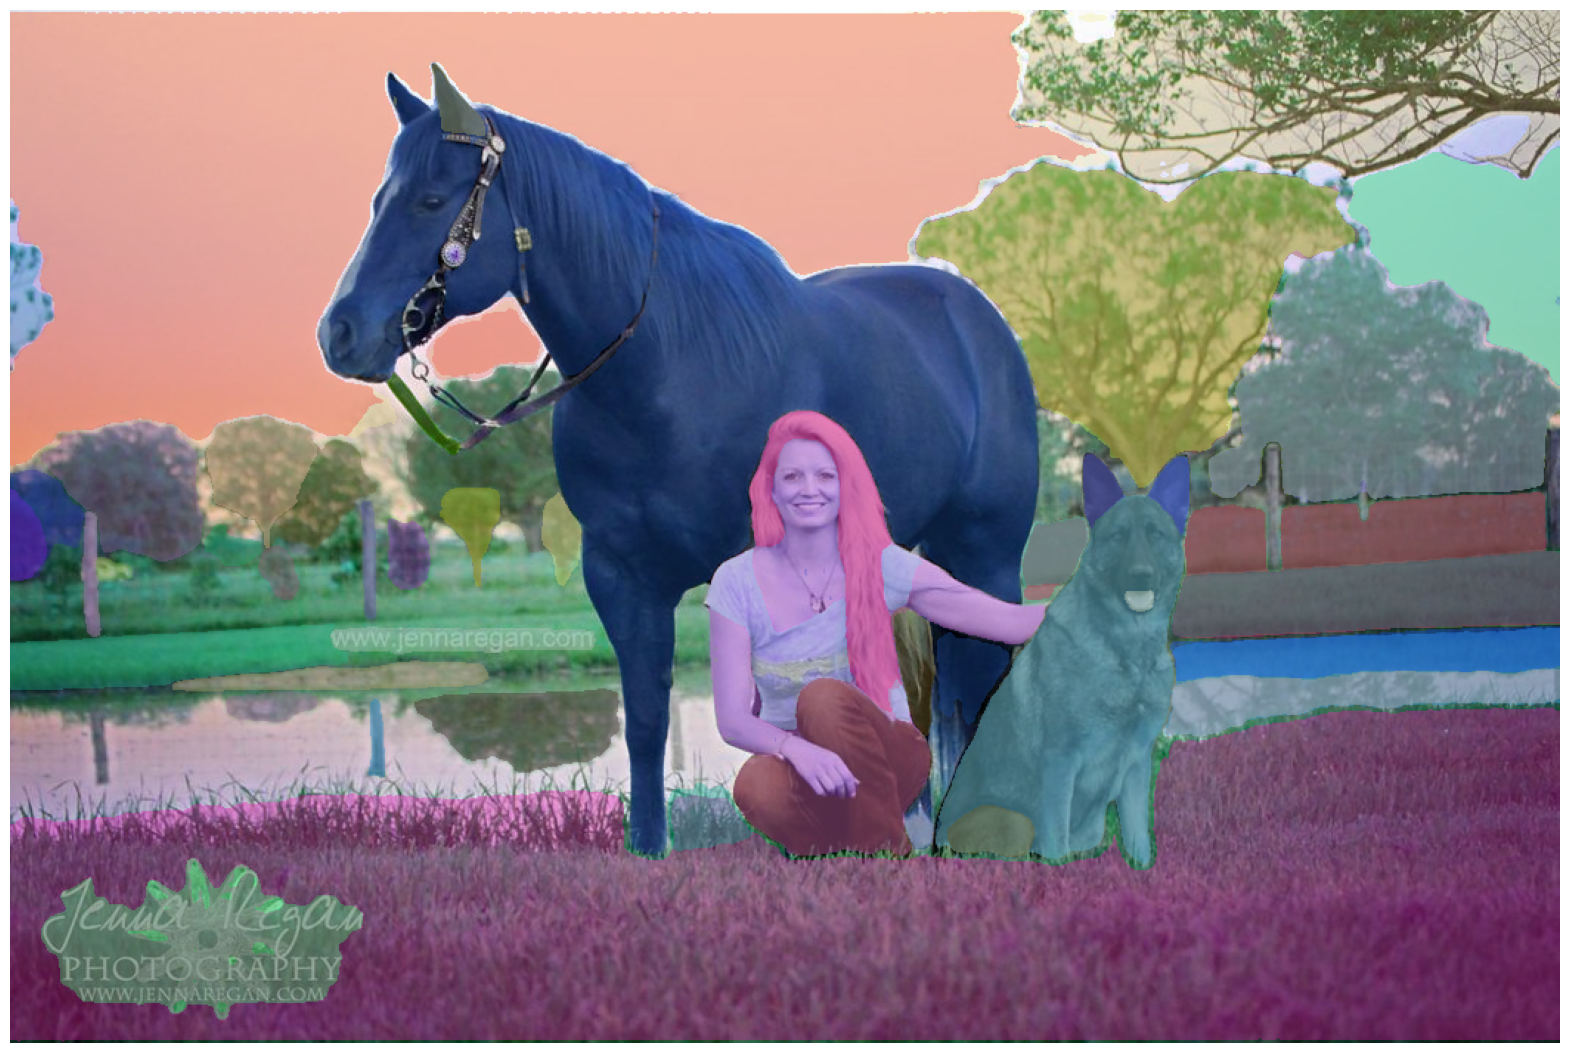
As we can see, each major object has been successfully separated and overlaid with a masking layer. The model attempts to go further than identifying the objects alone, and many of the objects are actually overlaying other masks. For example, the dog's ears are both clearly labeled as the same sort of ears, as shown by the coloration. They are a part of the total dog segmentation mask, but are each themselves represented by their own mask objects.
If we wanted to use this method to get masks for images with unclear labels, we can parse the array of masks, and then select the desired mask from the array.
Integrating SAM with Dolly and GroundingDINO
Bring this project to life
There is a fascinating project called Grounded Segment Anything that is currently working to integrate SAM with their GroundingDINO model, as well as additional generative input channels like Stable Diffusion or Whisper. Their work focuses on integrating text inputs with Segment Anything to create an alternative supervision method for image segmentation with SAM.
Inspired by their work, and seeing the relevance to our recently released YOLOv8 Web UI, we have created a spin off of their demo, gradio_auto_label.py. The original demo integrated with the OpenAI API to use ChatGPT to help direct automatic labeling of images using SAM, GroundingDINO, and BLIP.
Seeking a completely open source alternative, we have created our own application to run with Gradient using the open-source Large Language Model Dolly. We have named it SAM-Dolly-AutoLabeler.py. Follow the instructions below to learn how to use the application.
Running the AutoLabeler
To run the autolabeler application, open the repo in a Gradient Notebook. You can do this by pasting the URL into the Advanced Options field "Workspace URL" in the Create Notebook page on Gradient, or by clicking the Run on Gradient link above or at the top of this page. We recommend at least 16GB of VRAM for this task, as SAM and Dolly both are relatively resource intensive for inference.
Once the Notebook has spun up, we can open the AutoLabel-Notebook-Launcher.ipynb and run the first cell. This will download all the required model files onto our Notebook for GroundingDINO and SAM.
!wget https://dl.fbaipublicfiles.com/segment_anything/sam_vit_h_4b8939.pth
!wget https://github.com/IDEA-Research/GroundingDINO/releases/download/v0.1.0-alpha/groundingdino_swint_ogc.pth
Afterwards, we install some required NLTK packages we need to parse the text outputs later on.
import nltk
nltk.download('punkt')
nltk.download('brown')
nltk.download('averaged_perceptron_tagger')
Once that's finished, we are ready to run the application. Execute the code cell below to start:
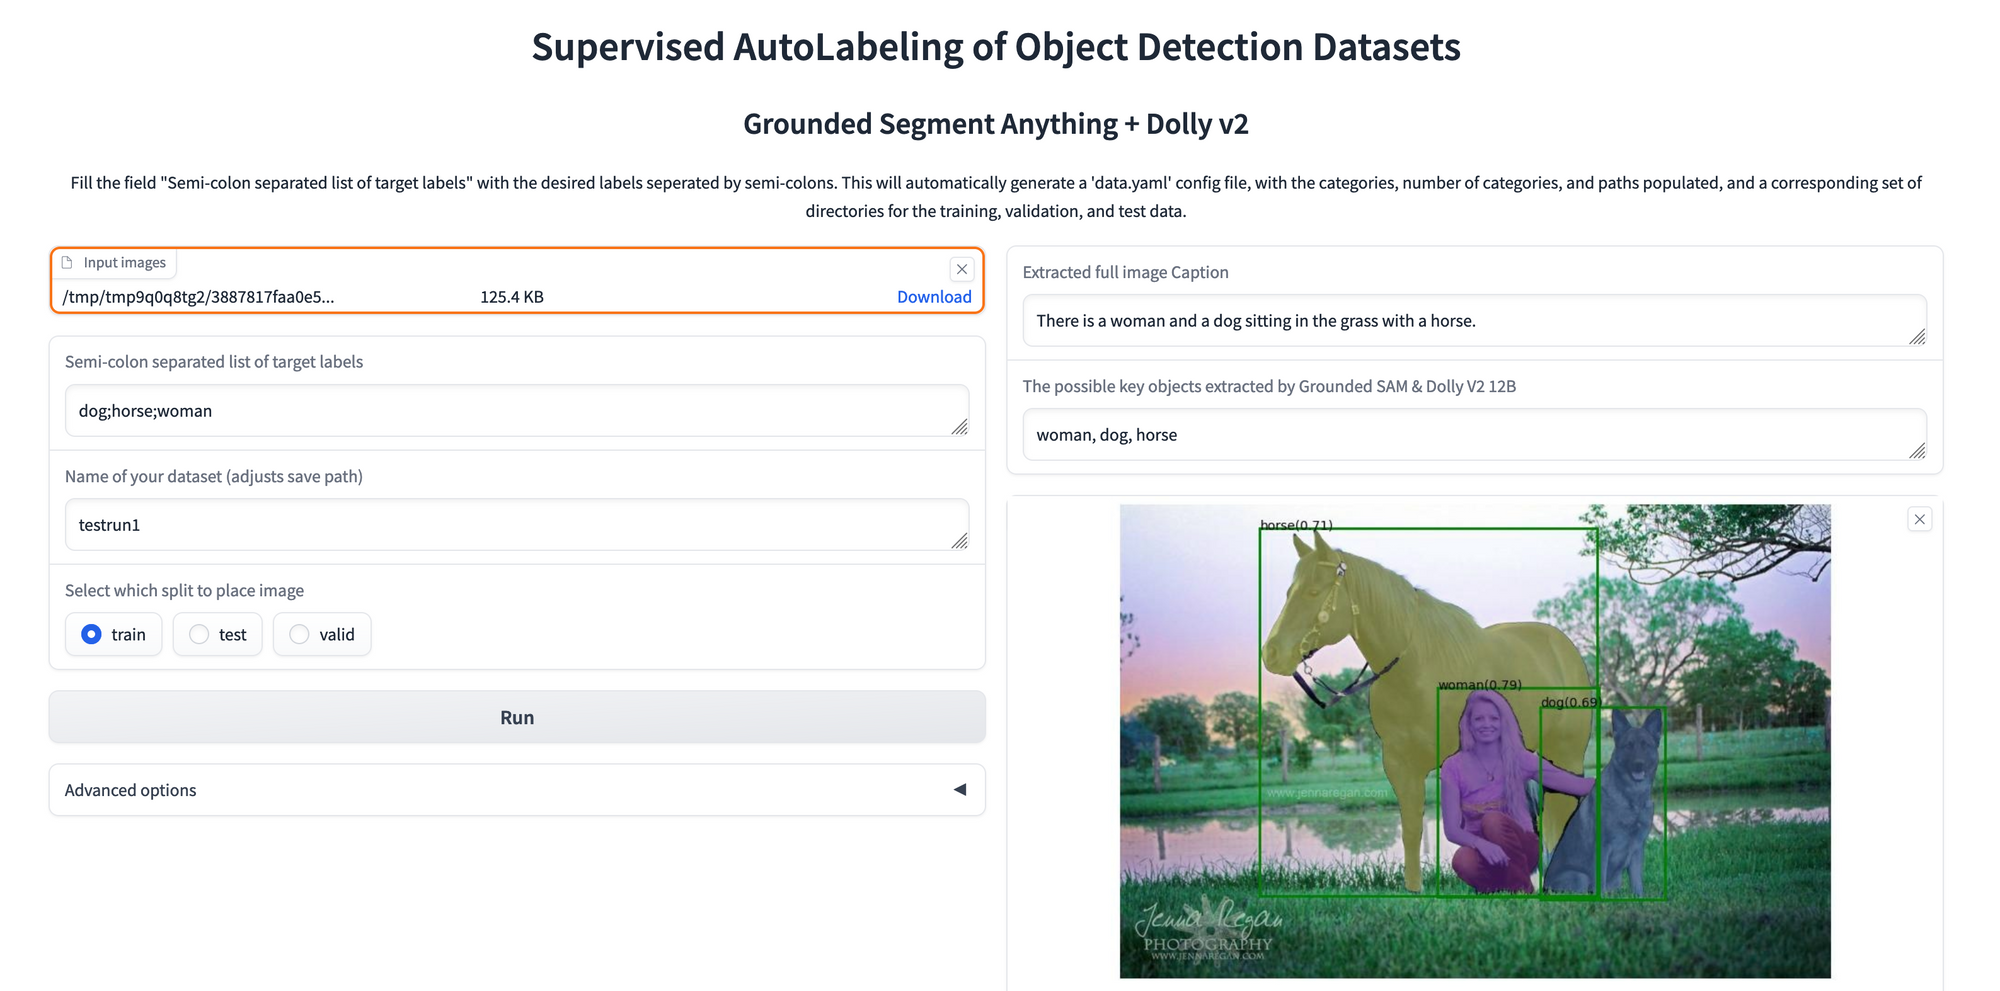
!python SAM-Dolly-AutoLabeler.py --shareThe AutoLabeler accepts uploads of one or more images. We then declare our desired target labels in a semi-colon separated list using the field below. We then name our dataset. If there is not an existing dataset with that name, it will create a new YAML file that contains the corresponding labels, number of categories, and training, test, and validation paths. Labeled images, label files, and labeled images will be saved in corresponding subdirectories in /datasets from the same name.
Once the predictions have finished running, we are left with a gallery of our labeled images with their bounding boxes and segmentation masks overlaid. We can then click on each of those images to get corresponding metadata and a mask only image of each input.
The extracted full image caption is the original BLIP output for the model's caption. We then parsed it using Dolly to extract relevant tags that match out inputted targets. The possible key objects extracted by Grounded SAM and Dolly field thus lists the image labels that were included in the original YAML input tags. This prevents additional tags from being marked.
Put together, this offers a robust system for generating many object labels without any manual work by the user. This could potentially save thousands of hours spent preparing data for object detection tasks.
In our next article, we will look at integrating this with the YOLOv8 Web UI to create a fully automated object detection model training and inference pipeline.
Closing thoughts
Segment Anything represents a really powerful step forward in object detection/image segmentation technology. As we showed in this article, the novel framework allows for nearly zero-shot image segmentation, and, when integrated with other models like LLMs, even enable fully automated object detection pipelines.
Next week, we are going to take a deeper look at the AutoLabeler application, and show the full capability of the app when integrated with YOLOv8.