
Introduction
We have seen the use of 2D image generation for various applications: social media content creation, dataset augmentation for research purposes, and personal/commercial image editing. Although 2D images are useful for a myriad of tasks, there exist other domains that require images with depth information i.e. video games, film-making, and 3D computer-aided design (CAD).
When it comes to 3D generation, models can be trained to produce novel views of objects in 3D (NeRF), 3D point clouds of an object (Point$\cdot$E), or 3D continuous objects (DreamFusion, DreamFields & Magic3D). In this article, I will highlight some of the key research papers covering 3D view synthesis and 3D object generation over the last 3 years. I will discuss the goals of the different projects, the methods they used to achieve those goals, and the applications of the models they create.
Neural Radiance Fields (NeRF) (UC Berkeley, Google, UC San Diego)
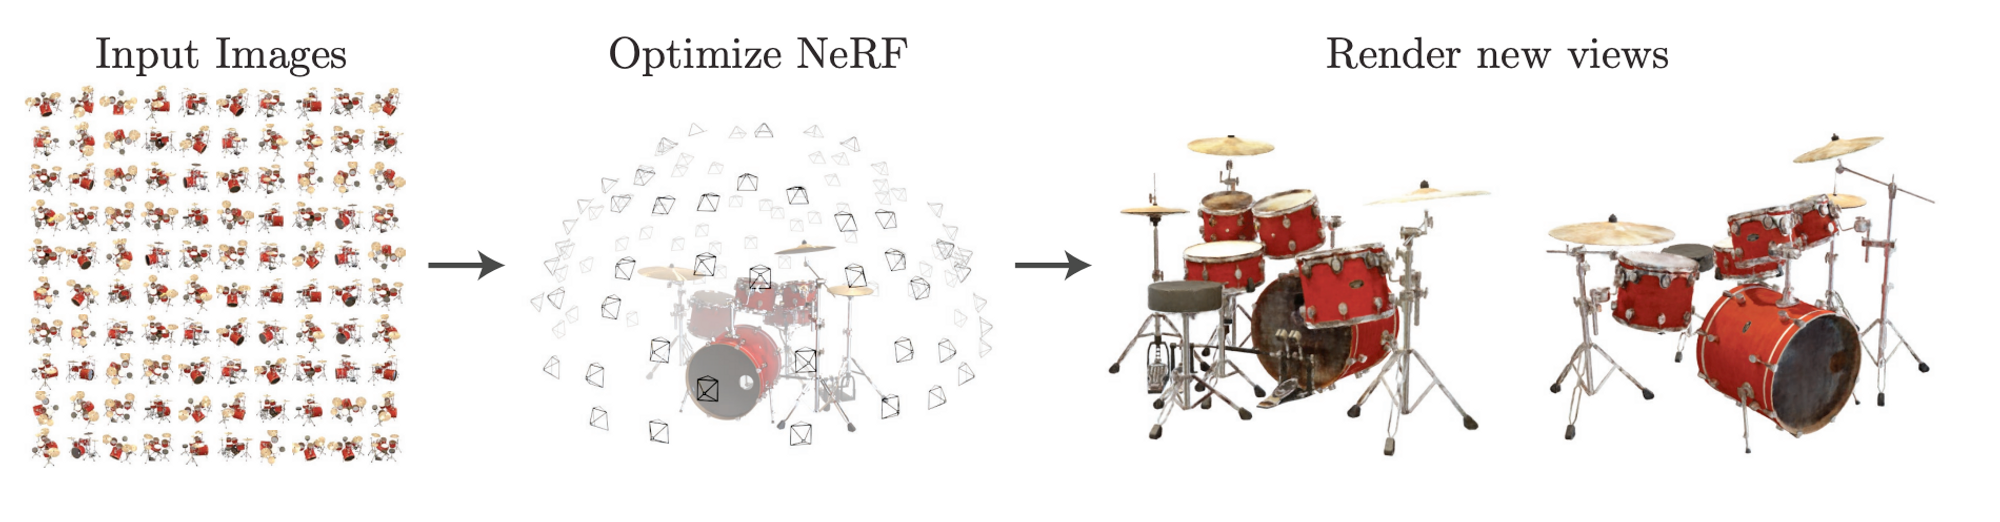
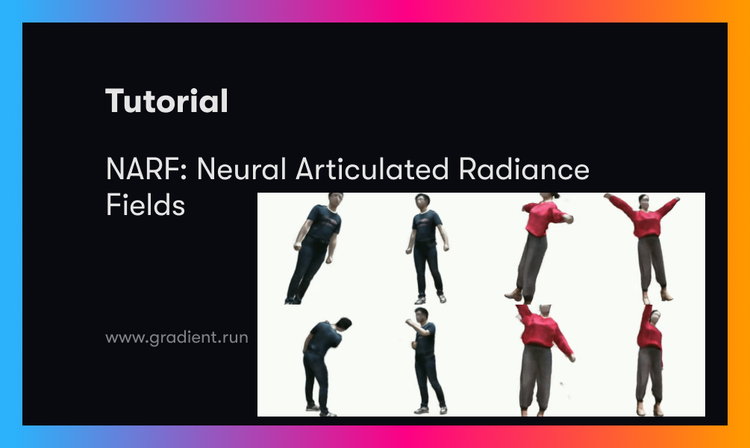
The goal of this project was to create a model that could be used to generate novel views of a scene having only been trained on a few viewpoints of the scene as seen in the image above.
NeRF is a generative model that is conditioned on a collection of images and accurate poses (e.g. position and rotation), that allow the trained model to generate new views of a 3D scene shared by the images (view synthesis).
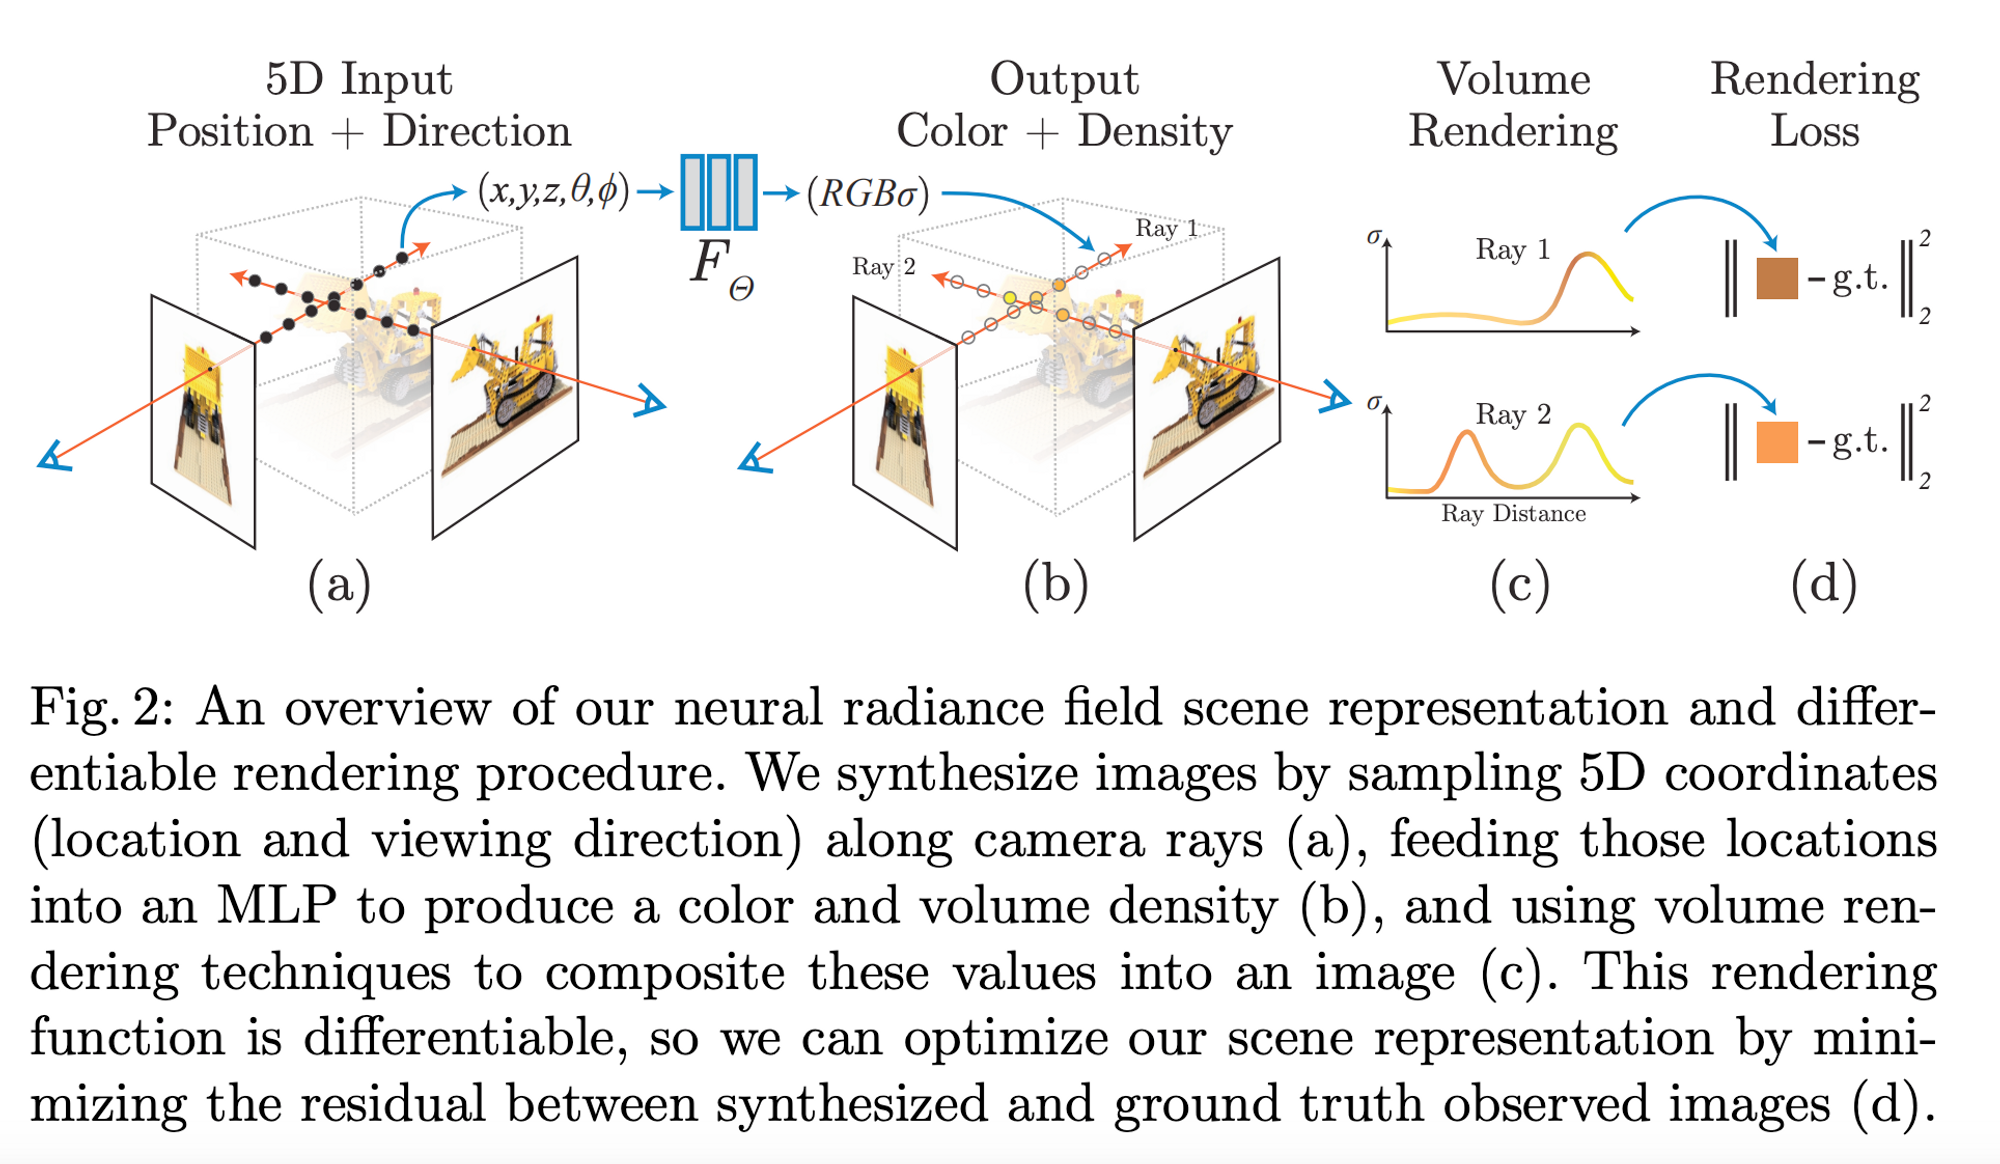
NeRFs rely on light field functions which describe how light transforms throughout a 3D volume. It describes the direction of light rays moving through every $x = (x,y,z)$ coordinate in space and in every direction $d$ described as $\theta$ and $\phi$ angles or a unit vector. Collectively these values form a 5D feature space that describes light transport in a 3D scene.
NeRFs take in a 5D vector input for each point on the pixel/ray: the position coordinates $(x,y,z)$ and the viewing and rotation angles $(\theta, \phi)$ → $[x,y,z,\theta, \phi]$ and they output a 4D vector representing the output color $(RGB)$ and density $(\sigma)$ of that point → $[R,G,B,\sigma]$
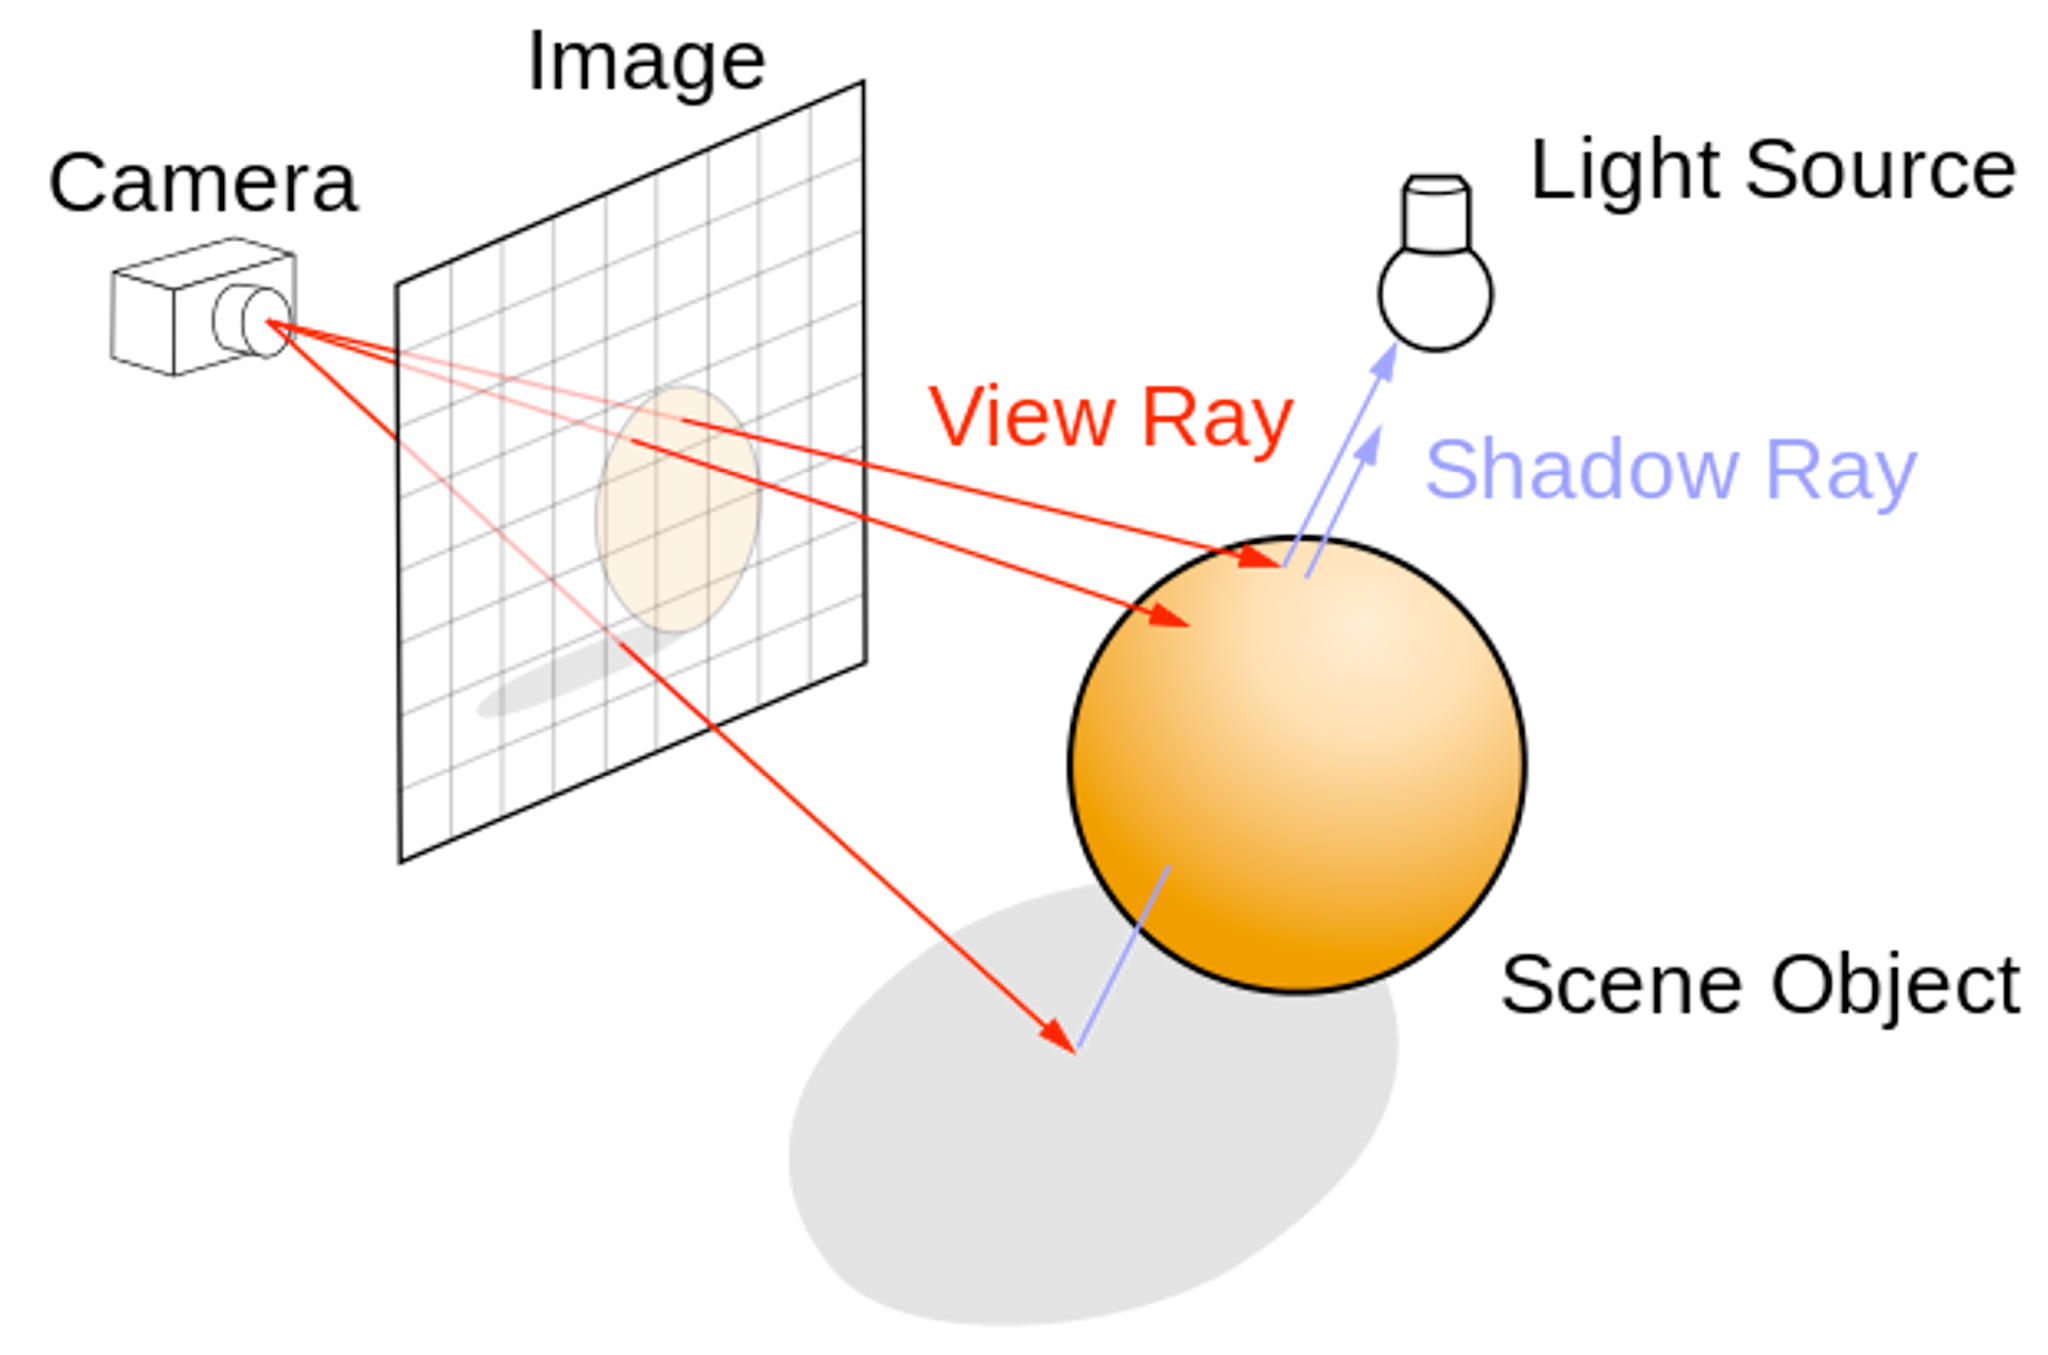
The ray tracing algorithm follows a ray of light from the eye/camera to the objects in a scene. The ray travels from the eye/camera into a pixel of the image and intersects with the nearest object in the scene.
Now that we have some intuition on ray tracing, understanding the rest of the NeRF model is simple. Given a collection of training images with information about the viewing direction, we can assume that the pixels of the images are rays. During training, the MLP learns the rays from known viewpoints i.e. it learns that pixels/rays from specific viewpoints $(\theta, \phi)$ intersect with objects in the scene at known points $(x,y,z)$ on the ray and have the corresponding $\text{color } (RGB) \text{ and density } \sigma$ values. Once the model is trained, you can probe it on a given viewpoint $(\theta, \phi)$ and it will assess all the relevant pixels/rays $(x,y,z)$ of the scene to find the points of intersection with the object in the scene (if any) and the corresponding density and color values of that point. You can think of the density $(\sigma)$ that is output by the MLP as a measure of the occlusion of the ray by the object.
If you probe the model with several viewpoints you can get a 360 degree view of the scene having trained on only a sparse set of images.
Applications:
- View synthesis for videogames and augmented reality applications
- Scene generation for visual artists (wallpapers, murals, etc.)
Bring the NeRF project to life
DreamFields (UC Berkley, Google)
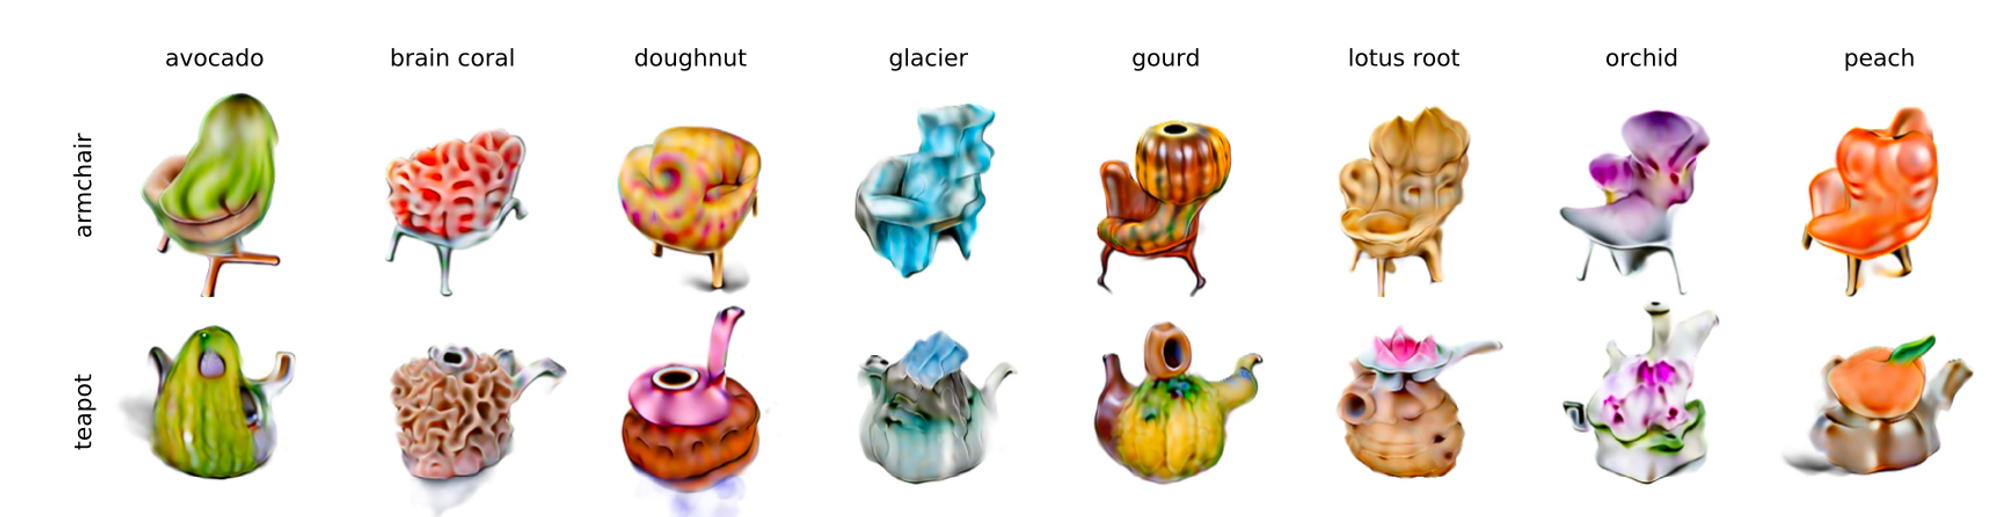
The main idea of this project is to automatically generate various 3D models from natural language prompts. The authors demonstrate that they can use language to control the shape, color, and style of the 3D object.
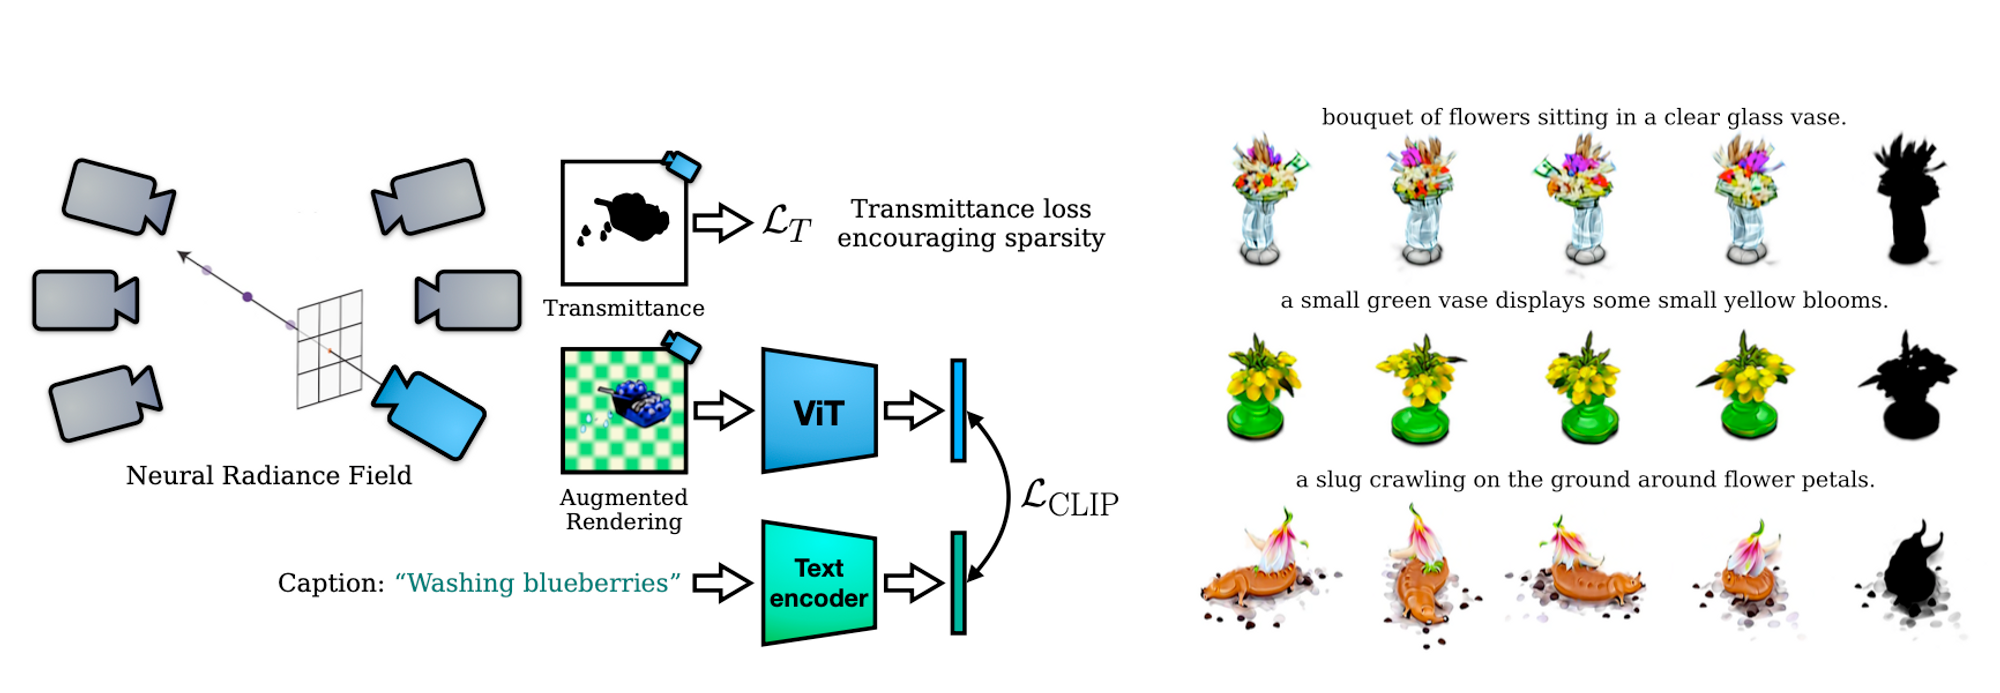
A Dream Field is a NeRF trained to maximize a deep perceptual metric with respect to a scene's geometry and color. NeRFs, as we know, generate novel views after being trained on input images of a scene from different viewpoints. However, when training a NeRF using a 2D text-to-image model, we are not likely to have a range of viewpoints from a single image or even a collection of images generated from the same prompt. With this in mind, the authors decided to train a radiance field whose renderings have high semantic similarity with the text prompt as opposed to the input image(s). In order to meet this objective, the development of the Dream Fields model involves optimizing both CLIP embeddings and NeRFs volumetric renderings.
How do they do it?
- Just like NeRF, Dream Fields optimize an MLP to output the color and density for every point of a 3D scene $(x,y,z)$
- In this project, the scene representation is only dependent on the 3D position and not the viewing direction $(\theta, \phi)$
- They assume that an object can be described similarly when observed from any perspective. Therefore, they randomly sample poses and try to enforce the rendered images to match the caption at all poses. They use a trained CLIP network to measure the match between a caption and an image. In this article, I will refer to this measurement the CLIP distance.
- In each iteration, the goal is to randomly sample a pose p and render an image I, and then minimize the CLIP distance with respect to the parameters of the Dream Field MLP $\theta$.
The authors note that training the NeRF on a few viewpoints and optimizing on CLIP distance alone results in artifacts that are not visually compatible according to humans: "The geometry is unrealistic but that texture reflects the caption"(Jain, Ajay, et al.)
To resolve this issue, they applied a few optimization techniques:
- Pose Sampling
Because image augmentation (crops, rotations) only works in 2D, Dream Fields support 3D data augmentation by randomizing different pose extrinsics at each training iteration. This leads to an improvement in the realism of object geometry.
Some of these extrinsics include camera elevation, focal length, and distance from the subject. Although they tried different augmentations they found that the best results were obtained when they used a fixed-scaled focal length (x1.2) during optimization. - Encouraging Coherent Objects through Sparsity
Transmittance is the probability that light traveling from the source to the object will be absorbed by other materials along the way to the object. If the probability of transmittance is high it means that less light makes it to the object and the object at the point of intersection is less visible.
In order to remove spurious artifacts in the final rendering, they maximize the overall transmittance and implement a threshold transmittance probability of 88%. This means that 88% of the light traveling from the source to the object will make it to the object. The authors note that doing this improves geometry and prevents transparent scenes. - Randomizing the Rendered Backgrounds
Well, the authors note that when they rendered the objects onto a white or black background during training the transmittance value approached the target (88%) but the overall scene was messy. When they augmented the scene with random background images, they obtained coherent objects. The random background images in question here are Gaussian noise, checkerboard patterns, and random Fourier textures. - Guiding the Object Localization
Because natural images in CLIP’s training data may not always have the object centered, the model maintains an estimate of the 3D object’s origin and shift rays accordingly. To prevent the rendered objects from drifting too far, they bound the scene inside a cube which is created using the pixel/ray density values predicted by the NeRF.
Applications
- Personalized 3D object generation
Bring Dreamfields to life
DreamFusion (Google)
DreamFusion is a diffusion model aimed at generating 3D images from text inputs. They used a pretrained 2D text-to-image diffusion model to perform 3D object synthesis without the need for 3D training data. They also use NeRF (above) as a building block for optimizing the 3D rendering during the training process.
DreamFusion follows the work on DreamFields (above) which uses CLIP to guide the 2D text-to-image generation. In this project, however, they use a pretrained Imagen model as a text-to-image diffusion guide.
How do they do it?
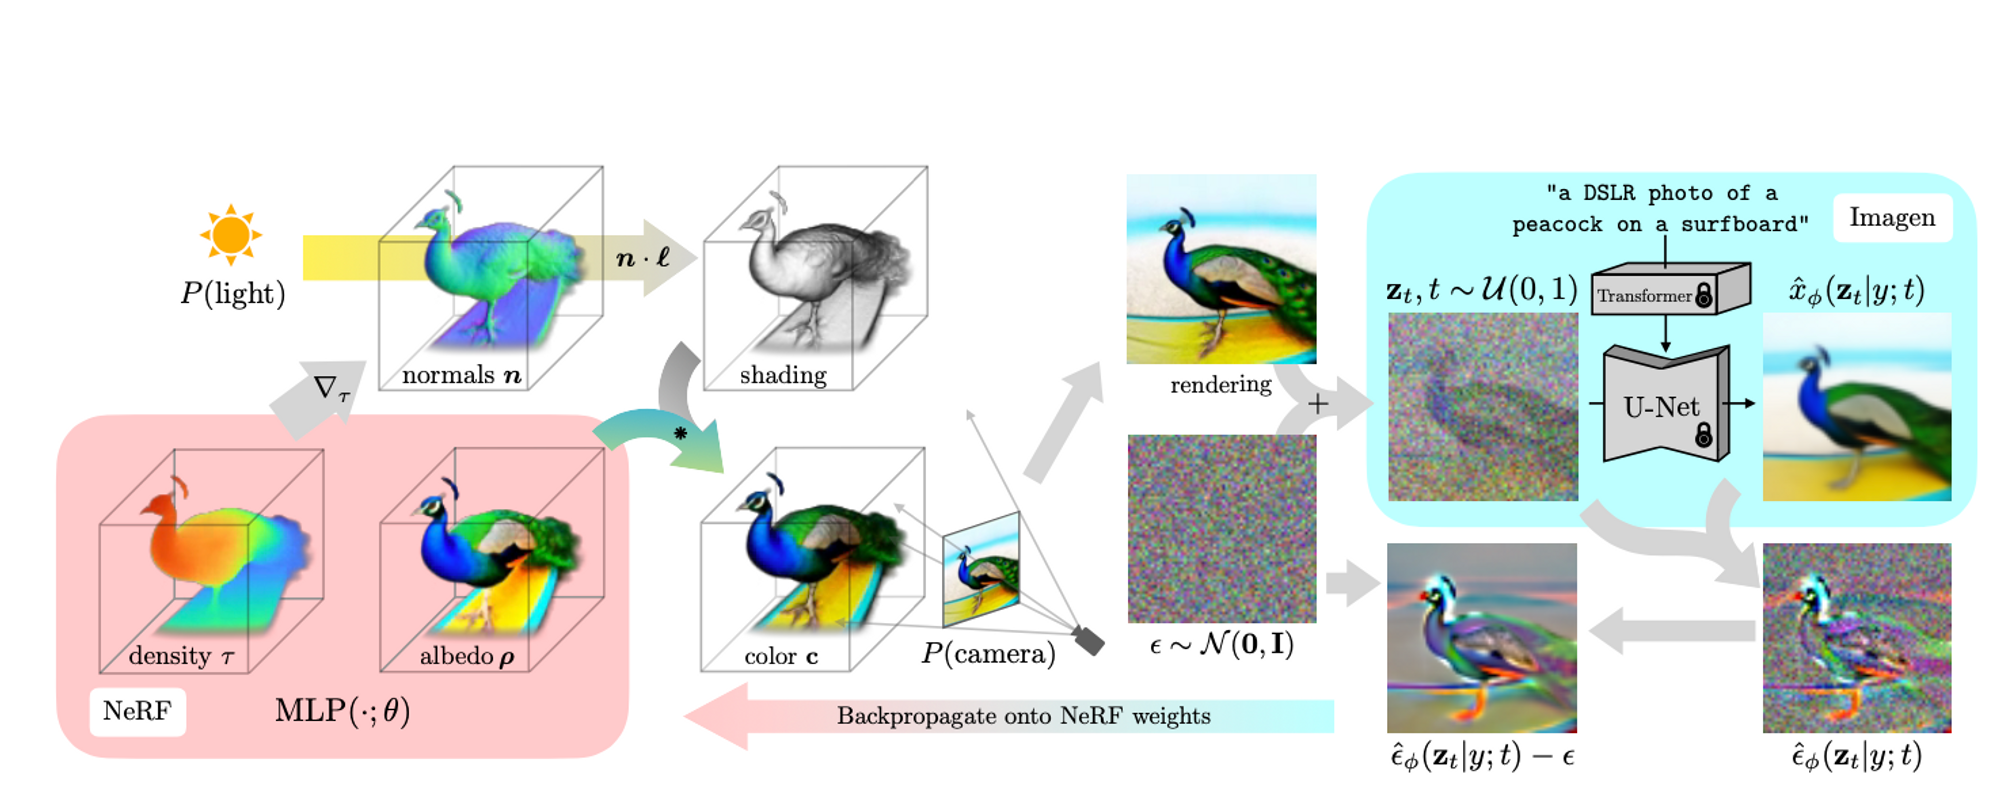
- To synthesize a scene from a text, the first step involves generating an image using Imagen and then initializing a NeRF model with random weights.
- Thereafter, they repeatedly render views of the Imagen-generated scene from random camera angles and positions.
- The renderings from NeRF are used to score the distillation loss function that is centered on Imagen. This means that every NeRF-rendered image is assessed on the likelihood that it came from the Imagen model conditioned on the given text prompt.
- Once the loss is calculated, the NeRF parameters are updated and another batch of images is rendered from different camera angles and positions. This process goes on iteratively until we get a fine-tuned NeRF model for the given text prompt.
The NeRF that they use is MIP-NeRF 360 which was originally designed for 3D reconstruction of images. Their model is different from basic NeRFs because it is able to parameterize the color of a surface and then control the illumination of that surface.
In order to structure the scene, they query the NeRF model to render an object within a fixed bounding sphere and then use a separate neural network to compute the background color.
Applications
- Personalized 3D object generation
Bring Dreamfusion to life
Magic3D (NVIDIA)
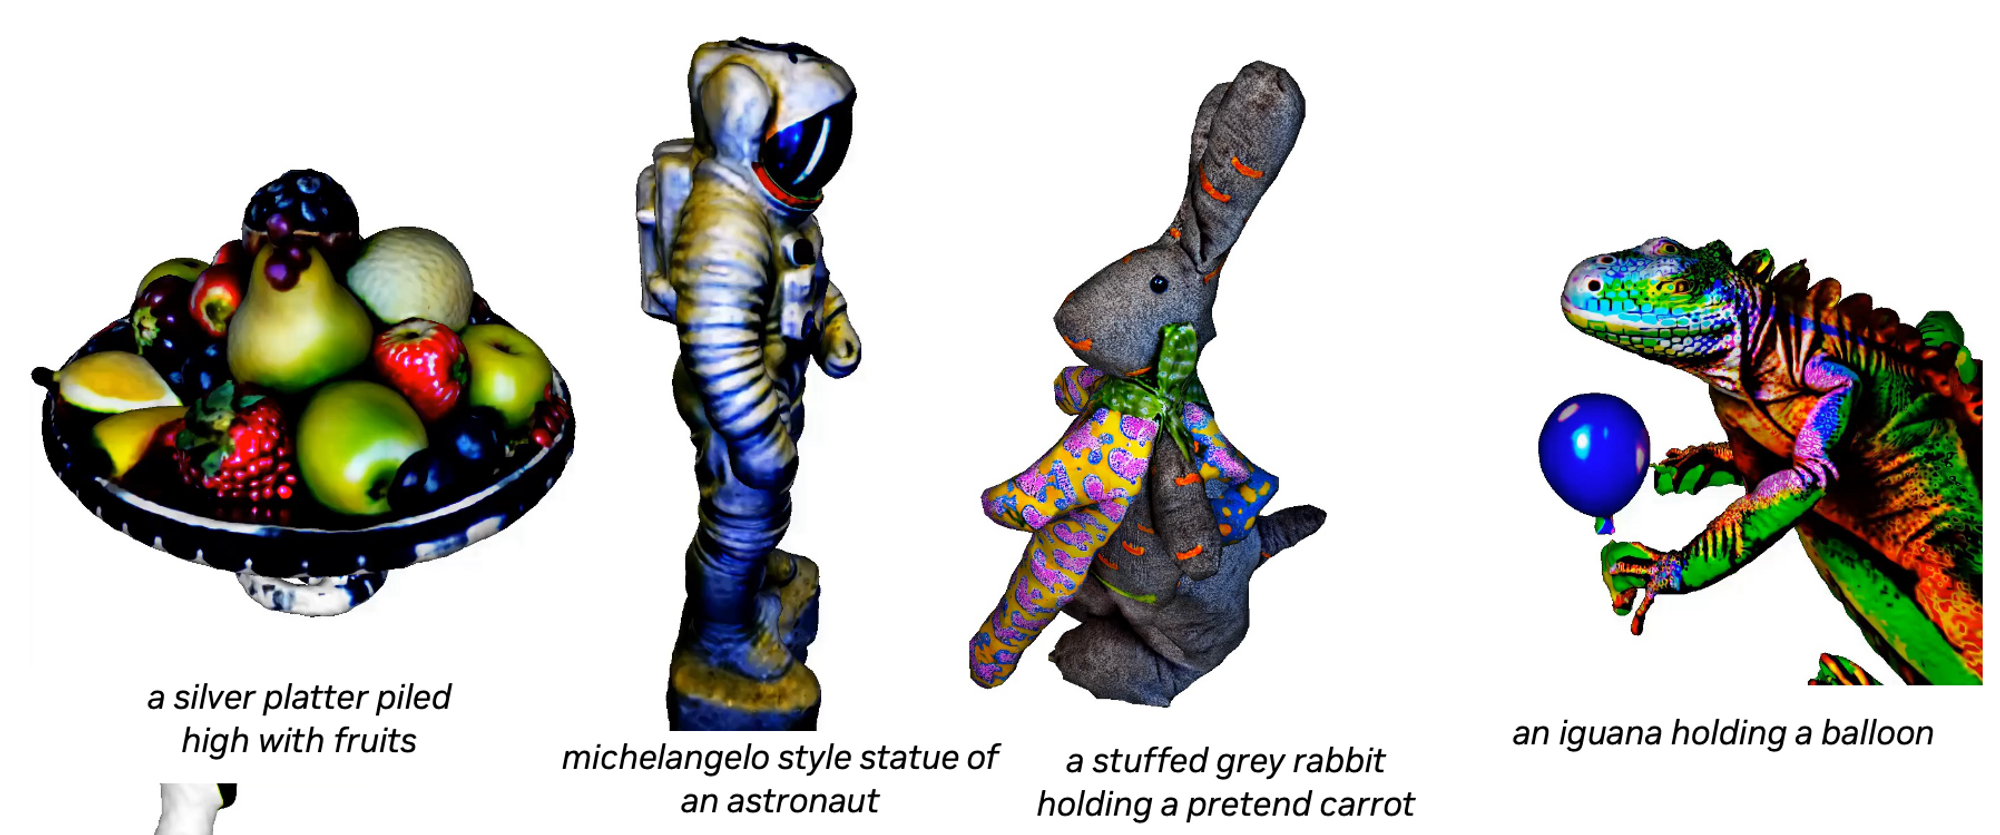
The goal of this project is to create a text-to-3d diffusion model. Like DreamFusion, they use 2D image diffusion models as a prior for their 3D generation, however, their model is twice as fast and generates higher resolution 3D models because they use multiple diffusion priors. A prior is simply a trained network that guides the generation process. In 3D generation, the prior is often used to calculate the loss function based on 2D images which are snapshots of the 3D object that was generated. The implementation of this model happens in two stages: the coarse (low-resolution) stage and the fine (high-resolution) stage.
How do they do it?
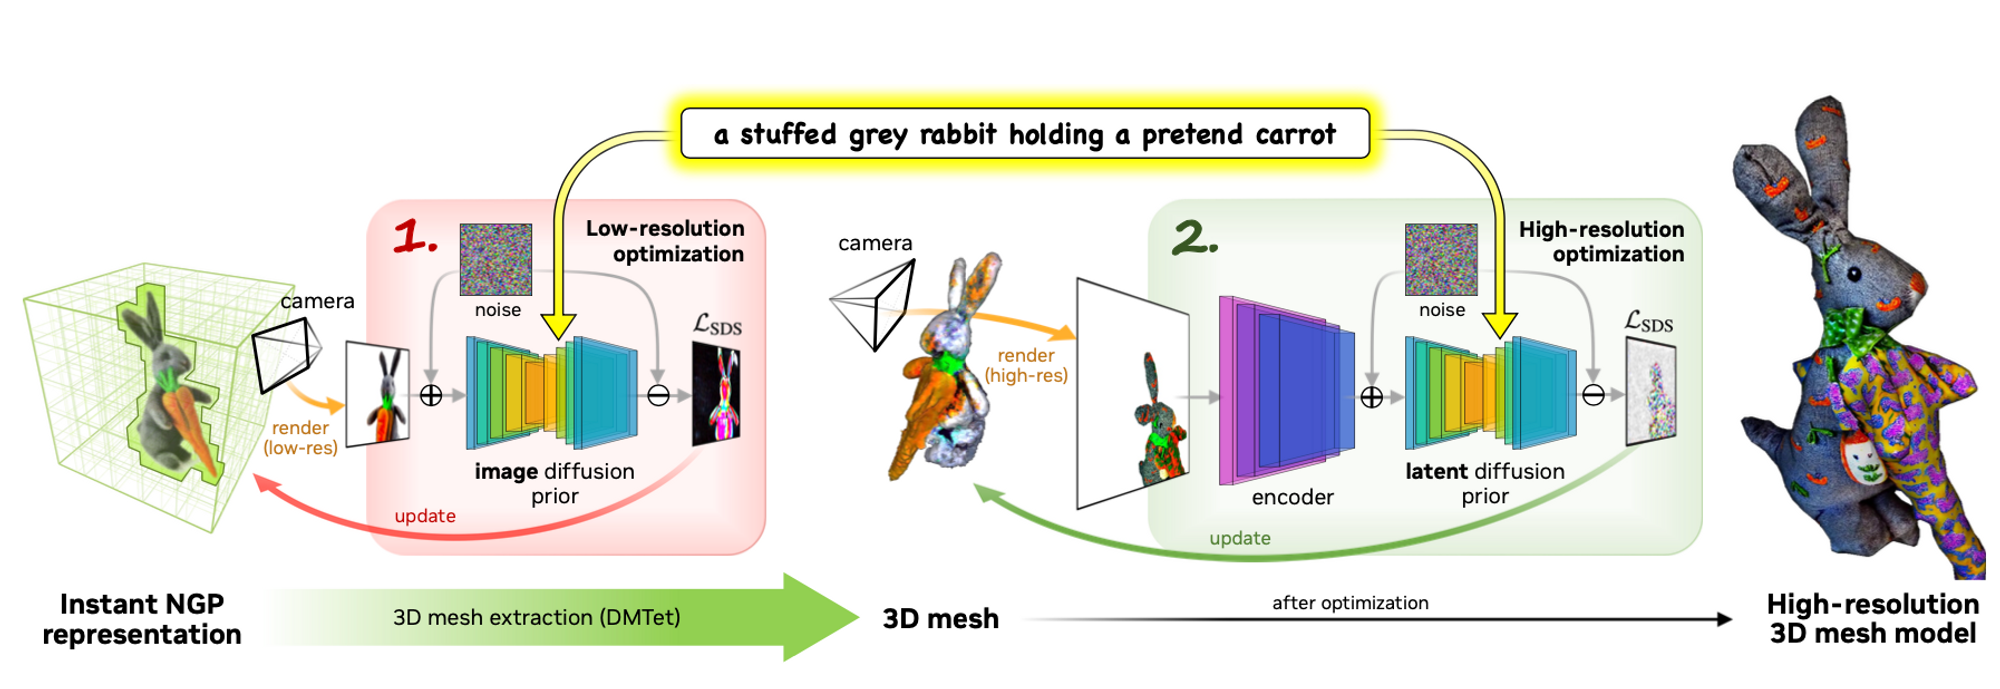
- The first step involves utilizing a low-resolution diffusion prior and optimize neural field representations (color, density, and normal fields) to obtain the coarse model.
- Thereafter they differentiably extract textured 3D mesh from the density and color fields of the coarse model.
- After getting the coarse mesh, they fine-tune it using a high-resolution latent diffusion model. After optimization, the model generates high-quality 3D meshes with detailed textures. (Lin, Chen-Hsuan, et al.)
Model Details:
Coarse (Low-Resolution) Stage
The 2D image generation model guiding this process is the base model in eDiff1 (similar to Imagen in DreamFusion). This diffusion prior is used to compute gradients of the scene model via a loss defined on low-resolution rendered images.
In order to generate the scene in the coarse stage, they utilize neural fields. The initial stage involves finding geometry and textures from scratch given a 2D image. This is a challenging task because of the topological changes in 3D and depth ambiguity from 2D images.
Because NeRF is computationally expensive, they chose to use the hash grid encoding from Instant NGP, which allows them to represent high-frequency details at a much lower computational cost. The hash grid contains two single-layer neural networks one for predicting albedo and density and one for predicting normals.
In order to avoid computing over empty space, they “use the density-based voxel pruning approach from Instant NGP with an octree-based ray sampling and rendering algorithm.” ( Lin, Chen-Hsuan, et al.)
Fine (High-Resolution) Stage
In the fine stage, the model guiding the generation process is a latent diffusion model (LDM) that allows backpropagating gradients into rendered images at a high resolution of 512x512. In this project, they use Stable Diffusion.
The scene model used in this stage is a textured mesh model. Unlike volume rendering for neural fields, rendering textured meshes with differentiable rasterization can be performed efficiently at very high resolutions. Using a neural field from the coarse stage, they overstep the issue of learning large topological changes in the meshes.
They represent the 3D shape using a deformable grid in which the vertices of the grid have signed distance fields (SDF) values $s_i \in R^3$. Each vertex also contains a deformation vertex $\triangle v_i \in R^3$ from its initial canonical coordinate.
They extract a “surface mesh from the SDF using a differentiable marching tetrahedra algorithm” and in order to determine the textures, they use the neural color field as a volumetric texture representation. ( Lin, Chen-Hsuan, et al.)
Applications:
- Personalized text-to-3D
- Style-guided text-to-3D
- Prompt-based editing through fine-tuning
Point$\cdot$E (OpenAI)
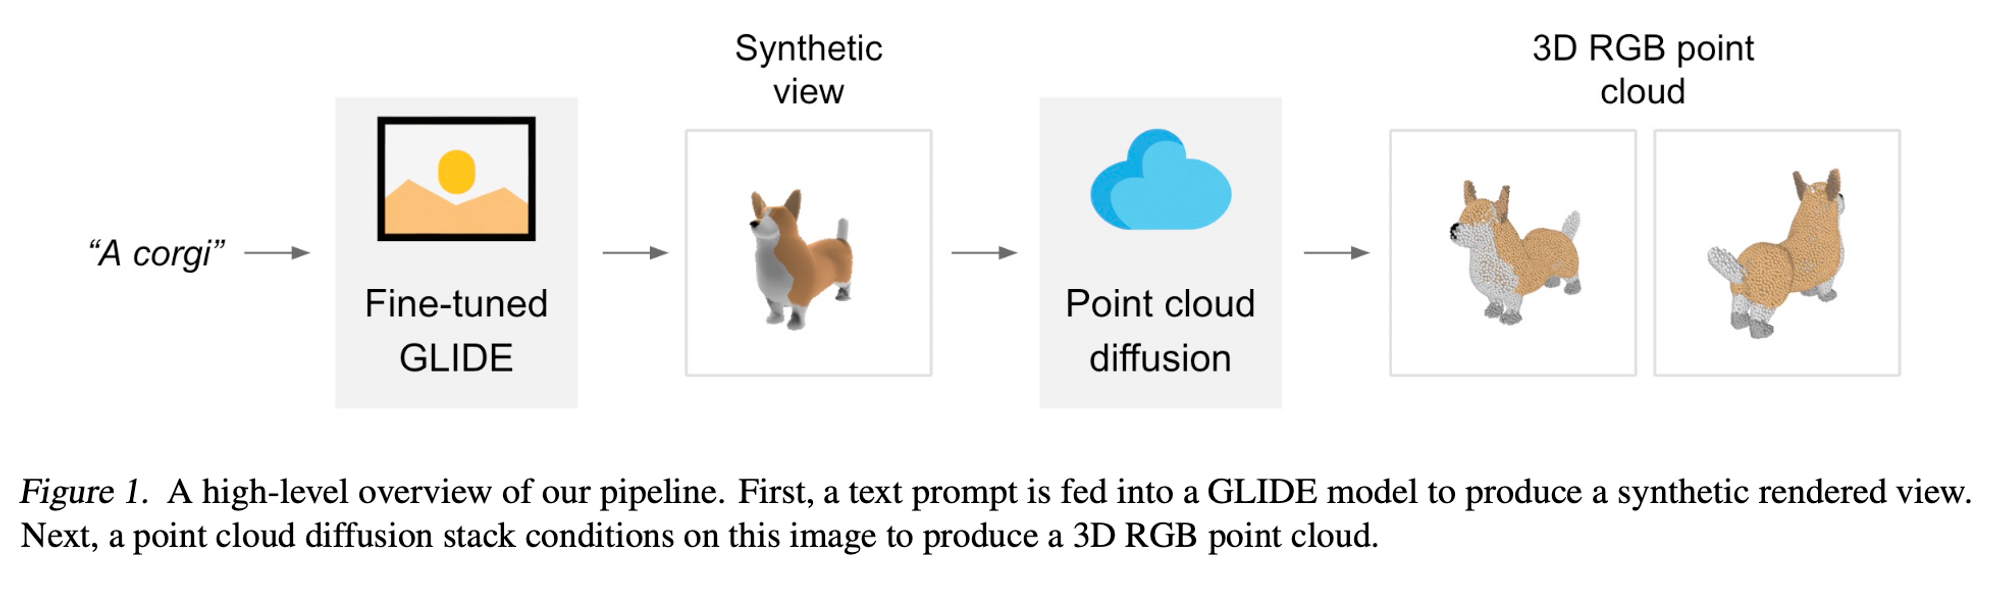
The goal of this project is to produce a 3D object (point cloud) using a single GPU in only 1-2 minutes. Like most of the aforementioned models, this model generates the 3D object using a text-to-image diffusion model to generate a single synthetic view and an image-to-point-cloud diffusion model that produces a 3D point cloud based on the image.
For the text-to-image conditional generation, they use a version of GLIDE fine-tuned on 3D renderings. Their image-to-3D model uses a stack of diffusion models which generate RGB point clouds conditioned on images. In order to perform rendering-based evaluations, they produce meshes from generated point clouds using a regression-based approach.
How Do They Do This?
They break the generation steps into 3 parts:
- Generate a view conditioned on a text caption
- Produce a coarse point cloud (1024 points) conditioned on the synthetic view
- Produce a fine point cloud (4096 points) conditioned on a low-resolution point cloud and the synthetic view
To generate text-conditional synthetic views they use the GLIDE model fine-tuned on rendered 3D models from their dataset. In order to generate low-resolution point clouds, they use a conditional permutation invariant diffusion model similar to GLIDE.
To upsample the low-resolution point clouds to high-resolution point clouds, they use a diffusion model which is additionally conditioned on the low-resolution point cloud.
Their dataset contains millions of 3D models and associated metadata. They process the dataset into rendered views, text descriptions, and 3D point clouds with associated RGB colors for each point.

They represent a point cloud as a tensor of shape Kx6, where K is the number of points, and the inner dimension contains (x,y,z) coordinates as well as the (R,G,B) colors normalized from (-1,1).
They then generate these tensors directly with diffusion, starting from random noise of shape Kx6, and gradually denoising it.
Just like the Magic3D model, they upsample their 3D objects for fine-tuned results. They first generate 1K points with a large base model and then upsampling to 4K points using a smaller upsampling model. The upsampler uses the same architecture as the base model with extra conditioning tokens for the low-resolution point cloud.
In order to render the generated point clouds, they convert them into textured meshes which are then rendered using Blender. Producing meshes from point clouds can be challenging and introduce a lot of noise and outliers into the final output. In order to solve this problem, they use a “regression-based model to predict the signed distance field of an object given its point cloud and then apply marching cubes to the resulting SDF to extract a mesh.” (Nichol, Alex, et al.)
Finally, they assign colors to each vertex of the mesh using the color of the nearest point from the original point cloud.
Applications
- Creating CAD artifacts
- Personalized 3D generation
- Making pretty point clouds :)
Bring Point E to life
Summary
All the models highlighted above are useful for creating 3D objects that can be used in other domains i.e. computer-aided design, filmmaking, gaming, etc. There are 2 factors to consider when choosing between the available models: object resolution and access to auxiliary software i.e. Blender for point clouds. While all the projects highlighted in this article have commendably pushed the frontier in terms of 3D object generation, the current state-of-the-art projects are Magic3D and Point$\cdot$E. Magic3D is the better option if you are trying to generate continuous 3D objects which can be used in different domains. Point$\cdot$E is great if you would like to generate point clouds. I went into detail about the methods used in the different projects because the various optimization techniques are in fact modular. If the reader decides to revise an implementation of a model to better suit their task, then it becomes apparent what the tradeoffs are when one switches out a component of the model for something else. 3D generation is still relatively new and ripe for exploration given that there are few “3D-object and text-caption” paired datasets publicly available. I am optimistic that this area will continue to grow in the near future.
Citations:
- Mildenhall, Ben, et al. "Nerf: Representing scenes as neural radiance fields for view synthesis." Communications of the ACM 65.1 (2021): 99-106.
- Jain, Ajay, et al. "Zero-shot text-guided object generation with dream fields." Proceedings of the IEEE/CVF Conference on Computer Vision and Pattern Recognition. 2022.
- Poole, Ben, et al. "Dreamfusion: Text-to-3d using 2d diffusion." arXiv preprint arXiv:2209.14988 (2022).
- Lin, Chen-Hsuan, et al. "Magic3D: High-Resolution Text-to-3D Content Creation." arXiv preprint arXiv:2211.10440 (2022).
- Nichol, Alex, et al. "Point-E: A System for Generating 3D Point Clouds from Complex Prompts." arXiv preprint arXiv:2212.08751 (2022).


