Creating 3-D models and deploying them for real-world applications is a major aspect of developing them. These created models are used for numerous purposes, such as cartoon designs, movie animations, game designing, architectural structures, and so much more. These achievements of 3-D modeling are exceptional, and there is a continuous progression in the following field with the introduction of newer methodologies and technologies.
In the first part of this series of 3-D modeling with Python scripting in Blender, we covered most of the essential basic requirements. However, one could notice that the project we implemented was lackluster in terms of colors. This concept is precisely what we will understand and discuss in the second part of this 3-D modeling series. In this article, we will add some much need backgrounds and textures to the monkey mesh. Take a quick peek at the table of contents to gain an intuition of the upcoming topics of discussion.
Table Of Contents:
- Introduction
- Adding Backgrounds To Your 3-D Models with Blender
- Adding Backgrounds in Blender with Python
1. Importing the essential libraries
2. Importing the Monkey mesh
3. Selecting the camera
4. Displaying the Background in the camera view
5. Compositing The Background
6. Saving the rendered image in the respective path - Adding Textures To Your 3-D Models with Blender
- Adding Textures in Blender with Python
1. Importing the essential libraries
2. Adding the Monkey mesh
3. Positioning the camera
4. Adding the texture
5. Assigning it to the object
6. Saving the rendered image - Final combination of both backgrounds and textures
- Conclusion
Introduction:
The process of adding background images and textures to a 3-D object holds a high significance in 3-D modeling. Apart from making the entire structure and look more aesthetically pleasing, it also adds quality and a high appeal to our models. In the previous article, we designed multiple models (monkey meshes) with multiple camera views. However, the overall structure was quite basic and did not include any other core detailing. Hence, the overall rendered image generated was not appealing or majorly realistic.
In this article, we will change this factor by applying both the backgrounds and textures to our model. We will firstly proceed with the implementation of the background with the help of only Blender and the numerous tools provided to the users in Blender. Once we successfully implement the following task in Blender, we will proceed to analyze how to perform the exact same action with the help of Python programming.
With the help of a few Python code blocks, we can understand how these actions work and how we can replicate the same task with ease. Similar to the background generation, we will also perform a similar implementation for both the textures adding with Blender and with Python programming. Once we are able to individually implement both the tasks of adding the backgrounds and adding the textures accordingly, we can proceed to combine both of them together and fit the object mesh. The Blender file and codes for the successful implementation of the background and texture with the monkey mesh will be provided.
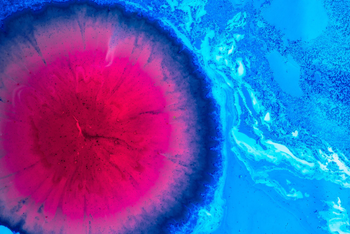
Adding Backgrounds To Your 3-D Models with Blender:
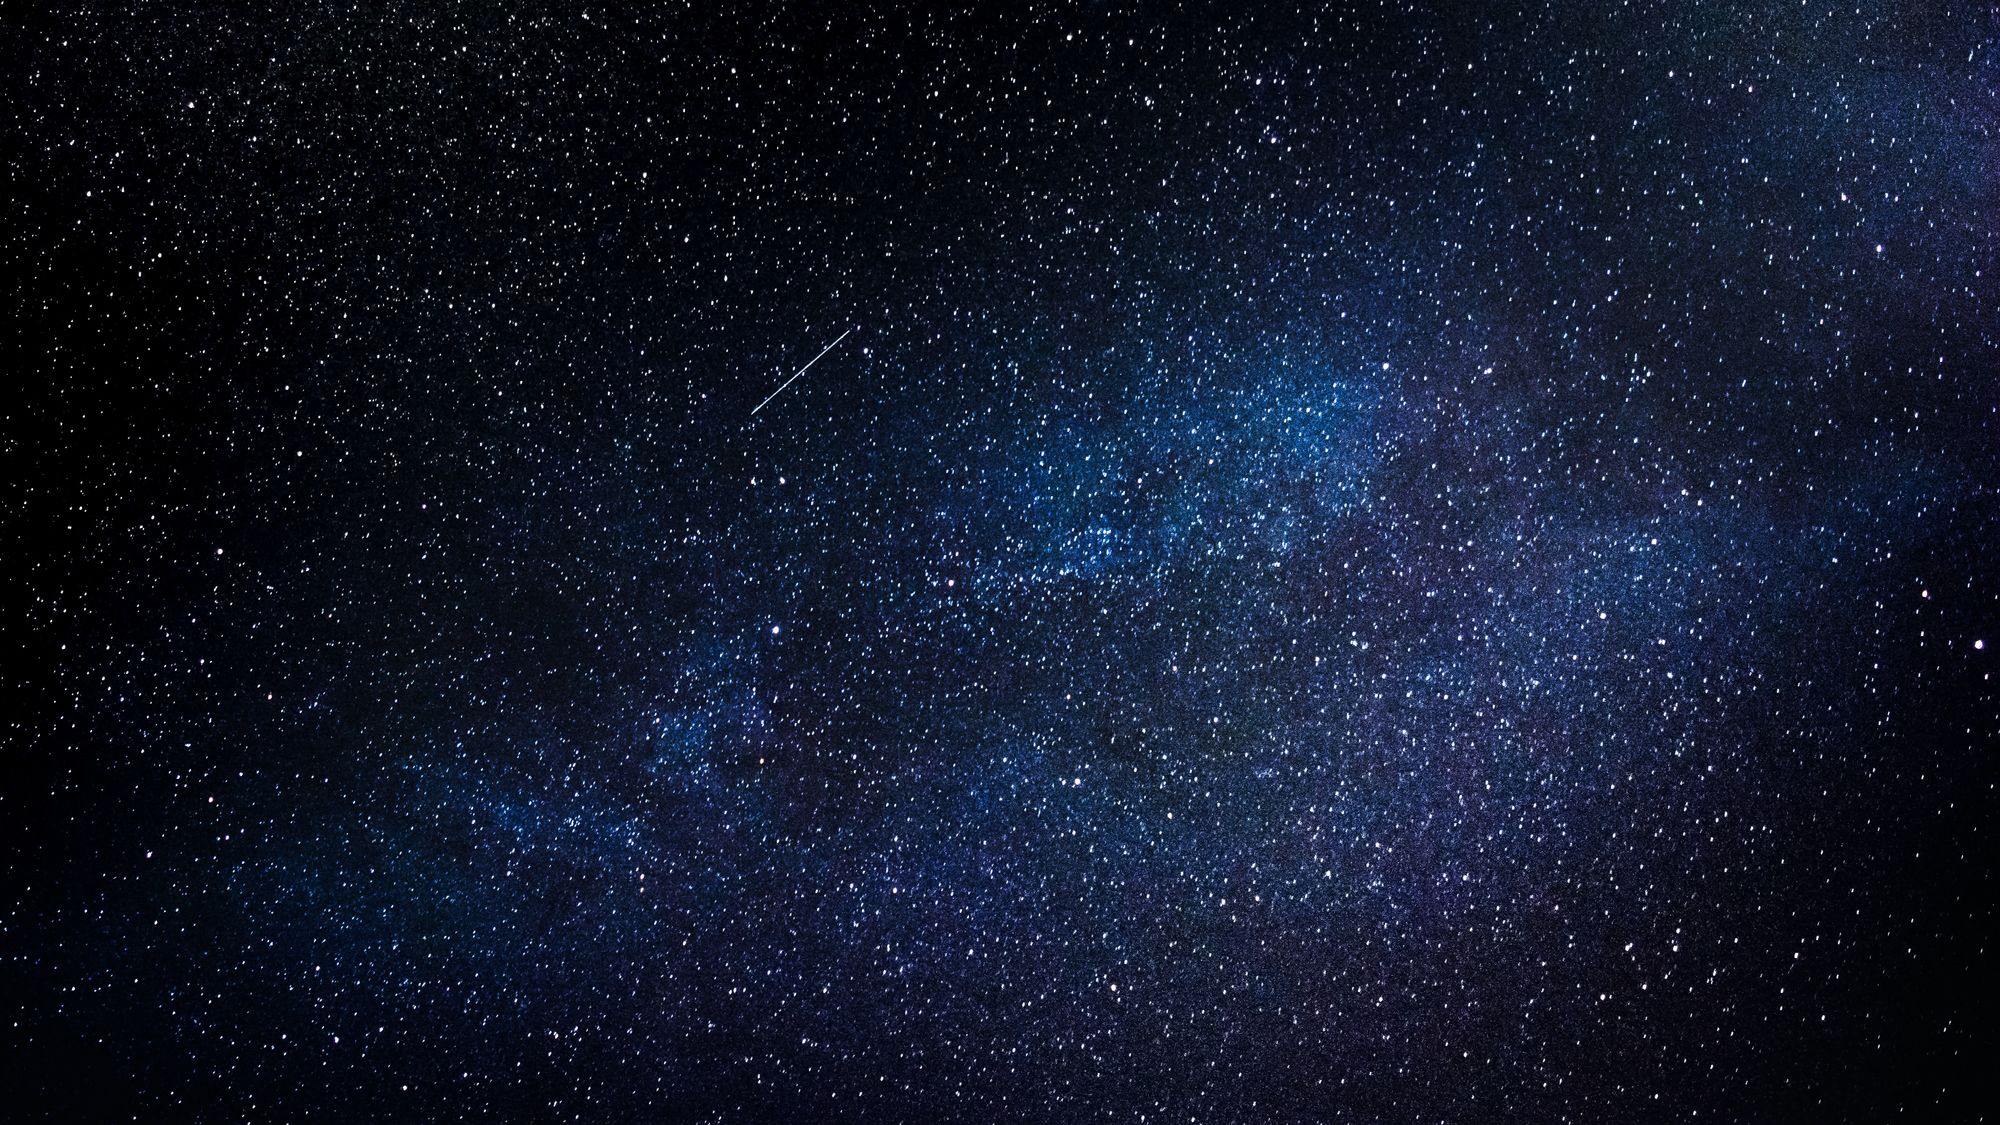
The above image is one of the background images that we will use throughout the article. I would recommend downloading the above image and saving it in an accessible directory with the name "Universe.jpg" for reusing the image multiple times throughout this project. Ensure that you remember the path in which you are storing this picture so that you can either open it with Blender or specify the Python path to access the image. To re-iterate, the article assumes that the developers have some basic knowledge of working with Blender or have read the first part of this 3-D modeling series. Let us get started by making the necessary imports and adding the background to our object.
The first step is to ensure that you delete the initial cube that is placed by default in the central location of the Blender screen. You can do this operation of selecting the object with your mouse and clicking the delete button on your keyboard. The essential steps for performing this action are mentioned in detail in the first article. If you any clarifications, please re-visit part of this 3-D modeling series. Once the monkey mesh is placed on the blender screen, our next step is to adjust the camera or the object accordingly.
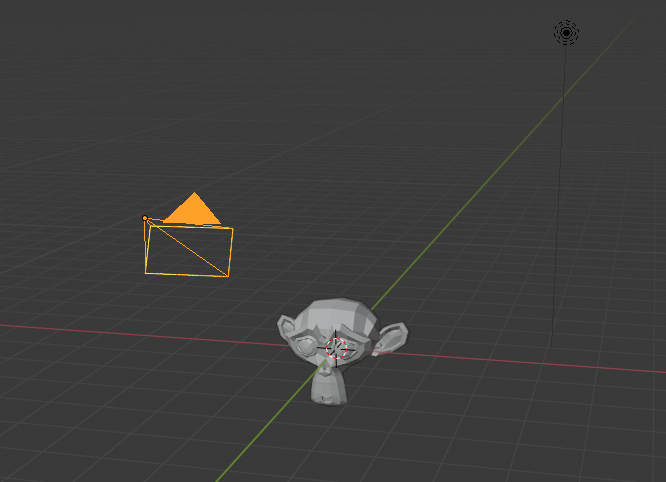
It does not matter if you either choose to change the position of the object or the camera. For reference, I will change the position of the camera. Similar to the first article, click on the camera module in Blender and press 'G' on the keyboard to drag it to a suitable location. Once you drag it to the required location and place it, you can also click 'R' on the keyboard and select the respective axis to rotate the camera around. You can select the 'X', 'Y', or 'Z' axis for rotating and placing the camera in the desired position. Once this step is completed, you should have a couple of figures that look like the following image shown below.
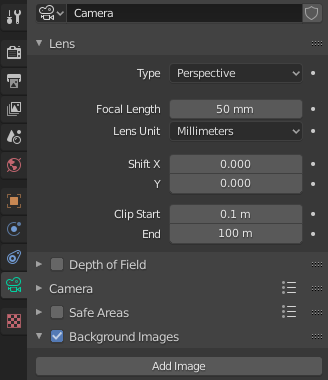
With the camera selected, click on the Numpad 0 button to check the view. Once confirmed that you have the perfect view, the next step is to ensure the settings and properties are adjusted accordingly. Towards the right side of the Blender platform, you will find the properties window where you can click on the camera icon and check the background images option. After checking the small box, you can choose to add the background image of your choice. Remember the path where you saved the "Universe.jpg" previously and proceed to add the image to Blender. Another step to ensure you complete is to click on the render properties icon in the properties window and scroll down to the film section. Check the transparent icon, and you can finally proceed to re-click the Numpad 0 button to view the object in the respective background.
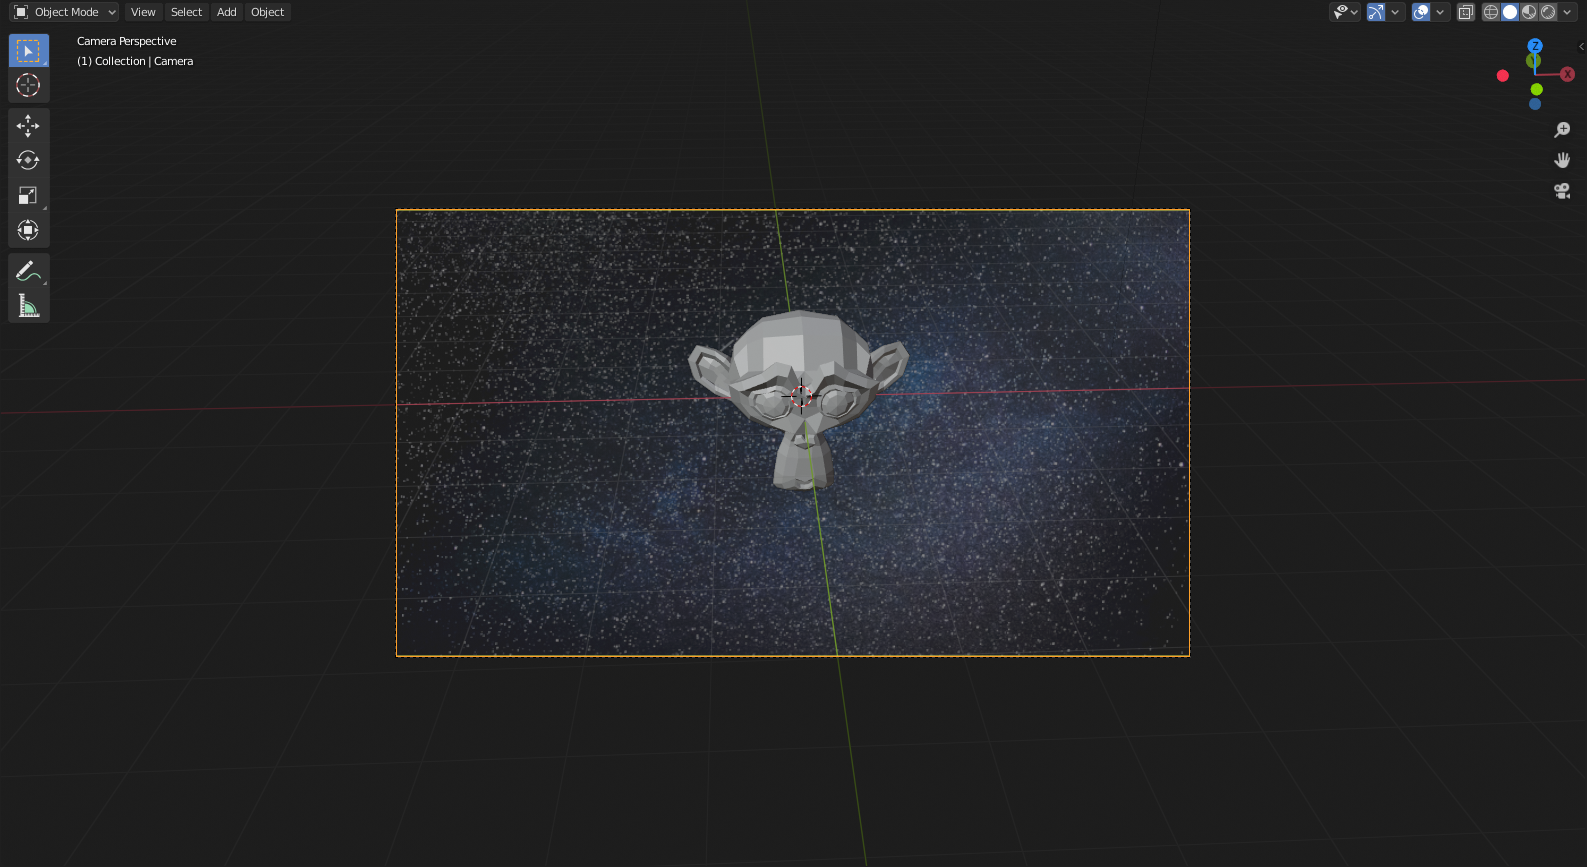
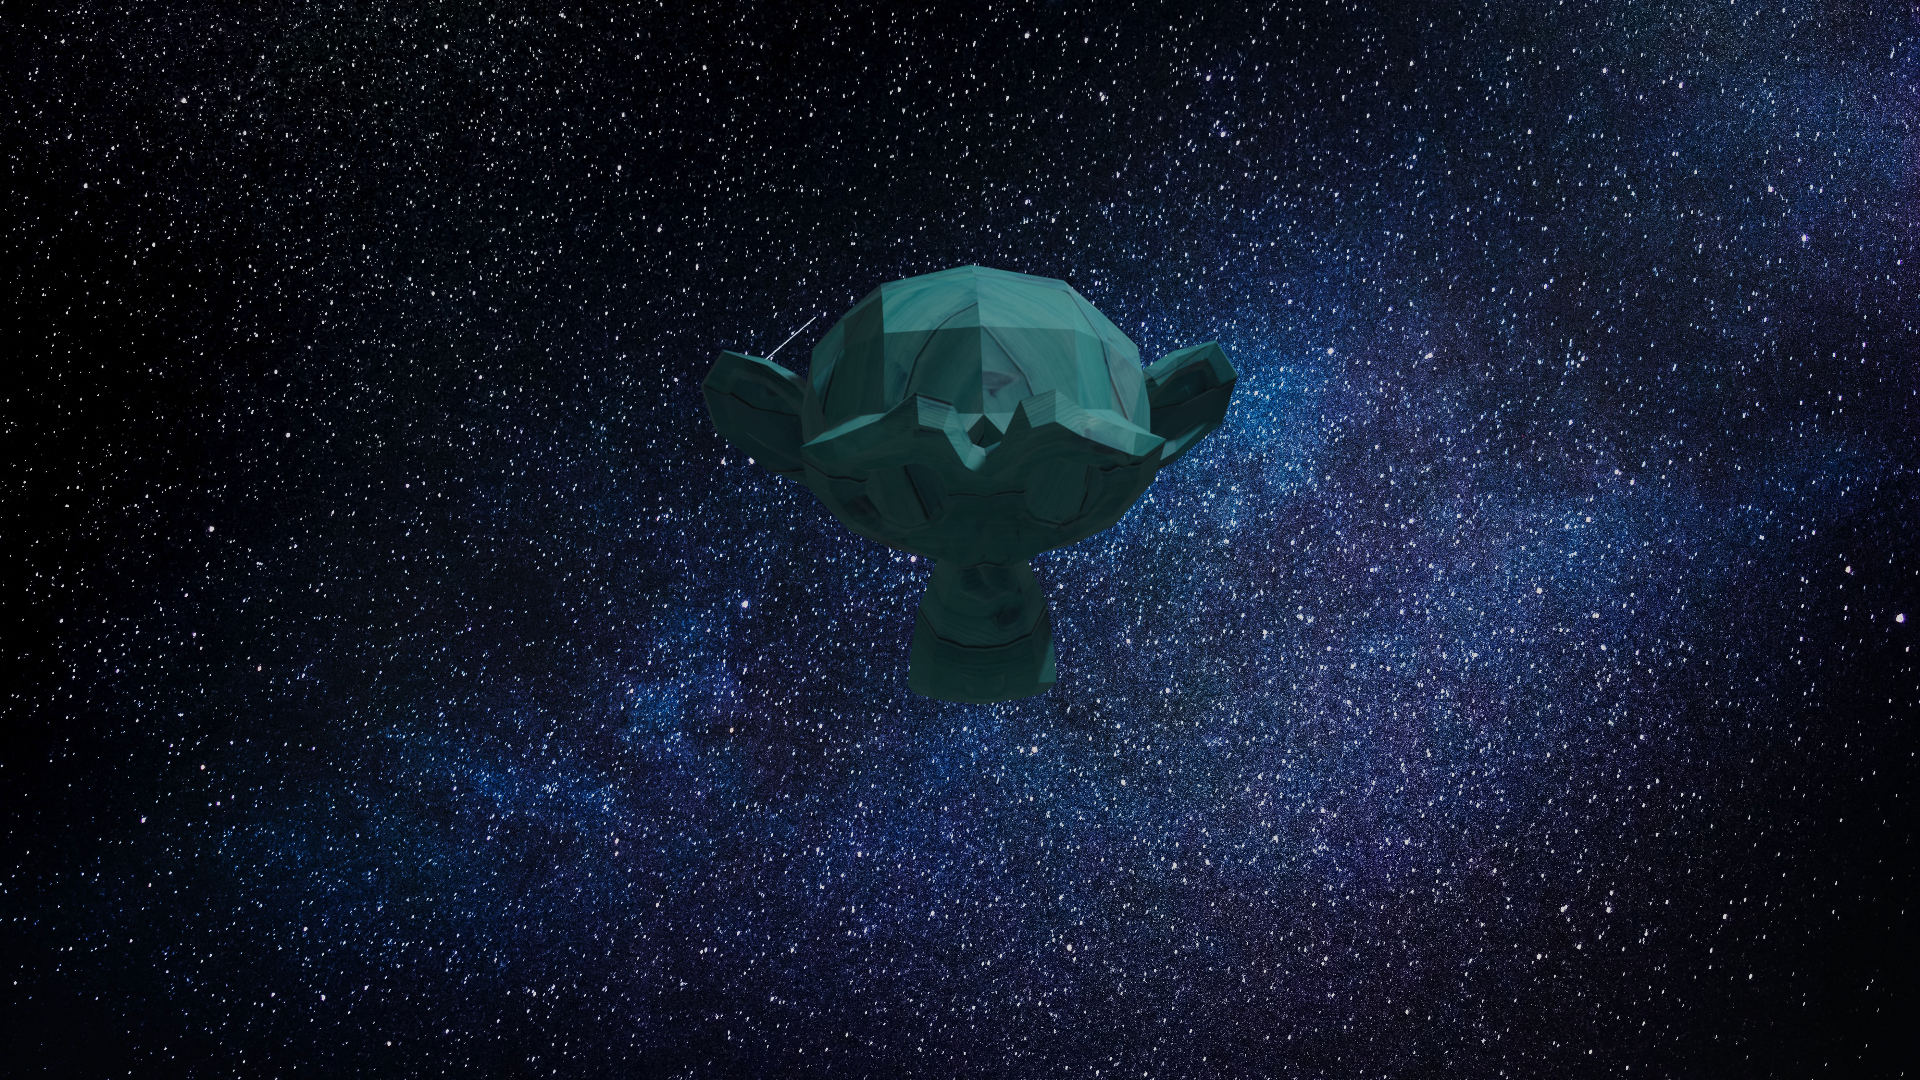
If all the steps are followed accurately until this point, then the users can view the background with the camera view. However, when you try to render the image by clicking the F12 button on the keyboard or by going to the Render option in the menu tab and clicking on render image, you will notice that the background has not yet been applied to the entire image. Despite the background being visible in the camera view has not yet been applied to our render settings. While you can take a screenshot of the same and save the image in Desktop, we will need an actual rendered image for many different types of applications. Hence, our next step is to add the required compositing so that we view the background image, inclusive of the renderings as well. The below image shows the representation of the monkey mesh placed in the respective Universe background in the camera view.
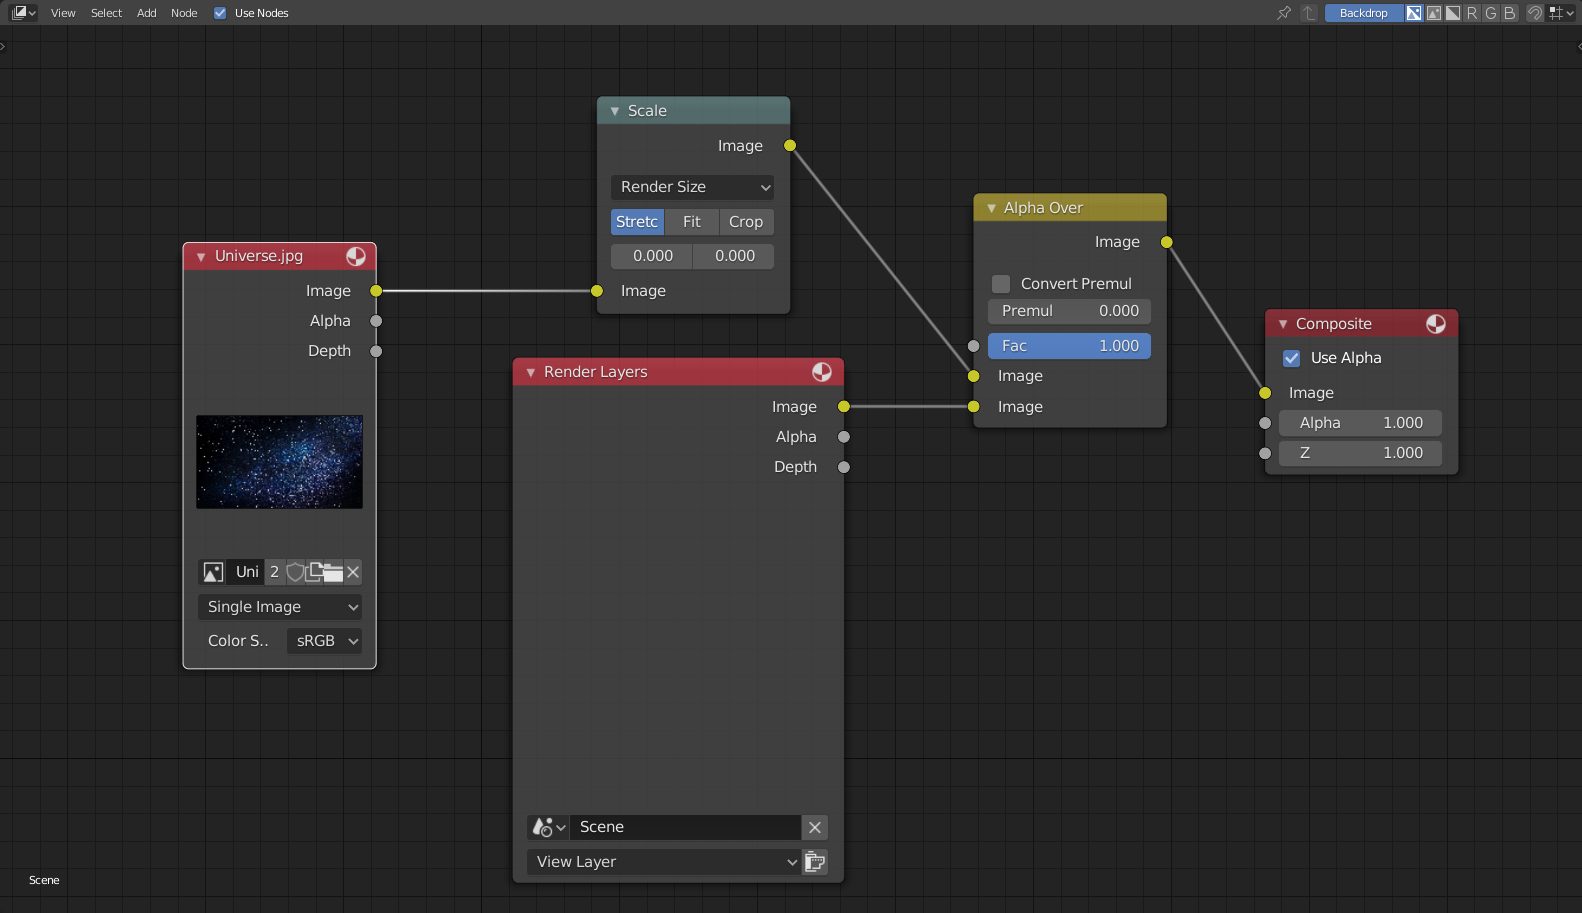
Now that we have the required mesh and the appropriate background in the camera view, our next task is to perform the compositing actions so that our image will include both the object mesh and the Universe background in the render settings. Click on the compositing option in the main menu bar. upon entering the new layout, select (check) the use nodes option that is available on the screen. Checking the use nodes options will display the render layers and the composite boxes, which we can utilize for constructing our background. We will need to add three additional boxes and set some properties for each of them so that we can access the background in the render view. Follow the remaining steps as mentioned below and ensure that your properties are set as shown in the schematic representation.
- Firstly, we will add the input image that we need to pass through with the help of the image node. For creating this node, find the add icon in the compositing menu bar and follow these steps -
$ Add --> Input --> Image $
Once the input image node is added, our next task is to add the jpg image of the Universe (or any other background image that you had previously used). This step can be completed by selecting the browse image field to directly select the Universe background image or by opening it from the saved directory. Both methods should work fine, but it is preferable to follow the former rather than the latter as it directly provides you with the option of your respective image. - The next block we will add is the scaling block so that we can appropriately fit our model to the render size. For performing the following action, these are the necessary steps -
$ Add --> Distort --> Scale $
Once we add the scale node, ensure that you change the coordinate space from relative to render size. The following change will allow us to view our image in the render space as desired. - The third and final node that we will add in the compositing section is the Alpha Over node. This node helps to coordinate the overall procedure by layering the images on top of one another, provided the Alpha values of foreground image pixels are greater than zero. If the condition is satisfied, then the background image will be overlaid. The steps for performing this action are as follows -
$ Add --> Color --> Alpha Over $
Once you add the final Alpha Over node, we can proceed to connect all the layers as shown in the figure below. The detailed connections will further be discussed with the Python code. For now, you can make the appropriate connections, as shown in the schematic representation below.
Finally, select the option of render image by clicking the F12 button on the keyboard or selecting the render and render image options from the menu bar. The implementation of the background with the object mesh is successfully completed. Now that we know how to add the respective backgrounds with Blender and its tools, it also becomes significant for users to understand how to code the following with Python. For coding models like the SMPL model help the developers to automate the process with Python, where you need to generate multiple copies with little or no variations. Hence, it is essential to understand how to utilize the Python development environment available in Blender for producing more effective results. Let us get started by learning how to add backgrounds to Blender with Python.
Adding Backgrounds in Blender with Python:
We have successfully completed the addition of backgrounds in Blender with the help of the numerous tools available in Blender. However, it is necessary to ensure that we can automate our creations in Blender, and we can achieve this task with the help of Python. We will import some essential libraries, import the monkey mesh, select our camera, and display the background in the camera view. Finally, we will perform the compositing procedure and save the rendered image in the appropriate directory. All the code blocks will be written in the text editor environment in Blender.
Importing the essential libraries:
The first step is to import all the necessary libraries, as mentioned in my previous article. These imports are necessary to access the environment variables in Blender, and the math function, which is pre-built in Python, will be used for specific mathematical operations.
import bpy
import math
Importing the Monkey mesh:
Our next step is to delete the default cube present in the Blender screen and replace it with the monkey mesh in the spawn location. For further details on the code related to this section, please visit the introduction to Python scripting with Blender, as I have explained the following steps.
#  Remove The Default Cude Object
# bpy.ops.object.delete(use_global=False)

for o in bpy.context.scene.objects:
    if o.name == "Cube":
        bpy.ops.object.delete(use_global=False)

# Import the monkey mesh
bpy.ops.mesh.primitive_monkey_add(location = (0, 0, 0))
Selecting the camera:
Our next step is to select the default camera that is available in Blender. Once we select the camera, we will set the image path to the directory where we have stored our Universe image in the .jpg format. For the next step, we can either change the location of the monkey mesh or alter the location of the camera such that the position of the object is aligned in a suitable manner with the camera. In the following code block, I choose to alter the position of the camera such that the object would directly be placed in a linear position to the camera. The locations and rotation angles were approximately chosen for this particular task. You can feel free to change and experiment with the location positions and rotation angles of camera placement.
# Selecting the camera and adding the background
cam = bpy.context.scene.camera
filepath = "D:\\Cool Projects\\Paperspace\\3-D Models\\Universe.jpg"

# Locations
cam .location.x = -0.71
cam .location.y = -12
cam .location.z = 5.5

# Rotations
cam .rotation_euler[0] = math.radians(64)
cam .rotation_euler[1] = math.radians(-0)
cam .rotation_euler[2] = math.radians(-3)
Displaying the Background in the camera view:
Our next step is to display the background image in the camera view. For performing this action, we will access the image path that is stored in the file path variable. Once we load our background image, we will ensure that it is accessible in the camera view. After we the background images parameter to true, we will add the background image into our camera view. The final step is to make sure that we set the render properties of the selected camera according to our requirements. The only necessity is to enable the transparent value of the film section in render properties as True. All the mentioned activities can be performed with the following code block shown below.
# Displaying the Background in the camera view
img = bpy.data.images.load(filepath)
cam.data.show_background_images = True
bg = cam.data.background_images.new()
bg.image = img
bpy.context.scene.render.film_transparent = True
If you have followed all the steps correctly until this point, upon selecting the camera and clicking the Numpad 0 button on your keyboard, you will encounter the following image.

At this point, you can zoom in on the view of your respective image and take a screenshot and save it on your desktop. However, if you want to follow a more complex procedure to save the entire rendered image on your desktop without having to view the camera mode and take a screenshot, then we must follow a process similar to the previous section. The background compositing technique will make use of a similar method as the previously generated task of backgrounds, but with the help of Python code blocks, to perform the following operations accordingly. Let us look into the new compositing section to understand the step-wise procedure.
Compositing The Background:
For compositing the background, we will first convert the context area from the default layout (or text editor) to the Compositing section and deploy all the nodes available. We will make sure that the program is re-runnable and does not result in any errors. Hence, the for loop will remove any nodes during the initial run. We then start to fix the appropriate positions of all our nodes and add them to their respective locations. We will also use all the exact same nodes as the ones previously mentioned in our Blender build and set all the parameters similar to the actual construction architecture as well. With the Python code, it becomes easier for us to understand all the links, as shown in the connectivity diagram. We will connect the first image link (link at index 0) to the first scale node. The first link of the scale node and the first link of the rendered layers node to the first and second links of the Alpha Over node, respectively. The final connection is the output of the Alpha Over node link to the input link of the composite node. Once all the steps are completed, we will restore the default layout to the text editor.
### Compositing

bpy.context.area.ui_type = 'CompositorNodeTree'

#scene = bpy.context.scene
#nodetree = scene.node_tree
bpy.context.scene.use_nodes = True
tree = bpy.context.scene.node_tree

for every_node in tree.nodes:
    tree.nodes.remove(every_node)

RenderLayers_node = tree.nodes.new('CompositorNodeRLayers')
RenderLayers_node.location = -300,300

comp_node = tree.nodes.new('CompositorNodeComposite')
comp_node.location = 400,300

AplhaOver_node = tree.nodes.new(type="CompositorNodeAlphaOver")
AplhaOver_node.location = 150,450

Scale_node = tree.nodes.new(type="CompositorNodeScale")
bpy.data.scenes["Scene"].node_tree.nodes["Scale"].space = 'RENDER_SIZE'
Scale_node.location = -150,500

Image_node = tree.nodes.new(type="CompositorNodeImage")
Image_node.image = img
Image_node.location = -550,500

links = tree.links
link1 = links.new(RenderLayers_node.outputs[0], AplhaOver_node.inputs[2])
link2 = links.new(AplhaOver_node.outputs[0], comp_node.inputs[0])
link3 = links.new(Scale_node.outputs[0], AplhaOver_node.inputs[1])
link4 = links.new(Image_node.outputs[0], Scale_node.inputs[0])

bpy.context.area.ui_type = 'TEXT_EDITOR'
Saving the rendered image in the respective path:
Finally, we will render all the images to the respective scales and create an image path that contains the directory where we will store the image. Finally, we will write the image into the respective path, where we will store the rendered image. The below code block shows the entire process for saving the rendered image appropriately in their respective path.
### Rendering Procedure
render = bpy.context.scene.render
scale = render.resolution_percentage / 100

FILE_NAME = "Space Monkey.png"
FILE_PATH = "D:\\Cool Projects\\Paperspace\\3-D Models\\Space Monkey.png"

# Save Previous Path
previous_path = bpy.context.scene.render.filepath

# Render Image
bpy.context.scene.render.filepath = FILE_PATH
bpy.ops.render.render(write_still=True)

# Restore Previous Path
bpy.context.scene.render.filepath = previous_path
With the completion of the saving process of the rendered image of the monkey mesh with the Universe background, we can proceed to the next section of the article, where we will understand how to deploy textures to our 3-D models. This process and step are simpler in comparison to adding the required background and can be completed in fewer steps with Blender or in fewer lines of code using Python.
Adding Textures To Your 3-D Models with Blender:
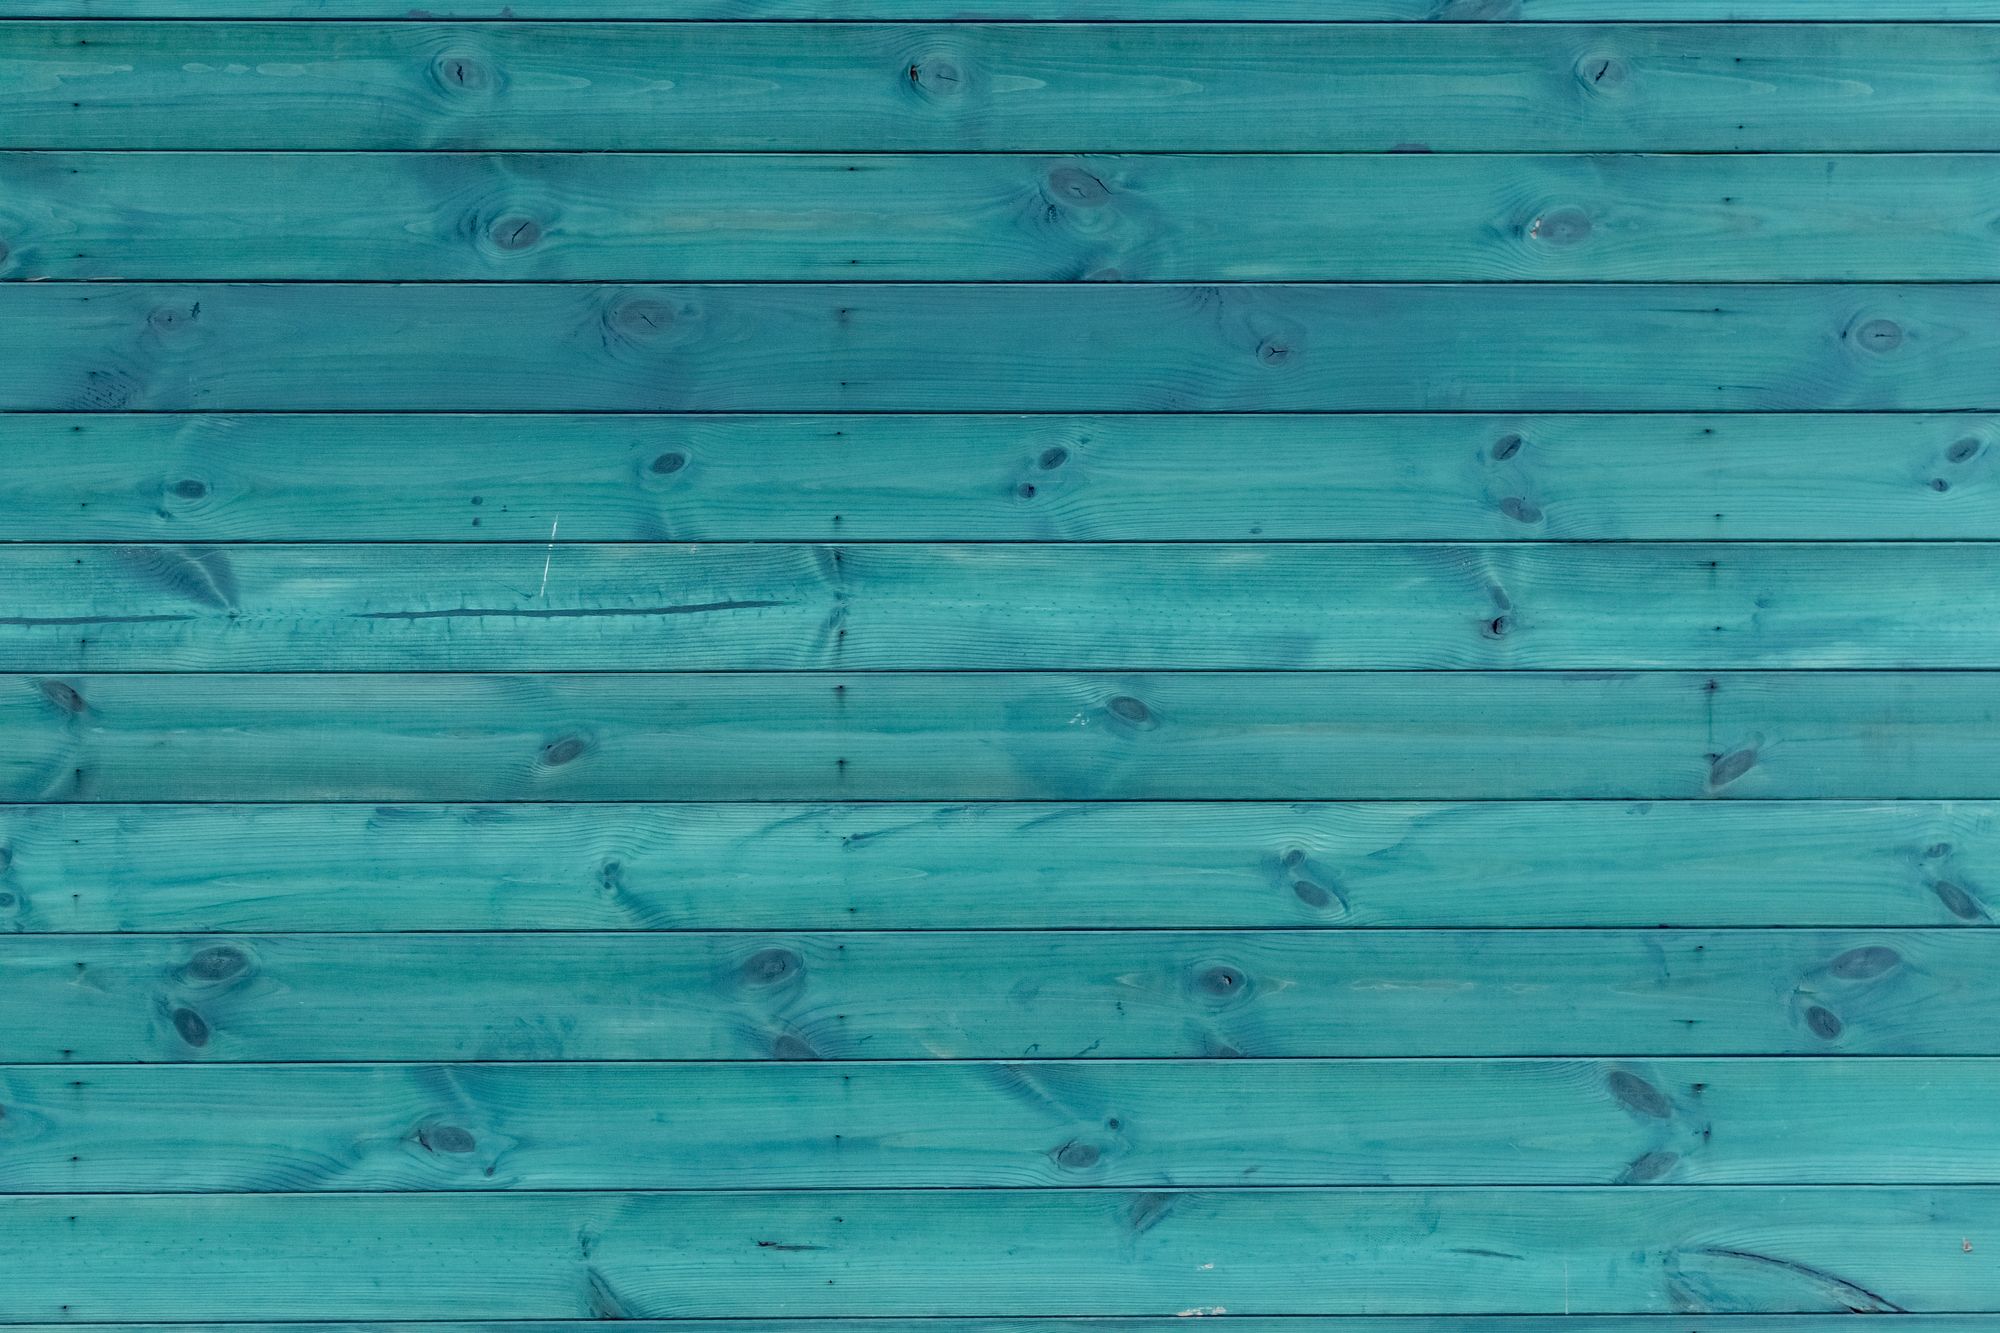
After understanding how to implement the backgrounds for any type of mesh with both the tool kits in Blender and Python scripting in Blender, we will now look at how to add some textures to the respective mesh (or object). Download the above image and label it as "background.jpg" (or texture.jpg). The initial step is to delete the default cube in the Blender screen and add the monkey mesh. Once this step is completed, select the monkey object and go to Material properties on the right side of the Blender screen. Check the below figure if you are confused.
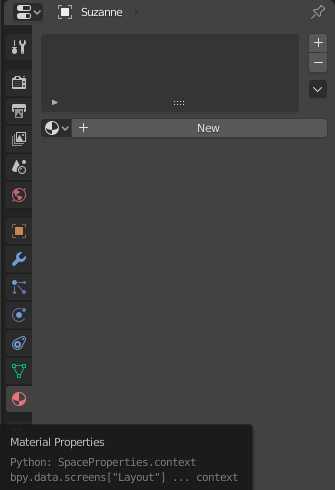
Click on the new button icon to create a new material. Once this new material is added, it is time to set the surface. We will stick to the default Principled BSDF Shader selection. There are several options available for this particular task, but we choose the Principled BSDF Shader because it combines multiple layers into a single easy-to-use node. While there are many other selections and parameters that you can set for performing the action of adding your textures, we will only focus on adding our desired background without changing any other attributes.
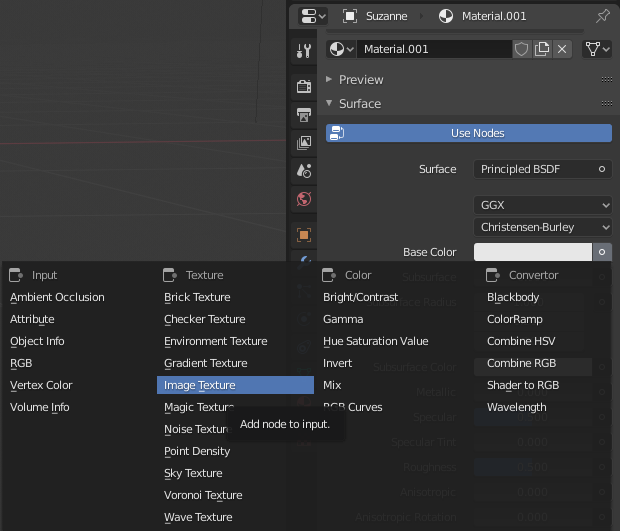
Once you click on the image texture option, you will find that you have three new options available to you right under the base color. These three available options are to browse an image to be linked, creating a new image, or opening an image. Since we have already downloaded the desired texture that we wish to add to our monkey mesh, we will choose the open option. Once you click on the open icon button, you can browse through your folders until you find the appropriate directory, where you have stored your texture image. Once you select the texture image, almost all our steps are completed. Change the viewport shading from solid object to the rendered state, and you can see your imported textures on the object. Let us also understand how we can perform these actions with the help of Python Scripting. Below is the representation for the final view of the textured object.

Adding Textures in Blender with Python:
Now that we have finished looking at how simple it is to add textures to your desired mesh or object with Blender, let us also analyze how we can perform the same task with Python programming. A few of the initial steps will remain similar to adding the background, such as importing libraries, adding the monkey mesh, adjusting the camera accordingly, and saving the rendered image. The concepts of adding the desired texture and assigning it to the object are the primary objectives that we will focus on more. Hence, these two concepts will be prioritized over the others. Let us begin coding the adding of textures to the respective object.
Importing the essential libraries:
Our primary imports will remain the same as previously discussed. Refer to the previous section of adding the backgrounds or the previous introduction article for further information.
import bpy
from bpy import context, data, ops
import math
Adding the Monkey mesh:
We will next make sure to delete the default cube that is provided in Blender and replace it with the monkey mesh, which will be placed at the location of (0, 0, 0) in the center of the Blender file.
#  Remove The Default Cude Object
# bpy.ops.object.delete(use_global=False)

for o in bpy.context.scene.objects:
    if o.name == "Cube":
        bpy.ops.object.delete(use_global=False)

# Import the monkey mesh
bpy.ops.mesh.primitive_monkey_add(location = (0, 0, 0))
Positioning the camera:
We will then proceed to place the camera in a way such that it traces the central space of the monkey mesh. We will alter the locations and rotation axis as shown in the below code block. These values are approximately determined, and the user can feel free to experiment with them. Also, another essential point to note is that you can alternatively change the positioning of the monkey mesh as well. Or you can choose to make no changes whatsoever.
# Adjust Camera Locations
cam = bpy.context.scene.camera

# Locations
cam .location.x = -0.71
cam .location.y = -12
cam .location.z = 5.5

# Rotations
cam .rotation_euler[0] = math.radians(64)
cam .rotation_euler[1] = math.radians(-0)
cam .rotation_euler[2] = math.radians(-3)
Adding the texture:
With our primary steps completed, we can finally proceed to add the required texture to the selected mesh. Note that you can also add a random color as per your desire. However, we will focus on adding downloaded textures to our mesh objects. The first step is to create a new material, provide a name to the following material, and store it in a variable. For this variable, we will assign the usage of nodes as True. Now that we can access the numerous nodes for this variable, we will set our tree nodes with a Principled BSDF Shader selection. There are several options available for this particular task, but we choose the Principled BSDF Shader because it combines multiple layers into a single easy-to-use node. We will then add the path which contains the location to the stored texture image. The final step is to link the input node with the final output link that stores the textured image and ensure that our context object is set as active.
# Adding the texture
mat = bpy.data.materials.new(name="New_Mat")
mat.use_nodes = True
bsdf = mat.node_tree.nodes["Principled BSDF"]
texImage = mat.node_tree.nodes.new('ShaderNodeTexImage')
texImage.image = bpy.data.images.load("D:\\Cool Projects\\Paperspace\\3-D Models\\Background.jpg")
mat.node_tree.links.new(bsdf.inputs['Base Color'], texImage.outputs['Color'])

ob = context.view_layer.objects.active
Assigning it to the object:
Select the object to which the following texture must be applied and set it to the declared variable containing all the nodes and links. The final step is to change our dimensional viewing space from the default solid viewport shading to the rendered viewport shading. We can notice that the selected object has acquired the desired texture image that we had initially selected. This entire step can be performed by the code block shown below.
# Assign it to object
if ob.data.materials:
    ob.data.materials[0] = mat
else:
    ob.data.materials.append(mat)

# Change the ViewPort Shading to RENDERED
for area in bpy.context.screen.areas:
    if area.type == 'VIEW_3D':
        for space in area.spaces:
            if space.type == 'VIEW_3D':
                space.shading.type = 'RENDERED'
Saving the rendered image:
The final step is to save textured mesh to the desired path location as selected by the user. This step is similar to the previously discussed image rendering techniques. Ensure that you set the desired path and proceed to follow the previous methods accordingly or view the code block shown below to save the rendered image in the required location. Once this step is completed, we can combine both the backgrounds and textures accordingly.
### Rendering Procedure
render = bpy.context.scene.render
scale = render.resolution_percentage / 100

FILE_NAME = "Textured Monkey.png"
FILE_PATH = "D:\\Cool Projects\\Paperspace\\3-D Models\\Textured Monkey.png"

# Save Previous Path
previous_path = bpy.context.scene.render.filepath

# Render Image
bpy.context.scene.render.filepath = FILE_PATH
bpy.ops.render.render(write_still=True)

# Restore Previous Path
bpy.context.scene.render.filepath = previous_path
Final combination of both backgrounds and textures:
If you have successfully followed along with the tutorial until this point, we have implemented both the tasks of adding the background as well as adding the desired texture to our mesh object. While we have performed both these tasks individually, it becomes even better when we use our gained knowledge to combine both elements together and wrap them into one entity. The above image is the final result that you will receive when you try to perform the combination of the background and texture to the object.
For performing the combination of both the background and texture on the mesh, you can either follow along with the Blender only implementation of the article or follow along with the Python coding implementation of the tutorial, or use a mixture of the knowledge gained from both these individual aspects accordingly to produce the best results possible. Both the Blender file and the Python file will be provided as well. If the users are stuck at any particular point, they can feel free to access these utilities to clear their confusion. If you do encounter any issues, debug them as it will help you learn more.
Conclusion:
In this article, we learned how to implement the addition of a background and a texture in Blender. For both these tasks, we understood how they could be implemented in Blender with the numerous tools it offers the developers. Apart from just using the developer tools offered by Blender, we also understood the complete procedure on how to implement and perform the tasks of adding the respective backgrounds and textures accordingly with the help of Python scripting in the text editor offered in one of the many different Blender layouts. Once we finished implementing these elements individually, we finally combined both of them to create an improved and aesthetically more pleasing rendered image.
In the first part of this 3-D modeling series, we understood how to implement multiple monkey meshes and view them in a multi-camera view. While we covered most of the basic concepts in the first section, our primary focus in this article was to dwell more deeply into the visual aspects of Blender. We added both the background and texture to provide a finer look and make it more aesthetically appealing. In the next parts of this 3-D modeling series, we will look at how to perform animations and how to work with SMPL models, respectively. Until then, keep experimenting and enjoy learning!