
Bring this project to life

In Multi Layer Perceptrons (MLP), learnable parameters are the network's weights which map to feature vectors. In the context of Convolutional Neural Networks however, learnable parameters are termed filters, filters which are 2-dimensional matrices/arrays commonly square in size.
In my previous article, we developed a bit of our intuition on how these filters are used with images via a process called convolution. In this article, we are going to explore what these filters actually do to an image as it passes through the layers of a Convolutional Neural Network (CNN).
Neural Nets and Feature Extraction
An essential capability of neural networks is their ability to extract features from data so as to then use them in archiving a certain goal, be it classification, regression etc. In MLPs, this process is easy to conceptualize, data points which are often times attributes of a particular instance of data are mapped to trained weights in order to combine or transform them in some form into essential features. On the other hand, feature extraction is not as clear cut when it comes to CNNs as they do not deal with a vector of attributes rather they deal with images which are a 2-dimensional matrix of attributes (pixels).
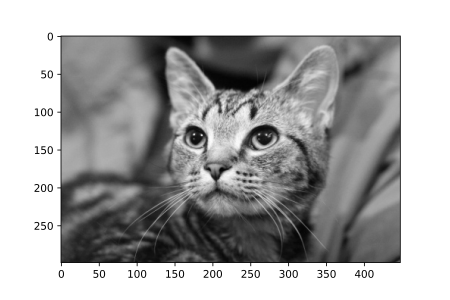
Besides, what would represent a feature when it comes to images anyway? When talking about a tabular dataset of houses for instance, columns which hold attributes such as number of bedrooms or size of living room are said to be features of a particular house instance. So what about an enhanced definition (480p) image of a cat which has a size of (640, 480) pixels? This image has 640 columns and 480 rows, a total of 307,200 attributes (pixels), what represents features in this case?
Images On Edge
A lot of the details of what makes up an image is actually contained in its edges or outlines. It's one of the reasons why we can easily distinguish objects in cartoon sketches. In fact, there are numerous studies to suggest that edge perception is one of the first techniques utilized by the human brain when processing visual cues coming from the eyes (Willian Mcllhagga, 2018). Edge perception is not just limited to human vision, some studies have argued that it is one of the reasons why Avians (birds) are so adept at dodging obstacles mid-flight at such high speeds as well as landing on small targets from so far away with pinpoint accuracy (Partha Bhagavatula et al, 2009).
CNNs and Human Vision
There has been a lot of talk about how neural networks mimic the human brain. One scenario that gives some credence to this is the fact that just as the human brain begins to process visual cues coming from the eyes by perceiving edges, Convolutional Neural Networks also begin to extract features from images by detecting edges, in fact it can be said that edges represent image features. The tools it uses for this purpose are its learnable parameters, its filters.
That is specifically the purpose served by filters in a Convolutional Neural Network, they are there to help extract features from images. While the first few layers of a CNN are comprised of edge detection filters (low level feature extraction), deeper layers often learn to focus on specific shapes and objects in the image. For the purpose of this article, I will be focusing on edge detection in the first few layers as it is quite an intriguing process and the filters are easily comprehensible.
Filtering Out Edges
The cool thing about Convolutional Neural Networks is that they can learn custom edge detection filters based on the probability distribution of pixels in a certain dataset and the network's specific objective. Notwithstanding, there are some classic manually formulated edge detection filters which can be used to develop an intuition of what edge detection looks like in a computer vision context. They are the Prewitt, Sobel, Laplacian, Robinson Compass and Krisch Compass filters.
To really examine what these filters do let's do some grunt work by applying them unto images using the manually written convolution function given below.
import numpy as np
import torch
import torch.nn.functional as F
import cv2
from tqdm import tqdm
import matplotlib.pyplot as plt


def convolve(image_filepath, filter, title=''):
    """
    This function performs convolution and
    returns both the original and convolved
    images.
		"""

    #  reading image in grayscale format
    image = cv2.imread(image_filepath, cv2.IMREAD_GRAYSCALE)

    #  defining filter size
    filter_size = filter.shape[0]

    #  creating an array to store convolutions (x-m+1, y-n+1)
    convolved = np.zeros(((image.shape[0] - filter_size) + 1,
                      (image.shape[1] - filter_size) + 1))

    #  performing convolution
    for i in tqdm(range(image.shape[0])):
      for j in range(image.shape[1]):
        try:
          convolved[i,j] = (image[i:(i+filter_size),
                                  j:(j+filter_size)] * filter).sum()
        except Exception:
          pass

    #  converting to tensor
    convolved = torch.tensor(convolved)
    #  applying relu activation
    convolved = F.relu(convolved)

    #  producing plots
    figure, axes = plt.subplots(1,2, dpi=120)
    plt.suptitle(title)
    axes[0].imshow(image, cmap='gray')
    axes[0].axis('off')
    axes[0].set_title('original')
    axes[1].imshow(convolved, cmap='gray')
    axes[1].axis('off')
    axes[1].set_title('convolved')
passThis function replicates the convolution process with an additional step of ReLU activation as expected in a typical convnet. Utilizing this function, we will be detecting edges in the image below using the filters listed above.
You can run this code for free in a Gradient Notebook by clicking the link below!
Bring this project to life
Prewitt Filters
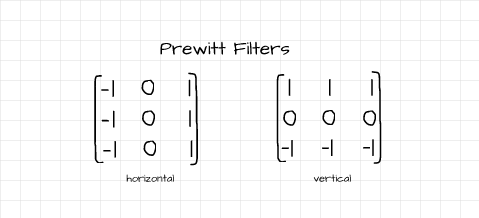
The Prewitt operator is comprised of two filters which help to detect vertical and horizontal edges. The horizontal (x-direction) filter helps to detect edges in the image which cut perpendicularly through the horizontal axis and vise versa for the vertical (y-direction) filter.
# utilizing the horizontal filter
convolve('image.jpg', horizontal)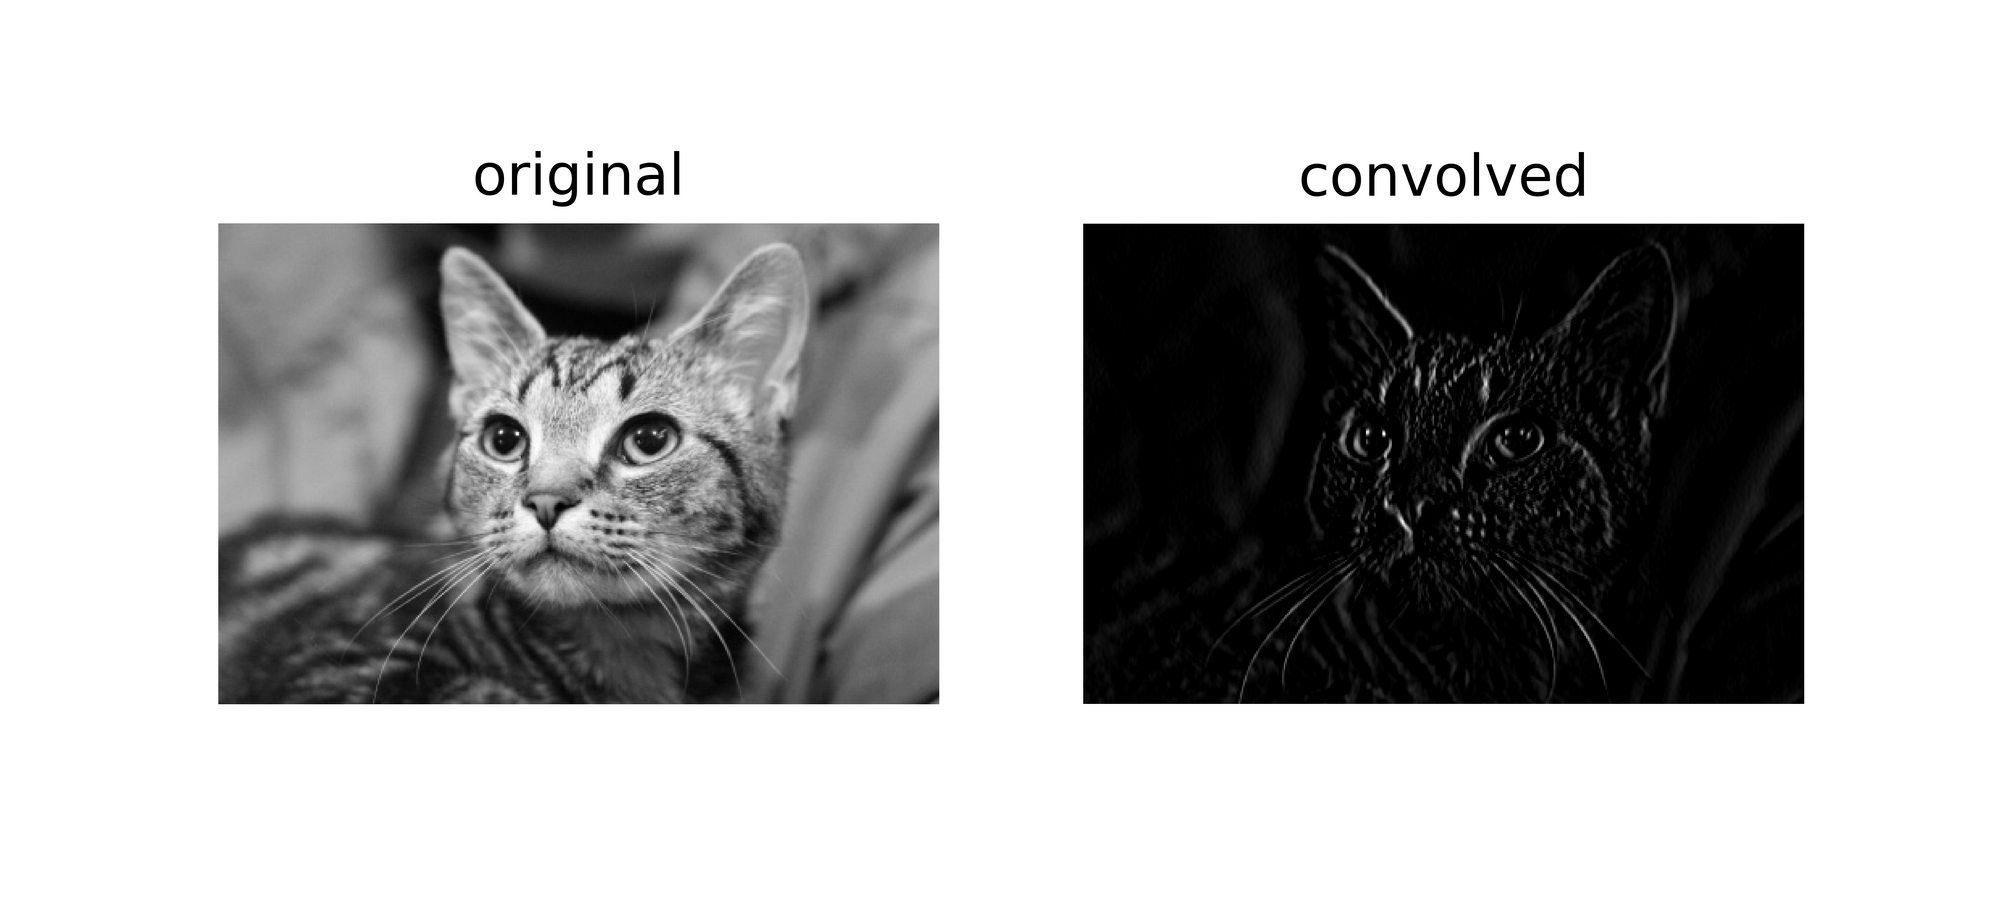
# utilizing the vertical filter
convolve('image.jpg', vertical)
Sobel Filters
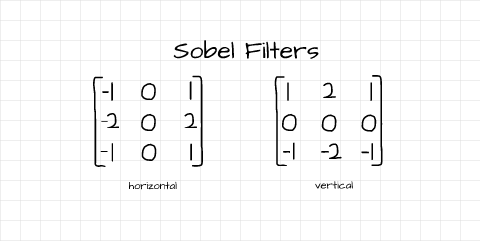
Just like the Prewitt operator, the Sobel operator is also made up of a vertical and horizontal edge detection filter. Detected edges are quite similar to results obtained using Prewitt filters but with a distinction of higher edge pixel intensity. In other words, edges detected using the Sobel filters are sharper in comparison to Prewitt filters.
# utilizing the horizontal filter
convolve('image.jpg', horizontal)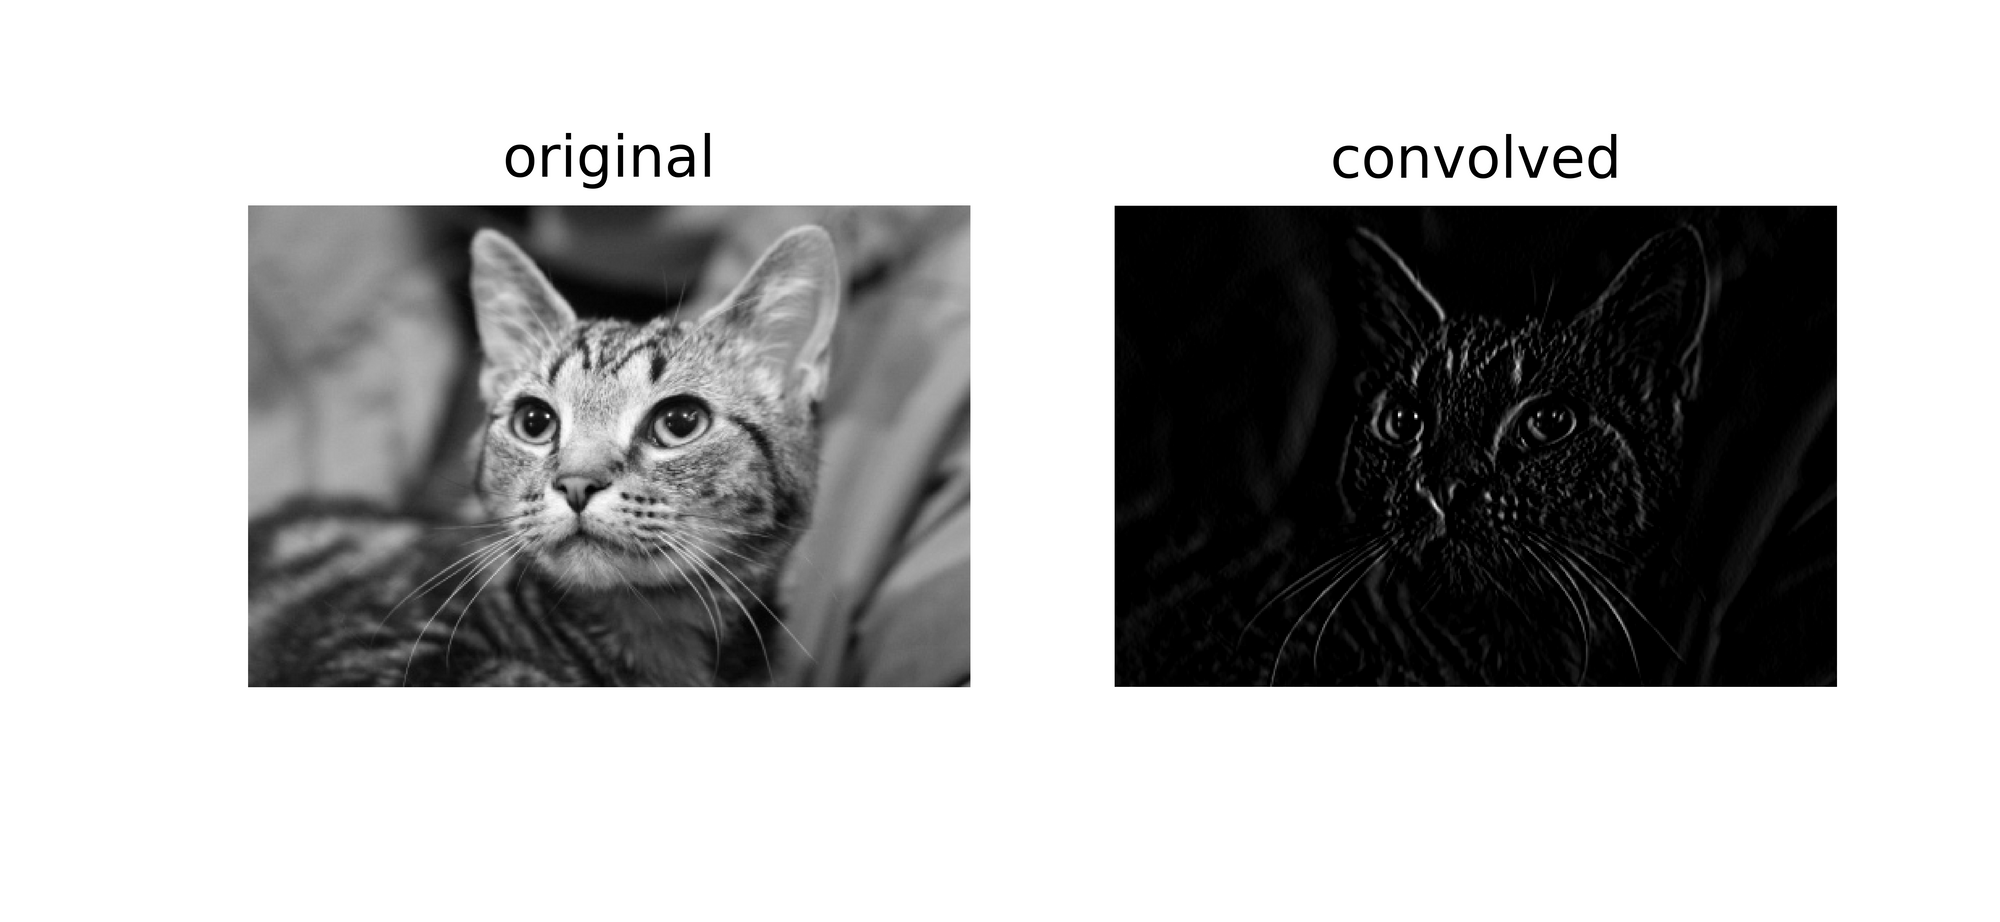
# utilizing the vertical filter
convolve('image.jpg', vertical)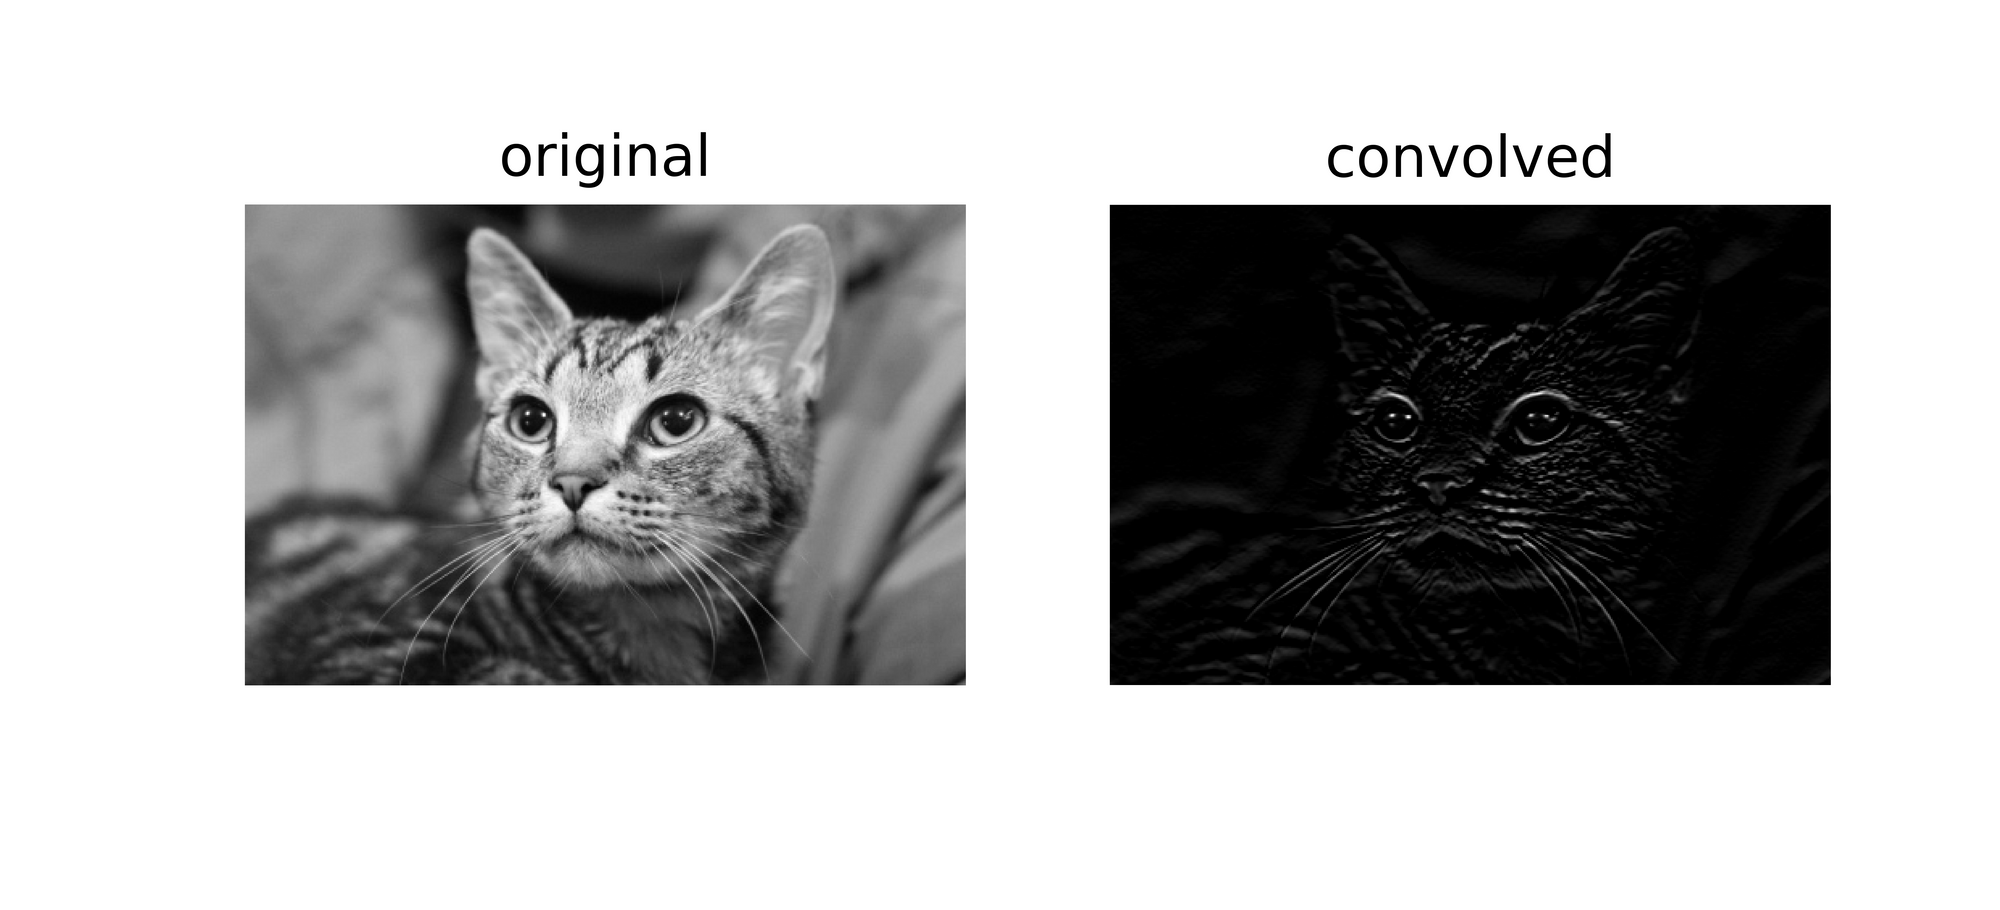
Laplacian Filter

Unlike the Prewitt and Sobel filters, the Laplacian filter is a single filter which detects edges of different orientation. From a mathematical standpoint, it computes second order derivatives of pixel values unlike the Prewitt and Sobel filters which compute first order derivatives.
# utilizing the filter
convolve('image.jpg', filter)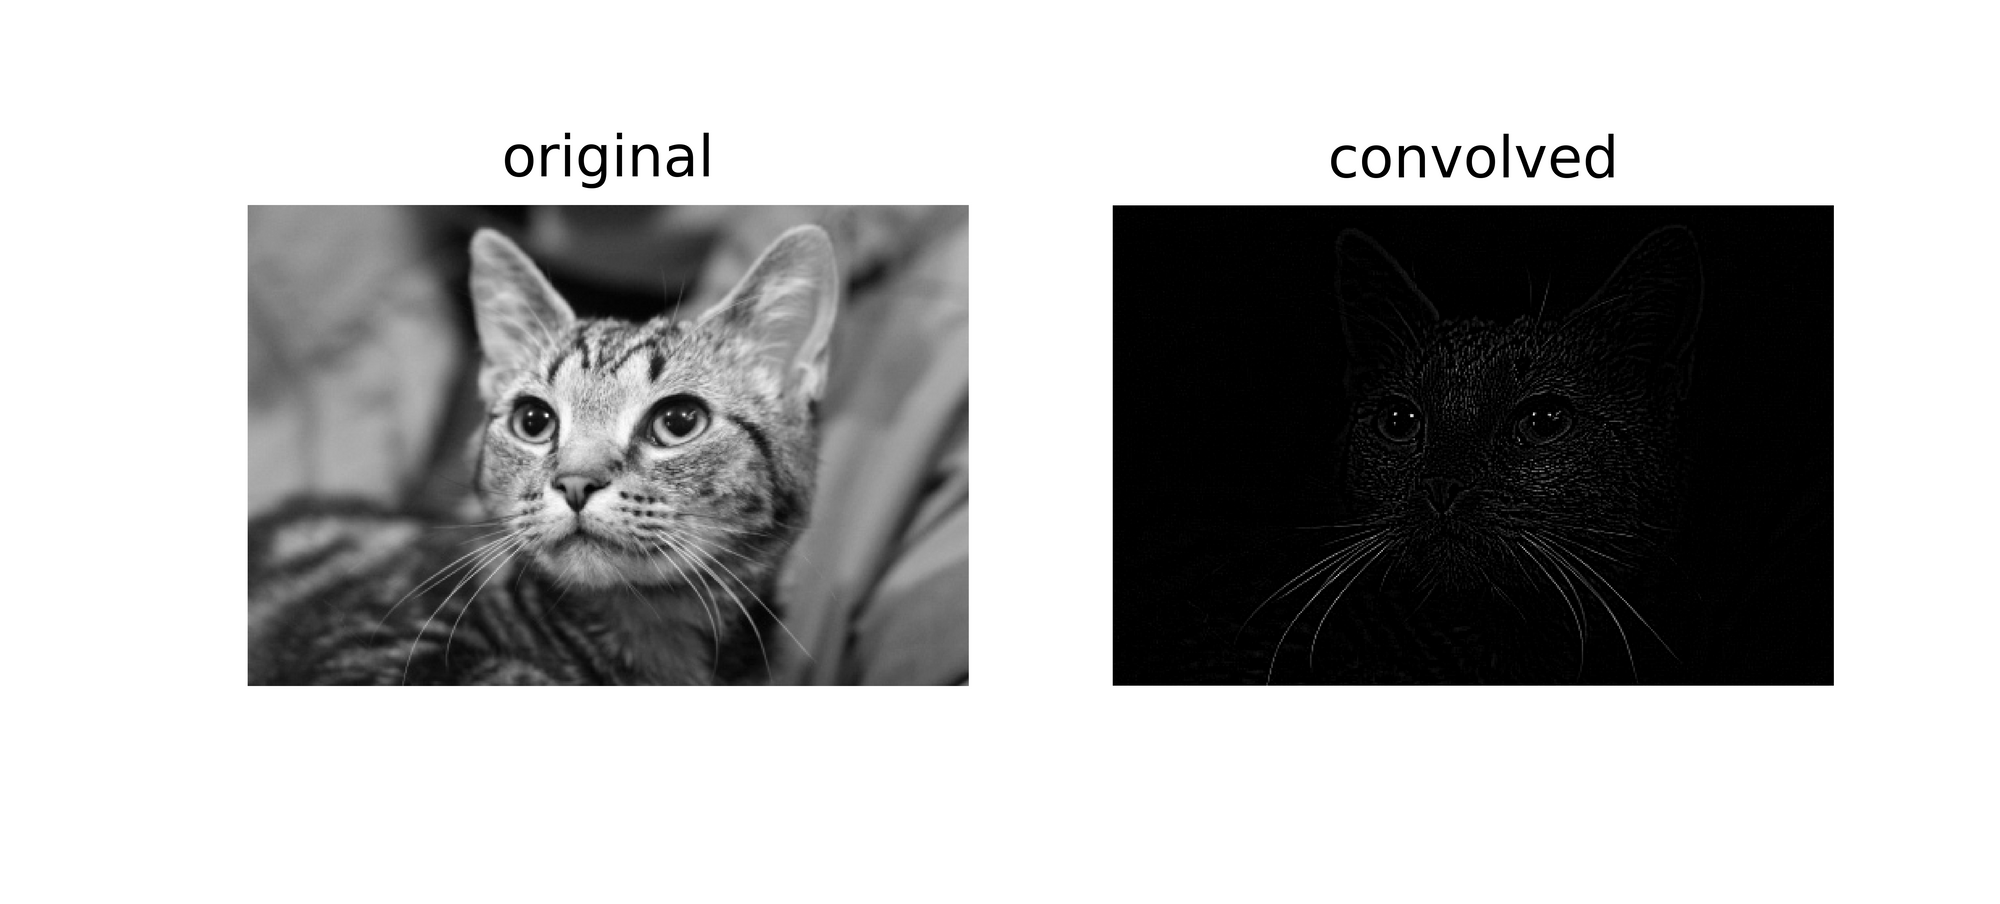
Robinson Compass Masks
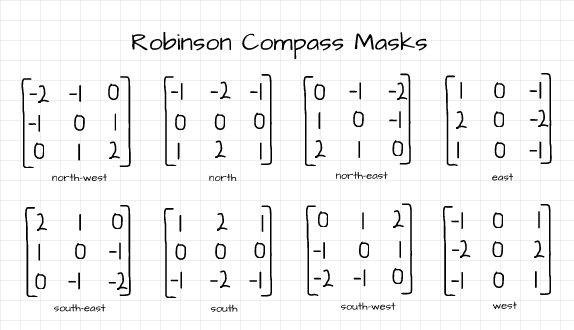
The Robinson Compass masks are edge detection filters which are made up of 8 different filters accounting for the 8 geographical compass directions as shown in the image above. These filters help to detect edges oriented in those compass directions. For brevity, just two of the filters are used for illustration purposes.
# utilizing the north_west filter
convolve('image.jpg', north_west)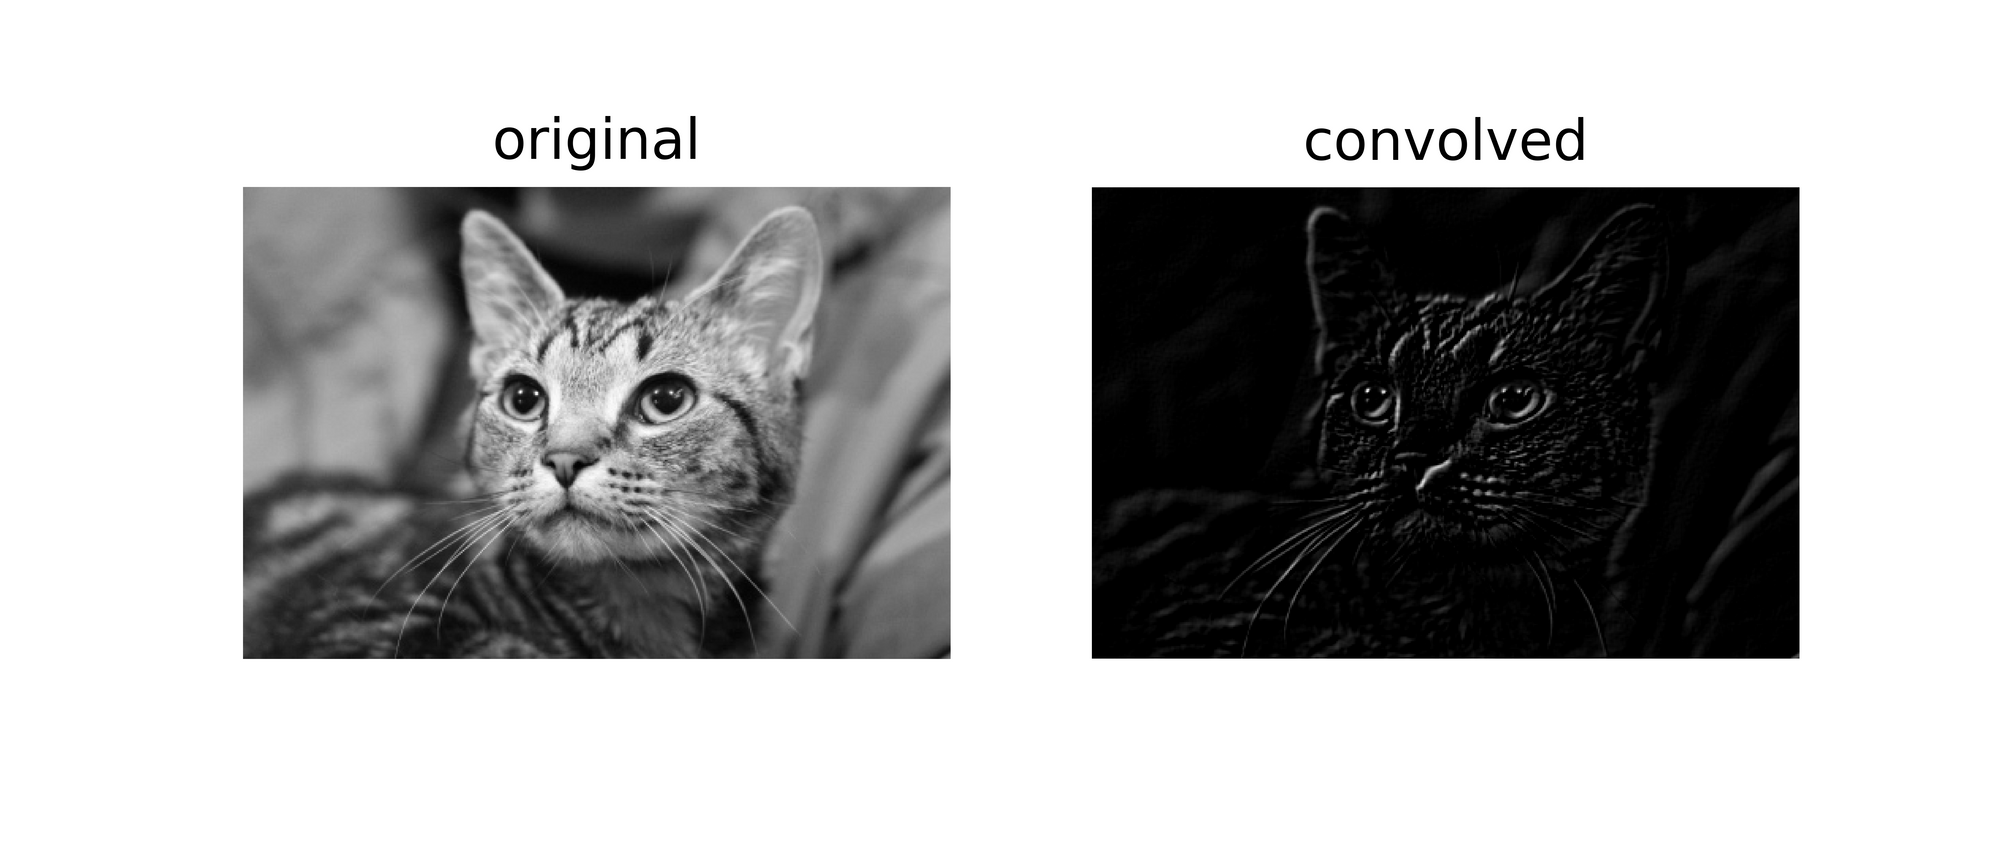
# utilizing the north_east filter
convolve('image.jpg', north_east)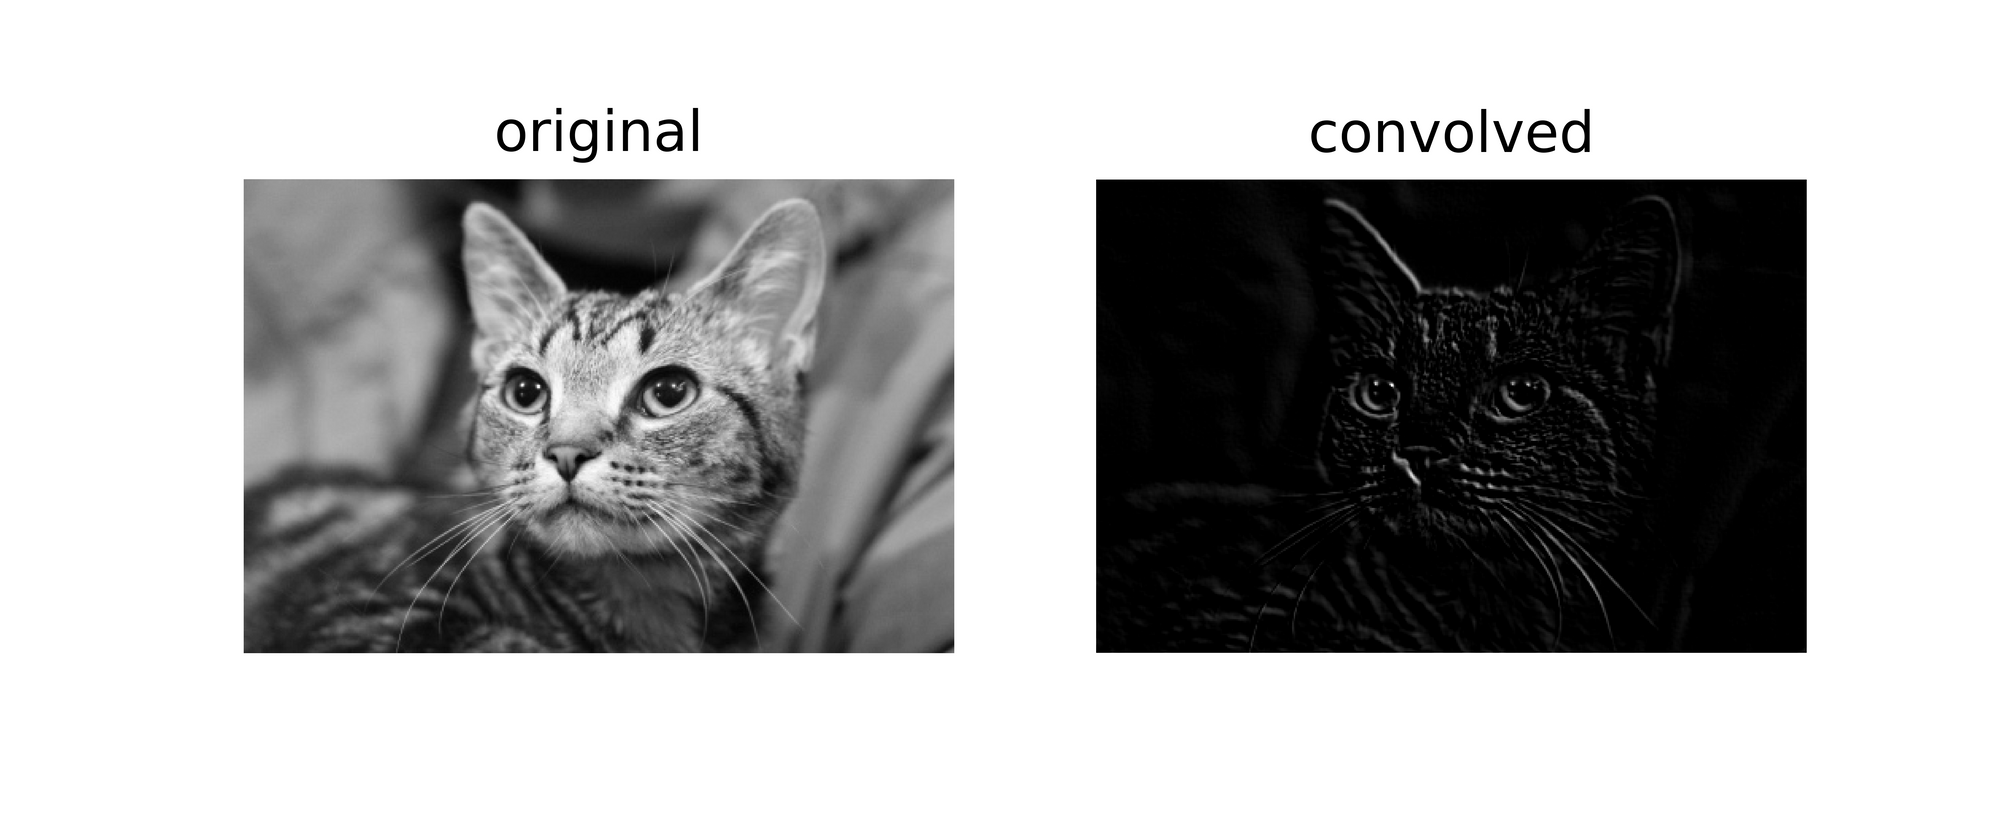
Krisch Compass Masks
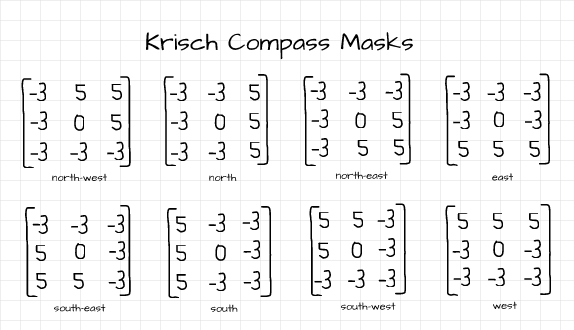
Similar to the Robinson Compass masks, the Krisch Compass mask is also comprised of 8 filters which help to detect edges in geographical compass directions. two of the filters are used below.
# utilizing the south_west filter
convolve('image.jpg', south_west)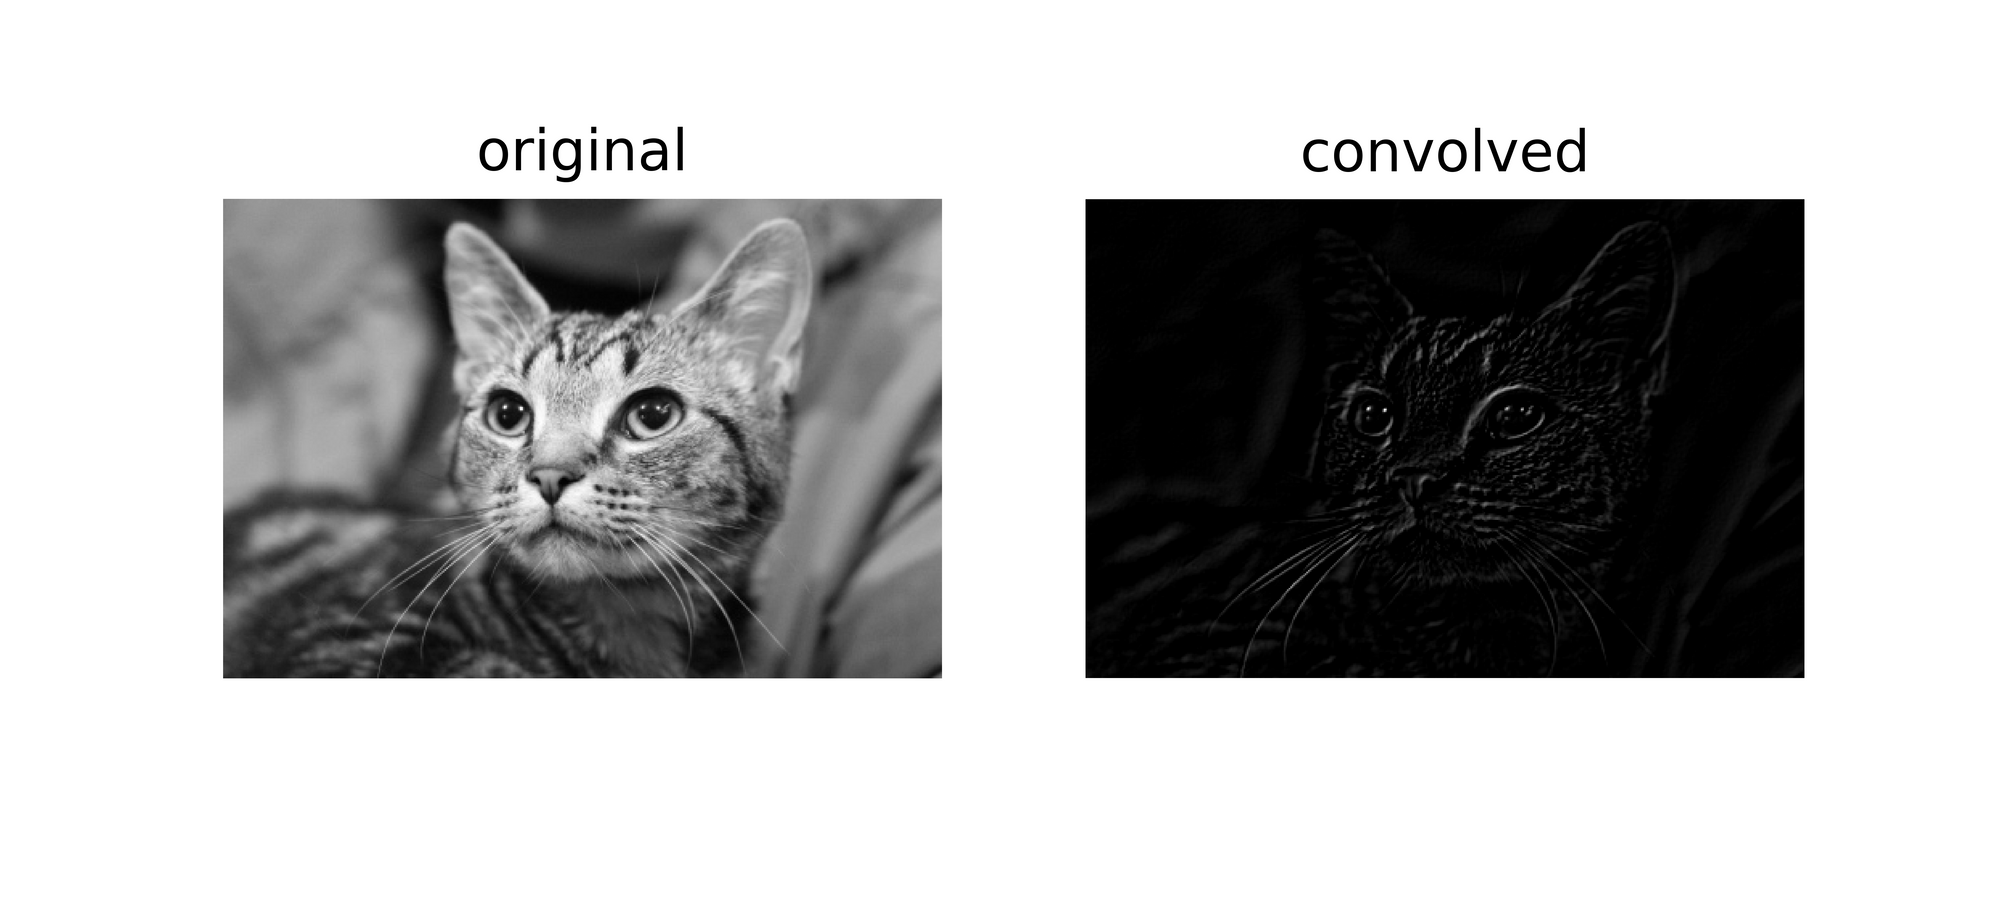
# utilizing the south_east filter
convolve('image.jpg', south_east)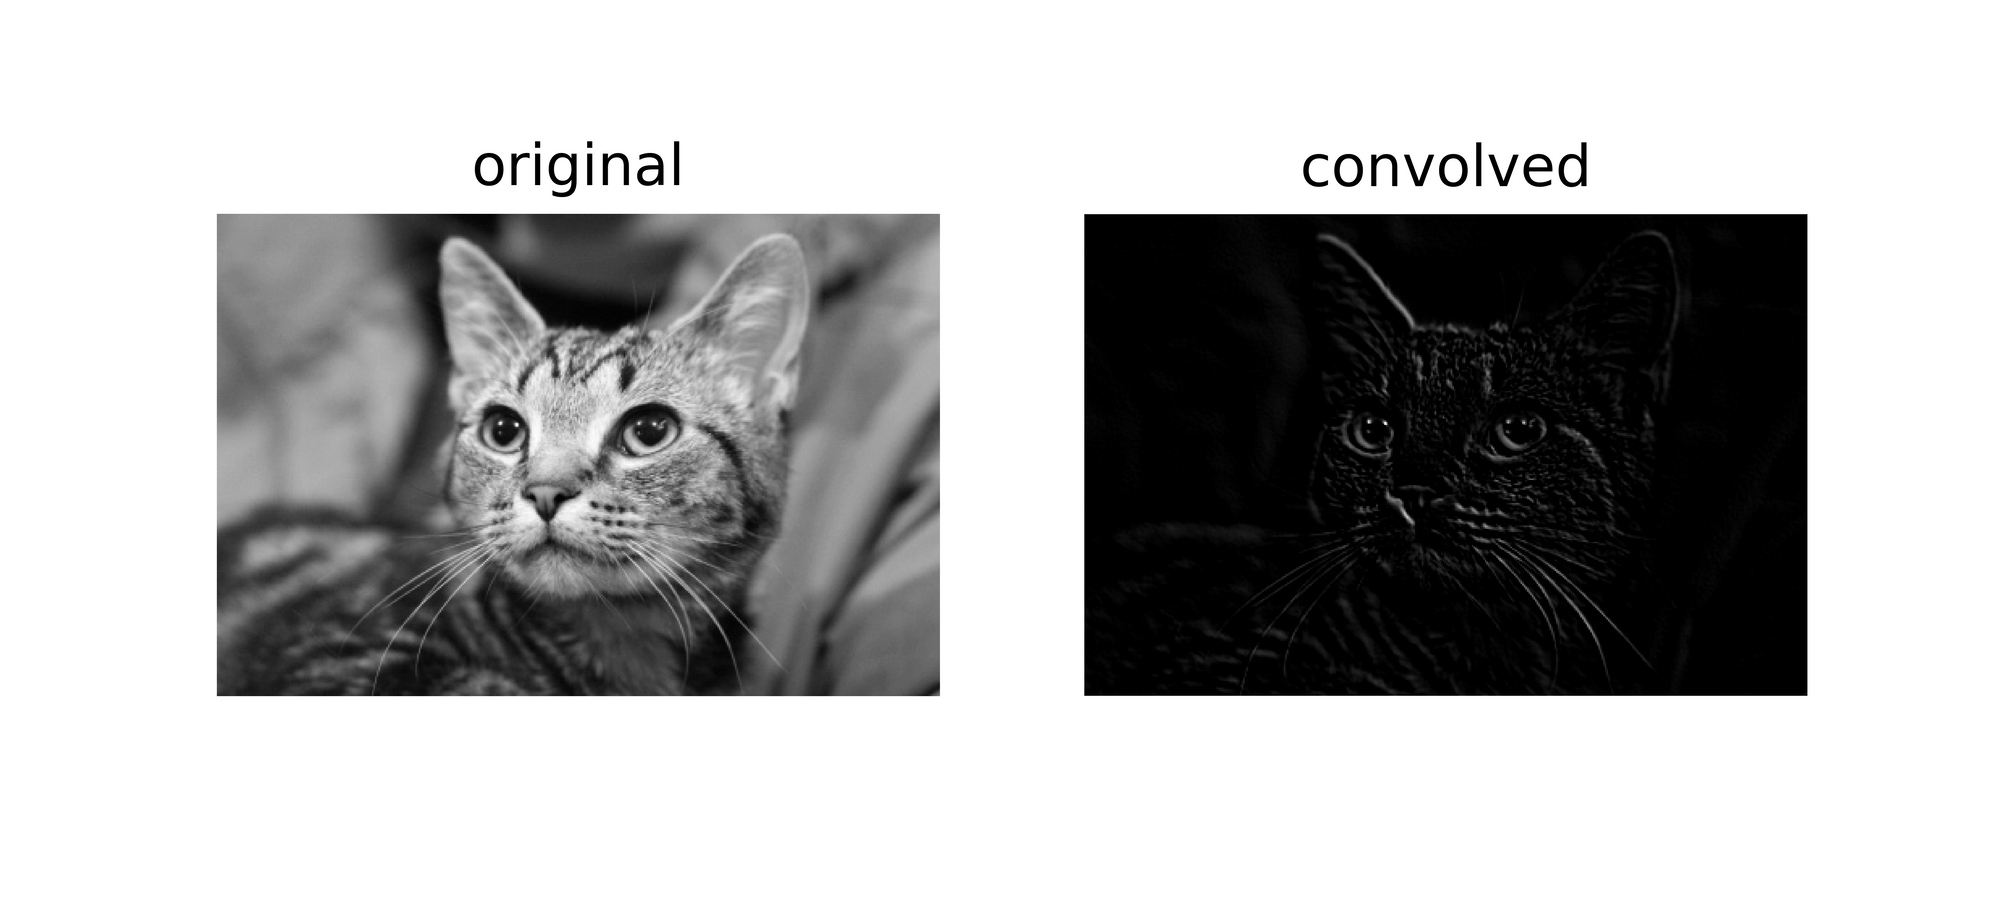
Filter Notations
There's a pretty important statement above which you most likely missed,
The horizontal (x-direction) filter helps to detect edges in the image which cut perpendicularly through the horizontal axis and vice versa for the vertical (y-direction) filter.
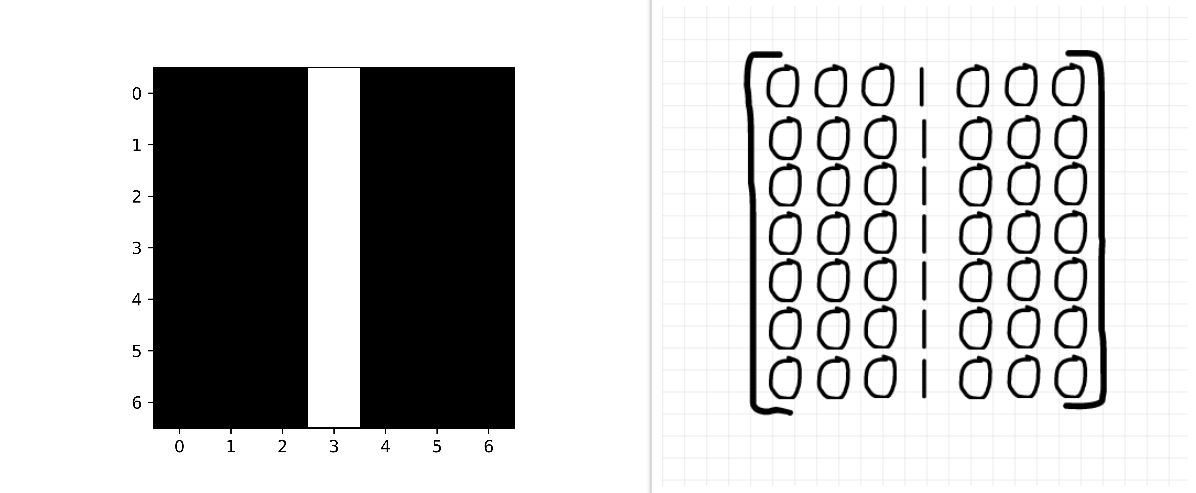
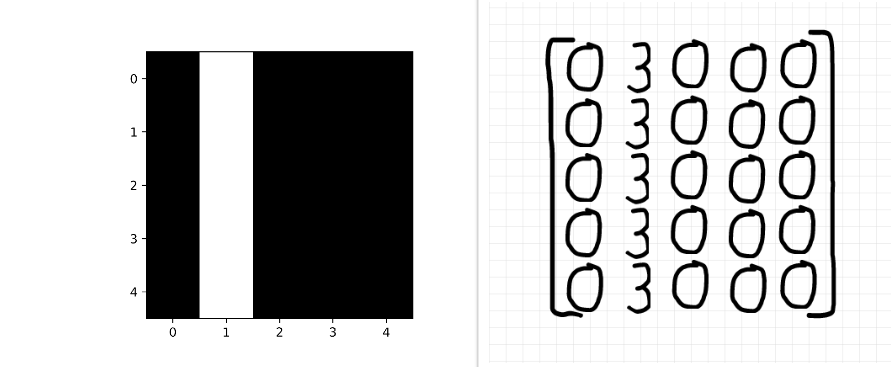
That statement might seem a bit confusing but I'll break it down further in this section. Consider the image below, the figure on the right is what the human eye sees while the figure on the left is what a computer perceives. As evident in the image, the white line delineates a clear vertical edge on the black 'canvas', to the human eye this is evident because of the contrast between that line and its surroundings (In the same vane, a computer needs to be able to perceive this change in contrast on a pixel level and that's essentially what edge detection entails).
In order to physically encounter this edge however, one would need to run a finger from left to right (horizontally) or vice versa. The same applies to edge detection filters, to detect a vertical edge you need to utilize an horizontal filter.
Let's attempt to detect edges in the image using both the horizontal and vertical Prewitt filters, the math behind the edge detection process is illustrated in the image below. The math behind the convolution process is quite easy to follow as outlined;
- Place the filter at the top left corner.
- Perform element-wise multiplication.
- Compute a cumulative sum.
- Return obtained sum as a corresponding pixel in an empty array.
- Shift the filter to the right by one pixel and repeat steps 1 - 4 as you continue to populate the first row in the empty array towards the right.
- Stop when the filter falls out of bounds.
- Shift the filter downwards by one pixel to the second row.
- Repeat steps 1 - 6 as you populate the second row in the empty array.
- Do the same for all rows until the filter falls out of bounds in the vertical axis (dim 1).
Activation is done using the ReLU function which simply casts any negative pixel to 0. After convolution and activation, the vertical edge is highlighted by the horizontal filter while the vertical filter returns a blacked out image (all zero pixels) meaning it has detected no edge.
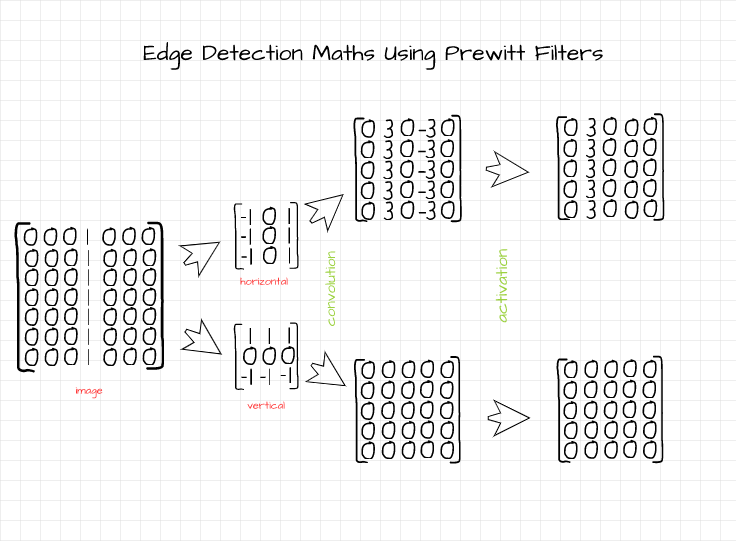
The resulting detected edge is visualized below. Following the same logic, if the line were to be horizontal, representing an horizontal edge, the vertical filter would highlight the horizontal edge while the horizontal filter returns a blacked out image.
Using The Convolution Function
For those who might want to use the convolution function above on a different image or to test out different filters for edge detecting or other image processing tasks, this section is a quick guide on how to do so.
The function takes 3 parameters namely, 'image_filepath', 'filter' and 'title'.
'Image_filepath'
This refers to the location of the desired image on your local drive or cloud. In a case where your image is in the current working directory, all you need to do is enter the image name complete with its file extension. If not, you'll need to provide an absolute path, something of the form 'C:/Users/Username/Downloads/image_name.jpg' (forward slash in this case since we are working in Python).
Filter
This is in fact the filter you would like to use in the convolution process. Filters are quite easy to make using NumPy as demonstrated below. All you need to do afterwards is to supply the filter object in the function.
#  creating a Prewitt horizontal filter
prewitt_x = np.array(([-1, 0, 1],
                      [-1, 0, 1],
                      [-1, 0, 1]))

#  creating a laplacian filter
laplacian = np.array(([-1, -1, -1],
                      [-1, 8, -1],
                      [-1, -1, -1]))
Title
This will be the title of the image visualization provided when the function is used. It's an empty string by default but feel free to provide a suitable title as desired.
Final Remarks
What makes Convolutional Neural Networks special is their ability to extract features from a 2-dimensional representation of data such as image pixels. The features are extracted as edges using tools contained in the neural network called filters.
In this article, we have examined what edge detection/feature extraction looks like from a computer vision point of view using some predefined filters. It is worthy of note however that a CNN will not be using these predefined filters for edge detection, it will rather learn the best filters to detect edges and extract features in the dataset of interest.