Run the Stable Diffusion Web UI in a Notebook with no setup required
Last month, we discussed some of the primary capabilities of the Stable Diffusion Web UI from AUTOMATIC1111 and the other contributors from the Stable Diffusion open source community. The Web UI is a popular Gradio web application that allows users to generate images from any of the main Stable Diffusion pipelines including image to image, text to image, and much more, and also offers tools, many of which have been added since the last article, including training textual inversion embeddings and hypernetworks, upscaling photos with GFPGAN and CodeFormer, and the addition of extensions.
In this article, we will take another look at the Web UI as it stands here at the end of November. We will start by walking through the steps to launch the Web UI quickly and easily from a Paperspace Gradient Deployment. We will then break down some of the best extensions and new capabilities, and demonstrate what they can add to your workflow with worked examples.
Launching the Web UI from a Gradient Deployment
There are two ways to run the Web UI from Gradient: in a Gradient Notebook or from a Gradient Deployment. The Notebook version of the deployment can be accessed by creating a Notebook with the Stable Diffusion runtime selected. Then, we can mount Stable Diffusion v1-5 model public files to our Notebook, and launch the Web UI.
If we want to run a Deployment, we need a suitable Docker container that contains all the pre-requisite components and packages for us to run the application. In the next section, we will walk through the Dockerfile used to create this container. If we want to update the container in the future, we can use this Dockerfile to create a new version of the container using the latest update of the Web UI.
This first section will act as a review of the setup process described in the previous article, but significant updates to the process have necessitated we revisit it before digging into using the extensions.
The Dockerfile
Let's get started by looking at the container we will be hosting the Web UI on. It includes a number of the packages we will need to run Stable Diffusion, though others are actually installed upon launch for the sake of simplicity. The launch.py script included with the Web UI automates a lot of the process, but we still need to set up the environment to the minimum.
Here is the sample code from the Dockerfile:
# Paperspace base container as our baseline
FROM paperspace/gradient-base:pt112-tf29-jax0314-py39-20220803

# Upgrade pip to prevent install errors
RUN pip3 install --upgrade pip

# Clone Web UI
RUN git clone https://github.com/AUTOMATIC1111/stable-diffusion-webui

# Make it working directory
WORKDIR /stable-diffusion-webui

## pip installs
RUN pip install transformers scipy ftfy ipywidgets msgpack rich einops omegaconf pytorch_lightning basicsr optax facexlib realesrgan kornia imwatermark invisible-watermark piexif fonts font-roboto gradio
RUN pip install git+https://github.com/crowsonkb/k-diffusion.git
RUN pip install -e git+https://github.com/CompVis/taming-transformers.git@master#egg=taming-transformers
RUN pip install git+https://github.com/openai/CLIP.git
RUN pip install diffusers

# Get model ckpt
RUN apt update
RUN apt install -y aria2
RUN aria2c --seed-time=0 --dir models/Stable-diffusion "magnet:?xt=urn:btih:2daef5b5f63a16a9af9169a529b1a773fc452637&dn=v1-5-pruned-emaonly.ckpt"

# Finish setup
RUN pip install -r requirements.txt
RUN mkdir repositories
RUN git clone https://github.com/CompVis/stable-diffusion /repositories/stable-diffusion
RUN git clone https://github.com/TencentARC/GFPGAN.git /repositories/GFPGAN

EXPOSE 7860
Note that there exists another version of this container with an identical Dockerfile, without the aria2 install and download of the model checkpoint. This container is much smaller. We will discuss using this in more detail in a later section.
Updating the Web UI Deployment container
If we want to create an updated version of this container, we can simply re-run the Docker build command with this Dockerfile. It will then get us the latest version of the Web UI in the new container. This can then be uploaded to Dockerhub, where it can be used by Gradient for Notebooks, Workflows, and Deployments.
To run this process, we can use the code snippet below in our own terminal.
git clone https://github.com/gradient-ai/stable-diffusion
cd stable-dffusion
docker build -t <your account>/stable-diffusion-webui-deployment:<tag>
docker push <your account>/stable-diffusion-webui-deployment:<tag>
We can then replace the first line of the Deployment spec we show in the next section with the name of the new container. We can also alter the Dockerfile itself if we want to make any changes like adding additional model checkpoints or image embeddings. This will allow for a much more customized experience, if so desired.
Paperspace will make efforts to regularly update the container ourselves, so check back to our Dockerhub page for this project to see updates as they are made.
Spinning up the Gradient Deployment for the Web UI
Now that we have seen what goes into the container, we can look at the steps for spinning up our Gradient Deployment of the Stable Diffusion Web UI. By the end of this section, users should be able to run their own Web UI container with their own custom models and embeddings as needed.
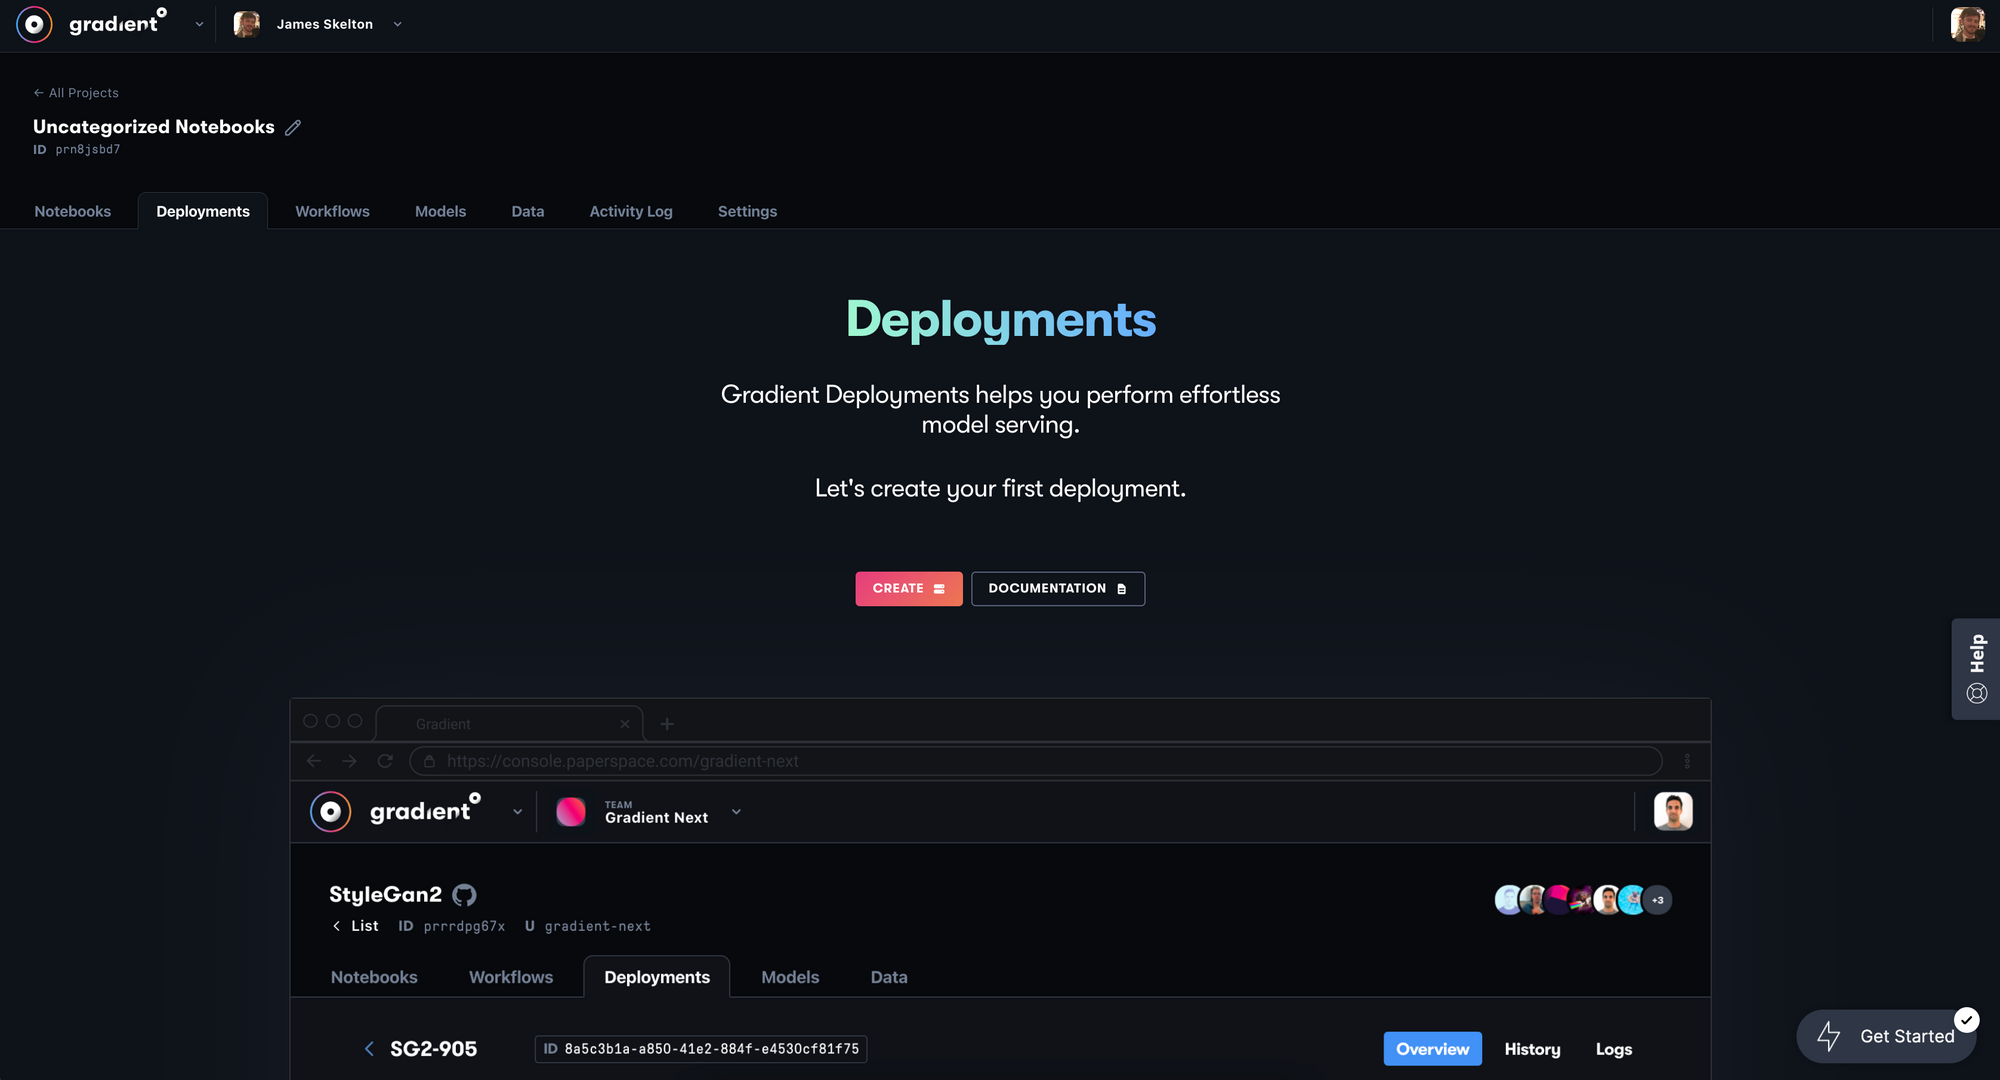
First, make sure that you have signed up for a Paperspace account and put a credit card on file. Unlike the Notebook version of this process, there is no Free-GPU option for the deployment. Keep this in mind if you intend to use the Web UI through this method. Go ahead and log in to your account and head to the Deployments tab of any project.
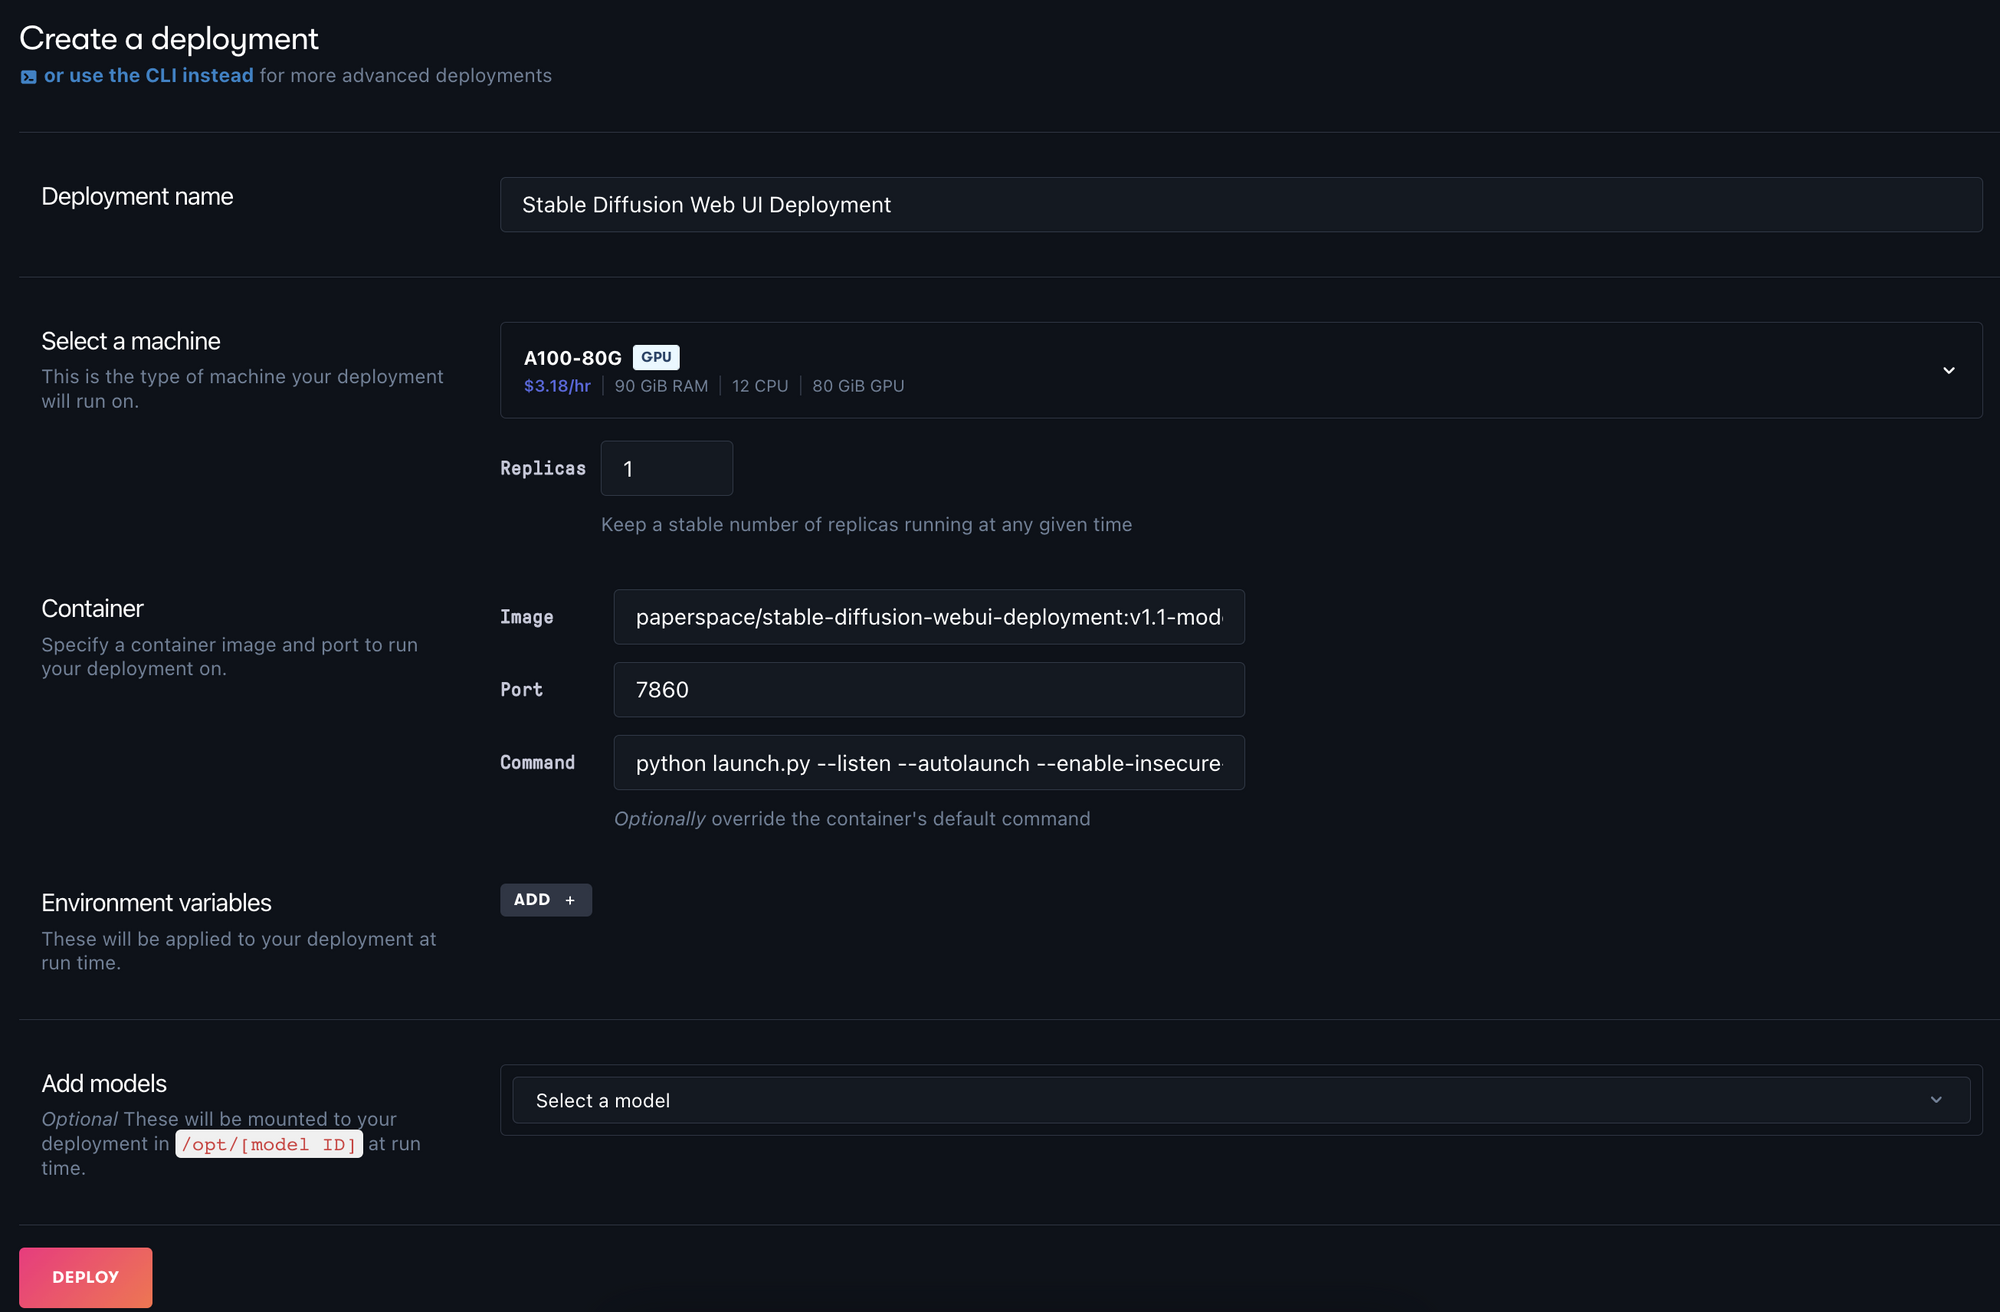
Next, hit the 'Create' button to open the create page. This is where we can fill in the information spec for our Deployment. Name the deployment appropriately. We chose 'Stable Diffusion Web UI Deployment'.
We can then choose a GPU option for our machine. Our suggestion is the A4000 or A5000, as they are extremely powerful for their price-point. See our review of Paperspace GPU pricing for more information about selecting a GPU.
This section is where we can begin to start making some more customization choices for our deployment. There are now two existent versions of this container: one with the pre-trained v1-5 model pre-downloaded, and another that assumes a model is uploaded as a model artifact to Paperspace. In the next section, we will look at using the model artifacts to run the Web UI with our own uploaded model files, enabling us to access something like Dreambooth models or Textual Inversion embeddings. For now, we will use paperspace/stable-diffusion-webui-deployment:v1.1-model-included . This container comes with the v1-5-pruned-emaonly.ckpt already downloaded.
Finally, we will set our port to the exposed "7860", and enter the command to launch the Web UI on startup:
python launch.py --listen --autolaunch --enable-insecure-extension-access --port 7860
Here is the spec fully written out:
image: paperspace/stable-diffusion-webui-deployment:v1.1-model-included
port: 7860
command:
- python
- launch.py
- '--autolaunch'
- '--listen'
- '--enable-insecure-extension-access'
- '--port'
- '7860'
resources:
replicas: 1
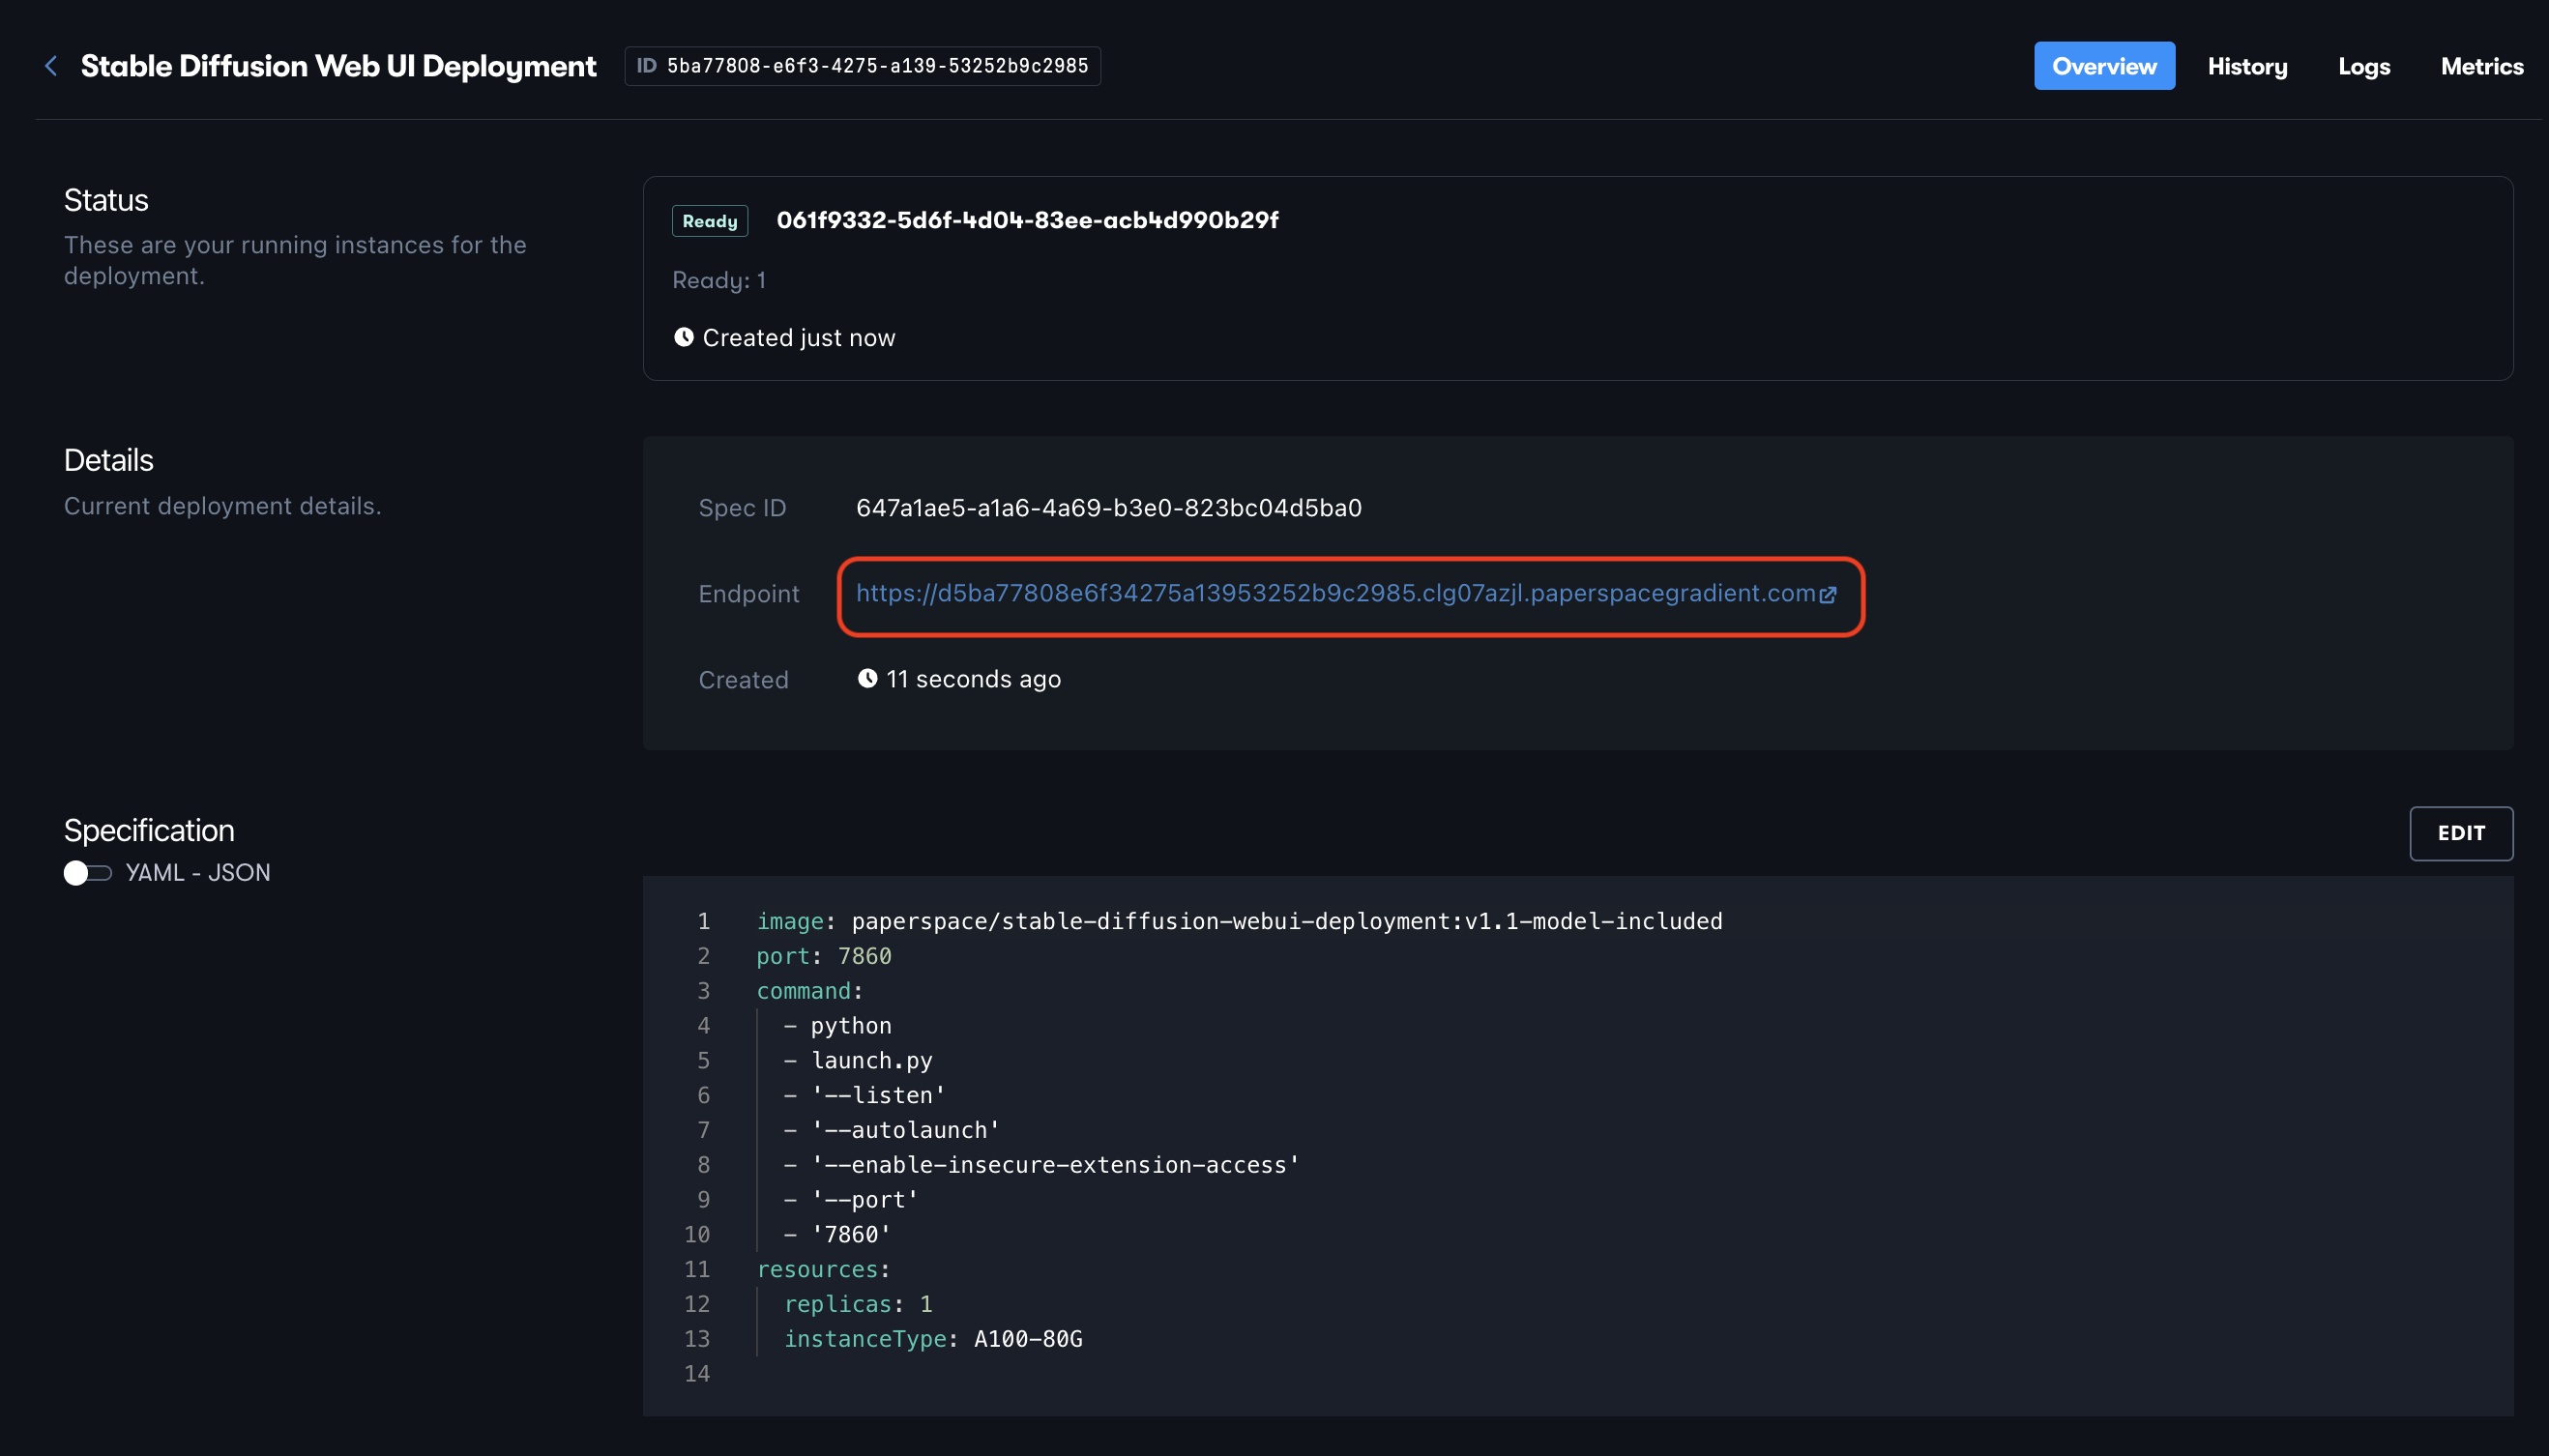
instanceType: A4000We can then hit Deploy to spin up the container and application. This will take about 2 minutes to start up, and can be accessed by clicking the API endpoint link in the Deployments details page.

If everything launched successfully, you will be greeted by the txt2img "homepage" of the Stable Diffusion Web UI when you go to the link, and can now get started synthesizing images!
Alternate: launch the Web UI Deployment with the Gradient CLI
Alternatively, we can launch the Web UI from our local terminal using the Gradient package. You can install the package and login using the snippet below. You just need to create an API key in your team settings page in the API keys tab, and fill it in where prompted in the snippet.
pip install gradient
gradient apiKey <your API key here>
Next, open your terminal and navigate to a directory you can work in. Then, create a new YAML spec file with touch yaml.spec. Then fill in that spec with the following:
image: paperspace/stable-diffusion-webui-deployment:v1.1-model-included
port: 7860
command:
  - python
  - launch.py
  - '--autolaunch'
  - '--listen'
  - '--enable-insecure-extension-access'
  - '--port'
  - '7860'
resources:
  replicas: 1
  instanceType: A4000
Finally, we can create our deployment with the following command:
gradient deployments create --name [Deployment name] --projectId [your Project ID] --spec [path to your deployment spec file i.e. spec.yaml]
Then when you are done using the deployment, you can delete it by going back into your spec file and changing it to have 0 replicas (second to last line of spec). This will stop the deployment from running without deleting it. Then update your deployment with the following terminal command:
gradient deployments update --id <your deployment id> --spec <path to updated spec>
Launching the Web UI with an uploaded model artifact
The container paperspace/stable-diffusion-webui-deployment:v1.1-model-included is a hefty 11.24 GB. This is largely due to the model checkpoint, which takes around ~ 5 GB of memory alone.
To ameliorate the problem of container size, we have also created a version without the model downloaded: paperspace/stable-diffusion-webui-deployment:v1.1. This lighter container is designed to connect to a model artifact uploaded to Gradient.
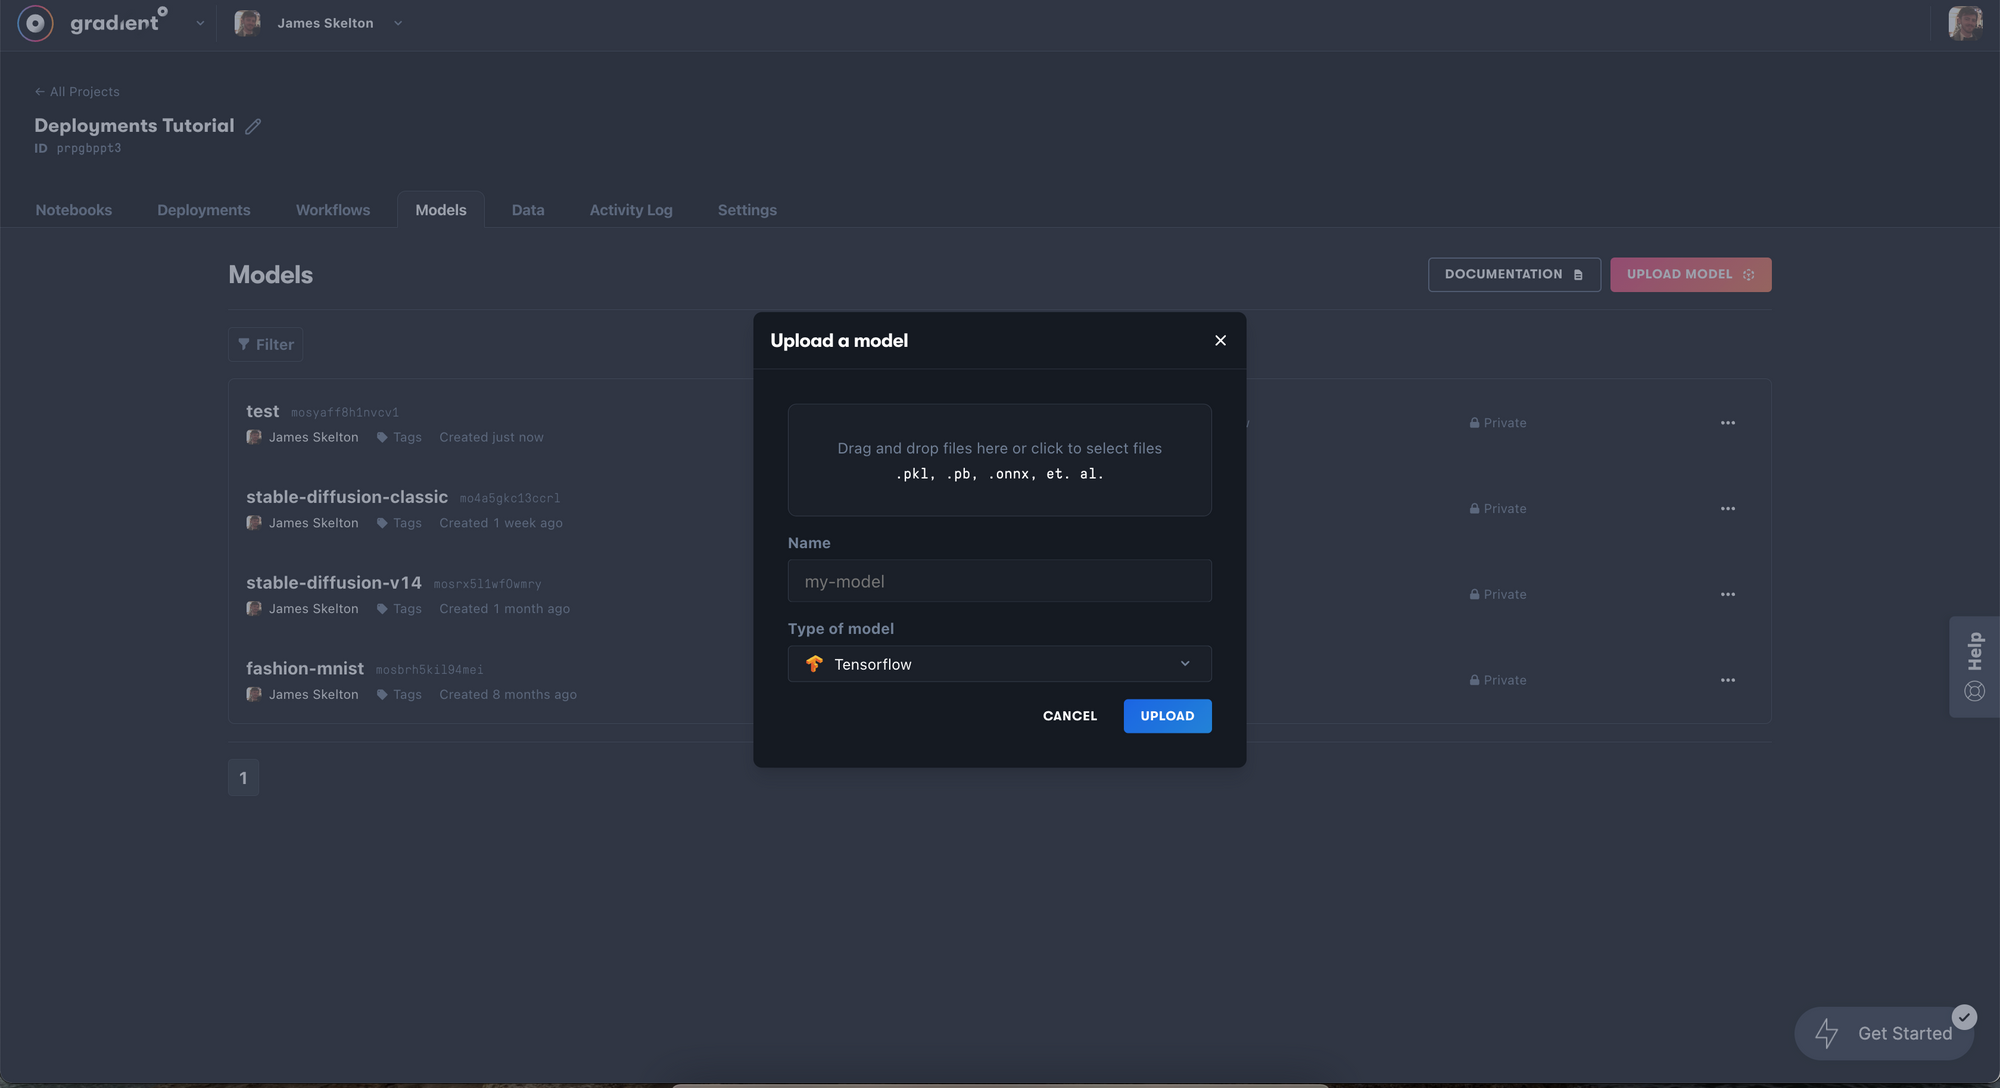
To do so, we need to first upload a model checkpoint to the project we are working in. In the Gradient console, navigate to the models tab and click upload model. Then select your model checkpoint of choice (though, v2 is currently not working with the Web UI) from your local machine, and upload it.
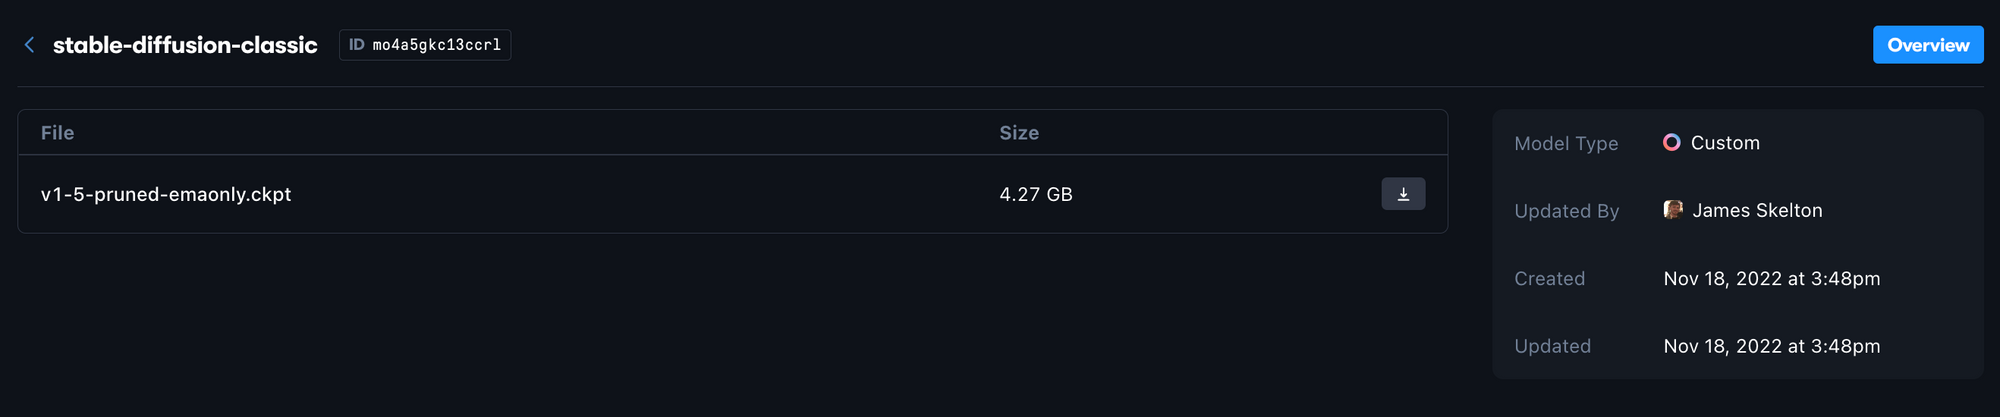
Now, the uploaded model can be accessed using the ID value listed at the top by a Gradient Deployment or Workflow. We just need to modify our YAML spec appropriately to connect them. As we can see from the image above, the example v1-5-pruned-emaonly.ckpt file is associated with the id mo4a5gkc13ccrl, which can be found at the top by the name of the model artifact.
When we connect the Deployment to this artifact, it will use this ID automatically as the subdirectory name, so the new files are mounted in the opt/<your model id>/ directory. Therefore, when the Deployment is active, we will need to launch the Web UI with the --ckpt flag to grab with these names.
opt/ can be found in the root directory of any Gradient Deployment, so we can use this new information to infer the location of the checkpoint file: ../opt/mo4a5gkc13ccrl/v1-5-pruned-emaonly.ckpt.
Beyond the CMD, we also need to set the environment variables and declare the file id and path for the container to connect with. We can use the sample YAML spec below by filling in the missing values to launch the Web UI with any uploaded diffusion model.
image: paperspace/stable-diffusion-webui-deployment:v1.1
port: 7860
command:
  - python
  - launch.py
  - '--share'
  - '--autolaunch'
  - '--listen'
  - '--enable-insecure-extension-access'
  - '--port'
  - '7860'
  - '--ckpt'
  - ../opt/< model id >/<checkpoint file name>
env:
  - name: MODEL_NAME
    value: <name you gave to the model artifact in console>
  - name: MODEL_FILE
    value: <file name for model i.e. v1-5-pruned-emaonly.ckpt>
  - name: MODEL_DIR
    value: /opt/< model id >
models:
  - id: <model id>
    path: /opt/<model id>
resources:
  replicas: 1
  instanceType: A4000 # <-- we recommend the A4000 or A5000
When inputted to the Gradient Deployments create page, we will get something that looks like this:

We must fill in the Environment variables correctly for this to work, but if we succeed, we will have deployed a 5 GB lighter version of the model using our own model file!
What's new in the Web Ui Deployment
Run the Stable Diffusion Web UI in a Notebook with no setup required
Since we last updated the Web UI Deployment, significant progress has been made in upgrading the application across every kind of functionality. Thanks to the robust Gradio framework, it has proven a very capable absorber of the cumulative efforts of the open-source community to develop for Stable Diffusion. In this section, we will look at each of these new features in detail.
Extensions
The Web UI has long featured an ability to intake user scripts, if the correct command line flag is applied at launch. These user scripts have allowed users to modify the application and expand functionality in significant ways. In order to simplify using these scripts and accommodate low code users, the 'Extensions' tab was added to the Web UI. These extensions package user scripts from the community that can then be added on to the Web UI. These vary from powerful add ons and tools to useful edits to the UI to style inspiration tools. Some examples of these extensions include, but aren't limited to:
Dreambooth
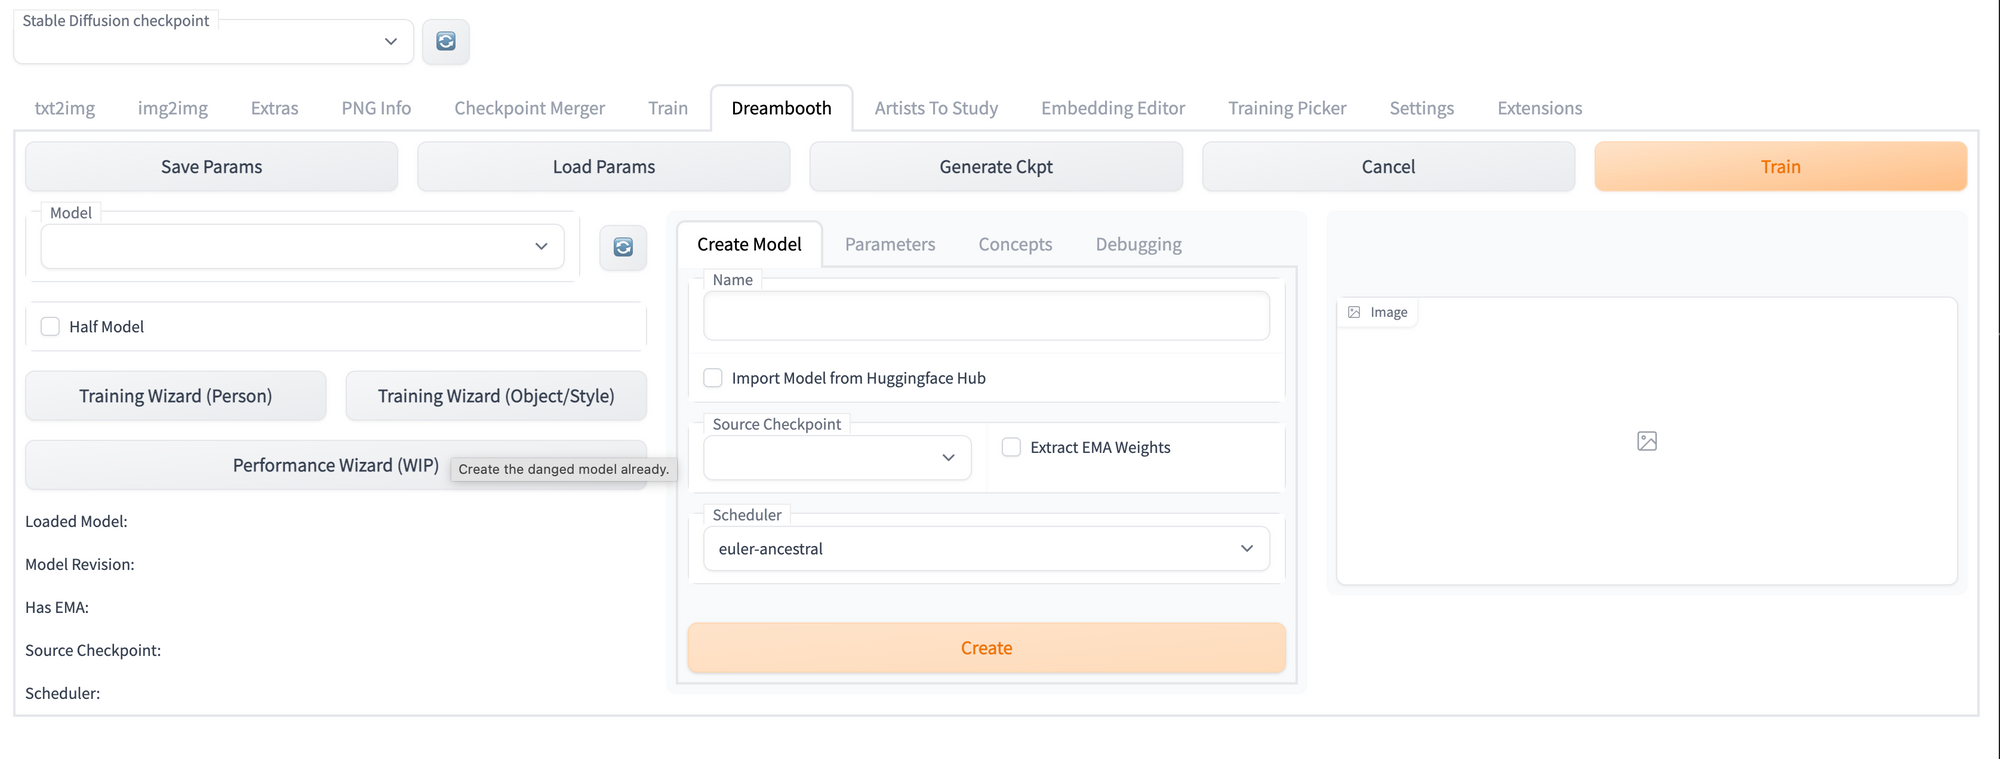
This extension allows users to train a new, fine-tuned model by inputting a number of images for the model to tune itself to. This is one of the most popular methods for creating a customized version of the Stable Diffusion model, and the extension makes it simple to use in the Web UI.
If you try this, be sure to compare your results with your results from using the Gradient Dreambooth Notebook!
Image browser
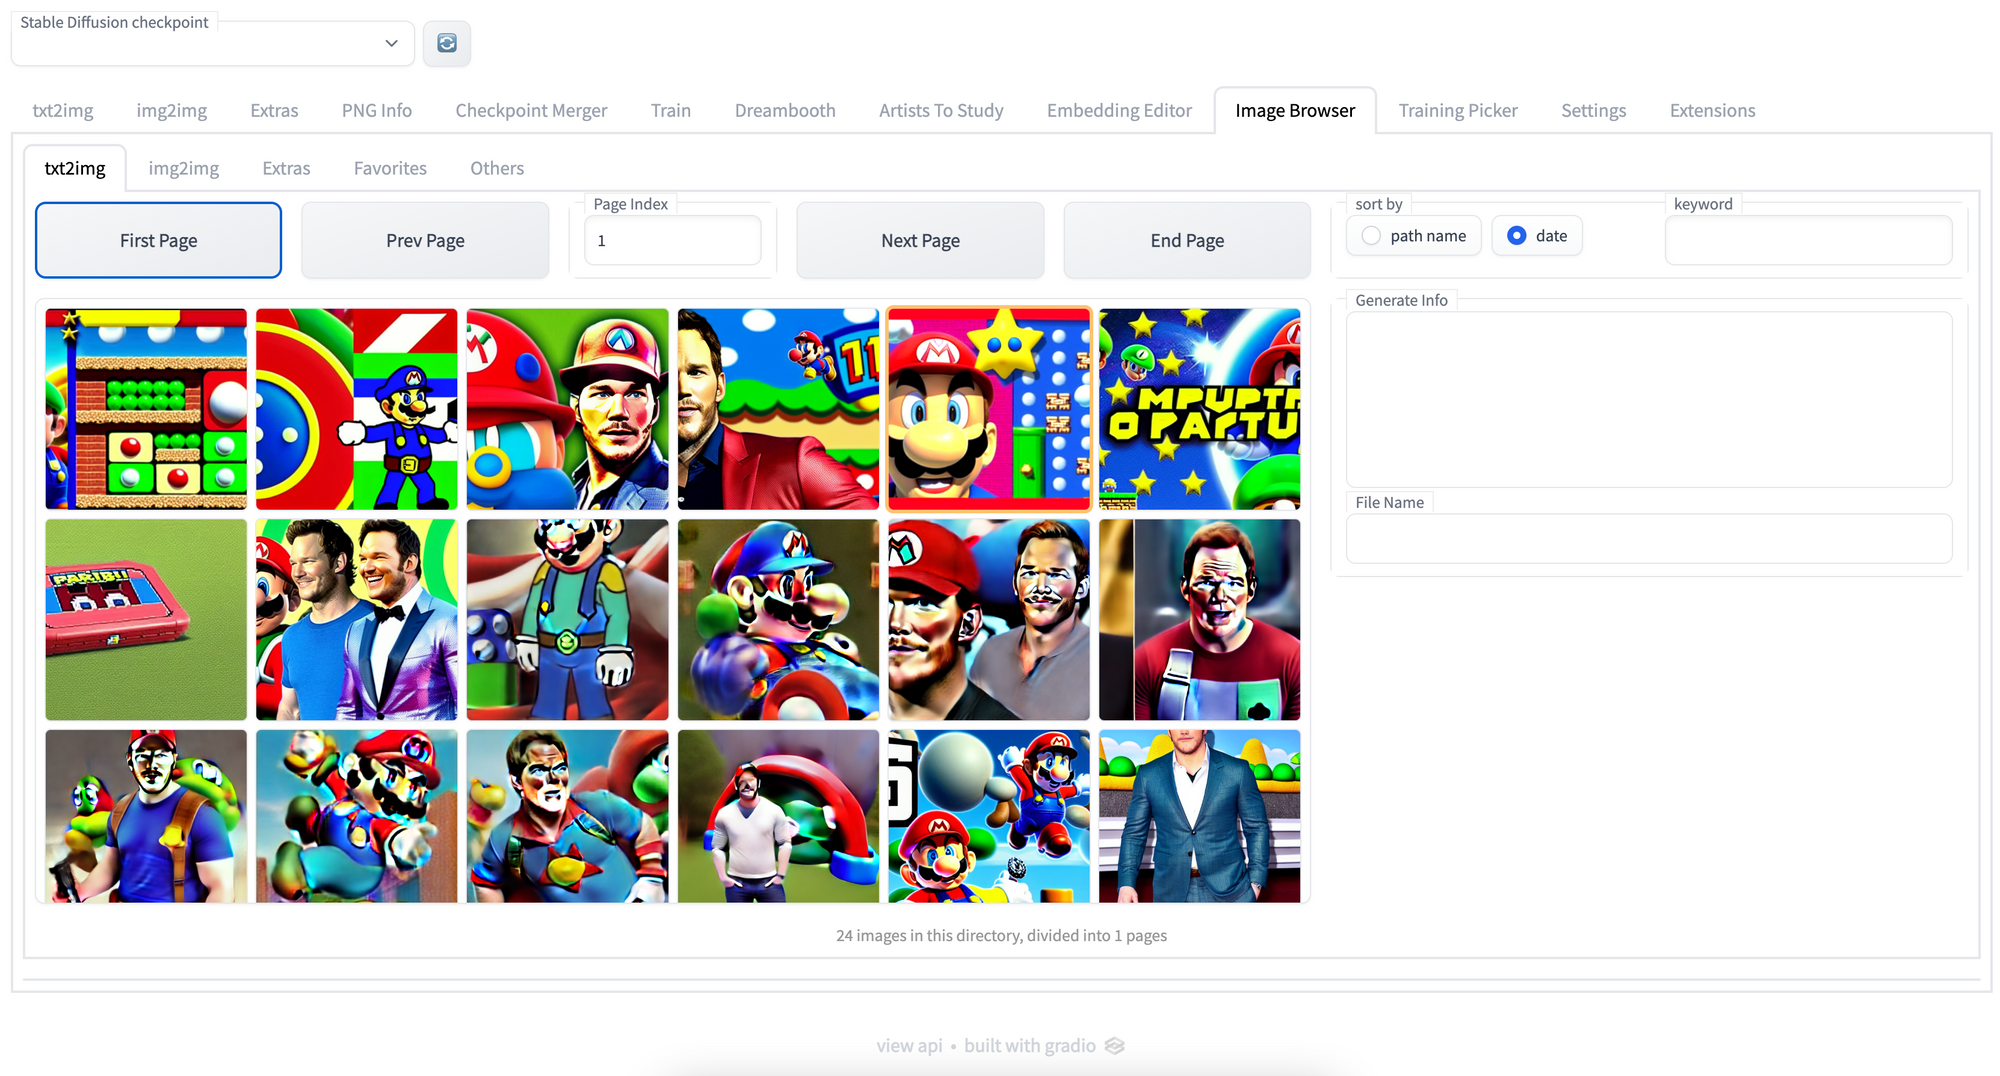
Perhaps the most useful utility extension, the Image Browser add-on allows users to examine the images generated throughout the session from within the Web UI. This is particularly useful to Deployment users, as it provides an easy method to download images generated at any time earlier in the session, and compare photos across different generation specs.
Embeddings Editor
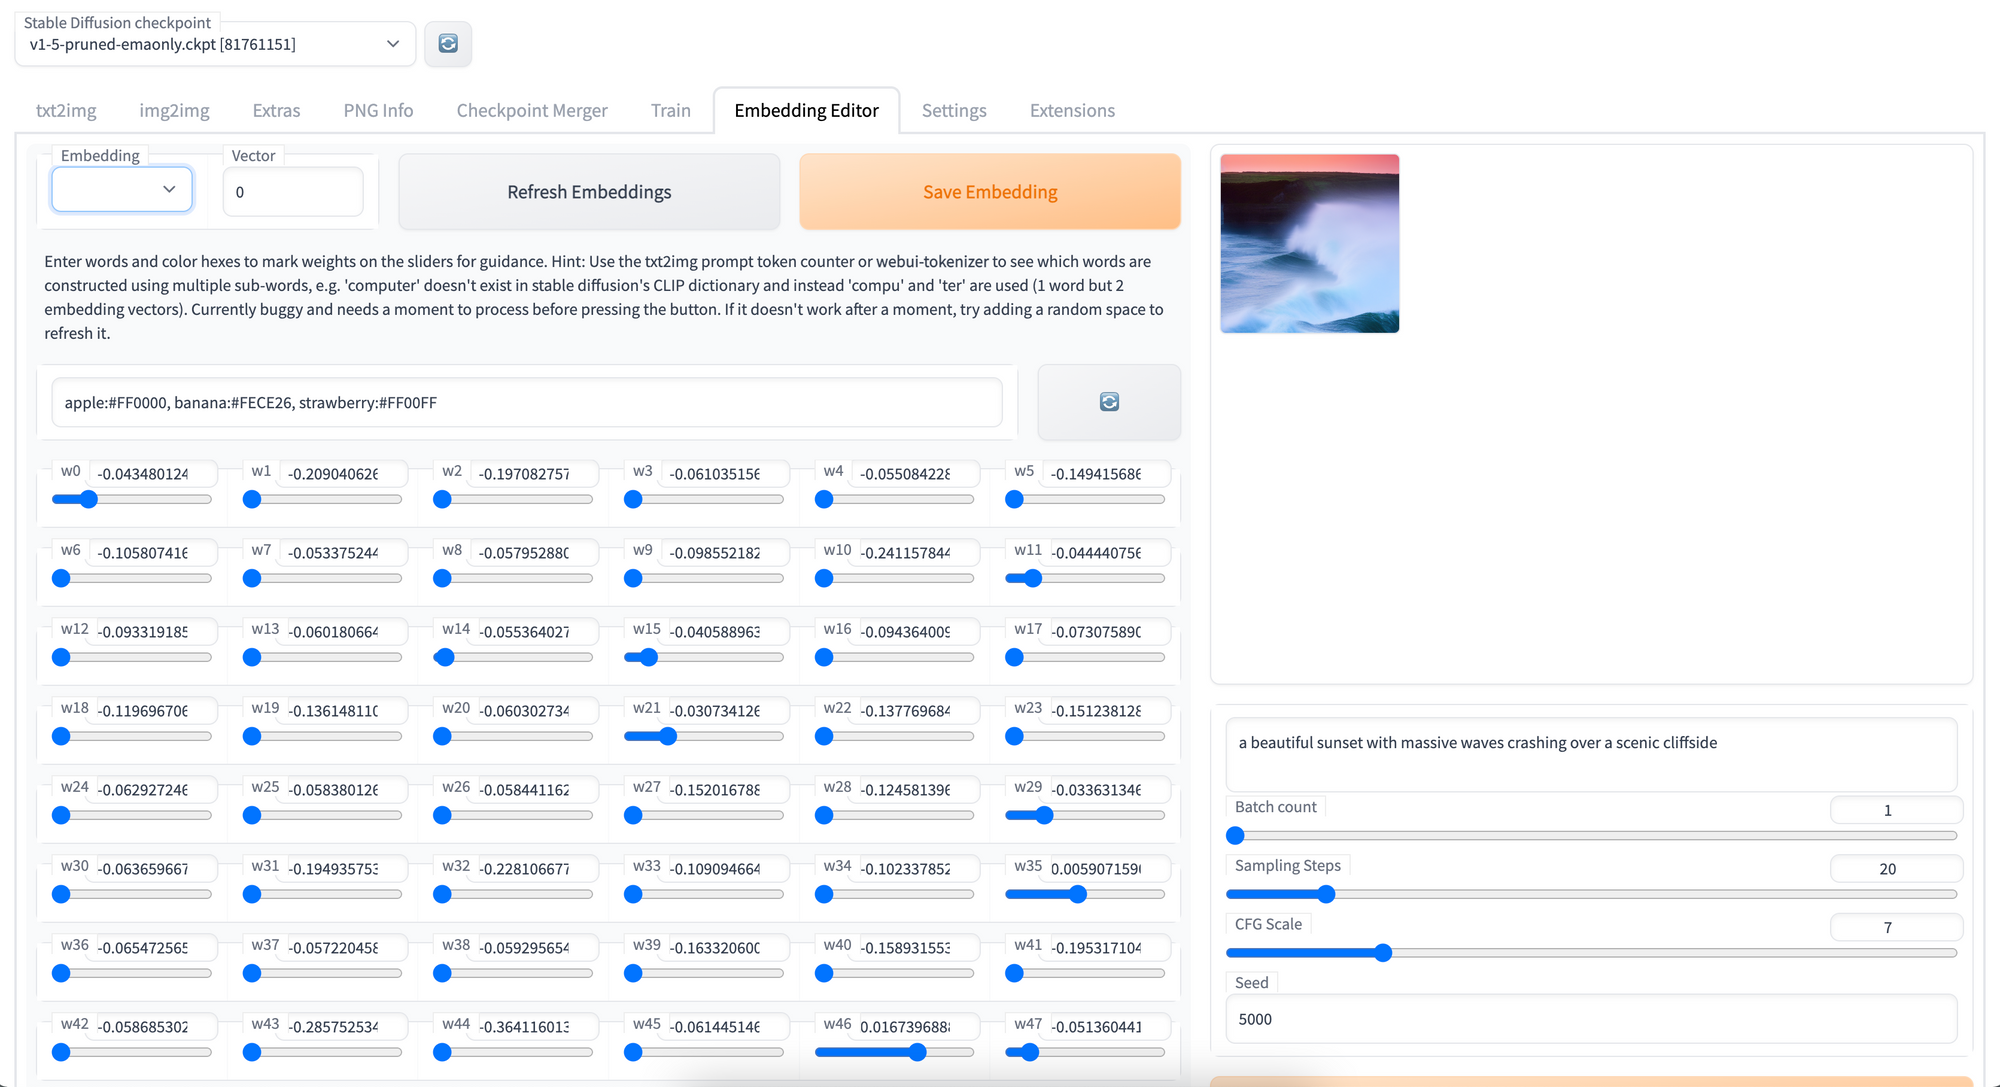
Textual Inversion is another popular method for fine-tuning Stable Diffusion, though unlike Dreambooth it focuses on creating an optimal word analogue representation for the features of the training images. Through the Embeddings Editor, users can alter and edit existing embeddings. This is rudimentary as of right now, but careful users could tweak their Textual Inversion embeddings using this to great effect.
Be sure to compare your results with those from the Gradient Textual Inversion Notebook!
Aesthetic Gradients
Aesthetic gradients are a method devised to personalize a CLIP-conditioned diffusion model by guiding the generative process towards custom aesthetics defined by the user from a set of images. Using this extension, users can create an aesthetic gradient using a few images. This new style can then be applied to any images generated going forward.
Artists to Study
In addition to the more functional extensions mentioned above, there are a number of tools for helping users get inspired for their own work. One example of this is the Artists to Study extension, which quickly generates sample images from a plethora of different styles and aesthetics to help the user decide on a style to use.
Localizations & more
One of the most useful extensions are the localization extensions. These allow users to change the language of the Web UI to their native language, and likely will give many non-English speaker users the ability to run this Web UI they would otherwise be unable to make full use of. Localizations include Traditional Chinese, Korean, Spanish, Italian, Japanese, German and more!
This look at the extensions was by no means comprehensive. Be sure to check out the Wiki and associated repos for detailed information about each extension of interest.
Checkpoint Merger
Previously, it was possible to merge checkpoints using the command line (Glid-3-XL-stable had a great script for this), but this was by no means an intuitive process. For low code users, it was likely prohibitively difficult to merge two models.
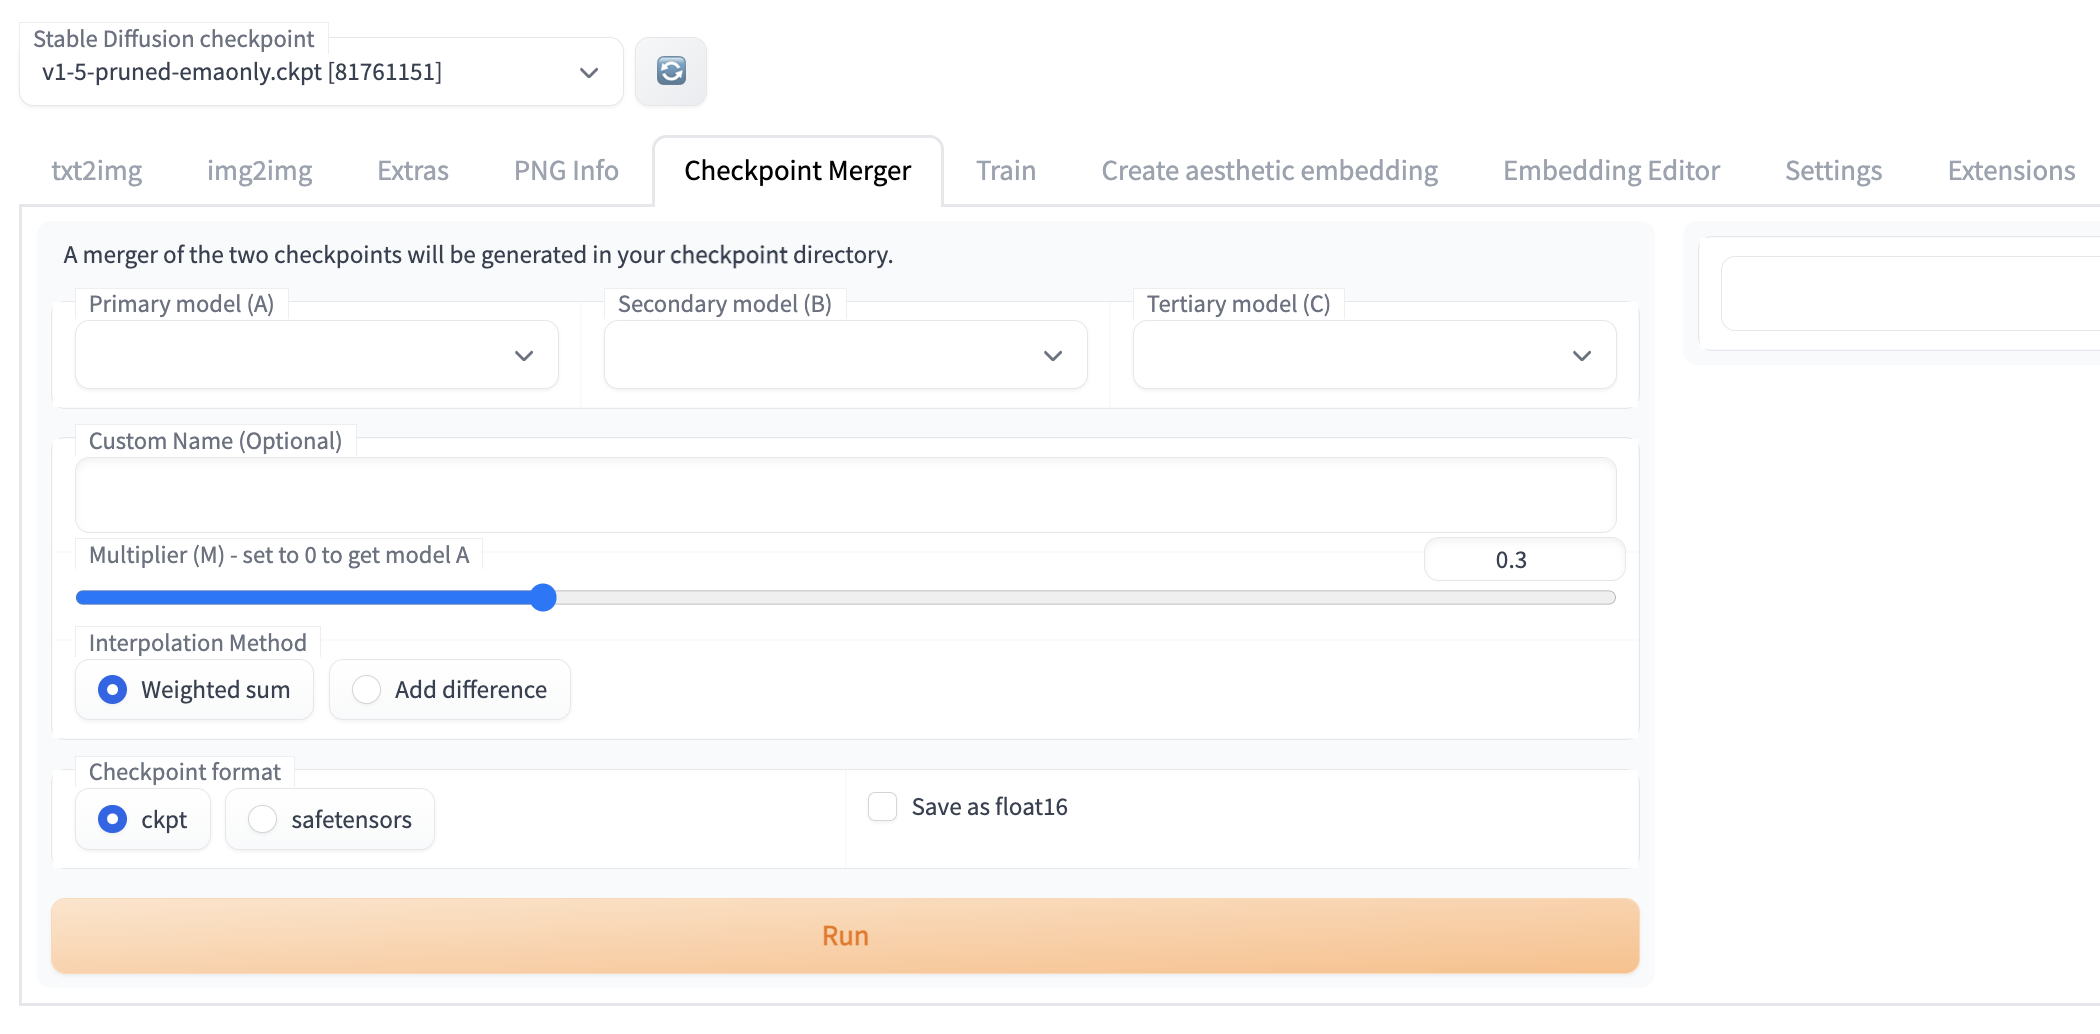
The checkpoint merger is one of the most useful tools in the Web UI. With this tool, it is possible to be more meticulous when combining two models. The slider allows the user to determine what rough "percentage" of the model weights are transferred to the output model, and allows users to iteratively test different combinations of models as needed.
Train
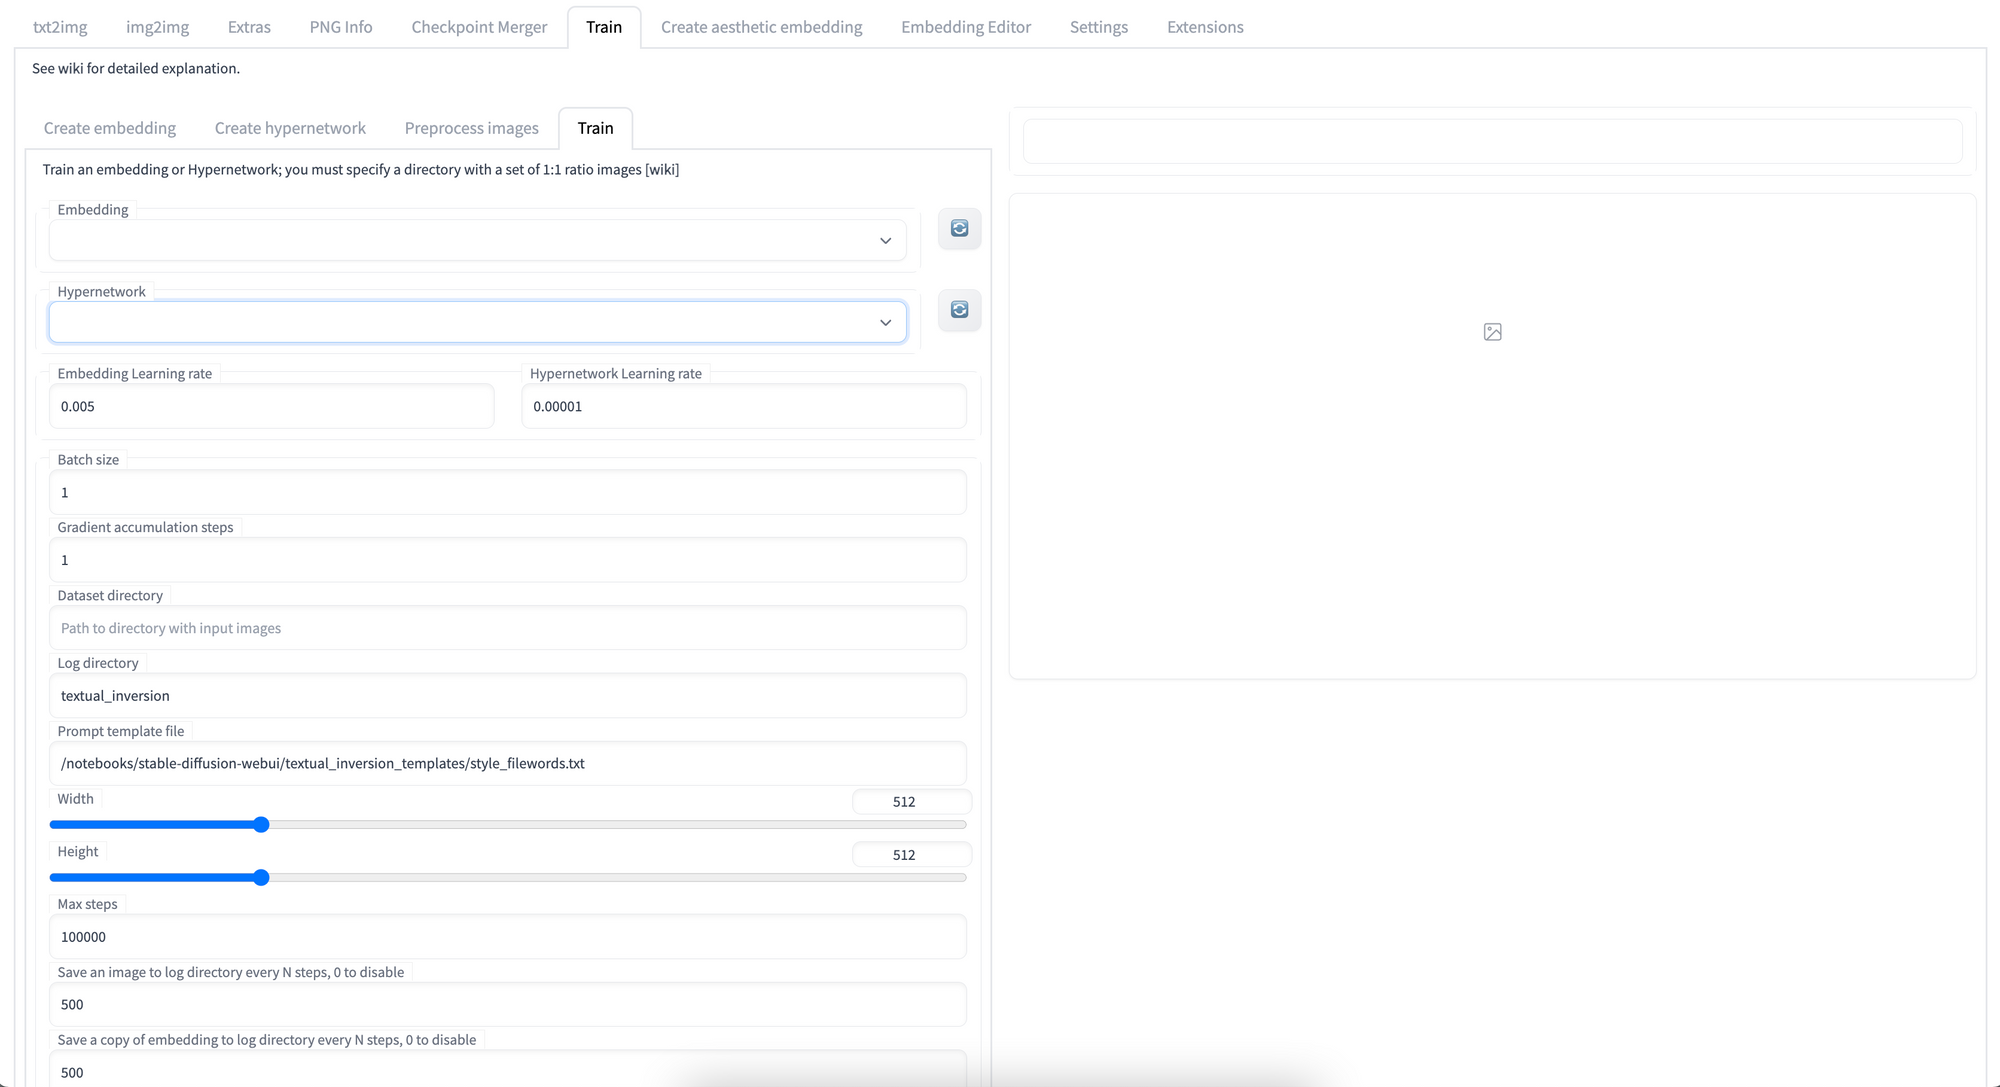
The train tab adds the ability to train hypernetworks and image embeddings within the Web UI using a selection of files. These capabilities are still being updated to match the function of external tools, but they can still be useful especially if we want to train an image embedding on a relatively low-power GPU.
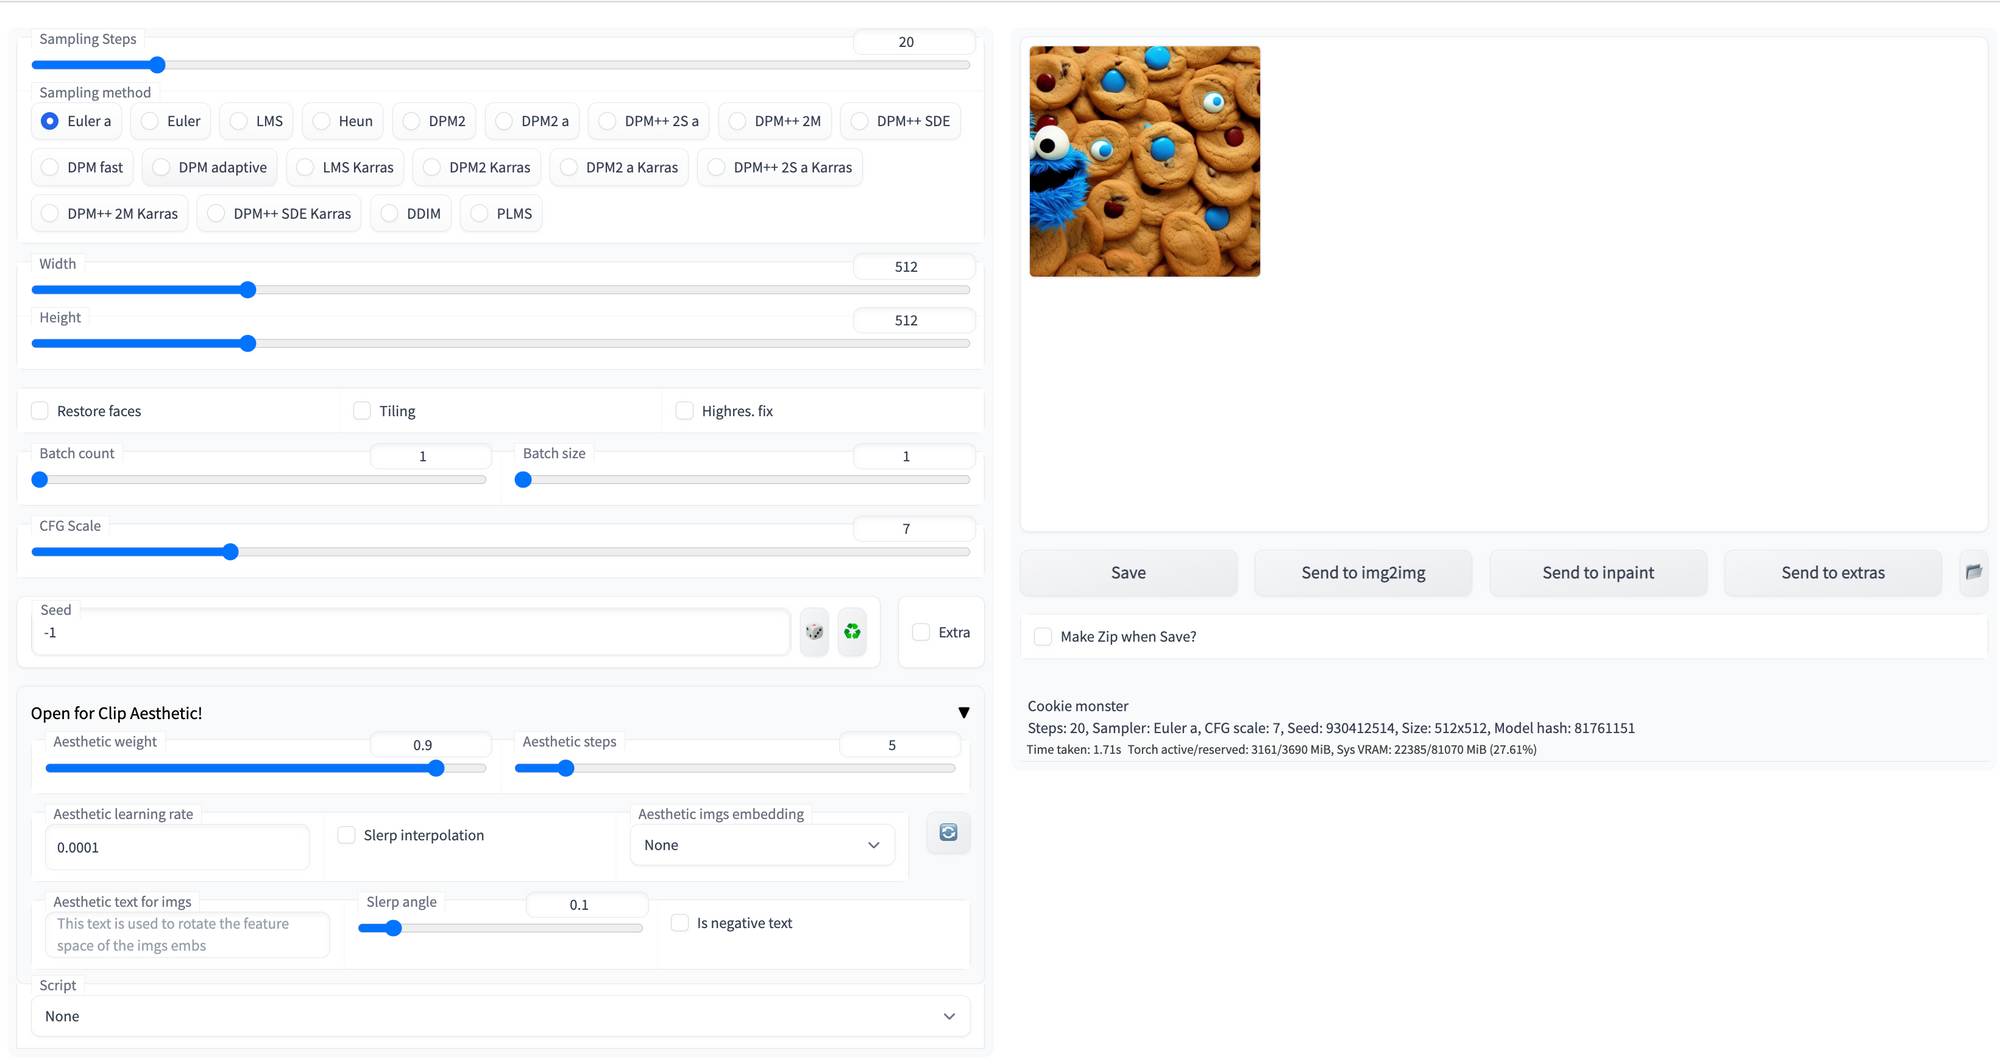
New schedulers
When generating images with Img2Img or Txt2Img scripts in the Web UI, users have a choice of selections for what scheduler to use. Per the Huggingface docs, "The schedule functions, denoted Schedulers in the library take in the output of a trained model, a sample which the diffusion process is iterating on, and a timestep to return a denoised sample. That’s why schedulers may also be called Samplers in other diffusion models implementations." [Source].
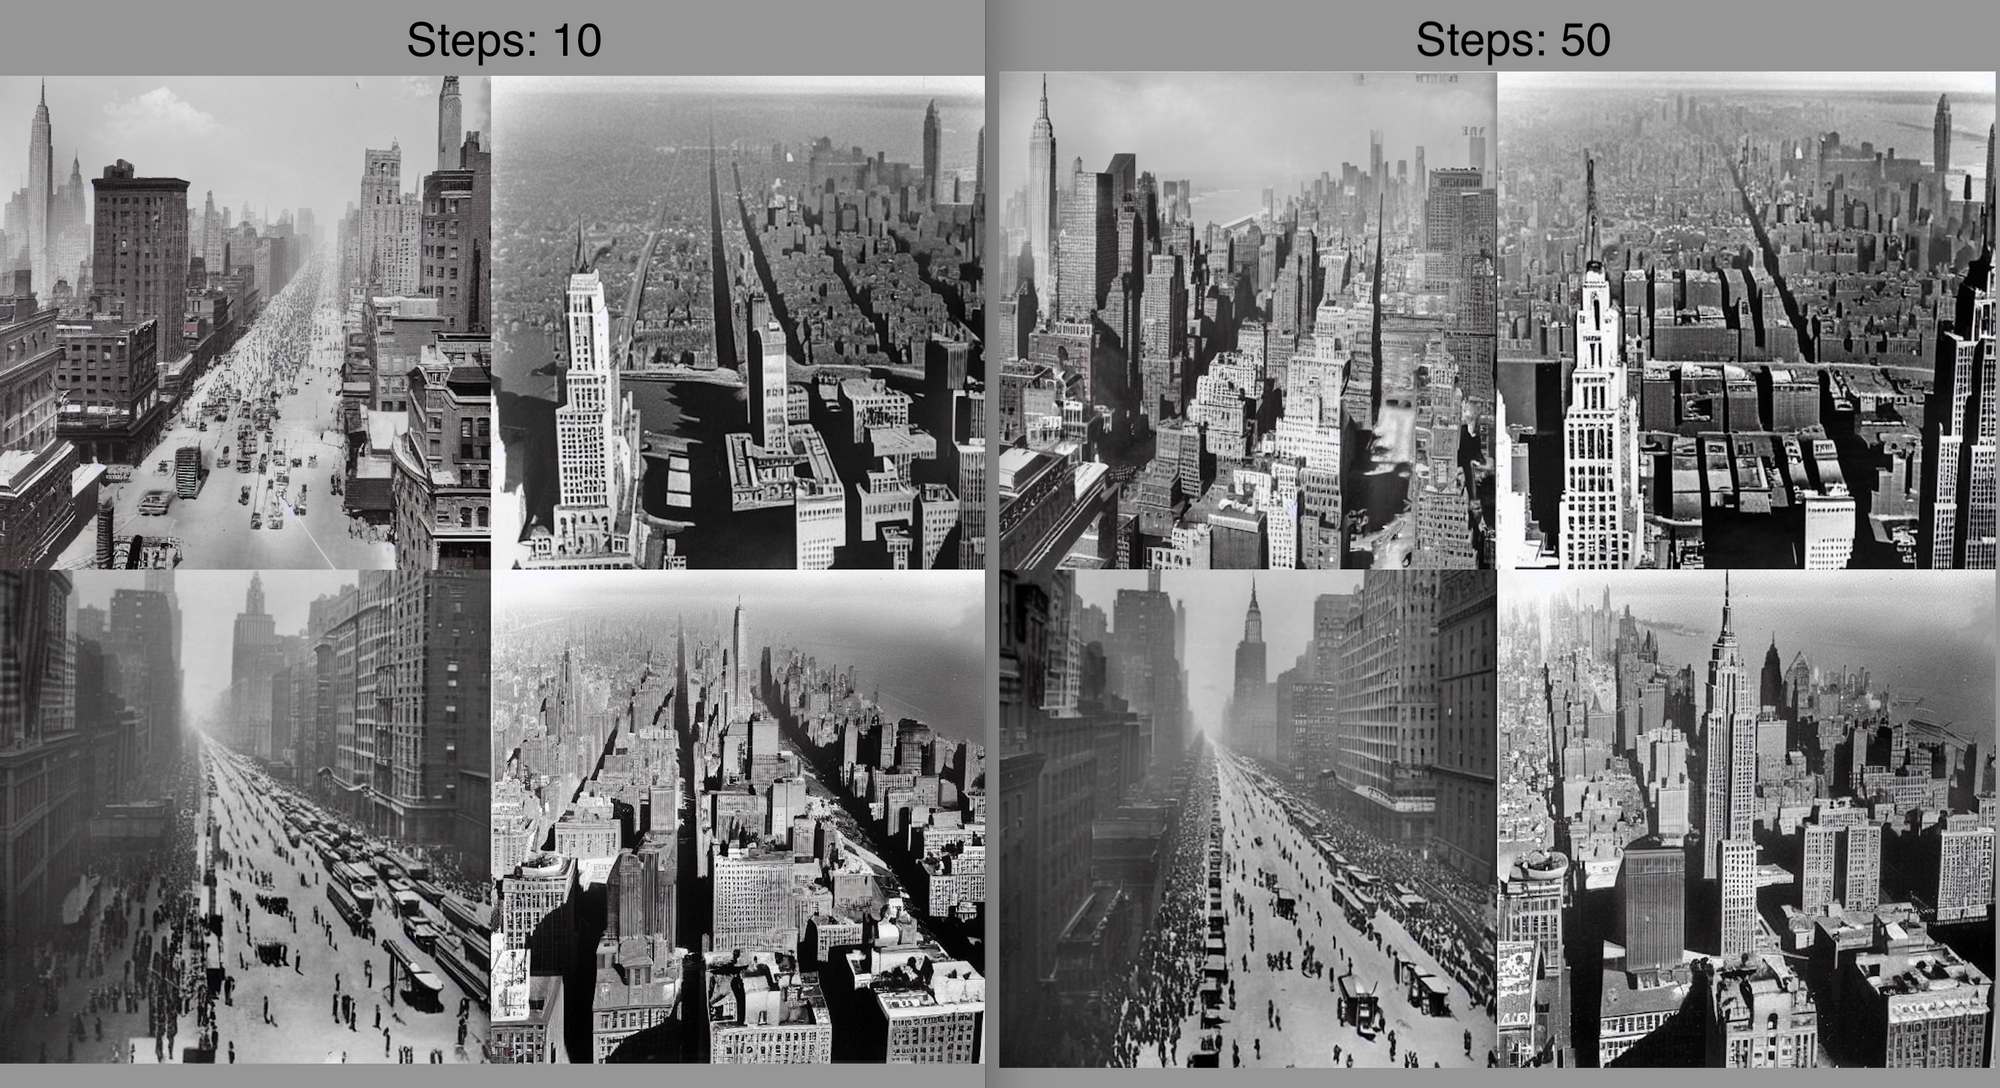
There are a number of new Schedulers added to the Web UI since the last iteration of this deployment container. In particular, we want to call attention to the DPM++ 2M, DPM++ 2M Karras, and DPM++ SDE schedulers. These are all capable of generating high quality outputs at extremely low sampling step values. Above is a sample containing images generated at 10 diffusion steps and 50 diffusion steps. As we can see, there is relatively little loss in graphic fidelity, and the images in the left hand grid are aesthetically nearly identical in terms of detail and definition as the images generated with 5x the amount of steps.
Closing thoughts
In this article, we looked at the steps for creating and updating a container for the Stable Diffusion Web UI, detailed the steps for deploying the Web UI with Gradient, and discussed the newer features from the Stable Diffusion Web UI that have been added to the application since our last article.
In the future, check back to this article series for updates on the Stable Diffusion Web UI container.