Bring this project to life
A couple weeks ago, we covered the release of the latest Stable Diffusion model from the researchers at Stability AI. This model, which boasts an upgraded VAE design, an extended architecture, improved text-image latent understanding, and a doubled base resolution. These capabilities, along with its continued excellence at covering a wide variety of different styles, shapes, and features, have allowed Stable Diffusion XL (SDXL) to smoothly transition in to the go-to model for text to image synthesis in the past few months.
As such, there has been a growing demand for the ability to use many of the same featured capabilities and upgrades that have come to the 1.x and 2.x versions of the model that have released in the last year. These additions to the models base functionality, such as LoRA modeling, ControlNet, EBsynth, and other popular extensions for the Automatic1111 Web UI, have allowed Stable Diffusion to rocket to the wider worlds attention, and users are ready to have these same capabilities with Stable Diffusion XL.
In this article, we will cover using the convenient workflow created for the Fast Stable Diffusion project to create a trained LoRA model using any style or subject. We will walk through this process step-by-step using sample photos of this article's author's face to train the model, and then show how to use it in both the Stable Diffusion Web UI from AUTOMATIC1111 and the ComfyUI.
Low-Rank Adaptation (LoRA) Models
LoRA stands for Low-Rank Adaptation. These models allow for the use of smaller appended models to fine-tune diffusion models. In short, the LoRA training model makes it easier to train Stable Diffusion (as well as many other models such as LLaMA and other GPT models) on different concepts, such as characters or a specific style. These trained models then can be exported and used by others in their own generations. [Source]
We use LoRA's with Stable Diffusion to train low-cost models that capture the desired subject or style, and can then be used with the full Stable Diffusion model to better work with that entity.
Fast Stable Diffusion
The Fast Stable Diffusion project, lead and created by Github user TheLastBen, is one of the best, current means to access the Stable Diffusion models in an interface that maximizes the experience for users of all skill levels. The Fast Stable Diffusion implementations of these UIs allow us to maximize our hardware to get the optimally shortened generation times for every image we synthesize.
Currently, Fast Stable Diffusion supports both the AUTOMATIC1111 Web UI and the ComfyUI. For more details about each of these, use the links above to access their original web pages.
We go into more detail on using the Stable Diffusion Web UI in our Stable Diffusion breakdown for creating a Deployment for the application with Paperspace. For more information on the Stable Diffusion XL model, check out the theory section of our walk through for running the model in a simple Gradio web interface.
Demo
While last time we had to create a custom Gradio interface for the model, we are fortunate that the development community has brought many of the best tools and interfaces for Stable Diffusion to Stable Diffusion XL for us. In this demo, we will first show how to set up Stable Diffusion in a Paperspace Notebook. This process has been automated in a Ipython notebook for us by TheLastBen, so the model itself will be downloaded automatically to the cache. This cache will not count against the storage limit, so don't worry about the download size. Next, we will discuss some best practices for taking/selecting images for a specific subject or style. We will then show how to properly provide captions for the training process for the LoRA. We will then conclude by showing some sample photos we made using a LoRA model trained on the author's own face.
Setup
Bring this project to life
To get started, click the link above to access the Fast Stable Diffusion interface in a Paperspace Notebook. This will automatically launch into a Free GPU (M4000). We can turn off the machine at anytime, and switch to a more powerful GPU like the A100-80GB to make our training and inference processes much faster. Try out the Paperspace Pro & Growth plans for access to hourly priced machines for a single monthly payment at no additional cost.
Once your Notebook has spun up, simply run the first two code cells to install the package dependencies and download the SD XL Base model.
# Install the dependencies

force_reinstall= False

# Set to true only if you want to install the dependencies again.

#--------------------
with open('/dev/null', 'w') as devnull:import requests, os, time, importlib;open('/notebooks/sdxllorapps.py', 'wb').write(requests.get('https://huggingface.co/datasets/TheLastBen/PPS/raw/main/Scripts/sdxllorapps.py').content);os.chdir('/notebooks');import sdxllorapps;importlib.reload(sdxllorapps);from sdxllorapps import *;Deps(force_reinstall)
This first cell actually installs everything. You may also notice that it creates a folder titled Latest_Notebooks. This is where we can continually get access to updated versions of the notebooks included in the PPS repo. The next cell downloads the model checkpoints from HuggingFace.
# Run the cell to download the model

#-------------
MODEL_NAMExl=dls_xl("", "", "")
Once that is completed, we can start the more involved part of this tutorial.
Image Selection and Captioning
Selecting the images for a LoRA (or Textual Inversion embedding, for that matter) model is extremely important. To be concise, the images we select for the training will have profound effects downstream on our final image outputs. It is critical when training a working LoRA model to select images that actually contain the desired subject/style's features in a variety of settings, lighting, and angles. This variety will introduce the required flexibility to our LoRA that will give our outputs the desired versatility and diversity we expect from a LoRA.
To that point, for this tutorial we are going to show how to train a SD XL LoRA on our own face. A lot of the points we will make about choosing the best photos will also extend to a stylistic LoRA, so don't worry if that is the goal.
To start, let's make a quick list of all the characteristics we are looking for in the image dataset for a Stable Diffusion LoRA:
- Single subject or style: things are going to be much more difficult if there are multiple entities present in the training images. Focus on a single subject featured in different ways for the best results
- Different angles: it is critical that the subject is represented from different angles in the inputted training images. This will ensure that the LoRA doesn't functionally overtrain on a single perspective of the subject. This massively inhibits the models final flexibilility
- Settings: if the subject is always in the same setting, i.e. backgrounds, clothing, etc., these features will be carried into the LoRA results. Be wary of datasets comprised of images all taken in a single session. Alternatively, a totally blank background seems to work nearly as well as varying them
- Lighting: the least important trait to keep in mind, though still relevant, consider using different sorts of lighting for your different images. This will make it easier to place your subject in different places throughout the generated images
Now, with that in mind. Let's take some quick images. We are going to just take some selfies in front of a blank wall. Let's use 5 for the example. We can take a look at the ones we are using for this demo below.
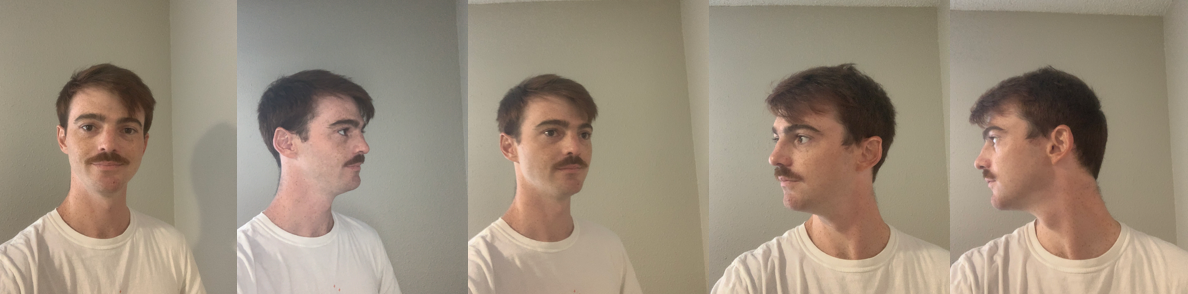
These are the images we used. As is clearly visible, these are just simple selfies. We took each with our head turned towards a slightly different angle to make sure the model gets a full view of the subjects face. We recommend starting with a small dataset like this one using the subject's face/body in similar positions.
Remove_existing_instance_images= True

# Set to False to keep the existing instance images if any.


IMAGES_FOLDER_OPTIONAL= ""

# If you prefer to specify directly the folder of the pictures instead of uploading, this will add the pictures to the existing (if any) instance images. Leave EMPTY to upload.


Smart_crop_images= True

# Automatically crop your input images.


Crop_size = 1024

# 1024 is the native resolution

# Check out this example for naming : https://i.imgur.com/d2lD3rz.jpeg


#-----------------
uplder(Remove_existing_instance_images, Smart_crop_images, Crop_size, IMAGES_FOLDER_OPTIONAL, INSTANCE_DIR, CAPTIONS_DIR)
Here is the code snippet that holds our settings for the images to upload. These are unique to each session, and these can be cleared by running the very last code cell. Let's take a look at the captioning process.
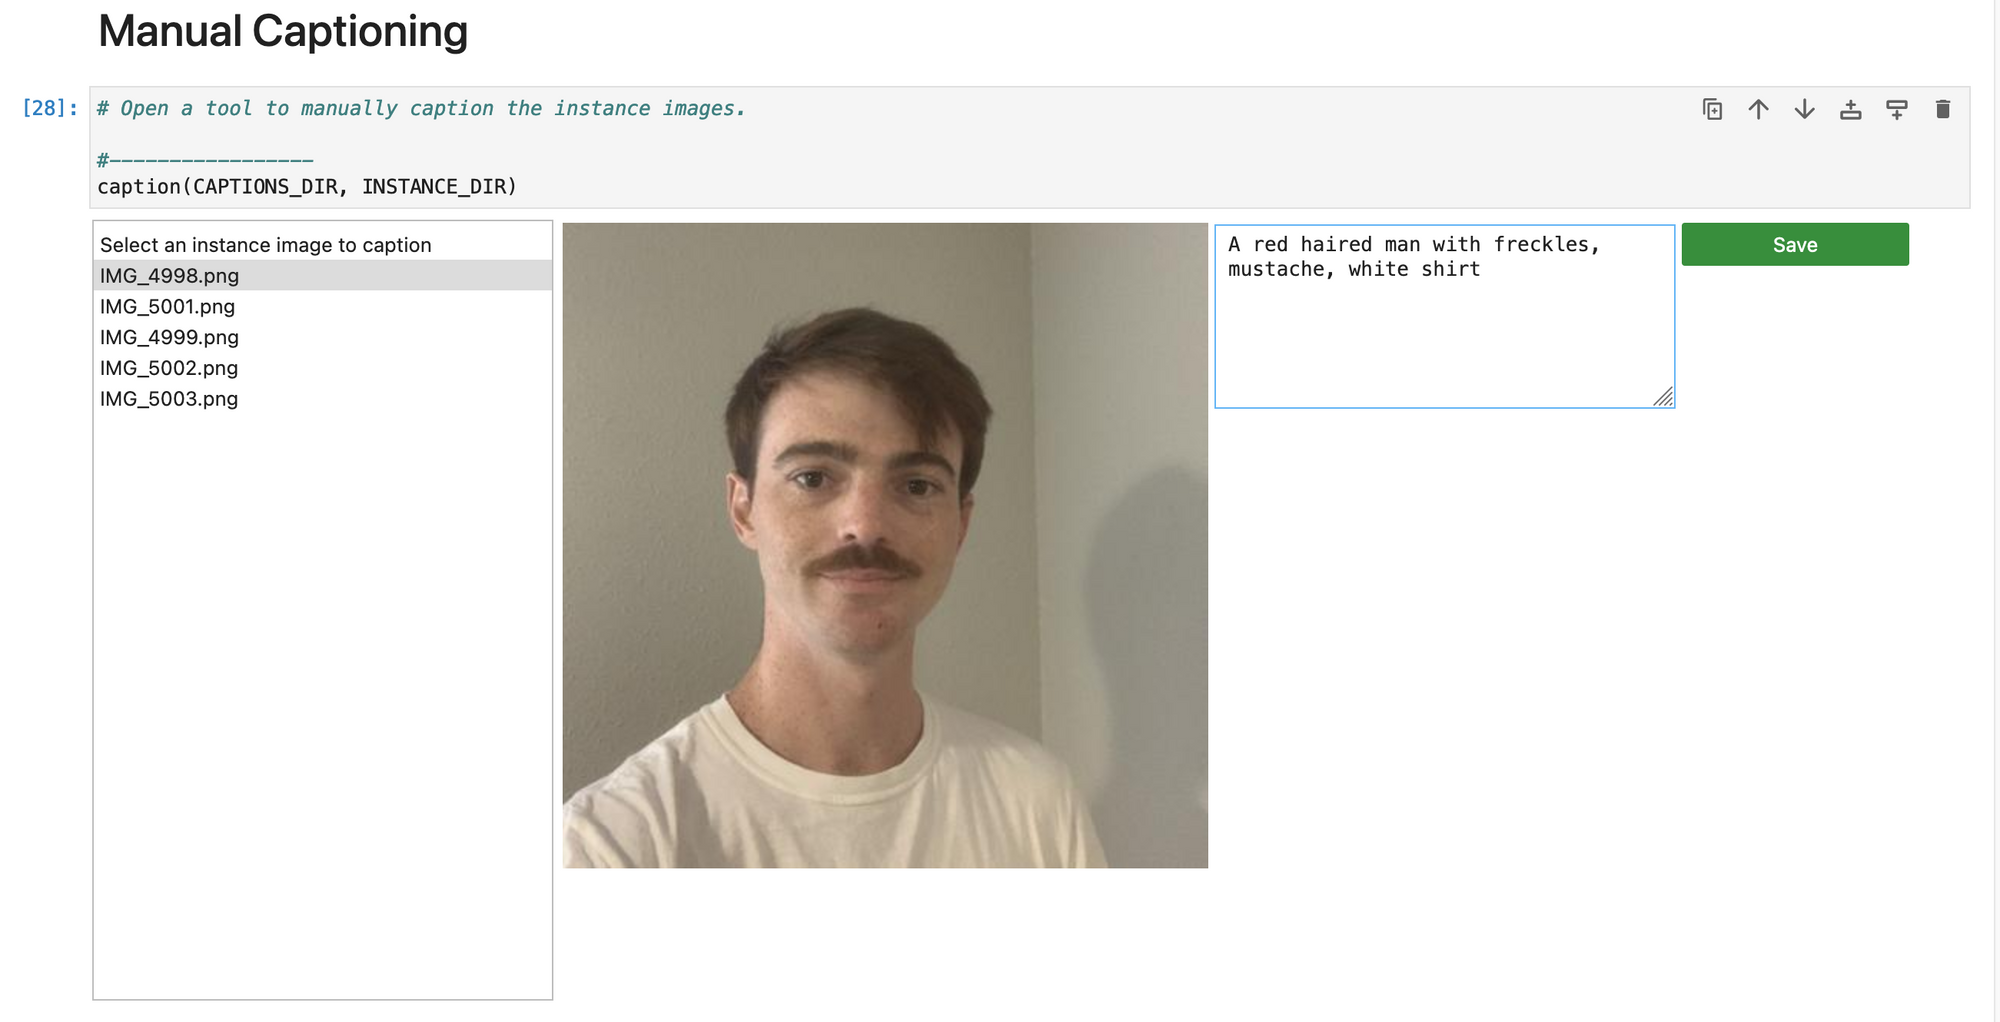
The next cell has the manual captioning code GUI set up for us. Here, we can go one-by-one labeling our images with appropriate captions. We recommend being as descriptive as possible for each caption to improve the efficacy of the training process. If this is too tedious because of a large dataset, we can use the Stable Diffusion Web UI's Training tab to automatically generate corresponding captions in text files for each image. We can then designate the path to it in the code cell, and skip this manual captioning altogether.
Once this is all done, we can begin training.
Training the LoRA model
Resume_Training= False

# If you're not satisfied with the result, Set to True, run again the cell and it will continue training the current model.


Training_Epochs= 50

# Epoch = Number of steps/images.

Learning_Rate= "3e-6"

# keep it between 1e-6 and 6e-6


External_Captions= False

# Load the captions from a text file for each instance image.


LoRA_Dim = 128

# Dimension of the LoRa model, between 64 and 128 is good enough.


Resolution= 1024

# 1024 is the native resolution.


Save_VRAM = False

# Use as low as 9.7GB VRAM with Dim = 64, but slightly slower training.

#-----------------
dbtrainxl(Resume_Training, Training_Epochs, Learning_Rate, LoRA_Dim, False, Resolution, MODEL_NAMExl, SESSION_DIR, INSTANCE_DIR, CAPTIONS_DIR, External_Captions, INSTANCE_NAME, Session_Name, OUTPUT_DIR, 0.03, Save_VRAM)
Here we have the code cell for running the LoRA training. There are a few particular variables defined here we can change to affect the training process. First, if we run the training and it doesn't work the way we want it to, we can resume training using the Resume_Training variable. Next, the Training_Epochs count allows us to extend how many total times the training process looks at each individual image. We can adjust the learning rate as needed to improve learning over longer or shorter training processes, within limitation. Finally, change the LoRA_Dim to 128 and ensure the the Save_VRAM variable is key to switch to True. This will be difficult to run on the Free GPU otherwise.
Once we have our settings chosen, we can run the cell. Afterwards, the model checkpoint will automatically be saved in the right places for the ComfyUI or AUTOMATIC1111 Web UI.
Now that we have completed training, we can jump into either the ComfyUI or the Stable Diffusion Web UI to run our LoRA. This will make it simple to test the model and iterate on our training procedure.
Running the LoRA model with Stable Diffusion XL
Now that we have completed training, we can jump into either the ComfyUI or the Stable Diffusion Web UI to run our LoRA. This will make it simple to test the model and iterate on our training procedure.
User = ""

Password= ""

# Add credentials to your Gradio interface (optional).


Download_SDXL_Model= True


#-----------------
configf=test(MDLPTH, User, Password, Download_SDXL_Model)
!python /notebooks/sd/stable-diffusion-webui/webui.py $configf
We are going to use the AUTOMATIC1111 UI for this example, so scroll down to the second to last code cell and run it. This will automatically setup the Web UI for us and create a sharable link we can access the Web UI through from any web browser. Click the link and open up the Web UI.
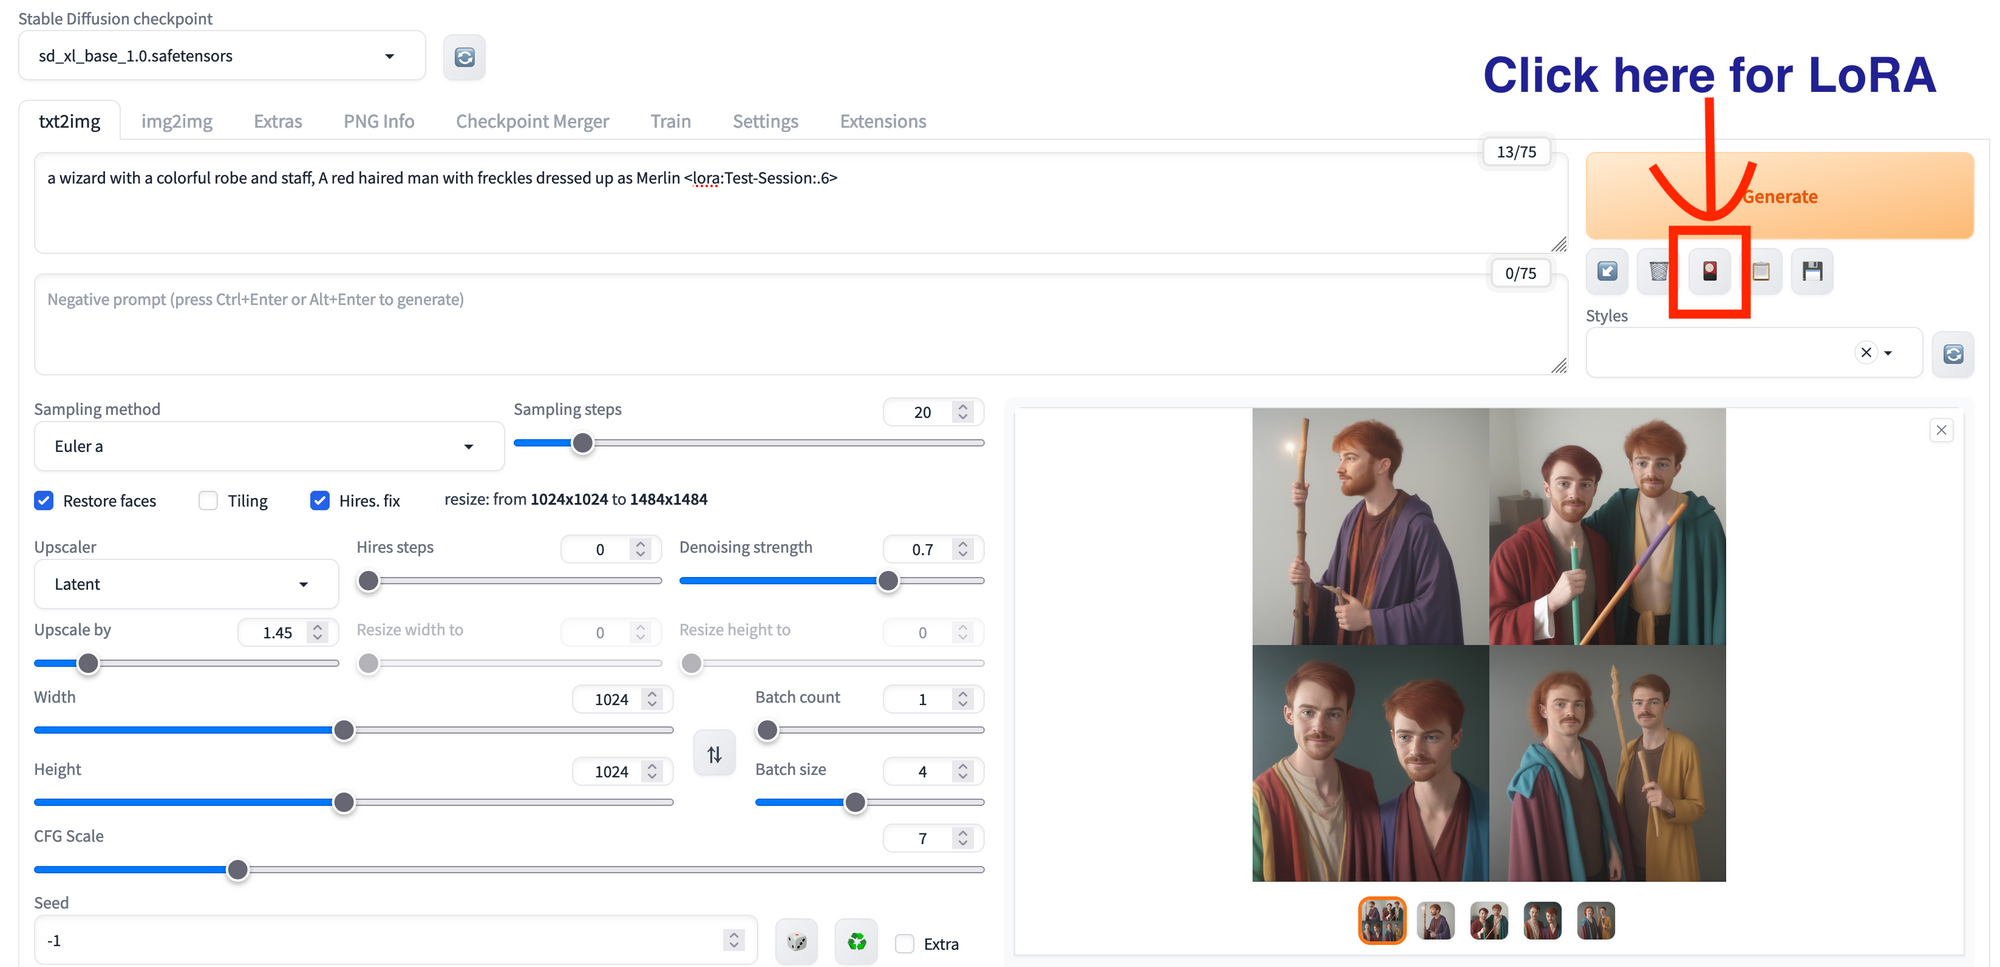
From here, we can click the little red and black symbol with a yellow circle under the generate button to open the LoRA dropdown, and select the LoRA tab. Then, select our newly trained LoRA ("Example-Session" if the session name was unchanged). Then type out a test prompt with the LoRA at the end. Here are some sample photos we made using the prompt "a wizard with a colorful robe and staff, A red haired man with freckles dressed up as Merlin lora:Example-Session:.6".

As we can see, the core characteristics of the original subject are maintained in this new context provided by the SD model. Test out lots of different training subjects and then prompts to get the best results!
Closing thoughts
The Stable Diffusion XL model shows a lot of promise. This project, which allows us to train LoRA models on SD XL, takes this promise even further, demonstrating how SD XL is easily poised to replace the 1.5 models as the de facto methodology for image diffusion modeling.