This is part 3 of the series where we are looking at ways to adapt image augmentation techniques to object detection tasks. In this part, we will cover how to implement how to rotate and shear images as well as bounding boxes using OpenCV's affine transformation features.
Before you start, it is highly recommended that you should have gone through the last two parts of the series because they form the basis of what we are going to do here.
GitHub Repo
Everything from this article and the entire augmentation library can be found in the following Github Repo.
https://github.com/Paperspace/DataAugmentationForObjectDetection
Documentation
The documentation for this project can be found by opening the docs/build/html/index.html in your browser or at this link.
This series has 4 parts.
1. Part 1: Basic Design and Horizontal Flipping
2. Part 2: Scaling and Translation
3. Part 3: Rotation and Shearing
4. Part 4: Baking augmentation into input pipelines
This part assumes that you have read the above articles, since we are going to use the functionality that has been introduced in the earlier articles.
Let's get going.
Rotation
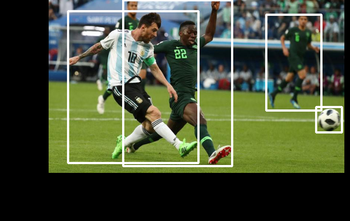
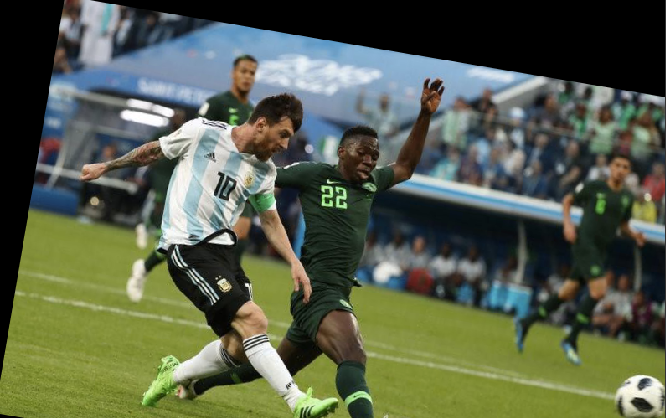
The results of a Rotation transformation look typically like this
Rotation is one of the nastiest data augmentations to deal with. Soon you will know why.
Before we get our hands dirty with the code, I'd like to define some terms here.
- Affine Transformation. A transformation of an image such that parallel lines in an image remain parallel after the transformation. Scaling, translation, rotation are all examples of affine transformations
In computer graphics, we also use something called a transformation matrix, which is a very handy tool to carry out affine transformations.
A detailed discussion of the transformation matrix is not possible as it would take us away from our task. So, I've provided a link at the end of the article where you can read more about it. In the meantime, think of the transformation matrix as a matrix with which you multiply a point's co-ordinates to produce the transformed point.
$$ T_p = M * [ x\:y\:1]^T $$
The transformation matrix is a 2 x 3 matrix, which is multiplied by [x y 1] where (x,y) are co-ordinates of the point. The idea of having a 1 is to facilitate shearing, and you can read more about it in the link below. Multipling a 2 x 3 matrix with a 3 x 1 matrix leaves us with a 2 x 1 matrix containing the new point co-ordinates.
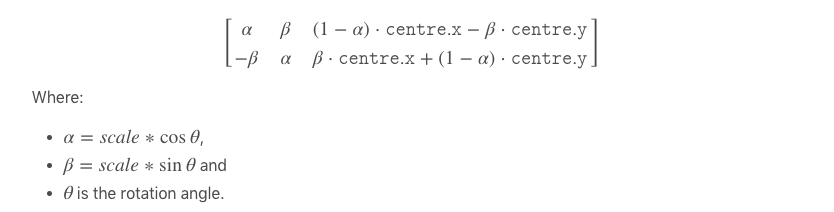
The transformation matrix can be also used to get the coordinates of a point after rotation about the center of the image. The transformation matrix for rotating a point by $\theta$ looks like.
Thankfully, we won't have to code it. OpenCV already provides inbuilt functionality to do it using it's cv2.warpAffine function. So, with the requisite theoretical knowledge behind us, let's get started.
We start by defining our __init__ function.
def __init__(self, angle = 10):
    self.angle = angle

    if type(self.angle) == tuple:
        assert len(self.angle) == 2, "Invalid range"
    else:
        self.angle = (-self.angle, self.angle)
Rotating the Image
Now, the first thing we have to do is rotate our image by an angle $\theta$ about the centre. For this, we need our transformation matrix. We use the OpenCV function getRotationMatrix2D for this.
(h, w) = image.shape[:2]
(cX, cY) = (w // 2, h // 2)
M = cv2.getRotationMatrix2D((cX, cY), angle, 1.0)
Now, we can get the rotate image simply by using the warpAffine function.
image = cv2.warpAffine(image, M, (w, h))
The third argument to the function is (w,h) which is so due to the fact that we want to maintain the original resolution. But if you imagine a bit, a rotated image will have different dimensions, and if they exceed the original dimensions, OpenCV will simply cut them. Here is an example.
We lose some information here. So, how do we get past that? Thankfully OpenCV provides us with a argument to the function that helps us determine the dimensions of the final image. If we can change it from (w,h) to a dimension that will just accomodate our rotated image, we are done.
The inspiration for this comes from a post by Adrian Rosebrock over at his blog PyImageSearch.
Now the question is how do we find this new dimensions. A little bit trigonometry can do the job for us. Precisely, if you look at the following diagram.
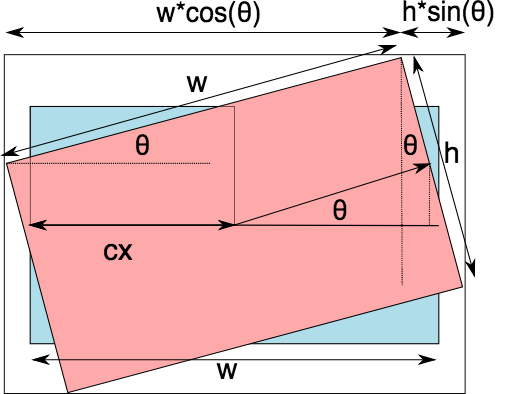
Where
$$ N_w = h * sin(\theta) + w * cos(\theta) \\ N_h = h * cos(\theta) + w * sin(\theta) $$
So now, we compute the new width and height. Note that we can get the values of $\sin(\theta)$ and $\cos(\theta)$ from the transformation matrix.
cos = np.abs(M[0, 0])
sin = np.abs(M[0, 1])

# compute the new bounding dimensions of the image
nW = int((h * sin) + (w * cos))
nH = int((h * cos) + (w * sin))
There's something still missing. One thing is sure that the center of the image does not move since it is the axis of rotation itself. However, since the width and height of image is now nW, nH, the center must lie at nW/2, nH/2. To make sure this happens, we must translate the image by nW/2 - cX, nH/2 - cH where cX, cH are the previous centers.
# adjust the rotation matrix to take into account translation
M[0, 2] += (nW / 2) - cX
M[1, 2] += (nH / 2) - cY
To sum this up, we put the code responsible for rotating an image in a function rotate_im and place it in the bbox_util.py
def rotate_im(image, angle):
    """Rotate the image.

    Rotate the image such that the rotated image is enclosed inside the tightest
    rectangle. The area not occupied by the pixels of the original image is colored
    black.

    Parameters
    ----------

    image : numpy.ndarray
        numpy image

    angle : float
        angle by which the image is to be rotated

    Returns
    -------

    numpy.ndarray
        Rotated Image

    """
    # grab the dimensions of the image and then determine the
    # centre
    (h, w) = image.shape[:2]
    (cX, cY) = (w // 2, h // 2)

    # grab the rotation matrix (applying the negative of the
    # angle to rotate clockwise), then grab the sine and cosine
    # (i.e., the rotation components of the matrix)
    M = cv2.getRotationMatrix2D((cX, cY), angle, 1.0)
    cos = np.abs(M[0, 0])
    sin = np.abs(M[0, 1])

    # compute the new bounding dimensions of the image
    nW = int((h * sin) + (w * cos))
    nH = int((h * cos) + (w * sin))

    # adjust the rotation matrix to take into account translation
    M[0, 2] += (nW / 2) - cX
    M[1, 2] += (nH / 2) - cY

    # perform the actual rotation and return the image
    image = cv2.warpAffine(image, M, (nW, nH))

#    image = cv2.resize(image, (w,h))
    return image
Rotating the Bounding Box
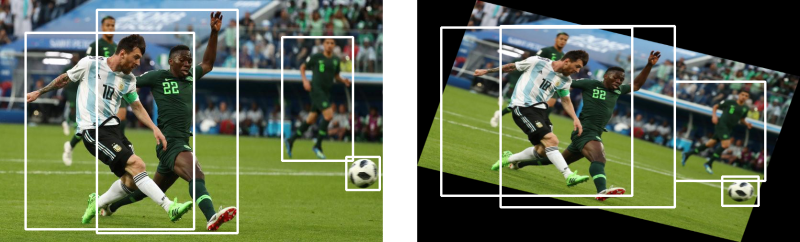
This is the most challenging part of this augmentation. Here, we first need to rotate the bounding box, which gives us a tilted rectangular box. Then, we have to find the tightest rectangle parallel to the sides of the image containing the tilted rectangular box.
Here is what I mean.
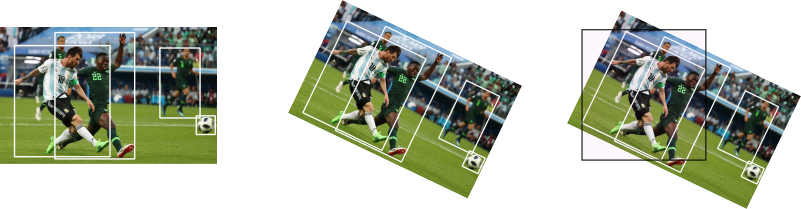
Now, in order to get the rotated bounding box, as seen in the middle image, we need to have all the coordinates for all the 4 corners of a box.
We could actually get the final bounding box using 2 corners only, but that would take more trigonometry to figure out the dimensions of the the final bounding box (on the right in the image above, in black) using only 2 corners. With 4 corners of the intermediate box in the middle, it's much easier to make that computation. It's only a matter of making the code more complicated.
So, first, we write the function get_corners in the file bbox_utils.py to get all the 4 corners.
def get_corners(bboxes):

    """Get corners of bounding boxes

    Parameters
    ----------

    bboxes: numpy.ndarray
        Numpy array containing bounding boxes of shape `N X 4` where N is the
        number of bounding boxes and the bounding boxes are represented in the
        format `x1 y1 x2 y2`

    returns
    -------

    numpy.ndarray
        Numpy array of shape `N x 8` containing N bounding boxes each described by their
        corner co-ordinates `x1 y1 x2 y2 x3 y3 x4 y4`

    """
    width = (bboxes[:,2] - bboxes[:,0]).reshape(-1,1)
    height = (bboxes[:,3] - bboxes[:,1]).reshape(-1,1)

    x1 = bboxes[:,0].reshape(-1,1)
    y1 = bboxes[:,1].reshape(-1,1)

    x2 = x1 + width
    y2 = y1

    x3 = x1
    y3 = y1 + height

    x4 = bboxes[:,2].reshape(-1,1)
    y4 = bboxes[:,3].reshape(-1,1)

    corners = np.hstack((x1,y1,x2,y2,x3,y3,x4,y4))

    return corners
After this is done, now we have each bounding box being described by 8 coordinates x1,y1,x2,y2,x3,y3,x4,y4. We now define the function rotate_box in the file bbox_util.py which rotates the bounding boxes for us by giving us the transformed points. We use the transformation matrix for this.
def rotate_box(corners,angle,  cx, cy, h, w):

    """Rotate the bounding box.


    Parameters
    ----------

    corners : numpy.ndarray
        Numpy array of shape `N x 8` containing N bounding boxes each described by their
        corner co-ordinates `x1 y1 x2 y2 x3 y3 x4 y4`

    angle : float
        angle by which the image is to be rotated

    cx : int
        x coordinate of the center of image (about which the box will be rotated)

    cy : int
        y coordinate of the center of image (about which the box will be rotated)

    h : int
        height of the image

    w : int
        width of the image

    Returns
    -------

    numpy.ndarray
        Numpy array of shape `N x 8` containing N rotated bounding boxes each described by their
        corner co-ordinates `x1 y1 x2 y2 x3 y3 x4 y4`
    """

    corners = corners.reshape(-1,2)
    corners = np.hstack((corners, np.ones((corners.shape[0],1), dtype = type(corners[0][0]))))

    M = cv2.getRotationMatrix2D((cx, cy), angle, 1.0)


    cos = np.abs(M[0, 0])
    sin = np.abs(M[0, 1])

    nW = int((h * sin) + (w * cos))
    nH = int((h * cos) + (w * sin))
    # adjust the rotation matrix to take into account translation
    M[0, 2] += (nW / 2) - cx
    M[1, 2] += (nH / 2) - cy
    # Prepare the vector to be transformed
    calculated = np.dot(M,corners.T).T

    calculated = calculated.reshape(-1,8)

    return calculated
Now, the final thing is to define a function get_enclosing_box which gets us the tightest box talked about.
def get_enclosing_box(corners):
    """Get an enclosing box for ratated corners of a bounding box

    Parameters
    ----------

    corners : numpy.ndarray
        Numpy array of shape `N x 8` containing N bounding boxes each described by their
        corner co-ordinates `x1 y1 x2 y2 x3 y3 x4 y4`

    Returns
    -------

    numpy.ndarray
        Numpy array containing enclosing bounding boxes of shape `N X 4` where N is the
        number of bounding boxes and the bounding boxes are represented in the
        format `x1 y1 x2 y2`

    """
    x_ = corners[:,[0,2,4,6]]
    y_ = corners[:,[1,3,5,7]]

    xmin = np.min(x_,1).reshape(-1,1)
    ymin = np.min(y_,1).reshape(-1,1)
    xmax = np.max(x_,1).reshape(-1,1)
    ymax = np.max(y_,1).reshape(-1,1)

    final = np.hstack((xmin, ymin, xmax, ymax,corners[:,8:]))

    return final
This once again gives us a notation where each bounding box is determined by 4 co-ordinates or two corners. Using all these helper functions, we finally put together our __call__ function.
def __call__(self, img, bboxes):

    angle = random.uniform(*self.angle)

    w,h = img.shape[1], img.shape[0]
    cx, cy = w//2, h//2

    img = rotate_im(img, angle)

    corners = get_corners(bboxes)

    corners = np.hstack((corners, bboxes[:,4:]))


    corners[:,:8] = rotate_box(corners[:,:8], angle, cx, cy, h, w)

    new_bbox = get_enclosing_box(corners)


    scale_factor_x = img.shape[1] / w

    scale_factor_y = img.shape[0] / h

    img = cv2.resize(img, (w,h))

    new_bbox[:,:4] /= [scale_factor_x, scale_factor_y, scale_factor_x, scale_factor_y]

    bboxes  = new_bbox

    bboxes = clip_box(bboxes, [0,0,w, h], 0.25)

    return img, bboxes
Notice at the end of function, we rescale our image and the bounding boxes so that our final dimensions are w,h and not nW, nH. This is just in line to preserve the dimensions of the image. We also clip boxes in case any box may be out of the image after transformation.
Shearing
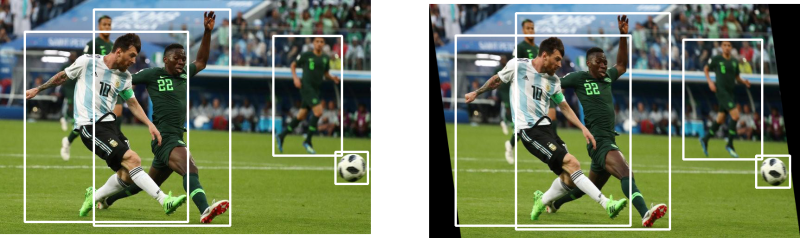
Shearing, is another bounding box transformation, that can be done with the help of the transformation matrix. The effect that shearing produces looks like.
In shearing, we turn the rectangular image into ... umm...sort of a parallelogrammed image? The transformation matrix used in shearing is.
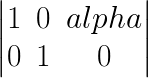
The above is an example of a horizontal shear. In this, the pixel with coordinates x, y is moved to x + alpha*y, y. alpha is the shearing factor. We therefore define our __init__ function as.
class RandomShear(object):
    """Randomly shears an image in horizontal direction


    Bounding boxes which have an area of less than 25% in the remaining in the
    transformed image is dropped. The resolution is maintained, and the remaining
    area if any is filled by black color.

    Parameters
    ----------
    shear_factor: float or tuple(float)
        if **float**, the image is sheared horizontally by a factor drawn
        randomly from a range (-`shear_factor`, `shear_factor`). If **tuple**,
        the `shear_factor` is drawn randomly from values specified by the
        tuple

    Returns
    -------

    numpy.ndaaray
        Sheared image in the numpy format of shape `HxWxC`

    numpy.ndarray
        Tranformed bounding box co-ordinates of the format `n x 4` where n is
        number of bounding boxes and 4 represents `x1,y1,x2,y2` of the box

    """

    def __init__(self, shear_factor = 0.2):
        self.shear_factor = shear_factor

        if type(self.shear_factor) == tuple:
            assert len(self.shear_factor) == 2, "Invalid range for scaling factor"
        else:
            self.shear_factor = (-self.shear_factor, self.shear_factor)

        shear_factor = random.uniform(*self.shear_factor)
Augmentation Logic
Since we are only covering horizontal shear, we only need to change the x coordinates of the corners of the boxes according to the equation x = x + alpha*y. Our call function looks like.
def __call__(self, img, bboxes):

    shear_factor = random.uniform(*self.shear_factor)

    w,h = img.shape[1], img.shape[0]

    if shear_factor < 0:
        img, bboxes = HorizontalFlip()(img, bboxes)

    M = np.array([[1, abs(shear_factor), 0],[0,1,0]])

    nW =  img.shape[1] + abs(shear_factor*img.shape[0])

    bboxes[:,[0,2]] += ((bboxes[:,[1,3]]) * abs(shear_factor) ).astype(int)


    img = cv2.warpAffine(img, M, (int(nW), img.shape[0]))

    if shear_factor < 0:
    	img, bboxes = HorizontalFlip()(img, bboxes)

    img = cv2.resize(img, (w,h))

    scale_factor_x = nW / w

    bboxes[:,:4] /= [scale_factor_x, 1, scale_factor_x, 1]


    return img, bboxes
An intriguing case is that of a negative shear. A negative shear requires a bit more hacking to work. If we just shear using the case we do with positive shear, our resultant boxes must be smaller. This is because for equation to work, the coordinates of the boxes must be in the format x1, y1, x2, y2 where x2 is the corner which is further in the direction we are shearing.
This works in the case of positive shear, because in our default setting, x2 is the bottom right corner's x coordinate while x1 is the top left. The direction of shear is positive, or left to right.
When we use a negative shear, the direction of shear is right to left, while x2 is not further in the negative direction than x1. One way to solve this could be to get the other set of corners (that would satisfy the constraint, can you prove it?). Apply the shear transformation and then change to the other set of corners because of the notation we follow.
Well, we could do that, but there's a better method. Here's how how perform a negative shear with shearing factor -alpha.
- Flip the image and boxes horizontally.
- Apply the positive shear transformation with shearing factor
alpha - Flip the image and boxes horizontally again.
I'd prefer you to take a piece of paper and a pen to validate why the above methodology works! For this reason, you will see the two occurences of code lines in the above function which deal with negative shears.
if shear_factor < 0:
	img, bboxes = HorizontalFlip()(img, bboxes)
Testing it out
Now, that we're done with Rotate and Shear augmentations it's time to test them out.
from data_aug.bbox_utils import *
import matplotlib.pyplot as plt

rotate = RandomRotate(20)
shear = RandomShear(0.7)

img, bboxes = rotate(img, bboxes)
img,bboxes = shear(img, bboxes)

plt.imshow(draw_rect(img, bboxes))
This is it for this part, and we're almost done with our augmentations. There's only one little augmentation left Resizing, which more an input preprocessing step than a augmentation.
In the next and the final part, we will show you how you can quickly incorporate these augmentations in your deep learning input pipelines, how to combine them multiple augmentations seamlessly and how to generate documentation.
Exercises
Here are some of the things you can try on your own.
- Implement the deterministic versions of the above augmentations.
- Scaling and Translation can also be implemented using the transformation matrix with a much smaller code. Try to implement them using this way.
- Implement Vertical Shear