The natural environment and the surroundings that we perceive in our daily life all around the world is a 3-Dimensional vision. To interpret 3-D in terms of geometry is quite simple. We consider the horizontal x-axis, the vertical y-axis, and the rotational z-axis that contribute to the location or position of an object in 3-D space. We live in a world that is purely 3-dimensional in nature, consisting of the three defining paramount factors in length, breadth, and height. Most solid substances like spheres, cylinders, cubes, cuboids, and many other similar shapes are 3-Dimensional in nature. Hence, being able to recreate 3-D views and perspectives with simplistic tools are of high significance in the modern era.
The 3-D models were created during the 1960s, and since then, the popularity of 3-D modeling is on a monumental rise. In simple terms, 3-D modeling is the aspect of creating an object in 3-dimensional space to capture all its inherited properties such as size, shape, and texture of a real or imaginary object. In this article, our main objective will be to gain a basic understanding of one of the best computer software for 3-D model rendering in Blender and try to learn all the elementary aspects related to this topic.
We will also not only look at the physical aspect of manipulating objects with Blender but also dive into Python scripting to coordinate tasks and complete specific actions. Let us have a look at the table of contents and have a view of the concepts that we will be exploring and experimenting on for the rest of the article. Feel free to skip ahead to the topic you want to learn the most. However, if you are new to the topic of 3-D modeling, it is advisable to check out the entire article.
Table Of Contents:
- Introduction
- Getting Started With Blender
- Understanding Python Scripting With Blender
- Developing a simple 3-D Project with Blender
- Performing the same task with Python Scripting
1. Importing the libraries
2. Removing default object and camera
3. Adding multi-monkey meshes
4. Creating camera
5. Saving the rendered image
6. 2 Additional multi-cameras and saving - Conclusion
Introduction:
The main focus of this article is to get started with Blender, and after going through with a basic intuition of Blender, we will dive into how to get started with Python scripting in Blender. Blender is one of the best tools for creating 3-D models. It is completely free and open-source, with a bunch of versions that are released. The most stable version at the time of writing this article is 2.92, while the latest version of Blender that is being tested at the moment is 2.93.0 Alpha. However, I will be utilizing the 2.81a version of Blender for the purpose of this article. I would recommend the users who wish to follow along using the same version as there might be subtle changes along with each new category. Hence, it would be best to keep up with the equivalent versions accordingly to avoid any further confusion.
The Blender platform is a fabulous tool for computer graphics designing and 3-D modeling. It supports the entirety of the 3D pipeline—modeling, rigging, animation, simulation, rendering, compositing and motion tracking, video editing, and 2D animation pipeline. The popularity of Blender is constantly peaking due to the wide array of beautiful projects that you can construct with the help of Blender. It provides you with numerous tools and various help kits for any type of computer designing that you are trying to accomplish. Apart from these fantastic tools, it also provides its users to utilize a programming language like Python, from which you can code your scripts from scratch and construct numerous projects. Let us get started with learning how to use Blender and Python scripting in Blender.
Getting Started With Blender:
For this entire article series, we will use the 2.81 version of Blender. The latest version of Blender at the time of writing this article is 2.93. The users can feel free to explore the most recent version as well and construct their projects in this environment. However, there might be certain subtle changes between the two versions. The Blender 2.81 version can be downloaded from the following link.
This new version has several improvements over the previous generations, notably in newer brush and cursor settings, masking advancements, additional tools, RTX Graphics Cards support, and so much more. Make sure that you follow along with the downloading and installation procedure until you have successfully installed it on your system. Once completed, the users can proceed to click on the Blender application and open the application.
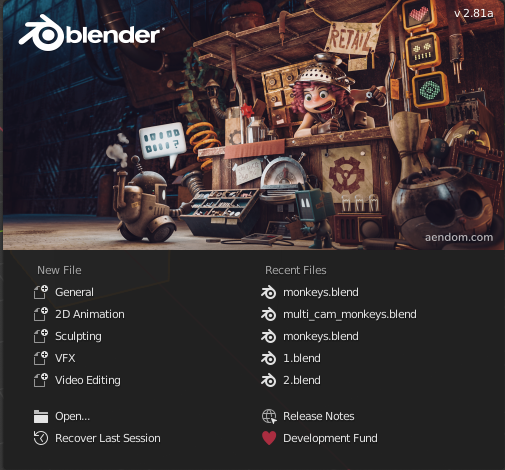
Upon opening Blender, you will find the pop-up menu shown in the above image at the center of the Blender screen. Here, you will find multiple options on the type of file you want to create, including options like General, which is basically a 3-D Modeling space for performing most actions, and the option that we will utilize for this tutorial series. We also have other types of files to work on, including 2-D animation, sculpting, VFX, and video editing. You also have access to the five most recent files that you have previously worked on or the option to browse any other file with the Open icon. Select the General option, and we can proceed to understand some basic functionalities in Blender.
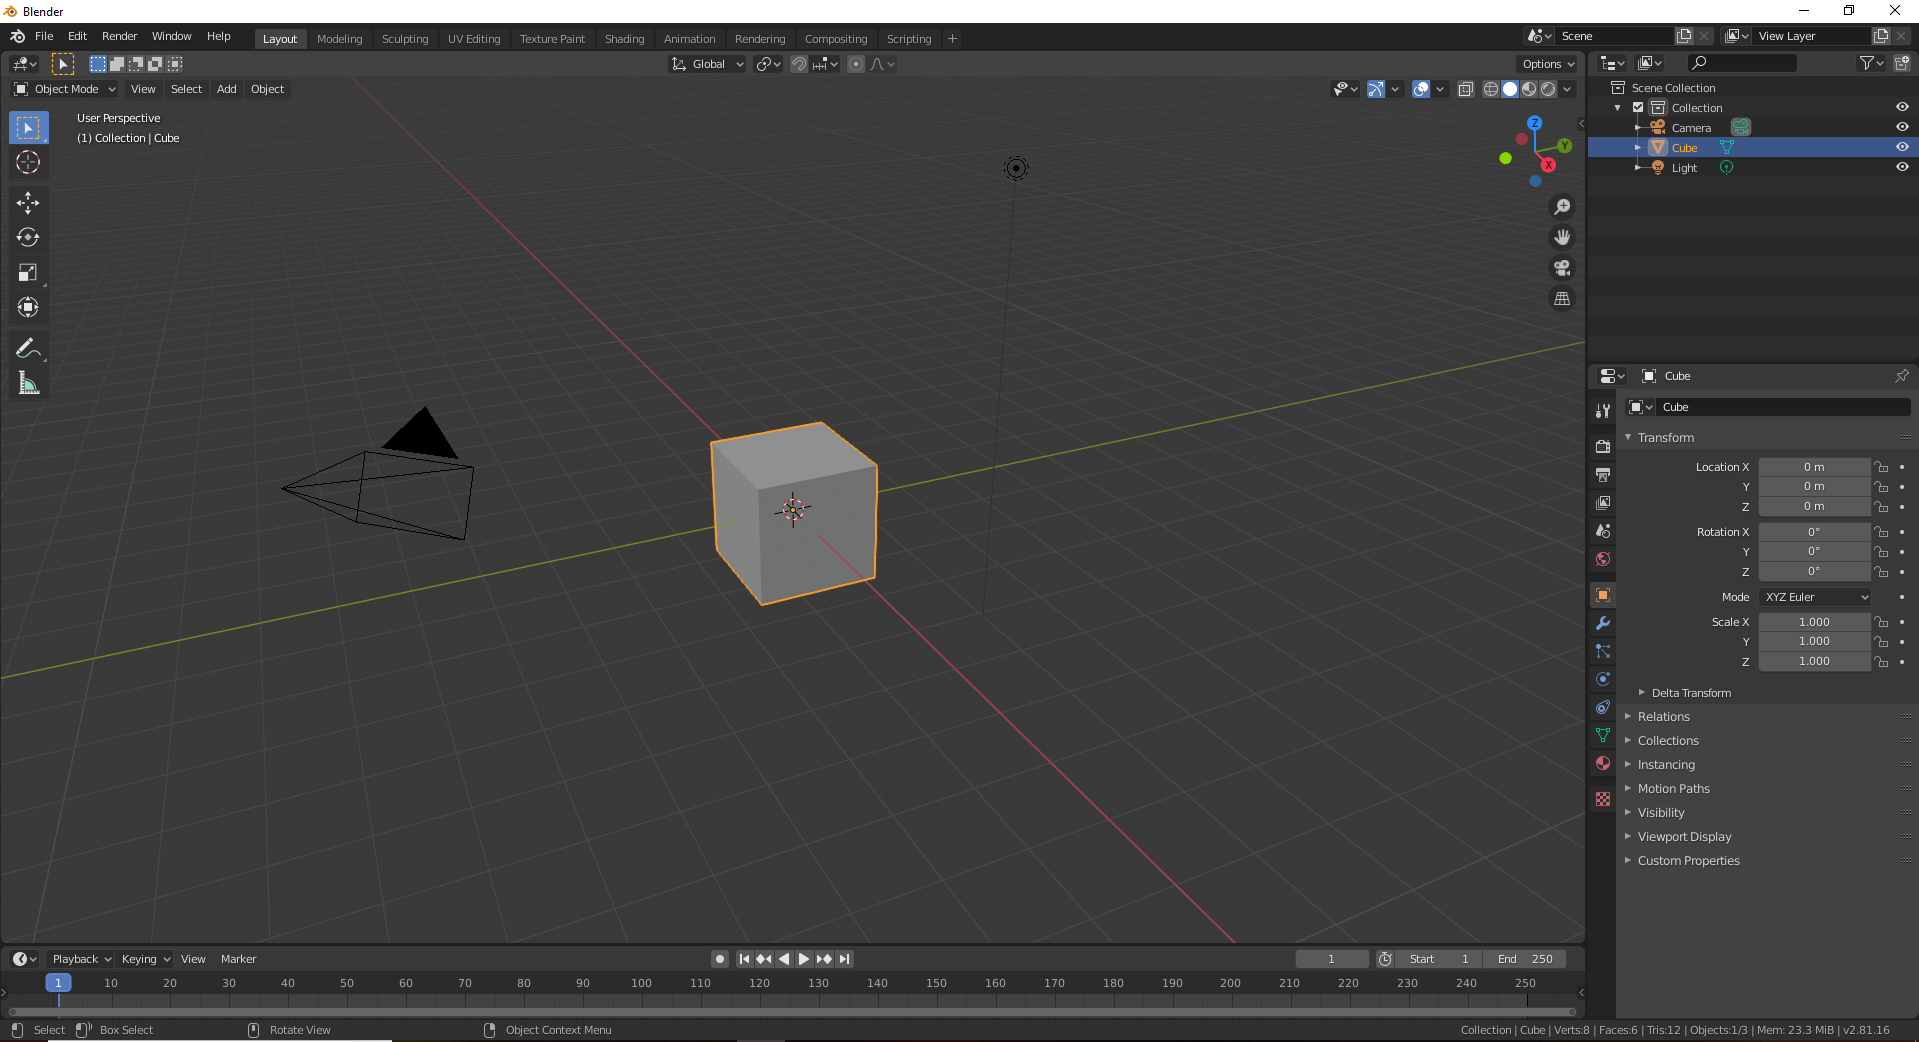
When you enter the general structure of Blender, you can explore the entire 3-D Viewport environment by clicking the mouse 3 (middle mouse) button and moving the mouse around for having a better look at the space that we will construct our 3-D modeling projects. You can also use the 'X,' 'Y,' and 'Z' notation on the top right of the 3-D space to perform the following action. Click on the cube to select the cube and experiment with the numerous actions you can perform on this object. The 'G' button on the keyboard is a shortcut to move the object to the desired location. The 'R' button is the shortcut to rotate a particular selected object. We will gain a more sound understanding of Blender when working on the project in the later section. For now, let us explore some basic tools that are available to us in Blender.
On the right side, we can notice that there two other additional editor windows, namely the outliner and the properties editor types. The outliner editor type is used to keep track of the numerous objects that are present in the Blender space so that each of them can be handled accordingly. The properties window is one of the most useful entities as it helps to view, set, and alter the different kinds of properties of an object. This editor type will be used quite frequently. Hence exploring the following is highly recommended.
The first menu or the main menu bar shown in the below image contains some of the most basic functionalities which are useful for the development of 3-D models. The File option will occur with similar striking features to most users who have experience with any other type of development environments with the basic options of opening, saving, and other similar operations. The Edit window allows users to perform actions such as undo, redo, etc. The Render window will be used quite frequently for rendering the images, which is converting the objects from a 3-D figure to an image. The important function in Window is the toggle system console which allows you to debug your Python programs. The Help option provides users with access to some fantastic documentations. The other options will be explored as we proceed in these articles series.

Below is the image representation of the other menu bar that consists of some vital elements that you might find useful while constructing your 3-D models. The Object mode is one of the many methods in which you can interact with the objects in the Blender space. While the object mode helps you to manage items in a solid-state, the edit mode will help you to manage on a more elementary level. The other options like View, Select, and Object is for performing specific actions. The Add function is something we will use in our articles to add some different types of meshes for learning 3-D modeling.

While there is tons of information and so much more to learn about all the numerous entities, tools, and technologies in Blender, we will re-visit the other necessities as required in the upcoming articles of this 3-D modeling series. For now, this basic introduction to Blender will suffice for elementary projects. We can move over to the Python scripting section to gauge some of the basic concepts of programming in Blender.
Understanding Python Scripting With Blender:
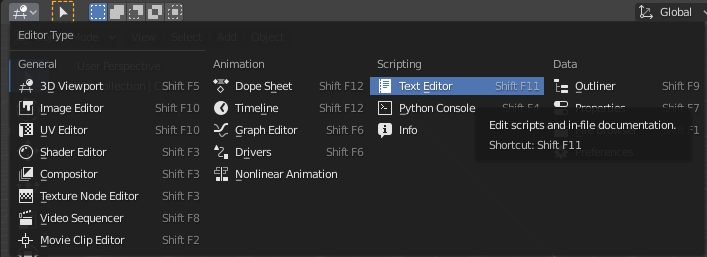
For processing all your actions with Python scripting in Blender, migrate the cursor over to the editor type icon in the top-left of the Blender screen right below the menu bar. If you hold the cursor in the specified location, you will notice that the icon displays that the current editor type for the particular area is a 3-D Viewport generalization where you can manipulate the performance, actions, and operations of objects in a 3-Dimensional space. Click the icon, and you will be greeted with numerous options. Select the text editor option that allows you to edit your Python scripts or any other type of in-file documentation. Check the below figure for further guidance.
An alternate method of performing this action is with the help of shortcut options provided to you by Blender. You can use the Shift + F11 combination for entering the text editor mode and use the Shift + F5 combination to re-enter the 3-D Viewport state. I prefer to divide the screen into both the viewport and the text editor environment while Python scripting. Once you have enabled the text editor on your screen, click on the New option that is available. Once you click on the New icon, you can notice that a new text file is created. To perform Python scripting, we will rename this newly created file to something like "test.py" and import the bpy module. Note that you can label the Python file as anything that you prefer. However, the extension of ".py" is extremely crucial.
import bpyOnce you have imported the bpy module, you can now perform multiple Blender operations with the help of Python scripting. We will understand this concept better when we dwell on the later sections of developing our 3-D model project with Python programming. For now, let us understand a few basic points to keep in mind.
- Accessing Data Blocks - The module bpy.data allows the users to access the library data in the file. (If you scroll over a particular property, you can notice that there is some default Python code embedded in the instructions.)
bpy.data.scenes
<bpy_collection[1], BlendDataScenes>- Collections - The users can view the numerous objects in the Blender space.
list(bpy.data.objects)
[bpy.data.objects["Cube"], bpy.data.objects["Plane"]]- Accessing Attributes - With the knowledge of a particular data block, we can access their respective features.
bpy.data.materials.new("MyMaterial")
bpy.data.materials['MyMaterial']- Context - To allow the particular action to take place according to the user's desire, we make use of the bpy.context operation.
bpy.context.scene.objects- Data Creation and Removal - We can create and remove the data accordingly. This concept will be covered in the first steps of most projects, including the one in the next section.
With the discussion of some of the basics of Python scripting in Blender, we can proceed to develop some simple 3-D modeling projects. If you want further information on this topic, visit the following documentation. Let us move ahead to constructing our first project with Blender.
Developing a simple 3-D Project with Blender:
Task: The simple 3-D project we will develop in this article is the importing of multiple monkey meshes and viewing them from different perspectives with the help of a multi-camera view.
For performing the following task, we will first delete the default cube that is present on the Blender screen. For performing this action, you can select the object with your mouse and click the delete button on your keyboard. The other option is to select the object and click on the 'X' button on your keyboard. The option of deleting the object is presented to the user which they can proceed to do so. Once you have deleted the default cube, our next step is to load the monkey mesh. For performing this step of importing the monkey mesh, click on the add button in Blender, then select the mesh icon, and follow along till the last line, where you have the option to select a monkey.
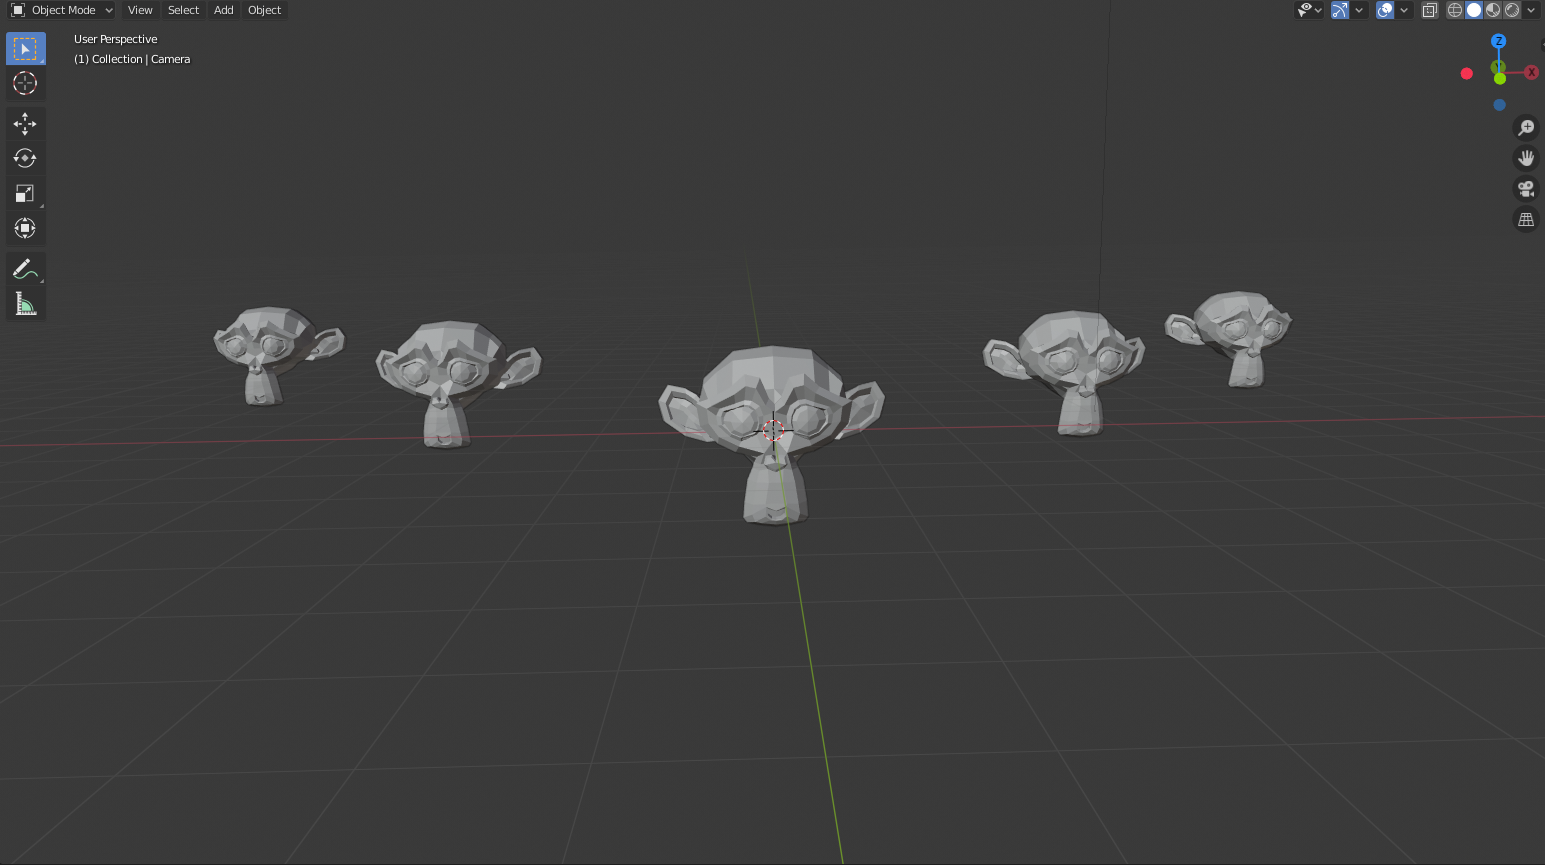
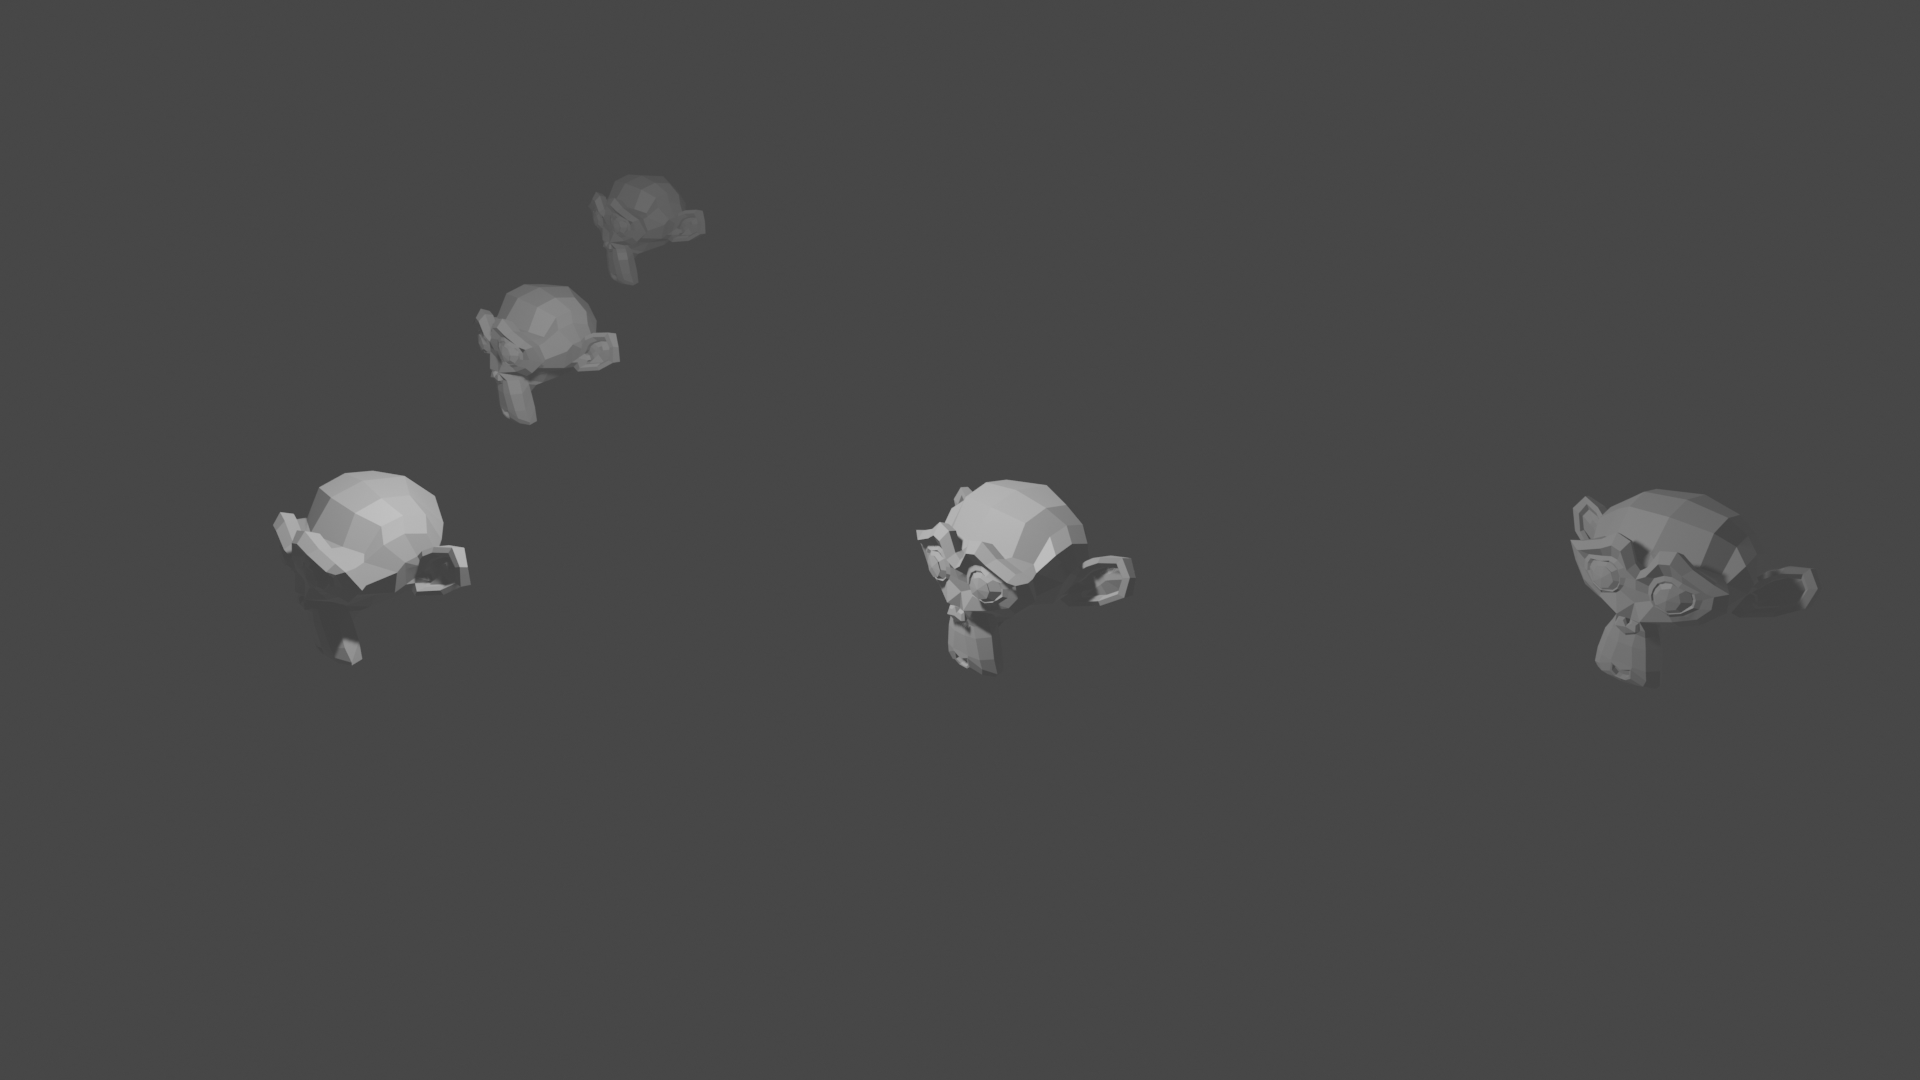
Now that we have successfully added the monkey mesh, you can proceed to click on the object and click ctrl-c and ctrl-v. The following copy-paste action can also be performed with the help of the right click of the mouse after selecting the object. A monkey mesh, once copy-pasted, is draggable to a location as desired by the user. Select the newly created object mesh and press 'G' on the keyboard to drag it to a suitable location. Press the left click on the mouse to drop it in a suitable location. You can create five such copies and drag and drop them in the position you desire. The image representation shown below is how I copy-pasted (used a code) to place the monkeys in their respective positions.
Once the monkey meshes are placed on the blender screen, our next step is to adjust the camera or the object accordingly. Since we have multiple meshes on our screen, the best option is to adjust the camera views to view the positioning of the monkey meshes from different perspectives and camera angles. Click on the camera module in Blender and press 'G' on the keyboard to drag it to a suitable location. Once you drag it to the required location and place it, you can also click 'R' on the keyboard and select the respective axis to rotate the camera around. You can select the 'X,' 'Y,' or 'Z' axis for rotating and placing the camera in the desired position.
Once the camera is placed in the desired location, you can create multiple cameras by copying and pasting them similar to the monkey meshes. Drag them to their selective positions with the help of the 'G' button and placing them with the left mouse click. Click on the ctrl + Numpad 0 command to select the particular camera that you are using. Once the desired camera is selected, you can either click the f12 button or migrate to the render icon on the menu bar and select the render image option. Save the image in the desired location. It is recommended that the viewers try out different angles and positions to see from which perspective they would achieve the best possible view of the multiple monkey meshes. Below is one of the examples of the rendered images produced in Blender.
I also have two more rendered images from the center and left angles, respectively. These will be covered further in the next section of performing the same task with Python Scripting. Feel free to experiment and learn more before heading over to the next topic.
Performing the same task with Python Scripting:
We have understood the basic working procedure of how to create multiple monkey meshes and a multi-camera view with Blender. Let us understand how to implement the same project with Python programming. Open the text editor in Blender and let us begin our coding. The primary steps for this process will involve importing all the required libraries, deleting the default cube object and camera, writing a couple of 'for' loops for importing multiple monkey meshes, creating the camera, and finally saving the rendered image.
We will repeat the creation of the camera and saving the rendered files two more times. This step is done to generate multiple rendered images from different camera placements so that the viewers can see these images from numerous positions. Let us get started with the coding process.
Importing the libraries:
We will import three main necessities for achieving our project. Firstly, we will import the bpy library, which will allow the users to access the Python environment in the Blender text editor. We will import some functionalities from this library for easier accessibility. However, the users will probably notice that in some code blocks, I have not utilized them much. Finally, we will also import the math library for performing different types of computations. In this particular scenario, the math library is used mainly for computing the Euler angles for measuring the degrees of rotation. The necessary imports are as follows:
import bpy
from bpy import context, data, ops
import math
Removing default object and camera:
Our next objective is to remove all the unnecessary elements from the Blender environment. This action can be performed in two ways. One method is to use the delete function and set the use global parameter to False. The other method is to create a for loop and check for all the objects in the default screen, select the particular type of object that you are looking for, and delete the appropriate element that you may deem unnecessary for the particular project. Below is the code block for performing the following action.
#  Remove The Default Cude Object
# bpy.ops.object.delete(use_global=False)

bpy.ops.object.delete(use_global=False, confirm=False)

for o in bpy.context.scene.objects:
    if o.name == "Cube":
        bpy.ops.object.delete(use_global=False)
Adding multi-monkey meshes:
In the next step, we will add the monkey meshes accordingly in their respective positions. For performing this step, we will set three variables initially to zero. These three variables are a representation of the x-axis, y-axis, and z-axis. We will modify these variables accordingly to obtain the best positioning of the monkey meshes. The count variables are used to alter the locations of these axes as desired.
The first iterative loop will add three monkey meshes in their respective locations, and the second iterative loop will add two more monkeys on the other side. Feel free to try out numerous alternatives and location changes to see what suits your models the best. The final models you obtain should look similar to the first image shown in the previous section. However, we can notice that the method of using code is more effective and efficient than randomly copy-pasting the same.
# Create multiple monkey meshes
x = 0
y = 0
z = 0

count1 = 0
count2 = -5

for i in range(3):
    # Import the monkey mesh
    bpy.ops.mesh.primitive_monkey_add(location = (x + count1, y + count1, z))
    count1 += 5

for i in range(2):
    # Import the monkey mesh
    bpy.ops.mesh.primitive_monkey_add(location = (x + count2, y - count2, z))
    count2 += -5
Creating camera:
Once we finish creating multiple monkey meshes, we can add a camera to view our objects and their overall view. We will set the scene and create our camera, and set the camera lens to 30mm. The default camera size is usually 50mm. However, we will use this particular size so that all the objects are clearly visible in the specified range. We will then create our camera object and set the locations and rotation angles for our camera.
The location will determine the position of the camera, where we will have the best view of all the objects present on the visible area of the screen. The rotation angles are converted from degrees to radians with the help of the math library that we imported earlier in this coding section. We will specify the degrees (radians) of rotation along all of the three-axis so that both the locations and rotation angles are placed correctly. We will link the scene collection to the current camera and ensure that the currently selected camera is set to active.
### Creating A New Camera Angle
scn = bpy.context.scene

# create the second camera
cam = bpy.data.cameras.new("Camera")
cam.lens = 30

# create the second camera object
cam_obj = bpy.data.objects.new("Camera", cam)

# Locations
cam_obj.location.x = 16
cam_obj.location.y = -6
cam_obj.location.z = 8

# Rotations
cam_obj.rotation_euler[0] = math.radians(64)
cam_obj.rotation_euler[1] = math.radians(0)
cam_obj.rotation_euler[2] = math.radians(47)

scn.collection.objects.link(cam_obj)

# Set the Camera to active camera
bpy.context.scene.camera = bpy.data.objects["Camera"]
Saving the rendered image:
The final step after creating multiple monkey meshes and placing our camera in the desired location is to save the image. Before we save the image, we will render our image and store it in a ".png" format. Rendering is basically converting the 3-D scene in the Blender space into a 2-Dimensional view so that they are easier to visualize in a printed form. For performing this step, we will set the path and render the 3-D model scene from the perspective of the camera into a 2-D image that will be saved in the specified directory. Once our image is rendered and saved, we can restore the previous path to perform further computations and operations.
# Setting the path for the first image captured in the first camera
FILE_NAME = "1.png"
FILE_PATH = "D:\\Cool Projects\\Paperspace\\3-D Models\\1.png"

# Save Previous Path
previous_path = bpy.context.scene.render.filepath

# Render Image
bpy.context.scene.render.filepath = FILE_PATH
bpy.ops.render.render(write_still=True)

# Restore Previous Path
bpy.context.scene.render.filepath = previous_path
2 Additional multi-cameras and saving:
While you can choose to end your programming in the previous rendering step of this section, I will go one step further to add some additional cameras and save the images from a couple more different perspectives and views. We will create two more cameras and set the lens, positions (in the x-axis, y-axis, and z-axis), and the rotation Euler angles (about the x-axis, y-axis, and z-axis). The steps performed in this code are similar to the previous two code blocks where we performed the action of adding a camera and saving the rendered image. We will scale all the resolutions for each of the camera views and save them in the specified directory locations. Feel free to experiment in this step and explore the numerous options by activating more cameras and viewing your models from several other perspectives.
### Creating A New Camera Angle
scn = bpy.context.scene

# create the second camera
cam2 = bpy.data.cameras.new("Camera 2")
cam2.lens = 40

# create the second camera object
cam_obj2 = bpy.data.objects.new("Camera 2", cam2)

# Set Location
cam_obj2.location.x = -0.1
cam_obj2.location.y = -19
cam_obj2.location.z = 10

# Set Angles
cam_obj2.rotation_euler[0] = math.radians(64)
cam_obj2.rotation_euler[1] = math.radians(-0)
cam_obj2.rotation_euler[2] = math.radians(-0.1)

scn.collection.objects.link(cam_obj2)

# Set the Camera 2 to active camera
bpy.context.scene.camera = bpy.data.objects["Camera 2"]

### Rendering Procedure
render = bpy.context.scene.render
scale = render.resolution_percentage / 100

FILE_NAME = "2.png"
FILE_PATH = "D:\\Cool Projects\\Paperspace\\3-D Models\\2.png"

# Save Previous Path
previous_path = bpy.context.scene.render.filepath

# Render Image
bpy.context.scene.render.filepath = FILE_PATH
bpy.ops.render.render(write_still=True)

# Restore Previous Path
bpy.context.scene.render.filepath = previous_path

### Creating A New Camera Angle
scn = bpy.context.scene

# create the second camera
cam3 = bpy.data.cameras.new("Camera 3")
cam3.lens = 40

# create the second camera object
cam_obj3 = bpy.data.objects.new("Camera 3", cam3)

# Set Location
cam_obj3.location.x = -20
cam_obj3.location.y = -12
cam_obj3.location.z = 12

# Set Angles
cam_obj3.rotation_euler[0] = math.radians(64)
cam_obj3.rotation_euler[1] = math.radians(-0)
cam_obj3.rotation_euler[2] = math.radians(-46.1)

scn.collection.objects.link(cam_obj3)

# Set the Camera 3 to active camera
bpy.context.scene.camera = bpy.data.objects["Camera 3"]

### Rendering Procedure
render = bpy.context.scene.render
scale = render.resolution_percentage / 100

FILE_NAME = "3.png"
FILE_PATH = "D:\\Cool Projects\\Paperspace\\3-D Models\\3.png"

# Save Previous Path
previous_path = bpy.context.scene.render.filepath

# Render Image
bpy.context.scene.render.filepath = FILE_PATH
bpy.ops.render.render(write_still=True)

# Restore Previous Path
bpy.context.scene.render.filepath = previous_path
Once you finish running all these code blocks, ensure that you have three new images saved in the ".png" format and verify if all these rendered images are captured from different locations and angles as they are the views from the three different cameras angles. Once verified, we have successfully completed all the tasks for this particular article. In the upcoming series of 3-D modeling, we will explore more concepts!
Conclusion:
In this article, we understood how to get started with Blender and all the initial concepts required to learn 3-D modeling with Blender. After exploring the tools and technologies offered by Blender, we also looked into the option of Python scripting that is available in the Blender environment. The Python scripting helps developers to compute and perform specific actions more effectively and efficiently in the Blender modeling space. After learning some basic aspects of Python programming in Blender, we worked on a simple 3-D project, introducing the concepts of multiple meshes and multiple camera creations. We first understood how to construct this project with the help of only the Blender tools provided to us.
Once we understood the numerous aspects of our 3-D modeling project with Blender, we then proceeded to perform similar actions and achieve the same task with the help of Python Scripting. With the help of the text editor option available in Blender, we constructed multiple monkey meshes with a multi-camera view and saved all the rendered images in the desired directory location. In the next part of this article series, we will dwell more deeply on how to make our models look more visually appealing and aesthetically pleasing. We will learn to add backgrounds and textures to our structural designs with both Blender tools as well as Python programming. Until then, enjoy learning and have fun exploring!