There are numerous interpretations of human models for different types of graphics designing. The art of constructing and building 3-D structures resembling a more human-looking model for existing software and graphic pipelines is one of the major aspects of designing. A Skinned Multi-Person Linear (SMPL) model is a skinned vertex-based model that accurately represents a wide variety of body shapes in natural human poses. The SMPL models represent some of the best works on realistic human models as they are compatible with most of the popular platforms that are currently used for graphics generation, such as Blender, Maya, Unreal Engine, and Unity. This high compatibility allows for the possibility of numerous successful work that can be accomplished with these SMPL models.
In the previous articles on 3-D modeling with Blender, we understood the basics of getting started with most of the essential aspects of Blender, such as the numerous tools, codes, functionalities, properties, and other significant topics. We also explored the territories of assigning and adding background images to the particular model. Apart from adding the respective backgrounds, we also learned the process of adding a desirable texture to make our model look more visually appealing and aesthetically pleasing. We will utilize the knowledge of these previous concepts and apply them to the current theory of SMPL models.
In the previous article on 3-D modeling, we also dwelled on the animation of models. However, we won't focus much on the aspect of animation of SMPL models for this piece. We will learn to import the Skinned Multi-Person Linear model into the Blender environment and make the required additions accordingly. Below is the list of the table of contents for the type of topics that we will cover throughout this article. Check it out to understand the essential concepts that we will learn in this article of working with "SMPL Models With Blender".
Table Of Contents:
- Introduction
- Creating and generating SMPL models
- Understanding how to work with SMPL models in Blender
- Performing numerous tasks with Python and Blender
1. Importing the SMPL model
2. Adding background image to the respective model
3. Adding a desirable texture
4. Rendering the image
5. Adding a multi-camera view - Adding Multiple Textures in Blender
- Conclusion
Introduction:
The Skinned Multi-Person Linear (SMPL) is a realistic 3D model of the human body that is based on skinning and blending of shapes which is learned from thousands of 3D body scans. The primary idea of constructing the SMPL models was to ensure that there would be a common platform where these realistic human models find their utility, namely in popular software such as Blender, Maya, Unreal Engine, and Unity. For the construction of these models, the concepts of blend skinning, auto-rigging, learning pose models, learning pose shapes, and learning blend shapes were utilized to ensure that the best results were produced. For further information on these topics and the SMPL models in general, I would recommend checking out the official research paper on "SMPL: A Skinned Multi-Person Linear Model" from the following link.
In this article, we will focus on how to create and generate SMPL models with the help of a GitHub reference and then learn the process of importing these models into the Blender environment. Once we have finished going through these basic procedures, we will start adapting our knowledge from the previous articles and start the implementation of some background details to the SMPL models, as well as try to add some texture to the following models. We will try to stick to only Python codes for performing all the desired actions that we discussed. The last action of adding multiple textures can be performed with the help of Blender tools for some higher precision and adding different types of colors. Finally, we will look at some existing and future works that are possible with these models.
Creating and generating SMPL models:
For working with SMPL models, one of the first steps that you can do is to visit the official website for the following from this link. If you haven't registered already, please make sure to do so and log in to the website. Here, you will have the opportunity to download datasets for Skinned Multi-Person Linear Models with different poses and parameters. It is preferable to find the .obj files or convert them from the existing format to the .obj format to ensure that Blender can access these files with greater ease. If you are having trouble with the process of downloading or installing these models successfully on your system, I would suggest trying out the next method mentioned in this section.
My suggestion for creating and generating SMPL models would be to utilize the following GitHub link from the developers who have done a great job in interpreting the SMPL models for numerous formats, making it available in numpy versions as well as the TensorFlow deep learning framework and the PyTorch deep learning framework for GPU computations. Most of the codes are tested on the Ubuntu platform. If you are using the Windows platform for most of the Blender operations, you can use a virtual box and test out the Ubuntu environment. Most of the steps mentioned in the GitHub link are self-explanatory, but you need to make sure you have the requirements of Python and the copy of the GitHub repository on your testing device.
Once you finish all the installations, creating, and extracting the GitHub repository, you can proceed to create a virtual environment that will store all the essential requirements for this task. Once you create the virtual environment and install all the required dependencies in it, ensure that you activate the virtual environment for the particular task. Change the directory to the download GitHub repo and firstly run the pre-processing Python script. If you don't have GPU support on the particular platform, you can run the smpl_np.py script to generate the male or female models accordingly. The models will be created in the .obj format, which can now be imported into the Blender platform.
source ./ss_h_mesh_venv/bin/activate (In the previous folder or the directory you created your venv)

cd SMPL-master/

python preprocess.py

python smpl_np.py
If you have a GPU installation on your platform, you can run the TensorFlow script instead of the Numpy variation. Please note that you can make minor changes in the scripts to obtain different poses for the SMPL models.
python smpl_tf.py
If you are having trouble deciphering this step and are not able to generate the models as you desire, there will an attachment to a default male and female model so that you can continue working through the rest of the article as desired.
Understanding how to work with SMPL models In Blender:
Now that we have a brief understanding of how to create and generate SMPL models of different poses, we can proceed to understand how to work with the importing of SMPL models. We know that these files are saved as .obj files in your system. On a Windows platform, you will notice that these files are saved as 3D objects, and upon clicking on properties, the specific format is shown to be a .obj file. Most of this article will focus on how to work with SMPL models using Python scripting. However, for importing the model and other similar steps, we will also cover how you could complete the following steps by only using the Blender platform and the numerous functionalities it offers.
Firstly, let us understand the code structure to import the SMPL model into the Blender platform with the help of Python scripting. The code block below explains how the following task is achievable. In the text editor section, we label the file with the format of .py and proceed to import the essential libraries such as bpy and math libraries that will help us to achieve almost all the necessary tasks in this article. The first step is to delete the default cube of the Blender screen. This process is possible in two ways. The commented line performs the action as desired, but if you are trying to run the script multiple times, you would rather prefer to check if there is a cube to delete or not and only delete the cube when there exists one. The final step of importing the desired SMPL model is quite simple, as you need to specify the path that connects the code to your stored location of the male or female model.
import bpy
from bpy import context, data, ops
import math
### Remove The Default Cude Object
# bpy.ops.object.delete(use_global=False)
for o in bpy.context.scene.objects:
if o.name == "Cube":
bpy.ops.object.delete(use_global=False)
### Import The SMPL Model
file_loc = 'Your Path to smpl_male.obj or smpl_female.obj'
imported_object = bpy.ops.import_scene.obj(filepath=file_loc)
obj_object = bpy.context.selected_objects[0]
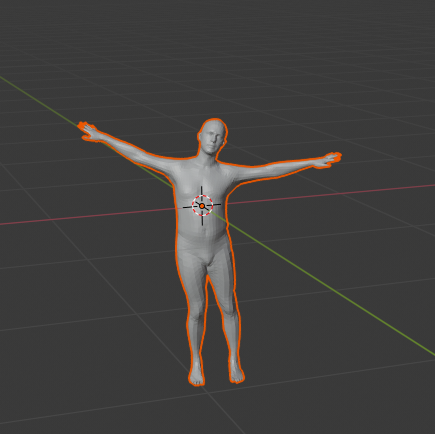
print('Imported name: ', obj_object.name)If you want to import the model directly into your Blender environment, the process for doing so is quite simple as well, provided you know the location or path in which you have stored the specific model. Upon entering the Blender platform and selecting a general project, delete the default cube. The process for deletion has been discussed many times in previous articles. Feel free to choose whichever method suits you best. Once the default cube is deleted, select the file from the main menu bar. Select the option to import and from the variety of options that are available to you, choose the Wavefront (.obj) option. Browse and select your desired model, and it should appear on the Blender screen, as shown in the image below.
The imported model will need some readjusting and rescaling. We will cover how to perform the following steps effectively in the next section.
Performing numerous tasks with Python and Blender:
In this section of the article, we will focus on performing a variety of tasks on the SMPL model. Firstly, we will start off with the process of importing the SMPL models into the Blender platform. Once we successfully import the SMPL model, we will start working on adding some essential features to the following model. We will add a background image to the respective models and then proceed to add a desirable texture to the same. The texture will most likely represent a typical skin color.
Once we have accomplished these tasks, we can proceed to view our final rendered images from numerous perspectives. This task is possible with the help of multiple camera views. This entire section of the article is more focused on accomplishing the desired tasks with the help of codes. However, I will briefly go over how you can complete these tasks with the help of using just the available Blender tools. But the issue is that you can't replicate and build many models of different structures because the complexity of work without the codes increases significantly.
Importing the SMPL model:
In the previous section, we have covered in detail how to import the SMPL model into the Blender platform. The code recap is shown below in the following snippet.
import bpy
from bpy import context, data, ops
import math

###  Remove The Default Cude Object
# bpy.ops.object.delete(use_global=False)

for o in bpy.context.scene.objects:
    if o.name == "Cube":
        bpy.ops.object.delete(use_global=False)

### Import The SMPL Model
file_loc = 'Your Path to smpl_male.obj or smpl_female.obj'
imported_object = bpy.ops.import_scene.obj(filepath=file_loc)
obj_object = bpy.context.selected_objects[0]
print('Imported name: ', obj_object.name)
The next significant step is to adjust the positioning of the model, rotate the model accordingly to match the best view of the camera, and finally scale the model to a decent size such that we can view the model clearly. The following actions can be performed with the help of Python scripting with ease. The created object assigned to the model needs to be selected, and we can vary all the required parameters accordingly. The location, the rotation Euler angles, and the scaling parameters are all variable along the x-axis, y-axis, and z-axis. Once you alter each of these attributes in the specific axis, you will receive a much more desirable modification of the SMPL that will find great utility for most tasks that we are trying to accomplish in this article.
# Locations
obj_object.location.x = 0
obj_object.location.y = 0
obj_object.location.z = 0.5

# Rotations
obj_object.rotation_euler[0] = math.radians(90)
obj_object.rotation_euler[1] = math.radians(-0)
obj_object.rotation_euler[2] = math.radians(60)

# Scale
obj_object.scale.x = 2
obj_object.scale.y = 2
obj_object.scale.z = 2
If you are trying to accomplish the following steps with the help of just the tools assigned in Blender, this process is quite simple. Upon selecting the SMPL model on the screen, move to the properties layout. The object properties should be selected by default. However, if it is not, you can adjust all the parameters of location, rotation, and scaling accordingly. You can manually adjust the location of the model with the help of the mouse, the rotation angle with the help of the 'R' key on the keyboard along the desired axis, or the scale of the model with the 'S' key on the keyboard and scaling it evenly along all axes.
Adding background image to the respective model:
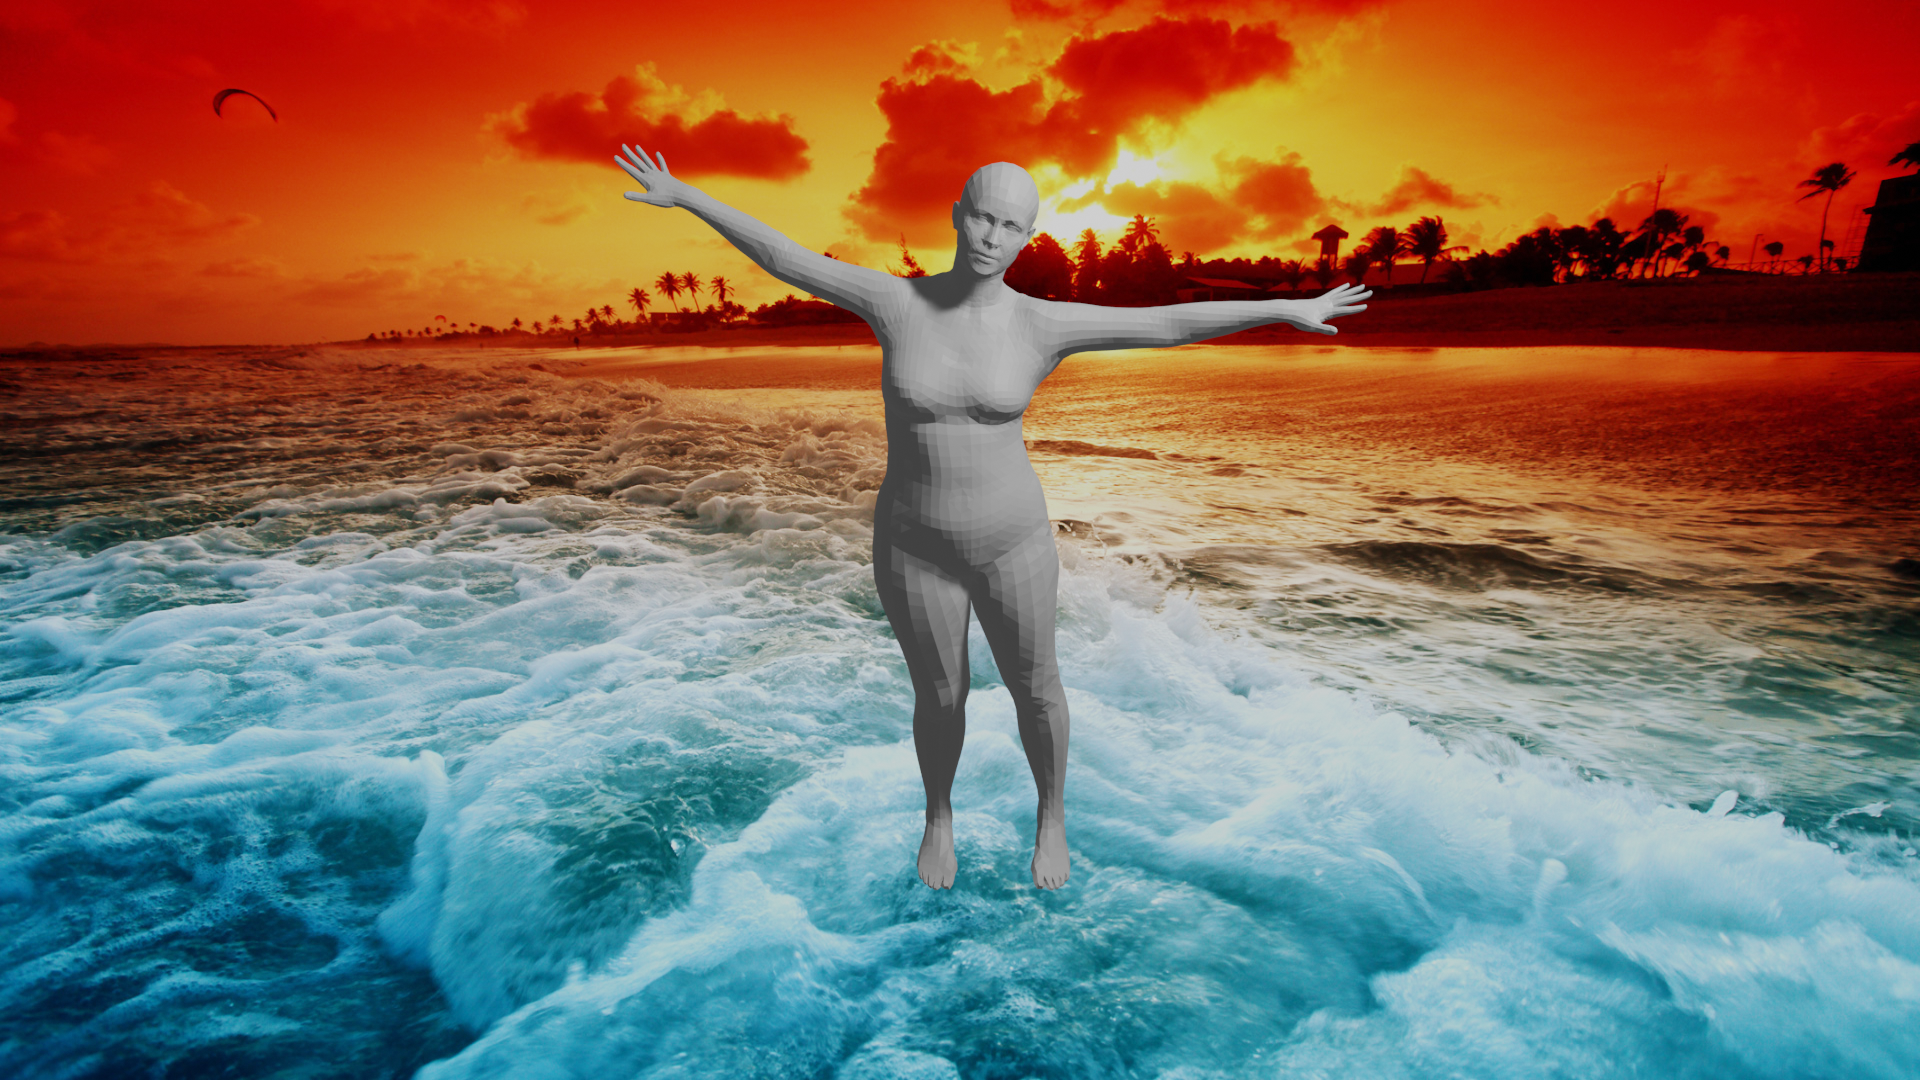
The next step that we will focus on is adding a background image to the respective model. The steps for completing the following procedure are covered extensively in my previous article on the basics of adding background images and textures to your 3-D models. The process remains mostly the same for even the SMPL model as well. Let us revisit the following code snippet to understand the concept slightly better.
For adding a desired background to the image, the first step is to select the camera that we will utilize for viewing the SMPL model. Once the camera is selected, we can specify the path that contains the location of the male or female model. Once we finish assigning the background image to a variable, we can start the process of composting. We have extensively covered this topic in one of the previous articles on 3-D modeling. Set the area of the UI type to Compositor Node Tree. This step changes the layout to the place where we can construct nodes to connect our desirable features accordingly. Remove all the default nodes and start constructing the new nodes with their appropriate connections. The locations of each of the nodes are not mandatory. However, the following placement seems more aesthetic when observing for any mismatches. Observe the code snippet below in case you are stuck with the coding process.
### Background Image
cam = bpy.context.scene.camera
filepath = "background image path"

img = bpy.data.images.load(filepath)
cam.data.show_background_images = True
bg = cam.data.background_images.new()
bg.image = img
bpy.context.scene.render.film_transparent = True

### Composting

bpy.context.area.ui_type = 'CompositorNodeTree'

#scene = bpy.context.scene
#nodetree = scene.node_tree
bpy.context.scene.use_nodes = True
tree = bpy.context.scene.node_tree

for every_node in tree.nodes:
    tree.nodes.remove(every_node)

RenderLayers_node = tree.nodes.new('CompositorNodeRLayers')
RenderLayers_node.location = -300,300

comp_node = tree.nodes.new('CompositorNodeComposite')
comp_node.location = 400,300

AplhaOver_node = tree.nodes.new(type="CompositorNodeAlphaOver")
AplhaOver_node.location = 150,450

Scale_node = tree.nodes.new(type="CompositorNodeScale")
bpy.data.scenes["Scene"].node_tree.nodes["Scale"].space = 'RENDER_SIZE'
Scale_node.location = -150,500

Image_node = tree.nodes.new(type="CompositorNodeImage")
Image_node.image = img
Image_node.location = -550,500

links = tree.links
link1 = links.new(RenderLayers_node.outputs[0], AplhaOver_node.inputs[2])
link2 = links.new(AplhaOver_node.outputs[0], comp_node.inputs[0])
link3 = links.new(Scale_node.outputs[0], AplhaOver_node.inputs[1])
link4 = links.new(Image_node.outputs[0], Scale_node.inputs[0])

bpy.context.area.ui_type = 'TEXT_EDITOR'
Once all the connections are made as discussed, it is essential to convert the area of the UI layout from the compositing section back to the text editor to continue the process of Python scripting for all the remaining tasks in this section. You can press "Numpad 0" on the keyboard to view the SMPL model in the respective camera view. All the steps performed with the help of Python scripting can also be replicated with just the necessary Blender tools to receive a desirable result. However, the complexity of constructing each of these steps each time you want to build a model instead of copy-pasting a script or snippet is more troublesome. Let us proceed to analyze how we can add textures to our SMPL models.
Adding a desirable texture:
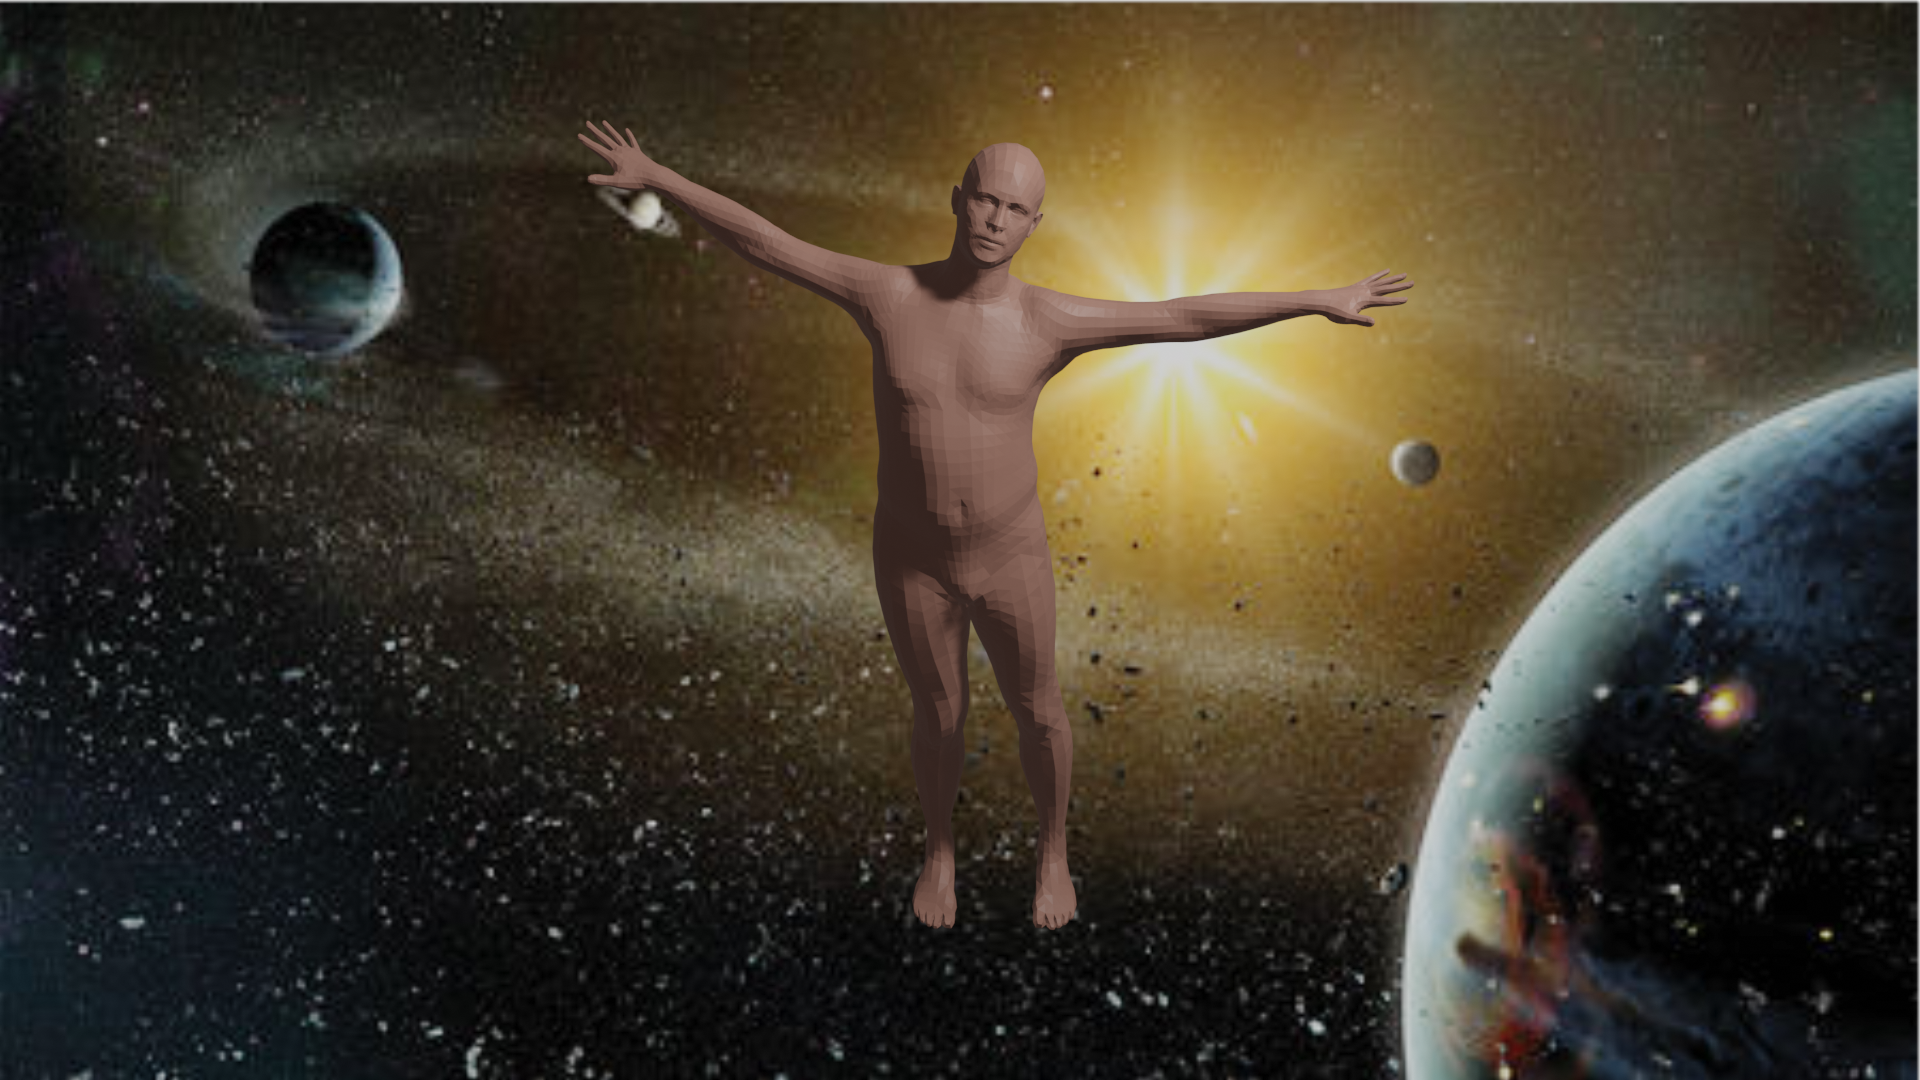
Now that we have successfully imported the model and added a background, it becomes essential to add a new texture to the model to make it look more realistic. The process of adding a single texture with the help of Python scripting is quite simple. You can create the name of your material and store it as the desirable variable and continue to create nodes to define your specific properties. You can also choose to download your custom skin colors that you feel will optimally fit your SMPL models and create the node links to map them accordingly. The entire model will import the texture you add in this section by using the following code block mentioned in the below snippet. You can feel free to modify, alter and experiment with the code accordingly!
### Adding Textures

mat = bpy.data.materials.new(name="New_Mat")
mat.use_nodes = True
bsdf = mat.node_tree.nodes["Principled BSDF"]
texImage = mat.node_tree.nodes.new('ShaderNodeTexImage')
texImage.image = bpy.data.images.load("Any texture like a skin color")
mat.node_tree.links.new(bsdf.inputs['Base Color'], texImage.outputs['Color'])

#ob = context.view_layer.objects.active

# Assign it to object
if obj_object.data.materials:
    obj_object.data.materials[0] = mat
else:
    obj_object.data.materials.append(mat)

# Change the ViewPort Shading to RENDERED
for area in bpy.context.screen.areas:
    if area.type == 'VIEW_3D':
        for space in area.spaces:
            if space.type == 'VIEW_3D':
                space.shading.type = 'RENDERED'
For completing the following step without making use of any codes, you can keep the object selected and change the properties section to the material properties layout and proceed to add your desired skin location or any other color of your choice by assigning the required material. To view the assigned color, you will need to switch the viewport view from the solid state to either the material preview mode or in the rendered mode. All the other properties can be manipulated and changed according to the user's desire. However, as discussed in the previous section, we can notice that the manual computation of each of these steps instead of using Python Scripting could be quite complex for creating multiple models. Let us now proceed to understand how we can render the SMPL model and save it in the required path location.
Rendering The Image:
One of the final steps for creating our model and saving it in the required location is the process of rendering. We have discussed the rendering process several times before in previous articles. Define the render context and scale the resolution percentage in the respective variables. In the next step, we can define the path where we want the respective model to be saved. Ensure that the format of the image is one of the typically used ones such as .png or .jpg. As soon we finish rendering the image, we can save the image in the required format and restore the previous path for further scripting and computations.
### Rendering Procedure
render = bpy.context.scene.render
scale = render.resolution_percentage / 100

FILE_NAME = "figure2.png"
FILE_PATH = "Save Path"

# Save Previous Path
previous_path = bpy.context.scene.render.filepath

# Render Image
bpy.context.scene.render.filepath = FILE_PATH
bpy.ops.render.render(write_still=True)

# Restore Previous Path
bpy.context.scene.render.filepath = previous_path
You can also choose to render the image directly with the tools provided in the Blender platform by selecting the option to render in the main menu bar and clicking on the render image option. Ensure that the respective camera is selected for performing the rendering action. You can also directly click the "F12" button on the keyboard for rendering the image. However, this process can be quite complicated if you have multiple cameras as your work increases in the switching process of the cameras. To switch between multiple cameras and have a multi-cam view, select the required camera and click "ctrl" + "numpad 0" on the keyboard. It is noticeable that the scripting process is quite simple for creating multiple such projects.
Adding a multi-camera view:
In the final section of this article, we will learn how to create multi-cam views and see the SMPL model along with the background details and the texture accordingly. To create the new camera, select the camera angle and give it a name of your choice. Set the lens according to the desired value and create your objects. You can set the location, rotation angles and link all the objects to the created camera. The rendering process can also be completed again, similar to the steps mentioned in the previous section. You can create multiple such cameras at different positions and capture numerous views and perspectives of the model. The changes in the variables and name of the camera can be made accordingly by following the code block shown below.
### Creating A New Camera Angle
scn = bpy.context.scene

# create the second camera
cam2 = bpy.data.cameras.new("Camera 2")
cam2.lens = 50

# create the second camera object
cam_obj2 = bpy.data.objects.new("Camera 2", cam2)

# Set Location
cam_obj2.location.x = -1.43
cam_obj2.location.y = -11
cam_obj2.location.z = 6.46

# Set Angles
cam_obj2.rotation_euler[0] = math.radians(62)
cam_obj2.rotation_euler[1] = math.radians(-0.01)
cam_obj2.rotation_euler[2] = math.radians(-6.89)

scn.collection.objects.link(cam_obj2)

### Rendering Procedure
render = bpy.context.scene.render
scale = render.resolution_percentage / 100

FILE_NAME = "24.png"
FILE_PATH = "Save Path"

# Save Previous Path
previous_path = bpy.context.scene.render.filepath

# Render Image
bpy.context.scene.render.filepath = FILE_PATH
bpy.ops.render.render(write_still=True)

# Restore Previous Path
bpy.context.scene.render.filepath = previous_path

# Set the Camera 2 to active camera
bpy.context.scene.camera = bpy.data.objects["Camera 2"]

cam2 = bpy.context.scene.camera
filepath = "Background Path"

img = bpy.data.images.load(filepath)
cam2.data.show_background_images = True
bg = cam2.data.background_images.new()
bg.image = img
bpy.context.scene.render.film_transparent = True
Now that we have covered almost all the essential basic aspects on how to deal with SMPL models in Blender, you can discover and explore more experiments to gain a better understanding of how to work with these models. In the next section of this article, we will look at one such improvement that you can make to your SMPL models to achieve better aesthetic looks by adding multiple textures to your models.
Adding Multiple Textures in Blender:
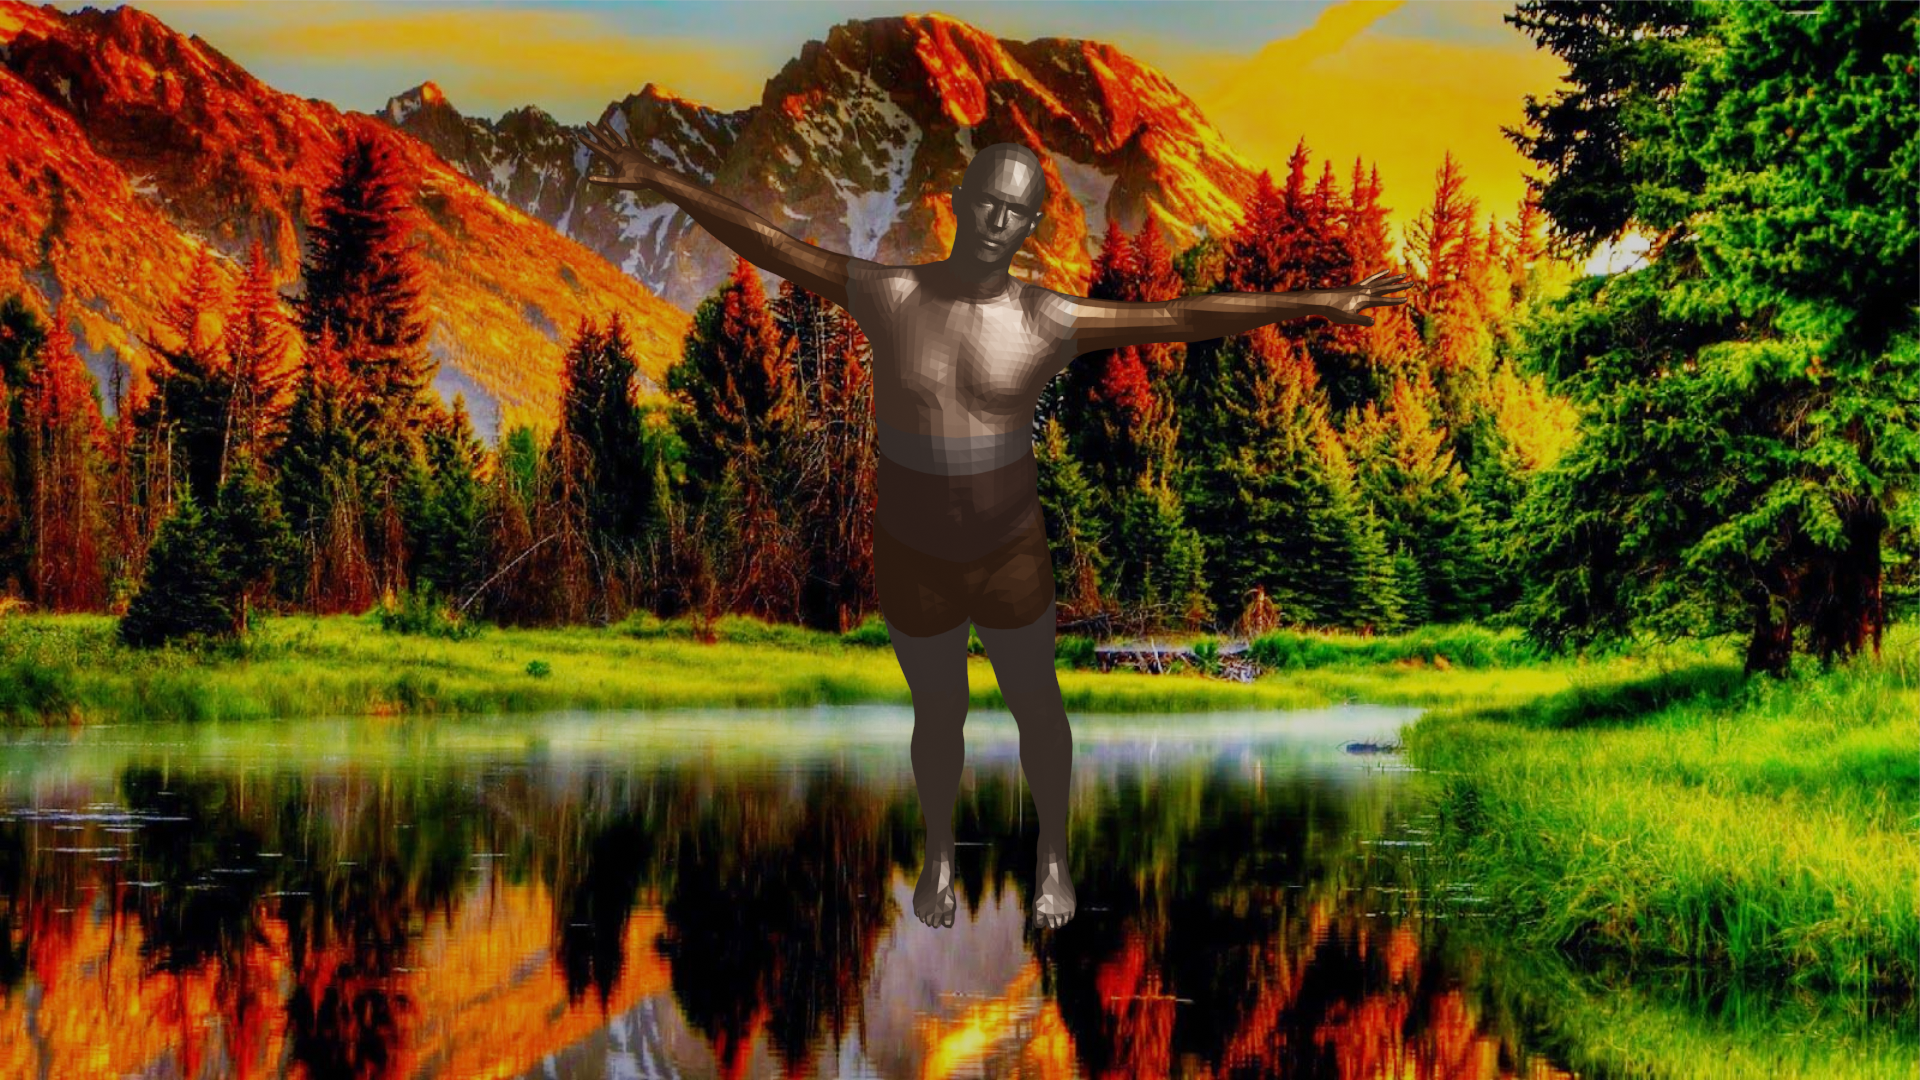
In this section of the article, we will look at some of the additional improvements that we can potentially add to our SMPL models. One of the advancements that we can make is the addition of many different types of textures. We can incorporate multiple skin colors as shown in the above image or different kinds of textures into the SMPL model for numerous purposes. The following task can also be done with the help of coding and Python scripting by UV mapping, but you can also just complete the following task with the help of the Blender tools.
For precisely computing the following part of adding multiple textures, I would recommend toggling the x-ray mode on the top right of the Blender layout screen and switching from the solid viewport material preview to the rendered state. On the top-left screen, switch from the object mode to edit mode so that you can start making some changes to the textures of your SMPL model. The next step is to add multiple textures and color shadings of your choice in the material properties layout. You can either use the default color shadings that are available to you in the Blender tools or your skin/other textures that you have downloaded.
You can now proceed to select the specific regions with your mouse and assign that those specific regions and parts the texture or color of your choice. Ensure that you zoom into your SMPL model so that you can see these regions more closely, and then you can select the required regions more precisely. An example of such a multi-texture model is as shown in the above figure. There are a lot of experiments that you can perform with these models, and it is highly recommended to try out numerous variations of them.
Conclusion:
There have been several creations of human models for obtaining the best type of architecture that is suitable for numerous software designing platforms. For the generation of realistic human models, topics such as blend skinning, auto-rigging, learning pose models, learning pose shapes, and learning blend shapes are of great significance. With the absolute theoretical and practical knowledge of these concepts, one can generate a realistic human model structure. These generated human models are useful for creating a variety of realistic and plausible human shapes and structures that finds great utility in numerous works and projects.
In this article, we covered most of the minor aspects related to Skinned Multi-Person Linear (SMPL) models. We understood the concept of creating and generating SMPL models with realistic human structures so that they could be used for numerous training processes. We then understood the basic procedure of importing the SMPL models into the Blender platform with either code or directly through the tools available in Blender. We also explored the basics of adding a background to these SMPL models and adding a unique texture to make the models look more realistic to a human body. Finally, we explored the territory of adding multiple textures to the same model and also had a brief discussion on the types of future works that are possible with these models.
For the final step, I would once again highly recommend reading more research papers and exploring this topic on your own. In future articles, we will be back to more deep learning stuff and work on numerous projects related to GANs and other topics related to neural networks.