Animation is an extremely intriguing concept. Most people would have watched cartoons while growing up, and a lot of people even today are avid watchers of popular anime shows. These animations are fascinating as they replicate a cartoonish but almost realistic perception of how things could work. Animation, in simple terms, can be understood as a method of manipulating and operating on images or models in such a way that they can perform a specific task. These tasks could reflect any specific action such as walking, running, sitting, talking, and so much more.
In the previous articles on "Introduction To 3-D Modeling With Python Scripting In Blender" and "Basics of Adding Background Images And Textures To Your 3-D Models", we have covered most of the basic aspects of how you can manipulate and operate on 3-D objects, background details, and textures in the Blender platform environment. It is recommended that the viewers who are not familiar with Blender check out the previous articles to get updated with some of the latest methodologies that you can utilize. If you are brief knowledge on how to use Blender and its numerous tools and are looking to get started with basic animations, follow along the numerous contents to perform operations in the 3-D Blender space with and without codes.
In this article, we will try to focus on most of the essential and basic aspects related to animating a 3-D object in the 3-D space of the Blender environment. Our primary objective is to learn how to animate a 3-D object using only elements and the numerous tools provided by Blender, creating simple animations with the help of the Python programming language editor available in Blender, and finally, render an animation accordingly. To check out the numerous topics that we will cover in this article, check out the table of contents provided below.
Table Of Contents:
- Introduction
- Example of burning monkey animation with Blender (No Code)
1. Import the monkey mesh
2. Adding the quick smoke animation
3. Adding the fire and smoke animation - Animating A Block Of Cubes
1. Creating the base
2. Coding the entire block design
3. Adding an animation and a desirable color - Rendering an animation of 3-D models
- Conclusion
Introduction:
Animation in Blender is one among the multiple spectacular actions that you can perform with this platform. Arguably, the animation of objects or the entire environment in which the object is placed is one of the most intriguing and fascinating entities that a user can perform. Our focus will remain on developing a few models and animating them accordingly to achieve some cool-looking stuff, and finally rendering them into our desired directory.
Firstly, we will develop our baseline project of a burning monkey mesh animated to be lit in a fire. We will understand the fundamental aspects of completing such animation and how we can manipulate numerous tools and items to receive the desired result. The entire example is quite simple and can be performed without the requirement of any code. Almost any beginner to Blender animation should be able to perform this task successfully without too many complications.
Once we complete the animation of the burning of the monkey mesh, we will understand how to construct a falling tower of cubes that break upon impact with the help of both Python code that is available in the Python text editor and with the help of the numerous Blender tools. We will arrange these blocks accordingly such that they form a tower-like structure. When the tower is dropped from a distance and impacts a solid surface, it will crumble with all the blocks breaking down.
The final concept we will look at is how to render the entire animation. In the previous article on "Basics of Adding Background Images And Textures To Your 3-D Models", we have briefly looked at the process of rendering images. For completing an animation render, the process usually takes a bunch of sequential images that need to be rendered accordingly to get the required and desired results. It is preferable to have a graphics processing unit (GPU) for this rendering process. However, you can also complete the specific basic animation with the help of a CPU. The only issue would be the slightly larger amount of time that would be consumed for the rendering process. Let us get started with the example of the burning monkey animation with Blender.
Example of burning monkey animation with Blender (No Code):
The first project that we will learn in this article is one of the simplest and most basic animations for a beginner animator in Blender. We will understand how to import a random mesh (a monkey mesh, in this case) and set the selected object on fire. The animation produced will have a realistic touch of both fire and smoke, and you can view the frame-by-frame view on the burning monkey animation produced. The steps we will follow to complete this task are straightforward. We will import the monkey mesh, assign the quick smoke animation, change some materialistic properties, and finally view the animation. The rendering of the animation and more details with respect to code will be covered in future sections.
Import the monkey mesh:
If you have a basic understanding of Blender or have followed the previous two articles precisely, this task of importing the monkey mesh should now be a piece of cake. Upon entering the Blender environment and selecting a new project, you will notice the default cube placed on the screen. There are multiple ways to perform the action of removal of the cube object from the screen, as discussed in previous posts. You can either right-click on the cube and select the delete option or select the cube and press the delete button on the keyboard.
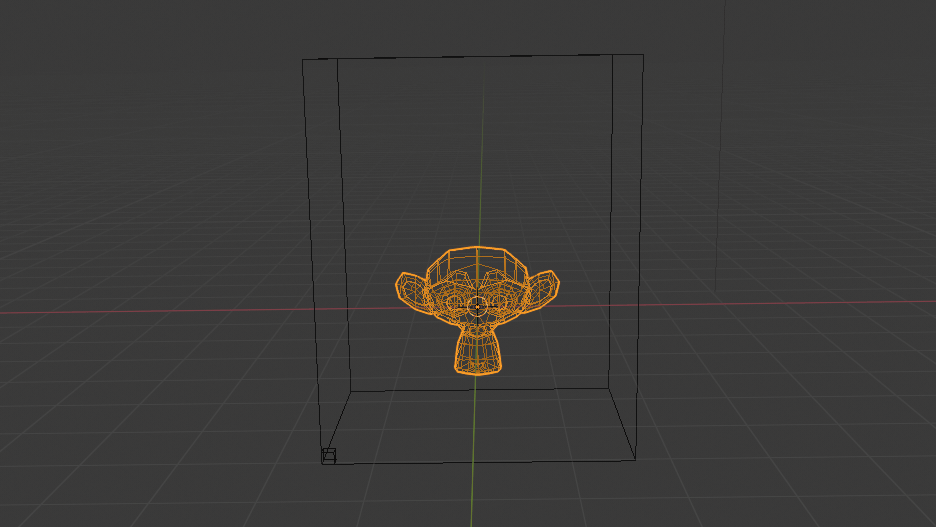
Once the default cube is removed, we can now proceed to add the monkey mesh on the screen. The monkey mesh is added by clicking on the Add button in the menu bar, selecting the mesh icon, and clicking on the last option of monkey mesh. Now we can proceed to change the overall 3-Dimensional view to have a clearer look at the monkey mesh. We can perform this action either by clicking the mouse 3 button or by making use of the x, y, and z-axis coordinate on the top-right of the Blender screen.
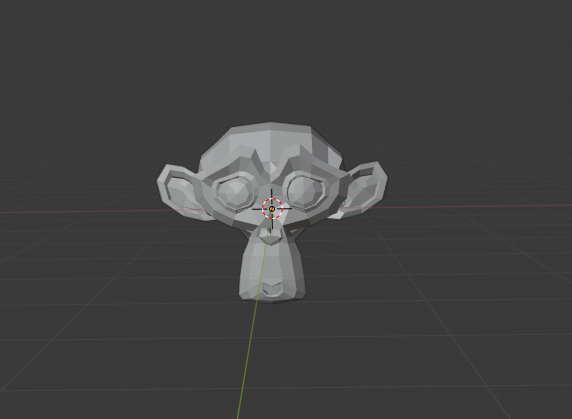
Once you have adjusted your screen and settings accordingly, you should have a better look at your 3-D model, somewhat similar to the image shown above. Once the importing procedure is completed and you have the screen adjusted according to your requirements, we can now proceed to add the quick smoke animation to the monkey mesh selected.
Adding the quick smoke animation:
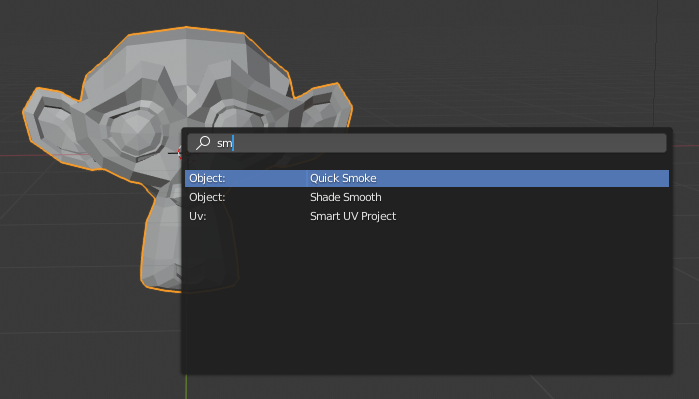
Our next step is to add the quick smoke object, which is already available pre-built in the Blender environment. To add the quick smoke animation, select the monkey mesh if you haven't already and click on the F3 button on the keyboard. Pressing the F3 button prompts the user with a bunch of options and a search button for making the required selective search. You can type in smoke as shown in the below image, and you will find the first option that shows the option of quick smoke that is available for the users to select. Select the first option, and you will now have the quick smoke activated.
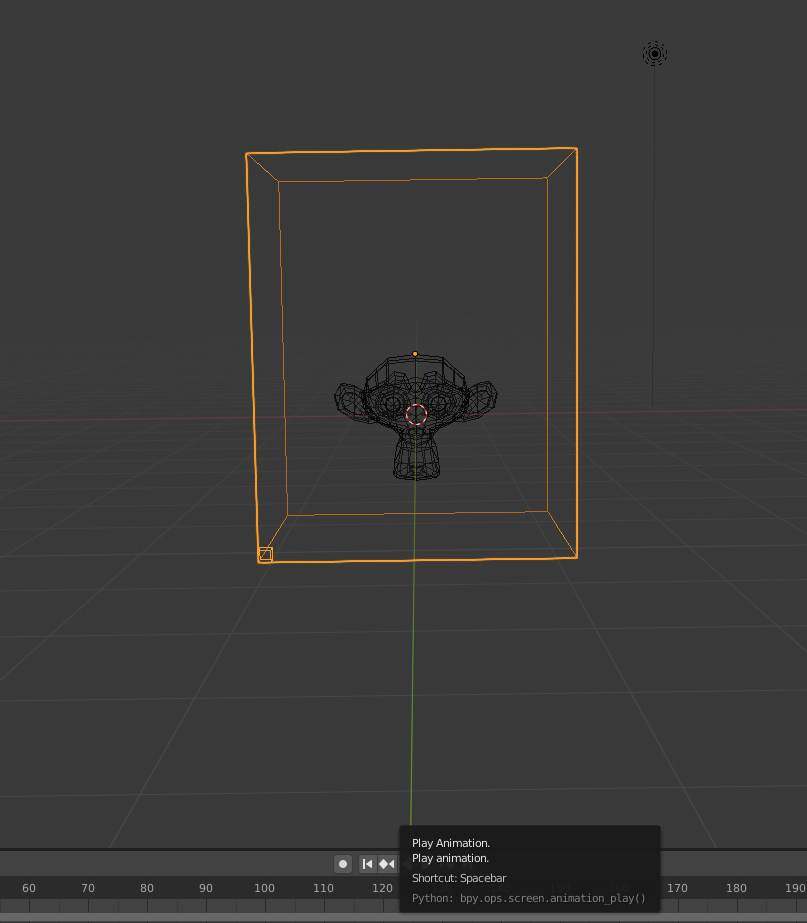
Once you activated the quick smoke functionality, you will receive the image as shown below. The box represents the frame inside which the smoke activation will be triggered and played. You can play the quick smoke animation and witness the monkey emitting smoke. This process can either be done by clicking on the play animation option on the bottom menu bar or by simply pressing the spacebar button on the keyboard. The following animation will continue to be played for the given number of keyframes that are provided by default. The range by default is usually set from '1' as the starting key range all the way up to '250' as the ending frame range.
Now that we have successfully completed importing the monkey mesh and the quick smoke animation, we can now proceed to finish the final step of adding both the combination of the fire and the smoke accordingly. In the next section, we will cover how to both the fire and smoke animation to our monkey mesh.
Adding both the fire and smoke animation:
For the final step of this section of the article, we will complete the animation of the monkey mesh and ensure that we are able to light it on fire. Once you have the monkey mesh selected, ensure that you select the physics properties on the properties menu bar to the right side of the screen. The image provided below shows the representation of all the steps that must be followed in order to achieve the required results. Once you click on the physics properties, notice the type function under the smoke column and make sure to set it to Flow. The "Type" functionality might be domain by default sometimes.
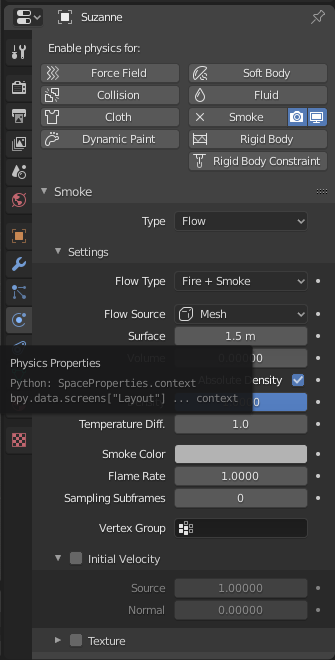
Once you have selected the type of the smoke functionality as "Flow", you can now alter the flow type as well. If the flow type is set to Smoke as default, then you can proceed to change the flow type under the settings panel to Fire + Smoke. Now that all the settings are made according to our requirements, we can view the final animation. The first gif image file shown at the start of this section is what you can view by playing the animation.
It is recommended that beginners to animation in Blender try to experiment with numerous parameters and options available in the physics properties layout. Try to vary different patterns, alter the various colors, and change the other parameters by yourself to see the change in the type of the result that you obtain from the following action.
Note: You might sometimes experience a slight delay in the animation process. Make sure that you have the monkey mesh selected and the properties are set accordingly. If the issue continues, restarting and retrying the project might be a solution to fix the following issue.
Now that we have briefly looked at how to perform one of the animation techniques on lighting a monkey mesh with fire and smoke, we can now proceed to construct another simple project of breaking cube blocks with the help of some code. Let us understand how to perform the following project in the next section of this article.
Bring this project to life
Animating A Block Of Cubes:

For the next project, we will animate a group of blocks that will fall from a distance onto a solid mesh plane surface. Upon impact on the surface, the group of blocks will crumble into pieces with a realistic physics simulation of gravity and breaking process. For constructing this project, we will make use of both the tools and technologies offered by Blender as well as the Python coding options that are available to us to ensure that the following task becomes easier to perform.
For the appropriate construction of this project, we will follow a step-wise procedure. The three primary steps in this section of the article will include creating the base, coding the entire block design, and adding a suitable color to our block design. In the next section of this article, we will focus on the final rendering step required for the animation of these breaking blocks. The following project is completely inspired by the following video. Feel free to check out the following video for the complete video representation and understanding of the project.
Creating the base:
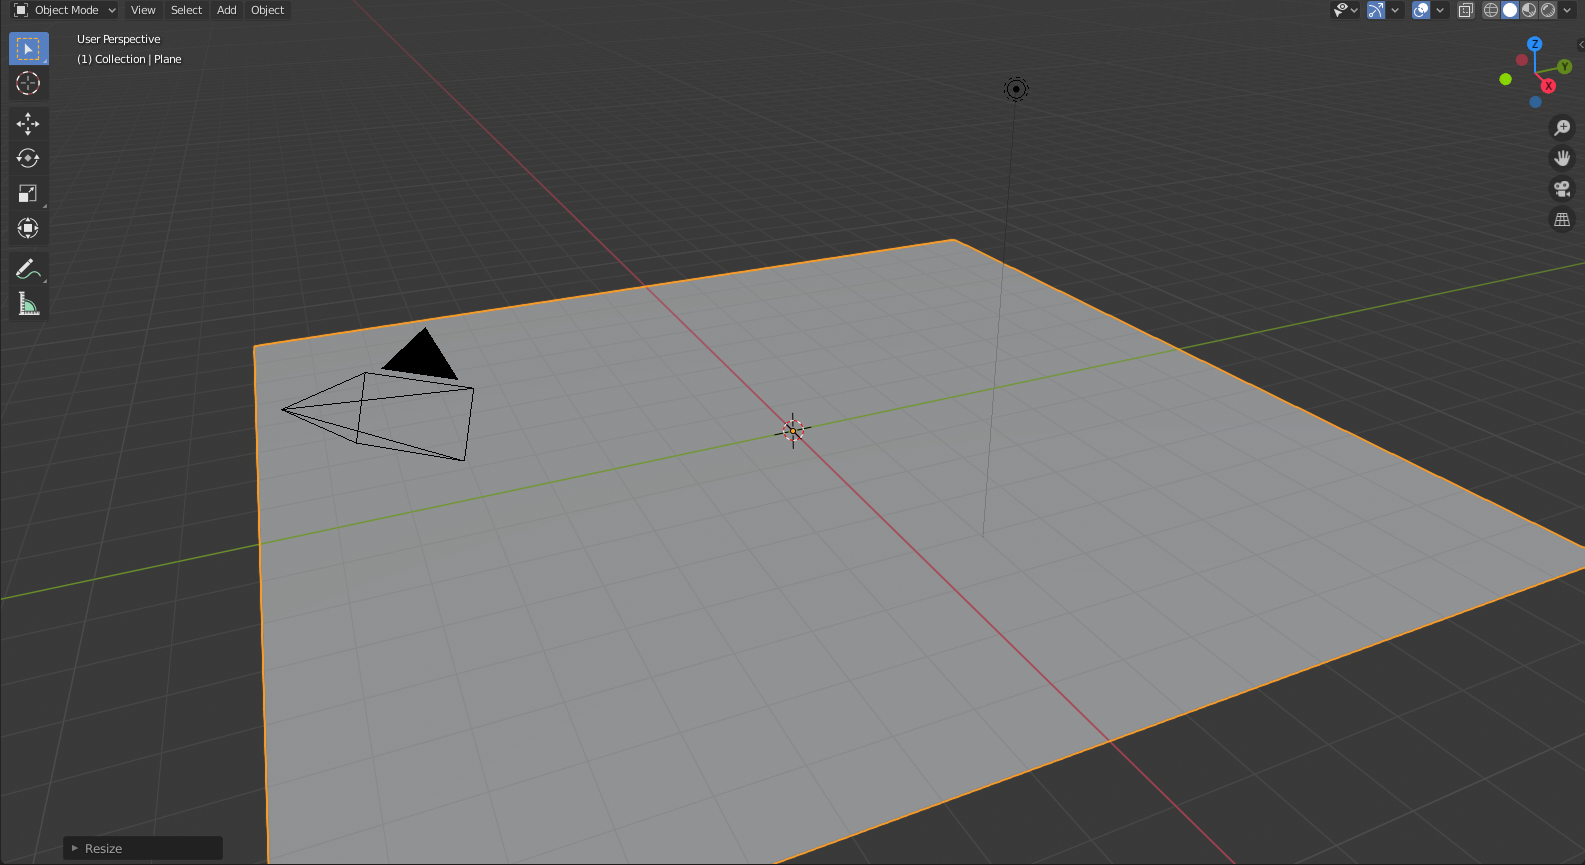
The first step that we will focus on in this section of the article is to create the base for the entire project. The surface of the base will act as the solid surface that will stay transfixed in the required position. The blocks upon impact on the solid base structure will falter and break into smaller pieces. The first step to creating the structure of the base is to add a mesh. But before you place the plane on the surface, ensure that you delete the default cube by following one of the steps as previously mentioned. Now, go to the add function in the menu bar and select mesh.
Click on the option of the plane to place the desired object on the Blender screen. Once you place the plane on the Blender screen, you will notice that the original size is quite small and needs some essential resizing. For resizing the size of the plane and making it much larger, ensure that you have the plane selected and click the 'S' button on the keyboard for increasing the scale of the plane mesh to the required size. You can also adjust the positioning of the plane surface by pressing the 'G' button on the keyboard along with a specific 'X', 'Y', or 'Z' axis to grab the plane along the desired axis and place it in the best suitable location for your view of the project.
Once you finish setting up the base structure as required, we can proceed to add some rigid body properties to the plane mesh. For performing the following action, check out the properties layout on the right side of the Blender screen and select the physics properties options. Select the rigid body option and set the type of object to passive. In the collisions section, set the shape of the object from the default option to the mesh selection. Finally, under the sensitivity option, select the margin function and make sure to set the following to zero from the default registered value. After the first step is completed, it might be a good idea to proceed to save the following Blender file. The next step in the upcoming section might take a couple of minutes to run the required generation.
Coding the entire block design:
Once we have the base structure set up, we can proceed to construct the block of cubes above the plane mesh. The idea is as soon as we start the animation, the group of blocks will fall from a distance from the initial surface, and upon impact on the transfixed base, the group of blocks will crumble one by one accordingly. To create these blocks and design each of them separately might be a complex process to build from scratch. Hence, we will make use of the Python scripting option that is available in Blender for performing the following task. Open the text editor layout as discussed in our previous articles. You can choose to give the following code snippet any name that you desire but just make sure that the name ends with a ".py" label indicating that the file created is a Python file.
In this section of the article, we will learn how to create the structure of the blocks with the help of Python scripting. The entire code snippet for this procedure is provided below. Let us understand the numerous steps and actions that are performed in this code block. Firstly, we ensure to import the Blenders Python module with the help of the .bpy library. We are setting a default number of seven that will represent the default range in which we want to start building the blocks in the x, y, and z coordinates.
We will also set the respective counters accordingly such that each of the generated cubes are placed in a unique position in the desired location. We are also enabling some of the essential contexts of rigid body physics where we can ensure that each block of cube will follow the basic rules of physics. Some of the parameters that we are utilizing are mass, collision shape, friction, linear damping, angular damping, and collision margin. The users can feel free to experiment with some of the other parameters as well.
import bpy

number = 7
counter = 0

for a in range(0, number+28):
    counter += 2
    counter2 = 0

    for b in range(0, number):
        counter2 += 2
        counter3 = 0

        for c in range(0, number):
            bpy.ops.mesh.primitive_cube_add(size=2,
                                            location=(counter3-2, counter2-2, counter-2))
            counter3 += 2

            bpy.ops.rigidbody.object_add()
            bpy.context.object.rigid_body.mass = 20
            bpy.context.object.rigid_body.collision_shape = 'BOX'
            bpy.context.object.rigid_body.friction = 1
            bpy.context.object.rigid_body.use_margin = True
            bpy.context.object.rigid_body.collision_margin = 0
            bpy.context.object.rigid_body.linear_damping = 0.35
            bpy.context.object.rigid_body.angular_damping = 0.6
It is crucial to note that the following code might take quite a bit of time to execute in its entirety. Depending on the type of CPU installed, the RAM, and the type of system you have, the process might take anywhere from a couple of minutes up to 10-15 minutes in some cases. So, be patient while the entire process is executed. Once you have all the blocks of cubes that have been built and placed in the desired location with all the set parameters, our next step is to prepare the animation.
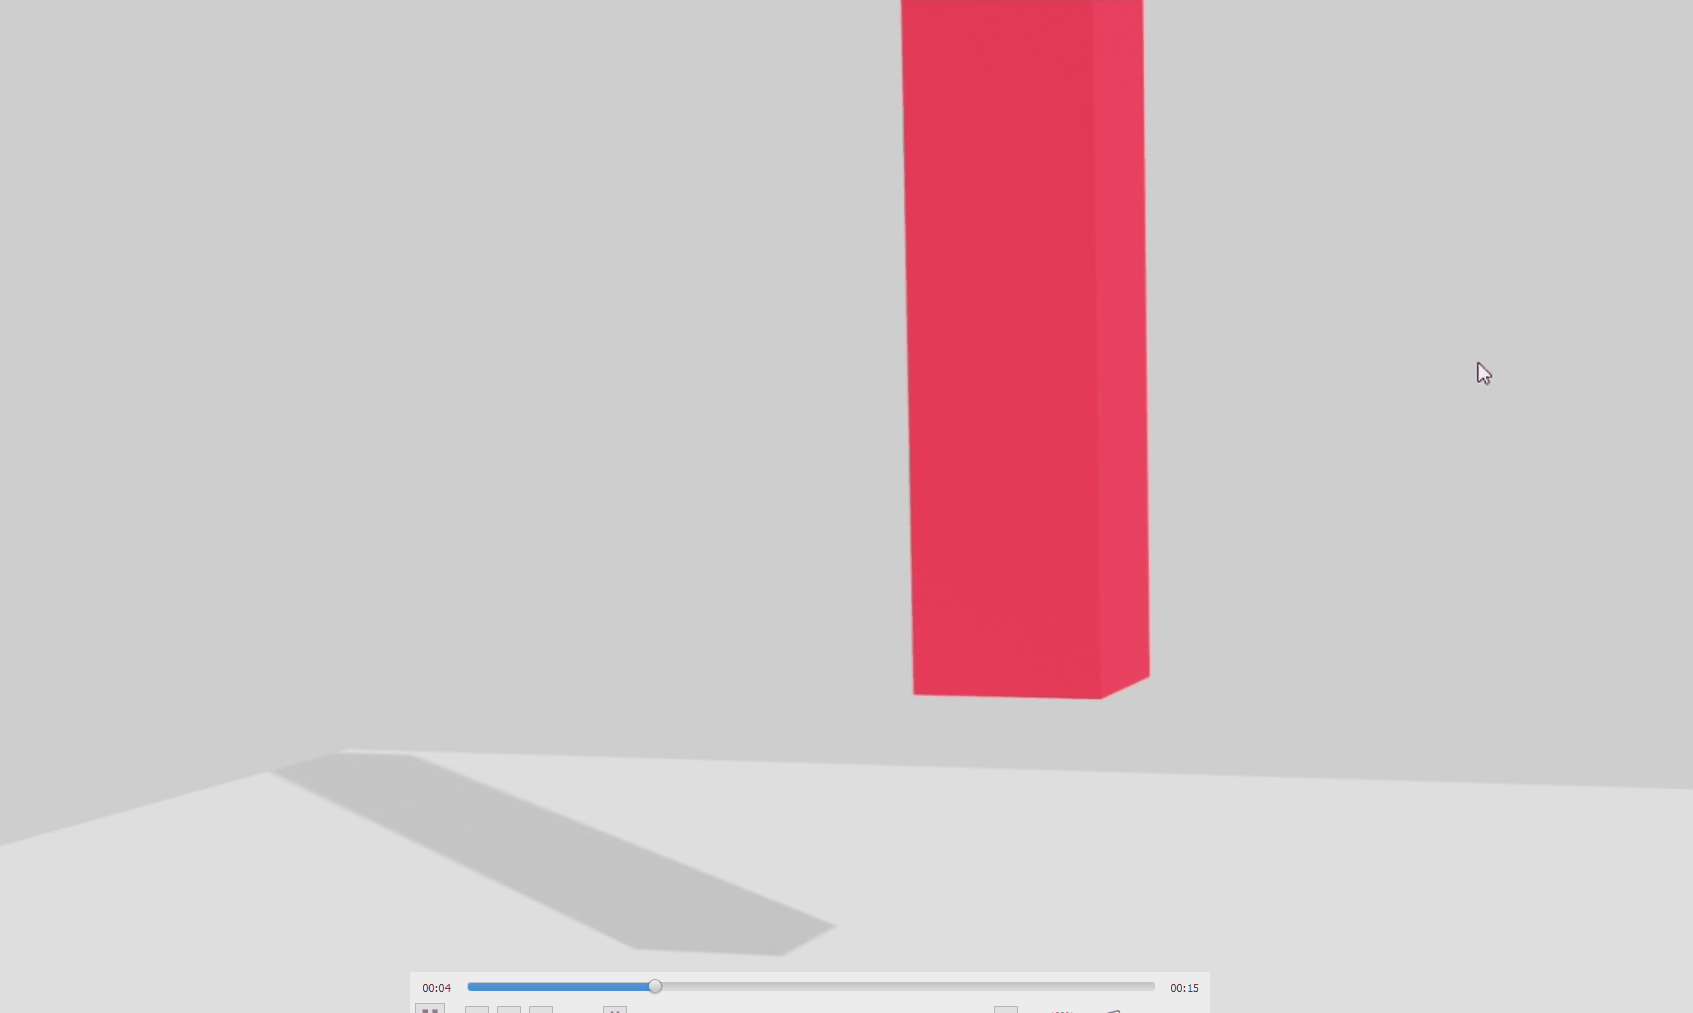
Adding an animation and a desirable color:
One of the final steps that we will follow is to create the animation process. Now select the base that we created in the first step of this section. Upon selecting the base, make sure that it is at a suitable distance from the block of cubes. Now visit the scene properties on the right side of the "properties" layout. If you have followed all the steps perfectly in the "Creating the base" section, you should be able to select the rigid body option in the scene properties section.
In this section, select the settings tab and set the steps per second from the default 60 value to about 500. Under the cache section, keep the start of the simulation as 1, but change the end of the simulation from 250 to 500. You can now proceed to bake the following to prepare it for the animation. The following step again could take some time, depending upon the type of device that you are working on. Once the baking process is complete, we will add a suitable color to our block of cubes.
The process to add a suitable texture is similar to the methods that we have discussed in the previous article on adding background and texture to your projects. you can box select all the cubes that are available on the Blender screen by clicking the 'B' button on the keyboard or by simply accurately selecting all the required regions of the block of cubes. After selecting all the blocks of the cube, shift + Select one of the cubes and move over to the material properties in the Right side properties layout of the Blender platform.
Here, you can feel free to add the texture you desire to the model. You can choose to either add a color of your choice from the provided hex values of colors, or you can choose a custom texture that you have previously downloaded or saved on your system. Once you have satisfactorily imparted the desired texture to the block of cubes, you can finally proceed to start rendering an animation. I have chosen the default red color texture as shown in the video representation in the next section of this article.
Rendering an animation of 3-D models:
Rendering is one of the most essential components of 3-D modeling. It is one of the final steps that must be followed to ensure that the final model or animation that is generated will have a visually pleasing as well as an overall high aesthetic appeal. The process of rendering helps us to achieve photorealistic or non-photorealistic image interpretations from a 2-D or 3-D model, usually by means of advanced computer software. Blender is one such software that has an in-built tool for the rendering and processing of images to make them photorealistic and more graphically advanced.
The final image that is received after image synthesis of the models is referred to as the "render" image. Usually, a GPU is preferable for computing the process of rendering as it takes quite a bit of computational resources for calculating the appropriate complex rendering mechanisms. While simpler projects with Blender can be completed with the help of a CPU, it is ideal to use a GPU for more complex computations. In this section, we will understand how to implement the rendering process for 3-D models, mainly on our previous project of animating the block of small cubes.
The next step we will accomplish is setting the camera angle perfectly for rendering the image. Select the camera and click on "Ctrl" + "Numpad 0" to view the position of the object with the camera. Click the 'N' button on the keyboard for getting an additional dialog box option. In the view prompt of the newly appeared layout, check the option that says lock camera to view. Ensure that you adjust the settings accordingly in such a way that the entire block of the cube is visible in the camera view as desired. You can also briefly play the animation to verify if everything is working as planned.
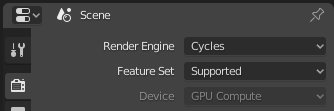
The final step is to set the render properties in the right-side layout of the Blender platform. Change the render engine to Cycles and the device for computation from CPU to GPU if you have the following device. You can also modify the renders and viewport in the sampling section as you deem necessary for the required computation. Set the directory to save the render animation images in the output properties layout and finally start the process of the animation of the block of cubes by going to the render and render animation options in the main menu bar. Depending on your device quality, you should be able to produce a decent animation after a few hours of training.
Conclusion:
Animation is one of the most intriguing fields in the modern era. The quality of numerous animations in tv shows, cartoons, animes, movies, and video games are consistently improving each day. The type of equipment used, motion control mechanisms and graphics tools are being constantly updated to suit the modern expectations of realistic animations. With the field booming and continuous advancements in the development of new animation techniques, getting started with 3-D animation using Blender is a great way for beginners to start exploring the numerous methodologies of the various actions, sequences, and types of animations that you can create.
In this article, we had a brief introduction to animation and animation of 3-D models in Blender. We learned how to construct a basic project on the animation of a burning monkey that was animated with Blender without making use of any codes. We then constructed another cool project of breaking building blocks that we built with the help of some Python code and the numerous utility options that are available in Blender to perform the following action. Upon building the breaking blocks project, we understood the rendering of an animation video in further detail and how the utility of a CPU and GPU differ for rendering high-quality projects.
In the upcoming article on mastering the basics of 3-D modeling, we will cover the topic of how to work on SMPL models with Blender. Until then, I hope you have a great time experimenting and learning more new stuff on animation, image processing, 3-D modeling, or any other amazing concept that you prefer!